When carrying out repairs or replacing an old sewer with a new one, many owners carry out this work on their own, without involving specialized companies. In this case, it is advisable, at least superficially, to know the theory and some frequently encountered terms. One of the main conditions for the high-quality and full functioning of any pipeline is its tightness.
In order to achieve this, it is necessary to connect the pipes correctly. The simplest connection method is considered to be a socket connection, as it does not require special skills or special equipment. Below we will take a closer look at what a pipe socket is, how such elements are assembled, etc.
Checking the system before use
The launch is carried out shortly after installation of the drainage pipeline elements; the PVC connection needs time to completely dry out and set, if an adhesive composition or sealant was used.
When using the detachable method or welding technology, control of the operation of the system according to the sewerage flow diagram is carried out immediately after installation. The pipeline is checked for leaks and bends as the temperature of the effluent increases. For this purpose, water is supplied - you need to turn the valve on the water riser. As the drains move, the condition of communications is monitored. For greater clarity, the pipe joints are covered with paper napkins, then you can notice the appearance of even a slight leak. To ensure that the pipeline is in a suitable condition for operation, you need to observe the movement of wastewater over a certain period of time.
Installation using sealant and special glue
When installing polyvinyl chloride socket pipes for sewerage, you can use silicone sealant or plumbing glue. This connection method ensures high reliability of the joint, and the work is carried out very quickly (read also: “What are the types of sewer pipe connections depending on the material used for the pipeline”). A mandatory condition that must be met is maintaining a certain period of time after laying the products. This requirement is necessary for the final hardening of the sealant, and only then the system is checked for leaks.
Our advice is to be careful when working so that the glue does not end up inside the pipe, because... In the future, its remains will lead to blockages.
When choosing an adhesive or sealing compound, consider the installation location of the pipeline: external or internal. You can also purchase adhesive mixtures at any hardware or plumbing supply store. This connection method is quite reliable and acceptable when laying external and internal sewer lines.
Recommendations for the arrangement of sewerage systems, which are strictly prohibited from being violated
Before reading these recommendations, it is important to understand that ignoring such simple rules may cause complete failure of the sewage system. The rules in question are easy to follow
The toilet should be connected to the riser separately from the rest of the plumbing. Each subsequent device must be connected to the waste system above the toilet connection point
It is important to understand that no more than three devices should be located on one liner, the performance of which is allowed by such placement.
Distance and diameter
- The diameter of each supply pipe must not be inferior to the largest circumference of the plumbing connections.
- The circumference of the toilet outlet is 10 centimeters. Accordingly, the riser cannot be thinner.
- The distance from the central riser to the plumbing fixtures (specifically the toilet) cannot exceed one meter. At the same time, any other plumbing fixtures can be installed at a distance of no more than three meters.
- If the installation of internal sewerage is carried out using a supply pipe with a size exceeding three meters, then the internal circumference parameter must be greater than 7 centimeters. The liner, the length of which is 5 meters or more, is mounted from pipes with a diameter of 100 millimeters.
You may also like: Sewer pipe diameters - table and dimensions
Socket sizes
Communications are divided into groups according to their intended purpose. Accordingly, they differ in size and main characteristics.
The dimensions of a sewer pipe with a socket for internal systems are presented in the table:
| Pipe diameter, or DN (internal diameter), mm | Internal diameter of the socket, mm |
| 32 | 32,3 |
| 40 | 40,3 |
| 50 | 50,3 |
| 75 | 75,4 |
| 100 | 100,4 |
Dimensions of communications for external systems:
| Pipe internal diameter, mm | Internal diameter of the socket, mm |
| 110 | 110,4 |
| 160 | 160,5 |
| 200 | 200,6 |
| 250 | 250,8 |
| 315 | 316 |
| 400 | 401,2 |
| 500 | 501,5 |
| 300 | 631,9 |
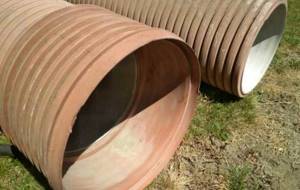
The most common designs: sewer pipe 32 mm (white), 50 mm (gray). These options are used for laying internal systems. For external drainage - PP sewer pipe bell-shaped 110 mm, and another 160, 200, 250 mm.
A common manufacturer of sewer pipes is Wavin Asto.
Socketless cast iron pipes sml
Socketless cast iron sewerage marked sml is a new design that began to be used several years ago. Socketless CTs are manufactured using the lithium method from cast iron with rosette-shaped graphite. This type includes several sizes of conditional transition: 50, 100 and 150 mm. The most common socketless pipes with a transition of 100 mm. The most popular on the market is cast iron SML from Duker. The structures are made of even shapes with walls of the same thickness. They also undergo additional processing, which significantly increases strength and removes brittle properties. Duker is undoubtedly one of the best companies producing cast iron structures.
Classification of socketless sewerage
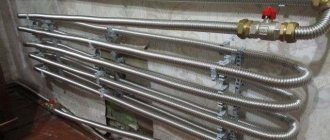
Socketless sewerage is connected using clamps. For different types of work and installation locations, you can use reinforcing or connecting clamps.
Based on the type of installation, socketless sewer networks are divided into:
- external ones are used to drain wastewater from buildings. Most often this type is installed underground. External sewers are a fairly common type;
- internal - these are pipelines, drainage of wastewater from city institutions that have a large amount of aggressive environment, and drainage of sewage water.
Cast iron products are not only reliable and practical, but also quite profitable. After all, the production itself does not require any special costs. The structures are protected by coating with epoxy resins, thereby increasing their service life.
Main characteristics
Sewage from socketless pipes meets all standards and Russian GOST 6942-98. Main technical characteristics: length (from 2 to 7 m); pipe diameter (500-1200 mm); wall thickness (6.7-31 mm). Depending on the scope of application, the engineer selects certain product parameters.
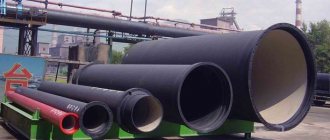
At manufacturing plants, they use heavy-duty cast iron, which is processed and brought into the appropriate form. The outside of cast iron pipes is coated with a red-brown coating, and the inside is coated with yellow epoxy resin to protect against mechanical damage. The pipes are connected into a single structure using clamps.
Advantages and disadvantages
Socketless pipes of this type have a wide list of advantages and disadvantages that make them the most popular on the market.
The main advantages of socketless CTs:
- a protective coating protects the surface from damage, corrosion, deposits and reduces the likelihood of flooding;
- clamps allow you to achieve tightness without additional devices;
- fire resistance and non-combustibility;
- wear resistance and long service life;
- withstands different temperatures;
- Possibility of installation under highways, which confirms the high strength of the material.
The pipes have a flat, smooth surface, which improves and leads to ideal hydromechanical parameters of the sewer system. There are practically no disadvantages to this design, except for the fragility of the material itself. But this drawback can be corrected by heat treatment.
Helpful information
It is difficult to imagine the modern world without sewer systems; first of all, they are distinguished by their quality and reliability. Thanks to this, engineers do not change systems every year.
The connection of cast iron pipeline elements without detachable joints is carried out using a coupling. It is crimped with a stainless steel clamp. The tightness of the pipeline is guaranteed due to the fact that the coupling is installed between the ends of the pipes.
A gas torch cannot be used for cutting CT. To perform these actions, use a hacksaw, a grinder for metal products, or a special device for cutting cast iron.
The sewer system must be assembled from smooth cast iron pipes without deformations (cracks and dents). Such structures will not last long and will require frequent repairs.
Where are sockets used?
Designs with a socket are used in the pipeline system for pressure and non-pressure passage of wastewater through pipes. Reinforced concrete products are used for laying an external sewer system, which requires structural elements with a large cross-section, and for the arrangement of storm drains on city streets. Plastic and cast iron products have the same areas of application on a smaller scale, in private and apartment buildings, and civil facilities.
Bells are used to protect cable wires and heating mains. All types of pipes are resistant to large differences in ambient temperatures, pressure from top soil filling, and road surfaces. The tightness of the pipeline guarantees optimal pressure inside the pipes with which the liquid flows through the sewerage system.
Features of installation work.
Laying external sewerage pipes made of concrete requires the use of large sockets, which necessitates the use of special equipment and the work of specialists. Large structures made of concrete are difficult to transport, but over time the costs will be recouped by their service life; systems laid from concrete sockets of the system will last for many decades.
Important! During the installation of structures made from sockets, the requirements of GOST standards should be observed, taking into account the specifics of the application.
At the design stage of sewer and drainage systems, the following factors are taken into account:
- 1.Pipe service life.
- 2. Conditions suitable for the use of pipes.
- 3. Scope of use.
- 4. Depth of laying the route.
Cast iron sockets have a certain length, cutting cast iron is a problem, and already during the design process you need to clearly calculate the route for the pipeline system. You also need to accurately calculate the diameter of the sockets for a given system, elements that help ensure branching, and fasteners.
Plastic structures require compliance with the same rules during installation. The properties of the material ensure ease of construction work without involving special equipment or specialists. The sewer system is guaranteed to serve for many years, subject to the above installation requirements.
Sequence of work
Installation of sewer pipes during sewerage installation is carried out in the following order:
Installation of a riser with terminations in the basement and on the roof
It is important to remember that the riser should be located near the plumbing. The connection in the basement is made with an inclined pipe leading into the septic tank
The end of the pipe in the attic should be equipped with a check valve or left open. Carrying out the supply from plumbing equipment to the central riser. Connecting the line to the riser from the rest of the plumbing located above the toilet entrance. Installation of siphons on each plumbing fixture. Connection of liner and siphons.
At this stage the work is considered completed. Next, it remains to check the tightness of the joints and the rigidity of the pipes on the walls, as well as the absence of discrepancies.
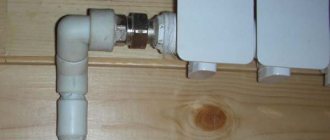
Types and types of connection fittings
The English word "fit" means to gather. It is thanks to him that the fitting got its name. With the help of such connecting elements, pipes are joined in the same and different planes.
They allow you to create branched systems and avoid obstacles. When using fittings, pipes of the same or different diameters are joined.
Manufacturers produce threaded and soldered connecting elements. The first type allows you to connect polypropylene communications with steel pipes and fittings in the form of taps and valves.
The second type is intended for connecting polymer elements to each other by soldering. First of all, when using special welding equipment. It heats the parts, so their structure softens. Only after this the fitting can be put on the pipe.
Couplings and adapters
The simplest fitting for polypropylene pipes is a coupling. It is made in the form of a barrel, the internal diameter of which corresponds to the cross-sectional size of the pipe along the outer edge.
PP coupling
The couplings have thicker walls. They are used to connect pipes of the same diameter, inserted into the so-called barrel on both sides if it is made entirely of polypropylene. When the coupling is threaded, soldering is performed on one edge only.
Combined coupling PP
An adapter is an element that allows you to connect pipes of different diameters. Used in branched systems with several consumers.
Adapter PP
Using adapters, it is possible to narrow the diameter of the communication and create excess pressure in the circuit.
Angle, tee and cross
In most cases, utility lines have a branched structure. Angles are used to rotate the system 90° and 45°. They form a system of the required configuration. After all, polypropylene is a hard and elastic material that bends only after heating.
However, this method is not used when laying communications. As a result, when bending, the cross-sectional size and wall thickness of the pipes change. This reduces the strength characteristics of the system. Consequently, it often leads to the appearance of a leak when the pressure and temperature of the moving medium increases.
Corner pp
Angles are also available with a 3/4 female thread on one end. They are used during installation of mixers.
Tee pp
Tees and crosses are used to branch utility lines. They allow you to connect two or three taps together. The sizes of fittings for polyethylene pipes are selected depending on the design.
Crosspiece pp
Tees and crosses allow you to create bends at right or acute angles. This type of fitting is also available with threads on one end. In this case, they are used when installing shut-off valves.
Bypass and compensators
Bypasses are used to bypass obstacles on the way of laying systems. With their help, a more round bend is created than when using corners. Contours allow you to smoothly change the direction of pipelines. Therefore, it is possible to lay communications that have a more attractive and neat appearance.
PP bypass
Compensators are parts of engineering systems that can “absorb” pressure and temperature changes in hot water supply and heating pipelines. They increase reliability and maintain the integrity of networks. Several ready-made solutions are available. Polypropylene expansion joints are made in the form of a loop.
American fitting
The installation process of PP systems is made easier by the American. This is an element made of metal and plastic with a rubber insert. The parts are used for detachable sealed connections.
American pp
Such fittings with internal or external threads on one side are used when installing shut-off valves, hydraulic accumulators, circulation pumps, heating radiators, and so on.
Taps, valves and plugs
During the operation of utilities, it is often necessary to shut off the water. This is achieved by installing taps and valves. They can be made of polypropylene or brass.
Valve PP
In the first case, parts are soldered into systems. In the second, adapters are additionally used. Consequently, they allow threaded connections of network parts made of different materials.
Crane pp
Plugs are used in places where polypropylene pipelines end.
Plug PP
Such parts can be soldered to permanently block the outlet or temporarily installed using a threaded connection.
O-ring installation
Sometimes bell-shaped pipes already have a special groove for installing a ring there, which functions as a seal. The groove is located on the funnel-shaped expansion side. Basically, O-rings are made of elastic material with excellent waterproofing characteristics. Often pipes with a socket are already equipped with such rings in the store.
Installing a socket pipe with a seal is quite simple, but it does not guarantee 100% protection against leaks. Sometimes when laying a sewer pipeline, craftsmen play it safe and additionally place waterproofing tape or any sealant at the joint.
Installation of socket components is carried out in a certain sequence:
- According to the diameter and type of pipe, sealing rings are selected, which are installed in a special groove on the expansion side. For greater reliability and greater dimensional consistency, it is recommended to use products from the same manufacturer.
- Having placed the ring, you need to check the quality of its installation and the tight fit to the groove. If the sealing element loses its elasticity, or if there are visual or other defects, it is better to refrain from using it.
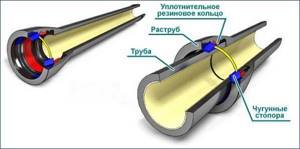
What is a bell
So, the socket is an extension at one end of the pipe, in the form of a funnel, it is necessary for making a quick and tight connection. The opposite end on the pipe remains flat. Pipes that have such a part can be made from different materials:
- cast iron;
- PVC;
- ceramics;
- concrete and asbestos concrete;
- steel.
The essence of the socket connection is that it is necessary to insert the smooth end of the pipe into the extension of the adjacent one and fix it. Depending on the material of the pipes, after installation, all connections are additionally sealed.
However, it cannot be considered only as part of a larger diameter structure. Most modern designs include metal retaining rings and rubber seals. Main functions of the bell:
- simplification and acceleration of pipeline installation;
- protection against leakage and creation of a tight connection;
- connecting fittings to pipes;
- allows you to assemble systems from different materials without the use of fittings;
- creation of additional stiffeners;
- makes it easy to replace old pipes with new ones;
- simplifies pipeline dismantling.
The pipeline turns out to be dismountable - if necessary, it can be quickly disassembled and reassembled, for example, if only part of the pipes needs to be replaced.
Where are socket structures used?
The socket installation method is used in various areas. The sewer system and storm drains require the use of special pipes. Pipes with sockets are an economical option for laying a plumbing system, are durable, and are easy to install.
Pipes are used:
1. During the construction of residential buildings and industrial facilities.- 2.Hydraulic works.
- 3. During road construction.
- 4.During the laying of railway tracks.
- 5.In agriculture.
Bell pipe structures are made from concrete, plastic, and cast iron. Pipes of different materials have their own characteristics and applications.
Functional purpose of the bell
The socket of a sewer pipe is a funnel-shaped expansion at one end of the system pipe. With its help, the installation of drainage pipes is carried out competently and quickly. This type of connection is most common for cast iron, steel, ceramic and PVC pipes.
As for pipe products made of asbestos cement and concrete, this kind of socket joint is rarely used in them. The principle of installation is to install one end of the pipeline into the expansion of the funnel of another pipe. To ensure the tightness of the joint, various waterproofing methods are used, which directly depend on the material of the pipe products. Also, this socket connection is acceptable when installing internal and external sewer lines.
The main purpose of the bell:
- Ensuring the tightness and waterproofing of the connection.
- Facilitation and acceleration of pipeline installation.
- Possibility of joining fittings with pipe products.
- Possibility of jointly connecting elements from different materials without the use of fittings.
- The function of an auxiliary stiffener when arranging external networks, which allows you to protect the system from deformation and unexpected impacts.
- Possibility of rapid installation, dismantling during repair work or replacement of a bell-type sewer pipe.
- Ensuring the dismantling of pipe joints with a socket without sawing the components.
Types of installation
According to the material of the pipe product, there are several ways to install it.
If you are installing a pipeline whose components are made of plastic, you can use:
- O-rings;
- sealant and special glue.
If the pipes are made of cast iron and ceramics, then the connection of the socket parts is carried out thanks to:
- welding;
- caulking.
Now let's look at each type of installation in more detail.
Cutting sewer pipes
It is not always possible to establish communications in their original form. If the room has a complex configuration, or the connection plan is non-standard, it is permissible to cut the products. For pipes made of different materials, different tools are used:
- Plastic. Products in this group can be cut using a regular hacksaw, a special saw for polymer material, or a pipe cutter. The plastic is soft enough, so there is no need to apply much force when cutting.
- It is not recommended to cut cast iron pipes. At the production stage, the edge is processed in a special way, which allows for the tightest connection. If such a need arises, cast iron products are cut using a grinder.
There are tools that allow you to cut a chamfer on the end sections of communications.
Removing the socket element
Carrying out repair work on the sewer system often involves the need to dismantle its section. Here they operate depending on the method of previously performed joining of tubes:
- When using sealant or glue, it is enough to forcefully pull the driven pipe towards you. It leaves the groove quite easily.
- If caulking was used, it is necessary to cut a piece of the product to the funnel. Then the remaining section of the tube is marked into four elements using a puncher and each of them is removed using a chisel and hammer.
When using resistance welding, proceed in the same way.
Source
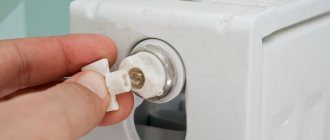
Installation instructions for various types of cuffs
The principle of fixing rubber or plastic, smooth or corrugated parts is similar, but the process itself may differ in nuances - from choosing the location of the toilet to using additional fastening methods. Let's look at three common connection options.
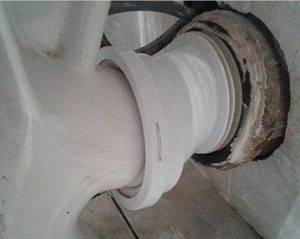
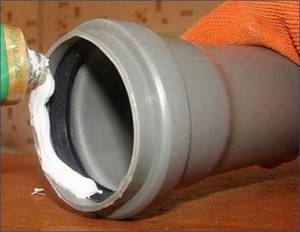
#1: Installing the rubber seal
A rubber cuff is a short, dense element that is not pulled from the outside, but is inserted into the socket of a cast iron pipe. This is a kind of seal or gasket that creates an airtight connection between the drain hole and the plumbing fixture.
In addition, it protects sanitaryware from chipping and damage in case of unintentional violation of the stability of installation.
Procedure for installing the rubber cuff:
If the toilet outlet fits into the socket freely, then a soap solution will not be needed. On the contrary, it is necessary to create a tighter junction.
For this, a traditional modern method is usually used - sealant is applied over the entire surface of the adjacent parts. After hardening, it forms a tight, hermetically sealed ring.
#2: Rules for using the eccentric
You will learn that you will need an eccentric at the stage of choosing a place to install the toilet. If the outlet hole of the plumbing fixture and the socket of the sewer pipe are not exactly opposite each other, a simple plastic connector is not enough. Offset axes require a curved part.

High-quality rubber or polypropylene eccentrics are sold in plumbing stores and can cost from 100 to 250 rubles, depending on the manufacturer
Before installation, you need to put the plumbing fixture in place, measure the length to the sewer drain and once again make sure that the eccentric model for the toilet is selected correctly. To check, you can simply place the part against both holes.
An eccentric can be used if the drain hole is located just above the toilet outlet. If the height difference from the outlet to the socket is more than 5 cm, problems with flushing may occur - in this case it is better to replace the pipes and install them lower
Work order:
- we clean the sewer inlet from old sediments;
- We put the cuff with the wide end (110 mm) onto the sewer socket, coating the junction points with sealant;
- we attach the second end to the oblique or horizontal outlet of the toilet, also using sealant;
- We carry out a test drainage of water;
- If no leaks are found, we fix the toilet in a previously prepared place with bolts.
The problem arises when, during installation, it turns out that the eccentric is selected incorrectly. To avoid an uncomfortable situation, instead of a rigid structure, you can immediately buy a part with an elastic corrugated middle.
As necessary, the ex can be slightly shifted to the right/left or slightly stretched, while maintaining its functional qualities.
Option for cascading use of eccentrics when the wrong toilet model is selected. If the pipes are located below, close to the floor or at its level, it is better to purchase a plumbing fixture with an oblique outlet
Movable parts are also relevant when there is a risk of the toilet being loosely secured. Simply put, when the plumbing fixture is shaken, the tightness of the rigid connection will immediately be broken, while this will not threaten the corrugation.
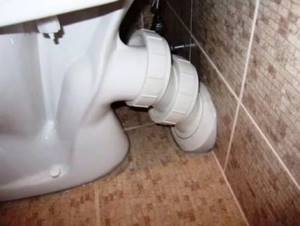
#3: Installing the bellows
When it is difficult to install a toilet due to an unsuitable outlet shape or a complex location of the sewer system, an elastic corrugated pipe is often used. Its advantage is that it can easily change shape and length, therefore it is suitable for almost all types of releases.
The only thing that needs to be taken into account when purchasing is the diameters of the fixing cylindrical ends. They can be 110 mm/90 mm, 110 mm/80 mm, etc.
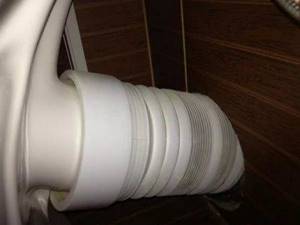
It is the corrugation that is used for temporary installation of a toilet during repairs, with strong displacements relative to the central axis of the inlet/outlet (instead of an eccentric) and during installation of a plumbing fixture at a distance of up to half a meter from the drain hole
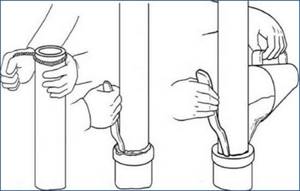
The principle of replacing or installing corrugation is the same as for other types of cuffs:
- removal of the old worn element;
- cleaning inlets from dirt and deposits;
- inserting the end treated with sealant into the sewer socket;
- fixing the second end to the toilet outlet;
- test drainage of water, elimination of shortcomings.
Experienced plumbers recommend not stretching the corrugation to the maximum, since as a result it loses its elasticity and fails faster.
It is better to choose a longer model or try to move the toilet closer to the sewer outlet. Another option is to purchase a combined cuff, consisting partly of rigid elements.
Installation methods
Pipes with a socket are mounted in several ways, it all depends on the material from which they are made. For plastic pipelines:
- using o-rings;
- on sealant and glue.
For cast iron or ceramic:
- welding;
- caulking.
Below we will consider these methods in more detail.
Installation of plastic pipelines
Today, plastic pipes are more popular among the population and are used most often. Let's figure out how to assemble such a system.
Using O-rings
The simplest option, but provided that the socket has a recess for the seal. Installation steps:
- If the ring is not installed by the manufacturer, then insert it into the groove yourself, making sure that it is elastic everywhere and that there are no cracks, tears or other defects.
- Lubricate the smooth part of the next pipe with silicone grease or soap.
- Carefully insert it into the socket until it stops.
As additional insulation, you can use sealing tape, which must be wrapped around the socket from the outside.
Sealant or glue
The use of plumbing sealant or glue helps create a more airtight joint. The disadvantage of this method is that you can use the sewer only after some time required for the applied products to dry. Stages of work:
- Sand the smooth end of the pipe with coarse sandpaper.
- Apply a strip of glue or sealant at a distance of about 2 cm from the edge of the pipe.
- Wait 30 seconds for the glue to dry.
- Insert the end of the pipe coated with glue into the socket and press for a few seconds.
- Wait for the glue to harden; the hardening time should be indicated on the packaging.
- Test the system.
Installation of cast iron pipelines
Since the socket of cast iron pipes is larger in diameter, other methods are used during installation, namely welding or caulking.
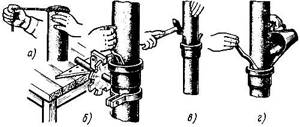
Caulking
For this method, plumbing flax or tow, as well as cement mortar or bitumen mastic, are used. Process:
- Take measurements, marking the depth of entry into the socket on the smooth end.
- Step back from the mark 2 - 3 cm, wind the tow or flax towards the end of the part.
- Insert the prepared end into the socket.
- Use a chisel to tighten the winding.
- Prepare a cement mortar (composition: PVA glue, water, cement), it should be liquid.
- Pour the resulting solution into the gap between the socket and the pipe; this can be done using a regular funnel.
After a day, the cement will set and the sewer can be used.
Welding
This option is rarely used, although it ensures 100% tightness of the joints. The thing is that it cannot be done without special equipment and skills in working with contact welding. Sequence of work:
caulking is done, but so that the solution does not reach the edge by about 1 cm;
After the solution has hardened, a welding mixture is applied to the edge of the socket and the resistance welding process is carried out.
Welding connection
This installation method is only suitable for cast iron pipe products. To be more precise, welding is not a separate method, but rather as an additional action after caulking of products. The welding work itself ensures complete waterproofing and also significantly extends the service life of the cast iron sewer system. Only craftsmen with the skills to carry out such work can perform high-quality caulking.
Installation by welding is carried out in a certain order:
- Install the straight edge of the pipeline into a cast iron pipe with a socket. Then pour in the cement mixture at a distance of no more than 10 mm from the end of the pipe and caulk it.
- After the cement has completely hardened, begin welding work. After covering the edge of the bell funnel with a special welding compound, weld it to the end.
- After the seam has cooled, check the tightness of the system.
PVC pipes
PVC and other plastic pipes can be joined in two ways:
| Using a rubber O-ring | This installation method is detachable, since if necessary, you can disassemble the pipeline, for example, to replace a damaged part. |
| Glue | It is a one-piece installation method, since the pipes are glued together. |
Now let's take a closer look at the features of each type of installation.
Socket connection diagram
Connection using a rubber ring
This installation method is the most common for plastic sewer systems. Its meaning is that the rubber ring is located in a specially made internal groove.
The ring performs several functions at once:
- Seal the connection;
- Retaining ring function;
- Partially compensates for the mismatch of the axes of the elements being connected.
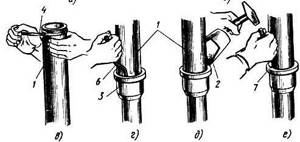
Instructions for connecting pipes and fittings using this method are as follows:
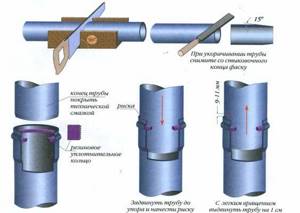
- First of all, you need to clean the sealing ring, the walls of the socket and the chamfered end of the pipe from debris and sand. If there is no chamfer, it must be made with a mounting knife or file, as shown in the diagram.
- Further, in order not to damage the O-ring during installation, the joint area should be lubricated with glycerin, silicone grease or soap, but not with oils.
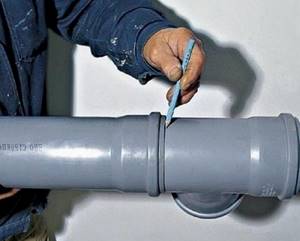
In the photo - marking with a pencil
- Then, having connected the elements, you should make a mark with a pencil of the extreme position.
- Next, using the mark as a guide, you need to pull the pipe back out by 9-11 mm. This gap is designed to compensate for thermal expansion of system elements and prevent internal stresses. For example, a polypropylene pipeline can be extended up to 5 mm per meter.
Since the shaped elements are short, there is no need to make any gaps when installing them.
At the end of the work, the joints must be coated with sealant.
In some cases, it becomes necessary to connect a plastic pipeline with a cast iron one. In such a situation, use a special adapter that has a double rubber gasket.
Adhesive connection
Adhesive connection
Doing the adhesive installation yourself is quite simple.
The procedure is as follows:
- A special adhesive composition is applied to a flat section of the pipe.
- Then the socket is treated with glue.
- Next, the elements are joined and strongly compressed.
- After some time, the glue hardens and the joint becomes airtight.
This method of connecting a pipeline is used less frequently. It should be noted that adhesive joints do not withstand lateral loads well.
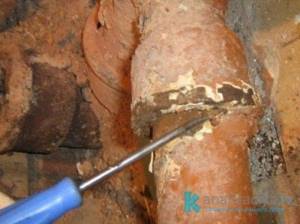
Scheme for caulking cast iron pipes
Dismantling pipes with socket
In the case of an O-ring and a pipe connection using sealant, dismantling will not take much effort. Simply apply a little force and pull the smooth end out of the pipe.
To eliminate caulking, additional equipment . Cast iron pipes are most often simply cut to the socket. Next, the end that remains inside the bell is divided into four sections using a hammer drill, and each section is removed separately with a chisel.
In the case of contact welding, do the same.
If you carry out all the work carefully and save the socket, it can be reused in the future to connect to a new pipe.
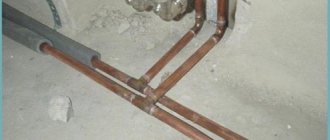
Cast iron pipe connection
There are the following methods for connecting cast iron pipes:
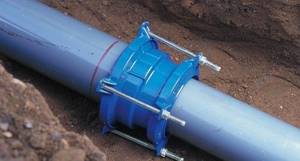
Connecting cast iron pipes with a coupling
Connecting coupling for cast iron pipes
Installation of socket cast iron pipes
The socket, located at one end of the pipe, is designed to insert the smooth end of another pipe into it. Sockets on pipes are available smooth or with a groove. After connecting the cast iron pipes, a small gap remains, which is filled with a sealant to make the joint airtight. The following is used as a sealant:
- cement mortar;
- expanding cement mortar;
- asbestos cement;
- sulfur
When hardened, the seals, in addition to providing a tight seal, impart strength to the joint. If the pipeline contains branches, the pipes are connected with cast iron fittings.
When it is necessary to reduce the length of a cast iron pipe, a chisel or pipe cutter is used to cut it. In this case, the pipe cut must be smooth, without chips or cracks, strictly perpendicular to the axis of the pipe.
Although cast iron is a strong and durable metal, it is highly brittle. Therefore, be especially careful when installing the pipeline.
To connect sewer cast iron pipes, follow the instructions:
- twist the resin strand into a rope 7-8 mm thick, wind it around the smooth end of a cast iron pipe; at the same time, make sure that the free end of the winding does not fall inside the pipe;
- insert the smooth end into the socket until it stops;
- Compact the tourniquet with caulk, hammering it into the socket until it is 2/3 full;
- make sure that the gap between the inside of the socket and the pipe being connected is the same in all places (around the circumference);
- Fill the remaining 1/3 of the socket with sealant.
If a rigid connection of pipes is required, it is better to use cement mortar (cement grade not lower than 300) or asbestos cement. In cases where less rigid fastening of joints is permissible, an asbestos-cement mixture prepared from 30% asbestos fiber and 70% cement grade 400 or higher is suitable.
Sealing the socket with resin strand and asbestos cement
You will learn further about how to connect cast iron pipes if pressure water supply is being laid:
- a gap (3-9 mm) is provided between the socket and the smooth end of the pipe;
- the joint is sealed using hemp (if pipes with a diameter of 300 mm or less are being laid);
- the hemp strand is inserted into the socket 25 mm, and the rest of the space is filled with asbestos-cement mixture (depth 25-30 mm).
When expanding cement mortar is used as a sealant, the installation of the pipeline occurs in the following sequence:
- fix the pipe with the socket facing up in a special device (Kozlov’s device);
- wrap the pipe connected to it from the smooth end with hemp strands;
- insert the pipe into the socket, fill it with caulk;
- center the pipe with metal wedges;
- pour the expanding solution into the socket.
Connection using expanding solution
Installation of a cast iron coupling for caulking joints
If the pipes are socketless, then for the installation of such a pipeline, couplings are used to connect pipes for stamping cast iron pipes. The coupling consists of two sockets that are directed in different (opposite) directions. The installation is more complex, it is characterized by certain nuances, we suggest considering the installation of cast iron pipes in this case in more detail:
- the sealant is applied around the entire circumference of the coupling and pipes, so it is necessary to provide free access to the connected places; in other words, if the pipe is installed tightly to the wall, part of the wall will have to be destroyed;
- the material used to seal the joint - bonding - is an oiled organic fiber; A graphite gland is also suitable for embossing joints;
- the pipe is installed in the coupling until it stops, otherwise the seal will get inside the sewer system;
- The caulking is caulked in several layers, each revolution around the pipe is compacted;
- in the absence of specialized equipment and tools, embossing can be done with a thin metal tube using a screwdriver;
- After installation of the seal is completed, the joint is filled with cement mortar.
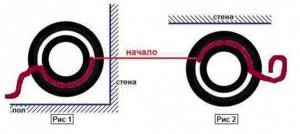
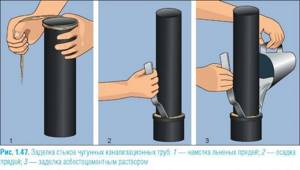
The starting point of the cable winding: in the lower part with a horizontal pipe (Fig. 1) and in the upper part with a vertical pipe arrangement (Fig. 2)
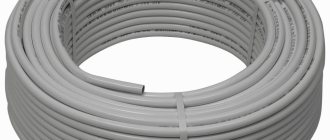
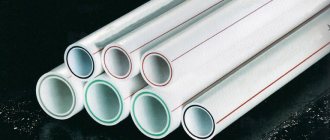
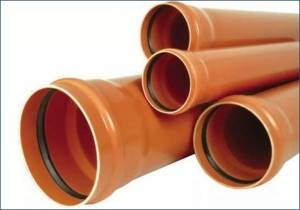
Pipes used in sewerage
The following pipes are used for sewerage:
- made of plastic;
- steel or cast iron.
There are plastic pipes made from polyvinyl chloride (PVC) and polypropylene (PP). The first ones are used for internal wiring as risers, for external sewerage - with insulation. Polypropylene pipes are durable and resistant to high temperatures. As for cast iron pipes, it was they, and not steel ones, that proved to be better in use. After all, steel is a metal susceptible to corrosion. However, the negative side of cast iron pipes is their heavy weight. Thus, polymer pipes are better in all respects.
Dismantling the old system
Often, problems can be caused not by the installation of sewer pipes, but by their dismantling, so this stage of repair also needs to be thought through. First of all, you should free up your workspace by removing furniture, partitions, etc.
Having gained full access to the riser, you need to prepare the tool you will use for dismantling:
- Bulgarian;
- Needle file;
- Hammer;
- Hammer;
- Chisel;
- Various screwdrivers;
- A hacksaw for metal.
The dismantling itself should be done in the following order:
- When making repairs in an apartment building, be sure to warn your neighbors not to use the sewer system;
- Turn off the water;
- Disconnect the hose supplying water to the toilet flush tank;
- Remove the toilet by unscrewing the bolts from the floor;
- Disconnect other plumbing fixtures (bathtub, sink, etc.);
- Next, all that remains is to dismantle the old pipes.
It is worth examining in more detail the dismantling of cast iron pipes. Typically, such pipes are secured with socket fittings, so they can be easily removed using a hammer and chisel.
When you reach the fitting connecting the intra-apartment system to the common building riser, be careful: do not use a hammer, because you can damage the riser. You can remove the pipe from the common riser by stripping the seal.