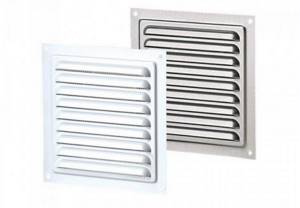
The ventilation system is several elements, one of which performs two important functions: it disperses air flows and distributes them in directions, plus it protects the ventilation ducts from the penetration of birds, small animals, and debris. This device is called a ventilation grille or air distributor. Before installing a ventilation grille in the kitchen or other room, you need to understand its design and installation methods.
ventilation grates
Types of ventilation grilles and their installation location
There are three main varieties:
- external;
- internal;
- transfer
The first ones are installed outside the building. They have high strength characteristics and can easily withstand natural loads, changes in humidity and temperature.
The second ones are installed indoors. They have high decorative properties because they are part of the interior design of rooms. In terms of design features, these are the simplest grilles, most often made of plastic.
Still others are installed between rooms. They are usually mounted either in the wall or in interior doors. The main requirement for them is high sound insulation of the device so that noise from neighboring rooms does not disturb people.
ventilation grates
According to their functional features, grilles are divided into supply and exhaust. Through the former, air enters the ventilation system, and, accordingly, into the building. That is, this is an external variety. Through the second he leaves the premises. These are internal type devices.
Depending on the location of installation, ventilation grilles can be divided into ceiling, wall and floor. The latter are installed only if the ventilation system of the house begins either in the basement or in the basement. Moreover, such a network does not have air duct wiring.
Floor-standing models are made of metal or high-strength plastic, because they often experience severe loads. Ceiling and wall elements are a decorative plastic element, rarely metal.
Main types
In fact, there is a huge selection of gratings; you can choose products to suit every taste, color and even budget. But despite this, all devices have their own distinctive features by which they can be differentiated.
The primary classification feature of difference is the location and method of installation, it can be as follows:
- external - this option involves installing a grille on the external wall of the building where the ventilation pipe exits;
- internal type - most often installed in the kitchen or bathroom, the structure is installed in the opening of the exhaust shaft;
- cross-flow type - such products allow you to regulate air exchange between adjacent rooms.
We recommend that you read: Grill hood
As for external structures, they differ from all other types in their dimensions, high level of strength, as well as good resistance to sudden temperature changes and other external climatic conditions. They are additionally equipped with a rigid frame that goes inside the ventilation hole. And then it is securely fixed with steel anchors or using special factory spacers. This installation method is considered the most reliable and durable.
Transfer models are most often used for fastening walls, partitions or doors; they are connecting elements between rooms. At the same time, they perform the task of air exchange and provide sound and light insulation. Typically, such devices are equipped with special V-shaped blinds that overlap each other.
Fixing a ventilation grille indoors is absolutely not difficult; anyone can do it. These products are distinguished by their aesthetic appearance, lightness and compactness. For the bathroom, it is advisable to purchase devices made of waterproof material, such as lightweight plastic.
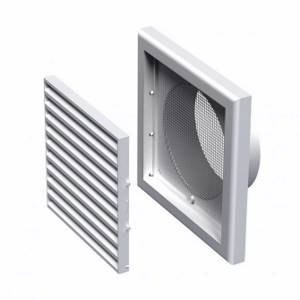
Construction and material
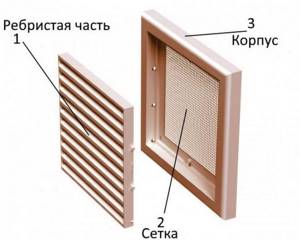
design of the ventilation grille
Purely structurally, the device consists of a body and a ribbed front part. Both elements can be connected to each other by bolts, screws, welding, casting and other methods. It all depends on the model.
There is another classification where elements of this type are divided into four categories:
- Adjustable. Their design includes blinds, with which you can change the direction of incoming air flows. They belong to the group of supply models.
- Unregulated, they are also non-directional. Their ribbed front part is stationary, that is, it is impossible to change its location inside the body. Such ventilation grilles are installed in the bathroom, kitchen or toilet.
- With shut-off valve. The design contains a valve that keeps the ventilation duct closed at all times. When ventilation operates, pressure is created inside the air ducts, which changes the location of the valve relative to its central axis. That is, it turns it. Thus he opens the channel. The purpose of the valve is to protect air ducts from the penetration of debris, birds and small animals.
- Inertial. This model repeats the functionality of the previous version. Only instead of a valve it has blinds.
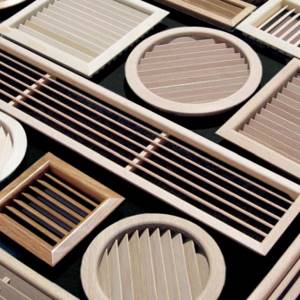
The shape of the gratings is made in the form of a square, rectangle or circle. It is due to this that you can easily select them to fit into the interior of the room.
Today, manufacturers offer several materials from which air distributors are made:
- plastic;
- aluminum alloys;
- galvanized steel, often painted;
- brass;
- tree;
- ceramics.
How the grille works
Ventilation grilles consist of a frame installed in the channel opening and a central section with slots. Flow guides can be fixed or adjustable (to change the direction of air masses).
At industrial facilities or warehouses, there are structures with a damper to protect against backdraft and the entry of dust or insects into the room.
Instead of a shield, several small screens can be used, connected to each other by a rod. The valve is opened by air flow; power drives are not used.
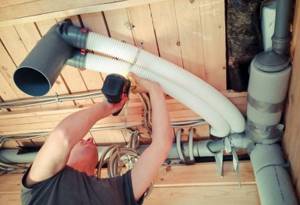
Installation Methods
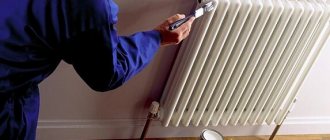
The ventilation grille is attached to surfaces that must have maximum evenness. Gaps are not appropriate here. Therefore, the installation process itself begins only after the premises have been renovated.
Attention! This element is selected in accordance with the cross-section of the ventilation duct. That is, it must completely cover the opening so that there is enough space for fasteners.
There are several installation methods.
Fastening with screws or self-tapping screws
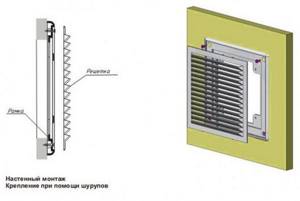
fastening with screws
Before installing the ventilation grille, it is disassembled. That is, the ribbed part is removed from the frame.
- Now the housing is placed at the installation site and marks are made with a marker or pencil through the mounting holes, for example, in the wall.
- The frame is set aside and holes are made using a drill according to the marks, into which plastic dowels are then inserted.
- Place the frame on the wall and secure it with self-tapping screws.
- Install the façade element.
With glue
The installation technology is the same as in the previous method. They just use adhesive instead of screws. Usually these are “liquid nails”. Glue is applied to the back surface of the edge of the frame, along the entire perimeter.
Apply the latter to its location, hold it for the required time with your hands so that the glue sticks. Then the front part is inserted.
This fastening method is well suited if the finishing of the surfaces of the room was made of durable material: ceramic tiles, laminate, wood, washable wallpaper.
Fastening with plinth or glazing bead
method of fastening with plinth or glazing bead
This option for installing ventilation grilles is used if they are made of wood. Not the easiest method, because here the glazing bead or plinth is like a frame for the air distributor.
Some masters act simply, simplifying the technology. They use one of the two previous mounting options. And then a frame is made from plinth or glazing bead around the perimeter, forming a decorative frame. Both last elements can be “planted” with glue or secured with self-tapping screws with small caps.
With spring pressure
Manufacturers install two spring-loaded spacer elements in the design of some models. They are located on opposite sides of the grid. Their task is to return to their original position under the action of a spring.
The installation method is simple:
- before attaching the ventilation grille, squeeze the spacer elements with your fingers so that they go inside beyond the edges of the housing;
- the device is inserted into the hole in the ventilation duct;
- the fingers release the spacers, which, under the action of springs, press on the walls of the air duct;
- The fastening is strong and reliable.
Conclusion
Having read the information described above, you have definitely found the answers to the questions posed and now have an idea of what a ventilation grille is and how it is attached to the wall. Do not forget that ventilation of the room is necessary not only for aesthetic reasons (to remove odors), but also for health benefits (air space is discharged).
Sources
- https://mystroiteli1.ru/ventilyaciya/ventiliacionnaia-reshetka-vidy-razmery-i-ystanovka.html
- https://TopVentilyaciya.ru/ventilyaciya/elementy/kak-ustanovit-ventilyatsionnuyu-reshetku.html
- https://StrojDvor.ru/ventilyaciya/kak-pravilno-vybrat-ventilyacionnuyu-reshetku-podxodyashhego-vida-tipa-i-razmera-metody-ustanovki/
- https://ventazbuka.ru/v-zdanii/v-kvartire/ventiliacionnie-reshetki.html
- https://AeroClima.ru/ventilyaciya/ustanovka-reshetki/
- https://uchebniksantehnika.ru/ventiliatsiia/vyiasniaem-kak-verno-ustanovit-ventiliatsionnuiu-reshetku.html
- https://SavoPenza.ru/sistemy-otopleniya/kak-postavit-ventilyacionnuyu-reshetku-2.html
- https://StrojDvor.ru/ventilyaciya/sposoby-pravilnoj-ustanovki-ventilyacionnoj-reshetki/
[collapse]
Installation features
The main requirement is determined by the question of how to install the ventilation grill correctly: up or down. This refers to the direction of the façade planks.
In fact, there is no difference where the air distributor holes point. After all, its main task is to close the hole and the inside of the air duct. That is, in this regard, the device performs purely decorative functions. And if the draft in the ventilation system is good, then the air will pass through the grille, regardless of where the lamellas of its ribbed part are directed.
Here it is necessary to take into account the purely aesthetic side of the issue. For example, if the grille is installed under the ceiling, as is often the case in the kitchen, bathroom and toilet, then the direction of the slats down will cause a good view of the channel opening, which is located behind the device. And if this air duct is overgrown with cobwebs, debris and dirt, then all this will be visible. Therefore, it is better to point the grille upward.
The opposite is true for door-mounted transfer models. They are located below the floor, so the strips of the ribbed part should be installed with a slope so that the slots between them are not visible from above.
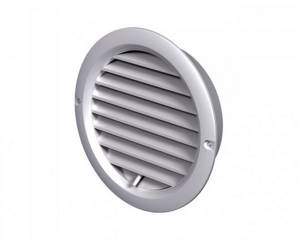
Lattice shapes
The configuration is determined by the size and contours of the ventilation ducts. In multi-apartment residential buildings there are rectangular or square highways.
On the entrance doors, elements in the form of a rectangle elongated in width are used. In office or industrial premises, it is possible to install air supply lines with a circular cross-section.
A number of manufacturers (for example, Vtvent) offer custom-made grilles according to customer dimensions; width and height are selected from the range from 90 to 3000 mm in 1 mm increments.
Ventilation grilles can be made to order.
Our services
Our company’s employees install hoods using a hidden or overhead method on a concrete, wooden, brick or plasterboard surface (wall or ceiling). Systems can be single-, double-row (such as blinds) or inertial. On the market you can buy a decorative product made of plastic, aluminum, wood or steel in a round, square or rectangular shape.
Installation services include:
- Dismantling of old equipment;
- Measurements;
- Installation of the grille in the prepared hole;
- Functionality check.
Depending on what material the grille itself is made of and the surface to which it is attached, the master will select the method of attachment:
- Screws;
- Liquid nails;
- Silicone or polymer glue;
- Using a plinth;
- Spacer mechanisms.
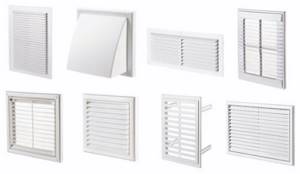
Types of ventilation grilles (by location, shape, material)
The modern market offers a large number of varieties of ventilation grilles. They differ in material, shape and installation location.
Location
There are several options - these are external and façade type, installation is carried out from the street side of the room, internal view and transfer type. The last type is placed on the ventilation hole connecting the object to the street, often the installation site in this case is doors.
Important! For the decorative type installed outside, it is better to use aluminum or galvanized material as the material. They cope with temperature changes and are resistant to weather conditions.
You can choose an overhead or built-in model.
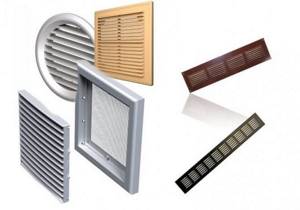
Material

Manufacturers offer various options for materials for the manufacture of ventilation grilles. The most common of them are metal and plastic options. The first type is aluminum alloy, galvanized and stainless steel (quite rare). External models are made of thick metal, and internal ones are made of thin metal. Aluminum is best suited for façade types; it is easy to maintain and resistant to external weather influences.
Internal grilles can be made of plastic and used as a decorative element. They are easy to care for, they are resistant to high humidity and chemical components intended for cleaning the product. An internal hole for ventilation requires a steel or aluminum product that can withstand temperature changes.
Luxurious decorative elements are products made of brass, copper or bronze. Such ventilation grilles are distinguished by unique ornaments and various additional decorations. They are installed in the floor or wall, installation in a window sill is possible.
Wooden models are rare, as they do not tolerate high levels of humidity and require an appropriate interior solution. Differences in the shape of ventilation grilles depend on the design of the product to order; the most common are rectangular varieties.
Advantages and disadvantages
Stable consumer demand and high popularity of grilles with a check valve are due to a number of undeniable advantages of these devices.
- The valve prevents the draft from tipping over and prevents the penetration of air masses from adjacent rooms or from the street.
- The high noise-absorbing effect reliably protects the room from extraneous sounds coming from neighboring rooms and street noise.
- The modern aesthetic appearance of decorative grilles allows devices to be placed in rooms for any purpose without the risk of cluttering the interior.
- Simple installation and low maintenance requirements make grilles one of the most practical devices for this purpose.
- The devices are available in a wide range with a wide variety of sizes, colors and designs. This greatly simplifies the selection of the desired model and allows you to purchase a grille to suit any interior.
- The low cost of products makes them even more accessible and popular.
The disadvantages of the devices include the risk of the dampers freezing in winter and the not very high performance of most models. However, the problem of freezing of the device is easily solved by installing a built-in heater.
What are they and why are they needed?
A ventilation grille is a special device that is installed in ventilation systems to regulate air flows coming from outside and inside.
The grille is installed for:
- ventilation in all spaces of any buildings;
- ensuring that the building meets all existing fire safety requirements - in the event of a fire, high-quality grilles with a ventilated mesh will allow you to quickly draw smoke out of the building and significantly reduce the risk of poisoning by combustion products;
- creating the best microclimate in all spaces of the home or office;
- protecting the ventilation shaft from small rodents and the appearance of all kinds of waste and debris in it;
- getting rid of various foreign odors, burning, stale air;
- original decoration of building facades;
- strengthening air draft throughout the ventilation system;
- simplifying the process of maintaining perfect cleanliness inside the mine.
Carefully inserted into the hood, such a product will decorate the appearance of the room from the inside, and a stylish hood for a stretch ceiling or a slot-type product will allow you to interestingly play up the interior design of the room. With the help of ventilation grilles for outdoor use, you can very creatively decorate the decor of the facade of any building, complement it in an original way, and make it truly unusual. Nowadays on the construction market you can find different types of these universal ventilation structures to suit every taste.
Arrangement in a brick house
Most modern houses are equipped with combined supply and exhaust systems, as they are more efficient than conventional types. The exhaust ducts are fixed in the main walls with a minimum thickness of 38 cm. One room can have from 1 to 3 such ducts, and when choosing a suitable model, the architectural design of the building is taken into account.
When installing a hood in a private brick house, you need to adhere to the following recommendations:
- The optimal parameters of the ventilation channel are 13 x 13 cm. It is better to build such a space during the laying of the wall structure.
- The inlet from the room to the channel is located under the ceiling.
- To bring the hood to the roof, it is necessary to arrange a pipe with a height of at least 50 cm above the ridge. If this rule is not followed, cravings may worsen.
- The optimal thickness of the channel walls is 2.5 bricks. If they are thinner, the air duct system will cool down, which will prevent the natural discharge of exhaust air to the outside, but will lead to cold masses being drawn in from the street.
When performing installation work in a brick house, you can additionally buy a wall fan and secure it at the base of the air duct. Bearing-type models are characterized by maximum strength, but during operation they create a lot of noise. Bushing devices operate almost silently, but their cost is much higher.
It is quite difficult to install ventilation in a private house or apartment. But if you follow simple rules, this problem becomes solvable.
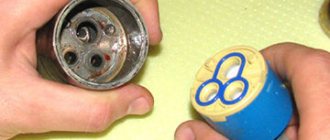
DIY ventilation with valve
Are you looking for bathroom fans with a check valve, but the price is too high for you? Don't despair, because the design of the device is not that complicated. If you study the principle of operation in advance and put in a little effort, you can make a full-fledged check valve for ventilation with your own hands.
More often, an axial anti-return valve is installed on fans. It can be in the form of a “butterfly”, a square cover or a round disk-flap, or a louvers grille. Dimensions for domestic hoods range from 100 to 315 mm. But not everyone can do this with their own hands. We'll look at a simpler option.
To make a fan with a check valve, you need:
- a piece of textolite or dense plastic no more than 4 mm thick;
- perfectly smooth dense polyethylene with a thickness of 0.1 mm;
- rubber gaskets;
- self-adhesive thin foam rubber;
- screws and bolts;
- stationery knife;
- fabric-based tape.

To create ventilation with a valve, you need fabric-based tape
- A plate is cut out of plastic. The required size slightly overlaps the outlet of the natural exhaust channel. Holes are drilled in the corners of the plate for mounting to the wall.
- A hole corresponding to the diameter of the fan is marked in the center of the plate. It should have a grid (the larger the cells, the denser the material of the shield). We cut out an opening with an air intake grille.
- Around the finished air intake you need to make 4 holes for fasteners, with the help of which your workpiece will be connected to the fan.
- To prevent small debris and insects from entering an apartment or house through the ventilation, a fine mesh or nylon is pulled over the grille. The latter is easy to replace if necessary.
- We connect the base to the fan using bolts and shock absorbers, having previously placed a rubber gasket between the elements. This will prevent air from “walking”.
- Flawlessly smooth polyethylene is glued to the base using tape and only then cut out. You need to use a sharp utility knife. Monitor the condition of the film. If the slightest waviness or folds appear, it should be replaced. An uneven surface leads to depressurization of the valve and reverse draft from the ventilation shaft into the room.
- When the leaf panel is cut, it is cut in half. This should be done at the very end so that the film remains intact and motionless for as long as possible.
- When installing a homemade fan with a check valve in a steam room, kitchen or bathroom, be sure to lay self-adhesive foam between the wall and the plastic shield to better seal the device.
Now you know how to protect your home from dampness, soot, and unpleasant odors inside and outside. Install a household exhaust fan with a check valve in the kitchen, toilet, steam room, office or store and you will be guaranteed clean air.
Dimensions of ventilation grilles
Modern design of indoor ventilation systems makes it possible to create ventilation grilles of unique sizes, moving away from standard options. For example, for a private house, an individual plan is developed, which is the basis for calculating the size of the element.
Standard square grilles start at 58 mm on one side, the most popular is 150 by 150 mm, and rectangular ones are most often produced with parameters of 170 by 80 mm.
For private buildings, larger options are applicable - these are 204 by 204 or 300 mm on each side. If certain parameters are required, the product is made to order according to a unique design.
Purpose and role
In fact, the ventilation system is one of the most important engineering structures of any house, regardless of whether it is private or multi-apartment. It is ventilation that is responsible for proper air exchange, as well as for comfortable climatic conditions in each individual apartment or room. The system has its own ventilation ducts, at the inlet and outlet of which a grille is mounted.

It performs several functions at once, namely:
- protects the mines from possible clogging, as objects and animals may accidentally fall into them;
- correctly distributes air flows, especially for supply-type ventilation grilles;
Incorrect application of elements
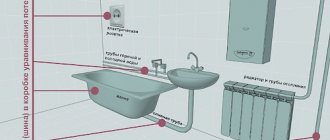
A common mistake is installing a ventilation grille with a non-return air valve in the kitchen or toilet. Supposedly, it protects against odors from neighboring apartments in a multi-story building. Why this approach is wrong:
- the reason for the penetration of unpleasant odors is the overturning of the draft in the ventilation shaft;
- the draft overturns due to the lack of inflow, the shaft of a larger cross-section (in the kitchen) forces the smaller channel (in the bathroom) to work in the opposite direction, the air moves from top to bottom;
- if you install a compensating air supply device in a window or wall, both pipes will begin to draw out exhaust air, foreign odors will disappear;
- a ventilation grille with reverse petals will protect the apartment from “foreign” air by 90%, but the remaining 5–10% of gases will leak out - the flap does not fit hermetically;
- Natural ventilation will not work without inflow.
Reverse draft action diagram - without inflow, the kitchen shaft draws air from the bathroom duct
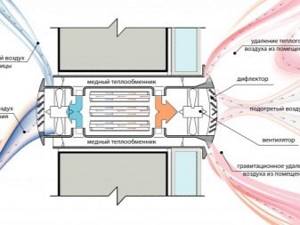
Let's give a second example - a diagram of forced ventilation of the kitchen and bathroom, which is found on many Internet resources. Here, 2 fans are used on a common air duct, two check valves prevent the occurrence of parasitic flows, and the third cuts off outside air. Why the diagram in the drawing is no good:
- According to the requirements of sanitary standards, the exhaust from the bathroom (bathroom, toilet) is prohibited from being combined into one channel with the kitchen ventilation.
- With the fans turned off, toilet smells will leak into the kitchen.
- When running two fans at the same time, it is difficult to predict the behavior of the air flows. Both valves will open, but the unit from the bathroom will “pass” the kitchen one, since it is installed on a straight section.
Air from the kitchen and bathroom cannot be combined into one channel, the diagram is initially incorrect
Conclusion: each room needs a separate air duct, as required by the standards. Then check valves are installed at the outlets of horizontal pipes to keep the cold out from the street. Ventilation ducts from the shower and toilet are allowed to be combined, as shown in the drawing.
It is allowed to connect channels from the bathroom. And so that when the fans operate simultaneously, air does not flow into the adjacent pipe, we join them at an angle of 45–60°