The faucet in the kitchen or bathroom may begin to leak. Trouble happens even with new plumbing.
Instead of immediately running to the store for a new faucet, it is better to learn how to change the cartridge in the faucet in the bathroom or kitchen, because it is this that most often causes problems.
This is really worth paying attention to, because replacing this one part will cost much less than purchasing the entire mixer. In addition, as we will see later, the operation is quite feasible for any non-professional.
Types of mixers and cartridges
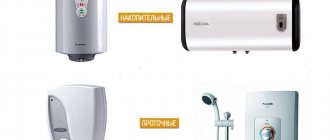
There are two types of mixers:
- Single lever.
- Two-valve.
Two-valve valves have long dominated the plumbing industry. In it, the mixing of flows is carried out in a mixer, and the pressure of each of them is regulated by turning the axle box valves (hot and cold).
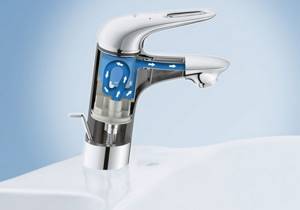
Single lever mixer
Single lever. Today, single-lever cranes (other names - articulated, joystick, mono-command) are increasingly being installed. And the point here is not only in a more advanced design and smooth control. Device manufacturers pay great attention to their design - elegant lines, the coating looks expensive (nickel, chrome, “black gold” are used).
Here everything is regulated by one knob: moving up and down increases or decreases the pressure, and turning right or left controls the water temperature. The mixing process in this design is carried out by a special cartridge - a part that you need to “get to know” better.
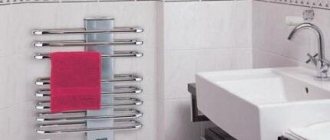
It is in the bathroom that heated floors are most often installed. It is quite possible to organize a warm floor under water tiles with your own hands if you follow the instructions.
Read professional advice on choosing a bidet siphon here.
You can read all about the pros and cons of using hygienic showers for toilets in this topic.
When should you change the cartridge?
Lever mixers fail as a result of wear of the moving elements. Ceramic plates are washed much less often than plastic components. In fact, it doesn’t matter why the cartridge is broken. This is a one-time item that cannot be repaired, only replaced with a new one. It is easy to understand that the cartridge in the mixer needs to be replaced by the following signs:
- the water does not mix as required, only cold or only hot water comes from the tap;
- the supply is disrupted; when you turn the lever, water does not flow from the tap;
- the water temperature changes even after the lever is locked in one position;
- it is not possible to obtain a jet with full pressure;
- it is impossible to completely turn off the tap;
- force is required to turn the lever;
- Water is leaking from under the lever.
Because tap water contains large amounts of impurities, including sand, lime, and rust, the life of your kitchen faucet or bath fixture may be reduced. A coarse filter will help extend its service life . However, this measure will not help you use your plumbing fixtures forever; there will come a time when you need to replace the cartridge.
Cartridge: types, design and disadvantages
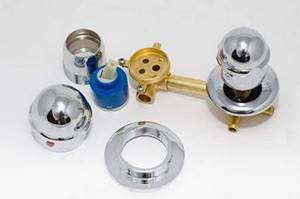
Based on their design features, there are two types of cartridges:
- Disc (ceramics).
- Ball (metal).
Both options are suitable for single-lever mixers; their service life and quality are approximately the same.
But ceramic disc models have become more widespread among manufacturers (for companies this option is more practical).
Disk
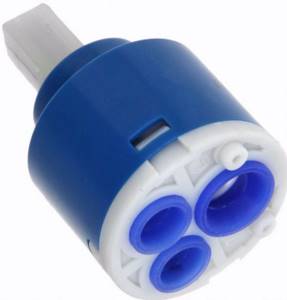
The discs inside the device are ceramic, but the body (or sleeve) of all models is plastic. In the lower part of the case there are three holes equipped with polyurethane foam gasket. Two holes are inlet, one is outlet.
Inside, two disks are hermetically adjacent to each other (in the closed tap position, the upper disk is tightly pressed to the lower one, and all the bulges of one coincide with the holes of the other). When a person turns the handle, the rod moves and the upper disk moves (the lower one is fixed in the body).
Disc cartridge device
The surfaces of the discs are very smooth, so sliding occurs. The degree of opening of the holes through which water flows affects the pressure and how much hot and how much cold will end up in the tap.
The disk version housing can be:
- Collapsible.
- Not collapsible.
The first consists of two halves - upper and lower.
Water mixers can be classified as precision mechanisms, since the gap between the thin plates inside it is hundredths of a millimeter! It is not surprising that they are so sensitive to suspended matter contained in water.
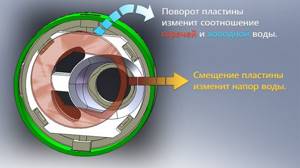
Ball
A hollow metal ball is placed in a ball sleeve and secured to the lever axis. The ball is equipped with passage holes, which, under the action of the rod (adjustable by a person), coincide with the holes in the cartridge.
Ball mixer
Liquid flows through the holes and, depending on how open a particular hole is, hot water is mixed with cold water.
The ball slides along rubber saddles, to which it is pressed due to the pressure of the water.
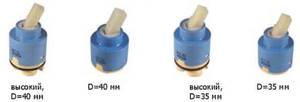
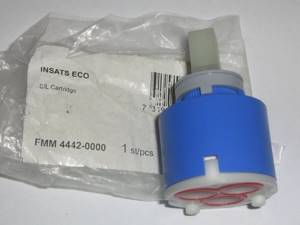
Popular cartridge sizes
Naturally, the cartridge sizes are standardized for each mixer model. For washbasins, sinks and showers, the most common sizes are 28mm, 35mm and 32mm. At the same time, parts from 40 mm to 46 mm are most often used for the bathroom (in particular, in Grohe and Kaiser). But why is there such a difference in almost identical mixers?
It is believed that the larger the ceramic mixer for a single-lever faucet, the better it is. In fairness, it is worth noting that with Chinese taps (with the exception of FRAP), where the diameter of the spout is often larger than that of branded ones, this rule is actually followed. But for branded models (Fiore Rubinetterie, Iddis, Sedal and others), a large cartridge is not always synonymous with quality.
Technical characteristics (diameters) of different mixer cartridges
Let's look at the technical characteristics using the example of a cartridge with a Touch-Z brass rod:
- Diameter – 45 mm;
- Height with leg – from 60 mm to 65 mm;
- The height of the cartridge without the rod is 47 mm – 50 mm.
Similarly, based on the characteristics, you can choose a cartridge for a kitchen faucet. Let's take Potato as an example. The diameter of the swivel spout is important here - it is recommended to use sizes from 26 mm to 30 mm. To supply hoses, a hole from 38 mm to 40 is used, depending on the model.
The listed sizes are considered standard, but for many original faucets they are not suitable due to their too large diameter. In such cases, non-standard components for 18 mm, 20 mm and 22 mm are used. Hose connections can also be made in holes from 25 mm to 26 mm or more.
Disadvantages and causes of breakdowns
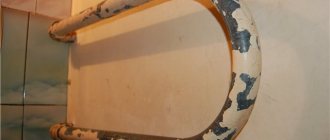
Lime deposits accumulate on the metal ball over time.
This is especially noticeable when the faucet is not used regularly.
In addition, this design is very sensitive to small abrasive particles.
However, a speck stuck in the structure can break the seal of the disk device.
The device is sealed as long as the rubber and Teflon gaskets and seals are in good condition. Their wear can occur over time or under the influence of damaging impurities in the water. A hum or leak during operation will indicate that the gaskets need to be replaced.
Water leakage can also be caused by a simple loosening of the lever connection. Perhaps the dripping will stop if you just tighten everything up.
In some cases, a crack or chip may appear on the plates, ball, or cartridge body. Using sealant, you can try to eliminate the gap in the shell, but internal damage cannot be repaired - the cartridge will need to be replaced.
Disassembling a single lever mixer
Symptoms of cartridge failure may include:
- Lever movement is difficult.
- Lack of response to tap control (pressure or temperature does not change).
- The supply of any water stops when the lever is turned all the way.
- Lack of complete shutdown, or leakage.
To avoid having to change the cartridge again and again, install a fine filter at the inlet - it will be good for both you and your mixer.
Cartridge - what is it, where is it located?
Mixers with a rotary lever are confidently conquering the market, displacing plumbing fixtures with two traditional valves from bathrooms and kitchens. Their key advantages are ease of use and practicality.
The cartridge is located in the core of the mixer. It doesn’t matter whether a single-lever faucet is used for a bathroom or a kitchen, its design is practically the same. The cartridge is responsible for mixing hot and cold water in the selected proportion and supplying it to the spout under pressure. The working elements of the device are protected by a plastic case. In its upper part there is a rod responsible for connecting the mixer lever to the upper ceramic disk. This disc moves due to the movement of the mixer handle. The second disk fits tightly to the first and always remains motionless. Both parts are equipped with holes through which water flows.
When the user lifts or turns the lever, the rod moves, rotating the first disc. Thanks to this, hot and cold water are mixed in the required ratio, and the pressure of its supply is regulated.
How to replace a faucet cartridge with your own hands
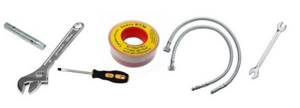
Prepare the tool:
- Knife.
- Hex key.
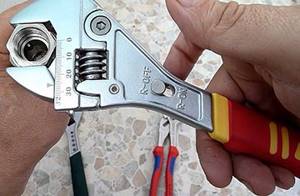
- Adjustable or open-end wrench up to 40 mm.
- Pliers may be needed.
- If the faucet is old, it is possible that the connections have become stuck - you need to keep in mind WD-40 liquid based on white spirit (popularly “Vedashka”, purchased at car dealerships).
It all starts with the preparation stage:
- The water supply to the pipes is shut off.
- The tap opens and the remaining liquid is drained.
- The sink is covered to prevent damage during work.
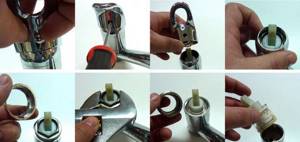
Replacement procedure:
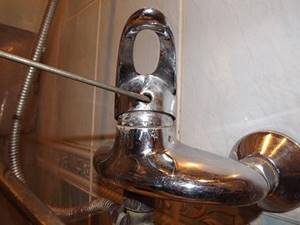
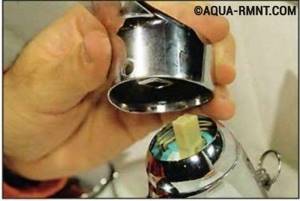
- The adjusting lever is removed. To do this, it rises to the highest position. Under it there is a small plug (usually red and blue). It is carefully removed using a knife. There is a screw hidden underneath (the locking lever and rod), which needs to be loosened. After this, the lever can be removed.
- The mixer dome is now visible. To get to the cartridge, you need to twist a couple more elements. The decorative overlay must be handled with care and twisted by hand. If the thread does not give in, it is carefully pryed out with pliers and/or moistened with prepared wedash. The clamping nut is unscrewed with an adjustable wrench. This is not such a valuable element; if you can’t unscrew it and the part starts to break, they simply break it out completely (it’s not difficult to buy a new nut).
- The old cartridge is removed. If the part is not purchased in advance, you can plan a trip to the store now, when the old cartridge is removed from the faucet. Presenting a sample to the seller will protect against annoying mistakes in choosing an element (see box below).
- “Cleaning” is done in the mixer body. The inner walls are cleaned of plaque and dirt.
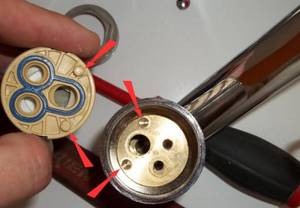
- Installing a new cartridge. When placing it in place, make sure that the mixer seats and the protrusions on the body of the part are aligned (this is not difficult to do by touch).
- Now the clamping and decorative nuts are screwed back in.
- The lever is put on, the screw is tightened and the plug is placed in its rightful place.
Cartridge replacement diagram
Ceramic products may differ in some parameters:
- rod length;
- landing rings;
- diameter – 35 mm and 40 mm.
Slatted ceilings in the bathroom are a popular solution. In addition, lighting can be easily integrated into them. Lamps for slatted ceilings - types and installation procedures.
General rules for repairing hot tubs are described in this topic. Simple breakdowns and how to fix them.
Conclusion
Replacing a cartridge with a new one is considered one of the simplest plumbing operations.
An experienced plumber will do everything in half an hour. It may take an hour for a beginner. And this hour can save a family a lot of money. How much exactly will depend on the chosen plumbing model.
The cost of some high-quality products reaches tens of thousands of rubles. The cartridge for such a device alone will cost 5–6 thousand rubles.
Others, designed for a wide range of consumers, will cost 150 - 250 rubles. Such cartridges usually last 2–3 years, but there is a chance that they will leak again after just a few months.
It all depends on the mixer
There is a wide variety of different taps; each manufacturer has its own subtleties and nuances in creating plumbing fixtures. But it is the cartridges that differ little in their internal structure; their quality and service life are affected by the material from which they are made.
For the disk type, it is important that the strength of the disks is at a high level, which is why many well-known brands are trying to improve their quality through carbon-crystalline coating. It allows you to improve the performance of the cartridge; its disks have higher strength and a specific, smooth surface.
When choosing a mixer, you need to pay special attention to its design. The methods of installation and fastening of the lever and handle play an important role. When purchasing a branded faucet, you should ask in advance where and how you can order replacement parts in case of need and whether parts from other companies can be suitable for repairing the faucet. Of course, it is better to purchase a faucet from a well-known brand or trademark, since these manufacturers have proven themselves well in the world market and have a high reputation.
Of course, the cost of such a product is quite high, but it is worth understanding that high-quality and durable plumbing fixtures can last for quite a long time without replacing parts or repairs, while economy-class faucets require, if not complete, then partial replacement almost every year or two.
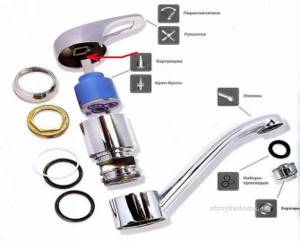
Mixer components
Often manufacturers of plumbing fixtures from well-known brands produce different series of products; there are luxury products, and there are also budget options. The main thing is that in both cases the manufacturer uses high-quality materials and modern technology to produce their goods.
The most famous global brands in the plumbing market are rightfully considered to be German manufacturers, as well as Swiss, Bulgarian and Spanish.
The following global brands are highly appreciated and have a well-deserved high rating:
- Grohe.
- Hansgrohe.
- Axor.
- Roca.
- Iddis.
- Gustavsberg.
Expensive products are usually equipped with a high level of protective water filters and are made of high quality material. So if you have to make repairs, it will be in the most extreme and rare cases.
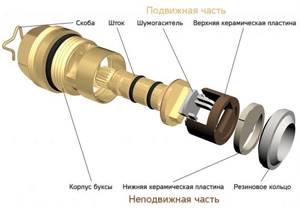
Repair of ceramic crane axle box
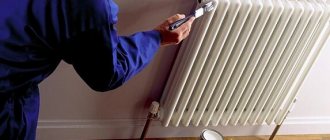
Is it possible to repair a ceramic faucet axle box? The answer is yes, although many craftsmen are inclined to believe that it is much easier to change it. But we are not looking for easy ways and will consider step by step how to repair it.
Valve repair
In most cases, the cause of leakage is wear of the sealing gasket. Over time, it loses its working properties and elasticity and must be replaced.
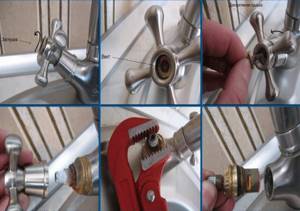
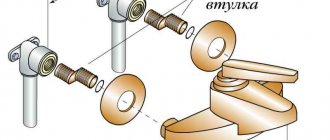
- First you need to remove the faucet valve. To unscrew the locking screw, you will need to remove the plastic decorative plug. This can be done with a knife, carefully picking it up. Removing the flywheel will require some effort.
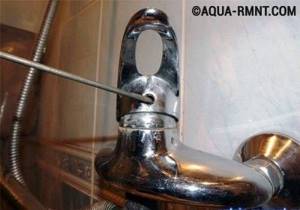
- Remove the decorative cap - “apron”. To do this, we will use an adjustable wrench, first placing a piece of cloth under it so as not to damage the nickel-plated coating. Often, oxide forms on the threaded connection, preventing normal operation. To make work easier, you can heat the cap with a hair dryer or fill the thread with acetic acid.
It’s not possible to unscrew the axle box valve - read how to do it here.
- After gaining access to the axle box, you need to unscrew it. It unscrews counterclockwise.
- After removing the valve axlebox, it must be thoroughly cleaned of slag and washed. Only after this can you begin repairs.
If water oozed from under the valve, then the reason was a violation of the rubber seal - the gasket between the body and the valve seat of the axle box. Replacing it will not be difficult; you won’t have to disassemble the valve axlebox. You can buy a repair kit at any hardware store - for example, in Leroy, its cost is 50 rubles.
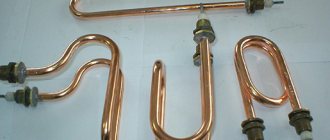
Replacing the pressure washer
To compensate for the gaps between the ceramic washers, a gasket made of fluoroplastic or caprolon is used. Since it bears a significant portion of the load, it becomes thinner and wears out over time, which immediately leads to water leakage.
- In this case, it is impossible to do without analysis. First, remove the locking half-ring and take out the rod.
- Remove the ceramic inserts and the pressure washer.
- We replace and reassemble in the reverse order, having previously lubricated the surface with a thin layer of grease.
Cleaning the crane axle box
Tap water contains impurities and foreign bodies that pass through the valve axlebox and settle on the inserts. To remove them you will also need to disassemble them. Then all parts are thoroughly washed. It is also worth carefully inspecting the plates for damage. If they are significant, then it is worth replacing them.
If it is not possible to purchase a repair kit, you can grind the plates yourself. To do this, you need fine abrasive powder, which is used to grind the valves. This powder must be mixed with machine oil and applied to a piece of glass. Then grind the ceramic inserts in a circular motion and assemble the valve axle box. It is also necessary to apply a thin layer of waterproof lubricant.
Damage to metal elements
If the analysis revealed such shortcomings as:
- Chips or cracks on ceramic inserts
- Violation of the integrity of the body of the crane axlebox
- Damage to threaded connections
All these shortcomings cannot be repaired and the valve axlebox assembly will have to be replaced.
How to replace a cartridge
The problem of replacing a cartridge has a fairly simple solution. You don't need any complicated specialized tools, just a couple of screwdrivers, a hex wrench and an adjustable wrench. Actually, repairing a mixer cartridge is no more difficult than replacing a worn gasket in a traditional valve design. To do this you need:
- Turn off the water supply, both hot and cold.
Remove the decorative plug from the faucet, on which hot and cold water are indicated in red and blue. A thin screwdriver is suitable for this.
The decorative plug is carefully removed using a screwdriver
- Under the decorative plug there is a locking screw that holds the handle. It must be unscrewed using a hexagon or a suitable screwdriver.
Now you can carefully remove the mixer handle.
After unscrewing the lock, you need to remove the handle and the protective ring
- There is a protective ring attached under the handle. It can be easily unscrewed simply by hand.
- After the protective ring is removed, you should arm yourself with an adjustable wrench. It is needed to unscrew the clamping nut.
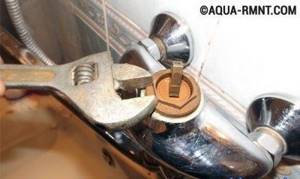
The clamping nut is carefully unscrewed with an adjustable wrench or wrench.
- Now the faulty cartridge can be easily removed from the mixer.
After this, you should carefully clean the mixer, removing accumulated salt deposits and other contaminants.
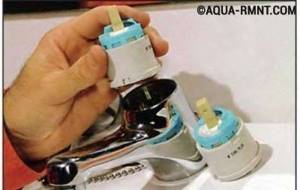
Having removed the faulty cartridge, you can go to the store to buy a suitable analogue
- All that remains is to replace the working cartridge and do all the above operations in reverse order, i.e., replace the clamping nut, screw on the protective ring, fix the handle, and then insert the decorative plug in its original place.
- Restore the water supply and check the operation of the device.
Tip: Cartridges may vary depending on the faucet model. Therefore, it is recommended not to buy a cartridge in advance, but to go to a plumbing store or market, taking the faulty cartridge in order to purchase exactly the same one.
The cartridge has two small protrusions.
You need to make sure that they match the holes that are made in the mixer body. If the cartridge model is selected incorrectly or the element itself is installed incorrectly, the tabs and holes will not line up. Water will flow into the cracks that appear between them and the mixer will begin to leak.
Thus, changing the cartridge in the mixer can be done even by a novice master. Of course, all operations must be done so as not to damage the decorative coating. Upon completion of the repair, the device will look and work like new, and the family budget will practically not feel the consequences of the repair.
What is needed for work
Replacing a kitchen faucet consists of two stages: first, remove the old one, then install and connect the new one. In addition to the new faucet, you will need wrenches of the appropriate size and some auxiliary materials. Most often, you need keys for 10 and 11, 22 and 24. In order to remove the mixer from the countertop or sink, you will need two adjustable wrenches.
One more thing. You will most likely need new hoses. Although most kitchen faucets are equipped with flexible hoses, their length is 30 cm. This is not always enough. Before starting work, you need to make sure that the standard hoses are long enough.
What is needed to replace a kitchen faucet?
It depends on how far the cold and hot water pipes are from the mixer. The hoses should sag slightly, because when you turn the tap on/off, there is a sharp change in pressure, which causes the hoses to twitch. If they are tight, the connection will very quickly become loose and leak. So, if there are 25 cm or less from the pipes to the mixer inlet, standard hoses will be enough. If more, buy longer ones. And advice: buy high-quality ones, not the cheapest ones. They quickly become unusable and can flood both you and your neighbors below, if there are any. Therefore, take flexible hoses made of stainless braid or corrugated stainless pipe. They will serve for a long time and without complaints.
To purchase hoses for a kitchen faucet, you will need the size of the “needle” - the tip that is screwed into the faucet, as well as the diameter of the pipe and the type of end (male-female) - in order to select the right fittings.
To seal the joint you will need linen tow with a sealant paste or fum tape. You will need various gaskets and o-rings (should be included in the kit, but just in case, find everything you have).