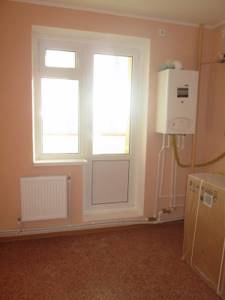
Question: Is it possible to move the AGV from the kitchen to the loggia. Loggia height 2.6, 6 sq.m., insulated, ventilated. Multi-apartment building, apartment on the second floor.
Answer: Yes you can. But not on your own! Contact the gas service of your district (city) in writing with a request to issue you technical specifications for moving your heating appliance (AGV) from the kitchen to the loggia. Be sure to indicate the dimensions of the loggia and make a reference to the Code of Rules SP 62.13330.2011 “Gas distribution systems”, Section 7 “Internal gas pipelines”, which allows the installation of boiler rooms in non-residential premises of apartment buildings. Good luck.
Added: 11/19/2013 11:19
Discussion of the issue on the forum:
Heating on the loggia, how to organize it
Installing heating on a loggia is only the first step towards arranging a full-fledged residential area on it. Even the most advanced insulation can only retain heat, but does not produce it itself. This is why the loggia needs heating. There are several ways to organize heating on a loggia, photo below.
Warm floor
It is most effective to install heated floors on the loggia. There are three main types of such a system:
- Electric heated floor - contrary to popular belief, it does not consume much energy (180-200 W/sq. m.). Like any electrical appliance, such a warm floor requires wiring on the loggia. The cost of such heating is quite high, but quickly pays off due to the reliability and efficiency of the heated floor. Can be installed under all types of floor coverings, with the exception of floorboards.
- Water heated floor - ease of installation and low cost of materials make this type of heating in demand. A warm water floor on a loggia can be installed under any covering, but its main disadvantage is the need to connect to a heat source, which is usually a central heating battery - and this is rarely legal. In addition, leaks are possible, which are extremely difficult to eliminate.
- Infrared heated floors are a fairly expensive but effective way to heat a loggia. Film heating elements are installed under finishing. The principle of operation is to heat surfaces, not air. Among the disadvantages is fragility, so you should not install infrared heated floors in areas where heavy furniture will be placed. It is best to install such a warm floor under porcelain stoneware, laminate or linoleum.
The advantages of heated floors are:
- Uniform heating of the entire floor surface.
- Visual absence of battery.
- Saving usable space.
- Ensuring a comfortable room temperature.
Electric heating
This group of heating devices includes:
- Oil heaters.
- Electric fireplace.
- Air conditioner.
- Electric convectors.
A convector is the simplest and most common type of heater for a loggia, but it requires the installation of an outlet, that is, you must first provide electricity to the loggia.
For heating loggias up to 5 sq. m. you can install a 1 kW heater, which will ensure uniform and rapid heating of the room. Such heating does not dry out the air, but is expensive if used continuously.
Removing central heating to the loggia
Removing the battery is the most economical, but has its significant disadvantages:
- To move the battery to the loggia you will need permission from the BTI, which is quite difficult to obtain.
- There is a possibility of a pipe burst, which will have serious consequences. This can happen if the heating is temporarily turned off.
Important: The main reason for the ban on removing the battery to the loggia is a decrease in pressure in the heating system, as the number of consumers increases.
How to insulate a balcony floor for water heating
If the possible consequences could not completely convince you to abandon water heated floors, then care should be taken so that the heating system can work for a long time and without unpleasant failures.
The first problem that needs to be solved is whether it is necessary to install thermal insulation?
The base definitely needs to be insulated. Thermal insulation helps to avoid defrosting of the water circuit and the appearance of large amounts of condensation. Individual heating on the balcony should heat exclusively your own living space, and not your neighbors.
What material is suitable for thermal insulation?
The device for liquid floor heating on a balcony differs from the traditional method of laying a water circuit.
The installation method with concreting is not suitable for the premises. Therefore, the use of foam plastic is excluded. The optimal solution would be to lay high-quality roll insulation with a foil coating on one side.
Balcony insulation with water floor heating can be done using a polystyrene mat system. The material simultaneously performs heat-insulating functions and serves as the basis for laying pipes.
Transferring the battery to the loggia
Important: Removal should only be done during the warm season, when the heating is turned off. Work is carried out only after glazing the loggia and carrying out work on its insulation.
Step 1
The location where the battery will be installed is marked. It should be close to the load-bearing wall, but at some distance from the door.
If the loggia area is about 6 sq. m or less, then to heat it you need 3-4 battery sections.
- Grinder, hammer drill and file.
- Steel plates.
- Polyurethane foam and cement mortar (1 part cement to 3 parts sand).
Step 2
Several holes 50 mm deep are hollowed out in the load-bearing wall with a hammer drill, cleaned and a steel plate is inserted into them (thickness up to 2 mm, width 25-30 mm, length - 300-350 mm):
At the location where the battery is installed, a grinder makes small recesses for mounting the entire structure.
Opposite the insertion points of the battery on the main pipe, the wall is punched through with a perforator. The holes made must be expanded to a pipe diameter of +50 mm.
Step 3
- Battery, pipes and fittings.
- Sealant, die and vice.
- Welding machine and tape measure.
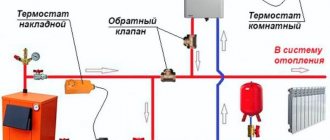
The main pipe is cut with a grinder and has an external thread, onto which fittings with an additional branch are installed.
Pipes with a 9 cm protrusion are led out through the wall. At their ends, threads are similarly made for attaching corner fittings.
The battery is installed in a prepared place, and pipes 25-30 cm long are removed from it (an angle fitting must also be screwed onto their ends). The junction of the pipe and the battery is welded, the seams must be processed as efficiently as possible.
After this work, vertical pipes are installed that supply and drain water from the battery - they are screwed into ready-made fittings.
The detailed process of installing the battery on the loggia can be seen in the video:
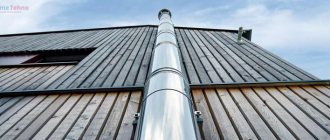
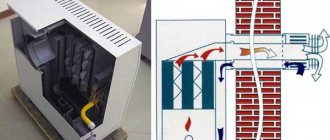
Installing a gas boiler on a loggia or balcony
Not the most popular, but sometimes common way to heat an apartment is to install a gas boiler on the loggia. There are many discussions and disputes on forums about the possibility of placing the unit in a given location. Of course, if there are more suitable places, for example in the kitchen or bathroom, then it is better to install the boiler there. Placement on the loggia can only be done as a last resort.
Getting permission
BTI permission is needed to move a radiator or connect another heating device. Everything said above is absolutely true and, most likely, such permission will not be given for the reasons already mentioned.
But there are several options in which a positive solution to the issue is possible:

Heating on the loggia is possible with a separate boiler room that serves only your home
What do gas workers say?
Most representatives of gas companies say that installing a gas boiler on a loggia, and especially on a balcony, is prohibited. But in saying this, they imagine a standard loggia in an apartment.
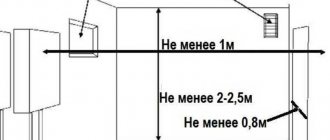
According to SNiP, a gas boiler can be installed in kitchens or in special rooms - heat generator rooms, which meet certain conditions:
- are not a bedroom;
- have a volume of at least 7 m²;
- equipped with natural ventilation;
- ceiling height – 2 m and above.
In addition to these requirements, to convert the loggia into a heat generator room, it will be necessary to insulate it with two-chamber bags and fireproof materials. After this, you should order a project for the installation and connection of this heating system. When it is ready, it should be agreed upon with the technical inventory bureau. BTI workers will definitely study the quality of insulation and the safety of the planned heating system. Otherwise, the gas unit in a cold room will freeze and damage both the plumbing and heating.

After receiving permission from the BTI, you can submit the documentation for approval to the gas supply company. Keep in mind that in different regions of Russia the attitude of legislation towards installing a gas boiler may differ.
If the gas supply company refuses to install the unit on the loggia, do not despair. You should look for alternative heating sources.
Which is better, water or electric floor in the loggia?
To understand which is better, you should once again remember why you can’t install a water floor on balconies.
Installation is prohibited by the housing code and is an illegal conversion of an apartment. Power supply from the central pipeline: radiators, heated towel rails, etc. is also a gross violation.
The design of the underfloor heating system has several limitations associated with the use of the concrete installation method. The polystyrene system for small rooms is financially unprofitable.
Insulation of the floor in a loggia or balcony can be done with roll insulation, due to the limited height of the ceilings and restrictions associated with the maximum weight load, which is somewhat ineffective and leads to certain heat losses.
If we take into account all these nuances, balconies and loggias, as well as apartments, it is best to heat or.
Is it worth installing a boiler on a loggia?
Before converting the loggia into a furnace room, you should once again weigh everything carefully - is it really necessary to move the gas boiler to the loggia. It’s one thing if the unit is being installed for the first time, and there is simply no other place for installation. And it’s completely different if you plan to move an existing gas boiler to the loggia. Remaking gas equipment is not a cheap pleasure.
Relocation of a gas boiler - approval and stages
Rules and regulations for installing a gas boiler
If you just want to make the loggia heated, then it is more advisable to think about alternative heating sources:
- electric convector;
- "warm floor" system;
- oil heater.
Using one of the listed options will save you from unnecessary expenses and a lot of time wasted on coordinating a new heating project with all sorts of authorities.
If you nevertheless decide to install a gas boiler on a loggia, this is only advisable if it will be used not as a storage room, but as part of a living space, for example, a kitchen or office. Then you should go and order a project for the future system from a specialist.
Unauthorized alteration of the heating may result in the inspection authorities levying a fine and forcing the heating system to be returned in accordance with the original plan. And this will again entail considerable costs.
Note! The owner of an apartment with improperly altered heating will face problems when selling it. Illegally installed communications must be included in the housing registration certificate.
BAXI Forum
Official BAXI Forum in Russia
- Unanswered topics
- Active topics
- Search
- Users
- our team
- Acknowledgments
- 07/19/2019 — The BAXI seminar book 3Q was published. 2019 (119 MB). Download
- 06/20/2019 — BAXI Energy voltage stabilizers are on sale.
- 04/16/2019 — Sales of BAXI Eco Nova boilers have started.
- 11/16/2018 — The BAXI 4Q seminar notebook was published. 2018 (8 MB). Download
Air intake from a glazed loggia
Air intake from a glazed loggia
Post by Spiridon » 04 Sep 2021, 22:19
Air intake from a glazed loggia
Post by RADAR » 04 Sep 2021, 22:23
Air intake from a glazed loggia
Post by Spiridon » 04 Sep 2021, 22:28
Air intake from a glazed loggia
Post by plehan » 04 Sep 2021, 22:29
SP 60.13330.2012 6.5 Apartment heating systems
6.5.4 The supply of external air necessary for combustion should be provided:
for an individual heat generator with a closed combustion chamber - a separate air duct outside the building;
Air intake from a glazed loggia
Post by Spiridon » 04 Sep 2021, 22:35
Air intake from a glazed loggia
Post by plehan » 04 Sep 2021, 22:36
Air intake from a glazed loggia
Post by Spiridon » 04 Sep 2021, 22:42
Air intake from a glazed loggia
Post by plehan » 04 Sep 2021, 22:44
Air intake from a glazed loggia
Post by RADAR » 04 Sep 2021, 23:27
I looked on the forum, except for one topic, there didn’t seem to be such a question.
Please tell me, the situation is as follows: A Baxi Nuvola Duotec+ 24 boiler is installed, air supply and smoke removal via coaxial. The first year of operation has passed; during the first maintenance, extensive traces of resinous deposits were discovered on the heat exchanger in the combustion chamber, presumably from pollen from pine trees that grow nearby. The foreman who serviced the boiler says that this is the first time he has seen this.
Don’t shoot me with a machine gun, but here’s what I want to ask. Is it possible to take the air supply from the hood? Today I looked, the draft there is excellent, the air is siphoning. Should this air suit the boiler? Just thoughts :gamer:
And so the boiler sucks oxygen from the house shamelessly.
Apartment renovation. Balcony.
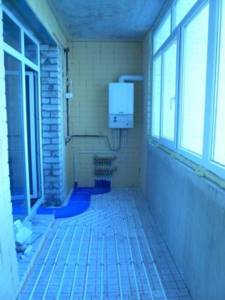
Hi all! I decided to share my experience in renovating an apartment. My first post will be devoted to the renovation of a loggia in a one-room apartment. All repair work was done by ourselves (me, father and wife). The repairs were done in free time from work and laziness.
And so, first of all, the apartment plan (the apartment plan is approximate to convey the whole essence of the post):
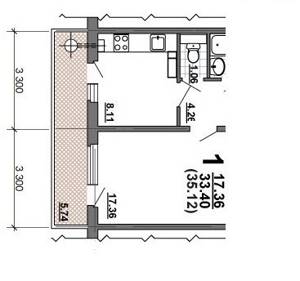
The length of the balcony is 6.5 meters, width 1.5 meters, height 2.8 meters.
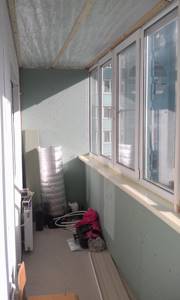
Exterior view of the balcony from the street:
Since the apartment has individual heating, the chimney pipe from the boiler passes through the balcony((((A brilliant solution by designers and architects. And right in the middle of the balcony there is another brilliant solution by the builders - this is a pipe with a diameter of about 8 cm, from floor to ceiling, to which fastens the front walls of the balcony.
On the other side of the balcony, a new surprise awaited - a fire escape.
The photo of the stairs is not mine, but it is very similar (taken from the Internet).
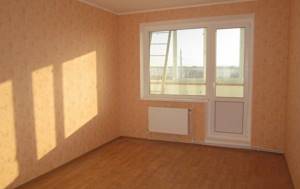
This is exactly the kind of balcony I got in this apartment. By the way, the balcony was glazed from the developer with ordinary glass in a plastic frame. Later they changed to 2-chamber double-glazed windows.
I started the insulation by cutting off the stairs first. Yes, you can’t do this, but if you really want to and no one will find out, then it’s probably possible.
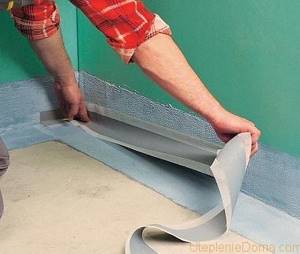
Next, I sealed all the cracks with polyurethane foam, after drying, I cut off the excess and taped all the corners around the perimeter with sealing tape (walls, ceiling, floor) so that it would not blow from anywhere.
There is no final result left (((. But it looks something like this:
Next, I started building the structure for the floor. Since the difference between the floor and the balcony was about 30 cm, I decided to raise it higher. I built this structure (photo not mine):

The first row of joists was anchored to the floor (there is a slab). The second row of logs are screwed to the first row. The result is a fairly strong and stable structure.
Then he insulated it with polystyrene foam (foam plastic thickness 5 cm) in two layers. The result was 10 cm of insulation thickness and 5 cm left for ventilation. Then I covered the floor with chipboard sheets. I measured the dimensions, angles and bends in advance. I made a pattern and cut it out. The result can be seen in the photo below.
Next, we had to build a frame from timber to insulate the walls and ceiling.
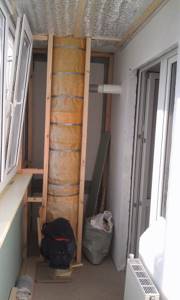
Here is the frame for the pipe from the boiler:
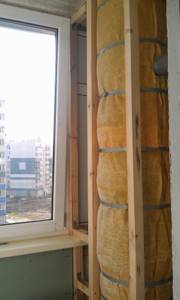
In the future, behind it there will be shelves for tools and all sorts of junk.
I decided to insulate the ceiling with penofol, since the neighbors above have an insulated and glazed balcony, and heat loss will be minimal. And it was impossible to steal extra cm from the ceiling from behind the window frame. The beam was fastened with dowel nails into the slab.
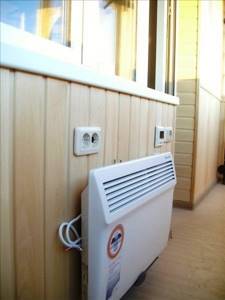
The walls were also insulated with polystyrene foam and penofol. Then I covered everything with moisture-resistant plasterboard. Before sewing up the side wall (which is in the picture below), I called an air conditioning installation technician to immediately install the air conditioner. I then covered the air conditioner pipes with plasterboard.
I brought 2 radiators out onto the balcony (from the kitchen and from the living room). I replaced the batteries in the rooms with new ones and hung the old ones on the balcony.
A window sill (length 6 m, width 20 cm) with a cutout for a pipe was attached to the corners. By the way, cut the pipe on steel, welded corners to it and attached beams to strengthen the wall.
I attached the window sills to the corners.
Window sills (30 cm wide) above the radiators were also attached to the corners.
Electricity (sockets and lights) was also installed on the balcony.
After covering everything with plasterboard, I primed everything. Then I putty the drywall joints.
We thought for a long time about how to decorate the balcony (plastic, wallpaper, plaster or something else). We decided to cover the ceiling with white glossy plastic and plaster the walls.
We bought decorative plaster (karoyed) and my wife and I plastered the entire balcony in a couple of evenings. After drying, they painted it.
A whole piece of linoleum was laid on the floor.
The balcony was renovated in 2014. The detailed estimate no longer survives.
The approximate cost of repairing a balcony is about 70,000 rubles.
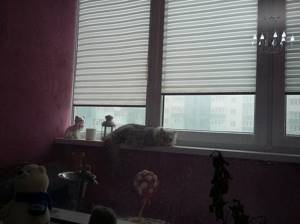
Here's what actually happened:

The balcony turned out to be warm, it doesn’t blow anywhere, the flowers grow, even with the heating turned off, it’s warm on the balcony and the cat likes it.
Next up was a kitchen renovation, but that's another story.
Features and advantages of heated balconies
What is the main advantage of heated balconies? Relatively inexpensive expansion of the apartment area. Unfortunately, that's where the positives end. Let's talk separately about each of the many disadvantages.
First of all, let’s condemn the option of completely combining the balcony with the room. Full combination means moving the radiators to the loggia and demolishing the window sill block. What are the disadvantages? Firstly, it is legally prohibited to bring heating appliances onto the loggia. This is due to a violation of the building’s thermal design.
The fact is that every millimeter of pipe, every radiator is part of a large centralized heating system for the city. They are hydraulically linked together into a system. If you violate this system without permission, the operating mode will be disrupted and, as a result, heating problems may arise anywhere in the house: noise in the pipes, insufficient heating of the radiators, vibrations in the risers, etc.
In addition, the window sill block is often part of the system that secures the balcony slab. Now that we’ve sorted this out, let’s talk about the general dangers of adding a balcony to a living space. Few people think about this, but in each apartment, even at the design stage, the existence of wet and dry zones, as well as certain volumes of ventilated air, is laid down. It is understood that air will penetrate into the apartment through open vents, low density and cracks in the windows, and then, due to the difference in air density in the apartment and outside, will be released into the atmosphere.
Ventilation ducts are provided in the most polluted places in terms of unpleasant odors, i.e. in the kitchen and bathrooms. Thanks to this arrangement, excess odors and moisture are removed.
What is the threat of adding balconies to the living space in this regard? Firstly, the ventilated space will increase, which means the ventilation duct may begin to be unable to cope with the resulting volume of air. After all, an engineer, in order to reduce the cost of communications, can calculate the volume of air “in grinding in”. This situation is possible, although it is one of the least likely.
A much more possible situation is when the air flow pattern is disrupted due to the glazing of the balcony. An unglazed balcony has much more leaks than a loggia. This means it has better air flow. We are used to thinking that the penetration of outside air into an apartment is definitely bad, but this is not always true. If you are concerned about glazing your balcony, you will have to think about organizing an additional inflow. In a good way, it is worth recalculating the ventilation system in the apartment, but all that the designers can advise you in this case is to install a check valve on the ventilation grille and organize an additional inflow: you can do it yourself.
Here is the whole heap of disadvantages that comes with arranging a living space on the balcony. It is also worth adding the cost of insulation here. If you are concerned about heating the loggia, then you need to understand that the balcony building structures were not originally designed to retain heat. To select the correct insulation, it is better to hire a specialist, since the planned thickness of the material depends on a fairly large number of parameters. And insulation, moreover, has the concept of a critical thickness, after which the thermal parameters of the material begin to deteriorate.