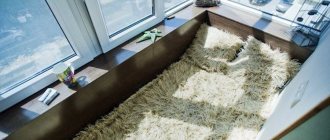
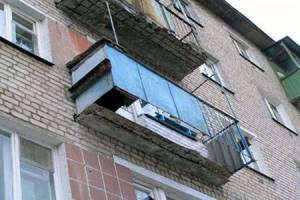
You can expand the usable space of any apartment by using a loggia or balcony. Initially, such structures were not intended for year-round use, so the temperature regime in them seriously depends on external weather conditions. That is why, to make full use of this space, it is necessary to take care of insulating the loggia or balcony.
The basic thermal insulation schemes of both design options differ little. The main differences lie in the need to construct a frame wall for balconies that do not have a permanent external fence, and to insulate the parapet for loggias that are bounded on all sides by concrete structures.
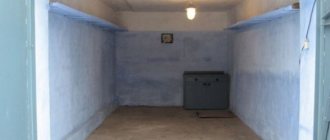
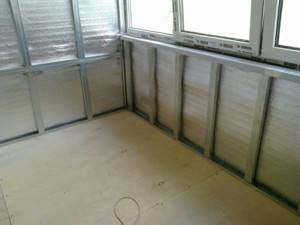
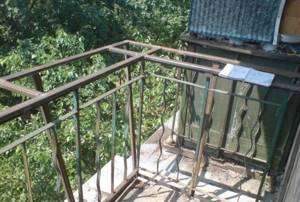
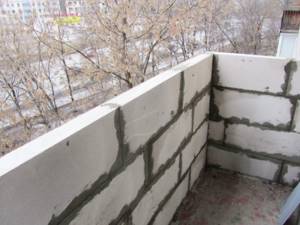
Balcony parapet cladding
After creating the fence structure, the next step is preparing it for cladding. To do this, a wooden sheathing is made on top of the metal frames and foam block masonry. If necessary, insulation is attached to it, only then finishing materials. The sheathing bars should be up to 3 cm wide, they are fastened with dowels. Lathing is needed to level the surface before attaching facing materials. Work begins with the side walls. It is advisable to impregnate the bars with antifungal protection.
Dimensions of vertical posts for lining: from 40x40 to 50x50, they are mounted with a certain pitch (up to 50 cm) over the entire surface of the barrier structure and must be installed in the corners. Cross members are made in sizes from 20x40 to 30x50. Insulation or sound insulation is placed in the gaps of the sheathing. If necessary, you can lay an electrical cord in the sheathing.
If you need internal insulation of a balcony parapet with a metal frame, you can do it:
- polystyrene foam;
- penoplex;
- mineral wool;
- foil polyethylene foam (penofol).
Sheets of insulation are attached between the sheathing beams and covered with waterproofing material on top. The seams are sealed with metal film. The insulation of the loggia parapet is done in the process of warm glazing of the balcony. Only after this are the frames and window sill installed and the slopes attached.
Finishing the parapet inside the balcony
The main stages of interior finishing of a block parapet:
- installation of moisture protection;
- installation of sheathing; fastening of finishing materials.
First, a vapor-tight waterproofing material is laid. For this, it is better to use rolled penofol. It is attached to the plastered masonry with self-tapping screws. Then a wooden beam is attached horizontally at the bottom and top of the fence along the entire perimeter, and vertical wooden sheathing strips are placed on it in increments of 40 to 60 cm.
The insulation is cut to the width of the step and inserted between the vertical beams along the entire perimeter. The seams are sealed with polyurethane foam. The top of the insulation is covered with plywood, gypsum board or PVC panels. The finishing material is laid end-to-end and secured with self-tapping screws to the sheathing beams.
This design of the inner side of the under-rail space gives the balcony a finished look and serves as additional heat protection. It is better not to use heavy building materials for these purposes. Euro-lining is considered the most decorative and environmentally friendly finish.
Parapet sheathing from the street side. The most effective way
If the parapet is made of brick or gas blocks, there are no problems with the cladding: the cladding is immediately attached to the masonry using long screws or dowels.
Metal structures require preliminary lathing. To do this, the support strip is attached to the railing for subsequent glazing. Sheathing posts are attached to it in 60 cm increments. To install siding, first fix the guides and the starting strip: for a horizontal assembly of panels - the bottom one, for a vertical assembly - the side one.
Then the first 3 profiles are installed and secured with self-tapping screws. Work continues along the entire perimeter. If the parapet requires insulation, the sheets are laid between the metal structure and the finishing on the outside. Then all voids are foamed from the inside.
Another layer of insulation is laid on the inside. It is attached to the sheets already installed on the outside with special mushrooms. Vapor barrier is not done in case of double insulation.
Tree
Most often, cracks in wooden cladding are formed due to the influence of various environmental factors - in particular, humidity and subsequent drying out under direct sunlight.
If such a problem occurs on your balcony, we recommend working with the entire surface first to prevent problems from occurring in the future. Here is a complete list of factors that affect the condition of the boards:
- insects (wood-boring beetles);
- high humidity;
- temperature changes.
The casing should be protected from all this, otherwise it will later turn into a collection of patches. The simplest way is a three-stage scheme.
First, treat all the wood with a special antiseptic that will protect the sheathing from insects and rot. Then let it dry completely, then apply a finishing coat with varnish or paint.
However, instead of the last two methods, you can use stain by saturating the boards with it. If you still decide to finish with varnish or paint, then leave this stage for last, do it after fixing the defects, which we will talk about now.
So, what can we use to repair wood paneling? Polyurethane foam is no longer needed for the same reasons that we gave in the case of plastic.
Wood is a fairly soft material. Of course, stronger than plastic, but also subject to deformation. Not only can the gap itself widen, but also the windows and doors will no longer close normally due to the displacement.
So let's put the foam aside until better times and turn our attention to ordinary factory putty. The work ahead of us is even simpler than in the case of plastic.
We thoroughly clean the gap, removing dirt, debris, dust and rotten, crumbling parts.
We fill the resulting hole with factory putty. The optimal tool for this is a spatula. The putty must be applied carefully; it should properly fill even the smallest bends of the crack. In this case, you should avoid protruding excess, so do not forget to constantly level the surface with a spatula.
After the work is done, we wait for the putty to dry. The approximate drying time is usually indicated on the packaging.
After drying, sand it. To get the most accurate result, we recommend that you first take a large sandpaper for this, and then a very fine one, then the surface will be perfectly smooth.
We complete the procedure with finishing - varnish or paint. At this stage, you can cover the repaired areas simultaneously with the entire sheathing.
If the boards we repair are not the internal lining, but the material from which the balcony railing is made, then it is advisable to take care of its outer side. After all, the outer part of the putty crack will be exposed to rain, and therefore the putty will collapse quite quickly.
So, if you can safely reach the desired area, treat the outside with something waterproof. But, if there is even the slightest danger, then it is better to hire a specialized team to completely cover the outside of the balcony with something like siding. Then no humidity will harm the balcony railing.
Internal insulation
When carrying out work from inside the room, all elements of the balcony or loggia are protected from heat loss, with special attention paid to external enclosing structures and walls adjacent to the street or technical premises. To protect the loggia premises from heat loss, it is necessary to perform the following blocks of work:
To protect the loggia premises from heat loss, it is necessary to perform the following blocks of work:
- if necessary, replace old glazing with new double-glazed windows or wooden structures;
- seal all defects and cracks in external enclosing structures;
- waterproof the walls, parapet, floor and ceiling, as well as the frame external wall for the balcony;
- lay insulation on all walls, floor and ceiling surfaces;
- attach an additional layer of vapor barrier;
- complete the final finishing of the room.
All types of work do not require special professional training, so anyone can insulate their balcony or loggia on their own.
Basic thermal insulation schemes
Regardless of the type of structure, protecting it from heat loss can be done in two ways:
- from inside the premises;
- from the outside of the house.
The first option involves installing waterproofing, laying a layer of insulation and interior finishing of the entire space of the balcony or loggia. In this case, you can carry out the entire complex of work yourself.
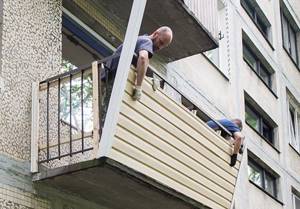
Insulation from the outside is most often carried out in the presence of a concrete parapet. Starting from the second floor of the house, such work can only be performed with a special permit in the field of industrial mountaineering. External thermal insulation can only be carried out by experienced specialists in compliance with all safety regulations.
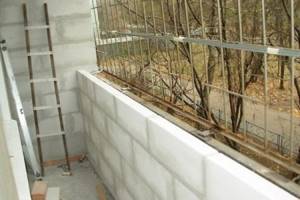
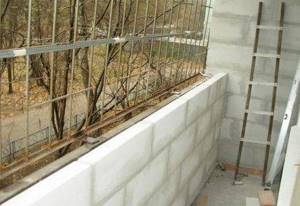
Strengthening the balcony parapet with foam blocks
Strengthening the parapet on the balcony can be made of foam block, which has the following characteristics:
- high strength;
- thermal insulation;
- soundproofing;
- fire resistance;
- durability;
- environmentally friendly.
This material is lightweight and easy to cut, so you can strengthen the balcony railing with foam blocks yourself. To do this you will need:
- foam blocks 70-100 mm wide;
- adhesive composition for blocks;
- plaster mixture;
- primer;
- waterproofing material;
- iron rods;
- fittings;
- galvanized mesh;
- Bulgarian;
- circular saw or hacksaw;
- perforator;
- propane torch;
- hammer;
- putty knife;
- plumb line;
- level.
The following procedure is performed:
- Taking measurements of fencing and window openings. The new fence should be 10-15 cm higher than the previous one, this is necessary for installing a drainage system. In a 10-story building its height should be at least 1 m, in a taller building - at least 1.1 m.
- If the screed is of poor quality, it is removed and then a new one is poured.
- The adhesive waterproofing material is spread. To do this you will need a propane torch. Sometimes waterproofing is not carried out. Instead, a U-shaped aluminum channel is laid around the perimeter of the balcony. It is fixed with cement mortar and screwed with dowels. The bottom row of foam block is laid out in this profile.
- The required number of blocks is calculated. If the result is not a whole number of rows, but for example 3.5, then the blocks are cut to the required size and used for the first row, and they are laid with the cut side down.
- Foam blocks are laid along the edge of the balcony slab parallel to the old parapet. The distance between the old and new fencing should be minimal, then there will be more usable area on the balcony. However, you can make a larger gap and place insulation in the gap. The solution for foam blocks is applied with a spatula. When laying, use a plumb line and level.
- Reinforcement and iron rods must be driven into the junction of the wall and the foam block masonry so that one end is in the wall and the other is located exactly on the horizontal masonry seam.
- Foam blocks are laid “in a run” on a special masonry mortar.
- The masonry is reinforced with galvanized mesh with a wire diameter of 3 mm.
- During the construction of a parapet on a loggia or balcony, the foam blocks are primed with a primer designed for porous materials. Then they are plastered outside and inside with facade plaster.
- The previous point can be omitted if the foam block parapet is immediately sheathed and glazed.
Strengthening Tips
It is necessary to take a decision from the relevant authorities. All independent work related to changing the appearance of the house entails administrative responsibility. It is worth knowing that if the fastenings are chosen incorrectly, the structure may collapse.
Once you have decided on the type of house, you can get to work.
It is very important to follow several rules that will give effective results. For example, when glazing the balcony part receives additional load, so it is important to strengthen it. This can be done in different ways
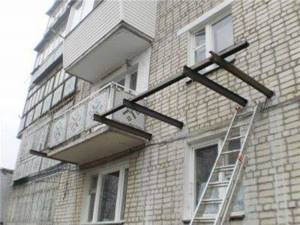
First of all, we need to create new support points:
- The first option involves installing supports from below. However, this method is suitable when the balcony is not high. To do this, you need to agree with your neighbors so that they do not complain about you when a similar structure is located in front of their windows. With this method of strengthening, 2 supporting metal structures are used in the lower part, which are concreted in the ground and support the balcony like columns. The supports are best secured using special brackets or screws.
The second method is fixation from above, much more convenient than the first. To do this, you need to drill 2 holes through the wall above the balcony (on both sides) and install strong metal rods (anchors, bolts) or special hooks. If they have threads, then they are secured with nuts and small plates, otherwise they must be concreted on both sides. The part protruding outwards serves to support balconies, which are suspended, for example, with chains.
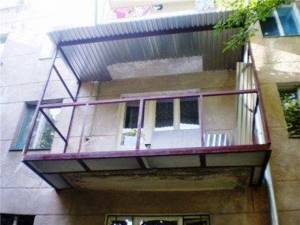
If the additional structure is outdated, its parapet needs to be strengthened. Metal structures are the best help in this matter. You need to weld a triangular frame, which needs to be attached as rigidly as possible to the wall of the apartment. This option is universal for all loggias, even the oldest.
By using a foam block, you can not only strengthen it, but also insulate the room, but this increases the weight of the structure, which will put pressure on the base of the balcony. Because of this, the method is not suitable for old and narrow balconies.
There is another option for fastening using T-beams. It is very suitable for updating old premises that are in danger of demolition, but you must know exactly the height of the ceiling:
- First you need to cut off the old slab.
- Drill out 1 m long recesses in the floor at 1.5-2 tee heights, if the ceiling allows. Don't forget that there are neighbors below you, and they need a ceiling. It is necessary to make 3-4 such grooves.
- Next, holes are knocked out in the wall.
- Metal rails (brands) 3 m long are passed through them. 1 m remains in the apartment, and the remaining 2 in the outer part.
- Build formwork on the floor and on the protruding part of the rails and fill it with concrete mixture. The level of the slab and the load-bearing covering of the house must completely match.
- Then the frame of the fence is welded from the corners.
- You can build a loggia, decorate and insulate it using special materials.
It is important to know how to properly strengthen it so as not to compromise the integrity of the building and not endanger those who go out onto the balcony. If you realize that you are unable to carry out repairs yourself, contact the experts for help.
Insulation
It is very pleasant to enjoy comfort both in summer and in winter. But in order for the use of the balcony to be possible at any time of the year, it must be insulated for the winter. Moreover, such measures will limit the access of cold directly into the apartment itself and keep it warm for a longer period.
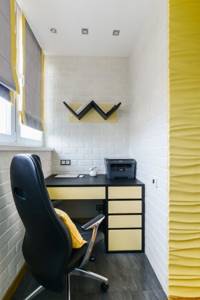
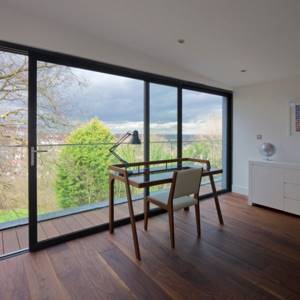
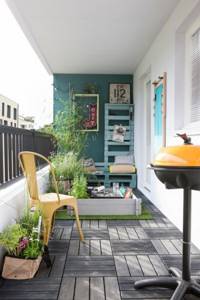
Stylish work area on the balcony
Insulation can be carried out both from the inside and from the outside, depending on what types of finishing will be used later. If you plan to sheathe the parapet from the outside, then between it and the sheets used, you can insert insulation inside the frame. The same can be done inside. Today there is a wide range of thermal insulation on the market.
Based on their composition, thermal insulation materials can be divided into three types:
organic; inorganic; mixed.
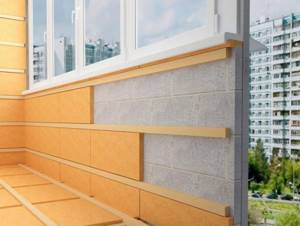
External wall insulation scheme
Foil will help create reflective insulation
Experts recommend the following most popular options for insulating a balcony:
Glass wool is affordable, easy to purchase at any hardware store, and has a service life of up to 15 years. Among the disadvantages, we can note the complexity of installation associated with the special structure of the material. It can cause severe irritation if it comes into contact with exposed areas of the body.
When installing glass wool, it is necessary to use protective equipment
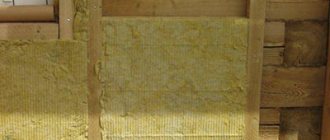
Basalt fiber is a type of mineral wool. For its production, basalt is used as a base, which ensures its environmental safety. But among the main advantages, fire resistance is highlighted. It can also easily withstand a wide range of temperature changes.

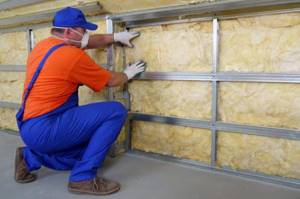
Installation of mineral wool
- Polyethylene is a fairly expensive material. It is best to place it under foil, creating reflective thermal insulation.
- Polystyrene foam is the most affordable and one of the most durable materials. Some manufacturers guarantee its service life up to 30 years. However, it has a high fire hazard. Taking into account the functionality of the balcony, this factor is not so significant.
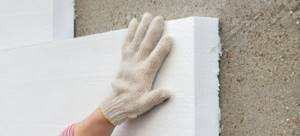
Insulation using foam plastic
The use of foam boards for thermal insulation helps to avoid “cold bridges”
This is not the entire list of thermal insulation options. Your choice may be determined by factors such as price, durability and ease of installation.
https://youtube.com/watch?v=YKO00flP1tA
Laying out the floor on a concrete slab
A repaired or restored slab becomes a reliable base for a balcony floor. It’s just not advisable to level the outer slope of the slab using a concrete screed - excess weight load on the slab is undesirable. The slope is concealed by the use of wedge-shaped logs. They are laid with the high side facing the parapet. The result is a horizontal base for the subfloor. Now, in the case of the provided insulation of the slab, it’s time to lay foam plastic or aluminized padding polyester between the lags. After this, you can put a rough pillow and lay a laminate floor or other decorative finish over it.
Important! Mineral wool should be excluded from the possible options for selecting insulation for the floor and walls under glazing along the perimeter of the parapet. It quickly becomes saturated with moisture, as it shifts the dew point towards itself
The result is that it creates additional load on the slab, loses its geometric shape and falls off, and ceases to serve as insulation.
This material will help in performing simple cosmetic and restoration work. When contacting specialists to determine the scope of work ahead and select methods for solving existing problems, it will be useful to communicate with them in the same “language.”
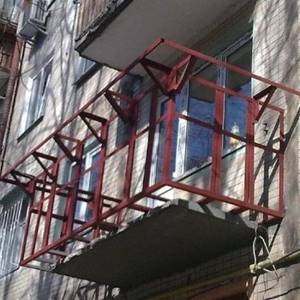
Strengthening the parapet with metal structures
This method of reinforcement is used if you plan to leave the balcony open or make cold glazing. The complexity and type of reinforcing metal structure depends on the goals of the event. So, if you just need to strengthen an old metal fence that can no longer withstand wind loads, it is enough to do the following work:
- Prepare new vertical supports.
- Attach them to the concrete slab through the corners and weld them to the existing parapet.
- Place horizontal railings on top of the supports and also weld them.
If glazing is installed on the new fence, you need to first weld a more complex structure, possibly extending it beyond the main perimeter of the balcony. Then fasten it to the slab and the outer wall, weld it to the old parapet.
How to seal cracks in concrete balcony walls
Probably everyone understands that the strength of concrete walls, floors and fences is extremely important for the operation of the balcony to be safe. Therefore, any crack or gap formed in concrete requires immediate attention.
To seal the cracks in the balcony walls, prepare the surface by removing all dirt and crumbled concrete, wash the crack, dry it, and then use a waterproofing material. It is best to use cement mortar to seal the crack, which hardens quickly.
What to make a parapet on a balcony from
As we said earlier, fences can be made of different materials: wood, metal, brick, aerated concrete block, etc. Let's consider each of the possible options.
Tree

For those who are interested in wooden fences for balconies, they are much easier to buy and install (of course, if you do not have experience in welding), but you should know that wood is unreliable. When exposed to the atmosphere, the material loses strength. Therefore, wooden parapets cannot be used for subsequent glazing.
Metal
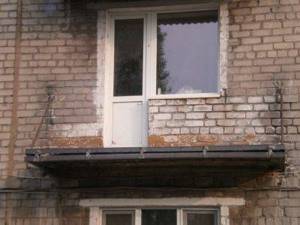
Metal structures for fencing balconies are the most reliable material.
If you are planning to install a balcony fence without subsequent glazing, then you can choose a forged metal structure as a parapet. This option will give the balcony individuality. Can be sold in any size for different designs.
It is worth noting that the forged parapet is mounted to the wall of the house and the external slab using anchors.
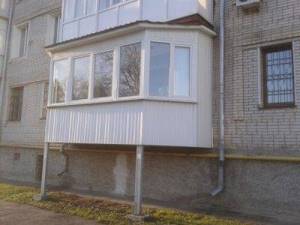
If you plan to glaze the balcony, you should choose a welded metal fence. The structure is assembled from several elements and secured with anchors. From the outside, such a parapet can be covered with siding, corrugated sheets or other material for external work.
Brick or foam blocks
Heavy fencing made of bricks or aerated concrete blocks is not suitable for remote balcony slabs, although there are craftsmen who want to insulate a balcony and load the slab to its fullest. The material is used only when installing parapets on loggias.
Concrete ceiling repair
What does the presence of cracks in the ceiling threaten us with?
Firstly, this is a sign of damage to the concrete slab, which in itself is dangerous. If you do not address this issue, then the ceiling will simply collapse one day. And you will be very lucky if there is no one on the balcony at that time. Secondly, the presence of cracks in the ceiling is always fraught with leaks. This question is especially relevant if your upstairs neighbors have not bothered to glaze their balcony. After all, then all the precipitation falling on it penetrates through the gap in the floor to you.
As you know, an uninvited guest is worse than a Tatar. And when the guest is a stream of water from the ceiling, accompanied by a retinue of mold and rot forming in the corners, such a party does not inspire enthusiasm at all. Unfortunately, to cope with this problem, you will have to work not only with yours, but also with your neighbor’s balcony, and simply covering up the problem areas will not get rid of it.
In a good way, if water flows to you from your neighbors, then they should be the ones who should be involved in restoring the concrete floor. So try to communicate with the owners of the upper apartment first. If they categorically refuse, you can file a claim with the organization servicing the house.
So, if there are cracks in the ceiling, you will have to completely restore the slab. You may ask why you can’t just cover the damaged areas on the side of your balcony with the same cement. Let's explain.
Even if there is no damage on your part, it will still remain on your neighbor’s floor. Any sediment will end up in these cracks. The water that gets there will periodically freeze to ice, while expanding and destroying the concrete surrounding it.
That is, even small existing cracks will increase, and, in the end, the collapse of the concrete floor will only be a matter of time, and not for long. In addition, more and more leaks will form in such slabs, so water, in any case, will find its way to the surface of your ceiling.
To prevent all this from happening, we need to bring the entire slab into proper condition, without wasting money on repairing individual areas. And we will start with preparation. As is already clear, the work is being carried out on the balcony of the neighbors above.
If there is a covering on the floor, remove it.
We also remove all concrete screed in those places where it has crumbled. We remove both crumbs and large pieces that are held unsteadily.
We clean the line where the ceiling meets the wall of the house.
All defects found on the cleaned slab - depressions, cracks and crevices - are carefully filled with cement mortar. During the process, do not forget to thoroughly level the floor surface. As a result, you should get a monolithic surface without potholes, bumps and other differences.
We wait for the cement mortar to dry completely and proceed to the main steps.
First you need to carry out the procedure of waterproofing the floor. You will need a special mastic (bitumen-polymer, coating or painting), which contains rubber and rubber components.
Instead, you can take a polymer material based on synthetic rubber, as well as plaster insulation. A layer of the selected material is applied to the entire surface of the slab. You should get several layers, with each subsequent one applied only after the previous one has completely dried. Waterproofing should cover the floor properly, as well as all walls to a height of 15 centimeters.
When the last waterproofing layer has dried, fill the floor with cement screed. Moreover, its layer should be thicker near the wall of the house and thinner near the balcony railing. Thus, we artificially create a slight slope of the floor surface, and subsequently the water falling on it will successfully drain out.
We slightly moisten the dried screed and treat it with a special waterproofing compound. For this purpose, for example, “Penetron” or “Skrepa” are suitable. Such waterproofing agents are absorbed as much as possible into all microscopic pores, then crystallize there, thereby filling the voids. After this procedure, moisture will definitely not be able to get into the updated ceiling.
In this way, it is necessary to treat not only the surface of the floor, but also the end part of the slab, in order to completely eliminate the possibility of moisture getting into the pores of the floor.
The work on the neighbor's balcony is finally completed. Now we can set about ours with peace of mind. Everything is simpler here: we fill the cracks in the ceiling with mounting foam or cement mortar, after drying we apply a waterproofing compound, and then you can begin insulation or finishing.
So we figured out our topic. Finally, we would like to draw your attention to this. For some reason, many people prefer to deal with cracks in a very simple way: they simply sheathe the inside of the balcony with some nice moisture-resistant material. That is, they act on the principle “if a problem is not visible, then it does not exist.”
But what is the result? The cracks haven't gone away. Yes, the wind no longer gets inside the balcony, and, at first glance, the goal has been achieved. In fact, during any precipitation, water somehow gets into the cracks from the outside, thereby gradually destroying the balcony railing.
In addition, through the through cracks, moisture reaches the back side of the skin. And there the development of mold, fungi and rot begins. As a result, you will still get a terrible appearance of the room, and as a bonus - a moldy, half-collapsed fence. So take your time and do everything right right away. Then the balcony will delight you for a very, very long time.
Source: seberemont.ru/kak-i-chem-zadelat-shheli-na-balkone/
A modern person, living in a city apartment in an apartment building, sooner or later thinks about glazing his balcony or loggia, if of course there is one.
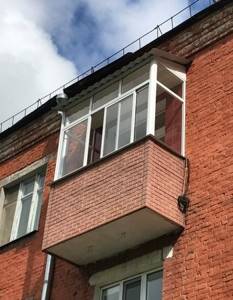
Thanks to the balcony, you can make your apartment larger by several square meters, which, with proper organization of glazing and finishing, can become quite full meters of living space. How to glaze a balcony in accordance with modern rules
In this article we will look at one of the common questions faced by owners who decide to glaze their balcony with their own hands.
How to seal the gaps on the balcony between the parapet and the concrete interfloor ceiling? A parapet is a protective fence, usually made of a welded metal structure, which limits the space of the balcony. These can be undecorated rods with railings or with an additional screen.
The balcony fencing is located at some distance from the slab - the balcony floor. This design is made for the natural outflow of water and other precipitation if it gets onto the balcony.
When glazing a balcony, when lightweight window structures are installed directly on the fence, this gap becomes optional, since the balcony space will be protected from external precipitation by the glazing system. What is the best way to seal it?
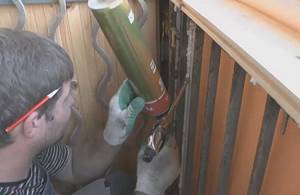
One of the most common ways to seal the gap between the fence and the balcony slab is foaming.
To do this you will need: a cylinder of polyurethane foam (1 or 2, depending on the width of the gap and its length), waterproofing vapor-permeable material (for external insulation of the foam seam), waterproofing vapor-proof material (for sealing the inner surface of the foam seam).
The process of sealing the opening in stages:
- The gap is sealed with a vapor-permeable moisture-proofing layer. This can be a special insulating tape (similar to that used for installing windows and other building structures) or any other material with the necessary characteristics.
- Foaming is carried out into the gap thus isolated. Make sure that the foam is distributed evenly, filling all the voids.
- On top of the foam, after it is covered with a hardened crust, install a layer of vapor barrier.
Source: remontokon24.ru/pr_zadelat-shell-na-balkone.html
The main stages when installing thermal insulation from the inside
Work on insulating walls, floors and ceilings is carried out after installing new glazing. If the balcony or loggia is already covered with metal-plastic or other modern double-glazed windows, then the integrity of the layer of polyurethane foam and sealants applied during installation is checked once again.
Surface preparation
The loggia parapet is carefully inspected to identify cracks and defects. To achieve minimal heat loss, as well as protect the structure from waterlogging, it is necessary to carefully seal all cracks with polyurethane sealant or polyurethane foam.
Additionally, all seams between the parapet, walls and floor are processed. The surface of the walls bordering the street is also inspected. It is necessary to protect all structures as much as possible from moisture penetration and heat loss through cracks and defects.
Waterproofing device
After eliminating identified cracks and defects, it is necessary to protect the surfaces of the room from external moisture. To do this, the inside of the balcony or loggia is completely covered with waterproofing films. The membranes are attached with an overlap, overlapping adjacent sheets by 5 - 10 cm and gluing all seams with protective tape.

When using polyurethane foam or extruded polystyrene foam, the waterproofing layer does not need to be laid. The low permeability of the materials will not allow moisture to penetrate the body of the insulation.
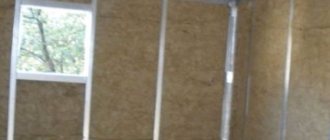
Laying insulation
After preparation is completed, the walls, ceiling and floor of the loggia or balcony are covered with thermal insulation materials. Rigid slabs are attached to concrete or brickwork using disc-shaped polymer dowels. The distance between individual fasteners should not exceed 40 cm. Most often, five dowels are used for one standard plate.
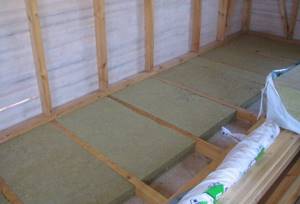
The joints between the sheets are additionally insulated with toluene-free polyurethane foam. All winter versions of such materials may contain toluene, but its use is unacceptable due to the negative effect on polystyrene.
Vapor barrier device
After laying the insulation, all structures are covered with a vapor barrier. For these purposes, it is best to use special polymer membranes or foamed polyethylene. The presence of a thin layer of foil on the inner surface of the material will help create the effect of a thermos and additionally protect the room from heat loss.
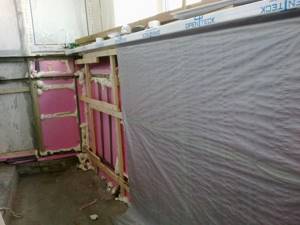
The vapor barrier can be fixed using polyurethane glue. All joints are also made with an overlap of 5–10 cm and taped with waterproofing tape.
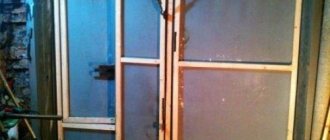
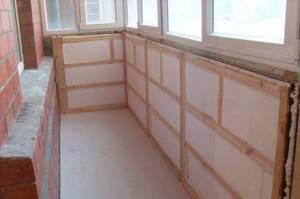
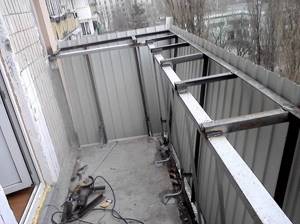
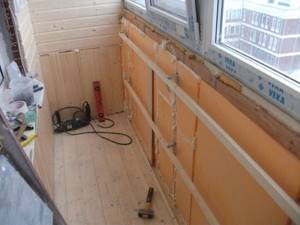
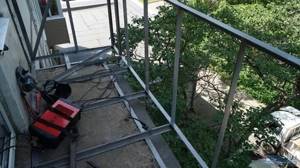
Frame installation and sheathing
After the main protective layers have been assembled, a frame is installed from wooden blocks of 40x20 mm or 50x25 mm for attaching the finishing material. Sometimes a metal profile 60x27 mm is used instead of wood.
The sheathing guides are fastened only after the elements have been leveled. For fixation, self-tapping screws are used, the length of which allows you to attach a beam or profile directly to a concrete or brick base. The location of the frame is determined based on the selected material.
So, for drywall it is better to set vertical guides, and for plastic panels - horizontal. The distance between the guides should not exceed 40 cm. After installing the frame, the walls, ceiling and floor are sheathed with the selected finishing material.
Insulating a balcony or loggia will allow you to expand the useful space of the apartment and get an excellent office or relaxation room.
Required materials and tools
In fact, independent insulation of a balcony or loggia does not require special professional equipment. To carry out all work you will need:
- drill or screwdriver with impact bit;
- grinder for working with metal profiles;
- gun for sealants and foams;
- tape measure, marking pencil, construction knife.
Supplies you will need:
- wooden blocks or metal guides for the frame;
- various types of self-tapping screws;
- disc-shaped dowels for fastening rigid insulation;
- waterproofing film and vapor-permeable membrane;
- selected insulation in the required quantity;
- polyurethane or silicone sealant and polyurethane foam;
- any finishing material to cover the room.
Standard sets of screwdrivers, pliers and other small tools that any owner definitely has can be useful in the work.
In addition, when constructing the frame, you will need a liquid or laser level to align the guides.
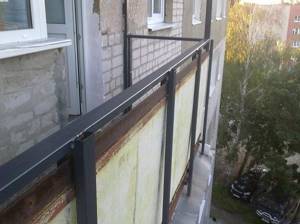
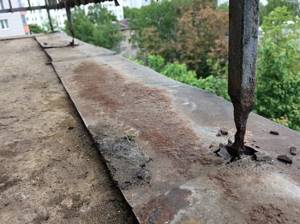
Insulation of a metal profile on a parapet
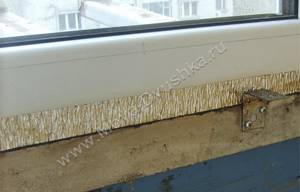
So, first of all, I had to solve a problem known and discussed in many forums on loggia insulation, namely: what to do with the U-shaped profile, which is installed on top of the brickwork and is intended to strengthen it, and its second function is the “railing” function "
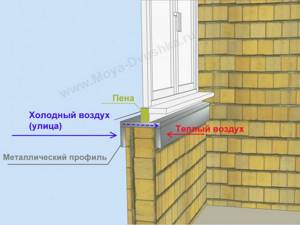
First, about the essence of the problem: such a profile faces the street with one side, and the other faces the inside of the room and, as a result, it is a cold bridge.
The figure below shows that cold air from the street cools the metal profile and penetrates into the room through this cold bridge. Moreover, frost forms on the surface of the metal at negative temperatures, and condensation forms at cold but positive temperatures, since a “dew point” appears on its surface. Thus, due to the impossibility of raising the temperature of the profile, it is necessary to protect its surface from warm air and move the dew point inside the insulation.
Moreover, another subtlety was added: this profile is the basis for installing the corners of the window sill, which further complicates the task.
Since it was not possible to remove the profile due to the fact that glazed frames were already installed on top, and simply put, the loggia was glazed, we had to twist and get out of the situation.
Metal profile on the parapet
Having thought a little, I pasted over the entire internal part of the profile, located indoors, with isofol (penofol or analogues). Since it does not adhere well, I used bitumen mastic to fix the polyethylene foam - the main part of isofol. This choice was ensured, firstly, by the fact that bitumen mastic will reduce corrosion of the profile, secondly, during subsequent steps, the isofol layer will be additionally fixed with mechanical fasteners, and thirdly, I already had such mastic left over from sealing the seams... so something like “he has a lot of this shoe polish.”
Here, by the way, it is worth paying attention to two things: firstly, before pasting, the corners for attaching the window sill must already be screwed in and leveled, and secondly, all joints, cracks and corners of the isofol must be sealed with aluminum tape. This is necessary so that warm air from the room does not penetrate through the cracks to the cold surface of the U-shaped profile
Otherwise, frost or condensation will begin to form under the isofol layer.
And one more thing I read on the forums. The fact is that one of the coldest places when glazing is the plastic spacer profile under the windows. Since it is hollow inside, I drilled it every 20cm and foamed it inside - this gives additional insulation and reduces the penetration of cold. After that, just in case, I also covered it with isofol, naturally gluing the joints with aluminum tape. Since I read this a little later, I frothed it at the next stages, but it’s worth doing this right now or almost at the very beginning.
In the photo below you can clearly see a metal U-shaped profile lying on a brick parapet painted blue. The stand profile is covered with isofol. The profile has a corner for fastening the window sill.
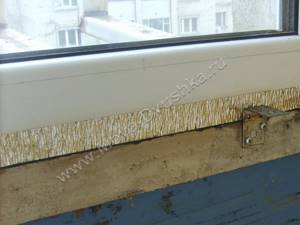
Profile on a brick parapet with a corner for a window sill.
The first winter quickly revealed shortcomings and cold spots - cold bridges (the spacer profile has not yet been foamed, but the parapet is insulated with EPS - more on that later).
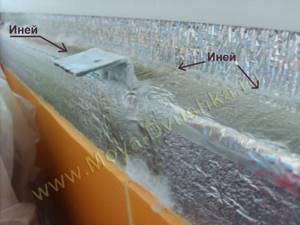
Frost on the railing
As a matter of fact, I had no doubt that the corners under the window sill would freeze at sub-zero temperatures, because they are the remaining bridges of cold. Subsequently, I solved this problem, but already at the stage of installing EPS boards and drywall
The photo also shows that the unsealed seam between the vertical part of the isofol (along the spacer profile) and the horizontal part (along the U-shaped profile) produces frost at the joint, so I would like to draw your attention once again: the seams must be sealed with aluminum tape
Thus, having partially insulated, or rather fenced off the U-shaped metal railings of the parapet from the internal atmosphere of the room with izfol (or its analogues), sealed its seams and joints, I moved on to the next part of the parapet insulation, namely pasting with extruded polystyrene foam slabs.
Concrete
Concrete is a solid thing, so we decided to divide the description of work with it into three parts.
First, let's talk about how to seal small cracks. For this we will need either ordinary cement mortar or polyurethane foam. For those who are new to repairs, we will tell you about the last resort in more detail.
Polyurethane foam consists of a polyol and an isocyanate, which form polyurethane foam at the output. This substance is distinguished by its strength, water resistance and other excellent insulating and sealing properties.
When choosing foam, pay attention to several indicators:
- household or professional - the first option is quite suitable for your purposes, since its use does not require special skill;
- temperature conditions suitable for use. On each cylinder you can find indicators and seasonal purpose. For example, summer foam can be used in the range from 5 to 35 degrees above zero, winter foam - from 10 to 35 below zero, all-season foam - from -10 to +35°C. Please note that the specified temperature is only necessary for the actual work. Once dry, the foam will withstand almost any conditions. But while it is in a liquid state, you should pay attention to the above indicators;
- shelf life and absence of deformation of the cylinder.
It is clear that an expired product may give a completely different effect than you expect. A dented cylinder indicates a mechanical impact on it, as a result of which a chemical reaction could begin, and as a result the foam has already hardened. In general, pay attention even to such banal things.
So, let's get down to minor repair work.
As in the case of plastic and wood, we thoroughly clean the gap. Garbage, dirt, crumbled concrete - all this must be eliminated.
If after cleaning the edges of the crack are wet, wait until they dry completely.
Now we treat the gap inside and along the edges with a deep penetration primer. This will help strengthen the concrete and prevent its subsequent destruction under the influence of external factors.
We are waiting for the primer to dry completely.
Fill the gap with foam. Remember that it will gradually expand. For this reason, the hole should be filled to a maximum of two-thirds. As it expands, the foam will successfully penetrate even small pores and cover the entire volume of the cavity being repaired.
Now you need to wait for it to harden. On average, this takes about a day. After this time, we cut off the excess foam that has protruded above the crack. To do this, you will need a sharp knife; you can take either a household knife or a stationery knife.
Next, the repaired surface should be painted or filled with liquid cement. Our goal in this case is to protect the sealant from exposure to sunlight, since it affects its integrity.
If the crack was initially very small, then you don’t have to bother with polyurethane foam, but get by with regular cement. Apply it with a spatula, smooth the surface and wait until it dries.
Analysis of the condition of the balcony
Before carrying out work on installing double-glazed windows, you should carefully inspect the balcony and determine its technical condition. In older houses, quite often the concrete slab is in poor condition. It is a common property of the house, so you cannot decide on your own whether it will withstand the weight of the reinforced parapet. This requires an expert diagnostic examination conducted by the Housing Office commission.
The fence on which the double-glazed window will be installed must have the following characteristics:
- Strength. The approximate weight of a single-chamber double-glazed window is 23-25 kg/m2, and a double-chamber one – 35-37 kg/m2. With a known glazing quadrature, it is very easy to calculate the load per linear meter of fencing.
- Sufficiently wide width. In addition to the plastic double-glazed window, an external ebb and possibly a window sill will be installed on it.
Subtleties of finishing
After the complex of works on insulating the external and internal parts of the loggia is completed, the time comes for finishing, a strategically important stage in the arrangement of these premises, on which its external attractiveness and comfort will directly depend.
The range of materials that can be used for the design and decoration of an insulated loggia is very diverse. These include:
- Wooden lining . Its advantages: ease of installation, combined with an attractive appearance, reliability and durability. However, this material requires periodic treatment with antiseptics to prevent rotting processes.
- PVC panels . They have a long service life, weigh little and are very inexpensive. At the same time, they have excellent technical characteristics. Disadvantage: poor tolerance to sudden temperature changes and susceptibility to mechanical stress.
- MDF panels . Very decorative and attractive. Negative point: insufficient strength, poor moisture tolerance and high flammability.
- Moisture-resistant drywall . Easy to install, environmentally friendly and non-toxic. It hides wall defects well and has a very low cost. Disadvantages: quite fragile, does not tolerate excess moisture well, requires additional finishing.
Strengthening the parapet with foam blocks
Foam blocks are an easy-to-use and relatively lightweight material with low thermal conductivity and hygroscopicity. For the construction of balcony railings, it is recommended to use grades D600 – D700. The work is carried out using the following technology:
- Clean the base of the stove from foreign objects, dust and dirt.
- If necessary, refill the screed. Lay a layer of waterproofing.
- Mark the location of the masonry.
- Take measurements of the fence. Calculate the required number of blocks. If the number of rows turns out to be fractional, then the trimmed row should be laid out first - this way the sections will be protected from moisture, which means the structure will last a long time.
- Along the line of reinforcement construction, a U-shaped profile is rigidly mounted as a mortgage. You can lay a layer of insulation between the old and new fencing, but this will reduce the usable area of the balcony.
- Lay out the first row of blocks, coating the bottom and side edges with mortar. Pieces of galvanized mesh are placed in the first and subsequent horizontal seams so that they connect adjacent blocks - this is how the structure is reinforced.
- Lay out the next rows of blocks with offset. Move the trimmed parts to the corners. Check the evenness of the masonry periodically with a plumb line and level. The side walls of the parapet attract the wall of the house. To do this, after each row, one end of the reinforcing rod is hammered into the wall, and the other is fixed in the seam with mortar.
- As they are erected, the blocks are impregnated with primer on the outside and inside.
Video instruction:
https://youtube.com/watch?v=jjcKtJbFPsY
Bricklaying is carried out using a similar technology. It should be borne in mind that this material is much heavier than foam blocks. In addition, it is capable of absorbing moisture, which further increases the total weight of the brick fence in wet weather. Therefore, in most cases, the use of bricks for the construction of balcony railings is irrational and unprofitable.
What sealants are suitable for balconies?
- Silicone sealants. They adhere perfectly to materials such as wood, glass, aluminum, etc. This allows them to be successfully used to prevent drafts and eliminate cracks.
- Acrylic sealants. They are often used for repairs, as they tolerate temperature fluctuations well, have good elasticity and thermal insulation. This sealant can be painted, it does not emit harmful substances into the atmosphere, and is absolutely safe for health.
- Polyurethane sealant. The balcony can also be sealed with polyurethane sealant; it is characterized by good adhesion and is resistant to various negative weather conditions. Hardens quickly and is suitable for subsequent painting.
- Thiokol sealant. The mixture is highly resistant to weather conditions and hardens after a few hours. Thiokol sealant is considered the most stable and durable. But they use it carefully, observing safety precautions.
In addition to sealing, our industrial climbers can seal panel seams, eliminating leaks. Our specialists adhere to the correct sealing technology, so we guarantee the high quality of the work performed.
Our professionals can handle orders of any complexity. Using modern, reliable equipment, industrial climbers work at heights quickly and accurately. By contacting our company, you can make your balcony more cozy and comfortable, protecting it from noise and dust from the outside, as well as from precipitation.
Don't miss the opportunity to use our balcony sealing services to create a great place to relax with friends or create a beautiful winter garden!
Acrylic
Acrylic sealant, the main component of which is polyacrylate (the more common name is acrylic), is a non-allergenic, non-toxic material, used for internal waterproofing of premises. Such compositions are characterized by high adhesion to concrete, brick, plastics, including PVC, and form an elastic seam that retains this property after polymerization of the substance.
Acrylic is a polymer based on acrylic acid. In addition to sealants, structural plastic, paint, and synthetic fiber are made from it, which, due to its hypoallergenicity, is used to create textiles.
Despite the fact that some manufacturers indicate on the packaging the high moisture resistance of the material, acrylic sealant is rarely used for waterproofing an open balcony or external sealing of balconies and loggias. With constant contact with moisture, acrylic can lose its adhesive properties and peel off from the surface. Therefore, it is not recommended for use in rooms with high humidity.
Technical properties:
- Base: polyacrylate;
- Surface film formation (at 20 °C): 2 hours;
- Full cure (at 20 °C): 48 h;
- Application temperature: from +5 °C to +35 °C;
- Operating temperature: from -40 °C to +80 °C.
Subject to operating conditions, acrylic sealant well seals the joints between a brick wall and a concrete floor
Polyurethane
Polyurethane is used as a substitute for rubber and caoutchouc. It has high elasticity and withstands constant contact with moisture. Two-component polyurethane sealants are especially durable; after curing, they can demonstrate at least a 4-fold elongation when trying to break (in some brands, the elasticity reaches 1000%).
Two-component sealants are a composition of two components (working mass and hardener), which are mixed immediately before waterproofing the object.
Polyurethane has proven itself well in insulating internal and external seams, joints, and roof elements. However, when working, do not forget about the harmful aggressive substances in the material. Use protective equipment.
Technical properties:
- Base: polyurethane;
- Surface film formation (at 20 °C): 1 hour;
- Full cure (at 20 °C): 7 hours;
- Application temperature: from -10 °C to +35 °C;
- Operating temperature: from -60 °C to +80 °C.
The polyurethane composition maintains the tightness of the joint even with significant movement of the structure
Silicone
Silicone sealants, common in the construction industry, consist of a base (silicone rubber), a polymerization catalyst (acetic aldehyde) and various types of fillers (plasticizer, adhesion primer, enhancer, dye). When the sealant comes out, acetaldehyde interacts with air moisture and helps the silicone base harden.
Methods for insulating loggias and balconies
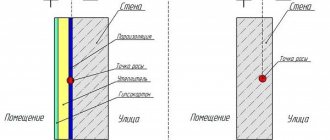
You can expand the usable space of any apartment by using a loggia or balcony. Initially, such structures were not intended for year-round use, so the temperature regime in them seriously depends on external weather conditions. That is why, to make full use of this space, it is necessary to take care of insulating the loggia or balcony.
The basic thermal insulation schemes of both design options differ little. The main differences lie in the need to construct a frame wall for balconies that do not have a permanent external fence, and to insulate the parapet for loggias that are bounded on all sides by concrete structures.
Preliminary work before insulation inside
The optimal option for glazing a well-appointed loggia: the use of 2-3-chamber double-glazed windows made of plastic or the so-called “warm” aluminum profile with a thermal break. The latter can have from three to five air chambers, providing a high level of thermal insulation.
Another important point is the quantity and quality of seals used in window structures, because they are responsible for ensuring that the loggia is warm and comfortable enough. The best sealants are those made from ethylpropylene dimonomer, which are characterized by good elasticity, frost resistance and durability.
Before insulating the loggia from the inside with your own hands, to ensure a sufficient level of thermal insulation, it is very important to carefully treat all joints and crevices using polyurethane foam that does not contain toluene. This component is a component of “winter” polyurethane foams.
Then a layer of waterproofing is laid, to create which various materials are used, including:
— rolled (roofing felt, glassine), which are laid overlapping and glued to the base.
— penetrating type (Penetron, etc.), applied with a brush and roller to a pre-moistened base.
Insulation options
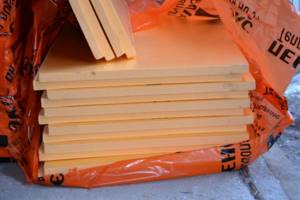
When finishing a loggia or balcony, the most popular options are rigid insulation materials, for example, extruded polystyrene foam or polyurethane foam. These materials are easy to attach to a concrete or brick base; they are characterized by low thermal conductivity of 0.035 W/mK and permeability. As a result, effective protection against heat loss can be achieved with a thermal insulation layer thickness of 50 mm, which reduces the cost of insulating a balcony or loggia.
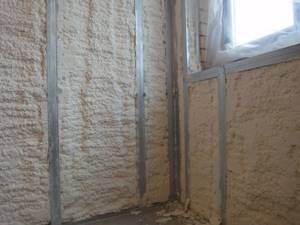
When choosing polyurethane foam, it is best to apply it by spraying. The protective layer is installed after assembling all frames for external finishing and laying waterproofing. Spraying ensures a monolithic structure of the insulation, which reduces the number of cold bridges. In addition, treatment can be carried out on all surfaces of the room at once, which reduces finishing time.
Semi-rigid mineral wool is quite suitable for protecting the ceiling and floor. It must be remembered that such insulation is extremely sensitive to getting wet. When moistened, cotton wool almost completely loses its thermal insulation properties.
Therefore, for such insulation, it is important to strictly follow the rules for installing waterproofing and vapor barrier layers
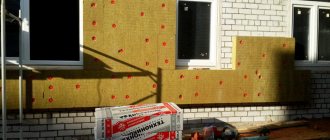
External thermal insulation
To insulate the room on the outside of the house, a structure of ventilated facades is most often installed. This approach allows not only to retain heat, but also to ensure constant removal of condensate from the insulation body. In the technology of ventilated facades, mineral or stone wool, as well as film waterproofing, are most often used. This technology is perfect for balconies without external enclosing structures.
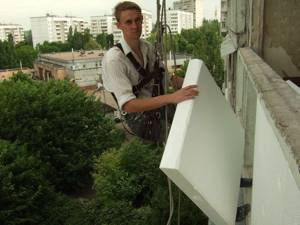
Another popular option for external insulation is to install a layer of rigid polystyrene foam boards or spray polyurethane foam followed by plastering the surface. This method is more preferable for protecting loggias with a concrete or brick parapet.
When the object is located at a height of more than three meters, thermal insulation must be carried out by specialists who have special permission to work at heights.
Internal and external editing of the under-rail space, methods of strengthening
Over the years of operation, the balcony and loggia are exposed to weather factors, concrete and iron must be restored. In order to maintain decorativeness, internal and external decoration of the under-rail space is needed
At the same time, when installing windows, the main load falls on it, so it is important to provide the necessary margin of safety for the enclosing structure around the perimeter of the balcony or the facade of the loggia. Everyone has their own technical subtleties
For example, a metal parapet on a loggia at the very edge of the slab will not be able to reliably hold a double-glazed window; it must be moved deeper. A collapsing slab can collapse under the brickwork; in Khrushchev and Brezhnevka buildings, a metal frame is often insulated. Loggias are more reliable. Firstly, these houses are relatively new. Secondly, the slab is fixed by the side walls, which allows increasing the static load. Such parapets can be safely strengthened with gas blocks.
The main mistake when repairing a balcony slab yourself
Installing a conventional sand-cement screed (using reinforcing mesh) on top of a concrete balcony base that has significant damage is a major mistake. Such “restoration” only adds excess weight, increases the load on the foundation (which already has defects) and in no way strengthens the reinforced concrete structure. Experts consider this measure purely cosmetic.
What can be done in this situation to make the slab more durable:
- We install a temporary support structure that will support the outer edge of your concrete slab. Naturally, this can only be done with the permission of the owners of the balcony located below, and only if it is in good condition and can withstand the additional load during the repair work.
- Using a hammer and chisel, remove loose parts of concrete from the surface of the slab.
- Along the entire length of the junction of the base of the balcony with the load-bearing wall, we hollow out a narrow recess.
- We attach the formwork around the perimeter of the slab.
- We install a reinforcement frame over the entire surface, which fits into the equipped gap.
- We clean the surface of the stove from dirt and dust.
- We apply a special composition (concrete contact) to it, which increases adhesion.
- We construct the screed from a mortar prepared from a special frost-resistant repair composition.
- After it has completely dried and gained the necessary strength (the time is indicated by the manufacturer on the packaging), we dismantle the formwork and temporary supporting structure.
- We apply a layer of waterproofing to the surface.
Types of parapets
The main difference between balcony parapets is the material from which they are made. Its selection should be approached with particular care and attention. Of course, the choice depends on the functions of the balcony. It is worth remembering that one of its main features should be lightness. At the same time, it must withstand temperature changes that are characteristic of any corner of our country, and be no less resistant to other external natural factors, such as direct sunlight, rain, wind, snow, etc.
White wicker furniture looks very beautiful
Small greenhouse on the balcony of a multi-storey building
Today, manufacturers offer a wide range of building materials for the construction of balcony railings. Let's take a closer look at how they differ, what their features are and how to make the right choice.
On the lower floors, as well as for arranging balconies in private houses, wood is often used. This option, even despite a lot of competition, has not lost its popularity for several centuries. It has positive aspects, which include light weight, ease of use, and aesthetics.
14
But at the same time, it also has negative aspects. Without special preparation and processing, it cannot tolerate the influence of external natural factors.
A glass parapet will help emphasize the modern style of the interior
Wooden floors have many advantages
The metal parapet is considered the most popular. It came to us during the Soviet Union and, due to the availability of the material and ease of installation, is still in demand today. It consists of a frame covered with sheet metal, for which pipes, angles, plates and other elements can be used
It is important that the edges of the sheet are processed correctly. Otherwise, it may cause injury
Metal structures are particularly durable
The next most accessible material is brick. When creating ground-based structures, it is one of the leaders in terms of reliability
But when it comes to a balcony, this material should be approached with extreme caution. First of all, you need to know the technical indicators of the endurance of the slab
Balcony interior in loft style

Calculating the load mass is a very important nuance when planning balcony repairs
Brick balcony parapets are the most popular
Foam blocks will help reduce the load on the load-bearing slab
- In addition to bricks, concrete blocks, natural stone, etc. can be used. Note that their weight may be greater, and therefore more dangerous. But due to their size, fewer elements may be needed for use, which will reduce weight and load. Therefore, just as in the case of bricks, the preliminary pressure on the base must be determined in advance.
- Today, foam or gas blocks are an excellent substitute for concrete materials. They have minimal weight compared to the above options. At the same time, experts note high thermal insulation properties as the main feature. Block structures are durable and resistant to external influences.
https://youtube.com/watch?v=qqFKHde7AnY
The only drawback in this case can be considered the cost, since the blocks of the new sample are presented as one of the most expensive examples. However, special glue is required for its installation. But all this can be brightened up by the speed and ease of installation, which you can do yourself.
14
The anchor expands in the wall and securely holds the object attached to it
Plastic
Cracks and holes in plastic can occur for various reasons.
This may be a result of improper installation or mechanical impact. Of course, if the hole is too large, you will either have to dismantle the plastic and install a new one, or invent a temporary patch from scrap materials, which will not look very aesthetically pleasing.
If the cracks are of an acceptable size, then they can be dealt with quite quickly and easily. I’ll say right away - do not use polyurethane foam for these purposes! Although this is the very remedy that is thought of first when the need arises to repair a hole, in our case it may turn out to be critical.
Let's explain why. Polyurethane foam has the property of expanding as it dries, and plastic is a material prone to deformation. Since it is impossible to regulate the exact amount of foam, it can push the gap apart, crushing its edges, and the result will look very bad.
So for our work, another product would be optimal, namely silicone sealant. it consists of silicone rubber, reinforcer, adhesive, plasticizer and vulcanizer. Some types also include dyes, fillers such as sand (these help the sealant better adhere to the surface to which it is applied) and fungicides.
It is the content of fungicides that you should pay special attention to when choosing a specific product. After all, they fight existing pockets of mold and fungi, and also prevent the appearance of new ones. Since we are talking about work on a loggia or balcony, we should take into account the fact that this room often has a high level of humidity. Especially if the room is not properly equipped and has neither insulation nor ventilation.
You can choose other components as you wish, it’s not so important. Silicone sealant by itself, without additional substances, perfectly adheres to the surface being treated and subsequently, after complete drying, effectively protects it from moisture.
You can work with this product at any air temperature; it feels great at both -50 and +200°C. The only thing you need to take into account is that it will not stay on a wet surface, it will simply roll down. True, there are professional sealants, they belong to a higher level, and such nuances are not scary for them. But their cost is appropriate, so in order to save money, it is easier to dry the area that you are going to seal.
So let's get started. In addition to the sealant itself, you will need a special gun with which you will squeeze out the product. You can purchase this equipment at a regular hardware store. Also bring a rubber-edged spatula, tape, and gloves. And don’t forget the solvent - we’ll explain below what it’s needed for.
Have you stocked up on everything? Let's start the procedure.
Carefully clean the gap from dust and dirt, wipe it with a damp cloth, and let it dry. We remind you once again that the sealant will not stick even on a slightly wet surface!
Place tape on both sides of the hole. This is necessary so that the sealant does not smear near the gap.
During the application process it is quite liquid, so you can easily cover all unprotected areas adjacent to the work site. So don’t be lazy, cover them with tape.
Place the bottle of sealant in the gun and squeeze the product into the desired location, filling thoroughly. The long tip, which is on any bottle, will help you get into any, even the most tricky places.
After filling the gap, we immediately remove all excess that appears from it. This can be done using the same spatula that has a rubber tip. Do not put off this matter, because otherwise, removing the unnecessary part will be fraught with great difficulties; it will simply not be possible to do it carefully.
We are waiting for complete hardening. Then we carefully inspect the treated area, checking if there are any small holes left somewhere. If you find it, process it according to the same scheme. If everything is in order, then you can remove the tape.
If you find areas stained with sealant (despite the use of tape), clean them as quickly as possible with a solvent.
That's the whole procedure. Silicone sealant does not need finishing; it will be invisible on the plastic, so you will get a visually perfect, undamaged surface.
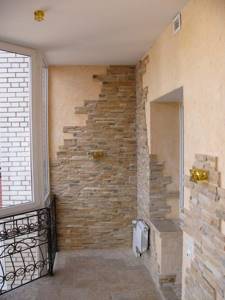
Interior decoration of the parapet
Sheathing the parapet on the inside not only gives a finished look to the repair, but also serves as an additional thermal insulation layer. The type of finishing is selected in accordance with the labor intensity of the work, financial costs, and the desired design of the room. The most popular methods of interior decoration:
- PVC panels;
- wooden lining;
- sheets of drywall followed by painting.
It is possible to use decorative stone or ceramic tiles, however, these materials are more expensive and heavier - this is not the best choice for finishing a balcony parapet.
Combination of decorative stone and plaster
Most standard parapets, especially in older houses, are not structurally designed for the installation of double-glazed windows on them
Therefore, special attention should be paid to the construction of the base for window blocks, since the strength and stability of the entire glazing will depend on the correct execution of this stage
Replacing old fencing
Preliminary dismantling of the old parapet is possible (but not required) in whole or in part. This is done in cases where:
- want to free up additional usable space;
The balcony is expanded along the base of the slab - the old structure has fallen into disrepair and its preservation is inappropriate.
The base is completely rotten
When dismantling the parapet, special attention should be paid to the safety of work at height, as well as to fence off the potentially dangerous area around the house and prevent passers-by from being in it. In some cases, it is advisable to use the services of professional industrial climbers.
Usually they strengthen the existing fence without dismantling it. The choice of method depends on many factors (the general condition of the base, the size of the balcony, the type of old fence, the future use of the balcony).
Covering the parapet with siding from the outside
Vinyl siding has proven itself to be an excellent material for exterior finishing of balconies. Simplicity of installation, low weight, a variety of colors, durability and affordable price are the main advantages of siding panels.
If the parapet is a metal lattice, then it is advisable to combine the insulation with the exterior finishing. Sequence of work:
- Place a level on the metal railing and secure a horizontal support bar, which will serve as the basis for the glazing.
- On the outside, make a sheathing of wooden beams in increments of about 60 cm. If the siding is laid out horizontally, install vertical posts; if it is vertical, then a horizontal sheathing is needed. Pre-treat the timber with an antiseptic. Carry out the work using a level.
- Attach guides and a starting strip to the sheathing for installing panels in the chosen direction.
- Install the first 2-3 siding panels, inserting them into the profile and securing them with self-tapping screws to the sheathing beams.
- At the same time as the siding is fastened, the insulation is fixed. Penoplex sheets cut to size must be inserted between the finishing panels and the metal parapet so that they fit into the cells of the sheathing.
- Complete the installation of siding on the outside of the balcony.
- From the inside, apply mounting foam to the joints between the insulation sheets and the wooden sheathing. The seams between the penoplex and the floor and walls are also sealed.
- Place a second layer of insulation on the outside of the balcony. The sheets are attached to the first layer with plastic mushrooms. The gaps between the parts are also filled with foam. A double layer of penoplex reliably protects the balcony from moisture and provides a good degree of thermal insulation. The parapet is now ready for glazing and interior finishing.
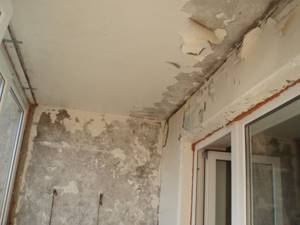
Troubles that may arise due to a balcony leak
When a balcony develops a leak, it becomes almost unusable. If in dry weather the leak only reminds of itself as traces left by the water, then during rain or melting snow it is impossible to dry clothes on it, the things stored on it become wet and become unusable. In addition, the finishing suffers: first, yellow smudges appear on the ceiling and walls, then the surfaces become covered with a dark moldy coating, which is difficult to remove.
If no measures are taken to eliminate the leak for some time, water will begin to flow into the living room through the joint between the slab and the wall. When it rains, wet spots form on the ceiling and wall adjacent to the balcony, and after they dry, yellow spots appear. In this case, repairs will have to be done not only on the balcony, but also in the apartment.