Features of insulation installation
High-quality installation of insulation is a guarantee that the structure will serve reliably and efficiently. Depending on the chosen insulation option, installation work will differ. Wells and wells in the winter at the dacha require mandatory insulation, so we will consider the features of the foam insulation method.
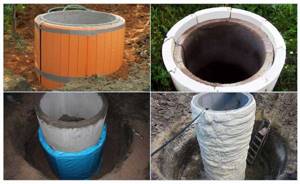
Insulating a brick well with foam plastic
The easiest way to insulate a well is to use polystyrene foam or expanded polystyrene. The difference between materials is not only in price, but also in efficiency. It is recommended to use polystyrene foam or penoplex as insulation.
The principle of the work is to perform the following actions:
- Remove soil around the perimeter of the caisson to be able to place the insulation deeper.
- Measure the required size of polystyrene foam and then cut it. The thickness of expanded polystyrene depends on the region of residence, but the best option is 4-5 mm.
- You need to glue the cut sheets of polystyrene foam of the required size using special glue. To prevent the structure from falling apart in the future, it is recommended to use additional fasteners in the form of plastic mushrooms.
- Installation of fungi is carried out using a drill.
- After installing expanded polystyrene sheets around the perimeter, it is necessary to resort to the reinforcement procedure after 24 hours. For this purpose, there are also special adhesive compositions in the form of bulk materials.
- Reinforcement of the outer surface allows you to protect the insulation from external influences, as well as increase the efficiency of the structure.
Insulation of the outside of houses is carried out in a similar way. To save on this insulation option, you can line the outer wall of the caisson with polystyrene foam, and then fix it with improvised materials. This method of insulation will allow you to remove polystyrene foam in the summer.
Additional protection at the stage of installation work: how to insulate the cover
For wells with submersible pumps, the system is mothballed before long periods of downtime. To carry out this procedure, pipelines are laid with a slope towards the water source.
After the pump is turned off, it is removed from the installation, and the water returns by gravity to the well.
If this technique is used, it is important to ensure that there are no pockets where water would accumulate
It is known how the well is insulated, as well as what materials are used for the work, so it remains to understand the question of how to close the well. The top cover plays an important role, since the lack of insulation on the top cover leads to the system freezing. There are options for insulating the top cover:
- manufacturing the lid from special materials;
- insulation of the existing cover;
- production of covers from woodworking materials;
- covering the upper part of the caisson with insulating materials.
The best option is to make a cover from insulating materials. Foam or polystyrene foam is used as such material. However, to ensure structural strength, the foam cover must be covered on the outside with a protective layer. Galvanized or plastic is suitable as such a layer.
You can make a cover for a well from woodworking material, however, under the influence of water and sun, such a structure will not last long. Additional protection of the structure from weather factors will be required.
Another popular method of insulation is the use of polyurethane foam. The inner walls of the caisson are covered with polyurethane foam, which allows for not only a good degree of thermal conductivity, but also waterproofing.
Before carrying out work on installing well insulation, you need to pay special attention to factors such as the region of residence, as well as the depth of soil freezing. You need to worry about insulating the well in advance, since with the arrival of cold weather it is already difficult to carry out most construction work
How to insulate a pipe from a well to a house
The pipeline from the well to the house needs insulation. This is due to the fact that the pipe exit from the well is the most vulnerable point of the water supply system, which is exposed to low temperatures.
When asked how to insulate a water supply system, the following options exist:
- Making shells from polyurethane foam.
- At the stage of installation work, the heat-insulating material is wound onto the pipeline. At the same time, it is necessary to consider the implementation of the waterproofing process.
- Installation of heating cable.
The choice of the best option depends on the diameter of the outlet pipe, as well as the depth of the well. An insulated well does not always guarantee that the pipeline will not freeze. For northern regions, it is recommended to insulate not only the section of pipe that comes out of the well, but also the entire pipeline located in the ground. Thermal insulation of water supply pipes in the ground should be carried out at the stage of laying the pipeline. As the optimal insulation option, it is recommended to use basalt fiber with a foil sheath. A heating wire is placed in the internal cavity of the insulation, which eliminates the possibility of freezing of the water supply.

Emergency option - resuscitation with boiling water
If extreme frosts or power outages cause the well to freeze, you can try to revive it with boiling water. To melt an ice plug in a well, you need to take a metal tube with a diameter of 10 mm. Then put a rubber hose on this tube and connect a funnel to it. The tube is lowered into the well until it stops at the ice plug. Then they begin to pour boiling water into the funnel. Under the influence of hot water, the ice will gradually begin to melt, and the tube will smoothly go down. In a few minutes it will be possible to clear the well of any ice that has formed.
If the well is in order, but water does not flow into the house due to frozen pipes coming from the pump, then a decision is made to replace them. If the walls of the water pipe have not cracked under the influence of frozen water, then you can try inserting a heating wire directly into the pipe using a special device. In this case, a cable is selected that can be used in water supply systems.
Well location options
To save on running a water main, many people want to build a well in the basement. This is convenient before repairing equipment, because heavy equipment may be required during repairs.
It is recommended to install a water intake at a distance of 3 m from the wall of the house. This is the best option, which also does not require plumbing, but access to equipment will be open.
In this case, you need to take into account that there is no accumulation of garbage or manure nearby. You also need to choose a place a little at a height to protect the well from melt water with soil particles.
Sequence of work
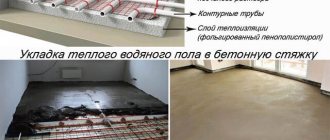
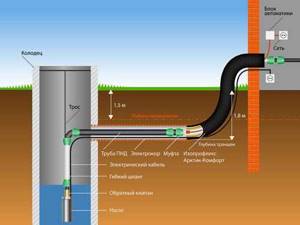
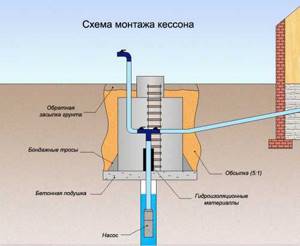
Diagram of equipment and well insulation. Click to enlarge.
Before insulating the well itself, you should insulate the riser. To do this you need to do the following:
- the riser itself is covered with metal mesh;
- a metal casing for the riser is made;
- a layer of dry sawdust is poured between the mesh and the casing;
- A small container with an outlet should be placed under the valve or faucet to prevent water from entering the insulating structure.
During severe frosts, the main thing is to prevent pipes from freezing. They do it this way: buy a pipe of larger diameter and install it on top of the water pipe; Afterwards, the technical pipe is wrapped with a heating cable.
The stronger the frost, the more it is necessary to heat the pipes using cables.
Another insulation option is to create a caisson well. In the place where the well is located, they dig a round or square hole. The depth of the well should reach the lowest freezing point of the soil.
The size of the well must be such that a person can go down there to inspect or repair the water supply structure.
Sequence of work:
- a round or rectangular well is dug to the freezing level;
- the walls of the well are insulated with foam boards or other insulating materials;
- The top of the well is covered with a lid lined with insulation.
The design allows you to monitor the condition of pipes and timely repair leaky areas.
It is better to insulate a well for the winter in the warm season. If the system breaks down in winter, it will be difficult to repair. You will have to dig out pipes from the frozen ground, having previously warmed up a section of the ground.
Replacing all structures in such conditions will not be easy. But you will also need to insulate the system and install a heating cable.
Equipment and materials
We prepare everything necessary for constructing a well in this way.
List of tools and equipment:
- excavator;
- truck crane;
- shovels;
- Bulgarian;
- roulette;
- bubble level;
- concrete mixer;
- boards;
- wood hacksaw;
- hammer;
- rule;
- concrete trowel;
- knife;
- roller;
- burner;
- spatulas;
- hammer drill with crown.
Installation diagram of a caisson made of concrete rings.
- sand;
- crushed stone;
- cement;
- reinforcing mesh;
- nails;
- knitting wire;
- rings of wells with a diameter of 1 or 1.5 m;
- well floor slab;
- well cover with shell;
- bitumen roll waterproofing;
- primer;
- bitumen mastic;
- waterproofing mixture;
- penetration for concrete;
- sheet polystyrene.
Resources involved in insulation
When deciding how to insulate a well for the winter, craftsmen choose between three methods - the introduction of specific materials, heating elements or the use of caissons. Conventional insulation materials are based on synthetic porous substances that have low thermal conductivity due to their fibrous structure and the presence of air cells.
Heating elements - cables - vary in power and functionality; the advantage of their use is the ability to regulate temperature parameters. Caisson chambers are produced in a factory; plastic variations are the most common.
Types of thermal insulation materials
In a separate form, they are used in areas with a mild climate and in relation to wells operated without downtime. In more severe weather conditions, a tandem with a heating cable is appropriate. Useful categories of raw materials:
- regular and extruded polystyrene foam. A synthetic resource with an abundance of air cells is characterized by low thermal conductivity and is used to strengthen underground and external pipelines and caisson chambers;
- penofol is sold in the form of cylindrical shells and flat panels, used for structures without external loads, as it is vulnerable to compression;
- glass and mineral wool are highly hygroscopic, so they are not suitable for installation in a humid environment. Cotton wool can be used to cover the head - winter preservation of the well mouth.
Expanded polystyrene - material for well insulation
Foamed polyurethane foam and penoizol are also used; specialized equipment is required for their application. Budget expanded clay is useful for sprinkling coffered pits and water ditches.
Specifics of heating cable operation
The advantage of this method is the possibility of preheating the liquid supplied to the system. In this case, during severe drops in temperature or downtime, freezing of water is prevented. The cable can be mounted externally or placed inside the pipeline; in the first case, insulation is used according to the shell principle.
Water intake is usually provided by HDPE pipes, characterized by low thermal conductivity; here, cable assembly inside is more effective. If you choose between self-regulating and resistive cables, it is better to give preference to the former, since they produce high efficiency due to the fact that their sheath heats up under the influence of the environment.
Despite the fact that self-regulating products are significantly more expensive than resistive ones, even when laying a short section, significant energy savings are observed.
Borehole materials at hand - easy help in warm winters
If in winter the temperature in your region does not drop below -10 °C, you can also use improvised materials that are sure to be found on your site, for example, sawdust, which are quite suitable for insulating a structure. To carry out work with their help, you must first dig a hole around the well with a cross-section of about 0.5 m below the freezing level of the ground by about 10 cm. Simply pour the material into the dug pit and cover everything with earth on top. And to improve the thermal insulation properties, mix sawdust with liquid clay.
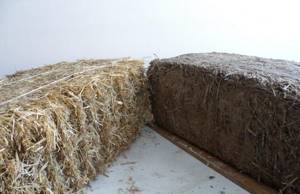
Straw for pipe insulation
You can also carry out insulation using a mixture of dry straw and leaves - during their natural decomposition, heat will be generated, which will prevent the well from freezing in winter. However, this method can hardly be called durable, since after 1-2 years you will have to change the “insulation” again. We told you about the main insulation options. “Which one is better to go with”? - you ask. To answer this question, let's look at two main things: how often you will use the well, and what the average winter temperature is in your area.
Pay attention to our recommendations, they will definitely help you make the right choice of insulation method:
- If you are not going to use the well at all in winter, then it is better to simply mothball it - lubricate all parts, wrap the head with old rags and cover with polyethylene.
- It is more efficient to install a caisson if you want to additionally equip the entire system with special hydraulic devices. However, creating a full-fledged caisson can cost a pretty penny.
- If you are going to use the well from time to time, for example, only on weekends, you should pay attention to the heating cable. Just 10–15 minutes after switching on, the system will be completely ready for use.
- If the climate in your region is warm, you can choose the method of constructing a casing pipe with a thermal insulation layer.
At the same time, no matter what insulation option you choose, remember that work must be carried out long before the onset of cold weather. This will allow you to avoid a sudden lack of water in your home.
Wells and wells made on personal plots are often the only source of drinking water for country houses. In the warm season, there are no problems with their operation, but with the onset of winter, there is a risk of freezing of pipes, both supply and casing - this can cause interruptions in water supply. To prevent such problems from arising, the owner of the well should take care of its thermal insulation.
Principles of insulation of water wells
It is recommended to carry out well insulation work in advance, without waiting for the onset of frosty weather. If the winters in your area are harsh and the groundwater level is high, a water source without thermal insulation will certainly freeze. If you treat this issue negligently, you risk not only being left without water in the winter, but also completely defrosting the system, which will need to be restored in the spring.
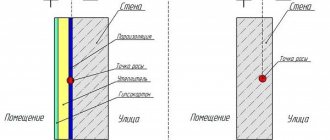
The basic principles of insulating wells and wells are the same, but when planning work you should pay attention to some nuances. How to insulate a water source correctly and reliably? First, let's decide what we need to protect ourselves from. The main problems for a water supply source located on the street will be:
- groundwater and sediments,
- drafts of cold air,
- winter soil freezing.
All of the above negative factors indicate that the main work during insulation will concern the sealing of the well, in addition, they will be aimed at increasing the heat transfer resistance of enclosing structures and pipelines. Having decided on the main tasks, you need to select the necessary construction and thermal insulation materials. Part of the work will be done for us by the soil, which in itself is a good thermal insulator (you just need to go deep enough), but, as a rule, you can’t do without insulation. In this case, it is very important to take into account the type of soil; for example, sandy soils freeze deeper than loams. But the effectiveness of protecting a well from freezing depends, first of all, on the quality and correct choice of thermal insulation, the purchase of which should take into account climatic conditions and groundwater levels.
Before carrying out insulation work, you need to make sure that the water well is clean and dry. When preparing for winter, it would also be a good idea to check the condition of the shut-off valves, all water pipes, and filters. If necessary, you should remove dirt and rust from them, replace all suspicious areas, because in cold weather it will be quite problematic to do an inspection.
What materials are better for insulation?
If in your area the winters are relatively warm and there are no prolonged severe frosts, then all sorts of “natural” and “improvised” means may be suitable for thermal insulation of the well. This can be: straw, dry leaves, sawdust, large wood shavings, top peat. Sometimes they use old foam rubber, sweatshirts, down jackets, and cotton blankets. To ensure that bulk materials are used efficiently, it is recommended to build a box or casing around the casing and pressure pipe. It can be made from galvanized iron, but it is better to use sheet foam or wooden boards. The box is assembled directly on site, after which it is filled with bulk materials.
In regions with real winters, to insulate wells, it is best to use modern thermal insulation materials that prevent pipes and wells from freezing even at very low temperatures. It is recommended to use the following insulation:
- mineral wool;
- expanded polystyrene;
- foamed polyethylene;
- EPPS.
Ecowool and other organic products are not suitable for well insulation, as they can quickly rot under the influence of high humidity.
This or that insulation is selected taking into account ease of use and some other parameters. For example, the walls of a brick square caisson can be easily insulated using sheets of polystyrene foam or extruded polystyrene foam. For cylindrical caissons, it is most convenient to use mineral wool in rolls or mats. Ready-made cylinders of insulation made from stone wool or polystyrene foam are very convenient to work with pipes and significantly reduce the time of operations. An excellent option for insulating wells is to use mesh-reinforced and foil-coated thermal insulators.
Insulating a well for the winter: why is the procedure needed?
By regularly drawing water from the well, the possibility of freezing is eliminated. This theory works, but causes some inconvenience, since to prevent freezing you have to periodically open the tap to drain the water (even at night). Laying water pipes from steel caused a problem when the water froze - cracking of the pipeline.
To prevent such a negative consequence, pipelines must be insulated. Moreover, this is appropriate not only for steel pipelines, but also for plastic products. Not only the pipeline needs insulation, but also the well, which is an autonomous source of water supply. If the well is not insulated, freezing of the pipeline will lead to catastrophic consequences. When a pipeline freezes on the surface of a well, a well pump will suffer only indirectly, but this is enough to put it out of action.
Water source and frosty weather
Before considering the question of how to close a well for the winter, you need to learn about the weak points of any such structure. Since the water surface in the wells is at a depth of 8 m, and the depth of soil freezing is only 10 meters, there is no serious threat to a closed spring in winter.
However, there is a weak link. As in any system where liquid is used, this is the plumbing, that part of it that is located outside the building. If there is water left in the pipes, then at zero degrees, and even more so at sub-zero temperatures, its freezing is inevitable. The consequence will be damage to these areas, which means failure of the entire system.
For this reason, the installation of the pipeline is always carried out below the level where the lower level of the soil freezing zone is located (1.5-2 m). However, sometimes this condition is not taken into account, so the result is the appearance of defects on the outer part of the branch.
Choice of insulation
When choosing insulation material for a well, you should pay attention to several factors. Ease of installation
To insulate pipes of various diameters, numerous adapters and elbows, it is better to use winding thermal insulation. The easiest way is to buy a roll of insulation and wrap it in several layers around the pipes
Ease of installation. To insulate pipes of various diameters, numerous adapters and elbows, it is better to use winding thermal insulation. The easiest way is to buy a roll of insulation and wrap it in several layers around the pipes.
Moisture protection. There is always a lot of moisture in the soil. In humid environments, materials such as sawdust or straw quickly become wet. Once wet, they begin to rot, and soon the structure will have to be replaced.
Cotton insulation materials are also afraid of water. Therefore, they will have to be carefully wrapped with films or foil. You can use foamed polyethylene. This insulation is covered with special aluminum foil, which does not allow moisture to pass through.
Strength. The insulation structure in the thickness of the soil will always be subject to pressure. Therefore, it is worth choosing a material that is resistant to mechanical stress.
If the well is not used constantly
Insulating pipes hermetically is not so easy. After all, the pipeline system contains adapters and elbows of different diameters. Often in winter, pipes begin to freeze inside.
How to insulate a well for the winter if the water supply will be used only occasionally? In such cases, it will not be enough to simply wrap the pipes with thermal insulation. Installation of heating elements will also be required.
Special thermal cables can be laid through the pipes. Freeze sensors can be used. Then the heating of the pipes will turn on automatically if the temperature drops to a certain point.
This design will cost more, but will eliminate the risk of the system freezing.
Installation of heating cable
Step 1: Cable Installation
First we need to dig a hole around the well, the depth of which should slightly exceed the freezing level of the soil. Next, we wrap the heating cable around the casing pipe and the cutting of the pipeline that is connected to the well. The number of turns of the product is usually indicated on the cable packaging.
Step 2: Additional insulation
A layer of thermal insulation material must be laid on top of the pipes that are wrapped with cable. When choosing a material, you should pay attention to the maximum temperature at which the insulation will not lose its properties. If you do not take this point into account, then when the cable gets too hot, the insulation may simply melt. We cover the structure with a waterproofing layer on top, which will protect the insulation and heating cable from the effects of groundwater.
Step 3: Completion of work
We check the structure to make sure it is stable and does not allow water to pass through, and fill the foundation pit.
How to insulate a well for the winter with your own hands?
There are several ways to insulate a well for the winter. Choosing one of them or combining several is a choice that needs to be made. Since the risk of a well freezing in a cold winter is significantly high (although it depends on the region), it is necessary to take care of insulation in advance.
Which material to choose
The choice of material that will not allow frost to have a detrimental effect on the well depends on the climatic characteristics of the region. If winters in the region do not bring severe frosts, then it is quite possible to make do with simple, cheap, but still effective materials - peat, straw, sawdust and even dry leaves. However, such materials have one feature - hygroscopicity.
Insulation of the source is more effective when using industrially produced materials. Their choice is huge: polystyrene foam, polystyrene foam, mineral wool, penoizol, glass wool. Such materials are more thermally insulating than straw or peat.
Sometimes it is recommended to use them in combination with an air cushion in order to enhance the effect. But practice has shown that this is an unnecessary move - modern materials have excellent thermal insulation properties, since they themselves have a porous structure. Even if frosts drop to critical levels, they are able to withstand such temperatures.
How to insulate
It should be understood that the insulation of the well should not be continuous, but partial, from the top. The water in the well will not freeze in any frost, because it is located at a depth where the temperature will be above zero in any case. Condensation freezes on the walls - water evaporation or water in the pipe leading to the house. Therefore, only the initial level of the well, approximately the first 40 centimeters, will have to be insulated. To do this, the earth around the casing is removed.
It would be better if the walls were reinforced with boards, plastic or other material to prevent the transfer of moisture from the soil to the insulating material. Next, thermal insulation material is placed into the void between the soil and the casing.
If it is polystyrene foam or polystyrene foam, it is advisable to use crumbs of them rather than whole pieces. You can use polyurethane foam, just keep in mind that the consumption will be considerable - 2-3 cans. The top of the shaft must be covered with a lid, but not insulated with a material similar to polyurethane foam - access to the inside of the shaft may be needed at any time.
Box installation
Any insulation work will be more effective if you additionally install a decorative box on top of the well. Shape, size, material - this does not play a fundamental role
It is important that access to the well is not limited and that the box is decorative and has meaning. That is, it is advisable to try to maximize its aesthetics
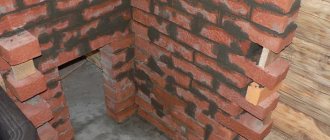
As options, it is worth considering combined boxes: brick bottom/wooden top. Brickwork will certainly protect against drafts, and a wooden frame can be easily made at home. Moreover, this insulation option will visually resemble a traditional well frame, which undoubtedly looks quite beautiful and aesthetically pleasing.
Insulation of the supply to the house
The pipeline from the well to the house must be insulated at the time of manufacture. To do this, you can use the same industrial insulation - mineral wool or polystyrene foam. Considering that the pipeline is usually quite deep, care should be taken to ensure the integrity of the pipe and/or cable. Then you can do the insulation and forget about it.
https://youtube.com/watch?v=VZgKbqL2v_8
To insulate plastic pipes of any diameter, you can also use ready-made insulation in the form of cut pipes made of foam polystyrene.
Caisson is the number one choice
So far we have been talking about inexpensive or completely free materials. But their quality is not always satisfactory. The use of a caisson makes it possible to achieve much greater efficiency in the fight against frost and its influence.
Installing a caisson will cost more than using sawdust or straw, but it's worth it. If you carefully study forums and other user resources on the Internet, you can come to the bold conclusion that the caisson has no drawbacks.
A caisson is one of the answers to the question of how to insulate a well so that it is beautiful, convenient, and reliable.
What is a caisson: types and design
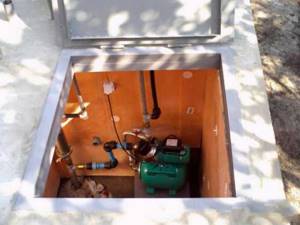
A caisson is an impenetrable tank 2 meters deep that serves as an additional room for a well. The caisson can be made of plastic, steel, metal, brick or concrete. The shape can also be different: round, square and rectangular. It is installed on the casing pipe of the water source, and has a hatch on top for full access to the well. The caisson must be insulated with waterproofing to prevent water freezing. Equipment installed inside the caisson:
• Pump; • Shut-off valves that block the flow of the medium; • Instruments for measuring water pressure – pressure gauges; • Filters; • Automation - a pump that turns off when the pressure drops below normal; • Hydraulic accumulator tank.
Gardeners install an additional piece of pipe in the caisson, which is used for irrigating the soil.
Advice! You can do without a caisson if the well is located next to a warm room. In this case, you will be able to see all the components of the water supply system, but the noise from their operation may disturb you.
Classification of pumps by source of intake and principle of operation ↑
First, let's decide on the type of pump. They are classified according to the source of the fence:
- superficial;
- deep (submersible),
according to the operating principle:
- vibration;
- centrifugal.
Let's consider each option separately.
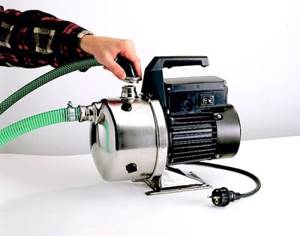
From the name it follows that such units are not immersed in water, but are located on the surface. If distance allows, it can be installed indoors or in a barn. To draw water from a well, a hose is used, one end of which is attached to a pump and the other is lowered into the water.
Some lightweight options can be installed on the surface of the water using a special float. The float can be made of foam, this will allow the unit to be in close proximity to the water without touching its surface. But more often, surface pumps are installed at a distance from the well. The suction height of such devices reaches 8 meters.
The use of an ejector allows you to greatly increase the pump pressure
Where the depth of the well exceeds these readings, you have to resort to small tricks. One option would be to use an external ejector. It is lowered into the well along with the suction hose. Part of the water raised by the pump is pumped through an additional hose into the ejector, which leads to an increase in inlet pressure.
Surface pumps are easier to dismantle and maintain. They are not exposed to moisture and are not difficult to use. Another advantage is the relatively low cost. However, the suction height of a surface pump is significantly lower than that of a deep pump.
Where the water is below 8 meters, it is more advisable to use a deep well pump. They are also called submersible, as they are lowered directly into the water. The body of such devices is made of waterproof materials and is sealed. Therefore, the depth of the well in this case does not matter.

The market for submersible pumps is now very diverse and everyone can choose a device to suit their requirements.
High pressure allows you to get water from any depth, but prohibits bringing the pump closer than 1 meter to the bottom. If you lower the submersible pump for a well, the quality of the supplied water will deteriorate. Sand and mule from the bottom will begin to flow into the hose. Over time, this can lead to mechanism failure.
In this unit, an electromagnet drives a vibrator, which ensures the movement of water through the pipes. The vibration frequency of the piston in the hydraulic chamber is 100 times per second. Due to the translational movement of the piston, the process of suction and expulsion of liquid occurs.
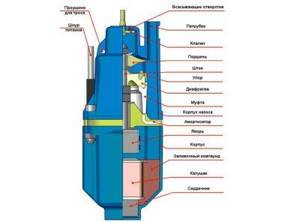
Internal structure of the vibration pump “Rucheek” (click to enlarge)
The vibrator is equipped with a control valve, which ensures the movement of water in the pressure pipe. The passing water protects the structural parts from overheating. Therefore, running the pump “dry” leads to breakdown of the unit. The vibration pump can only be installed on the surface. If the mechanism is installed inside the well, it will simply destroy it.
When considering deep-well units, it is better to choose a centrifugal pump for a well. The main design detail of such a pump is one or more wheels. They are located inside the housing on a shaft and consist of paired disks connected by blades.
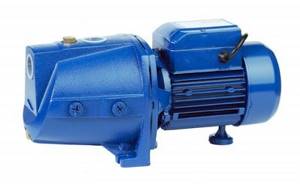
Centrifugal pump for well
During operation of the mechanism, the space between the blades is filled with water, which is subject to centrifugal force when the wheel rotates. This force creates an area of high pressure at the edges and low pressure in the center. The pressure difference between the outside and the center forces the fluid entering the wheels through the outlet pipe.
Now let’s decide: which pump is better for a well? A surface pump is capable of raising water to a height of up to 10 m. This is the case if the unit is located in close proximity to the well. And if it is removed, it is necessary to take into account the height difference between the dynamic water level and the pump, as well as pressure losses along the entire water main. Deep pumps have a number of advantages over surface pumps. Namely:
- noiselessness;
- easier mounting of the pump in the well;
- maximum depth of application;
- ease of installation;
- battery life.
Water passing through the pump cools its parts, which prevents the equipment from overheating. Submersible pumps are equipped with float switches, which automatically turn off the engine when the water level drops below a critical level. The only drawback of deep-well pumps is the difficulty of maintenance. When carrying out maintenance and repair activities, the unit must be removed from the well. Disassembling a sealed case is more difficult. To do this, it is advisable to call a specialist.
Well abandonment is a task for professional drillers
Wells are shut down for several reasons:
- flowing of the aquifer;
- liquidation and prevention of accidents;
- end of service life of a hydraulic structure, unsatisfactory quality of the casing structure;
- errors and unforeseen circumstances that make it impossible to complete the begun construction of a well;
- the need to temporarily shut down the source (then the well’s operation is stopped, but it can be restored).
If the well begins to flow, it is necessary to increase the bottomhole pressure. To do this, a dense technical liquid is pumped so that it creates a higher pressure than the pressure of the aquifer. After the accident has been eliminated, the liquid is pumped out, the structure is washed and prepared for subsequent operation.
Accidents during the construction and operation of artesian wells
Stages of killing a structure without the possibility of recovery
If an artesian well is abandoned or cannot be further used for technical, geological, or environmental reasons, it is liquidated in the manner prescribed by the Subsoil Law. This should be done by licensed professionals. The procedure consists of several stages:
- It is necessary to develop a liquidation project that takes into account all the passport data of the well and complete information about its arrangement.
- It is necessary to carry out logging to determine the actual depth and condition of the production pipe.
- Based on the passport data and the audit of the well abandonment, they are assigned a category and then act in accordance with regulatory requirements.
- When the procedure is determined, liquidation measures begin. First, a 2x1 m pit is dug around the well, after which the production pipe is cut off, cleaned using special equipment, washed, disinfected, covered with crushed stone and filled with cement solution to the full depth, a plug is placed and covered with soil.
- After completion of the work, the well is deregistered.
You should not deal with the liquidation of an artesian well yourself. This is a complex set of works that requires special knowledge. The service can be ordered from professional drillers who are well aware not only of the well-killing technology, but also of the specifics of documenting the work. A plugged artesian well must be safe for the environment and people living nearby. It is highly undesirable to save money on its elimination.
An artesian well must be cleaned up by professionals.
Installation of an insulated box
In regions with a mild climate and minor frosts, it is not necessary to install a caisson. The well head along with all the equipment is placed in an insulated box, which is opened if necessary. The protective structure can be built from wooden building materials or made of brick. The inside walls are covered with heat-insulating material. In addition to insulation, such a structure can also perform a decorative function if original design ideas are introduced into its design.
Insulation of a well in regions with a warm climate is carried out by building a small house in which equipment and pipework are hidden
Disadvantages of concrete caissons
The main and almost irremovable disadvantage of concrete caissons is the impossibility of its high-quality waterproofing. Even if all the work is done very well, water penetrates into it over time.
The photo shows that there is water at the bottom of the caisson
It enters the well through the pipe outlet points and the exit of the casing pipe from the bottom of the caisson. It is simply impossible to waterproof the joint between concrete and metal, plastic or other material in such a way as to guarantee its tightness for many years.
If in the case of metal structures this is achieved by welding, and with plastic ones by means of special rubber cuffs, then any cement mortar or waterproofing materials collapse over time and lag behind the surface. And any microcrack is an open gate for moisture.
Water enters the caisson through pipe entry points
The most vulnerable place is the insertion of the casing pipe. Firstly, it is located below all the others and closest to groundwater. And secondly, due to the impossibility of external waterproofing of the bottom.
Even if the groundwater is low, the caisson can receive high water, flood and melt water that seeps into the ground in certain seasons. And this is fraught with great danger, since it carries with it pathogenic bacteria captured along the way from septic tanks, cesspools, barnyards and other “dirty” places.
If the water level in the caisson reaches the neck of the well, it enters it and becomes a fly in the ointment.
The entry of water into the well makes the water unfit for drinking.
Therefore, the installation of concrete caissons can be justified only in areas where the groundwater level never rises high, and the soil itself is stable and does not have a destructive effect on the joints of the rings and other structural units.
There is also no particular need to rely on thermal insulation in conditions of severe and prolonged frosts. This further limits the scope of application of such caissons to regions with warm or temperate climates.
Features of well insulation
It should be equipped before the arrival of real frosts. For this purpose, modern insulating materials are used. When purchasing them, you need to take into account the weather conditions of the area and the occurrence of groundwater.
If the well is located in a region with mild winters and the temperature does not drop below 15 degrees, you can limit yourself to the available materials: straw, sawdust and leaves. But if the region has harsh winters, and as a result the soil freezes deeply, then you need to use glass wool, polystyrene or mineral wool. These insulation materials can reliably protect the equipment located in the well. The thickness of the insulation must exceed 30 cm. A gap of 5 mm must be provided between them and the pipe.
When choosing insulation for a particular case, you need to take into account its moisture resistance, the degree of complexity of installation, as well as strength and elasticity, so that it can thoroughly insulate numerous pipe bends. Roll materials are best suited for this.
Flaws
Despite all the positive factors, the ring caisson still has a number of significant omissions in its design. Its installation and use in low-lying areas with high groundwater levels is fraught with difficulties. If the waterproofing is done poorly, the well will flood, which in turn will cause the failure of expensive pumping equipment.
- Heavy weight. If the soil in the installation area is too soft, the structure will sag in just a few years. The pipes inside are deformed under the pressure of cement. In this case, the shelter will become unusable, which will entail significant material costs.
- Increased risk of flooding. If serious mistakes were made at the stage of laying waterproofing materials, the well will simply be flooded with groundwater. Even quality work will require a lot of money.
- The need for thermal insulation. A caisson for a well made of concrete rings does not retain heat well, which requires costs for insulating materials. In the cold Siberian latitudes, such equipment will have to be abandoned.
Group of well insulation methods
Thermal insulation can be passive (insulated caisson) and active (heating cable).
Insulation of a well with a caisson
The construction and insulation of a caisson is considered a classic method of thermal insulation of a well. The caisson can be purchased as a ready-made structure or built independently.
The purchased caisson has an undoubted advantage, which is its tightness. Homemade will cost less.
How to make/install a caisson for a well
dig a pit. The lowest point of the pit should be located below the freezing level. Therefore, the depth of the pit often reaches 2.5-3 m. To determine the exact required depth, you need to find out the freezing depth and add half a meter to be sure. The width of the pit should exceed the dimensions of the future caisson by 0.5 m;
arrange a sand-crushed stone cushion at the bottom of the pit (height 0.1 m);
cut a hole for the supply and distribution pipes (for a purchased caisson), install the caisson; Advice. An additional hole can be made at the bottom of the pipe through which condensate will be drained.
lay a brick caisson or lay a concrete circle (concrete rings), the quantity will vary depending on the depth of the pit;
install the necessary equipment in the caisson;
insulate the caisson from the outside (insulation layer – 50 mm)
Please note that a self-built caisson can be insulated from the inside if reliable waterproofing of the structure is ensured; close the caisson with an insulated lid
It is advisable to make a ventilation pipe in the lid;
close the caisson with an insulated lid. It is advisable to make a ventilation pipe in the lid;
backfill the pit. For additional insulation, you can mix earth with expanded clay.
In such a caisson, you can leave all the equipment for the winter without consequences.
Note that the Abyssinian well also requires the installation of a caisson.
Insulation of a well without a caisson
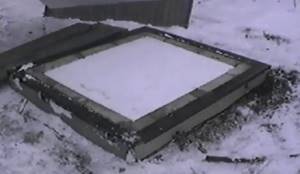
In regions with slightly sub-zero temperatures, the construction of a caisson can be avoided, and insulation will consist of constructing an insulated box located at ground level. The presence of an insulated lid on the box is a mandatory element.
Construction of a protective house over the well
Insulation of casing pipe
Such insulation allows you to do without the construction of a caisson.
How to insulate a well casing
dig out the casing to the calculated depth. A sufficient trench width (0.7-0.8 m) will simplify further work;
insulate the pipe with heat-insulating material. PPU shells are ideal for well insulation. This material is hygroscopic, durable, rot-resistant, thanks to a wide range of diameters it provides reliable sealing, and is also easy to install. If insulation is carried out with mineral wool, it is advisable to protect it by wrapping it in film or placing another pipe of larger diameter on the insulated casing pipe;
fill the trench;
install a clay castle near the head, which will prevent water from flowing along the pipe.
Insulating a well with a heating cable
Heating cable is considered an active method of insulation and the most effective. However, it is also the most expensive of those listed.
How to insulate a well with a heating cable
The heating cable installation technology involves:
a trench is dug (depth - below the freezing point);
installation of a heating cable around the casing pipe. For a low-power cable, a small pitch of turns is selected, a powerful cable is laid in a straight line;
the pipe is additionally insulated with heat-insulating casings;
if necessary, waterproofing of insulation is carried out;
The soil removed from the trench is filled back in.
The good thing about the electric heating system is that you can use it constantly and not have to wonder whether the well will freeze in winter, but you can use it from time to time. For example, installing a sensor will regulate the period of operation and downtime of the system. Also, this approach will allow you to defrost the system after winter or freezing. Of course, installing a sensor involves extra costs, but they will pay off in savings on electricity.
Protection of the well head from freezing
It is recommended to insulate the well in winter (the time of year is of great importance for the design of the system) to isolate the pipeline from frozen layers of soil. The system may consist of a casing pipe and a caisson (or without it). It is recommended to pay special attention to the ambient temperature. This determines the need for additional insulation.
Basic principles of caisson insulation
A caisson is a special device for a water intake system.
This is a tank mounted in the ground, cylindrical or rectangular in shape, made of metal or plastic. You can also create a structure by pouring concrete. It is mounted together with filters, a battery and a pump. The caisson for the well is insulated from the inside. For rooms with good heating, caissons are not used. In winter, it is recommended to carry out waterproofing reliably and efficiently to ensure its tightness. The material used as insulation must be resistant to winter frosts, rodents and insects. Typically gravel or ordinary sand is used. In some cases, a heating device is installed that contains a sensor with the ability to indicate temperature, or an ordinary incandescent lamp is used together with a heating cable.
One way to insulate a caisson for the winter:
Installation of casing pipe for the cap
In winter, the surface of the earth freezes heavily, and, accordingly, the metal pipes, drainage installations, and concrete rings located in it. The influence of frosty air affects the material both inside the pressure pipe and on its outside. If the pump is located shallow, insulation methods are used.
To protect the head from ice, a casing pipe is used. This is an excellent means of insulation up to 0.5 meters. Its diameter must be larger than the head to allow laying glass wool or wool with mineral fibers.
It is not recommended to cover the gaps remaining after the procedure with spray products. This damages the insulating layer.
This installation requires little money and time. It is better to install the casing pipe from metal or concrete , so it will last longer. Plastic can crack and split due to ground movement.
It is recommended to install all the material as tightly as possible to each other; you should not leave slits or crevices (in winter, moisture will penetrate through them and freeze; subsequently, ice will ruin the structure and deformation will occur).
Moisture ingress can be prevented during installation using a gasket. The seal is a rubber expansion filler (hemp stuffing box or sleeve) that helps close the gap between the casing and additional pipes of more than 100 millimeters. The oil seal is made from rubber waste from production; it can withstand temperature changes, soil pressure, and is effective against rodents and insects. Rubber seals can be replaced with lead ones.
Frame construction
For construction you will need the following materials:
- dry timber 5×10 cm;
- board 10×2 cm;
- lining, block house or siding;
- slats;
- flexible tiles
The work of building a well house with your own hands begins with preparing the site. The area near the casing is leveled and compacted.
Frame assembly
The foundation for the building is prepared from various materials: paving stones, tiles used to pave the yard or a concrete foundation. The simplest and most affordable option is concreting corner supports.
- Places for placing timber are marked around the pipe. Pegs are driven into the support areas, then cords are pulled to determine the perimeter.
- Holes are dug 30 cm deep, the bottom is covered with sand 10-15 cm deep.
- The support pillars are inserted into the holes and secured with auxiliary material (stones) at the level. Filled with concrete.
- After hardening (3-4 days), the lower framing of the frame is performed. The beam is connected along the perimeter using metal corners and self-tapping screws.
- The next step is the top trim. It is performed similarly to the bottom one. For structural strength, you can install an additional vertical stand in the middle of each wall.
Sheathing
The choice of material for cladding depends on the owners. It can be lining, imitation timber or a block house, in the form of a rounded log. Sheathing slats are placed on the frame, and if necessary, waterproofing and insulation are laid on them. The casing is attached to the top with self-tapping screws.
Roof of the house
The standard option is a gable roof. To install it, it is necessary to create a rafter system. It consists of trusses - two boards are fastened at the ends at an angle of 30°. Their strength can be strengthened with a crossbar - a plank nailed 20 cm from the top of the truss. You will need two roof trusses. They are connected to each other by a ridge beam. On one of the slopes, two additional beams are nailed to the ridge, which form an opening for the door.
The sheathing is mounted on the rafters. The waterproofing is spread over it tightly. Roofing material is laid on top, for example, flexible tiles or ondulin.
Roof for construction
Manufacturing process
It is best to carry out work in the summer, when the groundwater level drops and does not create additional problems. You need to understand that if you fill the bottom of the caisson yourself, it will take time for the solution to harden, which will interrupt the work for at least a week.
And when using a ready-made concrete slab, you will need to make a hole in it for the casing to exit. This is not easy without special equipment.
Step-by-step instructions for arranging a concrete caisson will help you cope with this work:
| Step by step photos | Description |
| A pit is dug around the well casing, the dimensions of which should exceed the diameter of the concrete rings by about a meter in each direction. This distance is necessary to carry out waterproofing work. The placement of equipment in the caisson must be decided in advance in order to leave the pipe in the center or move it to the side for greater convenience. | |
| A trench is laid from the pit to a house or other facility supplied with water. Pipes leading from the well will be laid in it. | |
| The bottom of the pit is leveled and compacted, and then filled with concrete mortar 10-15 cm thick. The approximate proportions of cement, sand and crushed stone are 1: 1: 2.5. It is advisable to reinforce the base with steel mesh. The poured base is left to dry for a week, covered with a film to protect it from debris and sunlight. | |
| Waterproofing concrete surfaces | The dried bottom of the caisson, as well as all the rings inside and out, are covered with bitumen mastic and each layer is dried. Holes for pipes are pre-drilled in the rings. Their walls are also treated with bitumen. |
| The rings are lowered one by one into the pit. To seal the joints, they are placed on mounting foam or cement mortar. After it dries, the seams are cleaned and treated with liquid glass. | |
| The last to be installed is the floor slab with the hole. A neck is constructed above it from a ring of smaller diameter or brickwork, which is closed with a lid. It should rise above the ground so that water from precipitation and melting snow does not get into the caisson. | |
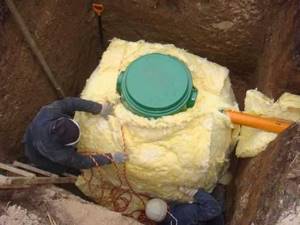
| On the outside of the rings, they are insulated with sheets of polystyrene foam with foamed joints or sprayed with polyurethane foam. If the diameter of the rings is large, the structure can be insulated from the inside. |
After backfilling the soil, the construction of the caisson can be considered complete.
Requirements for insulating materials
The insulation for the caisson must meet certain requirements.
The material must have a low hygroscopicity rate. Otherwise, having absorbed water, it will freeze and the entire insulating layer will be destroyed. If the material used is hygroscopic, it must be covered with a moisture-proof shell.
The insulation must have increased resistance to soil pressure. A decrease in thermal conductivity under load will lead to a deterioration in the quality of insulation.
The insulation material must be resistant to insects and rodents. Having made passages in it, they can get to the pipes and expose them, which will lead to freezing of the water supply.
There are two groups of insulation materials. The first are substances that can withstand frosts down to 15 degrees. These are usually natural materials - sawdust, expanded clay, peat. They are used in areas with milder climates. Their advantage is their availability and ease of use. But these materials are short-lived, and the insulation procedure has to be repeated every season.
What is this
A caisson for a water supply well or septic tank on your own land plot is a sealed device with the following functions:
- creating a positive temperature inside the cavity to prevent water from freezing;
- protection of the volume from the ingress of groundwater and melt water;
- ensuring the optimal distance of the pump from the wellhead;
- concentration of water supply or treatment units in one place;
- preventing people, animals and insects from entering the closed area.
The concentration of all elements allows for compact inspection and maintenance work. Sealing the space increases service life, protects the pipeline, hydraulic accumulator, treatment tanks, and pump from defrosting.
The need for a caisson when constructing a well is to locate the pump as close as possible to the surface of the earth. This makes it easier to install and maintain large and massive units. But there is a risk of defrosting and failure, which is prevented by a closed insulated cavity.
Types of caissons
The main feature of a caisson is a closed cavity. It is located on a private plot, usually underground, due to space saving and rational use of the surface.
The design is made vertically. In a horizontal section the following is performed:
- square;
- rectangular;
- round.
According to the material used:
- Wood
(larch), - the caisson looks like a closed classic well for water. - Metal
- vertical pipe of large diameter (from 1 meter). To increase strength, corrugated products are used. - Concrete (reinforced concrete)
, - a common arrangement of a well (inspection, overflow, connecting, etc.)
The latter option replaced the wooden device due to its improved consumer qualities. An alternative to a concrete caisson is polymer products.
Where to install the caisson?
Gaining popularity, the caisson began to be installed more often in dachas. They are installed against the periodic rise of groundwater to protect your crops for a long time. They can be purchased as a finished product with installation services or installed in-house.
To select a location for installing the structure, you need to know that its walls must be constantly exposed to air flow. The most successful option for installing a caisson is the space under the kitchen with an entrance equipped there. You should know that the hatch cover must close it tightly and not be higher than the floor. It is necessary to carefully examine the location of the proposed installation of the caisson. If the choice of location is elevated and dry, then there will be no problems with the construction of the structure. If the area is swampy, then you need to spend some effort. Due to the reliability of metal caissons, many experts recommend their installation.
Advice from professionals
It happens that the plot was purchased before the onset of winter. The owner had not yet settled in, and the well on the street was already frozen. Professionals advise to soberly assess the situation:
- When a thin crust forms on the surface of the water, it is simply broken with a long rod or a weight tied to a rope.
- When the pipeline is “caught” by frost and the water surface in the well is not frozen, hot water is used for thawing. You can also warm up the pipe with a hairdryer or fan heater.
Freezing of water in winter already signals the need to insulate the water supply source outside.
When water has frozen inside the casing, pump, automation, supply pipeline, it is pointless to reanimate the system in winter. We will have to wait for the end of frost and natural thawing, after which we will carefully work on thermal insulation.
We insulate the inlet water pipe
In addition to the mine itself, the pipeline entering the well and the house also needs thermal insulation. As a rule, in a dacha, the main line leading from the source to the house is laid shallow. This is due to the technically narrow capabilities of the work. That is why it has to be additionally insulated.
Method one into another
Take a plastic or metal pipe with a diameter larger than a water pipe. We will lay it on the base in a trench and lead it to the well, house and equipment. In fact, it will act as a sleeve or case.
There is no need to put it into the mine shaft, 10 centimeters inside is enough, that’s what we will isolate. To facilitate the process, 20–25 centimeters of sawdust are first poured into the trench, on which the pipe is laid. Soft insulation, glass wool, or penoflex is thrown on top. The structure can be covered with soil. We insert a water pipe into the case, leading it into the house and the well.
The air cushion between the insulated sleeve and the water pipe will create an additional barrier to the cold.
Important: for additional waterproofing, the case with insulation is wrapped with roofing felt or polyethylene.
Thermal insulation using penoflex
Modern material, flexible and durable. It looks like cylinders from 3 to 6 meters long. They vary in thickness and density. There is a penoflex for each pipe diameter. In this case, there is no need to use a sleeve. The pipe is completely insulated before installation, gluing all joints with metallized tape. Insulation of highways underground using Penoflex technology is possible at a depth of 70 centimeters.