All materials that can provide protection to various building structures from water and steam are called vapor barriers. Various materials are used as vapor barriers, so the fastening of vapor barriers varies. The various materials needed as a vapor barrier should be strengthened exclusively from the inside of the house. In special cases, for example, if the walls of the building are thin and weather conditions are associated with large temperature changes, a vapor barrier should be installed inside and outside the structure. Vapor barrier materials can be divided into sheet and roll.
When vapor barriering the walls of a house, a vapor barrier film or membrane is attached to the frame studs using a construction stapler.
Which side is the material laid on?
There is a lot of confusion and substitution of concepts on this issue. The fact is that vapor barrier materials in their pure form do not have a working side as such. The protective material is completely impervious to moisture in any form, so it makes no difference how you unfold it. The only exception is anti-condensation films with a fleecy coating. They are designed to absorb settling moisture, therefore, to obtain the full effect, you must follow the general rule - the smooth side of the film is always laid towards the heat insulator. If the canvas is the same (one-sided), it can be laid in any way. The rule is simple, but installation errors most often relate to incorrectly deployed material.
If we are talking about membranes with one-way permeability, the same rule is followed. Usually, the side facing outward has a pattern, and the side that fits against the heat insulator is smooth and without a pattern.
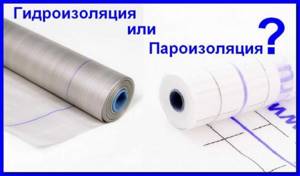
Vapor barrier and waterproofing: what is the difference
As you know, water molecules are larger than steam molecules, so not every material that does not allow water to pass through does not allow steam to pass through. That is, not every waterproofing material retains water vapor, so waterproofing materials are divided into two groups:
- Vapor permeable waterproofing. This is precisely waterproofing, which retains only water without interfering with the passage of steam.
- Vapor barrier or vapor barrier. Water does not pass through these materials in any form.
Differences between vapor barrier and waterproofing
Once again: vapor-permeable waterproofing conducts steam, but does not conduct water. The vapor barrier/vapor barrier does not conduct either steam or water. As you can see, they work differently, so they have different areas of application.
An example of the use of vapor barrier and waterproofing in a floor structure along joists
Let's give an example. Vapor-permeable waterproofing is used in floor construction along joists with mineral wool insulation. It is hemmed from the bottom and prevents water from penetrating into the thermal insulation, but does not prevent steam from escaping from the mineral wool. This allows you to maintain the insulation in normal condition.
In the same case, the vapor barrier is placed on top of the insulation - on the room side. In this case, it protects the insulation from both steam penetration and water penetration. How does the whole structure work? The vapor barrier does not allow water to pass through, which can be spilled on the floor in the room, and it does not allow steam to pass from the room into the insulation. But, all the same, some part of the steam gets inside the insulation through imperfect joints and other defects. Due to the fact that the bottom of the insulation is lined with vapor-permeable material, it can evaporate.
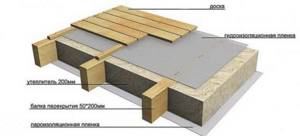
The simplest pie of a wooden floor using joists with insulation
If such a floor is made above the underground, the moisture that penetrates into the underground from the soil through the vapor-permeable film enters the insulation. This is not very good, but a vapor barrier placed on top prevents moisture from entering the house. And wet insulation dries out if there is ventilation in the underground. So, in order for the floor to be dry and warm, it is necessary that there are properly arranged vents in the base.
Is it possible to replace waterproofing with vapor barrier in this cake or vice versa? No. If you lay a vapor barrier underneath, the water will be trapped in the insulation. There it will accumulate and either break through the film somewhere and spill out, or it will simply lead to the insulation turning into dust.
Vapor barrier in a concrete floor pie
In the case of an insulated floor on a concrete base, everything is exactly the opposite. Let’s say right away that a vapor barrier layer is not always needed. This layer is needed if:
- concrete is poured on the ground;
- unheated room below;
- below is a room with high humidity (bathroom, kitchen, swimming pool, laundry room, etc.).
If the concrete floor is above a heated room, neither waterproofing nor vapor barrier is required. You can pack them just in case, but you can also save money.
As you can see, a vapor barrier is laid below, and a vapor-permeable moisture barrier is installed on top. Why? Because the situation is the opposite. Concrete will not be harmed by high humidity, it will only become stronger, so it is very logical to lock moisture in concrete and this can be done with the help of a vapor barrier. It will cut off both capillary suction and prevent the vapor form from leaking into the insulation.
Using a vapor barrier for a wooden floor over a concrete slab
It is better to lay vapor-permeable waterproofing on top of the thermal insulation. It will prevent water from getting inside, but will help maintain the normal humidity of the thermal insulation, as it will not prevent evaporation. Is it possible to replace steam and waterproofing here? Again, no. Otherwise, everything will not work correctly.
Types of vapor barrier:
Materials for arranging vapor barriers are produced in the form of rolls or sheets. Rolled insulation is rolled out vertically and secured with slats or profiles. Fasteners are placed horizontally. Ventilation holes are also required. To install a sheet vapor barrier, you need to install a base, a frame made of profiles. Sheet material is inserted into the finished frame and secured with self-tapping screws. This type of insulation is used for further surface covering.
During installation, special attention is paid to the correct placement of the insulating layer: the canvas is positioned with the inner surface facing the insulation. Mounting features
To firmly secure the insulating layer, self-tapping screws are used; nails are less commonly used.
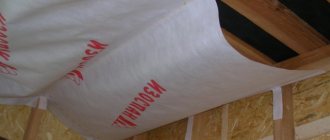
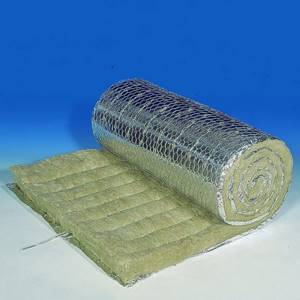
Roll of vapor barrier
Modern range of vapor barrier materials
In construction, it is possible to use several technologies that would protect the structure of the building. There are main types of vapor barrier materials:
Pasted vapor barrier - insulation carried out by pasting the base.
- insulation carried out by gluing the base (glued vapor barrier);
- protective layer of paint material (paint vapor barrier);
- Grouting the base with ordinary sand-cement mortar.
All these insulation methods mainly serve to protect the heat-insulating material from moisture penetrating from the room and are applied to the base of the structure.
Today, modern manufacturers offer quite a large variety of vapor barrier materials that perform several functions at once:
- “Penofol” is a material that is used as insulation, which performs functions and serves for heat, hydro and vapor barrier. Presented as a multilayer composite, covered on one or both sides with aluminum foil, and inside there is foamed polyethylene. There are quite a large number of modifications of this product, which will allow you to make a more accurate choice for a particular case. Thus, “Penofol A” is insulation covered with foil film only on one side, “Penofol B” is insulation covered on both sides with foil film, and “Penofol C” is insulation that has, on one side, a foil coating, and on the other side - a self-adhesive surface. If thermal insulation properties (insulation) are a priority, and vapor barrier properties are in second place, then perforated “Penofol” is used.
- “Armofol” is a foil material (insulation). Usually made from glass mesh on both sides. This modification of the vapor barrier material may have a self-adhesive surface. This material is mainly used for heat, hydro, and vapor barrier of baths, saunas, and bathrooms.
- “Alucraft” - this material consists of three layers: foil, polyethylene and kraft paper. This material is attached to the insulation from the inside to create a vapor barrier, usually under the lining. This material is secured using aluminum tape or a stapler.
- “Izospan B” - the material has a smooth structure on one side and a rough structure on the other. The rough surface serves to retain condensation and further evaporate it. It is used to protect the insulation and structures of buildings from moisture saturation from inside the room.
Variety of materials
To protect surfaces and insulation from moisture use:
- reinforced polyethylene film;
- aluminum coated film;
- film made of propylene fibers;
- membrane vapor barrier.
What where When?
The main role of a vapor barrier material is to protect wooden structures and insulating material from moisture, rotting and, as a result, premature destruction.
It is extremely important to use it on lower floors, above basements and basements, and especially above bathrooms and kitchens. It is also necessary to remember that the insulation protection must be double-sided, since wet mineral or glass wool almost completely loses its thermal insulation qualities. That is, the film is placed between the finished floor and the insulation material, as well as between the insulation and the subfloor
However, often the bottom layer is replaced with waterproofing
That is, the film is placed between the finished floor and the insulation material, as well as between the insulation and the subfloor. However, often the bottom layer is replaced with waterproofing.
Which side should I lay?
You need to know which side to lay the vapor barrier on the floor. An extremely important nuance, since the wrong technology for installing the material will negate all its properties.
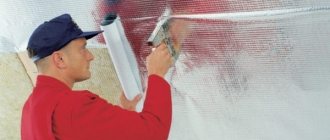
A man lays vapor barrier material on the floor
Here are the instructions:
- The double-sided film is placed with the smooth side facing the insulation and the corrugated side on top. The rough surface acts as a filter for steam and even the smallest drops of water.
- It is customary to lay polypropylene with the wicker side away from the insulation, and the smooth side inside.
- Installation of foil vapor barrier is carried out with the aluminum side facing the room, as it tends to reflect infrared radiation.
- Individual installation technology is possible for individual brands and types of vapor barrier materials.
- Before use, be sure to read which side to place the vapor barrier on the subfloor and insulation.
Laying algorithm
It's not complicated:
- First, the old flooring is dismantled down to the subfloor. Then the base is prepared: debris is removed, cleaned, leveled, treated with antiseptic and primer. Old floor beams or joists that have begun to collapse must be replaced with new ones.
- Hydro and vapor barrier of the subfloor is carried out, preventing moisture from entering the insulation from the ground or lower rooms. The film strips are laid with the correct side (see above) overlapping by 15-20 cm. The edges must be glued with reinforced or double-sided tape. Also, the vapor barrier should extend 10-15 cm onto the walls and joists. It can be attached to beams and joists with metal brackets.
- A layer of insulation is laid on top of the film with the seams staggered and a thickness of at least 20-30 cm.
- A second layer of vapor barrier is laid on top of the insulation, also with an overlap and gluing the joints. If installation is carried out on wooden floor joists, it is necessary to lay the film so that it sag slightly: this way a ventilation gap is created between it and the finished floor. However, it is also recommended to put counter-battens on the logs on top of the vapor barrier, which will prevent the film from coming into contact with the finished floor.
- The finished floor is filled and then finished with the finishing floor covering.
Now you know how to install a vapor barrier on the floor and will not make the mistake of doing your own repairs.
We recommend looking at what happens if the vapor barrier is not installed correctly. Condensation fills the ceiling with water, the insulation gets wet and mold spreads. Don't make these mistakes.
In winter, when it’s frosty outside but the inside of the house is cozy and warm, unnoticeable steam forms in the rooms. And this steam must leave the room freely. To accomplish this task, a vapor barrier is installed. You need to know which side to lay the vapor barrier on the floor, walls or ceiling.
Concrete and film
There is a basement of the house, it is covered with stone-like plaster. Uneven, cracking crap. You need to somehow attach a vapor barrier to it. How? Suggest options on how to fix it?
There is such a moisture-resistant sealant - Sikaflex 221. Apply it along the seams, having previously cleaned the places where peeling begins and apply the sealant. I can immediately warn you that it is black. As for the vapor barrier, I can suggest an option: stick butyl tape to the cleaned surface. There is another option, fix it with an external connection (aluminum at the desired angle)
Masters online: 140 Orders per week: 2,232 Offers per day: 1,405
Alexey, if you want to insulate the foundation with basalt insulation, then it is mounted on the wall and covered with a windproof film, then a ventilated facade. If you use penoplex, then level the wall and also mount it directly on the wall, putty on the mesh and apply a decorative coating.
There is such a moisture-resistant sealant - Sikaflex 221. Apply it along the seams, having previously cleaned the places where peeling begins and apply the sealant. I can immediately warn you that it is black. As for the vapor barrier, I can suggest an option: stick butyl tape to the cleaned surface. There is another option, fix it with an external connection (aluminum at the desired angle)
I found double-sided tape for carpets at OBI, it was written that it can be glued to concrete, everything stuck, everything is fine, today they already put the sheathing on top.. Thanks for the advice.
if the plaster is cracked, it must be removed. Then prime it and then it depends on what you are going to do. It seems to me that a vapor barrier is not the only solution. It is possible to install waterproofing and then everything else.
vapor barrier the base from what? dismantle the old plaster and continue with everything as it should be
a) the plaster is not mine. b) the manufacturer of thermal panels wants vapor barrier on the walls, I honestly don’t understand why it’s there, but the manufacturer wants it, so we have to do it. I wouldn’t want to dismantle it, it’s time and money, in general I’ve already solved the problem with a good double-sided tape for the floors. Thanks to all!
Alexey, vapor barrier is done from inside the room. The only thing that is important to the manufacturer of thermal panels is that these panels of his do not get wet, and he doesn’t care about anything else. I would think 100 times before contacting such a contractor, who does not care that your walls get wet, because the vapors will have nowhere to go, their elasticity will increase and they will begin to condense. But the thermal panels will be dry.))))) Complete bungling! I would still advise you to sort out this issue, otherwise it will be too late to drink Barjomi.
a) I am the contractor, I install these thermal panels, this is Fried. b) everything is explained to the customer of the work, that this is insanity, the customer refers to the manufacturer’s technology - if anything, all the questions go there. I didn't sign up for anything. :-))
How to lay a vapor barrier correctly
The question of which side to place the vapor barrier against the insulation depends on the manufacturer’s recommendations. If the packaging clearly indicates which side should be facing towards the structure and which should be facing inside the room, you must follow the instructions. If there is no marking or the packaging is damaged, it is worth considering the general installation rules.
First of all, the position of the “dew point” is taken into account
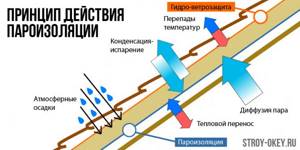
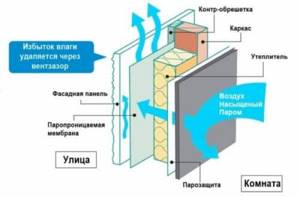
Warm air from inside a building tends to escape into the cooler outdoor atmosphere (most of the year), with interior structures transferring heat relatively easily. Reaching the insulation, the heat flow gradually dissipates; the heat is absorbed by the loose mass of the insulating material. If the outside of the insulation is protected from atmospheric moisture by a waterproofing film, then the question of which side to place the vapor barrier on the roof is decided as shown in the illustration above - between the rafters and the insulation, the rough or reflective surface inside the house. For materials with identical sides (both smooth), the manufacturer does not give any advice regarding installation - the film can be turned towards the rafters with either side. Usually, in this case, it is customary to nail the film directly to the rafters with staples; accordingly, it is better to choose a material of increased strength. It will not sag in the spaces between the rafters and will not tear under the weight of the insulation.
When deciding which side to lay the vapor barrier in the attic from the inside, you should take into account information about whether the room is heated or not. For heating, the film is laid on the inside of the rafters so that there is a gap of 10...15 mm between the insulation and the film, with the reflective side facing the inside of the room. If the roof gets very hot and moisture condenses on the outside, you can turn the film the other way around. In this case, it is convenient to use a material with a rough surface for moisture condensation.
In the case of installing a vapor barrier in a room, the question of which side to place the vapor barrier on the ceiling is solved as follows: for ordinary rooms, the reflective or rough side turns into the room, for rooms above hot and humid rooms (for example, a relaxation room above a steam room) - vice versa. The same goes for gender. Vapor-impermeable films can be installed arbitrarily.
For walls, the general principle is used - you need to retain heat inside the room. Therefore, the vapor barrier is installed from the inside and usually with the help of dense, vapor-impervious, reinforced polyethylene films. Here, the question of which side to attach the vapor barrier to the wall is not fundamental - the films retain heat and moisture equally, regardless of the mounting side.
Which side should you put the insulation with foil on? Types and installation
When insulating a home, the home handyman will have to solve two problems:
- insulate walls from excess heat entering the room;
- and also retain internal heat.
The solution can be found in various ways, because these days there are many thermal insulators, each of which has unique properties.

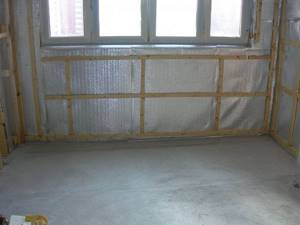
In the photo, foil insulation is laid on the wall.
One of the highest quality and innovative materials is foil insulation, one side of which is a reflector, keeping the room warm by reflecting IR rays. At the same time, the foil side is also a high-quality vapor and water insulator, which protects the insulation from the effects of condensation.
However, in order to produce high-quality thermal insulation using such materials, it is necessary not only to choose high-quality insulation, but also to figure out how to properly attach the insulation with foil, which we will talk about in this article.
Vapor barrier laying technology
After choosing a vapor barrier, it is also very important to install it correctly. This is not difficult, but requires care when installing, since in most cases the vapor barrier material has an external and internal surface in relation to the insulation
Choosing a side
Among builders, there are two opinions on which side to lay the vapor barrier against the insulation. Some believe that the vapor barrier should be attached only to one “correct” side, while others believe that it does not matter which side the vapor barrier is attached to. All vapor barrier membranes come in two types:
- for one-sided installation, this type of vapor barrier is attached to only one side;
- double-sided, which can be worked with regardless of its side.
Before installing the vapor barrier, you should carefully study the instructions included with the material itself. If there is none, remember these simple rules:
- The outer side of the vapor barrier has a pile in which moisture is retained and then evaporates. The inner one is smoother. It is the smooth side that should come into contact with the insulation.
- If the vapor barrier material has a different color, then the light side will be the inner side and should lie on the insulation.
- Usually the vapor barrier is sold in rolls. When rolling out such material, the side that will be facing the floor will be the inner one.
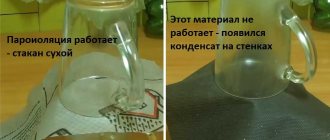
If you still have doubts, you can do a small experiment. Take a small piece of vapor barrier membrane and cover a mug of hot water with it. Condensation will appear on the side of the film that is waterproof, which means the inside.
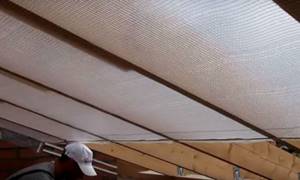
Installation of vapor barrier film on the ceiling
After determining the inner and outer sides of the vapor barrier, there are no further questions about how to properly lay the vapor barrier. But still, a few nuances need to be taken into account:
Before laying the vapor barrier, it is necessary to carry out preparatory work. First of all, it is necessary to treat all wooden elements with special agents against insects, fungus, rot and fire. Subsequent work should be carried out only after the impregnation has completely dried. Irregularities on the surface to which the vapor barrier will be attached should not exceed 0.5 cm. If the house is located in a climate zone where there are frosts below -25˚C in winter, then a vapor barrier must be laid on both sides of the insulation. When installing, pay special attention to the corners
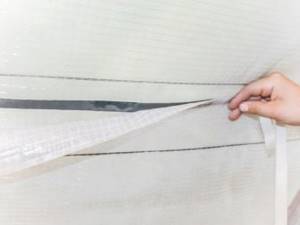
It is important that the corners are covered with a solid film. It must be well stretched. At the joints of the canvases, the vapor barrier must be laid with an overlap of at least 10-15 cm. With less overlap, moisture can penetrate inside.
Seal the joints with tape
You need to use special tape, preferably the same brand as the vapor barrier. The film is attached to the beams using a stapler. If installation is carried out between beams, you can use slats and screws with a wide head.
Laying vapor barrier on walls and ceilings
After installing the insulation on the walls, a vapor barrier film is laid. Which side to lay towards the insulation was discussed above. You just need to consider the following:
- The vapor barrier must be well tensioned so that it does not sag, there are no unevenness and so-called waves.
- The joint should overlap 5-10 cm and be securely taped with wide tape.
- The film should fit tightly to the insulation.
- Near window and door openings, it is necessary to leave 2-4 cm of vapor barrier film “in reserve”, since shrinkage or deformation of the material may occur during operation.
- There should be a small gap between the vapor barrier and the facing material for ventilation and condensate removal.
- After laying the vapor barrier, it is necessary to cover it with finishing material as soon as possible, since this material is “not friendly” to sunlight. If you leave the vapor barrier uncovered for just one season, ultraviolet radiation will do its dirty work and all your work will go down the drain, and the vapor barrier membrane will have to be replaced.
When laying a vapor barrier film there is nothing complicated and no special skills are needed. The main thing, as with any other work, is to be careful, take your time and read the instructions of the manufacturers of the material you are working with. Then there will be fewer mistakes, the house will be warmer, the mood will be excellent and you will be proud of your creation.
About foil insulators
Mineral wool with a layer of foil.
An absolute reflector has not yet been invented, but polished aluminum foil is very close to the absolute, because the material is capable of reflecting up to 97% of radiation . At the same time, the foil coating can withstand temperatures up to 500 degrees. It is thanks to such high characteristics that aluminum foil is one of the main components of a highly effective thermal insulation product.
According to experts, significant heat loss in houses and apartments occurs through infrared rays. And to prevent heat leakage, foil insulators or insulation materials that have a not very thin aluminum surface should be used. As practice shows, these materials perfectly retain heat in a room by reflecting IR rays.
When working with heat insulators of this type, it is necessary to take into account certain nuances, otherwise the result will not meet your expectations. Therefore, the question is: “how to lay insulation with foil?” in this case is very relevant.
- Like any other object, the aluminum surface is capable of heating, which leads to the fact that the material transfers heat towards the street, and accordingly, it cannot heat up.
The sheathing over the insulating layer is needed to provide an air gap.
- In connection with the above circumstance, manufacturers of such insulation indicate that it is necessary to leave a 20 mm air gap in front of the aluminum (on the inside of the room).
- This gap is necessary to ensure that the material does not heat up either due to direct heat transfer or convection. Here it is very important to know how to lay insulation with foil. The material is laid with a foil layer inside. In this case, the IR rays that hit the foil will be reflected back into the room.
Advice! When buying insulation, make sure that it is covered with aluminum foil. A thin layer of aluminum coating will not work because it is not able to contain IR rays.
Types of foil insulation
Now let's figure out what the insulation with foil is called. Such materials are a heat-insulating layer to which aluminum foil is welded.
That is, the choice should be based on two aspects:
- Based on the thermal insulation layer itself.
- Based on the quality and density of the foil itself.
Penofol is one of the best foil insulators.
Nowadays, there are various foil-coated thermal insulators produced by a number of companies, both famous and little-known.
However, if you are results-oriented, then you should pay attention to the following products:
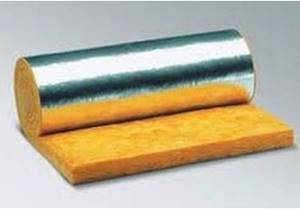
- Mineral wool insulation with a foil layer. Produced by a number of well-known companies, such as, for example, Rockwool. This material is an ideal insulator for surfaces that heat up to high temperatures (for example, baths). Mineral wool is also often used when laying pipes.
This is a universal heat insulator that is used to insulate loggias, interior partitions, floors, ceilings and roofs, as well as facades. The foil layer in this case serves not only as a reflector, but also protects the insulation, because mineral wool is known for its intolerance to moisture.
- The material is based on foamed polyethylene foam, on one side of which a layer of aluminum foil is welded. The most striking representative of this type is penofol - an excellent insulator, which has a thin layer, which is an undeniable advantage over mineral wool.
It is a universal material that can be used both independently and in combination with the same mineral wool.
- The third type is foil insulation, on the other side of which there is a self-adhesive surface. Most often used as a vapor and waterproofing agent.
Aluminum adhesive tape.
Installation of foil insulator
We will consider the most effective insulation option, which you can easily do with your own hands. Mineral insulation will be used as the main heat insulator, and penofol will be used as an additional insulator.
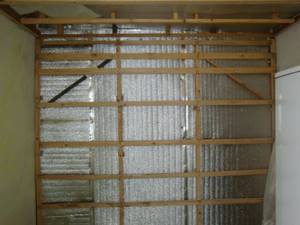
- We mount hangers on the wall to which wooden slats will be attached. The pitch between the hangers should correspond to the width of the insulating mat.
- We attach slats to the hangers, the width of which should be 2 cm greater than the width of the insulating boards.
Advice! It is advisable to treat the slats with protective compounds.
- We lay insulator slabs between the slats.
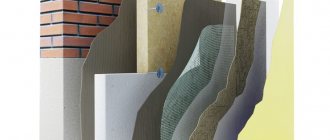
Wall thermal insulation diagram. 1. Wall. 2. Penofol. 3. Mineral wool. 4. Lathing. 5. Facing.
- Now let's move on to how to properly install insulation with foil. We fill the slats with penofol on top, with a foil layer inside the room.
- In the places where the penofol is attached to the sheathing, we stuff vertical bars, 2 cm wide. They are needed for ventilation.
- The next layer is the facing material - lining or drywall.
This method of insulation is quite simple and corresponds to modern ideas about the concept of “price/quality”.
Installation
In order to properly install a vapor barrier, you must first know what the house is like. It can be frame or made of timber. The fact is that laying material indoors and outdoors is not the same thing. Laying will be done differently.
- If we talk about external vapor barrier, then it is necessary to protect the house from the effects of cold wind; you should use a layer that will perform this function. Waterproofing is only needed when the building is old and needs to be protected from moisture.
- If a layer of waterproofing is laid inside the walls, then you should know that when water evaporates on the surface of the material, it must go somewhere. That is, the connection to the insulation should not be too tight - a small gap should be left.
- If the house is made of cylindrical timber, then there is already a gap for drainage, since the timber has a natural rounding. In this case, the membrane must be attached directly to the logs using a stapler. Afterwards it is necessary to make the lathing and install the internal finishing material.
If the vapor barrier is carried out from the outside, then in this case the film should, as it were, lie under the sheathing layer and adhere well to the insulation. At the same time, there should also be a place for condensate to accumulate and drain. In this case, the technology will be as follows:
- if the log is round, then the vapor barrier will be secured using a construction stapler;
- all joint surfaces must be glued using construction tape;
- if the house is frame or made of rectangular timber, the membrane must be placed on the counter-lattice in the same way as it was done from the inside;
- the film is nailed with wooden slats at the same intervals as the counter-lattice posts.
You should pay attention to another option for installing a vapor barrier, which is universal. This method will be used when mineral materials are used as a heat insulator.
This process consists of the following steps:
The vapor barrier film must be positioned on the side that is needed, and then carefully and efficiently fasten it to the sheathing. Damage to the film in this process is unacceptable; after this, you should glue any possible cracks, as well as places where there are punctures or overlaps; a sheathing should be made using beams to form good ventilation; Drywall, wall panels or necessary finishing materials should be placed on the structure.
It is necessary to figure out when it is really possible to simply insulate the walls with polyethylene film, and when better protection is needed. In this case, there are two options.
- If polystyrene foam, polyurethane foam or something similar is used as insulation, then there is no need to install a film to protect them, since it is not typical for them to absorb moisture. But if the house is insulated with ecowool or mineral wool, or with a material such as sawdust, then a membrane should definitely be used, since wool that has become damp will definitely become rotten in just 1-2 years.
- If the house is old and made of a wooden frame or a bulk structure, then a moisture retention layer will be necessary in any case to protect the wood itself.
Features of using foil insulation
The use of materials with foil for insulation depends on a couple of indicators: the properties of a particular heat insulator and the place where it will be used. In general, with the help of such thermal insulation, floor structures are insulated, the heat transfer of heating radiators is increased, and air ducts and pipelines are finished. Thermal insulation of entrance doors of verandas, loggias, porches and balconies also gives excellent results
When installing foil-type insulation, you need to acquire all the necessary tools for the job:
- Construction stapler.
- Small carnations with large heads.
- Nail puller and hammer.
- Construction tape with foil coating.
- Direct insulation with foil.
The most common mistake many builders make is incorrect installation of the material with the foil surface facing outward. Due to the fact that the foil is a reflector, it is designed to return heat to the room. But if you place the insulating material on the wrong side, you won’t be able to achieve this effect.
When laying foil insulation , it is recommended to enclose it in a wood sheathing.
Slabs, rolls or sheets of material must not be laid overlapping. They must be installed strictly on the same plane, secured with nails or construction staples.
Material with an adhesive surface does not need to be secured with additional fasteners, but to increase service life it is still better to use small nails. In the absence of an adhesive coating, rubber or acrylic adhesive can be used to fix the material on the surface.
After installing and securing all layers of heat insulation, the joints between them must be treated with foil tape. This completes the installation.
When installing a heat insulator on vertical surfaces that have mold, wallpaper or dirt on them, they must first be cleaned, otherwise the fixation will be very unreliable, and the material will simply fall off over time. In addition, it is recommended to treat the surface with antiseptic agents.
Vapor barrier of walls from inside a wooden house
The vapor permeability of a wooden base largely depends on the tightness of the sealing of seams, grooves, and the absence of cracks in the wood.
Therefore, the walls of a wooden house often require auxiliary protection - the installation of a vapor barrier layer during their insulation.
Vapor barrier can be done on the inner surface of the tree, but such a solution will not be entirely correct. The best option is to install a sheathing, which will later serve as a frame for the internal cladding.
To do this, wooden planks are placed on the base surface in a vertical direction, which are leveled (wedges are placed along the depressions, and the material is removed on the protrusions). First, the outer slats are set, along which the intermediate slats are aligned using a thread.
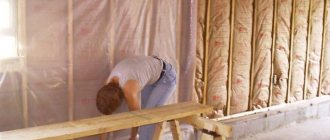
The insulating material is stretched onto the sheathing from the bottom up and secured using a construction stapler.
It is necessary to lay the insulation in such a way that the matte rough side is directed inward, this reduces the formation of condensation. There is no need to stretch the film very tightly, since after a while the wood will dry out, the tension may increase and the vapor barrier will simply break.
The canvases are overlapped and taped with moisture-proof adhesive tape.
A canvas with a self-adhesive strip along the edge will help speed up the process, thanks to which the joints are reliably glued without additional time spent on their subsequent gluing.
To install a vapor barrier indoors, the following materials are used:
- polyethylene film, the thickness of which is more than 0.1 mm;
- membrane film;
- mastic (excellent for plasterboard bases, the material perfectly allows air to pass through while retaining moisture);
- aluminum foil, at least 1.02 mm thick.
The foil is laid with a reflective surface towards the air space, this ensures a decrease in the degree of heat transfer.
Estimated cost of the material (depending on the manufacturer), the price is for 1 roll:
- aluminum foil – 800–6300 rubles;
- connecting tape – 150–500 rubles.
To effectively install a vapor barrier layer, you must adhere to certain rules:
- Inside the house, vapor barrier materials are mounted on the walls, which divide the living space into zones. These areas are often insulated with mineral wool, which, accumulating moisture, loses its positive properties. Therefore, it is recommended to lay a vapor barrier on top of the insulation.
- It is best to secure the film on the inside of the base with wooden planks pre-treated with an antiseptic. It is laid on both sides of the partition bases. At the junction, an overlap of approximately 2.5–3 cm should form between the panels, while the edges on both sides should not coincide with each other, and the distance between them should exceed half a meter.
- For effective ventilation of the walls and an optimal environment, the insulation is mounted on the inside of the thermal insulation layer.
Why do you need to install a vapor barrier inside and outside your home?
When finishing the walls of a house inside and outside, insulation materials are often used, which absorb moisture like breathable materials. As a result, a condensate collection point appears. This leads to destruction of the insulation, the appearance of fungus, deformation and damage to finishing materials (detachment of wallpaper, falling off of tiles, deformation of plasterboard sheets).
To create the desired microclimate in the room, a vapor barrier is used that can prevent moisture from reaching the insulation. At the same time, many of these components are breathable, which is necessary for both walls and finishing materials. This feature allows for ventilation, which is necessary for all elements on the walls.
Cases when vapor barrier is required:
- When the walls inside the room are insulated with mineral wool. It is breathable and breaks down when exposed to moisture.
- Walls covered with plasterboard and other cladding. Basically, condensation is created between the rough wall and the cladding, which negatively affects the finish.
- A vapor barrier layer is installed on the outside to protect the walls from external moisture. This is done when insulating the facade of a building.
To create the necessary climate in a room with a vapor barrier, a ventilation system is necessary.
Laying stages
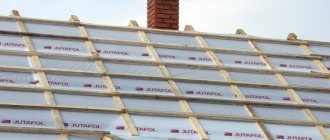
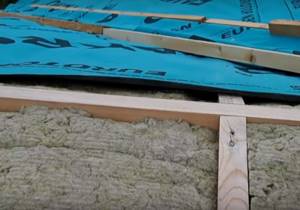
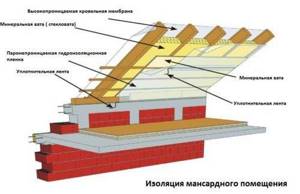
Let's look at the process of installing a vapor barrier step by step. It must be taken into account that the installation of insulating material is only an integral part of the overall process of installing the roofing and insulation pie. Therefore, it is quite difficult to highlight only the installation of a protective film.
The insulator is laid on both sides - between the roof and the insulation, and on the attic side on top of the heat insulation.
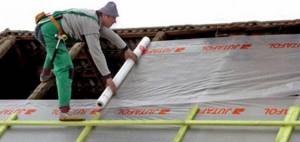
- The first step is usually to lay the outer layer. Most often, diffusion membranes or similar materials are used to remove residual water vapor from the heat insulator.
The membrane is laid before the roofing is laid. The material is laid in longitudinal strips, starting from the bottom (from the eaves area); strips are spread, trying to avoid wrinkles
This is important, since the connections are glued with a special adhesive tape. In some cases, two types are used - double-sided tape and a special wide adhesive tape to secure the connection line; The amount of overlap is usually 10-15 cm (it is often marked on the film with special marks)
When laying, you must act carefully, avoid tears or cuts of the tape. Particular attention is paid to the tension of the material - it should not sag, but excessive load is also dangerous, since when fixing the strips with a stapler, breaks are possible; the finished canvas must be completely sealed. All areas adjacent to supporting structures, cornices or ridges must be secured with double-sided tape or a special adhesive.
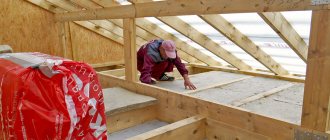
- Laying the heat insulator. This procedure is performed from the attic side (from the inside). Different materials are used - mineral wool, polystyrene foam, penoplex, etc. There is no point in considering the installation of insulation, since this is a separate and responsible procedure.
- Installing a vapor barrier from the inside. It uses a basic insulating film that is completely impermeable to any moisture. If the region has frosty winters, it is recommended to use foil material to save thermal energy. Installation procedure:
- The first strip is laid from the bottom. The side edges are glued (or fixed with slats) to the rafters. It is necessary to provide a temperature reserve in case of changes in the length of the web. To do this, a deformation fold is made near the edge of the strip, which is fixed with a clamp. With any changes in length, it will maintain the strength of the fastening and the overall tightness of the canvas. The length of the strip is attached to the rafters using a stapler;
- subsequent strips are installed overlapping. Its size is marked on the film and is 10-15 cm. The strips are connected to each other with double-sided tape and adhesive tape connecting the joint from the surface side;
- All areas of passage through the roof, adjoining walls or supporting structures are carefully glued with special acrylic glue or other materials. If the surfaces are smooth, you can use double-sided tape.
The last step should be the installation of longitudinal strips on top of the vapor barrier sheet. They are needed for installation of sheathing (OSB, chipboard, plywood, other sheet materials) and subsequent finishing. These strips are attached horizontally to the rafters. It is imperative to cover the joint lines of the vapor barrier strips with them. This will help protect the joint areas of the material from damage.

All passages of pipes, antennas or other structures must be insulated with special care. Special materials are used - adhesive tapes, sealant, etc. There should be no cracks, gaps or other openings through which moist air can enter the roofing pie. Otherwise, all efforts and expenses will be useless.
The use of foil insulation
The use of materials depends on their technical features.
- Foamed polyethylene is universal. It can be used for wall and floor insulation and sound insulation.
- Folgoizol is used in construction, pipe and roof insulation.
- Foil-coated mineral wool is used to insulate and retain heat in walls and floors. Unlike ordinary mineral wool, foil does not allow moisture to penetrate into the fibers.
- Basalt insulation is considered the most highly effective, as it is not susceptible to moisture, fire, or temperature changes. Used to isolate various objects.
- Expanded polystyrene slabs are used to insulate the floor.
All materials coated with aluminum foil have high technical characteristics.
Tips and tricks
The main purpose of a vapor barrier is to prevent water pores from leaving the room through the insulation and surfaces. This means that the vapors, one way or another, remain in the room, and in order to prevent the humidity from increasing and the microclimate from being disturbed, it is necessary to carry out natural or forced ventilation in a timely manner.
If you are interested in the question of what kind of overlap to make if parts of the membrane overlap each other, then we advise you to pay attention to the films themselves. There are markings along their edges - they indicate how exactly the overlap of the films should be.
Depending on the type and company, the value indicated there is no less than 10 cm and no more than 20.
For information on installing a roof vapor barrier and which side to lay the vapor barrier against the insulation, see the following video.
Properties
The materials used in production are most often environmentally friendly, safe for health and the environment.
Related article: Transparent bath
Advantages:
- light weight;
- durability;
- resistance to loads;
- protection against moisture penetration;
- high rates of heat saving and sound insulation;
- resistance to temperature changes;
- ease of installation;
- high reflective properties.
Such insulation can be used in any premises. In addition to the described qualities, it is capable of reflecting radiation.
How to properly install a vapor barrier on the floor
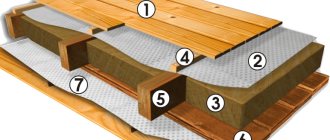
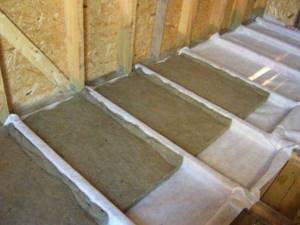
Scheme for laying vapor barriers when insulating floors along joists in a wooden house.
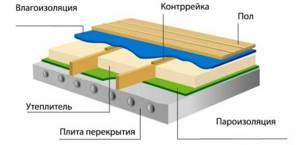
Insulating a floor is not much different from a roof, the only thing is that there is no finishing of the subfloor. Thermal insulation is laid between the logs of a wooden house. A subfloor is first laid underneath, which should not be solid, that is, between the narrow boards there should be indentations no less than their width. Thanks to these indentations, steam will have the opportunity to leave the insulation. Moisture enters the thermal insulation along with the air from the room, so the layers of floor insulation in a wooden house should be laid as follows:
- finishing floor;
- vapor barrier;
- insulation;
- wind protection or waterproofing.
A gap between the insulation and the vapor barrier is not required, but whether it is needed between the finished floor and the film is a controversial issue. Let's return to the moment when we talked about replacing the concept of a buffer air zone with a ventilated gap. Essentially, a ventilation gap is a space where constant air circulation occurs; if this does not exist, then it is just a buffer zone.
The classic version of the ventilation gap can be seen in the structure of the roof and ventilated façade. When insulating walls from the inside, it is still possible to achieve circulation in the buffer air zone, but with the floor it is more and more difficult. We need to make holes in the floor, but there is no guarantee that air will circulate there the way we need and whether it will at all.
Therefore, many craftsmen refuse a ventilation gap between the finished floor and the vapor barrier, and the same applies to walls. But if you look from the other side, a gap is still needed. Even if moisture condenses on the film, it will not be absorbed into the material in contact with it, and accordingly, it will not mold.
Instructions for attaching vapor barrier
For each structural element of a building: floor, walls inside and outside, interfloor ceiling (ceiling), roof, balcony, attic, there is its own technology for laying vapor barrier film. You need to know which side to attach the vapor barrier in a frame house.
Floor
Floor insulation is carried out in several ways: under a “floating screed”, “floating floor” and along joists. Consequently, there are different vapor barrier schemes.
According to the lags. There are two ways to protect a wooden floor from steam.
- If the logs have not yet been installed, the film (type C) is simply rolled out over the base of the floor, overlapping, overlapping the walls. It is attached with tape only to the walls. The logs will be rigidly fixed below. The joints are sealed with self-adhesive tape.
- When the joists are installed, the film not only covers the base of the floor, but also wraps the joists, leaving a small fold near each of them, so that when laying the insulation, the film does not stretch or tear. As in the first case, climbing the walls is mandatory. It is attached to the joists with brackets with a leg of 8-10 mm and a pitch of 50 cm. The attachment points are sealed with tape.
Under the screed. Protection of floor coverings from steam is not always carried out. So under ceramic tiles, waterproofing work is sufficient.
Under the laminate, a substrate made of:
- expanded polystyrene (trademark "Penoplex");
- polyethylene foam;
- bitumen-cork material (trade mark “TUPLEX”).
If the substrate is coniferous or cork, then a simple plastic film is placed under it. Double vapor barrier using polyethylene is gaining popularity: between the base of the floor and the screed, and additionally between the screed and the laminate.
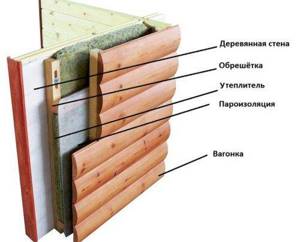
Frame house
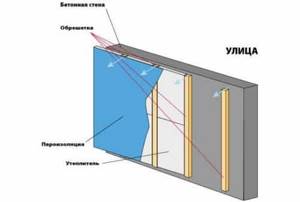
When insulating walls in a frame house, vapor barrier is carried out on both sides: from the inside of the building with a film with complete vapor impermeability (type C), on the outside - with a windproof membrane (type A). From the inside, the film is attached with staples to a wooden frame, from the street side - with a counter-lattice. This fastening allows you to solve several problems simultaneously:
- secure the windproof membrane;
- create a ventilation gap;
- serve as a lathing for facing material.
Facade
The facade vapor barrier scheme does not depend on whether the house is wooden, brick or concrete. The membrane is always laid over a thermal insulation layer. It is attached with a counter-lattice, which allows you to create a ventilation gap.
An exception to the rule is the “wet” method of insulation. No vapor barrier work is carried out here.
Wall from inside the room
When insulating a wall from the inside, regardless of the type of wall material, the vapor barrier is made of a vapor barrier film (type B). It is attached to the sheathing with a stapler, but the best solution is with counter-straps (then it is convenient to attach drywall to them). Place the smooth side against the insulation. The fastening points are sealed with tape.
Sometimes you can find recommendations to lay vapor barrier membranes between the wall and the insulation. In the opinion of the editors of the StroyGuru website, such a proposal is absurd. Let's try to explain.
- If the membrane has one-way conductivity, then there is no point in installing it for one simple reason: the higher partial pressure inside the room directs the flow of vapor molecules outward. Nothing should interfere with the removal of steam from the insulation.
- If you attach a type B film, the air flow from the room will reach the wall surface and condense there.
- Installing vapor barrier films on the outside of the insulation and between the walls stops the steam inside the thermal layer - it will break through into the insulation material in any case.
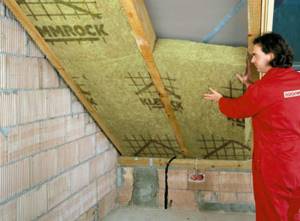
Attic
When insulating an attic from the inside, it is best to use a vapor-proof film (type B), and from the outside - type A membranes. They are laid on the insulation with the smooth side. Attached to the rafter system and beams with a stapler. The staples are sealed with construction tape.
The foil material is laid with aluminum coating inside. Fastened with wide-headed nails or a stapler. The fastening points are sealed with metallized self-adhesive film. A ventilation gap must be installed outside.
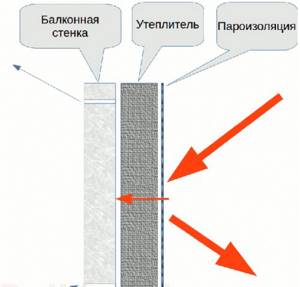
Balcony
When insulating a balcony with basalt wool, experts recommend abandoning vapor barrier. The use of other types of insulation requires the installation of a vapor barrier material using the technology used to insulate walls from the inside of a room.
What materials are used
The building materials market offers various types of water vapor barrier that have excellent characteristics. As a rule, breathable membranes and films are used to protect the walls of wooden houses from moisture, but there are other types of vapor and waterproofing. What materials are suitable for home insulation and vapor barrier:
- Ruberoid. The advantage of this type of material for waterproofing is its low cost, but roofing felt is more suitable for laying on the roofs of outbuildings than for protecting the walls of wooden houses. In addition, it is more appropriate to use such a product not as the main vapor barrier, but as an additional layer to more effective materials.
- Aluminium foil. The film is coated with metal on one side and has a reinforced mesh on the other. This device helps create a vapor barrier inside the room and a layer that reflects heat. To insulate a wooden house, a foil vapor barrier is spread with a metallized coating on the outside. Such material must be placed on the walls carefully so as not to damage its integrity. If you decide to foil your home, your home will not only be protected from corrosion, but also insulated.
- Diffusion membrane. Vapor-permeable material protects the home from moisture, regulates its amount, thanks to the ability to allow air to pass through (from two or one side). The vapor barrier membrane has a high vapor permeability coefficient, which is due to the microstructure of the material. A significant advantage of the diffuse film is the absence of a ventilation gap between the thermal insulation and the membrane, which ensures the most efficient use of space. Such a vapor barrier for the walls of a wooden house provides good insulation of the room. Unlike other types of vapor barriers, the membrane has a high price - this is its only drawback.
- Polyethylene or polypropylene film. Compared to polyethylene, polypropylene is more durable and weather-resistant. However, a vapor barrier film made from this material previously had a significant drawback - condensation formed on the insulation side of it, which led to a rapid loss of the performance characteristics of such a vapor barrier for walls. The modern type of material has a special layer of viscose containing cellulose. It absorbs a large amount of moisture, gradually drying under the influence of air ventilation. The main advantages of films for the walls of wooden buildings are their affordable cost, durability, and ease of installation.
Related Posts
- Everything about installing heated floors
- Vapor barrier of walls of a wooden house: choice of material
- Vapor barrier for ceilings in wooden floors: materials and installation features
- Insulation of a veranda in a wooden house
- Hydro-vapor barrier “isospan b”. characteristics and instructions where and how to use insulating material
- Fum tape technical characteristics, how and how much to wind on the thread
- Subtleties of attic floor insulation
- How to update old tiles in the bathroom
- How to cut metal using a grinder
- How to quickly and easily unscrew a tightened nut on an angle grinder
- How to insulate the ceiling in a bathhouse with your own hands
- How to glue fiberglass correctly?
- Why line the roof and ceiling with clapboard and how to do it correctly? nuances of the procedure
- How to check grounding
- How to properly insulate a wooden house with mineral wool
- Insulation of a concrete floor in an apartment
- Insulation of a house made of 150x150 timber from the outside
- Restoring the handle of a plastic window
- How to make a ceiling in a private wooden house and do-it-yourself finishing
- How to build a children's sandbox with your own hands
- Why does a water heater shock and what to do?
- When health is in your hands: a bathhouse that will be the envy of your neighbors
- How to make markings with your own hands for the foundation: rules
- How to seal the joint between the bathtub and the wall? 8 popular options
- How to remove a suspended ceiling: working with harpoon, cam, wedge fastening, dismantling PVC cloth and seamless fabric covering
Read with this
- Everything about installing heated floors
- Vapor barrier of walls of a wooden house: choice of material
- Vapor barrier for ceilings in wooden floors: materials and installation features
- Insulation of a veranda in a wooden house
- Hydro-vapor barrier “isospan b”. characteristics and instructions where and how to use insulating material
- Fum tape technical characteristics, how and how much to wind on the thread
- Subtleties of attic floor insulation
- How to update old tiles in the bathroom
- How to cut metal using a grinder
- How to quickly and easily unscrew a tightened nut on an angle grinder
Technical characteristics and price issue
It is impossible to name the general characteristics of all foil-type insulation - different materials have different properties. But you can consider the characteristics of the most popular and affordable insulation materials.
Insulator made of foil and polyethylene foam
In most cases, the material is sold in the form of compact rolls. The thickness of the insulation varies from 2 millimeters to 1 centimeter. Foamed polyethylene can be coated on both sides or on one. In addition, self-adhesive material is available on sale, when one of its surfaces is covered with an adhesive layer and a protective film.
The scope of use of polyethylene foil insulation for walls is, as a rule, not limited: they are used for insulation of floors and walls, roofs, ventilation, refrigerators or pipelines. Also quite often, this type of heat insulator is used for installing heated floors, for insulating baths, and as a finishing coating for linoleum or laminate.
To prevent heat from escaping through wall structures, a layer of insulation based on polyethylene and foil is secured behind the heating radiator so that there is about two centimeters of free space between the insulation and it.
Foil-coated polyethylene is often used in shoe production - good shoe insoles are made from this material.
In building materials stores you often find such names of materials as Ecofol, Izolon and Penofol. The price of one roll is directly dependent on the thickness of the material. For example, a roll of thermal insulation with foil 2 millimeters thick will cost about 1,700 rubles. With a thickness of 1 centimeter, the cost will be about 3,500 rubles.
Mineral wool with foil
In this type of heat insulator, only one side is often covered with foil. It is sold in two different formats: rolls and slabs. The thickness of the thermal insulation layer is from 4 to 10 centimeters. It is made on the basis of basalt wool or fiberglass.
The use of foil mineral wool is limited, since the material is harmful to human health, it causes lung diseases and releases phenol into the surrounding space. It is mainly used for external insulation of buildings and non-residential premises. Basalt wool is not subject to combustion; it is installed if resistance to high temperatures is required: on fireplaces, stove pipes, etc.
Properties such as moisture absorption, density and others depend on the brand and type of wool, as well as the characteristics that were included in the material by the manufacturer. The good waterproofing properties of this insulation make it possible to use it in showers, saunas and baths.
The most popular brands are Izover, Parok, Ursa and Rockwool. The cost of the material is approximately 1,300 rubles per 0.25 cubic meters.
Foiled polystyrene foam insulator
This is a high-strength thermoplastic, which is obtained by melting polystyrene granules. Produced only in the form of individual slabs. Such material can be used in places that are subject to significant mechanical stress and moisture - strong polystyrene with foil is not susceptible to rotting and mold or mildew. Therefore, it is often used when installing a warm water floor. The average cost is 90 rubles per slab.
How difficult is it to make a vapor barrier with your own hands?
Despite the fact that vapor barrier of walls in a house is an important point for protecting the structure from destruction, it can be done independently. To do this you need to follow the rules:
- You need to know how to carry out installation correctly in specific cases (high humidity, wooden walls).
- Before carrying out installation work, you should familiarize yourself with the technical characteristics of the selected material.
- The roll must be cut by clearly measuring the correct length. The fewer joints there are, the better for the building.
- Fixing the layer cannot be done simply with nails to the surface. Over time, the vapor barrier will tear and weaken. Be sure to use either wooden slats or a stapler.
Materials and tools required for installing vapor barrier
Before laying the vapor barrier part of the roofing pie, it is necessary to check whether everything is prepared for such work. To install a roof vapor barrier, you will need the following materials and construction tools:
- vapor barrier material, as mentioned above, it is best to use a vapor barrier film;
- construction tape or adhesive tape necessary for joining vapor barrier sheets;
- fasteners, which can be flexible dowels or metal staples for a construction stapler;
- wooden blocks with a small cross-section. They must be pre-treated with an antiseptic. This will increase their service life; construction tools: hammer, stapler, pliers and scissors.
After all the necessary building materials and tools are ready, you can talk about how to properly lay the vapor barrier material.
Purpose of the vapor barrier layer
It is important which side to mount the vapor barrier on and which side to place it towards the insulation
Without a vapor barrier coating, when there is a temperature difference in winter, moisture penetrates into the insulation in contact with cold and warm air. It is in a state of condensation, but then transforms into water. In a humid environment, germs and mold form, and metal elements begin to rust. The hydrobarrier eliminates these processes.
Dew point and vapor barrier
Inside the walls, at the moment of contact between the warm air masses from the room and the cold outside air, the dew point is reached. If condensation of water vapor occurs inside the insulating coating, the material becomes wet. It can deform and shrink, and lose thermal conductivity.
Laying a vapor barrier will provide:
- protection of insulation, roofing and wall elements from moisture;
- bringing the dew point beyond the walls of blocks, concrete, brick, outside;
- maintaining the strength of the building;
- preventing the formation of unsightly and allergenic black mold;
- comfortable microclimate;
- reducing costs for heating equipment and air conditioners.
A water barrier is the only way to protect a room in a frame-panel house from moisture.
Ondutis vapor barrier films for walls and roofs
The quality of insulation also depends on the material. Modern films Ondutis R100 for effective protection of thermal insulation materials and roofing structures from the destructive effects of moisture. They are combined with all types of insulation and are suitable for any roofing structure. Ondutis R100 films are produced in the form of a gray polymer sheet, reinforced with layers of film on both sides.
Ondutis B (R70) is an ideal vapor barrier for walls of various designs, insulated attics, roofs and ceilings. It provides excellent protection against external and internal moisture, especially in winter. Fully compatible with various thermal insulation materials.