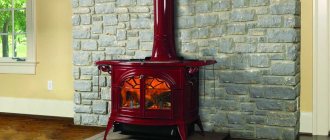
Advantages of heated floors
Heated floors are an excellent alternative to the “radiator” heating method, as they contribute to a comfortable and rational distribution of heat in the room.
And for such “additional” rooms as a balcony, this is generally the only possible option, because moving the battery here is problematic, and the constant use of heaters or fan heaters is not always effective. Among the main advantages of heated floors are:
- the highest level of thermal comfort, incomparable to any heating system;
- low heater temperature;
- absence of bulky and unaesthetic radiators requiring decoration and maintenance;
- the widest functionality of temperature regulation due to the installation of sensors and automation;
- long service life (for a water floor - several decades);
- the ability to install without special equipment and skills, the ability to carry out local repairs if necessary (for electrical structures).
Often before final finishing it is necessary to raise the floor level on the balcony. Read our guide and you will find out how you can do this.
And this article has all the information on how to choose a plastic window profile and what you need to pay attention to.
Which heated floor is better?
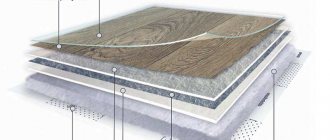
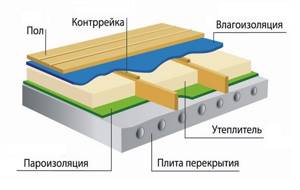
Each of these designs has its own operational features. But there are also common features - the “warm floor” system is installed exclusively on specially created thermal insulation - the insulating layer protects the floor from significant heat loss. Then a cement screed is made, after which the final floor covering is laid.
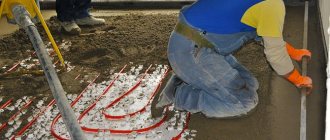
A water floor (from autonomous or centralized heating) is the most difficult system to install . In addition, it is characterized by high costs and heat loss, and therefore is unprofitable for such small areas as a balcony.
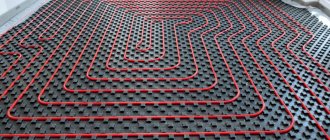
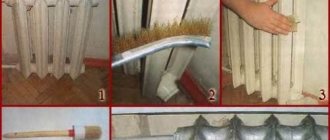
For balconies and loggias with cement-sand screed, cable heating concepts . The thickness of the screed is at least 45 mm. In addition, all gaps that allow air to accumulate inside the structure are eliminated - the presence of voids will lead to overheating and failure of the system. An electrical cable is attached to the subfloor - “snake” with a certain pitch. It is important to choose the right step:
- too large a step will result in the floor not warming up;
- Too small a step will significantly increase your material costs, and in the future, your electrical energy costs.
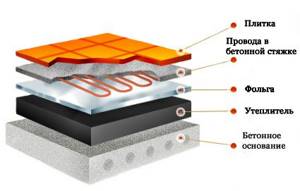
Installation diagram of a cable heated floor under tiles.
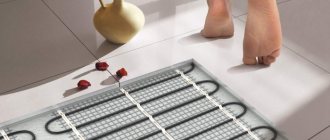
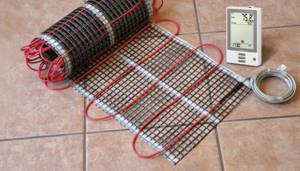
Ceramic tiles are laid on the screed - all the work is not complicated and can be done independently. However, it will be possible to use such a warm floor no sooner than in a month. If it is not possible to make a screed of the required thickness, then cable underfloor heating is not used, but heating mats . This option is also chosen if you do not want to calculate the number of heating cables and the pitch of their installation.
The choice of the type of electrical system also depends on the area of the balcony - the heating elements should provide a power of about 150 W per square meter.
Types of modern floor heating systems
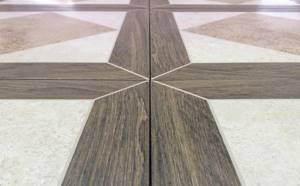
It is pleasant to walk on warm tiles barefoot.
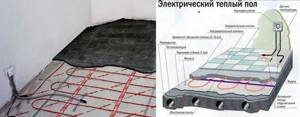
The heated floor system on the balcony is a structure made of heating electric cables or metal-plastic pipes filled with coolant - water. There is also a classification of heated floors:
- water;
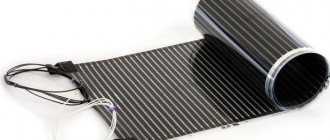
- electric (cable, film, heating mats).
The heat source, depending on the design, will be an electrical cable, infrared film or water.
Features of infrared heated floor
This heated floor design provides room heating using infrared radiation. It is distinguished by its warmth and softness, as well as its complete harmlessness to human health. Infrared flooring is also characterized by a high efficiency - radiant heating is incredibly effective in rooms and more economical than traditional systems .
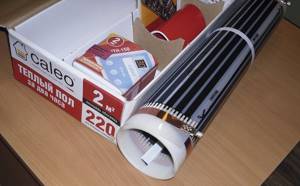
Laying infrared heated floors on the loggia
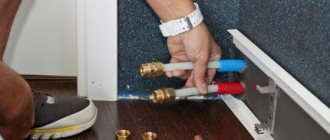
To install a film heated floor, you need:
- foil backing that does not conduct electricity;
- wires;
- perforated film;
- thermostat;
- insulating tape;
- masking and bitumen tape;
- standard set of tools.
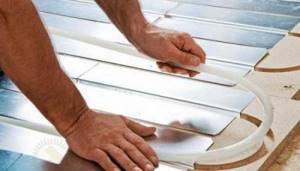
The actual installation of such a floor involves several stages. First, remove all debris from the floor surface, then mark the surface for laying the film and prime it. The foil substrate is laid in strips - they are prepared in such a size that they completely coincide with the strips of the heated floor (both in width and in number). It is important that the length of the prepared strips coincides with the total length of the room - it is not advisable to create joints between them. If there is a need to make a cut, then it is made only in the place where there is no graphite layer.
The cut film is laid in such a way that the copper contacts are located at the bottom and the matte surface is at the top. In addition, the contacts must face the wall where the thermostat will subsequently be installed. All work with infrared flooring is carried out extremely carefully so that the ferrite layer is not damaged.
Laying diagram of infrared film heated floor
But infrared heated floors, despite the positive technical characteristics and ease of installation, are not the best option for a balcony or loggia. Indeed, it does not require pouring into a screed, as is the case with electrical cables, but the infrared film is so thin that it can only be mounted on a perfectly flat base. In addition, this system will not operate economically at low temperatures (below +20).
Installation
We sort of figured out the types and purposes of the floors of balconies and loggias. Now, as I promised, step-by-step instructions will be given on how to install heated floors yourself.
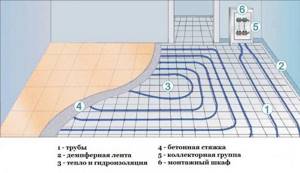
Drawing a diagram
The electrical diagram is the basis for installing a heated floor. The master must clearly see the location of all heating elements and controllers, and also have an idea of the interior items with which the balcony will be furnished.
When drawing up a diagram, it is necessary to take into account that power units are not recommended to be located in those areas where it is planned to install bulky furniture or equipment. They can place excessive stress on the coating, damage the heating element and block heat transfer.
The use of mats frees the installer from mathematical calculations regarding the laying step - the manufacturer has already taken care of this. It is enough to determine the power of the heating elements and their area.
It is not prohibited to lay mats diagonally and cut them into sectors. Laying can be done in such a way as to focus on heating particularly “problem” areas. When developing the scheme, you should take into account a distance of 10 cm from the walls along the entire perimeter.
Don't miss: Foam for wall insulation: the benefits of insulating a house in an air gap
You need to consider the location of the thermostat regulator and temperature sensor. They must be powered from a public network, so it is necessary to provide access to the outlet and wiring.
Checking the electrical wiring
Any heating system, even a low-power one, requires reliable wiring that will withstand the load, operate stably and ensure safe operation of the heating elements. In both old and new houses, the electrical wiring may not correspond to the calculated power of the heated floor, so you cannot do without checking the network.
The basis of the calculations will be the cross-section of the cable - the thicker it is, the greater the load it will withstand. The power of the cable will depend on the power of all devices that will be connected to it. A low-power cable that is too thin will quickly burn out and may cause a short circuit. If the wiring power is low, it is necessary to replace it with a new one that will correspond to the heating load. It is better to give preference to a cable with copper rather than aluminum conductors. It has better electrical conductivity and lasts many times longer.
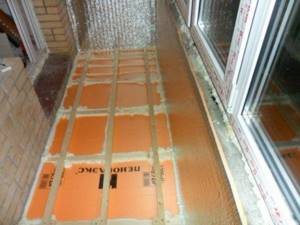
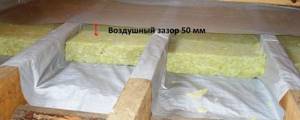
We carry out thermal insulation
High-quality floor insulation will protect the balcony from the penetration of cold and help increase the efficiency of the heating system. The optimal thermal insulation material in this case will be penofol, laid with the foil side up.
The entire surface must be glued with penofol, laying the strips joint to joint and gluing with tape. You need to lay the material so that it extends to the bottom of all the walls - this will make it warmer. The edges of the thermal insulation will also have to be protected - a damper tape laid around the perimeter of the balcony floor is suitable for these purposes. A metal mounting mesh is placed on top of the heat-insulating layer, which will serve as the basis for the mats.
Installing sensors and thermostat
It is best to mount the thermostat in an area that will be accessible for control, for example, next to an outlet. But the temperature sensor is installed inside the system - it must respond to changes in floor temperature indicators. The sensor is connected to the thermostat via a cable laid in a pre-made groove. It is recommended to place the device in a corrugated pipe, which will protect it from damage.
We attach the heating elements
Mats are the easiest heating elements to install. Their interior is equipped with adhesive tapes that securely fix the device to the substrate, preventing it from moving.
The heating elements are laid over the area according to the previously developed scheme. The system is then connected to the network, connected to the sensor and thermostat. At this stage, it is necessary to check the functionality of the entire circuit and eliminate any detected faults.
Filling the screed
It is best to cover heating mats with a cement-sand mortar. You can use crushed stone as a filler, and add any plasticizer to make the composition elastic.
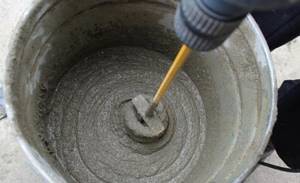
The surface of the mats is covered with a layer of no more than 3 cm with the solution, so as not to interfere with the spread of heat from the heating elements. It is necessary to achieve an absolutely even base - this will make it easier to lay the tiles and avoid distortions and cracks in the cladding.
Heating mats are the best solution for tiled floors
a warm floor under ceramic tiles on your balcony or loggia yourself, then electric heating mats will be the best solution. Such mats are produced in the form of a fiberglass mesh onto which shielded heating sections are attached.
The sections are manufactured by connecting the cold and hot parts using a coupling-free method, due to which they are unconditionally reliable.
It makes sense to lay heated floors under tiles only when the balcony or loggia is well insulated. From our review of materials you will learn how best to insulate a balcony from the inside.
And how to carry out all the work correctly so that you end up with a well-insulated balcony, read our article-instructions.
Pay attention to our article about covering a balcony with vinyl siding, which is located at this address https://balkonsami.ru/otdelka/vneshnyaya/kak-obshit-balkon-saydingom-svoimi-rukami.html
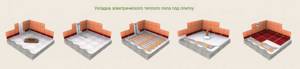
The actual installation of underfloor heating from heating mats is carried out in the following sequence:
- A diagram of the location of the heating mats is drawn up. Please note that it is not recommended to place electric heating elements in places where furniture is planned to be installed - this will lead to their overheating and failure.
- The floor surface must be prepared - foreign objects and debris are removed from it. If necessary, the floor surface is leveled.
- Thermal insulation material is laid, which helps prevent heat loss and increases the feeling of comfort in the room.
- A cement screed is created, which will serve as the basis for the subsequent installation of the tile covering.
- The heating mats are laid according to a pre-created pattern. Then the system is connected to the electrical network and the thermostat is installed. As elements of the electrical network, you will also need a temperature sensor and a residual current device.
Important! If during the work it becomes necessary to cut the fiberglass mesh, then this must be done extremely carefully so that the heating cable is not damaged.
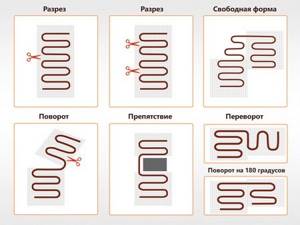
Cutting and laying heating mats correctly
- Electrical wires are connected to the network, which allows you to check the functionality of the entire system. If any malfunctions arise, they need to be eliminated at this stage - in the future, the entire floor will need to be dismantled.
- Ceramic tiles are laid directly on heating mats using tile adhesive. The adhesive layer during work should not exceed 7 mm. Laying tiles on heating mats
- After 20 days, after the glue under the tiles has completely dried, you can turn on the electric floor.
Operating a heated floor with heating mats requires careful control of temperature regulation. Damage to the floor covering is also not allowed. Such simple manipulations will allow you to create an ideal comfort zone on your balcony.
As a continuation of our article, we recommend that you watch a video that presents an alternative option for laying tiles on a heated floor . The presented technology uses a layer of finishing leveler, and you will learn about its advantages from the video.
Positive aspects of the heating system
Clay tiles are often used when laying flooring on balconies. A heated floor under tiles allows you to make the room more comfortable, which is the best replacement for heating devices, as it ensures proper heat distribution. Electricity costs when using various heating devices are significant, and an insulated floor has special advantages:
- creating a high level of indoor comfort;
- invisibility and lack of maintenance required;
- energy savings due to low heater temperature;
- service life up to several decades;
- high level of functionality;
- presence of heating temperature sensors and regulators;
- possibility of repair without dismantling the coating;
- ease of device without skills.
About the stages of insulation work
There is a large selection of different building materials on the market designed for high-quality insulation of balconies. But before starting work, you should decide what kind of balcony you should get and with what positive functions.
To insulate the balcony, you may have to rebuild the entire balcony, or perhaps just minor repairs. How can you insulate the floor on a balcony with your own hands? Firstly, since we will be working with the floor, we should first diagnose its construction part.
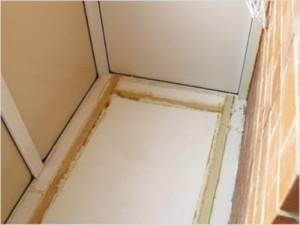
1. It is necessary to check the reliability of the balcony base plate, the absence of cracks, chips, and destruction of the concrete. If necessary, the balcony slab is strengthened using additional reinforcement and support brackets are installed under the slab. External construction work must be coordinated with the management of the building, neighbors and, if necessary, the local administration. Changes to the balcony design and appearance are possible, so the administration commission must give consent to such work.
2. After reinforcement, the metal part of the balcony is filled with concrete, forming a flat surface. During repairs, cracks, chips are repaired with mortar, and protrusions are smoothed out. The finished surface should be primed with a deep-penetrating compound. Joints and cracks in walls and structures are sealed with polyurethane foam.
3. To reliably protect the slab from dampness and moisture, it is advisable to waterproof it. The waterproofing composition Hydrotex or mastic on a bitumen, polymer basis is applied. You can also cover it with a layer of glued waterproofing.

4. If the floor is without insulation, then it is advisable to equip it with additional heating. It is necessary to install the cable on the prepared floor surface before pouring concrete. Next, you can lay tiles or lay laminate or parquet.
5. In many cases, the floor of the balcony is below the floor level in the apartment, therefore, at the request of the resident, additional backfilling with dry mixture or insulation with expanded clay is carried out, up to a certain level. You can also make a warm version from a heating cable or panels, equipped with different finishing materials.
6. In other cases, insulation is carried out with various insulating materials with the construction of a wooden frame made of timber, followed by decorative finishing.
Balcony waterproofing
When all the shortcomings of the floor slab and walls have been eliminated, you can begin installing waterproofing. Sometimes this step is skipped, and completely in vain: waterproofing is extremely important for the quality arrangement of a residential balcony.
If the waterproofing layer is not installed, moisture will definitely enter the room. In addition to dampness and mold, such exposure also leads to the fact that the floor insulation on the balcony loses most of its properties: almost all thermal insulation materials do not withstand the influence of moisture well and lose their characteristics.
Thus, we can come to the conclusion that waterproofing is necessary.
There are several types of waterproofing:
- Cast;
- Coating;
- Film;
- Rolled.
Each of them has its own characteristics and requires special attention.
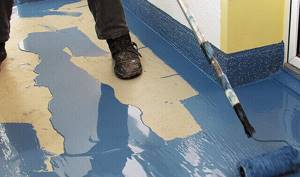
Cast waterproofing
For cast waterproofing, various “liquid” materials are used. These include “liquid glass”, bitumen perlite, foam epoxy and other materials with similar characteristics. A common feature characteristic of each of the presented compositions is a liquid structure.
Application of cast waterproofing is very simple: the composition is poured onto the surface and leveled (most often using a roller). Depending on the materials, cast waterproofing can be applied hot or cold.
To achieve maximum quality, cast waterproofing is applied in several layers so that its thickness is 2-3 mm. Each subsequent layer is applied only after the previous one has completely hardened.
In order for waterproofing to be installed easily and efficiently, the surface must be dried before installation. Small sides about 20-25 cm high are placed on the lower part of the wall. For this, you can use any waterproofing material, even a regular polyethylene film.
The installation of waterproofing from materials that require heating is carried out as follows:
- First, the composition is heated to the specified temperature;
- After this, the composition is applied to the surface and quickly leveled using a roller or squeegee;
- It is worth laying a reinforcement mesh or fiberglass between the layers of waterproofing to increase the strength of the waterproofing.
The process of applying a “cold” composition will be carried out according to the same algorithm, with the exception of the first point, since such compositions do not need to be heated. The peculiarity of such materials is that they usually take significantly longer to harden. A self-leveling floor can also be poured on top. By choosing in advance what to fill the floor on the balcony with, you can get everything done quickly and efficiently.
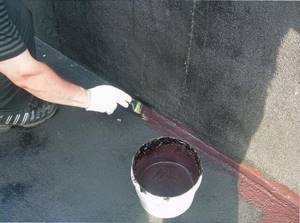
Coating waterproofing
For this type of waterproofing, bitumen mastics, polymer varnishes and other similar compositions are used. The main advantage of coating waterproofing is its ease of application without loss of quality: the effectiveness of such protection against moisture is quite high.
Before applying coating compounds, the surface is first degreased and primed. The hardened waterproofing composition hardens and creates a dense film that protects the room from moisture penetration.
Coating waterproofing can be applied in two ways:
- "Cold." Materials that are applied cold do not require heating. In this way, waterproofing is realized from “liquid rubber” and materials that include epoxy resin.
- "Hot." In a heated state, waterproofing materials based on bitumen and various polymers are applied.
To achieve maximum effectiveness of waterproofing, it must be applied in at least two layers.
Coating waterproofing has excellent characteristics and meets all requirements. A small caveat concerns only bitumen coatings - this material rarely lasts longer than 5-7 years due to its poor resistance to low temperatures, which causes it to crack.
It is best to use rubber or polymer-bitumen coatings for balconies and loggias, which are highly reliable and can last much longer, due to which the insulation of the loggia floor under the tiles will also have a longer service life.
About choosing insulation
The choice of thermal insulation materials is very large and therefore it is necessary to determine what level of flooring should be done, how to insulate the floor on the balcony and what kind of external decorative finishing will be used.
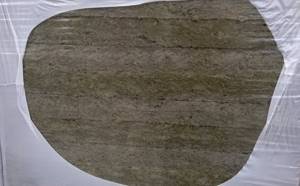
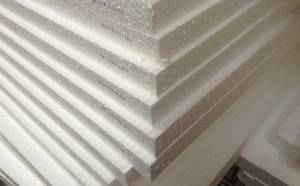
Expanded polystyrene foam is considered the most common insulation material with high thermal insulation properties. Easy to process, lightweight, vapor- and moisture-proof and affordable.
Foam plastic belongs to the category of rigid and porous insulation. It has good thermal insulation and can be easily mounted inside or without a frame. It is cheaper than expanded polystyrene, but is fire hazardous and emits toxic gases when exposed to smoke.
Penofol is a soft, thin insulation with a reflective effect on one of the foil sides of the insulation. It is used for thin thermal insulation and creating the effect of heat reflection inside the zone, especially when installing heated electric floors.
Mineral, basalt, glass wool - insulation made from mineral wool, fiber from glass, slag, basalt, etc. They are made in sheet form, have sufficient density and good thermal protection, and are easy to install.
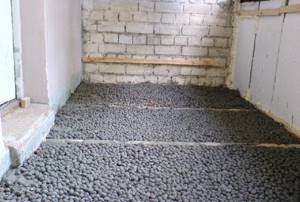
Sometimes the question arises: how to insulate the floor on a balcony under tiles? A fairly popular method: insulating a balcony with expanded clay - making a dry screed from a fine expanded clay backfill with laying gypsum fiber boards, plywood on top of it, or running it on top of a small layer of concrete screed followed by installation of tiles. For rigidity, it is recommended to reinforce the concrete layer with a laying mesh.
Insulation of balcony floors with sheathing
One of the methods of insulating a balcony is laying insulation using lathing. This method may look exactly the same for different insulation materials.
Before you insulate the floor on the balcony under the tiles using lathing, you need to find out how it will be installed.
The sequence of actions looks like this:
- First, the height of the floor is calculated without taking into account the thickness of the floor covering. As a rule, the floor level usually coincides with the height of the threshold of the doorway.
- Next, select the method that will be used to raise the height of the floor. The floor can be raised by installing the bars in two layers, by the width of the boards themselves, or by using special linings made of metal, plastic or wood.
- After this, the elements necessary to create the sheathing are prepared - boards or beams.
- Each element must be impregnated with an antiseptic, which will prevent the wood from rotting and moisture from penetrating into it.
- When the dried and processed elements of the sheathing are ready, you can proceed directly to its installation, for which several schemes are used.
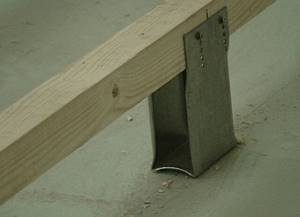
Scheme 1
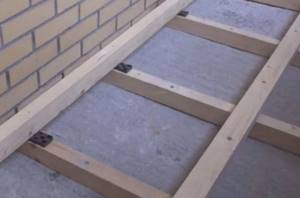
The supports in this case are U-shaped parts made of bent metal strip. A beam is mounted between the shelves of the parts, located at the required height. The timber is fastened using self-tapping screws.
The distance between the supports is about 50-60 cm. First, they are laid out next to the walls, and then, at a specified interval, they are mounted across the entire width of the balcony. The elements are fastened to the floor with anchors.
Cuts are made in the insulation at the same intervals at which the holder shelves are spaced. The insulating material is put on a metal support and pressed to the floor. Having completed this operation with each support, the remaining space between the rows is also filled with insulation.
After laying the insulation, you need to install the bars in the holders and screw them into the holes with self-tapping screws. When performing work, be sure to check the level so that the raised floor is strictly horizontal.
Scheme 2
Another type of structure used to create insulation with sheathing is studs.
This design looks like this:
- Special inserts are installed in the concrete floor, into which the studs are screwed.
- On the top of the mount there is a thread that allows you to adjust the height of the logs, adjusting them to the desired level.
- After installing the lag on the studs, the excess part is cut off with a grinding machine, and the entire surface becomes smooth.
This design is very convenient and allows you to easily lay the insulation at the level of the logs. Often the role of metal studs is played by plastic stands that need to be screwed into logs.
This option has a place, but there is one difficulty - the bars for the joists must be wide enough so that large-width plastic posts can fit through them. Otherwise, everything is done in the same way as with metal studs.
Scheme 3
If the previous schemes are not suitable for some reason, then you can use a self-assembled structure made from bars. Such lathing can only be installed if the concrete slab is initially absolutely flat, otherwise it will not be possible to create a flat floor.
The sheathing bars will be connected using metal corners, and the elements located along the walls will be attached to them using anchors. The resulting floor can be leveled along the upper edge of the sheathing, for which a straight line is cut on the wall, along which the side bars are attached. The lifting of one of the supports of the sheathing indicates the need to place a small piece of board or plywood under it.
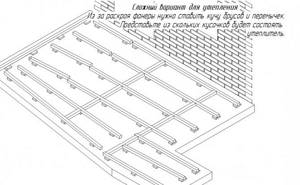
Scheme 4
If the floor level is initially high enough and the floor will practically not rise, then a sheathing can be made from two layers of beams located perpendicularly. The bottom row will be attached to the base surface, and the second row will be attached to the first.

With this design, the first row of joists is glued to the floor slab with polyurethane foam. When using this scheme, you can fix the second row only after the insulation fills the entire space between the guides.
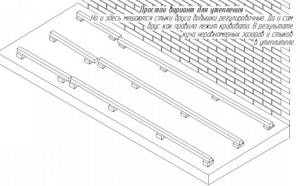
Scheme 5
One of the simplest ways to raise the floor level on a balcony is a design made as follows:
- Wide, even boards are attached to the ceiling and to each other using a corner;
- The boards are installed on edge so that the distance from the walls is about 5-7 cm;
- Insulation material is laid between the walls and boards;
- All free space between the boards is also filled with insulation;
- It is advisable to cover the top of the structure with film to prevent dust and fragments of insulation from entering the room.
Having finished laying the sheathing and insulation, you can begin laying the finishing coating.
Features of insulation work and advantages
There are several options for constructing the frame:
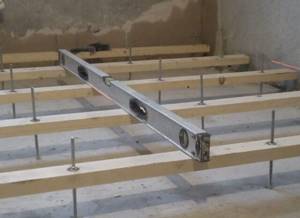
But to ensure the rigidity of the floor and eliminate subsidence and dips in the thermal insulation composition over the entire distance of the floor, it is advisable to use an additional timber frame, set according to the level and to a certain height, taking into account subsequent decoration.
The frame not only provides a level, but also makes it easy to place insulating materials between the joists.
To install wooden logs, use either a wide board, with a small thickness of insulating material, or a wooden beam with mounting supports made of metal, pieces of timber.
A wooden frame made of timber laid at a distance of half a meter will serve as a beacon level. The supports must be securely fastened to the floor of the balcony slab and to the beam frame.
After checking the level and reliability of the frame, you can insulate the loggia with materials and externally finish the floor.
Leveling the floor on the loggia with your own hands
First of all, we need to mount the frame for the future floor. We will tell you several options on how you can do this yourself.
The floor on a balcony or loggia is often uneven; this problem is also solved during the installation process.
There are several options for how to install logs correctly.
Using wedges and shims. Nowadays, in building materials stores, there are a lot of devices that help to attach joists evenly and securely.
Let us describe a simple mounting option using U-shaped racks.
We attach the U-shaped brackets to the floor, and screw the logs to the side using holes for self-tapping screws.
Advantages of insulated floors
- The thermal effect is significantly increased, heat loss is reduced;
- Increases noise and sound insulation from the street and external influences;
- Comfort in the apartment increases and the microclimate is maintained;
- The additional use of a warm option provides complete comfort at any time of the year.
Having insulated a balcony or loggia, there is a need for further insulation of the entire room, with its possible arrangement and integration with the apartment room.
Types of insulation
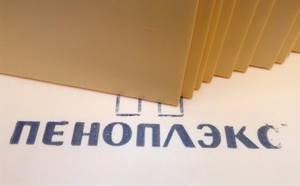
On balconies, the best insulation for flooring is 2 things. The first is polystyrene foam. In the form of Penoplex, Techno Nicole, Ursa. These are the same product under different names. The second thing is mineral wool of varying densities, also called stone wool.
Foam insulation is also used.
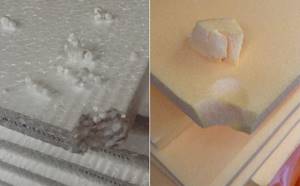
But you can only consider it to save money. It's worse to work with him. Polystyrene foam cannot be stepped on (it does not support weight and is pressed through) unlike extruded polystyrene foam. And the polystyrene foam falls into balls over the years.
Some guys use penofol. This insulation on the balcony is completely unnecessary, sometimes harmful to the floor. We have written about it in detail below, under the heading: unsuitable insulation.
Choosing the optimal insulation
The following materials for insulation are relevant today:
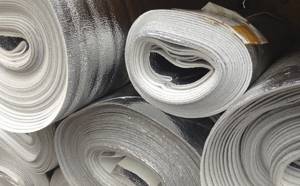
Option #1 - pefonol
This is the latest “generation” insulation, made from aluminum foil and polyethylene foam. Penofol has proven itself not only as an excellent thermal insulation product, but also as a worthy hydro and sound insulator. The industry offers the consumer single-sided and double-sided samples.
Insulation of the floor on the balcony with penofol
Available in rolls, thickness - 3-5-10 mm. An important advantage of using penofol is saving the space allocated for insulation.
Aluminum tape is used to glue pieces of material together.
Penofol insulation technology involves its combined use with penoplex.
Option #2 - polystyrene foam
This insulation has been “rooted” in the construction industry for quite a long time. It is still used today due to its low cost. Available in sheets 2-10 cm thick. Perfect for insulating balcony floors. Pieces of polystyrene foam are placed between the floor joists, any cracks that appear are filled with foam, and the finishing coating is laid.
Insulation of the loggia floor with foam plastic
Option #3 - penoplex (expanded polystyrene foam)
Extruded polystyrene foam has “standard” thermal insulation properties. Among its other advantages are low vapor permeability, absolute chemical inertness, lightness, and ease of use. More expensive than other insulation materials. Available in sheets 2-3-5 cm thick.
Option #4 - mineral wool
Porous material reminiscent of classic cotton wool. Mineral wool is obtained from fiber (basalt, glass fiber) that has gone through the process of melting, drawing, cooling, and crushing. It is not afraid of moisture and retains heat well.
Insulation of the floor on the balcony with mineral wool
Among the disadvantages, it is worth highlighting the inconvenience of working with it - the material is itchy. Mineral wool is produced in rolls and sheets. Unlike other insulation materials, it can penetrate into any gap. This is a significant plus.
Subtleties of floor insulation technology
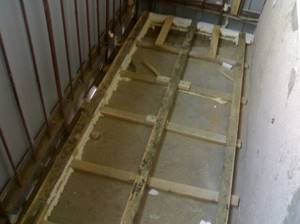
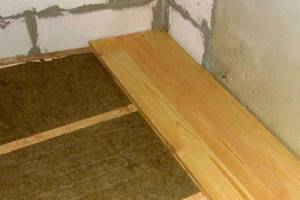
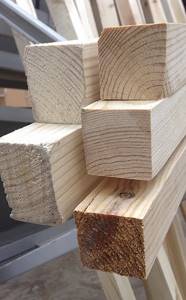
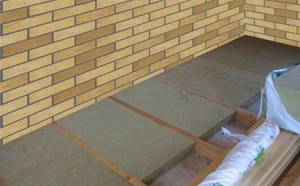
As a rule, the floor on the loggia is made as follows. First, a sheathing is made from timber with a section of 40*40 or 40*50. The floor is leveled with lathing and raised if necessary.
Plywood or board is laid on top of the timber. Either linoleum or underlay + laminate is laid on top of the plywood.
Since at the time of installation of thermal insulation the bars are already fixed. The insulation itself is difficult. It is difficult to install high-quality insulation between the beams and it takes a long time to feel it immediately when you work with your own hands.
At this point, most installers throw it in there as best they can. They penalize if necessary and close it before the customer sees it.
It should be noted that there are two main scenarios of action. The first option is needed if you are raising the floor level on the loggia and the second option if you are not raising the level.
If you do not raise the level, then you need the plywood sheet to lie immediately on top of the insulation. As a rule, there is a gap from the top of the foam to the bottom edge of the plywood. It is done so that the plywood does not put pressure on the insulation and lies flat on the beam.
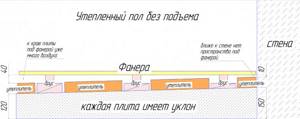
In this case, you can make a high-quality installation. Since the insulation lies on the concrete floor all between the beams. It’s convenient to foam it here. When the plywood covers the beam, closed narrow layers are formed - honeycombs.
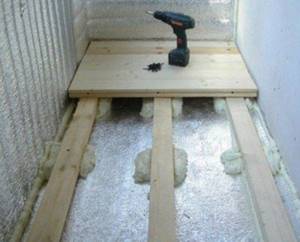
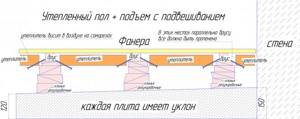
If you do insulation and raise the floor, not even by much, 8 - 10 cm. Then you get the second scenario. The beam hangs in the air; the insulation lies on the concrete itself. Under the bars there is an empty space through which air flows.
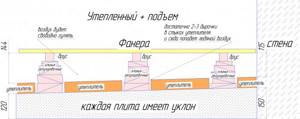
This space is the main headache for installers. I'll explain everything now. It turns out that many things cannot be done perfectly. It can be good, but it still can’t be perfect.
The same thing with foaming thermal insulation in inconvenient places. You can foam it, but you can’t do it so that there are no holes anywhere.
Through small holes in the seams, cold air enters the surface of the insulation. He can enter the slab area from the street (if you have a balcony with a metal parapet or a loggia with holes under the apron).
Still icy air is produced from warm air. In winter, warm air reaches the surface of the slab through the seams in the insulation. It is then cooled due to its low temperature. Then it returns under the subfloor, but now cold.
Due to these micro-movements, the air between the plywood and the insulation is always cooled. If there is an empty space under the beam, then this air is mixed throughout the entire area under the floor. He will always be cold. Regardless of what layer you have - 3 cm or 5 cm, it doesn’t matter. I repeat, it’s not all about the insulation, but the quality of the work. As preparation and observation skills for installers.
We are struggling with empty space under the floor in the loggias. For this reason, we have recently started installing mineral wool on the floor. Mineral wool is perfect as insulation for a balcony. It costs the same money as expanded polystyrene. However, polystyrene foam needs to be foamed. And foam is not cheap. For this reason, mineral wool is cheaper.
In case you raise the floor level. The entire space from the slab to the plywood can be lined with cotton wool. That is, lay it in 2-3 layers. Due to the lower cost, we will get the same cost. And eliminate air movement.
The use of mineral wool on the floor is justified and rational.
If you make insulation using polystyrene foam. Then ask the installers to foam the entire space under the bars, at the joints of the bars. To create sealed cells under the floor. Even if there is a weak point in one cell, the rest will not freeze.
How to attach insulation to the floor
Expanded polystyrene or polystyrene foam is simply laid on a concrete base. All joints foam.
Sometimes installers make additional sheathing, screw in self-tapping screws and lay the sheets in the air. At a distance from the surface of the slab. This is a complex, long process.
Nailing insulation to the slab with plastic mushrooms is pointless. He's not going anywhere anyway.
The cotton wool is placed in the same way. Cut to size and place directly on the stove. There is no trick to this process. The only thing is that the wool needs to be cut into slightly larger pieces than the distance between the beams. It has elasticity and, under its own springiness, compresses the span.
Required insulation thickness
If a person with normal hands makes your balcony. Then for minimal insulation 20 mm of polystyrene foam will be enough. On most balconies, including plywood, this will be enough. So that the floor is not cold most of the year.
If you are planning to make some kind of warm office or play area for children. Think about a minimum layer of 3 cm of polystyrene foam; 5 cm is excessive thickness for a loggia.
If you are adding a loggia to a room. The minimum required is either two layers of 2 cm polystyrene foam. Or, for example, one 5 cm thick.
If we talk about cotton wool, in all cases it is laid as much as will fit.
Unsuitable insulation
I want to tell you about the insulation that some people use on the floor. This is foil penofol. This material is not suitable for flooring. Moreover, he gets in the way there.
By the way, we have a very interesting article about penofol. I advise you to read here, I think you won’t waste your time.
Penofol is designed to be laid on a flat surface. And when you have bars and polystyrene with foam all around. Forget about a flat surface.
In such conditions, penofol can only be laid on top of the timber and in waves. It's hard to seal this with tape.
Plywood is laid on top of the penofol. When you step on the surface you apply a lot of pressure. Under these conditions, penofol can produce a crunchy sound of bursting cells.
Because the floor is done before the walls. You won't be able to simply open it and remake it. The sheathing of the parapet and walls will be tied to the plywood.
I do not recommend using penofol on the floor. If you still decide to use it, ask your installers to use thick plywood. Due to its rigidity, it will distribute pressure evenly across the penofol. What will protect you from the crunching sound on the loggia.
Insulation of floors under tiles
To lay tiles on the balcony, make a screed on the floor. But first they do insulation with penoplex under the screed. It is advisable to make the screed with expanded clay. The thicker you make it, the more money you'll throw down the drain.
We will write a separate article about this in the future. Now let’s say that neither the screed nor the tiles on the balcony have anything to do with the word warmth.
A balcony or loggia is the place where the screed will always freeze. And the tiles, regardless of the insulation, will be cold.
I have repeatedly cleaned the dust on such balconies with my own hands. This is not an easy task. Warm air from the room enters the cold winter loggia. It comes into contact with an ice tile and condensation forms on it. A thin layer of moisture on top of the tiles attracts dust to the surface.
For this reason, think twice before laying tiles on a warm balcony. If it’s cold, you’re welcome, but if it’s warm, you don’t need tiles.
Insulation with warm floors
Many balconies use insulation with underfloor heating. Often these are strip heated floors. Wire ones are rarely used. The latter are used with screed and tiles.
Most customers think that they can eliminate the installers' mistakes with warm floors. Like, I’ll turn it on and it’ll still be warm. This is actually a misconception.
Film heated floor, does not work around the clock on the balcony. It is turned on rarely - only when needed. It takes time for him to warm up a cold balcony. A lot of time.
Therefore, warm mats will not work at the right time. And the money will be spent. It is preferable to spend money from heated floors on insulation and quality labor.
I consider heated floors a luxury at the moment. In the current economic situation.
The floor is not the most responsible place
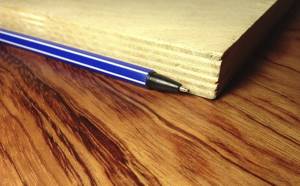
The floor is not the most important place for insulation. Even if you have poorly insulated the space under the plywood. That in itself it is a good heat insulator. For example, we supply 18 mm sheets, other companies supply 10 mm, so you can save money on the customer. We don't do that.
Plywood can protect you from many insulation mistakes. If you cover the timber with a floorboard, you get a different picture. Even a tongue-and-groove floorboard, when drying, allows cold air to pass from under the floor to the top.
Therefore, always choose plywood with finishing linoleum or laminate. It may be more expensive, but it looks better and is safer.
After the installers laid the plywood. Gaps form between the sheets at the joints near the walls. Size from a few millimeters to several centimeters.
Both small and large gaps are equally dangerous. It is better to coat small gaps around the entire perimeter with sealant and foam larger ones. This way you seal the underground space. Create another safety loop.
Next you need to lay linoleum or a backing for the laminate. The substrate itself is an insulator. Thin but still. The laminate layer also retains heat. Because the main component is wood sawdust.
Afterword
Summarizing what has been said, we can conclude that it is not worth saving on floor insulation. Or rather, it’s not worth saving on installers. If you choose the bad guys on the loggia, then nothing will save you. Not good foam, not several layers of insulation, not rock wool.
Installation of water heated floor on the balcony
Before starting installation of the heating structure, measurements should be taken and appropriate calculations made. This will determine the required system power. The value of this indicator is influenced not only by the quality of wall insulation, but also by the size of the areas:
- Whole floor.
- Balcony or loggia.
- Glazing, etc.
If the walls of the balcony are poorly insulated, a water heated floor with maximum power will do. Work begins with preparing the base for installation of the tile heating system. The worn-out coating is removed, and differences that are more than 10 mm are leveled out after installing a new screed. If this is not done, the water heated floor system will not function correctly.
Tools and materials needed when arranging a structure with your own hands:
- Polyethylene or propylene pipes with a diameter of 16-20 mm.
- A collector and a shield for it.
- Water floor.
- Reinforcement mesh.
- Components for screed.
- Pressure pump.
- Water boiler.
- Clamps for fastening pipes.
When choosing a boiler for a warm water floor, you should pay attention to the temperature range of the system. You can focus your attention on gas, double-circuit, electric and other types of equipment.
Methods for arranging a water floor on a balcony
There are 2 types of screed technology for a water heated floor system:
- Concrete.
- Flooring.
In the first case, there will be a lot of time spent. At the same time, the technology of installing concrete screed is particularly popular. It is a structure into which elements for heat transfer, that is, pipes, cables or heating mats, are pre-installed. The flooring should be laid after the concrete screed has completely hardened. To do this, you must wait a maximum of 28 days.
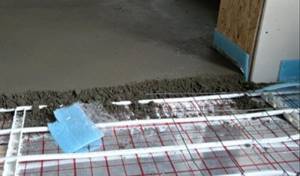
Concrete screed
The second option for installing the screed on the balcony does not involve a long wait for the concrete to completely harden. Ready-made materials are used here, and the technology itself is quite simple. The disadvantage of this method is the need to spend large amounts of money on the purchase of finished flooring.
The technology for installing a floor screed depends on the choice of a particular material. We should not forget that concrete screed is a fairly common method of arranging a subfloor. Floor screed can be modular wooden, polystyrene, wooden or wooden slatted.
Before insulating the floor on the balcony, you should select a heat insulator. It is laid on the base before pouring the screed. The thickness of the layer consisting of polystyrene foam, penoplex or polystyrene foam should be 30-150 mm. Only such a floor will allow you to retain the heat transmitted by the tubes. If you opt for a special heat insulator for heated floors, its cost will be more expensive.
READ MORE: Warm floor under laminate on the balcony
Floor screed
A waterproofing film made of polyethylene is laid on the heat insulating layer. After this, the bottom of the walls along the entire perimeter to the height of the screed should be covered with damper tape to compensate for possible thermal expansion of the screed. Next, you need to reinforce the base using a mesh with a cell size of 15-20 cm, the cross-section of the rods should be 5 mm.
Methods for installing heating pipes on the balcony
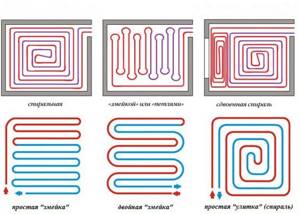
The following methods of laying heating pipes for a water heated floor system differ:
- Spiral.
- Snake.
- Combined installation method.
Laying pipes in a spiral is used when installing heated floors on balconies with the largest area. The spiral system ensures even heat distribution. Installation requires special care and a more thorough approach.
The pipe laying scheme involves alternating elements with cold and hot water. With this method, a uniform temperature distribution will be achieved. This method is advantageous, since the distribution of water through the tubes is facilitated, and for 1 m² of floor area on the balcony, 5 linear meters of tubes will be required if the distance between them is 20 cm. Each turn of the spiral is calculated by software, depending on the configuration of the balcony and its area.
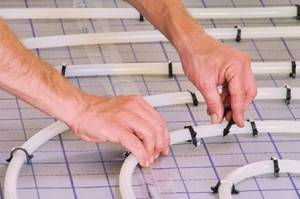
Tube mounting options
Installing pipes using a snake is a less labor-intensive process compared to the spiral installation method. First, the tube should run along the perimeter along the wall, and then go back in a wavy line. This is a simpler option for arranging the entire heating system and does not require special calculations. It is less labor-intensive, but does not allow even distribution of heat without problems.
The combined method of laying pipes involves combining zones with different methods of laying pipes: in a spiral and in a snake at the same time.
Laying scheme for a warm water floor
In large rooms, separate heating loops are usually provided. To obtain the desired effect, a certain step between the tubes should be provided. It should not exceed 20 cm. It is possible to lay pipes in increments of 30 cm between the elements of the heating system.
To determine the optimal location of the pipes, you will need to use a pre-compiled diagram, which is drawn to scale on a notebook sheet of squared paper. It will be necessary to take into account not only every protrusion and recess on the loggia or balcony, but also the location of the furniture under which laying pipes is not advisable. People with certain work experience can cope with the implementation of such a scheme. If you entrust the entire development of a water heated floor to professionals, they will determine the power and extent of the system. All other work can be done independently.
Special clamps are used to secure pipes to fittings. In this case, the distance between the individual fasteners is maintained at about 1 m. The clamps should not be overtightened, since heating the pipes leads to the expansion of these elements. In places where there are expansion joints, corrugated pipes are additionally used. This allows for maximum protection against various damages.
READ MORE: How to insulate a balcony with polystyrene foam
The pipes are laid from the wall to the center. After connecting the system to the collector, the elements are pressurized. It is necessary to discover new possible places that have various damages. As a result of testing, leaky sections are identified and subsequently replaced. Such a check is carried out at a system pressure of 3-4 bar for at least 24 hours. Next, you can proceed to making a concrete screed.
Filling is carried out using a special mixture for arranging heated floors. It is sand concrete grade M300. The screed should have a height of 3-7 cm, and its surface should be made as smooth as possible. To check the level of the screed, beacons are used, along which the concrete solution is leveled. The screed hardens and the concrete gains strength within 28 days. You can turn on the heating only after the screed has completely hardened, but not at maximum power. The temperature should be increased over 3-4 days.
How to insulate the floor under the tiles on the balcony?
When working on thermal insulation of the space of their balconies, many people pay attention to the fact that the greatest discomfort is caused by the cold surface under their feet. At the same time, the most popular coatings in this part of the house - ceramic tiles or porcelain stoneware - will themselves be “cold”. Therefore, to improve the situation, it is necessary to insulate the balcony floor under the tiles in order to make the floors at least a little warmer.

Design Features
The tiles have proven themselves very well as a finishing coating. However, it has one feature: to lay the material you must have a flat and durable surface. Therefore, you will have to choose suitable insulation materials and assemble a solid base for laying tiles or porcelain stoneware. As a rule, this is a lightweight frame filled with porous insulation or penoplex.
When using cotton fillers for insulation, it is necessary to ensure their protection from possible influences unfavorable to the materials. This means that you will need to waterproof the base and cover the material on top with a special membrane film that does not allow moisture to pass through. Even though the tiles laid on the floor will be a kind of barrier to water, the insulation of the balcony must be carried out in compliance with the technology.
Some craftsmen claim that to obtain a high-quality base for these types of coatings, it is necessary to pour a concrete screed. However, in the case of balconies, this should not be done. The load that the cement mass will create will be very large and the floor slab may not be able to withstand it. This option is well suited for loggias, and it is better to insulate balconies without screeds.
Choice of insulation
If you are planning to make a storage room here that will not be particularly warm, you can get by with formal insulation, but if you are planning to install additional heating and need to keep it warm in the winter, you will have to look for a solution with maximum efficiency. There are several materials that can help you cope with the task:
- Foam plastic or penoplex are practically “brothers” and differ in their characteristics in terms of service life, resistance to moisture and sunlight. They are used when you need to seriously insulate.
- Mineral or stone wool has excellent heat-saving properties and is easy to work with. However, it will be necessary to create insulation from water. The cost will be higher than other options.
- Izolon is an all-foam polyethylene, usually having one foil side. This is the same case of “formal” insulation.
Other materials, like expanded clay, cannot be used here - the layer needed is too thick. The effective work of expanded clay for heat conservation will begin from a backfill thickness of twenty centimeters.
How to do
Before you insulate the floor on the balcony under the tiles, you need to decide whether a floor heating system will be installed. To connect, you will have to bring the wiring into the space of the balcony, ensure its safe connection, and so on. It is better to do all this work in advance. At the same time, you can prepare the surface - clean it from debris and dust, prime it and dry it. If liquid waterproofing is being applied, now is the time to do it.
It will be easier later. A frame structure is installed on the waterproofed floor. It usually consists of bars of a suitable cross-section - about five centimeters. They are fixed with dowels. There should be at least ten centimeters of space between the wall and the nearest block. Two or three longitudinally spaced bars are enough. Between them there will be insulating material. If it is penoplex, then it is simply laid on glue or polyurethane foam. All the gaps and cracks are filled with it.
With mineral wool, the principle of work is slightly different. It is laid on a layer of waterproofing and is also insulated with a membrane on top. This way the heat-insulating layer will be protected from water ingress.
Sheets of moisture-resistant OSB or plywood with moisture-resistant properties are laid on top of the insulated frame. Then all that remains is to lay the slab in the usual way. If isolon is used, then after laying it, a thin, two and a half or three centimeter screed is poured, and tiles are laid on top of it.
In all cases, heating systems are installed after the rough foundation is ready. In cases with polystyrene foam, penoplex or cotton wool, it will be a ready-made base made of OSB or plywood, and in the case of isolon, it will be a screed. The tiles are fixed using the standard method - using an adhesive solution. At the same time, the heating cable needs to be filled with a sufficiently thick screed, the heating mats will be located inside a layer of tile adhesive, and infrared heating films are simply rolled out over the assembled structure and protected on top with polyethylene.
Floor tile laying technology
A tiled floor with a heated floor system installed underneath has a number of advantages when installed on a balcony:
- strength;
- durability;
- resistance to temperature changes;
- attractiveness from an aesthetic point of view;
- biological and chemical resistance;
- quick and easy cleaning.
Based on the above, tiles can be called an ideal floor covering for a balcony, especially taking into account the preliminary installation of heating mats.
It is advisable to choose ceramic tiles for the task, since they are lightweight and also low in price compared to other options (porcelain tiles, quartz vinyl tiles, Cotto tiles and clinker tiles).
Ceramics, with proper use, can last for decades. If it is damaged, replacing one or more tiles will cost an insignificant amount.
If the balcony is small in size, it is better to choose medium-sized tiles. Too large a tile will visually reduce the space even more.
The optimal option is dimensions 40 by 40 centimeters. It is highly advisable to buy all the necessary tiles at one time with a ten percent reserve.
First you need to decide on the method of laying the tiles. Several are currently practiced:
The standard option assumes that each side of the tile is laid parallel to the walls. This method is also called the basic one. The diagonal method can visually increase the space. If such an effect is needed, then the tile is chosen without a pattern.
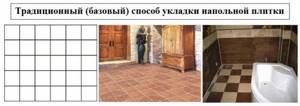
The basic method is quite difficult for people without experience.
The checkerboard method is very attractive because it allows you to lay tiles alternating between different colors. You can use different shades. This option is great for balconies with an unusual interior.
“Kaleidoscope” is an installation method that is perfect for interesting interiors. In this case, the colors are placed in random order. This is a very bright coating option.
When laid in a herringbone pattern, the tiles will look like classic parquet. For this method, you can choose any tile, except for those made to look like stone.
When laying tiles on a heated floor consisting of heating mats, it is better to choose the standard installation method. But with the proper skills and abilities, you can experiment with others.
Before starting work, you need to prepare several tools and aids:
- glass cutter;
- roulette;
- hammer;
- wire cutters;
- notched spatula;
- building level;
- pencil;
- clean rag;
- sponge;
- cross-shaped gaskets;
- scraper with rubber pad.
Video:
If we consider a situation where heating mats have already been laid on the screed, then you can skip the surface preparation stage. The surface must be marked, carefully controlling the accuracy of the marking.
The diagram is drawn up so that the installation starts from the middle. Then the cut pieces will be located at the edges, where they are less noticeable, and if noticeable, they look aesthetically attractive.
It is necessary to choose an adhesive that is as resistant to temperature changes as possible, since changes will occur in any case, since a heated floor system is being installed.
The glue is applied using a pre-prepared notched trowel. No more than one square meter of surface should be treated at a time.
To make the seams uniform, cross-shaped spacers are laid between adjacent tiles. If, nevertheless, porcelain stoneware tiles were chosen, then their installation is possible without seams, which creates the appearance of a solid coating.
Cross-shaped pads must be removed no earlier than after 24 hours.
After this, you can proceed directly to grouting the joints, using a scraper with a rubber pad. After grouting there will definitely be stains.
They can be removed immediately with a damp cloth. After all procedures, the tiles are thoroughly rubbed with a dry cloth.
Operating a heated floor on a balcony under tiles requires careful control over temperature regulation.