An important step in building a house is the selection and installation of a heating system. One of the possible options is laying a heated floor using water-filled pipes. If you know the technology and have the skills, installing a warm water floor with your own hands is not difficult.
Foundation calculation
Try a new product
Try for free Find out more
To make an underfloor heating structure effective, it is necessary to strictly follow the design of the multi-layer “pie”, choose the materials wisely and carry out all the work in a certain sequence. In this case, a ready-made water heated floor (WIP) will pay for itself in just a few years.
Water heated floor installation
The heating system, for which the term “water heated floor” is used, is a pump structure with a liquid coolant moving through plastic or metal pipes mounted in the floor screed.

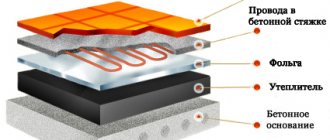
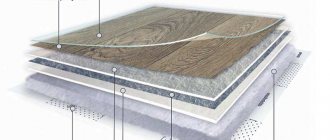
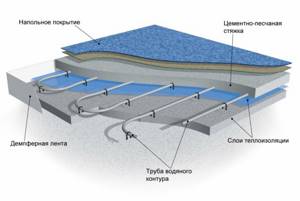
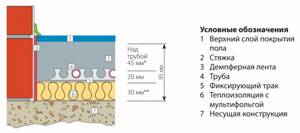
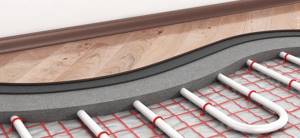
The standard VTP scheme is a pie of several layers. The lowest is the base on which the screed is poured. A heat-insulating gasket is made over it, which reduces heat loss during system operation. Pipes are laid on the thermal insulation. The next layer is again the covering screed. It is a kind of heat accumulator that heats the room. The final layer is the finishing floor covering.
Depending on which pipes are used to install the heated floor, the “pie” may be provided with waterproofing.
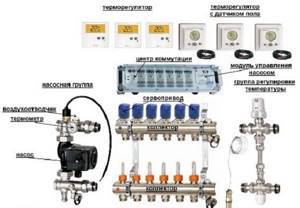
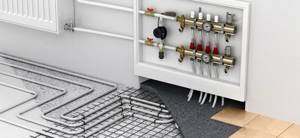
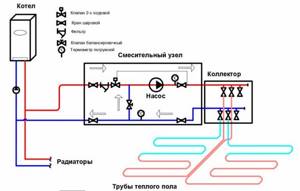
A working system includes several structural elements: a circuit of laid pipes, a collector, a pump, and a heating boiler. For ease of operation and control, heating devices must have adjustment sensors.
Design features
Mats for heated water floors
It is necessary to take into account in advance the details that distinguish certain equipment. So, in some situations, a built-in boiler pump is used to circulate coolant throughout all circuits. For a large facility, its performance may not be enough, so you will need to install a separate power unit.
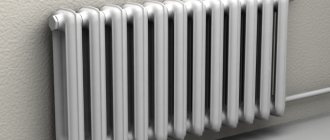
When using radiator heating, routes are created with a minimum number of turns, without sharp corners. By adding tilts towards the boiler, natural circulation can be ensured under the influence of gravity.
In heated floors, long pipelines with a large number of bends are installed
It is more difficult to pump water through such a system. Only coercive methods are used here. If there are errors in the calculations, the power of a separate pump will not be enough for distant circuits. In this case, their poor heating cannot be eliminated by removing air plugs. The system will need to be modernized.
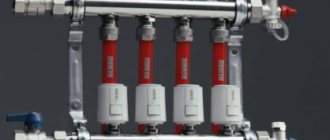
The comb regulators must first be correctly adjusted. In addition to mechanical flow meters, valves with electric drives are installed. Such devices change the coolant supply rate taking into account the readings of temperature sensors.
Automated adjustment system
Pros and cons of water floors
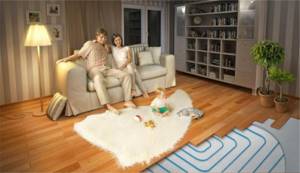
For many owners, heated floors seem to be a convenient way to heat their home. It is valued for many advantages:
- Availability. The VTP is easy to adapt to the autonomous heating system existing in the house. Laying a warm water floor is possible both in the entire building and in individual rooms (for example, in a bathroom and a nursery).
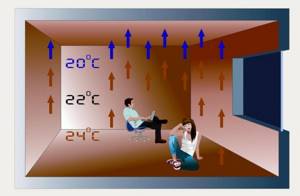
- Comfort. Thanks to the heated floor, the room maintains the optimal temperature. The air is heated evenly, starting from the bottom.
- Hygiene. When using a heated floor, the air does not dry out and an increased amount of dust is not created.
- Durability. The duration of operation is determined by the quality of the pipes. When choosing polymer products, the HTP system lasts at least 20-25 years, copper pipes increase the service life to 50 years.
- Self-regulation. Fine-tuning the system triggers autoregulation. The required temperature is stably maintained by the equipment.
- Economical. Since the floor does not absorb heat, and the upper horizon of the room remains unheated, there is no need to spend additional energy on heating.
With all the convenience and benefits, the installation and operation of a water-heated floor has its own problems, which determine its disadvantages. Firstly, such a design requires the development of a clear and competent project. Only specialists with the necessary qualifications can handle this work.
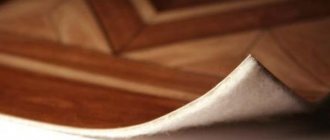
Secondly, an underfloor heating system is only possible in private homes. Obtaining permission for installation in an apartment that receives centralized city heating is almost impossible due to the potential for an accident. Thirdly, not all floor coverings are compatible with heated floors. Craftsmen recommend laying laminate, tiles or high-quality linoleum as the finishing layer. Materials such as parquet and carpet are not suitable for laying over laid pipes, as they have high heat-insulating properties.
When heated, low-quality linoleum can emit harmful substances with an unpleasant odor.
Heated floors in an apartment: a general concept
Underfloor heating is a home heating system that is used as additional heating.
Before installing the system, it is worth studying what it consists of and how it functions.
Principle of operation
After turning on the equipment, the heating circuit transfers heat to the floor material, which plays the role of a heat exchanger. Energy is released into the air, causing the room temperature to rise.
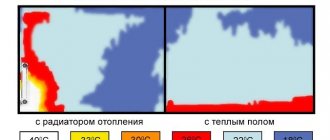
The lower layers heat up faster than the upper layers. Therefore, the method of maintaining a microclimate when installing floor heating is considered more comfortable for humans than with convection heating.
System design
All types of heated floors include 2 components:
- heating circuit installed between the screed and the floor covering;
- devices that support heat exchange.
Warm floors include a heating circuit and devices that support heat exchange.
Varieties of pie depending on the base
When designing and installing a heating system under the floor covering, it is necessary to take into account the quality of the base. The choice of materials and the laying of layers of the heated floor cake depend on this. VTP can be laid on three types of bases: soil, concrete and wooden floor.
On the ground
If the base is dense soil, then according to building codes it is allowed to make a heated floor from polymer or metal pipes on it. Initially, the soil is cleaned and leveled. Sand 5 cm thick is poured onto it. The sand cushion is compacted and slightly moistened with water. Gravel or crushed stone is poured onto the prepared sand layer. These materials can be replaced with expanded clay. After compacting, you should end up with a gravel layer 8 cm thick.
Installation on the ground can be done if the groundwater level is no higher than 5 meters.
Reinforced waterproofing is installed on the sand and gravel base and filled with concrete. The thickness of the rough screed should be 10 cm. The next element of a complex floor is another layer of waterproofing. The structure of the cake is complemented by heat-insulating material (expanded polystyrene). The thickness of the insulation depends on the conditions of a particular room. It can range from 5 to 15 cm. The further process includes laying reinforcing mesh, pipes, pouring screed and laying the finishing coating.

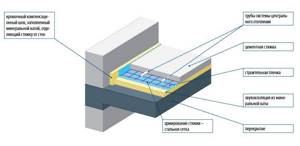
On a concrete floor
The process of laying on a concrete base requires a certain alternation of layers. Waterproofing is laid on concrete monolithic slabs, which can serve as floors. This role is often performed by ordinary polyethylene film. Insulation is spread over the insulation. It is recommended to use a material with a reflective surface, such as cork mats or polystyrene foam.
The next step is laying the reinforcing mesh. Next comes the layout of the pipes, which are the key element of the heated floor. They are filled with concrete. After the screed has dried, tiles or laminate are placed on it.
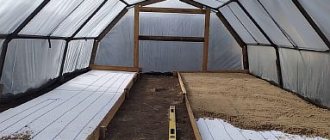
On a wooden floor
Making a heated water floor on a wooden base is possible in two ways. The first one repeats the technology of laying on a concrete floor. The second method does not require a screed device. The cake is mounted on a plywood base, on top of which logs are laid.
The next step is to lay a waterproofing film material, and on top of it between the bars is a 10 cm thick heat insulator. For pipes, grooves are cut out in the insulation and laid with reflective material. Then the pipes are pulled into the prepared grooves.
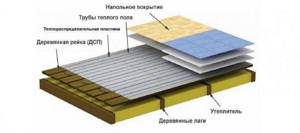
If a laminate is chosen for the finishing coating, it can be laid directly on the pipes. Under other floor coverings, thin sheets of plywood are first laid to make leveling the floor easier.
Schemes for laying water heated floors
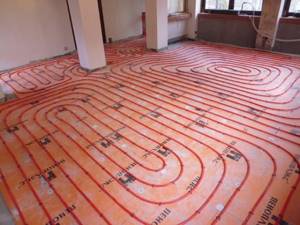
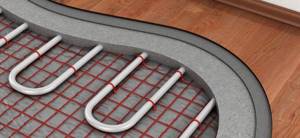
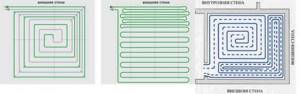
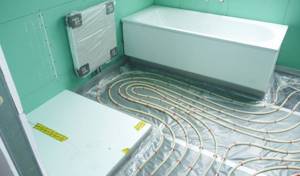
The main goal when laying heating pipes is to create uniform heating of the surface. To do this, it is necessary to spread the pipes over the entire area, maintaining the same distance between them. There are two layout paths: from the wall to the threshold and from the wall to the center.
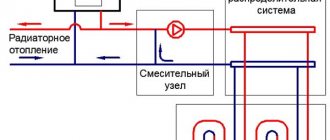
For convenience, it is best to use ready-made diagrams. They were developed by specialists and tested many times in practice. The beginning of the system is the mixing unit and manifold. In this case, the pipes are connected according to a certain rule: one end - to the inlet pipe, the other - to the check valve. There are several layouts for heating pipes. The most popular are “Snail” and “Snake”. A combined option is also in demand.
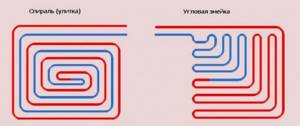
When laying out a pipe like a snake (or spiral), it is necessary to bend it 180 degrees. For such a circuit layout, a low-power circular pump is sufficient. The spiral pattern is preferable for children's rooms and bathrooms.

Laying heated floors in corner and end rooms requires more heating of the perimeter. To do this, they use a special scheme in which a pipe with hot water, after entering the room, first stretches along the walls and then is wrapped inward.
When laying out, the distance from the wall to the nearest pipe should not exceed 15 cm.
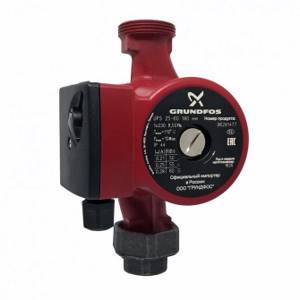
Pumps and heating boilers
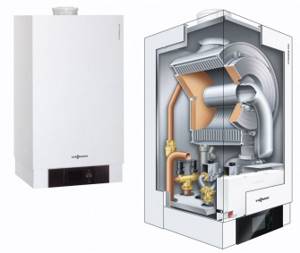
A water-heated floor performs its assigned functions while heating the water to only 45 degrees. But to maintain even such a low temperature level of water in the pipes, a suitable heating boiler is needed. And if the equipment is selected correctly, there is a high probability of saving on heating your home.
When performing all the work on assembling a water heated floor with your own hands, you must take into account the recommendations of specialists before purchasing a water heating boiler. Different types of boilers cope with the task of underfloor heating:
- Electrical. One of the ideal options for arranging underfloor heating in the house. However, it should be remembered that such devices consume a lot of electricity and require separate wiring.
- Gas. Such boilers are quite acceptable for installing heated floors. But it must be borne in mind that they are most effective when they reach high temperatures (70-90 degrees). In this case, their efficiency is 94-95%. When setting the required degree for the HTP, the efficiency of the gas boiler drops to 80-85%. The owner of the house in such a situation is forced to overpay. Therefore, it is recommended to choose adapted condensate models.
- Heat pump. It is also a suitable option for operating underfloor heating, as it provides high efficiency. But when choosing such equipment, you need to be prepared for large expenses when purchasing and a long payback period.
- Solid fuel. This variety is suitable if you choose a long-burning model and supplement it with a buffer capacity.
- Pellet. If you have the necessary fuel, this type of unit is quite suitable for connecting to a water heated floor.
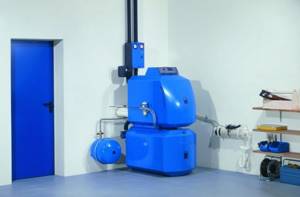
In many cases, the circulation of water through the underfloor heating circuit is carried out thanks to the operation of the pump. For a one- or two-story house with a total area of 250-300 sq. meters, pumps with a wet rotor are recommended. For a building where it is planned to heat a large area, a pump with a dry-type rotor is needed. When purchasing a pump, they also take into account its power, material, presence of a thermostat, and speed mode.
If the heated floor is installed in a room up to 40 sq. meters, then the system can do without a pump.
Basic operating rules
When using the system, observe the following rules:
- Maintenance and repair of the electric floor is carried out only after the system has been de-energized.
- Objects that interfere with heat transfer are not placed above structural elements. This leads to overheating and system failure.
- The structure is not subjected to significant mechanical loads. Impacts can lead to breakage of the temperature sensor and damage to the film heating device.
- If a malfunction is detected, turn off the supply of electricity or hot water and contact a specialist.
- If the floor will not be used for a long time, disconnect it from the power supply. When the system is the only source of heating, the minimum temperature setting is set in the absence of residents.
Repairs are carried out only after the system is de-energized.
When operating the system, you must not:
- independently change the design of heating elements;
- connect a rolled cable to the network;
- install heating cables or mats that are not disconnected from the power supply;
- perform installation and maintenance work on the system without the appropriate skills;
- connect the products to an electrical network that does not correspond to the parameters stated in the product passport;
- expose system elements to aggressive substances or lubricants;
- perform work without using personal protective equipment;
- expose system components to mechanical stress;
- leave heating cables unprotected.
Installation of a warm water floor
After the design of the HTP is completed, they proceed to the purchase of materials and directly to the arrangement of the floor. This work is carried out in stages, starting with surface preparation and ending with putting the system into operation.
Complete installation of a water heated floor is a responsible job. If you do not have the skills to assemble a pie and connect the system yourself, it is recommended to entrust the work to professionals.
Tips for choosing materials
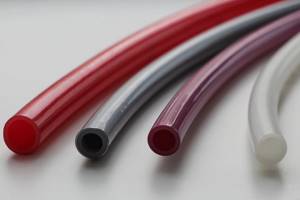
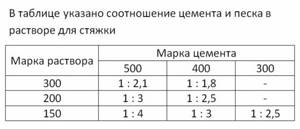
Before starting work, you need to decide on the materials. The choice concerns pipes, insulation, reinforcing mesh, and cement for concrete. A competent approach includes not only calculating financial costs, but also assessing the efficiency and durability of the components used. Pipes laid in the circuit can be made of different materials. Pipes made of polymeric materials and metal are suitable for high-pressure pipes:
- Copper. Due to good electrical conductivity, corrosion may occur in the material. Grounding is required during installation. The shelf life is up to 50 years, however, they have a very high price.
- Made from corrugated stainless steel. They feature optimal heat transfer and ease of bending. A circuit made of such pipes needs to be grounded, and its service life is limited to 30 years.
- Polypropylene. The pipes are frost-resistant and bend only when heated strongly. The service life is up to 20 years.
- Polyethylene PERT and PEX. Pipes are not designed for high temperatures. Shelf life up to 20-25 years.
- Metal-plastic. The products are not frost-resistant and can only be bent when using special equipment.
Pipes made of artificial polymer materials (polypropylene, polyethylene, metal-plastic) are characterized by a lack of electrical conductivity and a low level of heat transfer. The only exception is metal-plastic; its level of heat transfer is slightly higher compared to plastic.
For heated floors, pipes with a diameter of 16, 17 and 20 mm with a wall thickness of 2 millimeters are suitable. These data are indicated on the outside of the pipe itself along its entire length.
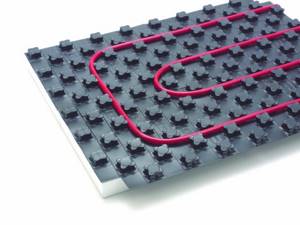
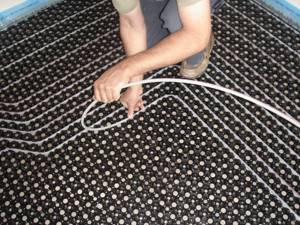
When purchasing insulation, take into account the thermal insulation properties, thickness and complexity of installation. As the most suitable option, experts recommend using slab extruded polystyrene foam (EPS) and profile polystyrene foam mats with mounting protrusions. The latter option is very convenient, as it makes it easier to lay out the pipes and, due to the presence of side grooves, there are no gaps between the plates.
For VTP on the ground and above the basement, insulation with a thickness of 10 cm is required, for the ceiling to insulate the floor on the second floor - 5 cm.
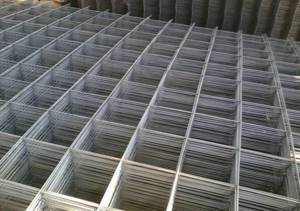
When choosing reinforcing mesh, you should pay attention to the material, the thickness of the rods, and the size of the cells. Metal, plastic products, as well as those made from composite materials are suitable for work. The most important thing is that the surface of the mesh is not corrugated, as this can lead to damage to the pipes. It is recommended to make reinforcement from a mesh with rods 4 mm thick.
Tools used
At different stages of work on the production of water heated floors, different tools are needed. To install floor insulation, you should prepare a construction knife, pliers, and bolt cutters. At the stage of assembling the collector and laying out the pipes, you will need screwdrivers, a tape measure, a level, a hammer drill, a drill, a screwdriver, a pipe cutter, a pipe welding machine, a reamer with a blade, an adjustable wrench and wrenches, and a crimper. The set of equipment for pouring screed includes a concrete mixer, a beating cord, and usually a construction trowel.

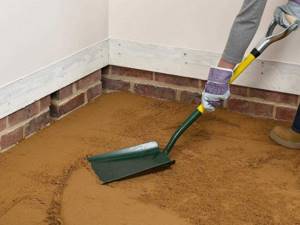
Surface preparation
The first stage of work is leveling the capital screed or soil. The base surface should not have height differences exceeding 1/2 of the pipe cross-section (approximately 6 mm), as this will lead to the appearance of air locks in the system.

If the VTP is installed on the ground, then first remove the surface layer to a depth of 30-35 cm below the level of the future finishing coating. The surface is cleaned and leveled. Next, the soil is covered with geotextiles and covered with sand and crushed stone. The last step in preparing the foundation on the ground is pouring concrete. The layer thickness should be 4-5 cm.
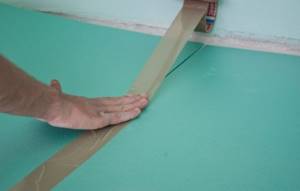
Placement of insulation
Before laying the insulating boards, a damper tape is glued around the perimeter of the room to a height exceeding the surface screed. The optimal thickness of this consumable is 10-12 mm. The tape protects the system from heat loss along the edge. The thermal insulation is installed on waterproofing material spread over the entire area. If 10 cm of insulation is required, a double layer of slabs is used. In this case, the upper plates are placed perpendicular to the direction of the lower ones.
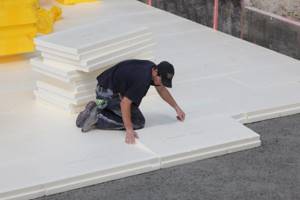
Polystyrene mats are laid out staggered like brickwork. Start work from the far corner of the room. If EPS is chosen for thermal insulation, then after finishing the layout, the slabs are fixed to the base using disc dowels. The attachment points should be on the perimeter of the slab and its center.
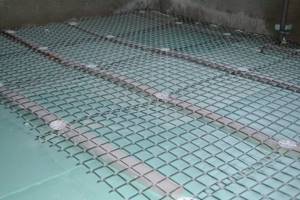
Reinforcement
The reinforcing mesh is designed to enhance the strength of the entire structure, distribute the load evenly, reduce cement consumption when pouring the screed, and provide the ability to attach heating elements.
The outer reinforcement should not be located close to the walls. The mesh is installed on the fasteners so that the height from the rough base is 2 cm. For ease of installation, pieces of beams or bricks can be placed under the reinforcement. The gap is necessary for the solution to penetrate under the heating element system.
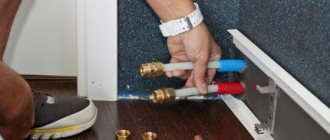
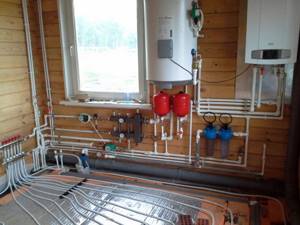
Selection and installation of the collector
The system includes a collector-mixing unit, which is an important functional element involved in wiring. Since the selection of components and assembly are critical moments, it is best if this is done by specialists.
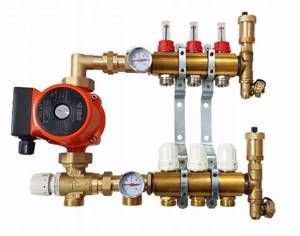
When choosing a collector, take into account the number of connected circuits and the quality of the comb material. It is best to purchase a comb that has one output more than necessary. This allows you to connect an additional branch or monitoring devices (thermometer, pressure gauge) to the system. High-quality collectors are made from stainless steel, brass, bronze, polypropylene.
During assembly, the inputs of the heated floor circuits are connected to the supply comb, and the output ends of the loops are connected to the return. They are mounted in pairs, as this simplifies adjustment. The circuits that are connected to the same collector must be equal in length.
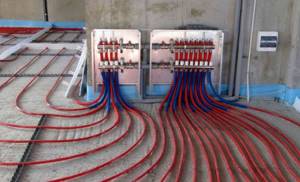
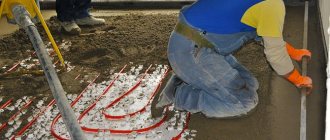
Marking and laying pipes
Pipes are laid on the installed reinforcing mesh. First, they are connected to the collector, laid around the room, and only cut off before connecting to the return line. The location of the circuit must be decided in advance. If “Snake” is selected for the warm floor, then the pipes begin to be laid from the outer wall or from the window. “Snail” is less demanding on this condition; its beginning can be anywhere.
There are certain rules when laying the contour. Firstly, the step should be 20 cm. Secondly, the length of the pipe in one circuit should not exceed 120 meters. Thirdly, the length of the contours in the system must match. The unfolded elements are fixed to the reinforcing mesh. If a polystyrene foam board with bosses was used as a heat insulator, then no special fastenings are needed.
Connection to the system and testing
Before the second screed is poured, the system must be tested. This procedure consists of several steps:
- The installed system is filled with water.
- Increase the pressure to 5 bar and maintain this level.
- Inspect the pipeline for leaks.
- Reduce the pressure to 2 bar and leave for a day.
- If after 24 hours the pressure has not dropped, set the operating temperature.
If the set temperature has not decreased after a day, it means that the water-heated floor is functioning normally and is ready for final decoration. If leaks or defects are found in the wiring, they are eliminated and the control test is repeated.
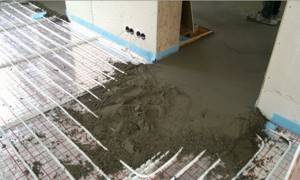
Pouring screed
This stage of work requires certain conditions. The main thing is the temperature is no more than 25 degrees. For water floors, it is recommended to use a special solution composition that has good thermal conductivity and ensures uniform heating. An alternative is self-prepared screed mixtures.
The thickness of the concrete screed in living rooms should be 20 mm, and in utility and utility rooms - up to 40 mm. Filling is carried out along the beacons, leveling the surface over the entire area.
Putting VTP into operation
The most important connection is the first one. If the installation of a water floor is done according to the rules, then serious problems should not arise. But for the sake of preserving the pipeline and protecting the screed from cracking, the launch is carried out according to a certain algorithm. On the first day, set the temperature to 20 degrees. On the second day, increase it by 3 degrees. Then every day they add 4 degrees until the indicator reaches the working level. After this, you can begin laying the topcoat.
Electric heated floor
It is problematic to install a water heated floor in an apartment. Running a pipe from centralized heating will be impractical, since the loss of heating temperature by the coolant will be significant. The neighbors will simply have cold radiators. Central heating is not designed to connect such systems.
In this case, the ideal solution would be to install an electric heating cable. Connecting a heated floor to a thermostat will allow you to control the heating temperature. In this case, home owners can choose the most suitable type of system. ">
Today, there are such types of heating wires on sale as cable (poured into the screed), mat (installed directly under tile adhesive), infrared film (installed under laminate, linoleum without glue). There are also self-regulating wires, which are most often mounted on pipes. However, creating full-fledged heating of a house with their participation today will be very expensive, so the presented heating elements are not used for such purposes.