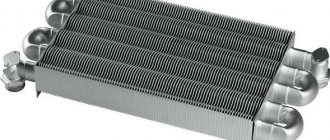
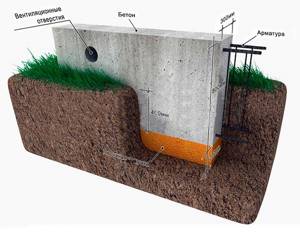
The strip foundation is a basic type of foundation, one of the most proven and deeply studied types of supporting structures.
The history of the construction of the belt goes back many centuries, so the statistics and design features have been worked out as closely and in detail as possible.
The strip foundation is harmoniously combined with units of other types of foundation or with structural elements of the building itself, allowing them to be implemented in various ways.
One of these options is the installation of floors on the ground, a simple solution that does not require lengthy work and does not load the walls.
The technique is quite widespread and deserves a detailed description.
Floors on the ground - what is it?
Ground flooring is a technology for creating a subfloor that rests directly on the underlying layers of soil. This technique is available in the absence of a basement or basement . It is simple and economical, used mainly in auxiliary and outbuildings - garages, storage facilities, bathhouses, etc.
For residential buildings, this technology is used less frequently, as it requires high-quality insulation, waterproofing, and ideally, the installation of a “warm floor” system.
It should be taken into account that the technique of installing floors on the ground is only suitable for traditional types of strip foundation and is not suitable for combined types of supporting structures, such as pile-strip, etc.
There are different types of subfloors on the ground:
- Concrete screed supported on load-bearing walls.
- A concrete screed supported on a layer of soil backfill and serving as a supporting platform for the walls.
- Boardwalk on joists.
- Dry screed with floating floor, etc.
Different design options require their own construction methods and the composition of the floor pie on the ground. to pour a mass of concrete directly onto the backfill layer; it is necessary to create appropriate preparatory layers that provide rigidity, resistance to loads and thermal insulation.
Wood flooring is easier to install, but also requires significant preparatory work.
NOTE!
The main factor influencing the condition of ground floors is the presence and depth of groundwater. Without examining the site, you should not make a decision about creating such a floor.
Soil compaction
The most important stage of work, on which the final quality and long service life of the floor depend. In cases of high soil density and low groundwater levels, this operation can be ignored. Compacting the soil simply won't work. If the site was graded with the movement of layers of soil, trees were uprooted, and other vegetation was removed, then compaction must be done.
The manual process is extremely labor intensive. To perform the operation efficiently, a special device is made - a manual tamper. Weight and size are selected based on your own capabilities. It is advisable to use this method for small amounts of work or to use it in hard-to-reach places.
The optimal solution would be to use an electric or pneumatic rammer. The speed of work and its quality increase manifold. The next stage - insulating a concrete floor in a private house will be easier to do. A smooth, dense surface is an ideal basis for a thermal insulation layer, the integrity of which during operation will determine the comfort in the home and protection from the penetration of cold.
The quality of soil compaction will increase significantly if, between operations to physically compact the soil, the area is watered abundantly. The number of voids is minimized. Soil softened by moisture requires less physical effort when performing the operation.
If an underground floor is planned, then it is done first. In a private home this is always the desired room. It is convenient for storing food, storing tools, equipment for cultivating land, and items used seasonally.
Even if it is not possible to make a full-fledged basement under the entire house, a small volume of a few cubic meters can be completed without difficulty. A convenient entrance is designed, walls are made using masonry or monolithic pouring. As a base for further layers of coating, you can install a wooden ceiling, or make a concrete floor using the formwork.
Might be interesting
Thermal insulation
What are thermal insulation materials: comparative…
Thermal insulation
How to insulate a roof from the inside and not make mistakes?
Thermal insulation
Roofing and drainage: heating rules
Thermal insulation
Insulated Swedish stove: pros and cons
Advantages and disadvantages
The advantages of flooring on the ground include:
- Simplicity and cost-effectiveness of creation.
- Ability to withstand high loads.
- Absence or low values of loads on the walls.
- Durability, high maintainability.
- Ability to combine with any type of finishing coating.
- Possibility of installing a heated floor system.
There are also disadvantages :
- The need for high-quality insulation.
- The device is not possible if the backfill layer is too thick (more than 0.6-1 m).
- Dependence on hydrogeological conditions in the region, impossibility of development in flooded areas or in regions with unstable groundwater levels.
- The need for a competent approach during construction.
All qualities of ground floors have been sufficiently well researched, which allows us to rely on technology and carry out work in strict accordance with its requirements.
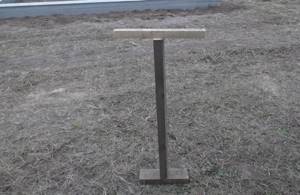
Stage 1. Determination of the “zero” level
First, determine “zero” (mortar filling level), which should be equal to the bottom of the doorway, and mark it around the perimeter. To do this, make marks a meter from the bottom of the opening (as shown in the diagram) and transfer them to the walls of the entire room (obviously, it is better to use a laser level for this). Next, measure back 1 meter down from these marks and draw a second line - it will be the “zero” along which the floor will be filled. To simplify the procedure, hammer nails in the corners and stretch the cord.
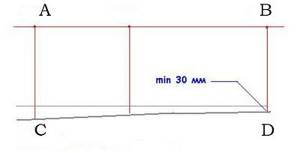
Scheme for determining the zero level: AB - level standard, CD - the highest floor level for the future screed
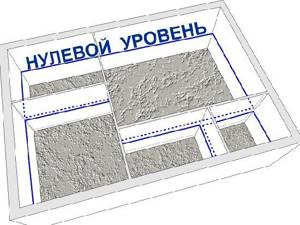
Zero level circuit
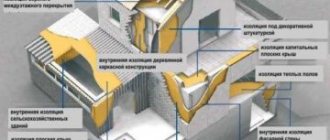
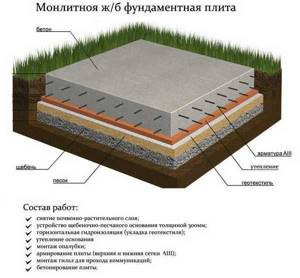
What is the device (by layers)
For wood subfloors, creating a complex pie is not necessary. A mandatory layer of sand backfill is sufficient, on top of which geotextiles are laid and insulation is laid or poured. The composition of the cake for a concrete floor on the ground is more complex.
Typically the following layers are created:
- Sand backfill.
- A layer of gravel cushion.
- A reinforcing mesh made of metal or fiberglass is laid.
- A rough layer of concrete screed 10 cm thick.
- Waterproofing layer.
- Insulation (expanded clay, polystyrene foam or, better, specialized penoplex).
- Additional layer of waterproofing.
- Clean concrete screed.
It is also recommended to reinforce the last layer to eliminate the possibility of cracks forming during drying. If necessary, water heated floor pipelines can be poured into it to obtain an effective and economical home heating system.
Comparison of characteristics
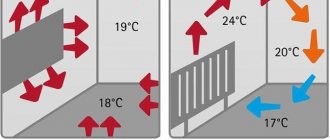
- Thermal conductivity is the most important parameter of insulation; it reflects the rate of transfer of thermal energy. The lower the thermal conductivity, the more difficult it will be for heat to escape the room. The overall thermal resistance of the structure is calculated from the thermal conductivity of all floor elements.
If the thermal resistance of the structure does not meet the objectives, then during the design, thicker insulation is installed, and this leads to increased costs. At the same time, insulation with the lowest thermal conductivity is not always the most rational choice, because it may turn out to be more expensive and it will be more profitable to take a thicker layer of inexpensive material.
- Moisture absorption – the ability to absorb moisture. When saturated with moisture, the insulation loses its thermal insulation properties - thermal conductivity increases. In a heated floor design, the heat insulator is separated from the ground by a layer of waterproofing, but in the case of floors, the possibility of leaks from above cannot be ruled out. In this regard, polyurethane foam insulation and foam glass perform best.
- The flammability class is usually given great importance when choosing insulation, but it is often forgotten that what matters most is not the flammability of the material itself, but the flammability of the entire structure. In ground floors, the insulation is sandwiched between the soil and the concrete screed, that is, surrounded by non-combustible materials. For this reason, the likelihood of contact of insulation with fire is very low.
- Density - this parameter affects the compressive strength and weight of the material. To prevent the screed from crushing the insulation, it must have the necessary rigidity; each material has its own permissible density. For example, PPS with a density of 35 kg/m3 can already be used for insulating floors on the ground; for mineral wool, the density should be at least 160 - 175 kg/m3.
- Weight - this characteristic is related to density; the denser the material, the heavier it is. Logistics costs for delivery and unloading depend on weight. If PPP can be delivered by a passenger car and unloaded by hand, then specialized trucks will be required to deliver aerated concrete.
- Price – Ultimately the choice is made based on cost. You should not look at the price per cubic meter of insulation, because this cost does not take into account the difference in the thermal conductivity of the material. For comparison, we will take the insulation with the lowest thermal conductivity as one. Different insulation materials will receive the following coefficient: PIR - 1, EPPS - 1.27, EPS - 1.27, Foam glass - 1.4, Mineral wool - 1.4, Aerated concrete - 1.58, Perlite concrete - 1.7. This way we can calculate the actual cost.
For example, at a price per cubic meter, aerated concrete is cheaper than extruded polystyrene foam, but taking into account the difference in thermal conductivity, the layer of aerated concrete will need to be made larger, and in addition, we must additionally take into account the cost of unloading and delivery, which will be more expensive for aerated concrete.
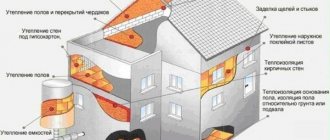
What you need to know before construction
Before proceeding with the construction of a floor on the ground, it is necessary to obtain sufficiently complete information about the composition of the soil layers on the site, the depth of groundwater and the extent of seasonal fluctuations in its level.
This data will allow you to decide whether it is possible to create floors on the ground with a sufficient degree of safety for the building and its inhabitants . It is recommended to create a high-quality drainage system that can ensure the removal of soil moisture if its level increases.
Then you should decide on the thickness of the preparatory layers of backfill. This issue is of particular importance since they must be thoroughly compacted. The thicker the layer, the more difficult it is to achieve sufficient compaction.
At the same time, it is impossible to achieve the natural compaction density of the backfill layer in practice. The preparatory layer will certainly give some shrinkage, the amount of which will be directly proportional to its thickness.
It is recommended to pour a layer of footing concrete (rough screed) onto a geotextile fabric. This will preserve water in the concrete mass and ensure normal crystallization of the material. If you pour directly onto the preparatory layer, moisture from the concrete will be absorbed into it and disrupt the hardening process, which will result in a weakening of the screed.
IMPORTANT!
When pouring all concrete layers, it is necessary to fully comply with the period necessary for the crystallization of the material and the development of technological strength. Otherwise, there is a risk of deformation or destruction of the underlying layers, the occurrence of defects in the geometry of the floor pie and loss of overall strength.
Before starting work, you must make sure that all communications passing under the floor level have been entered . After creating a floor pie on the ground, entering communications will be difficult and will require more complex methods for solving the issue.
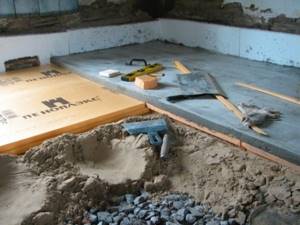
Sand and gravel layer for concrete floor
It is not recommended to skip this step. Dense soil cannot be considered a guarantee of the final quality of work. A layer of sand and gravel compensates for the natural movement of the soil and relieves the internal stresses that arise. The scope of work largely depends on the quality of the soil. In some cases, on rocky soil, it is enough to add sand about 10 cm thick.
If the soil is clayey, then it is advisable to supplement the layer with gravel or crushed stone. Soil used for agricultural purposes or with developed natural vegetation requires a different approach.
For example, black soil must be completely cleared of roots. After compaction, gravel is laid. Then sand is poured onto it. After spilling water, tamp again. Another layer of crushed stone is laid. The final leveling is carried out using sand level. Such a multi-layer base completely eliminates possible problems when operating housing on soft soils.
The final stage of the work will be to check the entire area horizontally, inspect for the absence of sharp stones and other objects that could damage the waterproofing layer laid on the prepared sand and gravel base under load. The method of laying a rough screed on top of crushed stone, which is then waterproofed and insulated, looks more reliable and of higher quality.
It is recommended to carry out this and the next stage as carefully as possible. The mobility of the sand and gravel layer is high. The best way to protect its integrity is to anticipate the laid boards or sheets. The load is distributed evenly over a large area and will remain flat for subsequent installation of insulation.
Construction technologies on strip foundations
There are several methods for creating floors on the ground, involving the use of different techniques and materials. They all have their own advantages and disadvantages, and have sufficient efficiency and load-bearing capacity.
The choice of methodology is made based on a comparison of the features of the technology and the conditions that exist in reality . In addition, the capabilities and preferences of the home owner are an important factor.
Let's consider the procedure for creating different technological options:
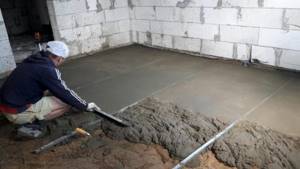
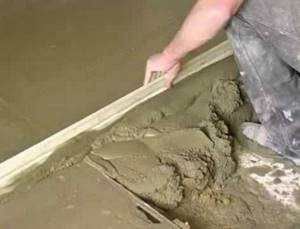
Concrete screed
Creating a concrete screed is the most labor-intensive and time-consuming process, requiring the use of “wet” solutions.
This feature must be taken into account in advance, since the specifics of the materials will require certain conditions:
- Air temperature not lower than +5° (optimally room temperature).
- No exposure to the scorching rays of the sun. If there is no roof, you can use a net or canopy for protection.
- Site prepared for work.
Work order:
- Creating a layer of sand cushion . Up to 0.6 m of sand is poured (optimally - about 20 cm). The layer is carefully compacted to a state of maximum density. As a guide, you need to achieve density like on a country road.
- The next layer is backfilling with crushed stone. The thickness of the layer is the same as that of the previous sand layer - about 20 cm. Tamping allows not only to increase the strength of the crushed stone layer, but also makes it possible to further compact the sand layer.
- Laying geotextile fabric . The strips of material are overlapped by about 15 cm with an overlap on the walls of the foundation strip.
- A damping tape is installed along the perimeter of the room on a tape , providing a mechanical decoupling of the floor and the foundation.
- A reinforcing mesh is laid and a rough concrete screed is poured . It is maintained for the required time according to the technology until the material completely hardens.
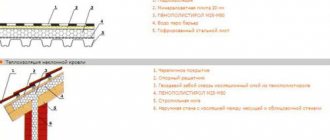
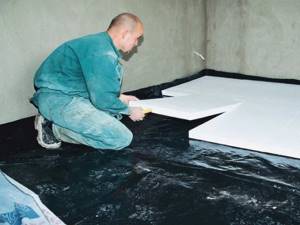
- Applying a waterproofing layer . Either a double layer of roofing felt coated with bitumen mastic or various impregnations are used.
- Laying insulation . The best option is penoplex for foundation work, characterized by density and resistance to external influences.
- Laying vapor-waterproofing film . The strips are laid with an overlap on the walls (over the damping tape) to a height of about 20 cm. The film is overlapped by 10-15 cm with sizing with construction tape.
- Laying reinforcing fiberglass mesh.
- Pouring finishing screed . Its thickness is usually 5-10 cm. If a heated floor system is used, then the installation and laying of pipelines, checking the strength of the connection under pressure and other operations prior to pouring concrete are carried out first.
The total thickness of the floor pie along the ground is selected in such a way that the floor level is as convenient as possible for installing doorways and other building elements. to carry out work in the warm season, when the conditions for hardening the concrete layers allow you to get the best results.
Dry screed
The technology for creating a dry screed makes it much easier and faster to get a high-quality result. The initial stages of work are the same as in the previous version - creating layers of sand backfill and rough concrete screed.
After this the following steps are performed:
- Laying waterproofing film using conventional technology - creating a sealed sheet of film strips folded in rows with a 10 cm overlap with the joints taped with adhesive tape. The edges of the canvas are placed on the wall to the approximate height of the dry screed.
- Installation of beacons. The recommended option is plaster profiles. They will serve as guides for creating a horizontal and level plane.
- Filling a layer of expanded clay. The material is aligned along the beacons, forming a horizontal plane.
- Subfloor slabs - plasterboard, plywood, etc. - are laid on top of the expanded clay. The most recommended option is tongue-and-groove plasterboard, which has a special profile along the side edges for connection.
- After this, the final finishing coating is laid.
Wood flooring
This option is considered the most budget-friendly. The simplest and most reliable design rests on pillars of bricks stacked in a well . The columns are placed in such a way that a support system is formed for installing the logs.
The columns are filled with expanded clay or, alternatively, an air gap is left to ensure dryness of the wood, which requires the creation of ventilation holes.
The joist system is carefully leveled horizontally and forms an even supporting plane . Then a wooden subfloor is laid. A layer of waterproofing film is installed on top, a standard substrate is laid and a finishing coating is laid - linoleum, laminate or other material to the owner’s taste.

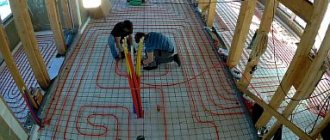
Step-by-step instructions for floor insulation
Proper insulation of the floor with polystyrene foam under a screed with your own hands requires adherence to a certain technology, depending on the base on which the slabs will be laid.
Insulation of concrete floor
It is easiest to insulate concrete floors, since the base itself is strong and does not require special preparation:
The surface is cleaned of dirt and inspected for defects. Potholes, cracks and other defects are repaired with cement mortar or putty. At the time of laying the insulation, the concrete surface must be smooth, clean and dry. The first layer is waterproofing. Let it be roofing felt or film, the pieces overlap about 100 mm, gluing the joints with double-sided tape
It is important to place the canvas on all walls around the perimeter of the room at least 70 mm. The excess will be cut off later. Polystyrene foam is laid on top of the waterproofing, securing each slab with five plastic dowels and umbrellas
Fastening occurs in the same way as on walls. Along the entire perimeter of the room, a gap of about 10 mm is left between the walls and the slabs. All laid slabs are covered with a layer of film. Further work involves laying reinforcing mesh, pouring rough and finishing screed.
After the concrete has dried, the gaps left near the walls are filled with foam. This will prevent cracking of the screed due to thermal expansion.
Insulation on the ground
Insulation of floors on the ground is important for a private house built on a strip foundation.
There are requirements under which foam plastic can be laid on the ground under a concrete screed:
- no impact on floors under heavy loads
- no basement or ground floor
- groundwater occurrence below 4 m
- the room must be heated, otherwise the freezing of the soil will cause deformation of the slabs
Laying foam on the ground
To lay foam plastic on the ground, it is recommended to use slabs with grooves 100 mm thick.
They will lie on a soft base, and the locks will not allow them to move apart.
The presence of locks will also eliminate the formation of cold bridges.
Further actions of ground insulation include the following steps:
- A layer of soil 600 mm thick is removed from the room. The bottom of the pit is compacted tightly and covered with a 300 mm layer of crushed stone or gravel. They can be used in combination with a mixture. If possible, a 100 mm layer of expanded clay is poured on top of the crushed stone. It has good thermal insulation properties, which will not interfere with concrete floors.
- The next layer is a sand cushion. You can even use granite screening. The pillow is generously moistened with water, gradually tamping until a dense layer 120 mm thick is formed. The finished surface must be perfectly flat, which is checked with a construction or laser level.
- A damper tape is glued to the wall around the perimeter of the room. It should protrude 150 mm beyond the boundaries of the future screed. Waterproofing is laid on top of the sand cushion. Its installation is the same as for the previous method.
- Foam boards begin to be laid on top of the waterproofing. They try to move them a little so that they squeeze out their place in the sand through the film. Each plate is connected with a lock joint, additionally gluing the joints with foil adhesive tape. It will 100% prevent the formation of cold bridges.
- The laid foam plastic is covered with film, a reinforcing mesh is laid and the screed is poured.
To make floors insulated with foam plastic on the ground even warmer, you can lay a heated floor cable under the screed.
Insulation of a wooden floor
Despite the fact that wooden floors are considered warm, over time, gaps form between the boards. It is through them that the cold penetrates into the house.
There are two ways to insulate a wooden floor with foam plastic under a concrete screed:
- If the wooden floorboards in the house are firmly attached to the joists and do not bend, you can lay the insulation on top of them. The layers of the cake will be similar to those for a concrete base. That is, between two layers of waterproofing there are foam slabs, and a concrete screed is poured on top of the reinforcing mesh. If the old floors are unusable, first dismantle the boards, level the joists and lay foam plastic between them, similarly protecting it on both sides with waterproofing. New boards are stuffed on top or OSB is attached.
- Insulation of wooden floors of a house under construction is carried out using the method of laying foam plastic on the ground. Naturally, these works are carried out at the initial stage before the installation of the logs. They are laid after the concrete screed has hardened on the foam. Further work involves placing wooden boards or OSB sheets on top of the joists.
Thermal insulation of a wooden floor with polystyrene foam will remove all the cold bridges, creating warmth and comfort in the house.
Which construction technology is best to choose?
The choice of technology is a matter of preference and capabilities of the home owner. Concrete screed allows you to get a durable and strong floor, but its maintainability will be extremely low . Failure of, for example, a heated floor system will create a serious problem with a very complex and costly solution.
Dry screed is much simpler and allows repairs to be made without much expense or problems, but this option is only suitable for people who are not afraid of repair work.
NOTE!
A wooden floor is a traditional solution, but the specifics of wood as a material have too many undesirable aspects, so this option is increasingly being abandoned in favor of other methods.
Laying insulation
A layer of 8-10 cm is considered sufficient to effectively protect your home from the cold. The main rule of this stage is the creation of a single area, without cracks and gaps. How to insulate a concrete floor in a private house, observing the recommended characteristics?
You should know that gaps of even a few millimeters increase heat loss by 10-30%. There are several effective ways to fix this problem:
- cut out parts as accurately as possible, achieving a tight fit;
- use special adhesives to create a sealed layer;
- lay insulation boards using polyurethane foam, which, having a porous structure similar to the base material, ensures maximum thermal protection efficiency.
Experienced craftsmen can easily remove large chips and cracks in the insulation coating with crushed polystyrene foam mixed with an adhesive composition. With this method, the effectiveness of thermal protection is practically not reduced, since the mixture has characteristics identical to the base materials.
Pouring the concrete layer
Next comes the turn of pouring the concrete layer. When purchasing concrete, you should give preference to grade M300 and higher. If you decide to prepare it yourself, the proportions of its components should be as follows: cement: water: crushed stone: sand = 1: 0.5: 4: 2. When preparing, you need to take into account the humidity of the sand, the temperature and humidity of the air, the brand of cement, which can make adjustments to the composition.
On the waterproofing layer, slats are installed 2 m long, 5 cm thick and a height equal to the height of the concrete layer, which is taken in the range from 5 to 10 cm. Usually the height is taken as high as possible - 8-10 cm, which depends on the level of the finished floor and the thickness other layers. The distance between the slats is about 1 m. All slats must be the same in height, which is controlled by the building level. Sometimes, before pouring concrete, boards are laid on the waterproofing layer to protect it from damage.
After installing the slats, you can begin pouring individual sectors, starting from the far corner of the room. Concrete is poured into the space between the slats slightly above their level. Then, using another level strip about 1.2 m long, resting on the guide strips, it is evenly leveled. Ideally, after laying, concrete should be compacted using vibrating machines, but this is not always possible. Therefore, when leveling, you need to create additional vibrations yourself by tapping on the surface, which will help distribute the concrete mixture as evenly as possible and compact it.
After filling the first sector, the rest are filled in the same way. When the entire area of the room is ready, the slats are removed, and concrete mixture is poured into the resulting voids. Thus, the result is an even and continuous fill without seams between sectors. If you receive an uneven concrete surface, you will also have to perform an additional screed under the insulation, and this will additionally cost time and money.
It is better to prepare concrete in small portions so that the time between preparation and pouring is minimal. Concrete left standing for some time degrades the quality of the pour. The concrete mixture hardens in 3-4 weeks, during which the surface must not be loaded or deformed. For more uniform drying and shrinkage, the concrete layer should be periodically watered with water or covered with moistened burlap.
Methods of thermal insulation of floors
Depending on the required thermal insulation indicator, it is necessary to select the optimal insulation option. Until recently, the choice was not particularly large - expanded clay or a mixture of sawdust and clay. But with the advent of modern polymer materials, it has become possible to use different methods of heat preservation when arranging floors on the ground. But first, let's look at the already classic method - insulating the floor with clay and sawdust.
Its advantage lies in the low cost of its constituent elements.
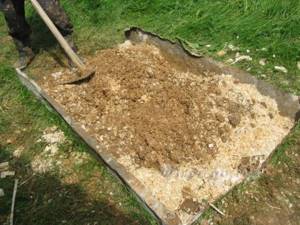
At the first stage, natural clay must be mixed with water and a liquid solution must be prepared. It is best to use a concrete mixer for this. Pre-clean dry clay from debris. Approximate ratio 1:5 (water/clay). The resulting mixture should sit for 2-3 days. This is necessary for complete dissolution. You need to periodically add water to the container and stir. Before applying clay to the waterproofing surface, dry sawdust is added to it - about 20% of the total volume.
However, the use of this method is currently not recommended, since the degree of thermal insulation will be extremely low. Insulation of the floor on the ground is best done using special materials - polystyrene foam, basalt wool or polystyrene foam. In this case, the final result will correspond to optimal thermal savings.
Expanded polystyrene
The structure of polymer polystyrene foam is in many ways similar to traditional polystyrene foam. The same initial components are used for it. The difference lies in their subsequent processing. To achieve a good density, the material is subjected to external heat and pressure. This method is called extrusive.
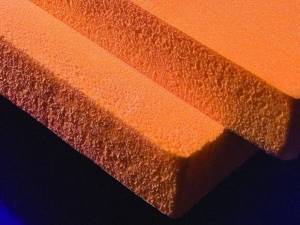
As a result, the insulation acquires the following unique properties that can be used for arranging floors on the ground:
- High degree of thermal insulation. The thermal conductivity coefficient varies from 0.025 to 0.032 W/m*K. For installation on a prepared ground base, sheets with a thickness of 50 to 100 mm will be required, which is significantly less than a layer of expanded clay or sawdust; Waterproof. The main problem with the operation of a dirt floor is the high humidity level. Expanded polystyrene has a low level of hygroscopicity and is almost completely impermeable to moisture. This will protect the wooden surface; Easy installation. Installation requires a minimum of tools. The structure is easy to process and, unlike foam, has good mechanical strength.
Work order
In fact, all work can be divided into three blocks:
- preparation of the base;
- thermal insulation device;
- laying the finishing layer of the floor.
Preparatory work
When working with soil, it is necessary to remove any vegetation from its surface. Grass roots attract and hold moisture, creating the perfect environment for mold to grow and deteriorate concrete or wood structures. In addition, the soil layer must be compacted as much as possible.
Next, filling is done with sand and coarse aggregate. If the groundwater level is high, it is better to increase the thickness of the sand cushion to 15–20 cm. Such a buffer will help retain excess moisture. When constructing a rough screed, reinforcement is not necessary. This layer serves as the basis for the insulation and does not act as a supporting structure.
Laying thermal insulation and finishing layer
Waterproofing is most easily accomplished using roll or film materials. In any case, the individual sheets are laid with an overlap of 10–15 cm. To fix materials with a bitumen layer, simply heat them. Other types of waterproofing are glued with special water-repellent tape.
It is also better to separate the insulation layer after installation and the finishing screed with waterproofing to prevent cement laitance from entering the body of the thermal insulation.
The final screed is made with reinforcement and made of concrete with a class of at least B15. This material has a denser structure, so it better prevents heat from escaping.
Insulation of the floor when located on the ground can significantly reduce heat loss from the interior, which significantly reduces the cost of heating the entire house.
Installation of sand floor cushion
Now you can start laying layers, starting with a sand cushion. Gravel or coarse sand is poured onto the cleaned, compacted and leveled soil in a layer whose thickness is at least 30 cm. Depending on the height of the foundation, the layer can be thicker. Gravel or sand is compacted and leveled. A smooth surface of all floor layers is a prerequisite. To level the gravel, a cord is usually used, which is attached to nails driven into the walls at the same height as the layer of fine sand. The gravel is poured 5 cm below the position of the cord. Using a level 2 m long slats, the uniform distribution of gravel and sand is controlled. It moves along the entire surface of the floor, identifying unevenness, which can be immediately eliminated by taking away the excess amount of gravel or, conversely, adding the missing amount. The remaining 5 cm are filled with finer sand, which is also leveled and compacted. When filling in sand, you need to take into account that after compaction it will shrink by about 20%, so you need to fill it in slightly beyond the markings. To ensure uniform shrinkage of sand, it must be moistened. After this, using a level, check whether the surface is flat. The height difference on it should not exceed 1 cm.