Types and features of frame lathing for siding
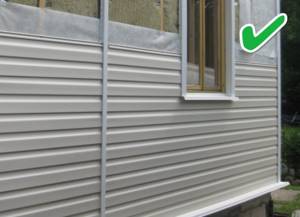
So, the better the quality of the lathing is made, the neater the facade will look and the longer it will last. An impeccable frame is capable of masking a wide variety of wall defects, since it is installed directly on their surface, and siding panels are attached to it on top.
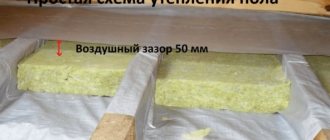
In addition, the lathing serves as the basis for laying heat insulation: mineral wool boards, expanded polystyrene, polystyrene foam and others. Another important function of the lathing is to ensure ventilation of the facade due to the formation of a distance between the surface of the walls and the siding through which ventilation occurs.
If the outer walls of the house are as smooth as possible, the question arises: is lathing necessary in this case or can you save money on it? Yes, it really is possible if the vertical battens of the sheathing are fixed directly on the building itself.
To secure the slats in the correct position on uneven walls, you need to use special hangers. On a flat surface such hangers will not be needed, which again leads to saving money and reduces installation time.
Tips and tricks
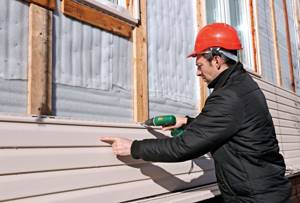
Cladding buildings with siding is very popular, but in order for such decorative finishing to reliably serve for a long time and decorate the appearance of the building, it must begin with the installation of sheathing.
The following tips will help you perform the installation correctly and choose materials:
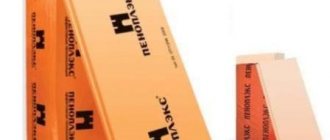
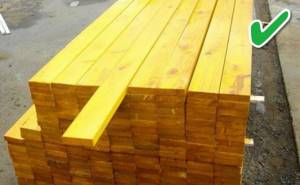
- A wooden frame is recommended for mid-priced houses or balcony cladding. It is considered an economical option. Before purchasing beams, they should be checked for defects and additionally treated with an antiseptic composition. But the best option for the structure is a metal profile.
- The sheathing pitch is usually calculated depending on the size of the facade and the thickness of the thermal insulation. In addition, you need to take into account the weight of the cladding panels and the characteristics of the base. It is not advisable to take a step exceeding 60 cm, especially for the installation of vinyl siding, for which the optimal distance in the sheathing is considered to be 40 cm. It is these indicators that make it possible to give the frame the necessary strength and rigidity.
Types of lathing
- Metal battens. They are made from a metal profile designed to work with drywall. For vertical slats, any profile used for racks or ceilings will do. However, they usually prefer ceiling PP 60x27 for the reason that there are suitable PN 28x27 guides for it, which are also needed for the construction of high-quality sheathing.
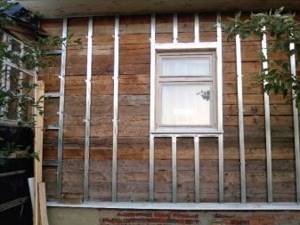
- Wooden sheathing. Its production will require less money than a metal one, but it has a number of disadvantages. The main one is that wooden blocks are subject to deformation during operation. For lathing, you need to choose only thoroughly dried wood. But there is still no guarantee that the sheathing will not deform over time, because it will be constantly exposed to atmospheric factors, such as high humidity. In this regard, metal undoubtedly wins - it is not subject to deformation, biological effects and lasts much longer.
Types of siding and areas of its application
Siding refers to polyvinyl chloride or metal panels used to decorate the facade of a building and capable of imitating a variety of materials with their decorative design: a cut of natural wood, stone.
Main characteristics of siding:
- In some cases, plain siding is used. On the positive side, siding is characterized by a number of its technical properties.
- This is durability and sufficient strength, which helps the material to withstand direct mechanical stress and adverse environmental factors.
- Siding does not rot and fungus does not develop on its surface. The decorative design of the finishing panels will not lose its attractiveness throughout the entire period of operation.
The modern building materials market offers the following types of siding:
- Polyvinyl chloride - made of PVC material and its decorative design can resemble the pattern of a cut of wood, natural stone or brick. PVC panels are used to decorate almost all types of buildings, from residential buildings with different service life to commercial and warehouse buildings. It is possible to install siding yourself with insulation.
- Metal - made from steel, aluminum, zinc by cold rolling molding, has an anti-corrosion coating. Metal panels are durable and resistant to aggressive environmental factors, and therefore this material belongs to the category of industrial goods and is suitable for finishing the facades of production workshops. The product has a high specific gravity compared to its polyvinyl chloride counterpart, and after deformation it cannot be restored.
- Wooden - used only for decorating private buildings. Without fail, the panels are treated with an antiseptic and dried under high pressure. The price for this material is quite high.
Note! In addition, siding may differ in the method of installation and fastening. Thus, horizontal panels and plinth material are used for finishing residential buildings. Vertical material is intended for non-residential and industrial buildings.
Metal frame installation technology
To equip a metal frame, special galvanized hangers are used. They are plates with perforations and are called pawns in installer slang.
Attention! If you need to make a 2-tier sheathing with an extension at the top of the wall, you need to stock up on another type of connecting parts called crabs. They are needed for joining vertical and horizontal profile strips.
The step-by-step process of manufacturing a frame for siding occurs as follows:
- First, markings are made, determining the optimal distance between adjacent sheathing profiles. In this case, they focus on the width of the heat insulator that will be laid, but do not forget about one technological requirement: the interval between vertical profiles should be within 0.40 - 0.60 m.
- Using a marker or chalk, marks are placed on the surface of the walls for attaching hangers. To fix the profile, you can use several fasteners, but according to the rules, their number should be at least 3. The upper and lower suspensions are placed at a distance of 0.15 - 0.20 m from the edges of the wall.
- The profiles are connected to the hangers using self-tapping screws SMM 35x51.
- Guide profiles PN 28x27 are installed at the bottom and top of the wall. They are laid strictly horizontally, regardless of the slope of the area on which the building is located. Galvanized hangers are also used for their fastening. The finished metal frame must be mounted exactly vertically. To achieve this, when installing profiles, their direction is determined by a plumb line.
- A double PP 60x27 profile is installed in the corners of the building, while a gap is left between the wall and the profile, the size of which is equal to the thickness of the thermal insulation with an increase of half a centimeter. Two profiles are connected to each other at right angles and fixed using SMM.
- To arrange vertical racks, the following technique is used: measure the interval between the guides, which are located above and below, subtract half a centimeter from the result for free movement and cut the profile to the resulting size. Next, the profile is inserted into both guides.
- The antennae of the suspensions should wrap around the posts on both sides.
- The correct installation of profiles is determined by a level and they are fixed in the required position, secured with self-tapping screws on hangers.
- To prevent the PP 60x27 metal profile from squeaking when moving, use plastic inserts, mounting them under both ends.
- The window and door openings are finished around the entire perimeter, and this is where the work on making the sheathing for the siding ends - the frame is ready for use.
Step-by-step instructions for installing siding panels
The façade is ready, the sheathing is secured, thermal insulation and wind protection are installed, and you can begin attaching the siding panels. The sequence of actions does not depend on the type of panels and is always the same:
Step 1. The starting slats and ebb tides are mounted according to the level. Experienced builders always leave a small gap so that the mobility of the base material or panels does not lead to deformation.
Step 2. Corner guide profiles are installed at the corners of the building.

It is convenient to use anchor plates for mounting guide strips
Step 3. The siding panels are secured to the sheathing beams through special oblong holes using self-tapping screws with a wide round head.
The panels are secured with self-tapping screws
Prices for popular models of screwdrivers
Screwdrivers
Step 4. After the panels are secured, the finishing strip is fixed.
The finishing strip secures but does not pinch the siding panels
Wood frame installation technology
Wood lathing is made according to the same principle as metal profiles. However, during installation a different set of tools and consumables is used. For example, you will need wood screws, a primer with antiseptic properties, and a hacksaw. The strength of both lathing is almost the same, but the service life is much longer for the metal one.
Nuances when making a wooden frame:
- wood must be treated with a special agent to protect it from moisture
- It is better to pre-plane the bars with a planer or process them on a surface planer so that they become even
- guides are not used when constructing a wooden frame
- the top and bottom of the racks are fastened with the same bars

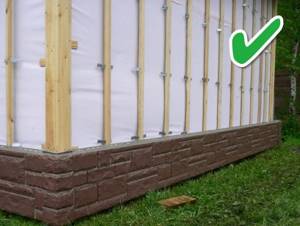
Frame on plinth
Siding is often used for covering plinths, and not just walls - it perfectly decorates the structure and masks flaws. The process of manufacturing the frame for the plinth is exactly the same as for the facade. The technology and materials are the same, but there are a number of features.
Important! Each element of the sheathing for the plinth is fixed on four vertical posts.
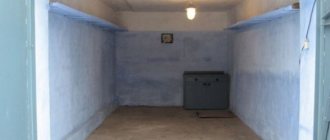
The interval between them is determined based on the length of the facing material and the thickness of the heat-insulating layer, if provided. The plinth sheathing is more susceptible to moisture, so it is recommended to make it from metal profiles.
Having carefully studied the recommendations for making a frame from both materials, you can easily cope with the work on your own and thus save money.

Flow calculation
Before you begin installing the frame, you should first calculate all the material. The number of beams is determined based on how many post supports need to be installed. They are attached in increments of 50–60 cm, so calculating their consumption will not be difficult. Hardware is also considered an important design detail; 1 element is usually required for a surface area of 400 mm.
If the sheathing is assembled from metal profiles, then for its installation the following should be prepared:
- UD profile. To calculate its number, you must first add up all the perimeters. For example, for covering a surface with an area of 3 × 3 m, in which there is one window opening measuring 1 × 1 m, the calculation is made: 3 × 2 + 3 × 2 = 12 m (consumption per wall) and 1 × 2 + 1 × 2 = 4 m (consumption for cladding near the window).
- SD profile. The required quantity of this element is determined by dividing the length of the wall by 0.6, since it is fixed in increments of 60 cm. If the height of the building is large, then the need for the number of profiles will increase.
- CD connector. It is necessary when the height and width of the building exceeds 4 m. The consumption of the connector depends on the distance between the profiles. As a rule, its consumption is low for cladding in narrow places.
- Suspension. The choice and number are calculated based on the quality of the wall surface. The minimum requirement for hangers is usually 1 piece. by 40 cm.
- Universal screws. For 1m2 you need 15 pieces. dimensions 4.2 × 16 mm and 4.2 × 19 m.
- Driven dowel. One direct suspension usually costs 2 units.
- Insulation. It is purchased taking into account the area of the building that is planned to be covered with siding.
- Wind protection and waterproofing. For 1 m2 of facade, 1 roll is required.
Material calculations should be taken with great responsibility, since the quality and strength of the sheathing will depend on this. Therefore, it is advisable to purchase all construction parts with a small reserve, so that in case of shortage, you do not waste time on additional purchases.
Why is a frame needed for finishing siding?
First of all, we’ll tell you why siding needs sheathing. If you think that siding panels are simply nailed to the facade, then you are mistaken. Although this is still possible, it is extremely rare - if the surface of the facade is completely flawless. And this practically never happens. Therefore, for most buildings, installing sheathing is an integral procedure for several reasons:
- Elimination of wall defects. Almost all façade walls have curvatures and defects that prevent the panels from being laid evenly. The cladding will turn out to be of poor quality, and it will not look its best. Leveling walls with plaster is a long and expensive process, but lathing is done quickly and costs much less for materials.
- Avoiding shrinkage. Wall shrinkage is typical for almost all new buildings. If you install siding panels on the walls just after construction, then over time they will warp due to shrinkage of the walls. The lathing will allow you to avoid such problems, because the panels will be fixed on it, and not on the walls themselves.
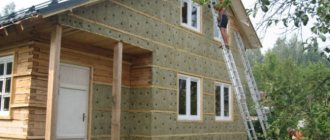
- Possibility to insulate the facade. The lathing serves as a basis for laying thermal insulation mats, for example, mineral wool or polystyrene foam boards. As a result, the building will not only be beautiful from the outside, but also warm from the inside. The walls will not become damp and covered with mold.
- The ability to create free air circulation under the cladding. The gap between the sheathing and the thermal insulation allows air to freely penetrate into the sheathing and resist the accumulation of moisture.
- The load on load-bearing walls is distributed evenly. This is very important in order to avoid gradual distortion of the walls and foundation.
Common mistakes when installing vinyl siding
Installation of siding without sheathing directly on the wall.
In America they do this; they simply attach the panels to OSB boards, which are used to cover frame houses. But in Russia the climate is different; for example, in areas with a humid climate, this definitely cannot be done. There should be a ventilated gap of about 20-30 mm between the siding and the wall, through which condensation will be removed through the soffit in the roof. It is also very rare that the walls of a house are not perfectly smooth, so lathing is necessary.
Curved subsystem (frame) for siding.
The main task of the frame is to level out the unevenness of the building walls and provide a ventilated gap. Therefore, the frame for the siding must be perfectly smooth, since after installation of the siding all irregularities will be easily noticeable.
Wooden frame without antiseptic.
Siding can be installed on a metal or wooden frame. If you are installing a wooden frame, then you must treat all the bars with an antiseptic to prevent the growth of mold and mildew.
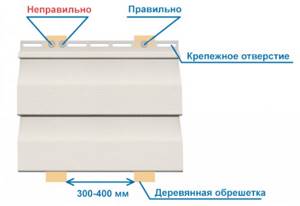
Large panel mounting distance.
A self-tapping screw or nail is installed every 300-400 mm, always in the center of the hole. Increasing the fastening distance can cause siding to sag and deteriorate the appearance of the facade.
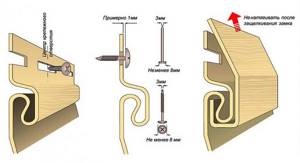
Fully screwed screws or driven nails.
Vinyl siding expands when heated. To avoid deformation of the siding during linear expansion, oval slots are provided on each panel in the upper part. Therefore, it is necessary to fasten it strictly in the middle of the oval hole and not tighten the self-tapping screw completely (do not drive the nail all the way in), so that the siding panel moves freely in the horizontal plane. Then waves will not form on the facade in the summer.
Use regular screws and nails.
It is imperative to use galvanized screws (nails), since the fasteners should not be subject to corrosion. When using ordinary self-tapping screws (nails), over time, rusty streaks appear on the facade and subsequently the panels may collapse.
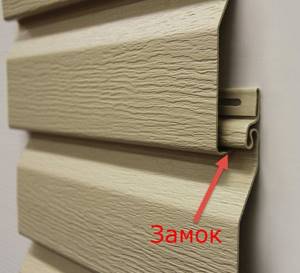
The locks between the panels are not latched.
There are so-called locks on each panel at the bottom. When installing panels, each subsequent panel is locked with a lock to the previous one or to the starting strip. At the same time, a characteristic click is heard. If the lock is not fully latched, then when heated by the sun, the connection opens and the panels move apart. If you make such a mistake, you will have to disassemble part of the facade to eliminate it.
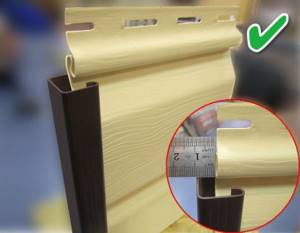
Installation of panels close to planks and corners.
When siding panels are inserted into additional elements, it is imperative to leave a gap for thermal expansion: 5-6 mm in summer and 9-10 mm in winter. If there is no room for contraction or expansion, then your panels may “lead” as the temperature changes. Therefore, it is necessary to take into account the temperature and climatic conditions of the area during installation.
Installation of siding without a connecting strip (H profile).
The siding is mounted without a connecting strip (H profile), with an overlap. After 2-3 years, cracks may appear at the junction and the planks may diverge. Therefore, it is better to avoid various advice from installers who claim that this type of installation is acceptable.
Incorrect calculation of the number of panels and additional elements.
Before purchasing material, think thoroughly about the design project and make a drawing of the house, indicating ALL dimensions on the wall (windows, doors, pipes, protruding elements, etc.). Better yet, order a design project for your home from some company. What is the drawing for? If your supplier calculates the material consumption without visiting the site, then he will calculate it according to your drawn diagram and all errors will lead to excessive or insufficient purchase of material. So take this seriously.
When counting material, add + 10%, do not count “back to back”. For what? Otherwise, you will completely ruin 1-3 bars, and you will have to go after them again. The panels may no longer be from your batch, and as a result there will be a “different tone” in color, i.e. new planks may be slightly lighter or darker in shade.
Lathing for siding made of timber or metal profiles - pros and cons
The sheathing for siding is a simple frame made of wooden slats or metal profiles located parallel to each other at certain intervals. The sheathing can be made both vertically and horizontally, depending on the method of installation of the siding itself. The siding panels and sheathing battens should be perpendicular to each other. The gaps between adjacent slats are determined in accordance with the weight of the siding panels - the heavier they are, the smaller the gaps.
Typically, thermal insulation mats made of mineral wool or expanded polystyrene boards are laid between the lathing slats.
Important: when making the sheathing, be sure to ensure that the slats located at the corners of the building are vertical/horizontal. This determines how correctly the corner profile will be mounted, and therefore the entire cladding as a whole.
As we have already said, the sheathing is made of wooden slats or metal profiles. Each of these materials has pros and cons. Wood lathing is cheaper and easier to make than metal lathing. Almost anyone can saw a piece of wood and nail it to a wall. However, wood has a number of significant disadvantages.
- Wood quickly becomes damp, especially in the basement of the house.
- To extend the service life of wooden sheathing, the slats should be impregnated with an antiseptic composition, which costs additional money, effort and time.
- Wood requires certain storage conditions: protection from bad weather, moisture, sun, and so on.
- The wood must be thoroughly dried, otherwise it will shrink.
- When choosing slats, you need to check each of them separately so that they do not have defects in the form of knots or cracks.
Metal profiles do not have all these disadvantages. In addition, it has its advantages:
- Resistance to rotting, cracking, shrinkage, and biological effects.
- No curvature.
- Minimum number of defective products.
- Convenient for storage and transportation.
- Easy installation.
However, it should be noted that metal profiles are much more expensive than wooden slats. Nevertheless, the difference in price is also justified by the difference in quality - the metal sheathing will last much longer, all costs will be justified.
Important: in any case, when choosing material for sheathing, you must calculate its quantity in advance. To the number you get when calculating, you should add 10-15% for the reserve.

Principles of sheathing for siding
Both metal and wood sheathing will be a good base for installing siding. But still, experts recommend choosing a metal profile in order to extend the service life of the skin. As we have already noted, wood sheathing has one significant disadvantage - it is not resistant to moisture and, under its influence, gradually begins to rot. It is especially undesirable to use wooden lathing when cladding the base, since it is most susceptible to moisture.
The thickness of the metal profile is desirable in the range of 0.40 - 0.55 mm, and it is also desirable to have additional stiffeners to enhance strength. For wooden blocks, the following two rules must be observed: pre-impregnate them with an antiseptic composition and dry them to a moisture level of no more than 15%.
DIY siding installation
Their consumption when decorating a house with siding is calculated based on the step between these hardware on the planks of 30 cm. The fasteners must fit at least 20 mm into the wooden lath or metal profile of the frame. In this case, a space of 1 mm should be left between its cap and the PVC lining. If this is not done, the vinyl siding of the house will warp and ripple when the outside temperature changes.
Assembling sheathing for cladding a house with siding
The sheathing is made vertical or horizontal with a distance between the slats (profiles) of 30–40 cm. These guides must be placed across the main vinyl planks. But by definition there should be no crossbars between them. You need to cover the house with siding yourself so that there is space under the panels for natural air circulation.
To ensure reliable fastening of the PVC cladding, additional support rails are installed around the openings and along the corners of the building. They are also needed in places where lamps and drains are hung on walls. It is necessary to securely fasten not only the facade panels for the exterior decoration of the house, but also various decorative elements on them.
House sheathing
Installing the starting bar
The first to be fixed to the walls is the starting bar. To do this, a rope is pulled level around the house on nails at a height of 3-4 cm from the lower edge of the mounted sheathing. The starting profiles are attached around the perimeter of the building not end-to-end, but at intervals of 5–6 mm in case of thermal expansion.
Installation of low tide and starting bar. Low tides are installed from the corner of the house. The starting profile is mounted 30-40 mm above the ebb strip.
Setting internal and external corners
Next, external and internal corners are attached, installed at the joints of two walls. Their lower edge should be located just below the starting strip already attached to the house. The first self-tapping screw is screwed into the top hole for fasteners so that the corner hangs on it.
External and internal corners are installed so that the lower edge is 4-6 mm below the starting profile, and the upper part is 1-3 mm below the soffit or cornice
Then the corner is aligned strictly vertically. The remaining screws are screwed down the bar in 30 cm increments in the middle of the holes and not all the way. This is the only way the PVC cladding of the house can “breathe” and not deform.
The corner elements are built up with an overlap. At the bottom of the top bar, the inner side edges are trimmed by 25 mm. It is inserted into the bottom corner by 20 mm, which leaves a gap of 5 mm for thermal expansion.
Installation of strips on door and window openings
The next stage is covering the house openings for windows and doors with platband. In order for everything to turn out beautifully in the end, you will have to work hard here. In the upper horizontal J-profiles you will have to make cuts in the sides with a bend of the cut part of the panel, and in the lower ones you will have to make an angled cut at 45 degrees.
Trimming the window profile
Vertical strips are cut at an angle at the top, and cut out at the bottom with a similar bend on the side. The purpose of all these manipulations is not just to cover the house beautifully with siding, but to join the platbands so that water cannot seep into the joints anywhere.
Installing the main panels
With basic planks everything is much simpler. The first of them just needs to be inserted into the starting profile, and then fixed to the sheathing. The rest will follow one after another. It is the ease of installation of the main panels that allows you to decorate your house with siding with your own hands in literally a day.
If there is not enough siding length, we join several planks through an H-profile. To do this, do not forget to install and secure the connecting H-profile in advance. The distances below and above are the same as for the outer or inner corner
Installation starts from the starting profile and ends with the finishing profile or molding
Don’t forget to make “hooks” at the top of the panel
The finishing strip is attached to the upper edge of the wind board using “hooks” similar to the molding.
Soffits are installed between the molding and the J-bevel
The planks should be fastened from the middle to the edges, placing the screws exactly in the middle of the holes on the edge. The finishing touch to the vinyl cladding of houses is the installation of the finishing panel with the insertion of the topmost main PVC strip into it.
Material selection
The first step is to decide on the material for the sheathing. If you choose a wooden beam, it should have a cross-section of 4x4 cm or 5x5 cm. You can use a thinner beam, but then it will not be as strong and reliable as necessary, and may not withstand the weight of the siding panels. To choose good quality wood, pay attention to the following factors:
- Humidity indicators. The beams under the sheathing must be thoroughly dried, otherwise during operation it will begin to shrink, and this will negatively affect the entire structure.
- Parameter matching. For the sheathing, you need to use timber of the length and cross-section indicated in the documentation.
- No defects. For the manufacture of lathing, only smooth bars are suitable, without knots, cracks, traces of biological influence and other defects.
Important: for lathing it is better to use wood that absorbs less moisture and, accordingly, lasts longer. For example, larch wood.
Required Tools
Here we list a set of tools that you will need when making wood sheathing.
- Construction plumb line and twine rope. They are necessary in order to insert an indentation from the facade in a strictly vertical position during the preparation of the walls - without slanting to the side.
- Nylon rope. It is necessary to set marks for aligning the sheathing parts strictly vertically and horizontally.
- Level. It will be needed in order to control the even position of the sheathing in the horizontal and vertical directions.
- Pencil/marker. With their help, you will apply marks on facade walls, sheathing bars and thermal insulation material.
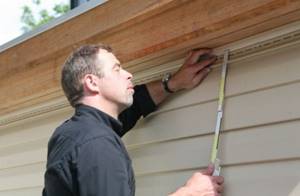
- Yardstick. Necessary for determining intervals and parameters.
- Carpenter's table. Necessary for working with wooden elements.
- Jigsaw. With its help, solid bars are sawn into separate parts of the required size.
- Hammer. Will be needed for drilling holes in the load-bearing walls of a building.
- Hammer. Use it to drive nails and dowels.
- Screwdriver. Used to drive self-tapping screws to connect wooden slats to brackets.
- Gloves. Necessary to protect hands from damage.
Important: when working with wooden slats, a jigsaw can be replaced with a circular saw by choosing a disk with suitable teeth.
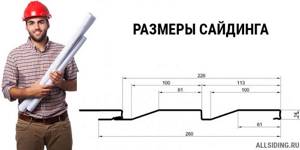
Dimensions
The sheathing for the siding panels is made in accordance with the area of the facing panels. Most often, its dimensions can be 30 × 40 mm, 50 × 50 mm, 50 × 75 mm and 50 × 100 mm. In this case, the length of the structure may vary, depending on the construction features of the building. If a wooden beam is used for the frame, then it is chosen with a humidity of no more than 12% and a step of 40 cm is taken between the fastenings.
For a metal frame, U-shaped profiles with a length of 3 m and a cross-section of 60 × 27 mm are recommended. These are standard profiles that have a flange along the edge and are used for installations of plasterboard structures. Products with a cross section of 50 × 40 mm and 40 × 40 mm are not equipped with flanging, so they are not suitable for lathing. Vertical posts are mounted at a distance of 60 cm from each other, and horizontal struts are installed in increments of 40 cm.
The size of the structure should be calculated so that the load on the corners and hangers does not exceed 40 kg. Otherwise, the structure will not withstand heavy weight and may become deformed. In addition, it is important to take into account the fact that thermal insulation will be placed under the frame. Therefore, the step between the profiles must be made according to the width of the expanded polystyrene panels. If the siding is heavy, then you will need to make lathing with frequent installation of slats.
Installation of timber sheathing
After you have completely prepared the materials and tools, you can proceed directly to the installation of the sheathing. It is done as follows:
- All elements that will interfere with the installation of slats are removed from the facade: sills, shutters, parts of the drain, air conditioning unit, and so on.
- Old finishing material is removed from the walls: plaster, paint and other types of finishing that may interfere with the normal installation of the sheathing. To get the job done faster, use a screwdriver and a hammer to pry up layers of old coating and knock it down.
- Using a plumb line, a level and a nylon thread, mark the distance from the facade where the sheathing will be located. Using the marks you have made, place small bars or brackets to secure the sheathing.
Important: all wooden elements must be impregnated with antiseptics and fire retardants.
- Place marks on the facade and drill holes in these places to secure the slats.
- Drive plastic dowels into the holes using a hammer.
- Attach a block with screws already placed in it to the mark on the wall and screw them in using a screwdriver. After this, take a level and see if the beam is level.
- At a distance of 0.50 m from the installed block, place the next one in the same way.
- In the same way, install support bars along the entire façade wall.
- Apply a deep penetration primer to the façade.
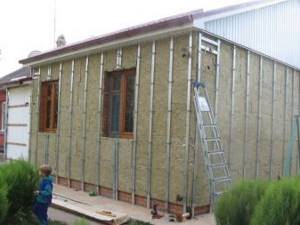
- Prepare thermal insulation material for installation on the facade. Cut holes in the material in those places where they will coincide with the support bars. Polystyrene foam boards or mineral wool are usually used as a heat insulator. The second option is preferable for high humidity walls.
- Lubricate the inside of the heat insulator with glue and lean it against the facade. The support bars must fit clearly into the pre-drilled holes. As for applying glue to polystyrene foam boards, it is applied around the perimeter and several additional dots are placed in the center.
- Check with a level whether the insulator is installed correctly.
- Insulate the entire facade of the building in the same way.
- Fill the joints that form between individual insulation boards with polyurethane foam and, after it hardens, cut off the excess.
- To improve the strength of the structure, secure the thermal insulation boards with disc dowels.
Important: if you choose mineral wool as insulation, after fixing it on the facade, cover it on top with a windproof membrane.
- Take a measuring tape and a plumb line to determine the distance between the sheathing and the insulation boards. Based on these data, install the slats vertically on the left and right along the edges of one wall. Stretch nylon threads horizontally between them - you will use them as a guide when installing other parts of the sheathing.
- Attach the next strip to the façade in a vertical position. Place scraps of rectangular or square wood between the support block and the sheathing piece. This is necessary so that a gap for ventilation is formed between the thermal insulation layer and the siding.
- Using the method described above, secure all vertical slats to the façade.
- Measure the areas at the top and bottom of the window and door openings where the flashings will be installed, and install the horizontal battens there.
At this point, the installation of the sheathing is considered complete. Now you can proceed directly to installing the siding.
Siding Installation Basics
Below is a plan of work that will need to be done to cover a house with siding:
Preparatory work
The first step is to dismantle all protruding parts: doors, trim, grilles, etc. Next, you should seal all the cracks using foam or cement mortar.
The walls should also be cleaned of all contaminants. A wooden house must be treated with an antiseptic and antipyretic; foam concrete walls are treated with a primer.
Sheathing installation work
Since siding is not attached to the walls, sheathing must be installed. To do this, use a metal profile or wooden slats. For walls made of concrete and brick, galvanized profiles are used.
You can use a CD profile for drywall. When cladding a frame or wooden house, you can use wooden slats 60 by 40 mm, having a residual moisture content of 15-20%. Before using the slats, they should be treated with an antiseptic. Using a tape measure and a level, make a straight line marking of the walls until a closed contour is obtained.
Now, the distance from the marking to the foundation is measured at the corners, after which another contour is drawn according to the minimum value. The next stage is the installation of vertical guides. They must fit snugly against the walls; to achieve this, you can use pieces of wood or dense foam. The guides should be located at a distance of 30-40 cm from each other.
In areas of additional load, for example, at corners and near windows, additional guides will be required. There should be no connections between the vertical guides. This is done to provide ventilation, which prevents the growth of fungi.
Thermal and moisture insulation
Waterproofing must be done, unlike insulation.
For this purpose, a moisture- and wind-proof membrane is used. If thermal insulation is performed, the lathing must be done in two layers.
Installation of guide elements
Installation begins with drainage. It is a rigid structure, so it is easy to attach. After that, corner profiles are attached using self-tapping screws. The next stage is fastening the starting strip to the drainage along the markings. Along the perimeter of the windows, window strips or J-profiles are fastened so that the location of the outer lower edge is slightly lower than the inner one.
The doorway is edged using J-profiles. When H-profiles are installed vertically in previously determined locations, use a level. Here you need to leave a gap of 5-6 mm to the foundation to avoid bending of the planks over time. The top edge of the siding is covered with a finishing strip.
Panel installation work
After installing all the guide elements, you can begin installing the panels. The first row is fastened to the starting bar.
All other panels are fastened in the same way, up to the window or roof. The panels should not be overtightened or tightly secured; they should move a little to the sides. The top row of siding is finished using a finishing strip.
The siding can be connected along its length using a special H-rail. When using it, the panels are installed in the H-rail, and you do not have to deal with the so-called “running” - i.e. make sure that the joints are not located along one vertical line.
It goes without saying that the H-rails will be visible from the outside of the building, which can negatively affect the design. This problem can be solved simply - either the H-rails are matched to the color of the siding, or the siding is installed “overlapping”. As already mentioned, this kind of finishing requires a “run-up” so that the seam line is not so noticeable. Usually, they try to direct the visible part of the joints to the side from which the house is viewed less often.