Heated window sills - types, advantages, installation methods
The topic of “warm windowsill” is relatively new, but no less topical. Many owners of houses and apartments, especially residents of the northern regions of Russia, are not satisfied with the quality of heating of their homes. Some insulate their facades, others supplement their heating with a “warm floors” system, and, to be fair, this gives some results. It also came to the window sills.
Easy way
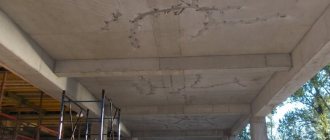
For those who live in regions with harsh climatic conditions, window sills with a heating function are becoming in demand. The subzero temperature lasts for more than six months. Fogging and condensation are common even with very high-quality double-glazed windows.
Building materials are created that are used to make window sills. Today they are actively promoting in the construction industry. New manufacturing methods and technologies are being developed that use available heat sources, primarily central heating and electricity.
- The essence of all heating variations, regardless of the coolant, comes down to one thing: make a window sill like a heater or battery. Heating elements, heat-conducting tubes for connecting them to the central heating system and other innovative solutions are used as heating.
There are several ways to heat a room.
- Electric. The operating principle is based on the technology of warm baseboards and floors, where heating elements are used. This system is convenient as an additional source of heating on very cold evenings. They consume a lot of electricity, but they have one significant advantage - the ability to adjust.
Electric option
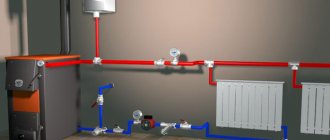
- Water heated – the absolute leader. Instead of heating elements, metal tubes are used, placed inside the window sill. It is possible to regulate the amount of heat generated and turn it off completely; this is done using taps. The method is budget-friendly because central heating is connected.
- Heating film is a new product in the world of heat. The method is becoming popular. The technology is very easy to install, efficient and economical: the power of a conventional device is 20 W.
For which windows is it permissible to install heaters?
Almost all types of window systems are fully compatible with this technology. Most often it is used for heating large windows; they are used for panoramic windows, and for greenhouses, and for staircases with a second light, shop windows and glazing of swimming pools. A built-in convector in a window sill can also be placed in a small opening in a living room; there are no restrictions on size or type of device.
The heater can be mounted under a regular plastic panel or under a monolithic slab made of natural or artificial stone. You can install a convector when replacing a window with a new one or during repairs, as an additional option.
Main types and types of devices
Devices for heating window openings use two main energy sources:
- Water heating.
- Electricity.
The first method uses heated water as a coolant. The operating principle of electrical devices is based on changes in the physical properties of metals under the influence of electric current. Water types include simple tube heat exchangers and heat exchangers with additional fins. Electrical models include convectors, IR film elements, cables, and free-standing devices.
Water
The heating system coolant is used to fill the heat exchanger. Pipes are laid under the stove, connected to the main manifold or directly connected to the heating system with heating of the coolant in the boiler circuit.
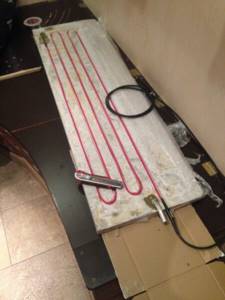
The simplest water heater is a tubular heat exchanger. A hot water supply pipe is connected to one input of the radiator, and a cooled water outlet pipe is connected to the other. To make the heating area larger, the structure is made in the form of a grid of 3 or even 4 parallel pipes, and additional metal plates are installed between them. The temperature of the coolant in the circuit is regulated using a thermostat.
Warm water window sill
There are several disadvantages of such a system:
- High cost of installation work.
- It works during the heating season.
- High cost of repairs.
Among the positive qualities it should be noted:
- Efficient heat distribution.
- Possibility of placement under a monolithic slab.
- Durability.
Electric
The electric heating method has found its application in several types of devices. Today for installation they use a convector built into a window sill, a heater made of infrared film, and models of external miniature heaters. All of them are united by the use of a 220-volt household electrical network as an energy source.
It is much easier to install such electrical appliances under a window unit. All of them are made from high-quality materials for conductive conductors and insulation coating. They operate on DC voltage of 12, 24 or 36 volts, which is safe for humans. The temperature is controlled by an electronic control unit. You can turn them on at any time, rather than waiting for the onset of cold weather.
Devices using the principle of convection air flow require holes to be cut into the panel for air circulation. Infrared film and ceramic heating element can be mounted under a solid panel without cutouts.
Electric heater for windowsill
The easiest way to heat a window is to install a specially designed heater. A miniature heater with a ceramic heating element is installed 5-10 centimeters from the window frame. It is connected via an adapter to the mains. For ease of use, the devices are equipped with a built-in programmer. Using it, you can set the desired heating temperature, on and off times. The heater itself has a reliable ceramic body and is protected from moisture.
The main disadvantage of such models is that it does not allow the frames to be opened wide for ventilation, and the cord cannot be hidden.
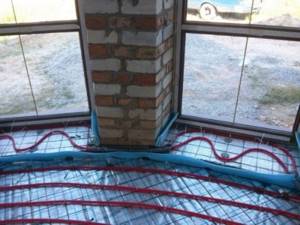
Electric heating of window sill with IR film
Installing IR film is in many ways similar to installing a “Warm Floor” system. The difference is that the heated floor system on the windowsill is installed in the form of 1-2 separate elements with an area of up to 1 square meter, and to cover the floor you will need to use 30-40 square meters.
Installation is carried out in the following order:
- The base is prepared - the wall is cleaned of dust, unevenness is leveled with a layer of mortar.
- A foil heat reflector is installed.
- An infrared film heater is placed on top of it .
- are connected, configured and adjusted .
- The top plate is installed using mounting adhesive .
The advantage of these heaters is their safety and low energy consumption. With low power, 20-30 W, it does not dry out the air in the room. A thin metal wire, heating up under the stove, evenly transfers heat to the entire surface of the panel and window opening.
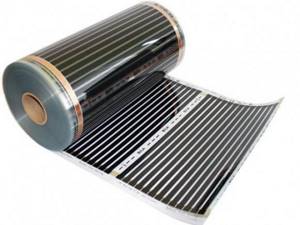
IR film
Unlike conventional open spirals made of refractory metals, the film rationally distributes heat. During its operation, the moments of maximum heating and cooling are smoothed out, a large coverage area allows for uniform heat distribution and the temperature difference is not so noticeable. A positive quality is its durability. Compared to a tungsten spiral, its service life is 3 times longer.
When installing it yourself, it is better to use a ready-made set of components. This is both simpler and more convenient. When ordering from a supplier, be sure to indicate the dimensions of the window unit and wall materials, the required power and the dimensions of the canvas. There may be several installation options, including the use of film ½ of the width of the slab. If the panel protrudes above the central heating radiator, installation can be done in a combined way - part of the panel will be installed on the brickwork, and part above the radiator.
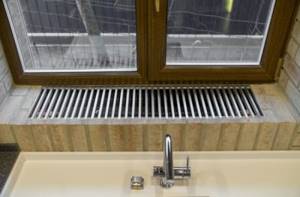
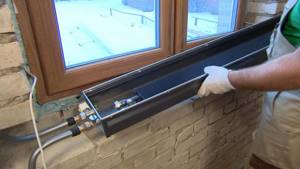
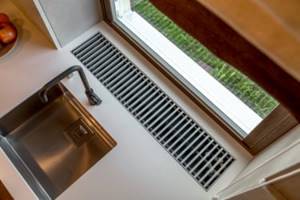
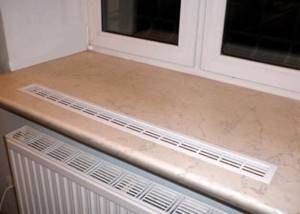
Convector in the window sill
Installing a convector in a panel is the most popular installation method. For this purpose, special miniature models of convectors are used. These are compact, but at the same time powerful devices that are used as a heat source for heating loggias, panoramic structures, and shop windows.
The specificity of installation is that the panel must have holes for the removal of heated air. Also, holes must be drilled in the wall to allow air flow into the convector housing.
A bimetallic spiral or a metal-ceramic element is used as a heating element. A ceramic heater is safer because it has better protection when it gets wet. Their power is less than that of other models, but when used for heating, the effect is much higher. The heated air with a metal spiral or ceramic heating element moves in a directed flow onto the glass, so it warms up better.
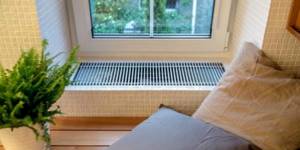
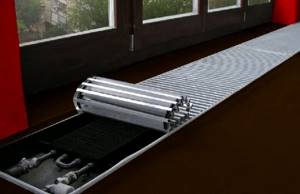
Heating convector
In addition, you need to pay attention to the shape of the decorative grille. The blinds of conventional grilles are located vertically. With such grilles, heated air will be directed upward. But with grilles that can be rotated, the warm flow can be rationally distributed over the entire area of \u200b\u200bthe glass and slopes. Flow distribution makes it possible, even with a small spiral power consumption, to achieve highly efficient heat distribution and cover the entire vertical surface of the glazing and slopes.
For modern convectors, in addition to the power of the heating element and the grille model, it is important to choose the right control unit.
The best option for control would be a programmer with the ability to wirelessly connect to smart home functions. In this case, it will be possible to program the operating mode, for example, to turn on at a certain time, adjust the heating temperature, specify the power, and even program the air humidity in the room. It will also be possible to change settings remotely using a smartphone or computer.
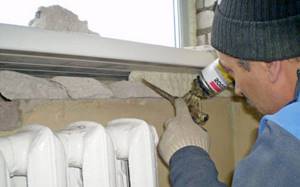
How to insulate the window sill of a plastic window?
Window sill insulation should begin at the stage of replacing old wooden windows, before installing new plastic profiles.
This is an ideal solution, since the thermal insulation of plastic windows is carried out precisely at the stage of their installation. In this case, the work will proceed in stages, as installation progresses, starting from the base of the window opening to plastering the internal and external slopes.
The main method is to use liquid foam to fill voids and formations in the hollow space under the window. Before using it, it is necessary to cover all cracks inside and outside with a waterproof solution. Additionally, we lay out the waterproofing film in one layer. We directly blow on the wetted surface (you can use a primer instead of water, this will increase the adhesion strength).
In our case, if you already have good windows that you do not plan to replace, you will need to organize insulation work in one of several ways. Absolutely all methods converge either on the use of additional thermal insulation materials, or on replacing the window sill itself and increasing the thresholds for outdoor use.
Convector in the window sill - main advantages
The method of installing a heating device in the window sill of a room compares favorably with other methods. First of all, this installation method allows you to avoid heat loss in the room and completely regulate heat transfer. In addition, a convector in the window sill also helps to avoid cold leakage from the windows and fogging of the glass.
Other advantages of this type of installation include:
- Practicality and compactness - convectors in the window sill take up a minimum of free space and are practically invisible in the room;
- Does not violate the integrity of the design - a variety of body designs, colors and design options for grilles allow you to choose a convector that ideally matches the overall style of the room;
- Complete safety and harmlessness - convectors in the windowsill do not heat up, do not heat up to high temperatures, do not release excess condensation into the air, and therefore do not harm the health of others;
- Absolute heating – convectors in the window sill provide quick heating of the room due to built-in powerful heat exchangers, as well as due to forced convection;
- Efficiency and durability - heating devices installed in this way ensure high-quality, uninterrupted operation and last a long time, protecting the room from humidity and cold.
Another reason for installing a heating device not in the floor, but under a window, is the low cost. Equipment in the window sill will allow you to save your family budget and avoid high energy costs. However, this method also has a downside. The method of installing heating equipment in a window sill is expensive; in addition, the installation process itself is quite complex and requires certain skills.
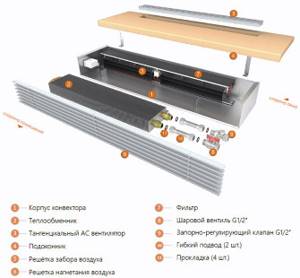
Features of the design of a convector in a window sill
The design of a convector built into a window sill is quite simple and has many similarities with in-floor structures. Such a convector consists of several main parts: a housing, heating elements, tangential fans and thermoregulation elements. The body can be made of various materials, mainly metal. The heating elements are made of durable steel and are responsible for heating the air.
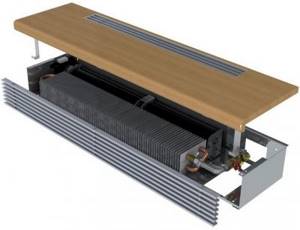
Fans are built in to circulate air and fill it with heat. The most complex and important component of the convector is the thermoregulation system, which is responsible for maintaining the optimal temperature in the room. In addition, window sill convectors are available in two types: with and without a complete window sill. If the window sill design is not included in the kit, installation of the equipment will be more complicated.
Basic installation rules
When deciding to install a convector under a window, it is necessary to study the design of the heating equipment itself and the window sill, especially if a non-professional is taking on the job. When installing the device in a window sill with your own hands, it is important to take into account the standards for equipment placement.
Some recommendations for self-installation will also help in this matter:
- Before installation it is necessary to take measurements;
- the width of the convector must be at least 70% of the width of the window;
- to install the convector, the width of the window sill must be at least 250 mm;
- in the case of installing a convector without a complete window sill, you will need to cut it in yourself and install it outside the device body;
- the convector can be installed in a single-pipe or two-pipe heating system;
- the depth of the parapet of the window opening must be at least 260 mm;
- if necessary or desired, a conventional in-floor convector can also be installed in a window opening;
- permissible equipment temperature does not exceed 115 degrees;
- After installation, the device must be connected to a current with a voltage of at least 12V.
It is best to provide an equipment installation diagram at the preparation stage; this will help to avoid distortions and installation problems. If you do not have experience working with such equipment, it is best to buy a convector with a ready-made window sill included.
Water heater
It is used for heating large areas of glazing - stained glass windows in halls, winter gardens, greenhouses and conservatories, shop windows and galleries. In the classic version, this pipe heat exchanger is connected directly to the heating of the building. When calculating power, the glazing area, frame material, wall thickness, and the number of chambers between the glasses in the frames are taken into account.
A more advanced installation scheme for a liquid radiator involves the use of a special heat exchanger made of stainless steel or copper with an increased surface area due to the use of radiator fins to increase heat transfer.
Which to choose?
The main criteria when choosing a window sill are the purpose and price. For example, if you intend to buy a simple white window sill for a standard plastic window, you are unlikely to be convinced of the need to purchase a stone one. Unless reinforced acrylic ones will interest you in a wide palette of shades.
If you select a wooden window sill for a wooden window (exact shade matching is required) or a stone one to implement an individual project and exactly match the interior, then don’t even think about a plastic window sill with a porous structure.
The price ratio for all the listed types of window sills is as follows: plastic ones are the cheapest, then come acrylic ones, then wooden ones, and stone ones close the list. A tabletop made of MDF or laminated chipboard is comparable in cost to an acrylic window sill board.
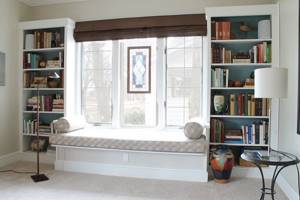
In the photo there is a beautiful window with a window sill, which is a functional part of the room design
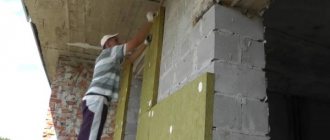
Choosing material for window sill insulation
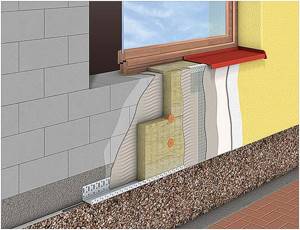
Rice. 5. The quality of window sill insulation will depend on the selected material
Most often, polyurethane foam is used to insulate PVC window sills. It can be used both to seal individual cracks and along the entire length of the base of the window frame. Better insulation can be obtained by using acrylic sealant. It is applied from a tube to all existing joints of the window sill with the frame.
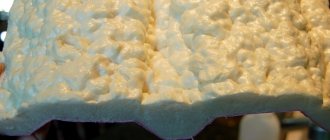
Polyurethane foam
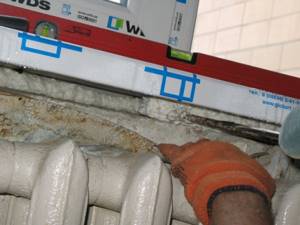
Rice. 6. Applying foam to insulate the window sill
To install a PVC window sill, it is necessary to cover its entire perimeter with mounting foam, which is a polyurethane foam sealant in aerosol packaging. Polyurethane foam is characterized by resistance to UV radiation and good adhesion.
The installation process involves drawing 2 intersecting lines in the center, which will simplify the process of adhesion of the slab to the base of the window. Next, all that remains is to attach the canvas to the base of the window opening. To check the evenness of the installation of the structure, you can use a building level.
When using polyurethane foam there is one very important nuance. This material tends to expand within 24 hours after application. Therefore, to prevent the window sill from moving, it is recommended to securely fix it for at least one day. For this purpose, you can use the most ordinary 3-liter jar of water. In addition, the use of polyurethane foam must be carried out in accordance with the strict requirements of the manufacturer indicated on the packaging of this product. In particular, the temperature regime of the surrounding space must be observed. Almost all manufacturers recommend using their products at an ambient temperature of at least 18 °C.
Acrylic sealant
Rice. 7. Acrylic sealant
An alternative to mounting foam is acrylic sealant. It is a non-toxic polymer material intended for both indoor and outdoor use. Among the main advantages of acrylic sealants are affordable cost, ease of use, high level of adhesion, paintability, resistance to ultraviolet radiation and fire safety.
The use of acrylic sealant allows you to obtain a better and more comprehensive seal. The sealant must be applied to small cracks and joints. During the application of sealant, excess may occur. In order to remove them, it is enough to use an ordinary spatula or rag. The base of the window opening should be treated with a primer. In some cases, putty is used to level the base, which should be applied in one layer, having previously aligned the beacons to the building level.
Advantages and disadvantages
Advantages of an electric window sill:
- Installation requires experience with electrical systems. If the master can make the electrical circuit himself, he can handle everything else.
- Organization of screeds for window sills.
- The amount of energy consumed by the system is minimal.
- Operational safety.
- A healthy microclimate is maintained in the home.
- The “bridges” of cold are completely closed.
- The windows are heated around the perimeter.
Flaws:
- If the diagram is not drawn up correctly, the system will not work. You will have to call a specialist, which will incur additional costs.
- Electromagnetic radiation remains an issue. It scares some people, others claim that humanity has been living side by side with electrical appliances for a long time, but there is nothing scary about it.
Advantages of a warm film window sill:
- This technology does not require large expenditures.
- There is nothing difficult about the work. You don’t need any special skills or knowledge to make it yourself.
- The film can be laid along the entire length of the window sill, in a separate part or along the edge (for maximum heating, cover 70% of the space with film, if the need for heat is minimal - 40% is enough).
- Even less electricity is wasted than when using an electrical circuit.
- Condensation does not form on the windows.
- The system is safe.
- Spreading throughout the house, the heat constantly dries the walls, and this helps prevent the appearance of fungus and mold on them.

Flaws:
Small electromagnetic field.
Advantages of a warm water window sill:
- The water window sill is fireproof.
- It does not require energy costs, since it is connected to the central water supply (in a private house - to a working heating system).
- The system is environmentally friendly.
- There is no electromagnetic radiation.
- Heat in the form of radiation is felt more comfortable than the operation of a radiator.
- There is no formation of ice, condensation, mold or mildew.
- The heating temperature is low (up to 50 degrees).
Flaws:
- The need to make a screed under the system.
- The problems with the mini-water system have not been canceled. If leaks form, you will have to disassemble the window sill to find the damaged area.
- Installing water window sills in an apartment will be more affordable at a price, but equipping a large house will cost a pretty penny:
- firstly, the water supply system will be more complex;
- secondly, windows in distant rooms will warm up worse (because when heat passes through the thermal contours of the window sills, some of it will be lost).
The most popular way to create warm window sills
Warm water , electric and infrared window sills are systems that require additional energy during their operation.
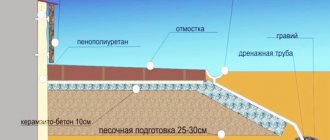
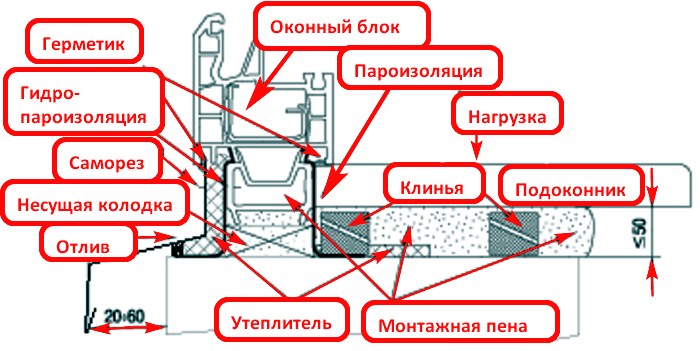
To make the future operation of the house more financially profitable, most modern builders recommend their clients to use the “Warm Window Sill” method, which is based on creating a “warm pillow”. If, when installing windows in a house, you can build such a cushion for each of them, the energy efficiency of the building will increase many times over. Warm air will not escape into the street and your money will not be wasted.
Window sill insulation options that exist today
In order to decide what exactly suits you, consider some of them:
- Heated window sills (finished) are a specialized PVC product in which electrical cables and temperature sensors are installed. On the one hand, it is very convenient to immediately install a specialized window sill, which already has a heating function, but on the other hand, this pleasure is not cheap. In addition, such a product also requires a special step-down transformer, which will take up space and also add to its price.
- Electric two-core heating cable. The master can install such a cable in the window sill, and install a coating on top that will suit the owner’s taste: it can be ceramic tiles, artificial stone, or porcelain stoneware. This method of organizing heating requires specialized, expensive installation; in addition, the cable consumes a lot of electricity.
- Installation of film infrared floor. Any homeowner can install an infrared heated floor in a window sill; in addition, a heated floor can come into contact not only with PVC, but also with any other coatings, which makes it possible to implement any design solution. It won’t be difficult to insulate the space under the window sill: a strip of heated flooring in front of the window is installed as simply as possible and can be combined with any floor covering.
Benefits of the latest technology
Infrared film is used not only for heating window sills; it is used in systems of heated floors and baseboards. Installation of this device is simple, and no special tools or skills are required.
The heating film has the following qualities:
- It heats up in a very short time: one or two minutes, and it is in the operating temperature range. It warms up efficiently, evenly, affecting the entire area.
- Electricity consumption is striking in its economy - 20 W. Three window sill plates - three 20 W each - the energy consumption is equal to one incandescent light bulb.
- Excellent aesthetic appearance. It does not damage the base at all, since for installation it does not require either a cement screed or an adhesive solution: it is applied to the surface using the dry method. This is very important: if it fails, there is no need to do “dirty” work. Replacement will require about an hour of free time.
- Sold in kits that include all the necessary accessories and elements for its installation: special tape, mounting wires, an insulating block, several clamps.
- To control such a heating system, a convenient electronic control has been created. There are both simple hand-held devices and programmable ones with an LCD display.
- Invisible to prying eyes. It is more convenient to measure thickness not in millimeters, but in microns.
Installation instructions
Fixation is performed using 2 methods. Let's consider the most popular option when you need to use sealant and wooden spacers. This is the most reliable way to install a plastic window sill at home with your own hands.
The operating procedure is as follows:
- We insert the plate into the prepared place. For fitting we use wooden beacons and a building level. We arrange the elements in increments of no more than 80cm.
- We place wooden support blocks at the front end. The distance between them is no higher than 50cm, and from the side slopes to the blocks - 10cm.
- Checks the angle of inclination a second time with a level. If there are discrepancies, then we adjust the thickness of the bars.
- We fill the hole between the slab and the concrete base with sealant. There is no need to completely seal the opening; we simply fix the aligned product.
- We place the load evenly on the window sill board so that the foam does not lift the window sill. Enough for 3-4 tanks of 5 liters each.
- Blow out the free space with foam. We use a construction gun to do the job neatly.
Advice! The slab should fit tightly with the window, and the gap between the wall and the window sill should not be higher than 4mm. - We give the structure 2-3 days for the foam to dry. Remove excess with a utility knife.
- If you find any cracks, seal them with acrylic sealant.
- We close the ends of the plate with plugs. For fastening you will need regular PVA glue.
All that remains is to remove the protective film from the product.