How to properly start a water and electric heated towel rail?
From the author: hello, our dear readers! Recently, we have been receiving more and more requests regarding the installation and replacement of heated towel rails. Apparently, due to the approaching spring, people are preparing to renovate their homes, introducing fresh innovations into it in the spring. Well, we are always happy to help, which is why we launched a series of articles on this topic. Today we’ll talk about how to start a heated towel rail and how to install it before that.
Problems associated with the summer season
The heated towel rail is designed to maintain an optimal microclimate in the bathroom, reduce humidity levels , and also to accelerate the drying of air and surfaces in the bathroom.
According to the law , heated towel rails must operate all year round and not depend on the central heating schedule.
Therefore, during installation, the equipment is connected to hot water supply . That is, despite the fact that the function of the PS is to heat the room, it belongs to the hot water supply system .
Reasons for leaking heated towel rails
Trouble can occur both with an old device and with a new one installed recently. There are several reasons and they do not depend on the type of devices.
- Violation of the tightness of the connection between the device and the riser pipe due to wear of the gasket (or inept installation) or metal corrosion. It manifests itself as constant digging and traces of streaks with rust.
- Leakage due to water hammer: most often appears at the seam of coils made from seamed pipes. This is the most dangerous type of damage: it can occur instantly and is accompanied by heavy flows of water.
- Previously undetected mechanical damage caused accidentally during repairs. The cause may be a hammer falling from above or a hammer drill that has jumped to the side.
- Manufacturing defect: cheap thin-walled heated towel rails made in China suffer from this. In the event that a “sink” (a place not filled with metal) is hidden in the “body” of the pipe, with increased coolant pressure or as a result of corrosion, such a defect will manifest itself in the form of a leak.
This is interesting: Exclusive and non-exclusive license difference
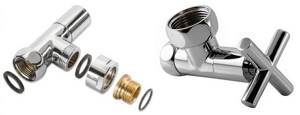
Typical connection diagrams for heated towel rails
In houses of the old housing stock, a section of the riser curved in the shape of the letter “C” or “M” was used to heat bathrooms and bathrooms. The simplicity of such a PS, however, has a number of advantages. Being connected in series to the DHW circuit, the device ensures constant temperature, eliminates interference in the operation of the system by other residents and has virtually no effect on the hydraulic resistance of the main line.
A heated towel rail in the form of a riser section, although it has an unsightly appearance, is at the same time the most unpretentious heating device
With the advent of more aesthetically pleasing stainless steel heated towel rails, the need arose to replace previous devices with the least interference in the operation of the heating system. The ideal situation can be considered when the internal diameter of the riser is equal to the cross-section of the contour of the new substation. Of course, if the heating device is installed using couplings and bends of the appropriate diameter.
A complete replacement of a simple heated towel rail with a modern device made of stainless steel is only possible if fittings with a full flow area are used - there is no question of installing ball valves
Before you start analyzing the connection diagrams for heated towel rails, you need to find out which engineering system - heating or hot water supply - it is connected to. The fact is that the heating device will only work in hot water systems with constantly circulating coolant. In the case of using the so-called dead-end circuit, the substation will warm up only when the hot water tap is open.
If taps and fittings are used to connect the heated towel rail, or if the new heating device consists of pipes of smaller diameter than the riser, then it is necessary to use a bypass . Being, in fact, a workaround for the coolant, this simplest device makes it possible to:
- maintain coolant circulation through the riser even if the substation is connected with pipes of minimum diameter;
- regulate the temperature of the substation or dismantle it without affecting the general heating system or hot water supply (installation of shut-off valves or a thermostatic device is required);
- By passing the main coolant flow through itself, the bypass ensures a constant coolant temperature for all apartments in the house.
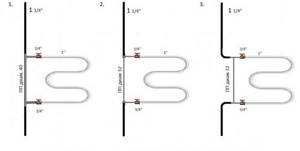
Depending on the installation diagram, a straight (1), narrowed (2) and offset (3) bypass is used
Over time, developers abandoned the installation of simple substations, leaving residents the right to choose and install a heating device. To do this, they began to make connections on the riser for the heated towel rail, while simultaneously ensuring normal coolant flow through a direct or offset bypass. It must be said that there is absolutely no reason to worry about the performance of such schemes - water is guaranteed to circulate through the heating device thanks to the “gravity pump” principle. It is based on the fact that the cooling coolant falls down and is replaced by masses of hotter water coming from above.

The thermogram of a heated towel rail operating on natural circulation indicates the high thermal efficiency of the “gravity pump”
For the same reason, the installation of a substation is considered the most effective, in which the coolant is supplied to the upper part of the heating device and taken from the bottom. This condition can be ensured with both lateral and diagonal connections.
The opinion that the latter method has an advantage in terms of flow rate and thermal efficiency is greatly exaggerated. However, one of the best schemes is considered to be the one in which the coolant is supplied to the near upper corner, and the return is connected to the remote lower corner.
A lateral direct or diagonal connection will not cause any surprises if the connection is made taking into account the required slopes
In this case, the performance of the substation does not depend on the speed and direction of the coolant supply, and the risk of airing the device tends to zero. The only condition is that slopes of at least 3 mm per 1 linear line must be observed. m highway.
With a lateral connection, it does not matter at all whether the substation is located between the supply and return points or protrudes beyond them. The only thing that needs to be taken into account is a significant increase in the risk of airing the device if its upper part is located above the branch along which the heated towel rail is connected to the riser.
Installing a heated towel rail above the point of insertion into the main increases the risk of air locks - in this case, you will need to install an air vent (Mayevsky tap)
The bottom connection of the heating device is considered less efficient and may cause its unstable operation.
The operation of heated towel rails with bottom connections very much depends on the pressure and direction of coolant supply, so several connection schemes are used - with a straight, offset or narrowed bypass
This type of installation is recommended for use only with top supply, as well as in systems with forced circulation of coolant.
Factors that lead to poor performance of a heated towel rail
Natural aeration
Air locks are a common cause of loss of performance of a device. They can occur for a number of reasons, the most common of which are:
- Plumbing equipment is of poor quality. Often, the problem of constant airing plagues cheap dryers made without the nuances of their further operation. Such products are produced mainly in China. Its manufacturers, not being concerned with basic engineering, produce heated towel rails of irregular shape, resulting in products with sharp changes and too thin pipes, where air plugs occur at the slightest opportunity.
- Incorrect device connection. A dryer installed without taking into account the features of the hot water supply system, connected too far from the heating riser, airs out very often and causes a lot of trouble for its owners. In such cases, you have to reinstall the equipment, so before installation it is better to carefully check the qualifications of the technician.
Seasonal shutdown of hot water
When the water is turned off in the summer, heated towel rails often stop heating. There is no householder in our country who does not face this problem. Why is this happening? There may be two reasons:
- The device was originally mounted on heating pipes, and not embedded in the hot water supply system. Naturally, at the end of the heating season the equipment will cool down.
- When the hot water supply is turned off in warm months and then restarted, an air lock may form in the system and accumulate in the dryer.
Dirty coolant (water)
Another situation: rusty water ran from the tap for a long time, and as a result, a much-needed product ceased to please with its usual functionality. Such a development of events is quite possible, but it is the most unpleasant. Dirty coolant in the pipeline system poses a danger to the device due to blockages and salt deposits. The resulting blockage prevents hot water from circulating in the dryer, causing it to cool down. The most common cause of blockages in a heated towel rail is the implementation of various activities in the pipeline system during the end of the heating season. It is at this time that rust and all sorts of debris are “churned up” in the sections of pipes and then travel to the plumbing equipment, which stops working, becoming clogged.
The heated towel rail in the bathroom does not heat: why does this happen?
The heated towel rail should generally work without any interruptions, but some breakdowns may occur with it. But don’t despair and draw hasty conclusions and run for a new device. It may also happen that the device needs to be repaired.
A water appliance usually seems more reliable than an electric one. However, this is not at all true, because some breakdowns are very difficult to fix. This is due to the inconvenience when working with such a device.
There are very few main reasons why the device stopped working. Some of them are trivial, while others require special attention and the help of a qualified specialist.
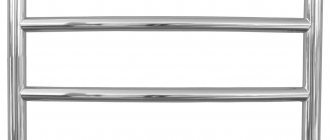
Installing and starting a heated towel rail with your own hands
Preparing to install a water heated towel rail
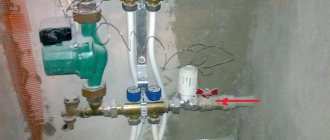
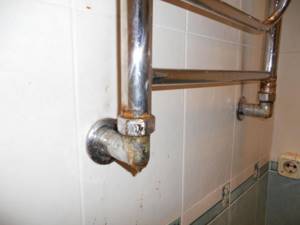
Heated towel rail connection unit.
When purchasing a product, you must request a passport for it, which will contain all the necessary information. When purchasing a water heated towel rail for an apartment, you will need to find out the level of water pressure in the riser. It will depend on the type of house, floor, and is determined by the condition of the water supply and the area of residence. When using a water heated towel rail, the thickness of the pipes used is important.
Installing a new device in place of the old one requires dismantling the previously used heated towel rail. I have an opportunity
installing a water heated towel rail in any place where hot water will be supplied. An important parameter for regulating a water drying structure is the operating pressure.
What to do
The first step is to determine what type of device you are using: electric or water.
In the case of an electric heated towel rail, check the connection to the outlet; if this does not help, use a tee and connect the device to another outlet.
With a water heated towel rail, the following problems may occur:
- The valve on the riser is closed. By opening the tap, the problem will be solved.
- There is no return line on the riser, or it is located before the heated towel rail. The problem can only be solved by connecting an electrical device.
- The device is installed on the heating system pipe. The heated towel rail will only become hot when the heating is turned on.
Troubleshooting Methods
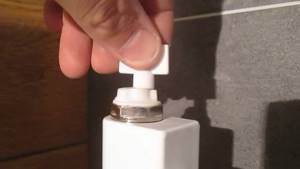
We remove air pockets. You can bleed air from equipment and heating radiators using a special air vent (also called a radiator valve or Mayevsky valve ). You need to insert a screwdriver into the valve hole and turn it until you can clearly hear air coming out of the pipes (you will hear a characteristic hissing sound). A weak flow of water will indicate the end of the diluting process.
Getting rid of blockages . For this procedure, turn off the water and disconnect the heated towel rail from the riser . Please note that several liters of water will remain , so place a bowl on the floor to collect the water. mechanical and chemical methods are used to remove blockages .
For the first one , take a plumbing cable and attach a homemade brush to it. The structure is inserted into the pipes and blockages are cleared using translational and rotational movements. In case of severe contamination, you cannot do without chemicals (any pipe cleaner will do). When using, it is important to follow the instructions on the package.
Normalization of circulation. To ensure that the heated towel rail heats evenly, when installing it, take care to install bypasses . They will help to avoid temperature differences between the first and last point.
Photo 2. During the process of replenishing coolant, a certain amount of air dissolved in water penetrates into the heating system; the Mayevsky tap serves to eliminate this problem.
To avoid further correction of installation errors, install the equipment according to the following rules:
- Place the upper outlet below relative to the outlet of the riser, and lower outlet above the beginning of the return line;
- there should be no loops in the path of water ;
- the cross-section of the equipment is carried out taking into account its hydraulic coil ;
- it is required to equip the device with a Mayevsky crane .
Rules for performing repair work
You can remove a blockage from an electric heated towel rail by unplugging it and removing it, then open the valve and use a brush or wire to clean it. Next, the same manipulations should be carried out with the pipe section.
If the water device is clogged, turn off the supply valve, dismantle it, then place the unit in the bathtub and remove any remaining liquid. Unscrew the couplings and transitions through which the liquid flows. Turning the device over using a thick cable, clean all areas in which the coolant cools. All areas are cleaned with a cable, after which the heated towel rail is shaken to remove the blockage. Next, the entire structure is washed with a powerful stream of water.
This is interesting! Small bathroom design: interior design options for small bathrooms, photos
The procedure is repeated several times and, if a very thick layer of plaque appears on the walls, hydrochloric acid is used, which is poured into the device and left there for 10 minutes. After which everything is washed with a large stream of water.
If an air lock forms after turning off the heating, the heated towel rail is partially dismantled. Next, take the bolt and look for a hole to bleed air. Using a screwdriver, unscrew it half a turn and wait until water starts dripping from it. Next, the bolt is screwed into place.
In other cases, the reasons that the device does not warm up or does not work may be due to outdated pipes, poor quality or incorrect installation. In order to find out why the riser became cold, the hot water in the pipes disappeared and to establish normal operation of the device, you should call specialists.
Why does a heated towel rail need a bypass?
Here the bypass solves several problems at once:
- Maintains normal circulation of hot water throughout the riser, eliminating the problem of interruptions in the supply and pressure of hot water to the apartments next along the riser. Part of the hot water flow passes through the heated towel rail, the rest passes by, which makes it possible to operate 1-2 dozen dryers at once without damage;
- You can completely turn off the heated towel rail without harming your neighbors. To do this, you will need to install a shut-off valve.

Summing up
Analyze the old diagram: diameters, presence of a jumper, feed direction. Try to keep the pipe sections unchanged. When connecting the heated towel rail, follow the recommendations given and the manufacturer's instructions.
Check the functioning of the assembled circuit before finishing finishing work. The dryer is left connected for half a day. A test run will allow you to identify leaks, heating problems, and eliminate shortcomings while access to the wiring is free.
Advice! If you need bathroom renovation specialists, there is a very convenient service for selecting specialists from PROFI.RU. Just fill out the order details, the experts will respond and you can choose who to collaborate with. Each specialist in the system has a rating, reviews and examples of work, which will help with the choice. Looks like a mini tender. Placing an application is FREE and does not oblige you to anything. Works in almost all cities of Russia.
If you are a master, follow this link, register in the system and be able to accept orders.
Installing and starting a heated towel rail with your own hands
Preparing to install a water heated towel rail
Heated towel rail connection unit.
When purchasing a product, you must request a passport for it, which will contain all the necessary information. When purchasing a water heated towel rail for an apartment, you will need to find out the level of water pressure in the riser. It will depend on the type of house, floor, and is determined by the condition of the water supply and the area of residence. When using a water heated towel rail, the thickness of the pipes used is important.
Installing a new device in place of the old one requires dismantling the previously used heated towel rail. I have an opportunity
installing a water heated towel rail in any place where hot water will be supplied. An important parameter for regulating a water drying structure is the operating pressure.
Materials and tools that will be required to install water drying equipment:
- Heated towel rail.
- Pipes.
- Brackets.
- Adapters.
- Bypass (jumper).
- “American”, having an internal thread.
- Bulgarian.
Heated towel rail installation diagram.
A water-type heated towel rail is mounted on the wall using special brackets that can be adjusted by changing the distance to the wall. The pipes that are connected to the drying device can be hidden in the wall, which is tiled on top. This option is the most labor-intensive.
Installing the device requires measuring the landing distance for it. When replacing old pipes with new ones, there should be no problems with purchasing a heated towel rail; you can purchase any type of device to your liking. New pipes are installed under the new drying model. When replacing equipment, they build on the previous one
water supply wiring. In this case, you should buy a device by measuring the length of the distance between the taps.
Installation nuances
Pipelines
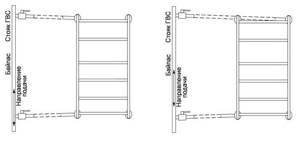
When planning the installation of a ladder-type heated towel rail, coordinate the position of the main connections with the installation location of the product:
- With a bottom connection, it is rational to arrange the supply and discharge taps closer to the floor.
- The horizontal one-sided connection is coordinated according to the interaxial dimensions with the riser tie-ins, taking into account the slopes.
Hidden lines are connected to the heated towel rail through water sockets.
Important! The installation of grooves in the ceilings and main walls of panel buildings is prohibited! Horizontal furrows are especially dangerous because they reduce the load-bearing capacity. Similar work in brick and monolithic houses is carried out on the basis of a conclusion from the designers.
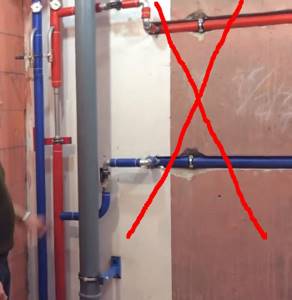
Based on ergonomics and heating engineering, building codes limit the placement height: the top of the coil is no more than 1.7 m from the floor, the bottom is 0.9 m. The indicated values are indicative for ladders.
According to SNiP, hot water supply pipelines must withstand a pressure of at least 0.68 MPa at a water temperature of 75˚C. The conditions are met by pipes: water and gas pipes GOST 3262-75, metal-plastic, glass-fiber reinforced polypropylene. The latter are preferred due to the combination of their properties. Taking into account the reduction in the service life of plastic with increasing temperature, products of the PN 20 group are selected with a pressure reserve.
The greater the temperature gradient, the more intense the circulation, so heat losses are minimized by insulating the riser and connections. Shells made of foamed polypropylene are used, the standard minimum thickness is 10 mm.
The thermal expansion of the plastic is compensated by turning the route, at which sliding supports are installed. The elongation of polypropylene heated to 60˚C will be 8 mm / 1 m. With horizontal lateral connection without hinges, the radiator brackets should not prevent axial displacement.

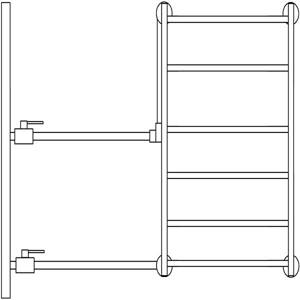
Connections, fittings
With a lower hidden connection, it is necessary to install water sockets at the same height, with the same depth, so marking and installation are carried out according to the spirit level. To maintain the correct center-to-center dimension, holes for dowels are marked after screwing the dryer in place. Small errors are compensated by eccentrics.
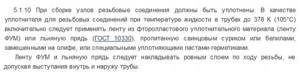
Choose angles with internal threads ½ inch, screwed eccentric transitions from ½ to ¾ inches. If the water sockets are precisely fixed on the profile, or fixed together with the ladder, you can eliminate the adapters by using parts with external threads corresponding to the union nuts.
In practice, implementations with flexible connections are rarely encountered. If the towel is attached near the riser, the method is attractive in its simplicity. However, the cross-section of the sleeves is always reduced.

Tension, twisting, bending radius less than 5 diameters - reduce the service life and cause damage. The standard recommends replacing polymer or rubber-metal hoses after 3 years.
The tightness of joints with union nuts is ensured by a mechanical seal using silicone or paronite gaskets. The latter are preferable for heating circuits and are sensitive to distortions.
Non-parallelism of the mating ends causes excessive deformation of the gaskets during tightening, resulting in leaks. It is impossible to rewind or coat the threads with sealant in such connections; distortions are eliminated by resoldering the sections.
Inch threaded connections are sealed in one of the following ways:
- The old fashioned way - with a strand of flax impregnated with red lead or white on drying oil. Lay from the end clockwise.
- Flax fiber coated with plumbing paste. A workable option.

Flax fiber and sanitary paste. - Fluoroplastic sealing material (FUM tape). It is difficult to wind up the required number of layers; they are often additionally lubricated with sealant.
- Sealing thread wound crosswise. The material is impregnated with a special composition at the factory, does not dry out, does not swell, the best solution.

It is not advisable to use silicone for sealing. “Sandwiches” from FUM, threads are a dubious technique.
Tips for attaching water sockets:
Elegant and practical connection via kit:
You need to connect a ladder-type heated towel rail to the water riser through ball valves. The fittings will allow you to turn off the device when the water supply is cut off, in emergency situations. It is convenient to start the radiator after flushing or replacing.
Valves are not used due to high hydraulic resistance. For steel wiring, bronze or brass taps with a stainless sphere are used; cast iron fittings are prohibited.
It is impossible to install a tap on the bypass; blocking or removing the bypass will unbalance the system and leave neighbors’ bathrooms with cold dryers. Transferring or changing the cross-section of a jumper without calculations can lead to similar consequences.
Without jumpers and taps they are placed on the heating riser.
Procedure
First, a diagram is drawn on paper with linear, interaxial dimensions, height marks, and diameters of sections. Further repairs are divided into two stages.
In the preparatory cycle, the existing coil is dismantled, if necessary, the riser pipes are changed, and taps are moved. They finish by installing taps on the outlets so as not to cut off the water supply to adjacent apartments. Move on to the main operations:
- Mark the sketch using a pencil.

- The route is prepared: furrows are cut in the partitions, support profiles and supports are attached.

Mark the groove.
Cut with a diamond disc.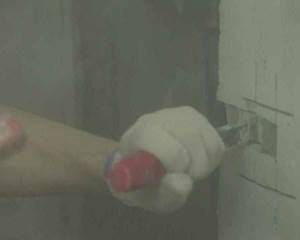
Knock out the rear sight with a chisel or chisel.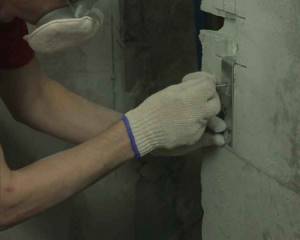
Mark the fastening centers.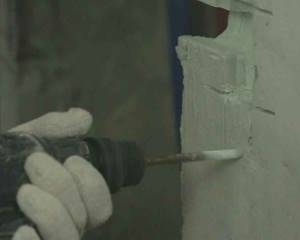
Drill holes for dowels.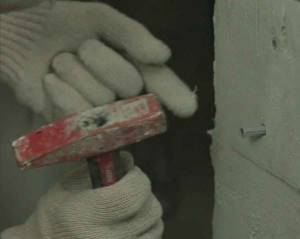
The dowels are driven in.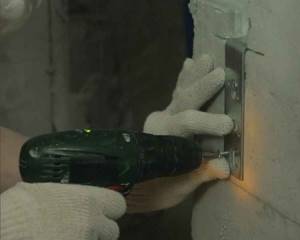
Screw the mounting plate. - Assemblies are assembled: sections are soldered, component fittings are attached to the device, transitions are screwed into the taps.

Fully equipped heated towel rail.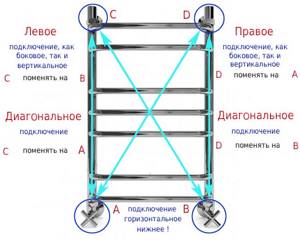
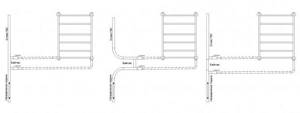
A model that allows you to choose the type of connection.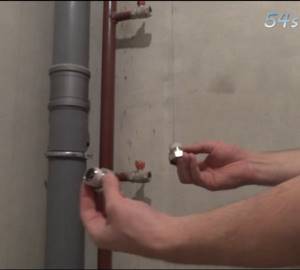
“American” for lateral connection.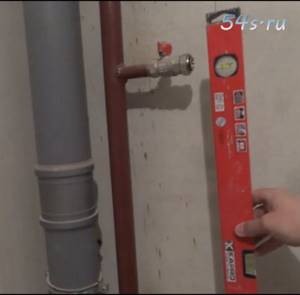
Having connected at the riser, we check the location of the ends of the American women. - The route is soldered from blanks.
To avoid damage to the polishing, the packaging film is not removed until the final run.
- Install water sockets: drill mounting holes according to the markings, tighten them with dowel nails. Without relying on the accuracy of the markings, you can temporarily attach a heated towel rail by screwing eccentrics into the corners and marking the center of the dowels. You will need an assistant to hold the towel.
Recessed water sockets are secured with dowel nails to the wall or screws to the mounting plate.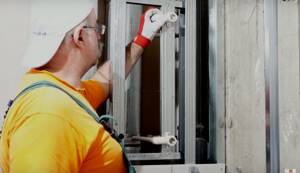
Fastening with self-tapping screws to a plasterboard profile.
The coupling ends are fixed with a solution.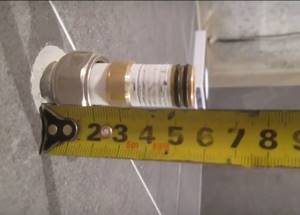
The length of the outlets is the same and must be overlapped by a decorative cup. - Fill the system, bleed air from the dryer, and leave it for testing.
Letting out the air. - Turn off the water and remove the radiator.
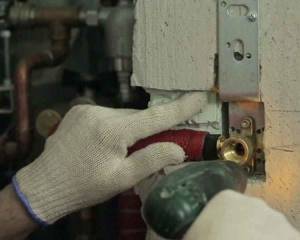
- After finishing the cladding, install the dryer completely, not forgetting to screw on the decorative trims. Secure the brackets with the supplied hardware. Do a control filling.

Marking the bracket fastenings
Protecting tiles from chipping when drilling
We drill and install dowels
Screwing the holders
Installing and connecting the dryer
Useful videos: