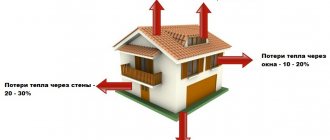
What causes heat loss?
A modern metal entrance door is actually a complex structure, where iron is just a shell. The cavities of the leaf can be filled with insulation, since the main function of the door is to retain heat. But there are often heat leaks, not only in private houses, but also in apartments. In addition, inexpensive metal doors have ordinary tin as a body, and cardboard honeycomb instead of insulation.
Reasons for heat loss in the house:
- Thin walls. Walls built in the classical way several decades ago, which do not have insulation, begin to freeze over time. As a result, the thermal insulation of the house deteriorates.
- Cracks and crevices. When a heavy structure shrinks, cracks form on the walls, which over time, if you do not pay attention to them, turn into huge gaps. Such gaps are also called cold bridges.
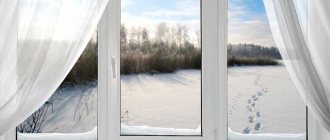
- Technical openings (old doors and windows). Over time, the wood dries out, thereby forming colossal gaps where the boxes are installed. Windows that are not properly insulated are one of the key sources of heat loss. And a door, if it is made of sheet metal and does not have the necessary insulation, or is of poor quality Chinese construction, with cardboard inside instead of a heat insulator, this is the direct cause of colossal heat loss.
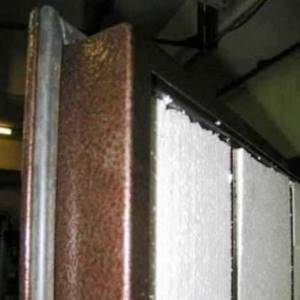
A metal door that does not have proper insulation is a direct source of cold in the house
Therefore, insulating doors is an important component of thermal protection of the entire house. But before you implement your idea, find out the exact reasons for the loss of heat, so that you don’t end up wasting time and energy on insulating the doors, and the reason for the uncomfortable microclimate lies in the cold bridges formed through the cracks in the house.
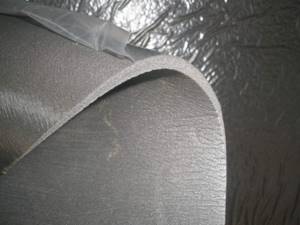
Sometimes heat can be lost not through the leaf, but through the cracks of the iron door frame
This is interesting: How to insulate a metal entrance door: let’s find out in order
How to insulate the threshold of a wooden entrance door?
Preserving heat in a house is a complex process, and simply installing a seal is not enough
It is important to pay special attention to the procedure for insulating the threshold. There are several ways to carry out this process
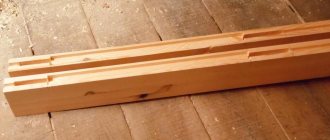
- Complete removal of the old rotten threshold and installation of a new wooden analogue. To do this, a wooden beam is pre-selected or made, suitable for both the length and width of the doorway.
- A dermatine roller is also very often made. All work is similar to the door seals discussed earlier. The only difference is that the product should be a little larger. The resulting product is mounted at the bottom of the door structure using construction nails. Additionally, a special lint brush can be nailed to the end of the door leaf.
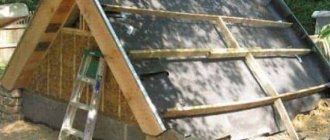
How to insulate a door at your dacha yourself
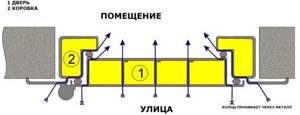
If we consider the technology of insulating the front door of a house, it is worth noting that insulation will be carried out in two directions of heat loss:
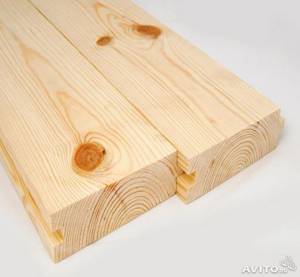
- door leaf, the main source of loss of warm air from a heated room. Iron structures conduct more heat, and wooden structures conduct less;
- door outline. If the connection of the canvas is not tight, then the draft blows out most of the heat.
It is possible to insulate the doors yourself, following the instructions presented below.
Thermal insulation of the door leaf
Insulation technology directly depends on the material from which the fabric is made:
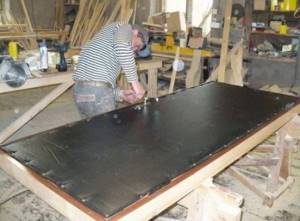
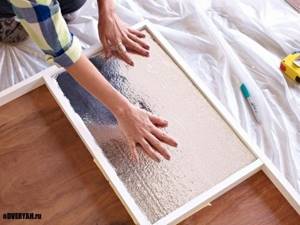
When thermally insulating metal doors, you need to fill the cavity in the door leaf with good insulation material. The first step is to open the canvas and remove the cardboard, often used in Chinese designs. The second stage will be filling the void with mineral wool or polystyrene foam.
If mineral wool is used, then you must first install the lathing, since without it the material can slide down. When using polystyrene foam, it should be cut into pieces of the required size and glued to the canvas with any mounting adhesive. All voids and cracks between layers should be foamed. As soon as the installation of the heat insulator is completed, the structure is lined with PVC or MDF panels. For a more economical option, you can use fiberboard.
Might be interesting
For thermal insulation, door insulation is mounted on a wooden panel; in the case of mineral wool, a film must be laid on top and the panel sheathed with dermantin. It needs to be nailed to the canvas with decorative nails.
Insulation of the opening
It is impossible to achieve complete thermal insulation of the front door by insulating only the door leaf, so the second stage will be insulating the frame.
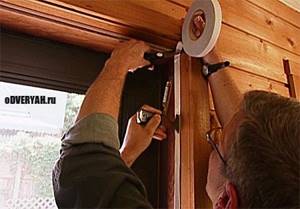
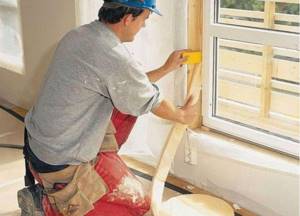
Installation of a seal around the perimeter of the door leaf, which can be foam rubber, rubber or polymer. Polymer tape has good characteristics and has a much longer service life. The foam insulation tape will fail very quickly, and the rubber seal will harden from the cold air. Installing the tape is not difficult - just glue it with mounting adhesive along the entire perimeter of the frame where the door leaf closes.
Sealing tape may not give the desired effect if the thickness of the tape is chosen incorrectly. A thin tape will not provide the proper insulating effect, and a thick seal will not allow the door leaf to close well.
Insulation of slopes
Often, errors in the installation of the entrance door group lead to the appearance of cold bridges between the opening and the frame. This often happens if installers skimp on foam or use low-quality material.
To eliminate bridges of cold and drafts, you will have to remove all the slopes and foam the entire space where there is emptiness. There is no foam, you can lay mineral wool and install the slope in place.
There is a situation when there is no visible damage to the foam, but there is blowing from the door. In order to determine where the draft is coming from, you need to light a candle and bring it to the seam, and if the flame sways, then urgently carry out insulation measures.
Sealing with rollers
The upholstery of a country house door from the outside must be completed by installing special rollers. To make them, you will need to cut 4 strips 10 cm wide. The length of 2 strips is equal to the width of the wooden panel with an allowance of 10 cm. The other 2 parts are cut according to the height measurement, not forgetting to leave the same allowance (10 cm).
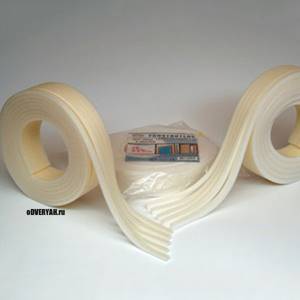
It is necessary to cut strips from foam rubber or other filler, the length of which corresponds to the length of the leatherette parts, and the width is 2-3 cm less. You can insulate wooden entrance doors with rollers both before and after installing the paneling.
Installation
Place the previously prepared leatherette parts along the edge of the door: long strips in height and short strips in width. Laying is done inside out so that the edge of the strip is at a distance of 1-2 cm from the edge of the wooden base. Fastening can be done with staples of a construction stapler or small nails with an enlarged head (upholstery nails). The fastening pitch is 10-15 cm along the entire perimeter of the canvas.
For better thermal insulation of doors, a strip of insulating material should be laid on a nailed strip of leatherette, 1 cm away from the edge. Bend the roller lengthwise in half so that the insulation is inside the upholstery. Tuck in all free edges and secure the edge of the roller to the wooden panel with decorative nails.
The fastener also performs a finishing function. Nails can be driven in at random intervals and even close to each other, but you need to ensure that they are evenly placed. The installation is completed by fastening the previously removed fittings: you need to cut holes for the handles, and fasten the locking plates over the upholstery.
Methods of using insulation
All homeowners strive to insulate their front doors. Therefore, you need to decide on thermal insulation materials that are widely used to insulate structures.
For all types of door structures, this option is suitable for enhancing the insulating effect and preventing the spread of drafts: the door frame must be sealed. Materials that act as sealants are usually:
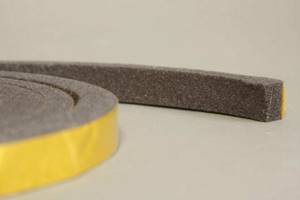
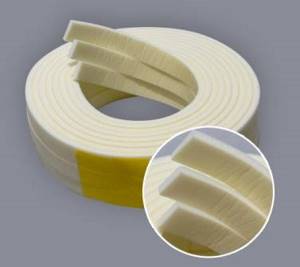
- self-adhesive foam pads;
- polyurethane foam;
- PSUL tapes (self-expanding sealing tapes that are pre-compressed).
Minvata
The material has excellent thermal insulation properties. Mineral wool is often used specifically for internal insulation of frame structures. However, mineral wool also has a significant drawback: over time it sags; the space of the canvas located between the skins in such cases is exposed in places.
Foam rubber
Insulation of a wooden door with foam rubber followed by upholstery with a decorative coating
Material up to 1 cm thick is used. Doors are insulated from the inside of the room with it. Next, the foam insulation is covered with sheathing, secured with decorative nails. Decorative cladding includes:
- leatherette;
- leatherette.
Foamed polyethylene (Izolon)
Its insulation characteristics are quite high. It is better to use the foil version of isolon, since then the heat does not leave the room, but is reflected back.
Izolon is similar to foam rubber, but more effective. It can be used in combination with other insulation materials.
Expanded polystyrene
This material has good thermal insulation qualities. In addition, it can be installed tightly between the frame elements. Expanded polystyrene retains its shape throughout its operational period.
A significant negative of expanded polystyrene can be considered the release of formaldehydes during long-term use, and they can harm health. And yet, the material is not fireproof.
Polyurethane foam
This insulation is successfully used for thermal insulation of frame doors, filling the internal space. It reliably seals any joints of parts, it penetrates into all gaps.
Read about polymer insulation or polystyrene foam for thermal insulation here.
How to choose a door to your house so you don’t have to insulate it
How to insulate a door in a private house with your own hands
The insulation characteristics of entrance doors directly depend on the material and method of their manufacture.
If you live in cold regions (namely, when the difference between external and internal temperatures is over 25 ° C) and there is no vestibule at the entrance to the house, you should immediately install insulated and sealed metal doors with seals and/or thermal breaks. The latter are recognized as the most effective, but have a slightly larger width compared to standard designs.
When choosing a specific model of an insulated door, pay attention to:
• On the material of the insulating layer and its hygroscopicity and thermal conductivity. The worst characteristics are observed in boxes filled with cheap corrugated cardboard and ordinary polystyrene, average - in doors insulated with basalt wool and PPE, the best - in models with a layer of polyurethane foam, sheet cork or polypropylene plates.
• Thickness and number of insulation layers or sealing contours. High-quality entrance doors combine at least 3 layers of insulation with a total thickness of 4 cm and above. Good models with a thermal break have at least 4 different inserts.
• Locations of thermal breaks. Correct doors have sealing inserts both in the door frame and in the leaf itself, in areas adjacent to the opening.
• Handle tightness. It is not recommended to save on accessories when choosing accessories; installing an insulated entrance door with a manual ventilator will be pointless.
• Manufacturers' stated warranties, user reviews of the brand and the time it has been on the market.
The Nord, Argus, Elbor, Bear, Termo and Torex series have optimal indicators in terms of price and quality.
Products made of wood and metal-plastic are significantly inferior to insulated metal models in insulating abilities. An exception is made only for two- or three-chamber sealed plastic varieties, chosen as an alternative.
If it is necessary to install external doors with glass inserts, preference is given to models with modern energy-saving packages that do not require additional insulation.
Stages of plating an iron model
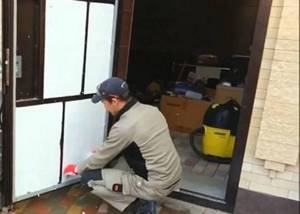
The sequence of actions when covering an old door depends on its design. If the design is more modern and the metal panels are attached to the base with screws, the insulation is done internally. When starting internal insulation, we remove the metal structure and place it on a work surface. Unscrew the screws and remove the metal panel (to ensure that the screws unscrew well, lubricate them with machine oil). Using a tape measure, take the dimensions of the internal cells of the door.
Carefully measure the insulation material and cut it off. Be sure to cut out a place for the door lock and peephole. For old doors, polystyrene foam or foil-lined stone wool are great. We treat the inner surface of the old structure with glue (liquid nails) and glue the prepared insulation. If there are any gaps between the old door and the insulation, fill them with foam. You must work carefully, squeezing out the polyurethane foam in small portions
It is important to ensure that it does not get on the bolt lock mechanism. For additional sound insulation, we lay foil insulation between the insulation and the metal sheet
We cover the structure with a metal sheet and screw in the screws.
If the old door is made by fixing metal panels by welding, then we proceed to insulate the old door using the external method. We prepare wooden blocks 20 (30) x 20 mm. We measure the parameters and cut the slats to the required length. Using a drill, we make holes for future fastening in the metal sheet. We assemble the base from prepared wooden blocks and fasten it to a metal sheet with self-tapping screws.
We prepare insulation according to the specified dimensions. We line and glue the insulation into the cells between the slats. We fix the MDF panel or board with screws. Additionally, for sound insulation, the door can be treated with leatherette from the outside or inside. To do this, we bend the leatherette and fix it with staples. Lubricate the lining and hem of the leatherette with glue (liquid nails) and press firmly against the metal sheet. This work is painstaking. At the last stage, we install door locks, handles, and a peephole. We return the finished door to its place.
When covering a single-layer metal door, it is necessary to measure the cells between the stiffeners. We cut the inner material to the specified size. We quickly glue the insulation into the cavity. We eliminate cracks and small gaps using polyurethane foam. We decorate with MDF panel.
Materials for production
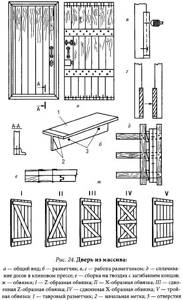
To understand how to make a door from boards yourself, you need to decide where the structure will be installed. Doors are:
- made of solid wood;
- paneled;
- panel;
- frame.
The wood species, grade and quantity are selected depending on the purpose of the door and the budget. Additionally, you will need wood glue and self-tapping screws, dowels or confirmations. It is advisable to choose wood that has been dried in special chambers. This prevents the plank door from deforming during operation.
It is necessary to choose even boards, since planing makes the material thin. Depending on the purpose of the door, the thickness of the boards can be 25-50 mm. Before making the structure, all boards must be thoroughly sanded with fine-grain sandpaper or a sanding machine.
Paneled
Paneled doors are made from boards or solid timber, but the glued version is more popular. To ensure that the material has a beautiful appearance, it is covered with wood veneer. If the door is made with high quality, it is difficult to distinguish it from a solid solid structure.
A simple paneled product consists of a frame of 2 vertical and 3 horizontal crossbars. They are connected to each other using spikes or dowels. To give the structure additional strength, all parts are glued together. The number of cross members also affects the rigidity of the product. The more there are, the stronger the door will be.
Panels made of thin boards are inserted into the openings that form between the frame elements. Plywood is also used; MDF, chipboard or glass can be installed. The panels can be coated with veneer or plastic, which imitates the texture of wood. The thickness of the panels does not exceed 1/3 of the thickness of the timber for the frame. The inserts are fixed using glazing beads or recesses in the frame. Since the panels are thin, the doors are used only as interior partitions.
These structures are not inferior to analogues made from solid wood in terms of strength and durability. Sometimes canvas can cost much more than solid wood. It all depends on what kind of wood and beams the frame is made of, as well as what type of veneer is made of.
From the array
Massive doors are assembled from thick boards, which are joined together to form a flat surface. The wood can be tongue-and-groove or planed. For rigidity, horizontal jumpers must be installed.
Depending on the functional purpose, different types of wood are used for doors. For entrance structures, choose dried dense material, for example:
With proper processing and care of the material, the product can last for several decades. The appearance of the door can be either simple or containing carvings or other relief design. It should be noted that solid wood structures are heavy. Therefore, they are more often used as entrance doors, but homemade interior doors are also found. Since the latter are not exposed to atmospheric influences, a type of wood with a lower density is selected, and the shield is also taken thinner.
Insulation methods
Insulation of metal doors
As a rule, an iron door is placed at the entrance. You can purchase it or make it yourself from a corner. Nowadays, door systems that are already insulated are sold, but there are also those that let cold into the room, because a structure without insulation does not retain heat.
There are no special rules for thermal insulation of an iron entrance door; everything here is quite simple and does not require any specific abilities or special tools. It is quite possible to do everything yourself and on a budget:
- If the structure is disassembled, you need to remove the cladding from the apartment side.
- Then glue the insulation to the outer plane using liquid nails or glue.
- Then install and secure the inner door leaf.
If the door is not removable, you will have to do things a little differently:
From the inside, along the entire perimeter of the canvas, you will have to screw wooden blocks to form a box. Please note that its height should not be greater than the height of the insulation. Attach a heat insulator between the bars and cover it using a fiberboard sheet
It is also important to screw it correctly from below to ensure a perfectly smooth surface. At the end, you can paint the door or decorate it with upholstery. It is also acceptable to use laminated fiberboard.
Insulation of wooden doors
A wooden door looks very impressive and retains heat much better than an iron one. But over time, the wood dries out, and cold air can penetrate into the house. If you have the aspirations and abilities, then it is possible to correct these defects with your own hands. You will need a sealant that needs to be glued around the entire perimeter to eliminate gaps.
Previously, the method of insulating wooden entrance doors using upholstery materials: leather or dermantine was often used.
Now this method is used very rarely, but if you still want to cover your door this way, you need to buy upholstery material. The size of the canvas should be 25-30 cm larger than the size of the door. The following steps:
- Next, remove the door and place it on a straight plane.
- Remove the lock, handle and peephole and spread the heat insulator over the door surface. You can use padding polyester, foam rubber, felt or cotton wool.
- Attach it in the center and corners of the door with nails or a furniture stapler.
- Place the upholstery on top and, folding it inward along the perimeter, nail it carefully. It is recommended to retreat about 20 cm from carnation to carnation.
- To make the door more beautiful, stretch the ribbon between them to form a diamond-shaped braid.
Insulation of plastic doors
The entrance door is also a plastic balcony door, which can also let in the cold. This can happen for several reasons, and if recognized, it is possible to decide what method should be used to insulate it.
The main reason for cold to enter the apartment is the lack of foam around the door frame and at the thresholds. You can get rid of such a defect in an elementary way - you just need to remove the old foam and seal the cracks with polystyrene foam, foaming it thoroughly.
The next reason is a damaged door seal due to sagging. In this case, the regulation is carried out by professionals, but you can try it yourself. To do this you will need an adjusting hex key.
To align the top corner, remove the cap from the top hinge and tighten the screw using a wrench. Do the same to align the bottom corner. If you need to lift the entire door, tighten the screws of the lower group of hinges.
For more information on adjusting and insulating plastic balcony doors, see below.
Preparatory work
Since we are insulating the wooden entrance door with our own hands, we ourselves will have to take care of selecting the materials necessary for this purpose. Before starting work, you should inspect the frame and door leaf for any cracks. This can be done with the help of a burning candle, brought to the joints of the wooden frame and the wall, the frame and the door leaf, as well as the panels, if the door leaf is not made of plywood. In places where there are cracks, the tongue of fire will fluctuate due to the draft. It is necessary to place marks near the detected cracks.
The gap between the wall and the wooden frame can be easily filled with polyurethane foam. But the cracks in the canvas and at the junction of it with the box will have to be insulated differently. To make the work easier, it is better to remove the wooden sheet from its hinges and lay it on the floor. The old covering and upholstery, if any, must be removed, and the handles and decorative covers on the locks and eyes must be dismantled.
Measurements of height and width are taken from the canvas. The outer side is measured from edge to edge. The inner one must be measured taking into account the connection to the box: departing from the edges by 2-3 cm.
What causes heat loss?
A modern metal entrance door is actually a complex structure, where iron is just a shell. The cavities of the leaf can be filled with insulation, since the main function of the door is to retain heat. But there are often heat leaks, not only in private houses, but also in apartments. In addition, inexpensive metal doors have ordinary tin as a body, and cardboard honeycomb instead of insulation.
Reasons for heat loss in the house:
- Thin walls. Walls built in the classical way several decades ago, which do not have insulation, begin to freeze over time. As a result, the thermal insulation of the house deteriorates.
- Cracks and crevices. When a heavy structure shrinks, cracks form on the walls, which over time, if you do not pay attention to them, turn into huge gaps. Such gaps are also called cold bridges.
- Technical openings (old doors and windows). Over time, the wood dries out, thereby forming colossal gaps where the boxes are installed. Windows that are not properly insulated are one of the key sources of heat loss. And a door, if it is made of sheet metal and does not have the necessary insulation, or is of poor quality Chinese construction, with cardboard inside instead of a heat insulator, this is the direct cause of colossal heat loss.
A metal door that does not have proper insulation is a direct source of cold in the house
Therefore, insulating doors is an important component of thermal protection of the entire house. But before you implement your idea, find out the exact reasons for the loss of heat, so that you don’t end up wasting time and energy on insulating the doors, and the reason for the uncomfortable microclimate lies in the cold bridges formed through the cracks in the house.
Sometimes heat can be lost not through the leaf, but through the cracks of the iron door frame
This is interesting: How to insulate a metal entrance door with your own hands
Eliminating gaps using a sealant
When choosing how to insulate a wooden entrance door, you should not ignore different types of sealing elements, but to determine the best one, it is better to consult with the seller. Seals are specially designed products whose function is to maximally fill the gaps and cracks between the door elements: the frame and the wooden leaf. In addition to thermal protection, the insulation serves as soundproofing for the entrance door to an apartment or house.
Installing a seal and sealing reduces the overall heat loss through a wooden door, solving the insulation issue by about 60%.
Types intended for wooden doors
To insulate wooden entrance doors, different types of doorway seals are used:
- tubular made of porous rubber;
- silicone;
- foam rubber.
There are options for attaching the seal: to the adhesive layer applied by the manufacturer or using small nails with your own hands. When choosing sealing strips for a wooden door, you should take into account the performance characteristics and durability of the material. The best choice is a rubber seal.
Choosing a material for insulating a metal entrance door
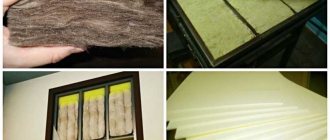
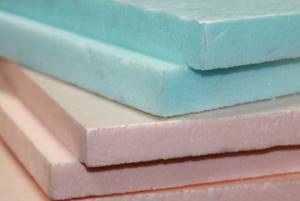
You cannot begin work without it, which is why you first need to decide on the best option, having previously examined each of them in more detail and purchase it. There are a large number of different insulation materials on the market, making it quite easy to choose the one that suits the cost and technical parameters. For thermal insulation, you can use not only hard but also soft materials.
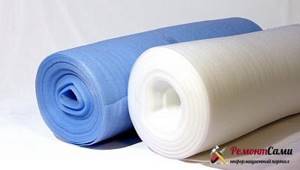
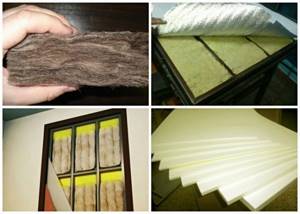
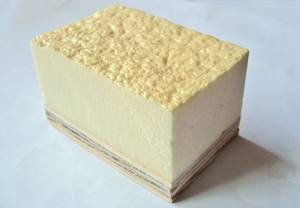
Mineral and stone wool
Mineral wool is in quite significant demand on the market among consumers, which has an affordable price, perfectly absorbs noise, has the ability to restore its original dimensions after compression and, due to its soft structure, is easy to use. This insulation withstands temperature fluctuations, providing complete protection of the building from the penetration of cold into it, and it is also environmentally friendly, non-flammable and allows you to vary the installation height without the need for additional cutting.
Mineral wool is supplied for sale in rolls and sheets, which makes it possible to cut blanks of the required size, which are placed in cells created by the stiffening ribs of the door structure itself. To obtain the required thickness of the insulation, you only need to press it down (pressure), which in the end will in no way negatively affect the technical performance.
The disadvantages of mineral wool include softness, which leads to shrinkage over time, but this disadvantage can be easily eliminated by creating stiffening ribs in the door structure, which prevent the material from slipping over a long period. Its significant disadvantage is its poor resistance to the influence of moisture, often acting as condensation, which occurs due to a shift in the dew point inside the door leaf. To perform high-quality insulation and avoid this drawback, it is better to give preference to stone wool.
Unlike mineral wool, it withstands its impact and allows for effective thermal insulation even of the entrance doors of private houses. In another situation, mineral wool may be a suitable option only when insulating structures that are installed in heated vestibules or corridors of apartment buildings, as well as when additionally installing a waterproofing film inside it.
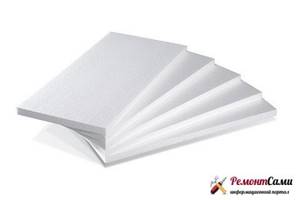
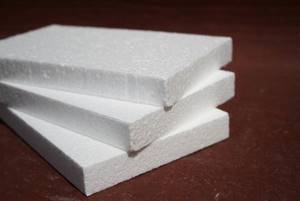
Foam plastic and penoplex
Preference is given to it quite often, since the insulation has insignificant weight, which does not lead to significant weighting of the door. The material has an optimal level of strength and excellent wear resistance, and due to its hygroscopicity, it does not require additional waterproofing. In addition, polystyrene foam has high soundproofing and thermal insulation properties, thanks to which it is possible to reduce noise levels and increase heat retention inside the house, as well as prevent the penetration of cold from the street. When choosing it, you should give preference to penoplex, which, unlike ordinary material, has a higher density, which is why such insulation, even of a finer thickness, has similar qualities as ordinary sheets of standard polystyrene foam. When using it as thermal insulation, it is advisable to additionally seal all seams with polyurethane foam to prevent the formation of cold bridges.
Note! It is not recommended to use ordinary polystyrene foam for insulation, since when heated it can release substances hazardous to health.
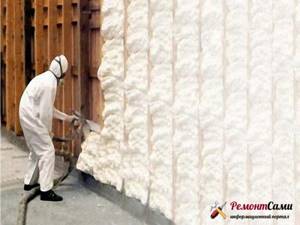
Polyurethane foam (polyurethane foam)
Not quite a traditional option for insulating doors, but which also has a number of positive qualities and even surpasses other materials in some respects. Initially, in order to obtain an effective result, you need to be able to correctly use a spray foam gun or the tube supplied with the container, thanks to which you will not only be able to complete the work fully, but also avoid spraying an excessive amount of excess.
The material itself, due to its airy structure, does not significantly increase the weight of the door leaf, withstands temperature changes and exposure to moisture, and if you know certain nuances, it is quite simply applied and evenly fills all voids, including hard-to-reach areas.
What experts are talking about: how to insulate a door and prevent drafts
The following tips will help owners of private houses choose the “right” entrance door:
- The best option is a high-quality three-stage door. Its tightness is maximum. And the durability is simply amazing;
- a metal entrance door is a guarantee of reliability and safety. Give preference to metal doors.
- when choosing a door, check how it is sealed;
- installation of the selected entrance door can be performed after all “wet” work. This means that installation is done after plastering and painting work, after installing partitions and plastering surfaces;
- Proper installation will avoid distortions. This means turning to professionals is the key to keeping your home warm.
The recommendations listed are easy to implement. And with some effort, you can maintain warmth and comfort in your home.
Option #1. Internal door insulation
The sheet of iron located on the door on the inside of the room is dismantled. This can be done if it is attached only in a few places. Weld seams are cut using a file or a hacksaw.
Inside the door there are metal stiffening ribs, between which the insulation is laid and secured. The material must completely cover the internal space, leaving no air chambers.
After this, the removed sheet of metal is fixed in place by welding. If this is not possible, holes are drilled in the sheet using a drill and the sheet is attached with screws.
Final recommendations
By analogy with an insulated facade, the insulation characteristics of the front door can be checked using a thermal imager or a lit candle.
In the first months after insulation, the door is periodically inspected and felt manually; defects such as distortion or peeling of the seal are eliminated without delay.
In the absence of positive changes (namely, strong drafts, freezing of the canvas or the appearance of ice on the frame with sufficient quality and thickness of the insulation and good insulation of the circuit), the door needs to be replaced with a factory-quality model, additional heating or protection with an air gap.
In some cases, the problem can only be solved by installing a second door. Now you know the answer to the question: how to insulate a door in a private house with your own hands.
Features of external door insulation
External insulation involves the use of materials such as, for example, foam boards 4-5 mm thick. This is quite enough to minimize freezing of the door leaf. External door insulation consists of several stages:
- The frame is made on the basis of wooden blocks, the finished structure is fixed on a metal sheet with self-tapping screws.
- Stiffening ribs are created from the bars, and insulation is placed in the recesses between them;
- finishing of the door using a cloth cut from artificial leather or leatherette. The materials are attached to the bars using nails with wide heads.
In addition to artificial leather and leatherette, a laminated MDF sheet, which is cut to the size of the canvas, is suitable for the external cladding of the door block.
Upholstery fabric
At this stage, insulating a wooden entrance door with your own hands consists of several separate operations:
- Materials are cut according to previously taken measurements of width and length. The insulation must be cut without an allowance, and decorative upholstery, if necessary, is cut with an allowance for tucking the edges (1-1.5 cm). It is necessary to tuck the edge when the sealing rollers are not installed. This is what they do if they perform internal insulation of the wooden entrance group of an apartment with insulation and leather.
- Installation of insulation consists of attaching it to a wooden door leaf. To do this, you can use glue, a construction stapler or wallpaper nails. The cut out rectangle needs to be aligned and attached to the canvas, leaving the edges of the material free for tucking the sheathing under them.
- The leatherette part is placed on top of the insulation and smoothed. Upholstery material must be attached from the middle of the fabric. If you want to make a decor, then its design is marked out in advance, and when attaching the upholstery, a fishing line is pulled between the nails along the intended lines. The edges of the upholstery must be tucked under the insulation and nailed with decorative nails at even intervals along the entire perimeter.
Seal installation
High-quality installation of frost-resistant insulation on the door leaf is only half the battle to eliminate the penetration of cold air into a residential building. Even with the door completely closed, there still remains a small gap between it and the frame, through which, as a rule, the cold penetrates. Eliminating drafts completely is the next, and most difficult, task for a homeowner.
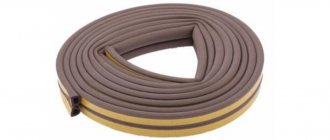
To effectively perform the job of eliminating drafts, you should select the optimal type of seal. Today, manufacturers offer the following types of this product:
- Silicone seals;
- Foam seals;
- Rubber seals.
The second type of seal allows you to quickly, inexpensively and effectively solve the problem of drafts. It is ideal for a doorway, a building structure such as a summer house, where there is no high traffic intensity, opening and closing of the outer door.
Foam seal
The use of silicone sealant for external doors will eliminate drafts for a longer period of time than when using a foam rubber analogue. The shape of the material ensures that the canvas is tightly pressed to the box - this will not allow air masses to penetrate into the living space.
Rubber compressor
Having chosen the optimal sealant option, all that remains is to install it in place efficiently. There are two most popular installation options:
- Using an adhesive strip.
- Using a harpoon in the groove.
The first option allows you to install a new seal on the door yourself, more quickly. But the durability of this type leaves much to be desired. Therefore, many professionals in their field recommend harpoon mounting in a groove.
Selecting a small groove in the quarter without disassembling the door frame will be quite difficult. Therefore, carefully nailing the seal with small nails will be much easier. Fixation must be done in the very corner of the quarter. This approach will allow the canvas to take a clear position in the door block, without any difficulties, and will provide good, proper protection from drafts.
Insulation of the threshold area
A common phenomenon is the appearance of cracks at the base of the door in the space between the leaf and the threshold. This defect, which leads to heat loss in the house, can be eliminated in several ways:
- Replace the old deformed threshold with a new product, the height of which ideally matches the level of the canvas.
- Make a roller with your own hands, similar to the one recommended for sealing the door contour, but with a greater thickness. Attach it with nails to the bottom of the canvas.
- To eliminate the excess gap between the base of the door and the threshold, you can also attach a special sealing brush along the bottom of the door leaf.
Insulation of the door leaf
Cheap Chinese doors are usually made without internal insulation, so the owners have to modify the design themselves.
The better to insulate
Before insulating the entrance metal door of an apartment, you need to decide on the type of filler in the interior space of the door leaf. Depending on the internal structure of the door, use:
- polystyrene foam boards or polystyrene foam;
- bulk materials (sawdust, expanded clay);
- polyurethane foam;
- thermal insulating mineral boards.
Polyurethane foam is considered more reliable and durable, but due to its high cost it is not used often; polystyrene foam and mineral wool insulation are much more popular.
Insulation with mineral wool slabs.
Materials and tools
Before insulating an iron door from the inside, you will need to purchase material and prepare the necessary tools:
- material selected as insulation;
- polyethylene film;
- wooden blocks with a cross-section corresponding to the thickness of the internal space of the door leaf;
- self-tapping screws;
- metal reinforcements for wooden frames (corners, profile);
- electric drill;
- construction knife;
- liquid Nails;
- hacksaw;
- Screwdriver Set.
Before insulating the iron entrance door from the outside, you will additionally have to purchase:
- dermantin or eco-leather;
- felt material.
Insulation instructions
Work on insulating the inner and outer parts of the canvas is different. Most often, internal insulation of the door is carried out, because... in this case it has to be disassembled.
Inside
To place insulation inside a metal door you will need to perform the following steps:
- the door is removed from its hinges and installed on a hill;
- dismantle handles, locks and latches;
- dismantle the fiberboard sheet from the inside of the door;
- take measurements of the internal space to prepare the wooden frame;
- individual elements for the frame are cut from the block;
- an adhesive composition is applied inside the door leaf and a plastic film is laid;
- assemble the frame (when assembling, you should take into account the locations of the locks and through handles);
Installation of a wooden frame. Foaming the gaps between the frame and the door.
- to enhance the rigidity of the frame, corner joints are reinforced with iron corners;
- Insulation is placed inside the frame cells;
- glue is applied to the sheathing, after which the top is covered with plastic film;
- small cracks and gaps not filled with insulation are filled with polyurethane foam;
Filling the seams between the insulation and the frame.
- the inner fiberboard sheet is returned to its place and secured with self-tapping screws;
- the door is hung on hinges and handles, locks and latches are inserted.
Outside
If it is necessary to sheathe the outside of a steel door with eco-leather, perform the following work:
- The door is removed from its hinges and placed on a hill.
- The felt insulation is cut to size and glued to the door leaf using glue (a 20 mm indentation is made along the perimeter of the door leaf).
- Eco-leather or dermantine canvas is cut to exceed the dimensions of the canvas by 50 mm.
- Dermantin is glued with a bend to the inside of the door leaf, and it is necessary to maintain uniform tension on the material.
- A metal strip is stretched around the perimeter of the door leaf, securing it with self-tapping screws. The tape serves as an additional fastener for the sheathing.
To obtain a decorative surface, you can additionally secure the material to the surface of the door using special self-tapping screws with curly heads.
This is interesting: How to insulate an iron entrance door - we describe it from all sides
How to insulate a wooden door?
Insulation of a wooden door begins with preparatory work:
- weakened hinges are secured with new elongated screws;
- if thick, heavy insulation is used, install an additional loop;
- eliminate box distortions and fabric defects;
- check the condition of the seal around the perimeter of the door frame at the junction with the walls;
- replace broken fittings: lock, handles, peephole, latch.
After all defects have been eliminated, installation of insulation on wooden entrance doors begins.
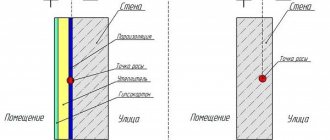
The question often comes up: is a vapor barrier necessary when insulating wooden doors? When arranging the installation seams of the door block - it is necessary. The gap between the box and the wall is sealed with foam. To prevent the thermal insulation from deteriorating, the seam is covered from the street with PSUL tape. From the room side, the foam is destroyed by vapors. For protection, the seam is sealed with vapor barrier tape. A vapor barrier may be required for the product if it is installed in a damp room and mineral wool serves as thermal insulation.
Installing a seal on a door frame
The first salvation from heat loss is to install a seal on a wooden door to eliminate gaps between the sash and the frame. The tape is selected according to the thickness corresponding to the size of the gap. A thin strip is useless, and a thick strip will interfere with the normal closing of the canvas. Installation of the seal consists of the following steps:
- Measure the gaps between the sash and the frame and select the thickness of the tape.
- A self-adhesive seal is glued into the groove around the perimeter of the bowl.
- The silicone tape is fixed with the staples of a construction stapler.
If the gap size is different around the perimeter of the door block, which often happens during deformation, the groove in the frame is widened and deepened. The edge of the blade is passed with a grinder. A two-layer or three-layer tape is glued to the new groove.
A properly glued seal should fit snugly around the entire perimeter of the sash and not interfere with its free closing.
Sealing with rollers
You can insulate the joint around the perimeter of the door frame using leatherette rollers with foam rubber inserted inside.
- Measure the length of all sides of the sash. According to the results, four strips of 100 mm wide are cut out of leatherette.
- The strips are placed against the edge of the sash with the wrong side up. Near the edge of the door leaf, the leatherette is fixed with a stapler.
- Thick foam rubber is placed inside each strip and a roll is formed.
- Secure the second edge of the leatherette with a stapler.
The door block becomes more beautiful, and all the gaps are hidden under the rollers.
Insulation of the canvas
To maximize the insulation of a wooden door with your own hands, use the method of double-sided thermal insulation. The sash is lined externally and internally. From the outside, the thermal insulation is covered with a material that is resistant to aggressive weather conditions. To insulate the front door from the inside, foam rubber and artificial leather are most often used. Do-it-yourself insulation of a wooden door with dermantin occurs in the following order:
- To make the work easier, the canvas is removed from its hinges and freed from old insulation, handles, locks and other fittings.
- A fragment larger than the dimensions of the sash is cut out of the thermal insulation material. It’s good if about 100 mm of foam rubber hangs from each side.
- The insulation along the edge of the door is fixed with staples. The hanging ends are cut with scissors.
- The foam is covered with artificial leather on top. Rollers are formed from the hanging edges and secured with furniture nails. The general plane of the canvas is decorated with a pattern. It turns out after nailing. The soft foam rubber between the wide caps forms beautiful bulges. Between the fasteners you can stretch wire or strips of dermantine sewn with a tube.
Upon completion of the work, install all the fittings and hang the insulated product on the box.
If polystyrene or polystyrene is chosen to insulate the door block, the final cladding is usually done with MDF. The sash increases in thickness and weight. The door block is additionally reinforced with hinges. A frame is nailed to the surface of the slatted sheet, forming cells. Foam boards are laid tightly, and the gaps between the slats are filled with foam. MDF is fixed on top.
You can glue thin slabs of foam to the door leaf without making a frame. For decorative finishing, artificial leather is used.
Materials and tools
Each type of insulation requires its own materials and tools.
For technological gap
To seal the space between the door block and the wall you will need:
- polyurethane foam in tubes;
- masking tape;
- polyethylene film;
- knife or scissors;
- construction gun for foam supply.
For door frame
The following will help you perform a thermal break in the box profile:
- an electric drill with a drill of the same diameter as the feed tube of a construction gun;
- polyurethane foam;
- construction gun;
- knife with removable blade.
For the porch
You can fix the problem called “blowing from the cracks between the door leaf and the frame” using:
- seal in one piece;
- universal or special glue;
- scissors or construction knife.
For internal insulation
Replacing the door leaf filler requires the following materials and tools:
- thermal insulation material;
- polyethylene film for waterproofing insulation;
- wooden blocks;
- self-tapping screws;
- glue;
- metal corners to give rigidity to the box of bars;
- electric drills with a set of metal drills;
- construction knife;
- scissors;
- fine-tooth wood files;
- screwdriver or Phillips screwdriver;
- an awl or thin nail;
- sandpaper P60.
Insulation of metal door frames
Insulation can be a waste of time if you don’t think about the most important thing - the door frame and the gaps between its base and the door leaf.
The work proceeds as follows:
- Initially, you need to remove the door panels and insulate them, but do not hang them back on the hinges, but work well with the frame.
- Initially evaluate how the box is installed; perhaps it needs to be strengthened to the wall, ceiling and floor, to make it rigid and reliable.
- Afterwards, the metal box should be thoroughly blown with foam, but only with professional foam, which will not open the base of the box or bend it.
- After the foam has dried, it will need to be carefully cut off and puttied several times, giving each layer the opportunity to dry. It is advisable to place a reinforcing mesh between the putty, otherwise within a year all your work may end up on the floor.
- Afterwards, wait for the putty to dry completely, rub it until smooth, prime and paint.
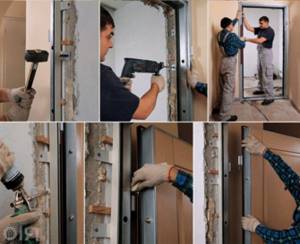
Stages of plating an iron model
The sequence of actions when covering an old door depends on its design. If the design is more modern and the metal panels are attached to the base with screws, the insulation is done internally. When starting internal insulation, we remove the metal structure and place it on a work surface. Unscrew the screws and remove the metal panel (to ensure that the screws unscrew well, lubricate them with machine oil). Using a tape measure, take the dimensions of the internal cells of the door.
Carefully measure the insulation material and cut it off. Be sure to cut out a place for the door lock and peephole. For old doors, polystyrene foam or foil-lined stone wool are great. We treat the inner surface of the old structure with glue (liquid nails) and glue the prepared insulation. If there are any gaps between the old door and the insulation, fill them with foam. You must work carefully, squeezing out the polyurethane foam in small portions
It is important to ensure that it does not get on the bolt lock mechanism. For additional sound insulation, we lay foil insulation between the insulation and the metal sheet
We cover the structure with a metal sheet and screw in the screws.
If the old door is made by fixing metal panels by welding, then we proceed to insulate the old door using the external method. We prepare wooden blocks 20 (30) x 20 mm. We measure the parameters and cut the slats to the required length. Using a drill, we make holes for future fastening in the metal sheet. We assemble the base from prepared wooden blocks and fasten it to a metal sheet with self-tapping screws.
We prepare insulation according to the specified dimensions. We line and glue the insulation into the cells between the slats. We fix the MDF panel or board with screws. Additionally, for sound insulation, the door can be treated with leatherette from the outside or inside. To do this, we bend the leatherette and fix it with staples. Lubricate the lining and hem of the leatherette with glue (liquid nails) and press firmly against the metal sheet. This work is painstaking. At the last stage, we install door locks, handles, and a peephole. We return the finished door to its place.
When covering a single-layer metal door, it is necessary to measure the cells between the stiffeners. We cut the inner material to the specified size. We quickly glue the insulation into the cavity. We eliminate cracks and small gaps using polyurethane foam. We decorate with MDF panel.
Step-by-step manufacturing instructions
Any step-by-step plan for manufacturing a door involves assembling a shield. If the installation of the canvas in the bathhouse is planned, then a simple assembly of the shield is carried out. To fix the boards, transverse and longitudinal elements are used. A warm box for the home is made taking into account aesthetics. The assembled shield is polished.
Making a door from solid wood
The step-by-step plan for assembling the canvas includes the correct choice of consumables. To make a shield, you will need tongue and groove boards more than 25 mm thick. Then the consumable material is cut into pieces.
The tongue and groove boards must be smooth and without grooves on the front sides
When assembling the shield, it is recommended to take into account the direction of the annual rings. To connect tongue and groove boards, a tongue-and-groove lock and wood glue are used. If the consumable material is non-grooved boards, then they are assembled using glue .
The work is carried out on a large surface area. The assembled coating is pressed with clamps. If the shield is dry, it is processed with a milling cutter. To ensure good sound insulation, it is recommended to assemble a shield from several layers of boards. The resulting structure is clamped with clamps.
Array gluing
Traditional methods of tying boards in solid wood doors
For tying, crossbars are used, installed at the top, middle and bottom of the covering. Markings for grooves are made on the canvas. The recesses made should be ½ the thickness of the consumable material.
Assembly diagram
Holes are cut using a router. It is more difficult to cut grooves by hand. For this you will need a chisel. A rubber hammer is used to insert the cross member. If you plan to apply a drawing to the resulting shield, first trace its outline using a pencil according to the template. A cutter is used for cutting.
The cutouts are milled according to a previously drawn pencil drawing.
Then the canvas is painted with pre-treatment with an antiseptic. Markings are made on the canvas and the box for installing hinges. The markings for the handle and lock are done in the same way. The last stage is hanging the canvas into the opening.
Treatment with antiseptic and varnish
Manufacturing of a panel door
The instructions for making a shield sheet allow you to use finely filled boards. Experts distinguish 3 methods for assembling such a design:
- preliminary assembly of the frame with subsequent filling of its internal space. Using this technology, you can create a solid or finely filled shield;
- separate production of the shield with its subsequent fixation into the frame. The last stage is covering with finishing material;
- The manufactured shield is mounted in a frame and lined.
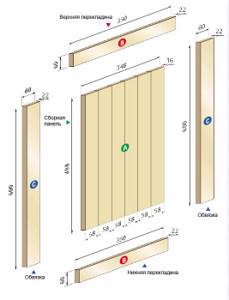
To assemble the canvas using the first method, primary tying is carried out. It will determine the size of the future door. The structure uses timber with a cross section of 30×120 mm. Consumables are cut to fit the dimensions of the future structure.
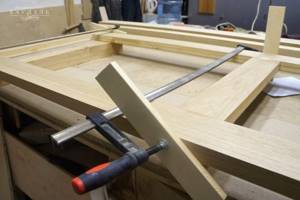
The next step is choosing the type of connection in the corners. Experts advise using the “half-tree” method. Accurate marking of future grooves is an important stage in shield assembly.
Connection diagram of frame elements
All grooves are coated with glue. The connection of the timber is carried out on a flat but large area. If the glue has dried, the connections are fixed with dowels. To do this, make through holes with a diameter of 8-10 mm.
Plywood or fiberboard is used to cover the frame. The markings are made and the frame is removed. The frame returns to its original place. It must be pressed against the facing material treated with glue.
Plywood or fiberboard is used for cladding
MDF is used to fill the interior space. It is glued to the bottom sheet of finishing material. But first the glue must dry well. At the same time, it is recommended to prepare consumables for the outer lining of the canvas.
Internal filling gives the canvas rigidity
If you need to glue 2 sheets, then the first sheet is fiberboard, and the second is laminated material or SF. The resulting structure is sent under the press.
You can cover the door with natural wooden slats. They are fixed to the frame. The holes made are filled with a mixture of glue and sawdust. If the surface is dry, it is treated with sandpaper. All corners and ends are processed with a milling cutter. The handle and lock are cut into the finished door leaf, and the hinges are fixed. The door is mounted in a corresponding frame.
A frame door is made using a similar method - the interior space is additionally reinforced with beams. But before starting work, accurate calculations are carried out and a drawing is prepared.
Making a paneled door
To make a paneled door, you will need special carpentry tools and experience. The components of the structure are made of plywood and solid boards. A drawing is pre-prepared, on which 4 panels are marked.
Paneled door in section
The frame is made of timber. It is pre-processed with a milling cutter. Then a groove is made on one side of it. Tenons are cut out on the crossbars, and the edges are processed with a router. Panels and mullions are inserted into the grooves.
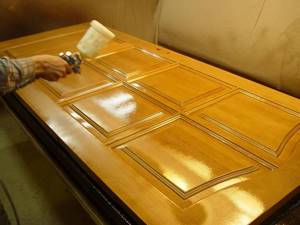
Insulating the fabric from the outside
Before insulating iron entrance doors from the outside, you need to buy insulating material, leatherette or other leather substitute. You will also need glue. It is easy to work with such materials; insulation is not difficult to do on your own.
The work order is as follows:
Before insulating an iron door in an apartment, the door must be removed from the awnings and placed on a horizontal surface. Measure out the insulation (it’s better to take felt) based on the size of the door. Lubricate the sash with glue and glue the felt material. Cut off the required piece of leatherette with a margin of 5 cm on the sides. Glue the canvas, bending it onto the inside of the sash
It is important to ensure that the material does not form folds and is stretched evenly, but not too tightly. To secure the upholstery, a metal strip is laid around the entire perimeter of the door leaf, using self-tapping screws as fasteners.
To ensure that the insulating material holds well and does not settle over time, and also to give a better decorative look, a symmetrical or asymmetrical pattern is made using self-tapping screws with curly heads. This way, insulating an iron entrance door will not only be more reliable, but also aesthetically attractive.
This is interesting: How to insulate metal entrance doors
Types of insulation
When choosing a suitable insulation, the performance characteristics of the material and installation features are first taken into account.
Foam rubber
This type of porous thermal insulation is one of the most affordable solutions. In addition, the installation of foam rubber is extremely simple, which makes the material popular when arranging the front door in a private home. However, in terms of functional parameters, foam rubber is somewhat inferior to modern analogues, which are endowed with improved heat and sound insulation properties.
Styrofoam
Decorating a wooden or metal sheet with polystyrene foam is considered one of the most inexpensive ways to prevent heat loss through the entrance area:
- due to the lightness of the porous composition, loads on structural elements and fastenings of the door block are eliminated;
- the presence of numerous air cells provides an effective barrier against the leakage of warm currents from the room;
- The product has high sound insulation characteristics.
Foam plastic, as a common type of insulator, is distinguished by its excellent strength and wear resistance, which determines its long service life.
Polyfoam stands out for its excellent strength and wear resistance
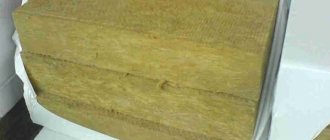
Minvata
Insulation based on mineral fibers promotes effective heat conservation and copes well with temperature changes. The potential of mineral wool also provides for a high level of noise absorption. The material has the ability to recover in size after compression, is easy to install, and is sold in an affordable segment. Among the disadvantages of mineral wool, susceptibility to moisture is noted. When deciding how to insulate a metal entrance door in a private house, they often give preference to stone wool, since this type of mineral wool is not afraid of a humid environment.
Mineral wool promotes effective heat conservation
Foamed polyethylene
Izolon - foamed polyethylene - is a relatively expensive type of thermal insulation. Among the competitive advantages of the material are high thermal protection properties, minimal product thickness, and the presence of an adhesive base. Thanks to the sticky surface, the isolon is easily fixed to the installed base. The structure of foamed polyethylene resembles foam rubber, but it has excellent strength indicators and provides a long service life. It is worth considering that isolon reacts negatively to prolonged exposure to UF radiation.
Polyurethane foam
The characteristic structure of polyurethane foam allows you to fill all the cavities of the surface being treated, without exception, to form a continuous thermal insulation sheet. The material is applied using special equipment. Insulating the front door with polyurethane foam requires considerable financial investment, but the high cost of the product is offset by its high performance properties.
Expanded polystyrene
Expanded polystyrene, as a type of foam, has a denser structure and, with a relatively small thickness, has similar properties as foam with more impressive dimensions. The material is not afraid of moisture, has self-extinguishing properties when exposed to flame, and is capable of providing a high level of thermal insulation of the structure being equipped.
Expanded polystyrene is capable of providing a high level of thermal insulation of the structure being equipped
Materials and tools
Modern materials make it possible to protect any home from the cold.
For insulation of metal structures the following are used:
- Styrofoam;
- polystyrene;
- mineral wool;
- polyurethane foam;
- foil isolon, penofol;
- seal.
In addition to insulation, you will also need hand tools:
- tape measure, pencil;
- screwdriver, screwdriver;
- drill with metal drills;
- scissors or sharp knife;
- awl, hacksaw, jigsaw;
- sandpaper, tape;
- glue (liquid nails), screws - self-tapping screws;
- acetone or alcohol.
Decorative materials:
- MDF – decorative panels or boards;
- decorative film with a pattern that replicates the texture of wood;
- paints and varnishes;
- leatherette imitating leather.
Safety precautions must not be neglected.
When performing locksmith work, it is important to have:
- gloves with polymer coating;
- goggles to protect eyes from mechanical particles and fragments;
- respirator for respiratory protection.
Tools for work
Tools you will need:
- to create grooves and holes, you will need a router;
- hacksaw;
- to sand the ends of the doors, you will need a plane;
- chisels;
- hammer;
- screwdriver
Standard set of tools for making doors
To assemble doors you will need the following materials:
The purchased wood is additionally dried. The boards are laid so that they do not touch each other.
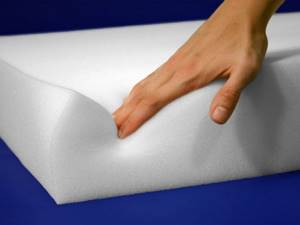
Materials for insulating iron entrance doors
The choice of thermal insulation material will depend on the location of the door itself (inside the entrance or outside the house). You can consider the cheapest options, such as corrugated cardboard or sawdust. But they are not suitable for outdoor structures: when moisture gets in, their heat-saving properties are greatly reduced. If you are looking for the most durable way to insulate a metal entrance door, you need to take into account the properties of heat-insulating materials:
- Foam rubber is recommended for insulating structures located in a warm entrance or vestibule, since unstable weather conditions lead to rapid destruction of the insulation.
- Mineral wool is prone to increased water absorption. When installed in doors leading to the street, it requires an additional insulating layer that will protect against moisture. When used for internal insulation, non-sheet material tends to move to the lower part of the structure over time, which increases the thermal conductivity of the upper section of the door.
- Polyurethane foam is resistant to all natural phenomena: humidity, cold, heat. It has a long service life and is not prone to deformation. It is used as internal insulation, but its installation requires certain skills.
- Izolon is a rolled material. It has an adhesive layer, which facilitates the installation process. Can be used for internal and external insulation.
- Foam plastic is resistant to moisture and deformation. A significant disadvantage of the material is its susceptibility to combustion.
- Polystyrene in its structure resembles foam plastic, however, due to the special composition of this material, its flammability properties are noticeably reduced and its durability indicators are improved. Insulation of a metal door with polystyrene can be done both from the inside and outside of the structure.
Which insulation for the front door is better?
There are many materials that can solve the problem of insulation, here are just some of the widespread ones:
- Expanded polystyrene. Inside this material there are many micropores with air, due to which the thermal insulation characteristics of the door leaf remain high. The upholstery base does not play a role in this case.
Related article: White interior doors - an elegant decoration for any interior
- Polyurethane foam. It is considered optimal among other solutions existing today. It is used both in rural areas and inside city apartments. But this material is expensive, and moreover, it is difficult to apply to wooden surfaces.
- Izolon. This is a type of polyethylene foam, a member of the group of ordinary foam rubber. The cost of the material is also high, but the result pays for all the costs.
- Mineral wool. This is a material that guarantees thermal insulation performance at a fairly high level. The only disadvantage we can highlight is the ability to accumulate moisture. In addition, mineral wool may sag over time.
- Foam rubber. This is a type of porous material available to almost everyone. The ease of installation makes it popular even among those who live in rural areas. The most budget-friendly type among insulation materials, it can be installed even on the street part of the structure.
- Styrofoam. An ideal solution if you need to insulate the entrance structure from the inside. It is distinguished not only by its low cost, but also by the fact that even over many years it does not change its original appearance.
Installing double doors
To make the house warmer, they often resort to installing a double street door. In this case, heat is retained thanks to the additional air space separating the room from the street. But such a proposal is not suitable in cases where reducing the space in the house is unacceptable.
A threshold is installed for the inside of this block, and additional insulation is laid on the slopes between the doors.
It is also important not to forget about protecting the outside of the door from moisture. For this purpose, the canvas can be treated with a special impregnation, painted or varnished. Good waterproofing will be ensured by treating the door with drying oil.
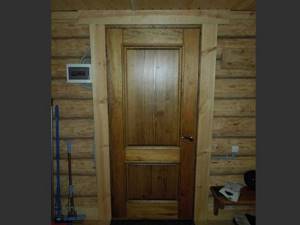
Insulated wooden entrance doors: step-by-step instructions
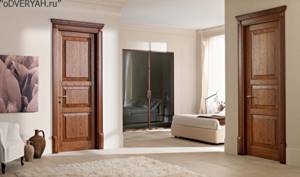
Despite the emergence of a wide variety of construction materials, wood has not gone out of fashion for many centuries. The reasons for such popularity lie in its unique qualities of this material to create comfort in the house and transform its appearance. Important advantages of wood include its environmental friendliness, low thermal conductivity and, with proper processing, enviable durability. Modern technologies and tools provide new opportunities in wood processing, bringing its surface to perfection and simultaneously emphasizing its natural beauty.
Insulated wooden entrance doors
Insulated wooden entrance doors of various models and designs can be found in specialized stores or ordered from specialized companies engaged in wood processing and the manufacture of door sets from it. However, if you wish and have the basic technological skills to perform carpentry work, it is quite possible to make a wooden door with insulation yourself.
Moreover, it should be noted that if the wood itself is of high quality and has the necessary pre-treatment, you can do without expensive professional tools during the door manufacturing process. Of course, in this case, the work will take more time and effort, but by doing the assembly yourself, you can save a decent amount.
As you know, during the cold season, heat loss occurs from a house heated from the inside through various elements of the building’s structure, and doors are no exception. This means that the total amount of thermal energy loss directly depends on how well the door and its frame are made and insulated.
Types of entrance doors
Wooden entrance doors can have different designs, and accordingly they are manufactured using different technologies. So, they can be massive, framed or paneled.
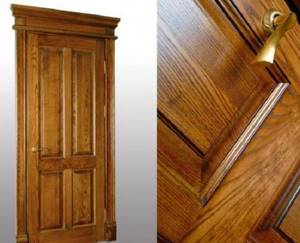
Solid wooden doors
Doors made of solid wood often do not even require insulation.
Solid doors are made of high-quality boards, at least 50 mm thick, which are connected to each other with tongue and groove joints in one plane. A massive canvas can have a smooth surface or decorated with carvings. The relief can imitate a paneled structure or have original designs with various landscapes, animals, plants, fantasy or folklore patterns, etc.
Carved decorations of massive doors
For a massive entrance door, mainly densely structured wood species are used, such as larch, cedar, oak and others, which have a beautiful textured pattern and color shade.
The board must be moderately dried and have high-quality processing. Such a door generally does not require special insulation, since the wood chosen for it usually has low thermal conductivity. However, in this case it is very important to provide high-quality thermal insulation of the door frame. If the door is planned to be installed in a private house in a region with harsh winters, then the inside is often lined with leatherette using thin insulation, for example, isolon.
Prices for entrance doors Teplo-lux
Entrance door Heat-lux
Massive doors are chosen not only for installation at the entrance to a house or apartment, but also inside residential premises, as well as in a bathhouse.
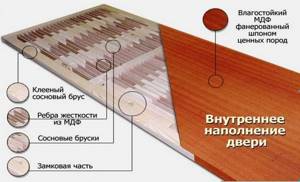
Paneled door
Wooden panel doors can be made entirely from natural wood or laminated veneer lumber, but composite materials, for example, MDF, are often used to make panels. This model is also suitable for installation at the entrance, but it is still most often used for doorways of apartments or in private houses located in regions with a mild winter climate. Often, in order to use such a structure as an entrance, an insulating material covered with leatherette is placed on it from the inside.
Paneled doors are very popular
Paneled doors by themselves are not a sufficiently “warm” assembly, since the parts from which they are made can be made of different materials, have different thicknesses, densities, and thermal conductivity qualities.
If the canvas is assembled from various types of wood that differ in color and texture, then in order to achieve an aesthetically pleasing and harmonious appearance, the parts are covered with natural veneer, which further reduces the thermal conductivity of the material.
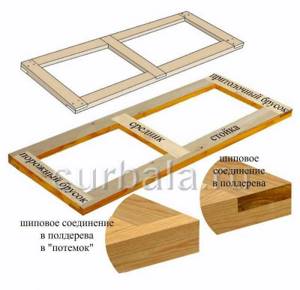
The paneled structure is made of solid or laminated timber; it includes an upper, lower, one or more middle horizontal crossbars and a vertical centerpiece (there can also be one or more). Horizontal cross members serve as “stiffening ribs” for the canvas, and the more of these elements are installed, the lower the risk of deformation of the structure.
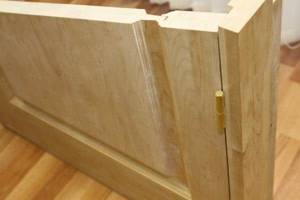
Basic panel door design
The structural elements are connected to each other by a tenon joint and then fastened with dowels.
Panels made of MDF or natural boards, processed along the edges with a router, are glued into the windows that form the frame. The thickness of the edges of the panel panels should be approximately ⅓ of the frame timber. The panels are installed in the grooves selected for them in the frame timber or secured with a figured glazing bead.
It should be noted that despite the fact that a paneled door consists of numerous elements glued together, if it is of high quality, it is in no way inferior to a massive one in terms of reliability and strength.
Paneled doors made by real craftsmen sometimes have a cost that exceeds the prices of massive structures, since much in determining this criterion depends on the type of material used and the aesthetic design.
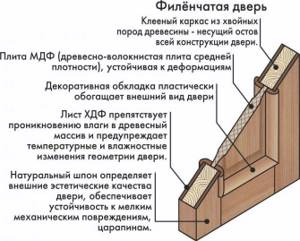
Frame and panel door structures
Frame entrance doors can be called the most common option, since they are generally affordable. There are, of course, quite expensive models - this parameter will depend on the materials from which the structure frame, its filling and finishing are made.
Frame type entrance door
The frames of this type of door are made of solid boards or laminated veneer lumber. For external cladding, MDF, fiberboard or lining made of natural wood, 10 mm thick, of different widths is used, which is installed horizontally, vertically, diagonally, or various geometric patterns are formed from it. A variety of materials are used as insulating filler. They are guided by this criterion when choosing a door according to the location of its installation or according to the climatic conditions of the region. Thus, polystyrene foam, mineral wool, shavings, cardboard or paper honeycomb are used as insulation materials.
Sometimes the frame consists only of strapping timber, and the space between the two sheathing panels is filled with low-grade lumber.
Frame or panel door structures can be solid, hollow or small hollow:
- Panel doors are called solid door structures, that is, a panel is assembled from unedged or low-quality timber, which is sheathed on both sides with fiberboard or MDF. As a rule, wooden lining is not used in this type of door, otherwise the door will turn out to be overly massive. A similar structure can be used as an entrance only for high-rise apartments, since the entrance premises themselves are a certain barrier that blocks the street cold. But even in such conditions of the entrance, good owners sheathe the door with insulating material in combination with leatherette.
A hollow door, which consists of a frame and one or two crossbars, sheathed with fiberboard, MDF or clapboard. The space between the facing sheets remains empty. It follows from this that this door is in no way suitable for installation at the entrance of a house or apartment. Its purpose is to separate the interior spaces.
- Small-hollow structures can have different fillings, including thermal insulation material. But if such a door is planned to be installed at the entrance, it makes sense to completely fill its cavity using insulation with low thermal conductivity - polystyrene foam, mineral wool, polyurethane foam, and in combination with them you can also use foil-coated polyethylene foam.
Having figured out what each type of door installed on the entrance door is, you can choose one of them for independent production. First of all, to carry out this process you will need to stock up on tools and materials.
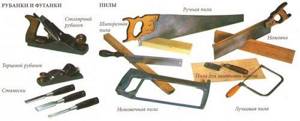
Tools for work
For any carpentry work you need to have special tools. Even if it is not possible to purchase expensive modern devices, it is quite possible to get by with a classic manual set.
Despite the advent of modern electrified tools, “classic” hand tools also do not go out of use.
- For ease of work, you will need a reliable and stable workbench on which the manufacturing, processing and assembly of structural parts will be carried out.
- The work will be extremely simplified if the owner has a router in his set of power tools. It will help you accurately and efficiently process the wood, give the desired shape and size to door parts, select grooves and sockets, and even decorate the canvas with some kind of relief design. If this tool is not available, then you can use milling drills by installing them in a screwdriver or drill. Previously, when such convenient devices did not exist at all, carpenters used chisels and cutters of various configurations for these purposes. So if you can’t purchase a router, stock up on a set of chisels.
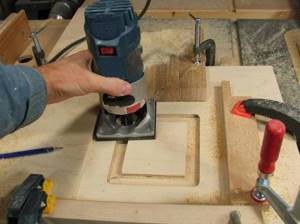
A hand router will greatly simplify many operations.
- A hand plane can also replace a milling machine in certain cases. They are used to level and adjust parts to size, cut off corners (chamfers) if necessary, and perform other technological operations.
- In order for the door elements to be glued together efficiently and firmly, it is impossible to do without clamps that will tighten the parts assembled into the canvas.
- To make the blanks you will need hacksaws.
- You need hammers - regular and rubber (or wooden - mallet).
- The final finish will require an electric sander and sandpaper. The grinder can be replaced with a small piece of block onto which sandpaper is nailed or screwed.
- To assemble the structure, install locks and hinges, drill holes for dowels or screws, a screwdriver is required. As a last resort, you can get by with a drill and a set of screwdrivers.
- Measuring and marking equipment is required - a tape measure, a ruler, a folding meter, and, of course, a carpenter's corner, a simple pencil or a marker.
Materials for making a door
To make a door you will need materials that need to be prepared in advance:
- Wood - according to size, grade and quantity, lumber is selected individually for each type of product.
- Special wood glue.
- Self-tapping screws of various lengths and wooden dowels. Typically, professional craftsmen use these to secure wooden parts together. But some manufacturers prefer metal corners and trims.
- Insulation material.
It should be noted that each type of door may require additional materials - they will be mentioned when describing the procedure for making models.
How to choose wood?
In order for the door to serve for a long time and not dry out or become deformed, the choice of wood must be approached with all responsibility. The main construction material is selected according to the following criteria:
- The type of wood is selected depending on the type of structure and financial capabilities. If a massive door is being made without additional insulation, then it is worth choosing more expensive types of material that have a high density - this could be oak or cedar, larch or the wood of some fruit trees.
- To make a solid or paneled door leaf, commercial wood with a minimum number of knots is purchased. For lining the frame structure, wood of a lower grade can be chosen, but if it is sheathed with wooden lining, then the cladding material must be of the highest quality.
- It is important to choose lumber with optimal humidity - it should be 11÷15%. Only in this case will the material be easy to process, and products made from it will serve for a long time without deforming, swelling or drying out. The best option would be wood that has been dried in a special chamber.
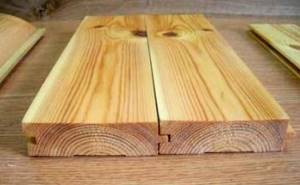
When choosing lumber, pay special attention to their grade, degree of drying and evenness
- When purchasing, each of the boards (beams) is checked for evenness. This process is carried out visually, or even better - by laying the purchased parts on a flat surface. So all the shortcomings will be immediately noticeable.
- In order for the finished door leaf to have a thickness of 50 mm, you need to choose:
- for a massive door - a board 50 mm thick;
- for a frame door sheathed with five-millimeter fibreboard, a beam or board of 40 mm, and sheathed with ten-millimeter clapboard - 30 mm thick;
- for the strapping and crossbars of the paneled fabric, you will need a board 50 mm thick, and for panels, depending on their design - from 15 ÷ 20 mm.
- In order for the structure to have good rigidity, it is better to choose boards for tying or making the entire fabric with a width of 120÷150 mm.
Before installation, all boards and bars must be processed with a grinder, installing fine-grained sandpaper on it, or manually.
What insulation should I use?
Since, basically, all homeowners prefer to insulate their entrance doors, you should also consider which thermal insulation materials are most often used for these purposes.
Prices for Zetta entrance doors
Zetta door
Whatever entrance door is chosen, in order to enhance the insulating effect and prevent drafts from entering the premises, it is imperative to seal the door frame. For this, mounting foams, special foam rubber self-adhesive pads or PSUL tapes (pre-compressed self-expanding sealing tapes) are most often used. Any of these options is suitable for all types of doors.

Sealing self-adhesive tape
The most common insulation materials for thermal insulation of the entrance door leaf:
| Material parameters | Izolon (polyethylene foam) | Expanded polystyrene | Mineral wool |
| Compressive strength at 10% deformation, not less (KPa) | 0,031÷0,33 | 40÷160 | — |
| Density, kg/m³ | 25÷200 | 15÷50 | 11÷50 |
| Thermal conductivity coefficient at 25±5˚С (W/(m×°K) | 0,031÷0,037 | 0,038÷0,041 | 0,036÷0,043 |
| Water absorption, % by volume, not less | 1,0÷1,5 | 1,8÷4,0 | 10÷15 |
| Flammability group | G2÷G4 | G2÷G4 | NG÷G1 |
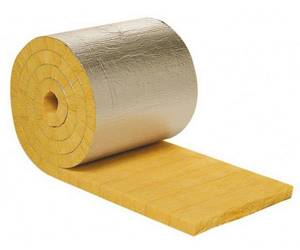
It is best to use dense mineral wool with a foil layer
- Mineral wool has high thermal insulation characteristics and is often used for internal insulation of frame doors. Its disadvantage is that it tends to sag over time, exposing some areas of the space between the sheeting. To prevent this phenomenon, it is advisable to glue mineral wool mats to waterproof glue, distributing it in strips on the insulated surface. Mineral wool mats are produced that are equipped with a foil layer - this version of the material is more expensive, but its thermal insulation characteristics are much higher. In addition, due to the foil layer, the insulation becomes more rigid, therefore reducing the risk of shrinkage.
Foam rubber is perfect for external door insulation
- Foam rubber up to 10 mm thick is used for external insulation of the door from inside the room, followed by covering it with leatherette or leatherette covering, which is secured with decorative nails.
How to insulate an already finished door?
To do this, you can decorate it with decorative upholstery and place thin insulating material underneath it. How to properly cover a door with leatherette - read in a separate publication on our portal.
Izolon, a foil-clad polyethylene foam, shows good insulating qualities.
- Izolon or foamed polyethylene has high insulation characteristics, and the foil version of this material tends to reflect heat into the room, so it is very widely used for thermal insulation. Izolon is somewhat reminiscent of foam rubber, but is more effective, and can be used in combination with other insulating materials. It is used to enhance internal insulation and for fastening to the inner surface of the door under decorative trim.
The most inexpensive option is to use polystyrene foam to insulate the door.
- Expanded polystyrene also has good thermal insulation qualities. In addition, it is tightly installed between the frame elements and does not change its shape throughout the entire period of operation. However, we should not forget that this material over time begins to emit formaldehyde, which is harmful to human health. In addition, polystyrene foam cannot be called fireproof.
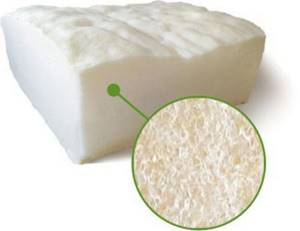
The fine-cell porous structure of polyurethane foam becomes a reliable barrier to the cold
- Polyurethane foam is perfect for thermal insulation of the internal space of a frame door, as it completely seals all joints of parts, penetrating into any gap. When using this material, it is not necessary to use complex equipment - you can simply use polyurethane foam, which has an easy-to-use packaging. Excess polyurethane foam rising above the frame can be easily cut off with a sharp knife.
Find out detailed instructions on how to upholster a door with leather yourself from a new article on our portal.
Manufacturing and insulation of paneled doors
This type of door consists of a considerable number of parts, and each of them has a rather complex shape. Therefore, in order for the assembly of elements into a single fabric to be of high quality, all parts must be very carefully manufactured to size and processed with high quality. If all these operations are carried out manually, then the manufacture of the door leaf will take a lot of time. In the case where there is no significant experience in wood processing, but you still decide to make the door yourself, you should not choose complex designs - it would be better to choose a simple and affordable frame type option.
| Illustration | Brief description of the operation performed |
| It will be easier to carry out the work if you draw up a detailed drawing of the product and put dimensions on it. In the presented drawing you can see the simplest version of a paneled door with a minimum number of connecting seams, since the door leaf contains only two panels. The individual parts are numbered and named: 1-horizontal upper mullion, included in the trim; 2-top panel; 3-vertical strapping bars; 4-middle; 5-bottom panel; 6- horizontal lower mullion, included in the harness. This drawing does not contain dimensions, but from it it becomes clear what parameters need to be calculated when drawing up a project for the manufacture of such a product, putting down the data necessary for a specific doorway. |
| To make the trim and mullions, you need to prepare a massive or laminated timber, but if you choose the second option of material, you should take into account that due to the glue it will be more difficult to process. The finished, well-planed timber is processed on one side with a milling cutter. A groove is cut into it for installing panels into it and connecting the parts to each other. In some cases, shaped cuts are made along the edges of the groove - chamfers. They will replace the glazing bead that secures the panel panel. If glazing beads are used, the edges of the timber can be left smooth. In addition, if insulation is attached to the inside of the paneled door, then the wooden parts can be “finished” only from the outer edge. |
| Next, you need to work on the connecting elements, since you will have to fasten together the horizontal and vertical strapping elements and (for the model shown in the drawing) one mullion. To do this, a tenon of the required size is cut out with a milling cutter in the horizontal elements along the edges, and corresponding grooves are cut in the vertical elements. The tenon and groove should have a thickness of ⅓ the size of the timber used. The connection can be different, and which one to choose based on ease of manufacture is up to the master to decide. The grooves cut in the horizontal beams must fit perfectly with the tenons, and the parts must fit tightly together. In order for this work to be done accurately, precise markings must be made before starting it. | |
| Panels, as mentioned above, are made of chipboard, boards or MDF. If boards are selected, the panel from them is assembled (glued, tightened with clamps and dried) in advance. Plywood with a thickness of 20 mm can be processed immediately after the groove-tenon joints are made. If the inner side of the canvas is insulated, then the panels can be processed only from the outside. |
| Sometimes a panel blank can be assembled in thickness from two or three layers, which allows its middle part to be raised to the level of the thickness of the trim beam. In this option, curly overlays are glued on both sides or only on one side to the middle, flat plywood panel. Such panels are glued together under a press, as they must form one whole panel. The middle layer of the panel must be adjusted to the groove, which is located in the strapping bars and the centerpiece. To ensure that the part fits freely into the groove, its thickness is made 1-2 mm less than the width of the groove. |
| After all the door parts have been made, it is advisable to treat them separately with antiseptic and fire-retardant impregnations; if necessary, immediately cover them with stain and dry them. | |
| After drying the parts, you can begin to assemble them into a single piece. This work should be carried out on a flat, durable table (workbench). To be sure, before “planting” the parts on wood glue, they are assembled dry. If all the tenons fit tightly into the grooves, and the assembly results in a perfectly even door leaf structure, then you can proceed to assembly using glue. The evenness of the door is checked by measuring it along the diagonals and comparing the resulting lengths - they must be the same. |
| To ensure that the work goes smoothly, it is carried out in stages: - the first step is to glue a horizontal strapping piece into one of the vertical bars; - next, a panel is glued into the resulting right angle and gently tapped with a rubber hammer until the tenons fit tightly into the grooves of the horizontal and vertical bars; - after this, a center piece is installed in the middle groove of the vertical beam and the lower side of the panel with glue, and also tapped with a rubber hammer; - then, a second panel is glued into the center and vertical beam; - then the second horizontal part of the trim is mounted on the lower part of the panel and the lower groove in the vertical beam; — the final and most difficult stage of assembly is the installation of the last vertical side of the trim; you must immediately install the tenons of the crossbars and mullion into it, as well as the unclosed sides of the panels. |
| While the glue has not dried, the entire structure can still be adjusted. To do this, you first need to check the dimensions of the diagonals of the structure again - if they are the same length, then this means that the corners of the canvas are right. Additionally, the corners are checked using a construction angle. After making sure that the canvas is glued evenly, it is clamped into clamps until the glue dries completely. | |
| Only after the canvas has dried, the binding at the corners and at the connection with the center is fastened with dowels. To do this, two diagonally placed through holes are drilled in these areas, the size of which will be 1÷1.5 mm larger than the diameter of the dowel. The dowels are lubricated with glue and carefully driven into the holes. After the glue has dried, the bonding area is cleaned and, if necessary, covered with putty. |
| Having completed these steps, the panels are framed with glazing beads. They are also fixed with wood glue, but to be sure, you can also use inconspicuous nails, for example, by biting off their heads. | |
| Next, the door leaf is marked to create holes and slots in which the fittings will be installed - locks, handles and hinges. |
| Using the markings, holes are drilled in the door leaf into which the fittings are fitted, but they will be installed after painting and insulating the door leaf. |
| If the door is planned to be painted or varnished, then this process is carried out in the sequence shown in the diagram. To ensure that the painting looks neat, you need to make sure that the paint does not pool in the corners. Even if the paneled door is planned to be insulated from the inside, painting is done on both sides of the door, as this will create an additional layer of protection for the wood. Insulation is carried out after the paint has completely dried. | |
| If the door has not yet been installed in the opening, then it will be easier to insulate it and cover it with finishing material, but it will also not be difficult to insulate the canvas already hung on the hinges. For insulation you will need foam rubber; if desired, isolon, leatherette, and decorative nails can be used with it. The foam rubber is laid out on the door leaf, the required size is measured and the excess is cut off. Since the insulation will subsequently be nailed to the wooden surface, it can be temporarily secured with double-sided tape. After this, holes are marked and cut out in the heat insulator for the peephole and installation of locks and handles. |
| If more effective insulation is required, then isolon is laid on top of the foam with the foil side up. If two materials are used in combination, their common layer should not have a thickness of more than 15 mm. In isolon, just like in foam rubber, you will need to cut holes, and then the material is secured to a wooden surface using staples, but not along the very edge of the canvas, but with a distance of 20÷25 mm from it. Leatherette is placed on top of the insulation and is also secured in several places. If the door is sheathed “in weight”, then all materials begin to be attached from above, gradually falling down. |
| It should be clarified that the trim on a door that opens outward differs from the trim on a door that opens inward. The photo shows a version of the door that opens inward. To insulate it, in addition to the general sheathing fabric, use leatherette strips 180÷200 mm wide, which should protrude about half beyond the fabric. Then these strips are bent in half, and a foam roller or a piece of foam rubber is placed inside them. Next, the lower part of the bent strip is tucked under the insulation laid over the entire surface, and its upper part is laid on top of the leatherette, bent inward by 10 mm and secured with decorative nails. The nails are hammered at a distance of 100÷150 mm from each other. | |
| If the door opens outward, then a strip with a foam roller is nailed to the door frame from inside the apartment. The fixed strip should protrude beyond the frame by 20÷25 mm, since it should tightly cover the gap between the door leaf and the frame elements. |
| In this option, leatherette is nailed onto the surface of the door, retreating from its edge by 10-15 mm - this must be observed so that the door fits tightly to the posts and crossbars of the door jamb. | |
| Locks and handles, as well as a viewing eye, are installed on top of the leatherette upholstery. The cut uneven edges of the material are tucked inside the holes prepared for installing the lock. | |
| How to correctly install the hardware elements, and what size gaps need to be provided between the door frame and the leaf, can be seen in this diagram. You can also clearly see how the box itself is assembled. Using the marked places on the end of the door, the required grooves are selected and the door hinges are screwed on. Then the door is installed in the door frame, on which the mating parts of the hinged hinges are already marked and screwed. |
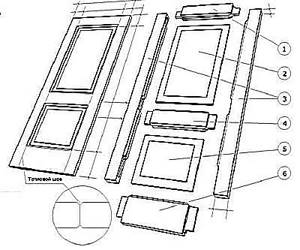
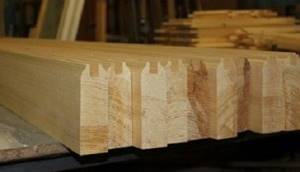

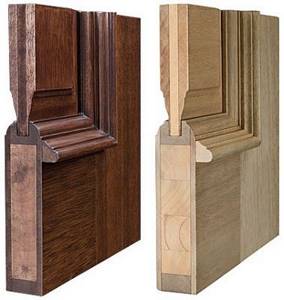
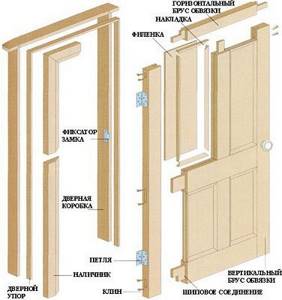
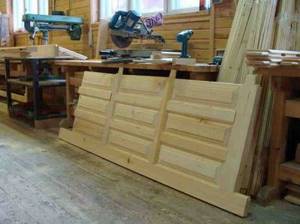
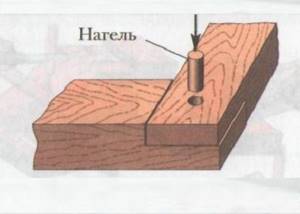
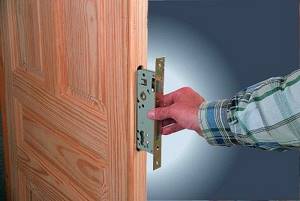
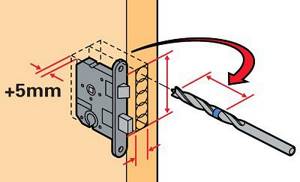
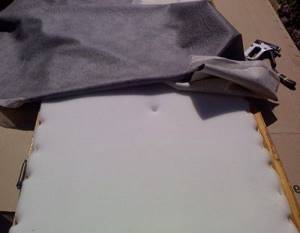
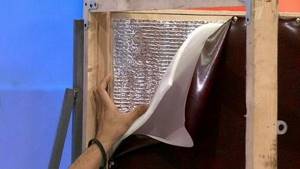
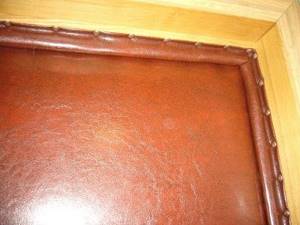
It can also be noted here that a massive door, if necessary, is insulated in exactly the same way.
Manufacturing and insulation of frame doors
A panel door, just like a paneled or solid one, is insulated from the outside - its internal space is completely filled with low-quality wood - this may not be edged timber or a board assembled into a panel and sheathed on the outside with fiberboard or thin plywood.
A frame door consists of a frame and several crossbars or diagonally installed spacers, between which insulation material is placed - mineral wool, expanded polystyrene, or the space is completely filled with polyurethane foam. The entire structure of the entrance frame door is sheathed on the outside with wooden clapboard. Some craftsmen install a thin metal sheet under the lining, which will make the door more reliable.
If desired, the surface facing the premises can be sheathed with fiberboard, and then additionally insulated with foam rubber, followed by upholstery with leatherette.
This door option can be called the most economical and easiest to manufacture.
| Illustration | Brief description of the operation performed |
| Before making calculations of the material, it is necessary to decide how the lining will be located, with which the door leaf will be sheathed, since this will determine how to install the frame cross members. |
| If the entire lining will be fixed vertically, then it is enough to install one or two crossbars. Horizontal lining requires the installation of two vertical bars inside the lining. If the cladding has a more complex pattern, consisting of small elements, then for each of them it is necessary to provide support bars, to which each of the pattern elements will be attached on both sides. | |
| Whatever cladding is planned, the first step is to assemble a reliable frame. Parts from timber of the required length are prepared for it. |
| At the corners, the timber may have different connections. Sometimes the “groove-tenon” method is used, but it is easier to use the “half-tree” or “paw” methods shown in the presented diagram. Taking into account the fact that the entire structure will be covered with clapboard, which will give it additional rigidity, such connections are quite suitable for fastening strapping bars. To ensure that the length of the groove is the same and the cut is even, you first need to mark the edges of the timber. The depth of the grooves should be half the thickness of the timber. | |
| Having prepared the strapping elements, you need to make the internal parts of the frame, according to a pre-drawn drawing. Crossbars or vertical bars can be connected to the harness using the connections mentioned above, or using metal angles. Before installation, all beam connections are coated with glue and aligned along the construction corner. The structure is compressed with clamps and left to dry. |
| When the glue is completely dry, two holes are drilled at the joints, into which wooden dowels are carefully driven. The drilled holes should have a diameter of 10-12 mm, respectively, the diameter of the dowel can be 1-1.5 mm less so that it fits into the hole quite freely. Before hammering it in, it is coated with glue. The part of the dowel protruding from above is cut off only after the glue has dried. | |
| If the strapping beam is not wide enough, then in the area where the lock is installed it is necessary to make an inlay from the timber. | |
| Next, the side of the frame that will go into the hallway is sheathed with one of the selected materials. Most often, fiberboard or plywood with a thickness of 5–8 mm is chosen, but some craftsmen prefer to cover both sides with clapboard 10 mm thick. |
| The lining must be well processed and have a beautiful textured pattern, only in this case the door will look respectable. The lining must be coated with an antiseptic composition and a fire retardant, then allowed to absorb and dry. |
| Insulation is carried out after all elements have been dried. To do this, one of the thermal insulation materials is placed between the timber battens. If mineral wool is chosen, it is best to fix it with glue, which is applied to the inside of the sheathing. It is also recommended to fasten a roll of isolon on top of the cotton wool - a foamed foil material, 3-5 mm thick. The foil should be facing towards the room. Izolon can be secured to frame elements using staples and a stapler. |
| When using foam plastic for thermal insulation, it is cut into separate pieces that have the size and shape of the space between the frame beams - the material should fit snugly against it. However, gaps still form between the foam plastic and the wooden elements, and they must be filled with polyurethane foam - it will additionally fix the insulation in the frame. |
| The best and most convenient option for insulating a frame door is foiled mineral wool. It is laid with foil towards the room to reflect heat into the room. This material can be cut well with a sharp knife, and the foil gives the material additional rigidity. |
| The next step is covering the second side of the door leaf with clapboard. To make the finish look neat and complete, it is recommended to attach a frame made of clapboard around the perimeter of the canvas, and elements according to the selected pattern are already installed inside it. The lining strips are connected to each other using a tongue-and-groove connection and secured to the frame with 20 mm nails or self-tapping screws, which are driven or screwed into the groove of the installed panel. You can use special metal holders called clamps for fastening. They are installed on the lower “flange” of the groove, and through them the lining is secured to the frame. After covering, such fastening becomes completely invisible. | |
| Next, the door is installed in the door frame, and the installation locations for the hinges are marked. Then, based on their size, the wood at the end of the door leaf and on the frame is selected to the required depth, since the hinge plates must be located at the same level as the surfaces of the parts to which they are attached. |
| After hanging the door on its hinges, markings are made for installing the lock and handle. The lock is applied to the canvas, where the depth of its installation is marked, and on the end part - the width and height of the groove to be knocked out. After this, the appropriate “socket” for the lock is selected using chisels and a drill or a router. In the latter case, the canvas will have to be removed and laid in a horizontal position. A lock is inserted and secured into the finished hole. Then grooves for the lock bolts are cut out in the door frame, and the corresponding metal plates are attached. | |
| An insulating tape made of foam rubber or silicone is glued to the door frame around the perimeter of the door frame. Thanks to this seal, the door will fit tightly to the frame when closed, which will significantly reduce the risk of a draft. |
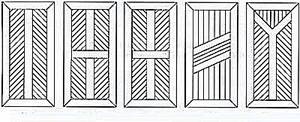
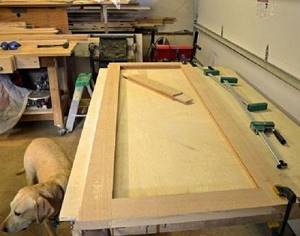
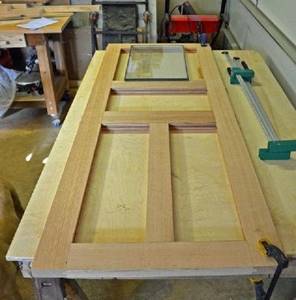
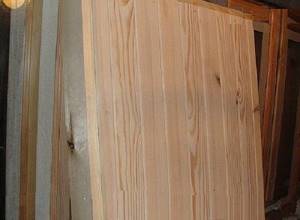
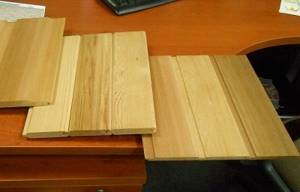
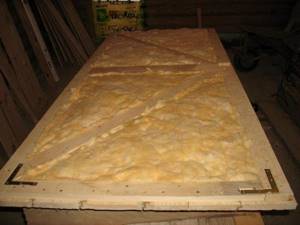
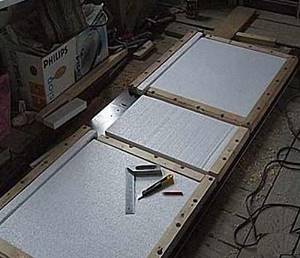

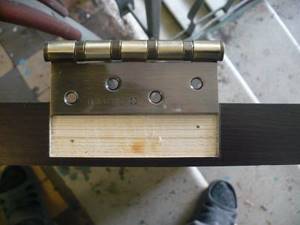
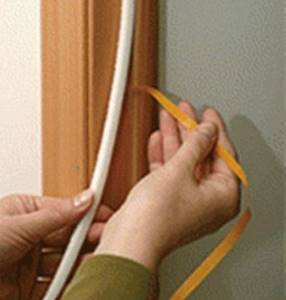
Having become familiar with the nuances of insulation, each home craftsman can choose the method of thermal insulation himself. So, if you plan to insulate an already finished door, you can use foam rubber or polyethylene foam in combination with leatherette. Well, if you plan to make this product yourself, then the frame option will be the most affordable even for a novice craftsman who has not yet gained sufficient experience in carpentry practice. And let the video lesson below help him:
Video: making a simple insulated frame-type door
Plywood and decorative inserts
We cut the plywood in the same way as furniture panels: on the table along the guide using a circular saw. We cut a large sheet for the door and the bases of the inserts for the bamboo sheet. We lay out the basics on the canvas. Now we cut the blade itself - with a jigsaw, on a band saw or with hand-held metal scissors.
Then we coat the canvas with varnish. For example, I added a little red dye to the varnish so that the canvas would not be too yellow. There is a special glue for bamboo fabric. This is what needs to be used. The glue is applied to the plywood and the canvas, followed by exposure (about an hour, according to the instructions) and then they are compressed.
How to properly upholster a door with dermantine or leather
The covering is fixed using special nails with decorative caps. To attach smoothly and neatly, you should first mark their locations on the material with a pencil. There are many design options, for example, making it in the form of a pattern or simply placing it around the perimeter of the canvas. You can cover it with inexpensive artificial leather or leatherette, the price of which starts from 120 rubles. per meter
Rollers
They help strengthen the place where the upholstery is attached and provide additional protection from wind and cold. They combat the cause of drafts by closing the gaps between the doorway and the leaf. You can make rollers by wrapping strips of foam rubber or other soft insulation with finishing material. They are nailed around the perimeter of the door from the inside.
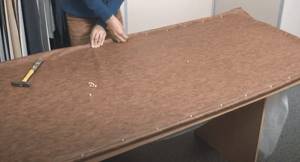
Cut 4 strips from dermantine or faux leather. The width of each is about 100 mm. Two strips of length equal to the height of the door. And two lengths equal to the width of the door. Next, the segments are folded in half and filled with a round seal and insulation.