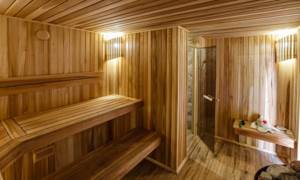
The door to the bathhouse should be as airtight as possible and have low thermal conductivity. Modern tempered glass products are airtight and beautiful. These can be seen in saunas. But a simple wooden structure will not be able to cope with the task of preserving heat. It will dry out and let the cold into the steam room. It is necessary to perform additional insulation of the bathhouse door. Our experts will tell you in this article how to insulate a bathhouse door with your own hands using various methods. The information will be useful to beginners and experienced professionals.
The door to the bathhouse must be insulated.
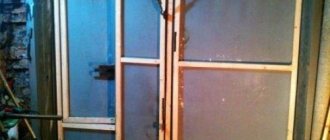
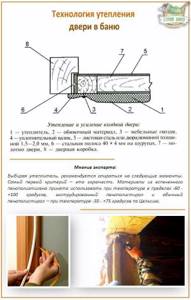
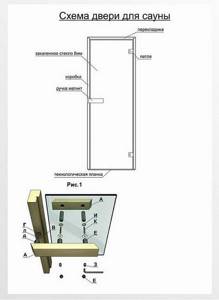
Insulation for a bathhouse door with your own hands - thermal curtain
A thermal curtain will help to effectively ensure thermal insulation of the dressing room.
Make a sealing frame on the inside of the door block. Cut the insulation into strips (2 strips measuring 10 cm * 100 cm and 2 strips 10 cm * 200 cm are enough). Nail them along the perimeter of the door frame 2 cm from the edge, placing them towards the door.
With a standard door size, nail wooden blocks on top of the insulation: two measuring 2x2x184 cm, and two measuring 2x2x80 cm. Wrap them with strips of insulation, cutting off its excess and press it on three sides with cash.
From thick fabric, tarpaulin or leatherette, make a continuous screen measuring 120 * 200 cm. On one side, sew it along the entire height so that a block measuring 2x2x200 cm fits inside this flap.
The other side must be attached to the wall, 10 centimeters from the cash. Cover the edge with a decorative strip. Sew metal rings at the top of the fabric.
Now the final stage of making a thermal curtain for a bathhouse door with your own hands - screw a self-tapping screw above the rail, leaving a 2 cm end outside, to which you should attach a strong wire.
We stretch it through the rings of the screen and secure it with another screw above the door block parallel to the cashing. To the left of the door, attach two springs or rubber bands from a bicycle inner tube, providing them with hooks. Sew rings onto the screen at the level of these springs. The work is done.
When not in use, the screen is located to the right, behind the door. When you enter the bathhouse, move it to the left, securing it to the hooks; the fabric will fit tightly to the sealing frame, blocking the access of cold air.
Insulation of the canvas
The fastest and easiest way to install door insulation is insulation on the frame.
First, wooden blocks 15-20 mm thick are prepared. The size is calculated based on the height and width of the door.

Then on the door leaf, from the side edges towards the center, 15 mm are measured on all sides - at this distance the bars in the form of a frame will be nailed around the perimeter. To do this, use a hammer and aluminum nails.
Installation of thermal insulation material
Insulation is nailed around the perimeter of the frame - it is better to fold it in half. It is cut in such a way that it completely covers the door frame, leaving a free edge of at least 15 mm on all sides.
The area inside the slats can also be covered with a layer of thermal insulation material.
Sheathing
The final stage is the installation of sheets of plywood or fiberboard.
As a result, when closing the door to the bathhouse, the insulation will fit tightly to the door frame, eliminating the slightest chance of cold air entering the room and getting the wood wet.
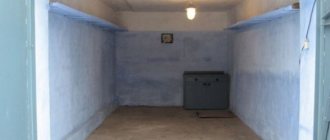
Warming the bath from the cold
Insulation from the inside is a mandatory aspect when building a bathhouse. This step will help reduce heating costs, maintain the desired temperature and speed up the heating of the room.
Thermal insulation materials are usually divided into two types:
- organic origin;
- inorganic origin.
Not only the thermal insulation and moisture-resistant characteristics of the insulating material, but also its environmental friendliness are considered a very important factor. In order to prevent heat from escaping outside, the base is often sheathed with foam boards, secured with glue. To insulate the walls of the bathhouse, lathing made of bars is used. If necessary, insulation is sometimes placed not in one layer, but in several at once. Sheathing with clapboard is the last stage, in which a small gap is left to prevent the material from rotting.
Ceiling insulation should not be ignored, otherwise 15% of all heat will be lost. The ceiling in the bathhouse is insulated using foam boards, which significantly reduces heat loss. After the seams are sealed with special foam and vapor barrier materials are used, you can begin covering with boards.
How to replace a door frame?
If there is high humidity in the bathhouse, the wood begins to rot. Replacing a door frame is not always easy, since first you need to disassemble the threshold and saw the lintel beam. Next, using a milling cutter you need to cut grooves of the required size, which are equal to the size of the opening. The elements of the box need to be assembled into a so-called tenon.
This structure is attached to the side of the door vestibule. The free space that forms between the box, wall, floor and ceiling is blown with construction foam or filled with special tow.
Several ways to insulate a bath door
Staple fiberglass can be used as insulation for a door block in a bathhouse; expanded polystyrene, incl. extruded; foamed polyethylene foam or basalt insulation. Each of these materials has its own characteristics in terms of flammability, vapor permeability, and environmental friendliness. But, in principle, any of them can be used.
Depending on the initial design of the door block, the insulation method is chosen:
- Manufacturing an additional wooden frame from timber and then installing it on an existing structure using insulation and decorative coating.
- Laying insulation into the inner chamber of the door.
- Installation of thermal insulation on top of the canvas using nails or screws, followed by covering the material with decorative finishing.
- Thermal curtain.
Let us consider in more detail the above mentioned insulation methods.
A thorough way to insulate the outer door of a bathhouse
If you need to insulate entrance frame doors without hanging inconvenient and always disturbing thermal curtains, then the best solution would be to cover the door with the most accessible and cheapest material - sheet foam.
The pre-framed bathhouse door must be freed from the closer drive, the handles removed and removed from the awnings. The next step is to remove the wallpaper nails and screws that secure the back lining of the door leaf.
In order to insulate the entrance block with foam plastic and at the same time avoid the appearance of cold bridges between individual pieces of insulating material, the ends of the foam tiles are either laid with overlapping grooves, or the seams are filled with thin strips of foamed polyethylene.
If you simply insulate the door by sticking pieces of polystyrene foam or expanded polystyrene, then after one or two winters the wooden bathhouse door will rot due to accumulating condensation. Insulation in this way can only be done if there is an unheated sauna vestibule.
The door to the bathhouse is swelling
With high humidity, high temperature and poor ventilation, the door may swell. This is not a good sign, but it is not necessary to replace the door with a new one:
- Provide good ventilation in the room and allow the wood to dry thoroughly;
- After complete drying, when the door returns to its previous size, apply a special water-repellent solution to it. It will prevent moisture from seeping into the wood in the future.
Tip: When treating the door with a water-repellent solution, do not forget about the door jamb. It must also be isolated from excess liquid.
The solution for treating doors can be polyfluid. It is very easy to apply and penetrates well into the very depths of the fibers, creating a protective layer. Read the instructions on how to choose a sauna stove
How to prevent a bathroom door from swelling
One of the most acceptable ways to resist swelling would be to simply coat the door block with moisture-resistant varnish. Such a coating will perform several functions at once:
- firstly, it will prevent moisture from affecting the surface of the door;
- secondly, the door block will not dry out due to exposure to low humidity in the bathroom;
- thirdly, the varnish coating gives the door an aesthetic appearance.
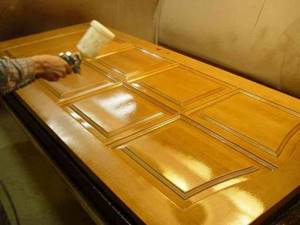
Coating the door with varnish You should also take care of proper ventilation of the room. Installing forced-air fans in the bathroom or special dehumidifiers will help get rid of humidity in the room.
Option with additional wooden frame
Materials you need to prepare:
- wooden beams 20 x 20 mm;
- insulation;
- aluminum and construction nails with heads or self-tapping screws;
- sheet of fiberboard or wooden plywood.
For ease of operation, the bath door must be removed and laid on a flat, solid base.
Wooden blocks must be nailed along the entire perimeter of the canvas, so that their edges protrude beyond the boundaries of the existing canvas by 10-15 mm. Using aluminum nails, it is necessary to nail the insulation onto the frame, folded in half so that it protrudes beyond the edges of the frame by 10-15 mm.
The mechanism of action of this design is that the door itself becomes warmer, and when closed, additional sealing is provided due to the insulation bent outward, nailed with an overlap.
Laying insulation into the inner chamber
If the bathhouse has a three-dimensional door, then it must have insulation in its cavity. If cold drafts appear in the bathhouse, the insulation must be replaced. In all likelihood, it has fallen into disrepair. To do this, the door removed from its hinges must be disassembled and the old insulation removed from its cavity. Having laid the new material, the canvas must be re-assembled and installed in place. All wooden parts must fit very tightly to each other, and there must be an air gap in the cavity of the canvas.
We insulate the bath door with our own hands
The method and technology of insulation depend on the design of the doors; the door leaf must first be put in order:
- If the bathhouse door has moved away from the door frame, drafts are sure to appear, so the first step is to repair or replace the hinges. The leaf should fit evenly to the door frame;
- A silicone cord is laid on the side posts and the top crossbar of the frame; the lower cut of the door leaf will need to be reinforced with an additional strip and a brush seal installed.
Only after minor repairs can the door leaf be insulated.
Advice! If you don’t have time to tinker with the front door for a long time, the bathhouse is steaming, and you need to insulate the entrance to the room now, you can use a temporary option - a thermal curtain.
To do this, a block is nailed from the inside above the entrance to the bathhouse, onto which any piece of dense, soft fabric, maybe even an old blanket, is sewn. In areas with very severe frosts, the owners of the bathhouse prefer to insulate it using curtains made of polyester mesh with a fine mesh, on which a wool blanket or thin natural felt is sewn. Synthetic fabrics, tarpaulin or film are not suitable for these purposes.
What should a door to a bathhouse be like?
It is most rational to use a low and narrow entrance for a bathhouse; air exchange through such a structure will be difficult and therefore the heat in the bathhouse will be better preserved. The door must open outward; this must be provided for safety reasons. After all, pushing it out, if necessary, is more realistic than opening it by pulling it towards you.
Since a resin door can release resin during operation, a more suitable material for making a door block for a bathhouse would be hardwood.
To avoid swelling of the door and subsequent damage, it must be thoroughly moisture-proofed. All parts of the door block must be carefully adjusted to each other. A whole door leaf is always more airtight than a prefabricated one.
Specifications
Usually the entrance door to the bathhouse is slightly smaller than the one installed for the steam room.
Usually the entrance door to the bathhouse is slightly smaller than the one installed for the steam room. Its standard sizes are:
- Canvas = 80 cm;
- Doorway height = 150 cm.
It is important to take into account the fact that the door will necessarily open outward, and not inward. Read the guide to choosing an electric sauna stove on this page
When choosing a wooden door for a bathhouse, you should definitely consider the following factors:
It is important to use only high quality wood; The door should only be located in the southern part of the room (to avoid slanting rain); It is worth paying attention to veneered doors, as they have a fairly high thermal conductivity and making them yourself is much easier.
Choosing a door size
The door will be exposed to extremes of heat and humidity. It is very important that steam not only does not escape when the door is closed, but also that it escapes to a minimum when people enter and exit. Therefore, the door to the steam room is traditionally made low. Its height depends on the height of the finished ceiling of the steam room itself, and it, in turn, depends on the height and number of “floors” - shelves
But the ceiling in the bathhouse is never very high - usually it is at the level of 220–230 centimeters
Its height depends on the height of the finished ceiling of the steam room itself, and it, in turn, depends on the height and number of “floors” - shelves. But the ceiling in the bathhouse is never very high - usually it is at the level of 220–230 centimeters.
We calculate: 230–60 = 170 centimeters, subtract the “margin” of 10 centimeters, result: the optimal door height is 160 centimeters.
Features of installing a door structure
If you need to install wooden doors, then installation of the frame is not required; its role will be played by the casing system. An exception may be the situation when wood lining is used as a finishing material. Then the box is placed on polyurethane foam.
After installation, the box is closed with platbands. In case of severe shrinkage, they can be replaced with new ones or simply reinstalled by adjusting the dimensions.
If you plan to install a metal door, then the casing is done a little differently. Its upper part does not need to be installed. Instead, you need to leave a gap that allows settlement to occur naturally.
The main advantage of a metal door is strength. Its box is able to withstand the pressure of wood during shrinkage without any consequences.
When cutting an opening, a number of recommendations should be taken into account:
- firstly, its height should be 150 millimeters greater than the door;
- secondly, the width of the opening should be 100–120 millimeters larger than the box (if its installation is necessary).
The above requirements are relevant and, if necessary, install a window. The casing must be carried out in any case, even if the opening cut in the log house is small.
When carrying out the work described above, the possibility of the formation of cold bridges should be taken into account. To avoid this, it is necessary to use thermal insulation materials, for example those with which the wall was insulated.
In other words, cracks and gaps formed during the installation process can be sealed with tow, polyurethane foam and other materials with similar functions.
It is preferable to use polyurethane foam, because it not only prevents drafts, but also gives strength to the structure. At the same time, it is much easier to use.
We insulate the door in the dressing room
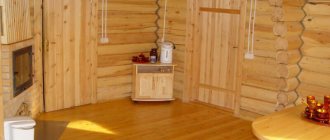
In cold weather, going to the bathhouse is a special pleasure; after warming up in the steam room, the body is in a comfortable, healthy state for a long time, so you want to stay in the bathhouse longer. In order not to overheat, you need to periodically enter the dressing room, and then continue the thermal procedures.
It’s good when the dressing room is built taking into account the lowest temperatures and is comfortable in it, because if the cold comes from the floor, then you won’t sit in such a dressing room for a long time, you can easily catch a cold and the impression of such a trip to the bathhouse will remain negative. Most often, the cause of discomfort in the form of a cold draft is the loss of sealing of the entrance door to the bathhouse.
Hanging blankets on the door or installing a second block do not solve this problem, but, perhaps, aggravate it by the fact that frost forms on the inside of the door and in some places the canvas freezes to the jamb. Then it becomes impossible to open the bathhouse without an ax; mechanical impact can lead not only to the formation of even larger cracks, but even to breakage of the block.
Tips for installing different types of bath doors
Following the installation instructions will help this element perform its intended functions. After all, the door protects from drafts and retains heat in the room. And its service life directly depends on proper installation. So, any door leaf should open outward. It is not advisable to remove the packaging from the product until the installation process is completed.
The entrance door to the bathhouse can be of the following types:
- wooden;
- glass;
- metal;
- from MDF, chipboard, plywood.
If your budget allows, you can opt for a metal door. It is durable, reliable and durable. However, this option is not in great demand. MDF, chipboard, plywood - all of them can be used as an entrance door. But such products are less durable due to the fact that the slabs quickly absorb moisture. This circumstance can lead to deformation of the product. The wooden option is the oldest and most traditional of all available. This canvas is attached to the frame.
https://vk.com/video_ext.php
The dimensions of the recesses should be 0.5 centimeters larger than the width of the frame beam. Such a reserve is needed to correct possible deformation of the canvas after its installation. The frame requires a beam with a section of 6 by 15 cm. When choosing a beam, you need to take into account the fact that the thickness of the canvas should be 5–7 cm less than the width of the frame posts.
You will see that the door leaf will fit tightly into the groove cut on the outside of the posts and crossbars. It protects the room from drafts. The main thing is not to confuse the location of the groove: the recess should be on the outside of the door leaf. After the timber is strengthened, you need to go over it with sandpaper to eliminate any unevenness on the surface.
The next step in installing the door is to tenon the top lintel of the frame with the posts at the corners. The entire door frame is leveled so that there are no distortions. Long anchors are used to attach the frame to the opening. After installation, you must once again check the strength of the fastening of the racks and the upper jumper. At the final stage, the threshold is installed.
After installing the door frame and threshold, the fittings are attached. It is recommended to use 3 sets of hinges: the first should be fixed 20 cm from the floor, the second - 50 cm, and the top - 140 cm. Then the door leaf with the installed fittings is hung on the frame.
When installing a glass door, you must first remove the panel. For this purpose, several screws are unscrewed using a hexagon on the hinges. Then the threshold is removed from the box. The side posts and the top crossbar are mounted in the opening, then the frame is attached. After fixing the box evenly, you can hang the glass sheet. The final stage is attaching the handle.
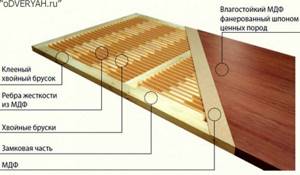
Double-chamber entrance door to the bathhouse
The presence of a vestibule prevents cold air from penetrating into the dressing room, but a very humid environment is created between the doors, which damages the structures, so the entrance door to the dressing room should be insulated as much as possible. The most optimal option for arranging the entrance is to install a two-chamber door.
The design should include 2 hollow chambers isolated from each other; inside each chamber there should be a certain volume that must be filled with insulation.
The manufacturing process consists of:
preparation of materials: wooden blocks 20 x 20 mm, 3 fiberboard panels, two of which will act as the outer and inner surfaces, and the third will act as a partition between the chambers and insulation. It is not necessary to use purchased insulation; outerwear that has gone out of use (natural fur coats, batting from coats, padding polyester, etc.) will do just fine.
manufacturing two identical frames from bars according to the size of the door leaf; making the door and installing it in place.
The sequence of work is as follows: first, a sheet of fiberboard is laid on a hard surface, face down, and a prepared frame of bars is nailed to it around the perimeter. Fill the resulting trough with insulation and cover it with a middle shield (it can be made from two components with careful adjustment of the parts).
Next, a second frame is attached to the resulting structure; it is also advisable to fill the second trough with light insulation and cover it with a third shield with the front surface facing outward.
Nails with heads or self-tapping screws must be chosen of such length that they go halfway into the cavity of the part to be joined. The end surfaces must be cleaned with medium-coarse sandpaper. It is advisable to prime the entire door and cover it with varnish or paint.
Double-chamber door against freezing and frost
Due to the significant temperature difference inside and outside the bathhouse, drops of moisture appear on the door. High dampness leads to deformation and freezing. Installing an additional structure does not always correct the situation, so it is better to make it yourself and install a two-chamber door.
To work you will need:
- inch board;
- fiberboard sheets;
- insulation;
- self-tapping screws
An inch board is sawn into two halves and adjusted with a plane to a thickness of 15 mm. Two identical frames with a jumper in the middle are assembled from blanks. They will become the basis of the door. The connecting pins are placed arbitrarily, this does not affect the strength of the structure.

Fibreboard blanks are cut to the same size. The door must be assembled on a flat surface. The fiberboard panel is laid first, face down. One of the frames is placed on top. Insulation is placed in the free space. The blank for the middle can be made of two parts. Next is the turn of the second frame and insulation. The design is completed by a fiberboard panel laid face up.
All parts of the door are fixed with self-tapping screws; the length of the fasteners must reach the second frame. The ends of the structure are sanded with sandpaper. The door is coated with primer and paint, hinges and a handle are installed.
The two-chamber structure, made by hand, has air gaps and insulation, and is not afraid of temperature fluctuations.
There are many ways to insulate a bathhouse door, and by combining them you can achieve a more significant effect.
We solve the problem comprehensively
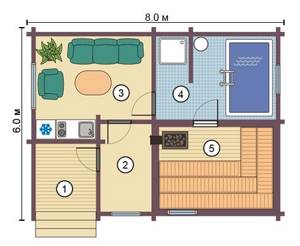
Proper layout of the premises is also important.
Many people, having spent good money on complete insulation of their bathhouse, suddenly discover that for some reason the desired insulation does not occur. Yes, it’s warmer, but where is the promised bliss, and why are there drafts across the floor?
The answer usually lies on the surface and whistles with pleasure - the door, the ordinary door to the bathhouse becomes the cause of this final inconvenience.
The solution to this problem can be very simple, or it can be a little more complicated, namely:
- Insulation of the door leaf itself;
- Insulation and sealing of joints where the door meets the jamb;
- Installation of thermal curtain;
- Installation of a second door.
Today we will go through all the points and be sure to solve two basic questions: how to insulate the door to the bathhouse and how to insulate the door to the bathhouse.
Let's get busy with the canvas
Photo of foamed polyethylene foil.
Any carpenter will tell you that it is not advisable to make the door structure heavier; moreover, this is fraught with distortions, and considering where the door is located (meaning in a bathhouse), then making it heavier is a completely unnecessary undertaking.
Therefore, in this section we solve the problems:
- Which insulation to choose so that it does not absorb moisture, can withstand low temperatures and is not very heavy;
- How to layer this insulation onto the door leaf.
We will not transmit the entire flow of information that the Internet is replete with about insulating fabric; we present a very simple method and its rationale:
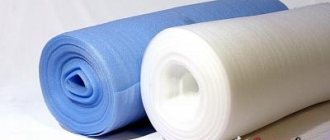
As door leaf insulation, we offer you polyethylene foam with a foil layer. The material itself is quite resistant to cold weather, has the invaluable advantage of being wind and moisture impermeable, in addition, the foil layer will return heat flows back to the bathhouse. And the weight of the material will be slightly more than the total mass of the paint and varnish impregnation layers. The hinges will not experience a large load and the canvas will not move.
Regular door covering with this material.
From canvas to jamb
After insulating the door leaf, let's work on the jamb
The simplest thing is to trim the inner perimeter of the jamb with the door tightly closed (and note, already insulated)
In the old days, the most popular insulation for the front door was felt, but now you can use any other method. Basic requirements for the material: it must be soft enough, and at the same time fit tightly to the door leaf, thus preventing the access of air, and also not lose its qualities when in contact with water, not cake or tear.
The technology has not changed:
- The insulation is cut into thin narrow strips at least 5 cm wide;
- A 20x20 mm strip is marked and sawed off in such a way as to completely and tightly cover the internal perimeter of the jamb (taking into account the thickness of the insulation itself);
- The insulation is folded in half and installed with a fold to the door leaf as close to it as possible, pressed and fixed with a strip to the jamb;
- Thus, the entire perimeter of the doorway is covered.
Full guarantee
If you already want to get a full guarantee of protection from the cold, then you can finish insulating the door to the bathhouse by using a curtain made of dense material. You don't need instructions to cut and make the curtain. We chose the material, cut it, cut it, stitched the edges, thought out the fastening system and hung it. In this case, the fastening system can be under the rings on the pipe, simply overlapping the valve and stitching the valve under the pipe, or you can even make a cloth for clothespins (clothespin fastenings). There is also a simple way to attach between two planks. Therefore, we do not limit you in fastening and choice of material.
A few words about the second door
That's the point.
The second door is a method that has been tested and proven to be positive. Place your bet. To implement this, it is necessary to either install a jamb in which it will be technically possible to install two doors, while the adjustment of the two panels must be carried out before installation in the opening, which sometimes requires financial costs, time, and the warm season.
You can install an additional jamb and canvas to the existing ones, but you need to think about fixing the new structure to the existing one. A positive quality of the second door is the layer of air, which plays a buffer role and prevents the cold from quietly passing into the dressing room.
Insulation of a wooden balcony door
One of the most common reasons for cold coming in from the street is the presence of a wooden door to the balcony. Moreover, if you take the wooden canvas itself, it holds air perfectly. But, unfortunately, such doors are usually made of thin panels. And in some cases, they generally install a canvas that can be used exclusively for interior doors
Therefore, when deciding to insulate a room, it is necessary to take into account what specific door defects the work will be aimed at eliminating. It could be:
- Sealing joints.
- Insulation of the canvas itself.
- Sealing of slopes.
Depending on this, both the methods used and the materials needed may differ.
What you will need, materials and tools
When deciding how to insulate balcony doors with your own hands, you should take into account that maximum efficiency can only be achieved when complex work is carried out. So, we will need:
Insulating a wooden balcony door will help keep the room warm
Insulating a wooden balcony door will help keep the room warm
- Insulation. This material will differ depending on its purpose. So, to insulate the door leaf you will need foam rubber, for the slopes you will need polystyrene foam or mineral wool, and for the joints you will need a regular sealant (can be purchased at any hardware store).
- Wood putty.
- Door upholstery (can be made of leatherette).
- Consumables.
- Construction mixtures.
Also, the following construction equipment will be useful:
- Level.
- Spatulas.
- A set of standard construction tools.
- Wallpaper knife.
- Roulette.
The set of tools and materials may vary depending on what kind of insulation work is planned.
How to perform the work, a brief step-by-step description
How to insulate a wooden balcony door with your own hands? To do this, it is important to understand that the essence of this procedure mainly comes down to eliminating the unimpeded penetration of cold air into the room. To do this you need to do the following:
- We remove the old paint, conduct a quick inspection of the door leaf and determine for what exact reason cold air is penetrating into the room. Carefully seal the cracks between the panels with putty.
- We remove the door leaf. We unscrew the handles, hinges and other fittings from it. Lay the door leaf on a flat surface. We take the upholstery and attach it to the canvas on one side. The size of the upholstery should be slightly larger than the size of the insulated part of the door. To do this, we use special nails with a wide shaped head (usually included with the upholstery material).
- Next, we fix the foam rubber around the door area.
- We begin to pull the upholstery onto the door. To do this, we fix it from the fixed edge. The distance between the nails should be about 15-20 cm. We turn the edges of the upholstery so that the place where the fabric is cut is on the inside. Insulation of a balcony door in this way can be carried out either on one external side or on both.
- Then we take the foam rubber and cut three strips from it, the width equal to the thickness of the door. Two strips in length should be equal to the width of the door, the third - its height. We prepare three strips of leatherette the same length as the foam rubber, and about 10-15 centimeters wide. We nail leatherette on three sides along the edges of the door.
- For additional compaction, we roll up the rollers, wrap the cut foam rubber with strips of dermantine, and attach them to the door using furniture nails so that they cover the gaps between the frame and the canvas on three sides.
- After completing this work, the canvas can be installed back. If necessary, apply sealing tape to the joints. But in most cases it will not be needed if the upholstery work is done correctly.
- If the door has glass, then window putty can be useful to seal the cracks, and energy-saving window film can be applied to the glass itself.
What are plastic window trims and how do they affect insulation? You will find the answer on our website.
Indications for insulation
Door insulation serves several purposes:
- First of all, this is to prevent heat loss. The bathhouse is especially susceptible to heat loss. It is always very hot in the steam room, and in winter, with a sufficiently large temperature difference, heat loss increases significantly.
- Protecting the door from drying out and rotting. A simple wooden door will begin to increase and decrease in size under varying humidity conditions. This will affect the door frame. As a result, situations often occur when the door simply stops closing or opening, and mold forms on the surface of the door leaf
- A big problem with wooden doors is drafts. Especially above the floor of a steam room without door insulation, a cold breeze will always be felt. This is unlikely to result in illness, but it will certainly ruin your vacation in the steam room.
It is necessary to insulate the doors in the bathhouse when there is heat loss.
Therefore, it is definitely necessary to insulate the door to the bathhouse. To simplify the process, the door to the steam room and the dressing room are insulated according to the same scheme.
Simple and ingenious - energyflex!
Here is the easiest and fastest way to insulate the entrance door to the bathhouse. This design is inherently very simple - it's all about the material itself.
So, you will need to insulate the pipes from Energoflex. It must be pressed along the edge of the door - but only lightly, so that later the doors close without problems - and secured with a construction stapler. After that, metal slats are screwed onto all this so that nothing falls off later. That's all - the whole job will take a maximum of 10 minutes, but it turns out quite effectively - the pipe will spring from the surface as needed, and will even bend if the door is not too level. And it will be quite easy to repair such insulation if it is scratched by a cat.
What happens if you don't insulate your doors?
I will share the experience of friends who let everything take its course in their bathhouse. They did everything beautifully, without thinking about frost or cold weather.
Any tree swells from contact with water, these are the laws of physics. During the cold winter season, frost forms on the doors. The doors do not close and are covered in ice. The long-awaited warmth arrives, the ice melts, the doors absorb moisture and swell so much that they can no longer be closed.
Spoiled wood begins to rot, and mold and rot form. In the bathhouse there is not the aroma of a broom and the heat of the bath, but the persistent aroma of old age and disrepair.
Don’t be lazy, take the time to insulate your entrance doors, because they are the main protection not only from prying eyes, but also a barrier to the winter cold!
Well, who doesn’t like to take a steam bath? Bath procedures are unlikely to ever lose their relevance, especially in cloudy and cold Russia. What could be nicer than taking a dose of warmth in winter? In order for a visit to the bathhouse to be absolutely comfortable, it must be built taking into account all the requirements. Insulating the door in a bathhouse is an important stage of construction; it determines how well heat will be retained inside the room. Today we will talk about how to insulate the doors to the bathhouse. Here you will find step-by-step instructions and useful tips.
What to do if the problem is in the door frame
A rotten door threshold or the formation of gaps between the logs and the door frame also provoke the penetration of cold air into the dressing room. The cracks can certainly be sealed without any reconstruction of the box. But if the reason is more serious, then the door frame will have to be partially or completely replaced.
To do this, the door leaf must be removed and the rotten element of the frame must be sawed in half: the top beam, threshold or side posts are sawed across and the fragments removed from the frame, being careful not to damage the mounting pins. After this, a new part is made and the damaged one is replaced.
The structure of the box and the bathhouse itself are not dangerous and the work cannot affect the integrity of the structure, so you can work slowly and without fear.
Ensuring good thermal insulation of a bathhouse is not only a comfortable stay, but also a guarantee of energy efficiency, since heating a high-quality bathhouse requires much less resources than heating a poorly insulated room where heat loss is inevitable. If necessary, during the warm period you should insulate not only the door, but also the walls, ceiling and floor of the bathhouse.
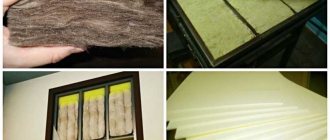
Insulation materials and their properties
There are special requirements for materials for insulating bathhouse doors:
- First of all, the thermal insulation material must be resistant to high temperatures. There is always hot air in the steam room, which enters the dressing room. There are a number of insulation materials that in normal situations behave more than adequately, but at elevated temperatures they begin to release harmful substances into the room. These include most mineral wool slabs.
- The requirement for moisture resistance of the material is also important. No matter how you protect the insulation, water will still find a way to get into the thickness of the material and destroy it. Therefore, you cannot use materials like foam rubber for insulation. But the moisture resistance parameter is fully met by polystyrene foam.
- The last factor is vapor permeability. Any tree must breathe and a wooden door to a bathhouse is no exception. Complete moisture insulation will cause the wood to begin to rot and the door will quickly become unusable. Among other tasks, insulating the door should maximize the service life of the structure.
Among the suitable materials are the following options:
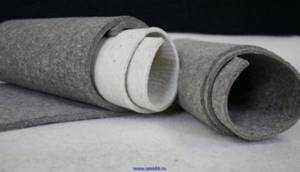
- Felt. An ideal material because it meets all the above requirements. At the same time, the insulation is environmentally friendly. But there is a huge disadvantage: natural felt is not cheap, and the market is filled with its synthetic substitutes. It is strictly prohibited to use material even with a minimal admixture of synthetics; such an analogue can catch fire from one spark.
- Mineral wool basalt slabs. This option meets all the stated requirements, while being inexpensive and easy to install. But in such situations there is always a “but”. Recent research by scientists has shown that when heated, insulation releases harmful substances. These studies have not yet been confirmed by a large series of experience; accumulation of information is required, so you should not discount mineral wool slabs. Whether to use this material or not is the decision of the bathhouse owner alone.
- Izolon foil. Today it is the most popular material in Russia for insulating bathhouse doors. This is an affordable insulation material, easy to install and easy to use. This material has no negative aspects in a particular situation. Izolon cannot be used for external insulation, but we are talking about internal structures, so this drawback is not critical.
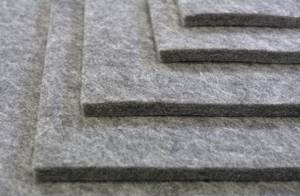
Felt is one of the materials for insulating doors in a bathhouse.
Glass wool based materials should not be used. This is a rule that cannot be broken. Insulation based on glass wool is a rather capricious material; it is better not to use it in recreational facilities such as bathhouses. It is very difficult to get rid of glass dust, which is a natural product of the installation process. After installing the insulation, glass dust will continue to cause inconvenience for a long time, remaining on the wooden floor of the steam room. The main criterion for choosing from the presented insulation materials should be the price. Insulation should be as cheap and accessible as possible. If you are hesitating between felt and isolon, it is better to choose a material that is cheaper in the construction region.
Which material to choose
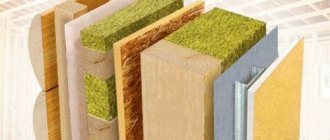
The modern market offers many types of thermal insulation materials:
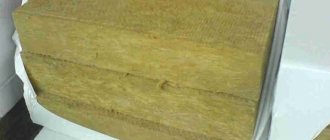
- mineral basalt wool;
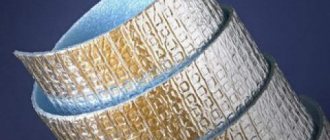
- staple fiberglass;
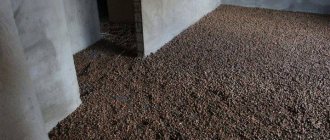
- hardboard;
- expanded polystyrene, etc.
Which one is better to choose for a bath? One of the main criteria is fire safety. The insulation must be highly resistant to fire and not emit harmful substances when heated.
Vapor permeability also matters. We must not forget that the door, like the bathhouse itself, is made of wood, and this is a natural, “breathable” material. If air access is blocked on at least one side, the wood will become damp and rot, and this will significantly shorten its service life. Therefore, it is extremely undesirable to use adhesive-based polystyrene foam boards for baths.
It is also necessary to pay attention to the weight of the material. The insulating structure should not exert significant load, otherwise the door leaf may warp.
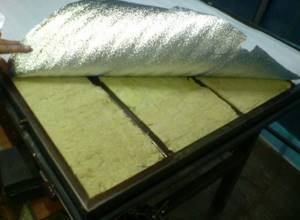
One of the best options based on the above requirements would be foil-coated polyethylene foam. It is a lightweight, non-flammable material that can reflect heat back.
Methods and technology for insulating a door block in a bathhouse
There are only 3 methods and technologies for insulating a door. Each of them has its own advantages and disadvantages, so it makes sense to talk about each option in more detail.
Additional wooden frame
An additional wooden frame is a design that is aimed at combating the main source of heat loss - heating of incoming air and drafts. The point of modernization is to reduce the distance between the door frame and frame as much as possible.
To do this, perform the following steps:
- The platbands are removed, and felt is laid between the platbands and the wall. Instead of removing the box, you can install an additional one. To do this, you just need to lay felt over the entire area of the door frame, and then cover it with a second layer of platband. The felt is nailed down with a construction stapler.
- The pie made from platbands must be covered with facing material: slats, clapboard or fiberboard
- The door is adjusted to the new dimensions of the casing
- The space between the door and the platband is laid with strips of felt or rubber sealant. The main task is to get rid of drafts
Thermal curtain
A thermal curtain is more of a temporary solution than a real solution to the problem of drafts and heat loss. The curtain is used in regions with particularly low temperatures in winter or as a temporary shelter in newly built baths. In essence, it is just a curtain made of heat-insulating fabric: leatherette or felt.
To arrange a curtain, you need the material itself, a block or baguette on which the material is hung.
There are two arrangement options:
- In the first case, simply nail the fabric to the block with a lath, or use the bar itself to press the fabric against the wall. Thin nails are used to press the strip. The advantage of this method is more efficient heat retention. The curtain will close on its own after entering the steam room. The disadvantage is obvious: entering the room will be extremely inconvenient.
- The second option is to hang the canvas on rings, which in turn are placed on a baguette. It's more convenient, but not as productive.
If we are talking about a temporary curtain, then it is better to use the first option, since temporary inconvenience can be tolerated for the sake of thermal efficiency.
But talking about constant discomfort when going to the steam room is stupid, so the second option is often used as a permanent solution.
Double chamber door
A two-chamber door or double door is the most popular and technologically advanced way to insulate a bathhouse door. The point is to replace the door leaf with a cake in which the insulation sheets will be sandwiched with fiberboard slabs.
To make a two-chamber door you will need:
- Fibreboard boards
- Bars for creating a frame. The width of the bar must correspond to the width of the insulation sheet. The same value is the future thickness of the door
- Insulation
- Nails or self-tapping screws for securing fiberboard sheets.
- Door fittings: hinges and handle.
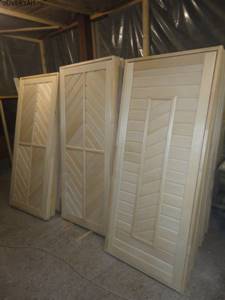
Double chamber door to the bathhouse
First, a frame is created. As a rule, these are just bars around the perimeter of the door with one lintel in the middle. A sheet of fiberboard is attached to the frame on one side. The space between the bars is filled with insulation, and then the pie on the other side is covered with the same fiberboard. Additional insulation of the door around the perimeter will allow you to forget about the cold and drafts in the steam room forever.
To summarize, we can say that insulating the door to a steam room or dressing room is a fairly simple task
It is important to choose the right material and carefully carry out insulation. But implementing even the most complex decisions does not present any particular problems
Popular insulation methods
The following are considered popular methods of insulating a bathhouse door:
- arrangement of a thermal frame;
- thermal curtain;
- replacing the door with a two-chamber one;
- complete replacement of the canvas along with the box.
Thermal frame
Thermal frame refers to a method of insulation when the door leaf is covered with felt or insulation. The edges of the material protrude 1.5–2 cm beyond the edge of the door and, when closed, cover the gaps between the door and the frame.
The step-by-step process looks like this:
- A sheet of hardboard, a special moisture-resistant fiberboard, is nailed onto the door leaf on the side where the opening occurs with small nails.
- One or two layers of felt or isolon are laid on top of the fiberboard. When cutting, allowances of 5 cm are left above the height and width of the canvas in order to make a sealing roller.
- Wooden blocks with a cross-section of 15x20 mm are prepared so that they can be used to create a frame around the perimeter of the canvas with an indentation of 15 mm inward.
- Nail the insulation with prepared bars.
When closing the insulated structure, the rollers will block the gaps between the door and the frame. The canvas itself is also insulated.
Thermal curtain
The thermal curtain creates an air chamber that prevents the rapid movement of hot air from the steam room. The picture shows the general principle of the thermal curtain design.
Production will take no more than half an hour:
- A canvas is cut out of a dense material, such as tarpaulin, the parameters of which exceed the size of the door frame by 15–20 cm. Hinges are made every 15–20 cm.
- Stretch the cable or wire, passing it through the loops, over the upper jamb of the opening.
- The edge of the curtain on the side of the door hinges is nailed to the wall, this will help to adjust the curtain less often.
- By additionally insulating the fabric, energy saving is improved.
Installation of a two-chamber door
If you have carpentry skills, bathhouse owners advise making a two-chamber door. Advantages of the design: does not dry out, retains heat better, is easy to manufacture.
To work, you will need the simplest carpentry tools: a hacksaw or jigsaw, a plane (electric or manual), a hammer, a corner, and nails.
The operating procedure is as follows:
- Two frames are made according to the size of the opening. The boards are pre-planed to a thickness of 15 mm.
- The frames are fastened to each other by laying a sheet of hardboard between them.
- On each side, the frames are filled with insulation of the appropriate thickness and upholstered with a finishing layer, for example clapboard.
At the last stage, hang the canvas on the box.
Installation of the thermal circuit
The thermal circuit is considered an effective method of insulation if the door leaf is in good condition and the heat leaves the steam room into the gaps between the door and the frame.
Rollers are made from any suitable material (leatherette in the photo).
When closing the door, press the roller against the gap, thereby closing the path of air movement.
Replacing the door frame
Replacing the box is a step taken in extreme cases when repair is impossible.
Procedure:
- Dismantle the old box by sawing the upper or lower beam of the frame with a hacksaw (jigsaw). Next, using a nail puller, remove the vertical parts.
- A sample is made under the door using beams of suitable cross-section. In this case, you will need a manual router. A simple option is to buy ready-made bars with samples.
- The strapping (box) is made according to the size of the canvas.
- The box is installed, the cracks are sealed with heat-resistant foam or tow.
- Hang the door leaf.
- Cashing in.
Adviсe
Experts have prepared several useful recommendations.
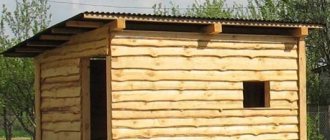
To ensure maximum comfort in your bath room, you should pay attention to some recommendations from experienced professionals. For example, it is better to install a sauna on the south side, since in winter, when you sometimes want to take a steam bath, it will be easier to get to the entrance due to the fastest snow melting on the side closer to the south
In addition, it will be preferable if the windows face west, since in the evening the room will be illuminated by rays for much longer. Also, for constant air circulation and excellent heat maintenance, it is recommended to build a bathhouse from wooden logs.
Additional Tips
If you need to keep the heat in the steam room, you should not make the doors too high and wide - this will limit the leakage of steam and warm air from the inside and the access of cold air from the outside.
If you need to quickly insulate a door with your own hands, it is permissible to use sheepskin, felt or a wool blanket.
High-quality, professional insulation of the dressing room will be ensured by the installation of a massive two-chamber door with internal insulation.
A reliable door to a bathhouse, made with your own hands from wood or other material, not only serves to retain heat inside the building. This is also an element of the overall design, which must meet the aesthetic needs of the owner. The choice of material for a bath door needs to be given special attention: the entrance can be made of treated tongue-and-groove boards or lining, lined with insulation. Internal doors do not need thermal insulation properties, therefore both wooden and glass doors to the steam room are considered equally good.
Interesting ideas for a bath
The interior of a bathhouse is a complex issue, requiring a special approach and good imagination. The most popular idea for decorating a bathhouse is the purely Russian style with a massive table and round wooden logs. To decorate the walls, they resort to a variety of forged elements or oak and birch brooms. This will add significant color to the interior of the bathhouse, bringing its appearance closer to the face of antiquity. Lovers of modernity can install a billiard table, arrange a “smoking room” or even a swimming pool, which directly depends on the total area of the bathhouse.
There is a whole variety of materials for finishing a bath that must meet the following requirements:
- Resistance to temperature changes and high humidity, which is the most important aspect when choosing any materials for the construction and arrangement of bathhouses.
- Hypoallergenic, safe for health. Materials must be chosen that will not leave burns on the skin, cause harm, or release toxic substances.
- Attractiveness. The aesthetic design of the premises and a well-chosen interior will attract glances, pleasing the eye.
- Hygiene. The selected material should be easily susceptible to cleaning agents, without entering into chemical reactions with them.
- Strength and durability. The materials must be expensive and of high quality so that the bathhouse remains in excellent external and functional condition for a long period of time.
As for the steam room, it is primarily recommended to decorate it with hardwood, which does not become so hot that one could easily get burned. In addition, they dry quickly, as a result of which fungus does not develop on the surface.
- A good example is the linden tree. This material is characterized by a relatively low heat capacity and, as a result, it heats up quickly, but it cannot be burned upon contact with the skin.
- Aspen is a strong, durable and high-quality material characterized by bactericidal properties.
- Alder is very pleasant to the tactile sensation, it is resistant to water of different temperatures - both cold and hot. This material is not inclined to react with either alkaline or acidic cleaning agents, so it can be called unpretentious in maintenance.
- Another recommended material is abash. This tree comes from hot Africa, from its very tropics. Abash is practically not inclined to heat up even at very high temperatures and become darker under the influence of various factors.
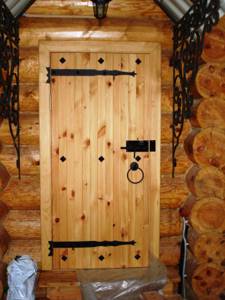
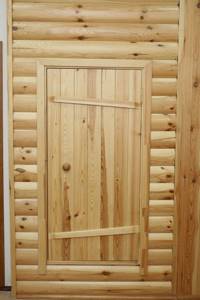
For log doors to the dressing room, coniferous trees are an excellent material, since the room is not hot, but retains heat.
- For example, one of the most popular materials used to decorate carved doors in a dressing room is pine. Even if it is capable of changing color a little over time, its advantages will remain cost-effectiveness, high strength and environmental friendliness.
- Fir and spruce are materials that practically do not differ in characteristics. One of the common features, besides durability, is that they do not release resin.

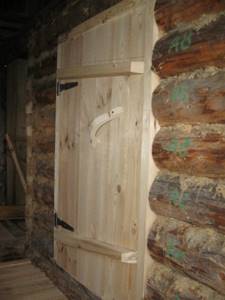
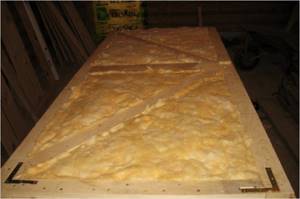
Step-by-step instructions for making a wooden door
An amazing fact: many bathhouse attendants notice that the bathhouse doors they made themselves have served faithfully for many years, and there is not a trace of deformation on them, but just expensive works of art purchased from companies for a lot of money with a quality guarantee “especially for the Russian baths" begin to lose their appearance already in the second year. And all because when something is done for oneself, it is always done according to technology, without saving material and certainly without any hackwork. But no one will be responsible for the conscientiousness of workers in the basement of some company. And as a result, it turns out that a beautiful door that smells pleasantly of wood, the next year after drying, begins to “delight” with serious cracks and loss of shape.
So, the most optimal door dimensions for a do-it-yourself bathhouse are 1.8 m x 0.7 m. Good wood for these purposes is alder, aspen and linden. If only coniferous species are available, then they must be processed so that the resin does not release later.
To make one, follow these instructions:
- Step 1. Planed boards of good quality, 5 cm thick, are prepared. These can be tongue-and-groove boards from the store, or home-made, but with the selected tongue.
- Step 2. The boards are laid out in a row and leveled. The most rational way to pad them is with PVA sizing.
- Step 3. As soon as the canvas of boards has dried, marks can be applied to the grooves. By the way, the grooves themselves need to be made in the form of a truncated cone. Their optimal depth is half or a quarter of the board, the base of the groove is 5 cm in diameter, the top part is 35 mm.
- Step 4. Now you need to select the grooves - according to the marks. A reward saw will help with this. Using it, you need to make two cuts - at an angle of 45˚, with a depth of a quarter or half of the board. And so that the cutting angle is the same everywhere, a block is attached near the groove - planed at the same angle.
- Step 5. Use a chisel to remove the wood between the cuts and install dowels - these are 5 cm thick bars. However, you can make it thicker - it will only make the door better.
- Step 6. The door is assembled with keys, and everything is checked for geometry and tightness. Why would it be possible to remove the keys and eliminate all the shortcomings.
- Step 7. The keys are punched into the grooves - dry or with glue, and their ends are cut into a cone.
How tight and reliable the fit of the boards and dowels on the glue is - that is how long the door for a bathhouse made by yourself will last.
Materials
Inside the bathhouse, only wooden and glass doors are used, and metal and plastic are also used for the entrance.
At the entrance to the bathhouse, you can install a door made of plastic and double-glazed windows to provide the dressing room with additional natural light
Glass
A glass door looks impressive, especially if there is a pattern on its surface, but it is impossible to make it at home: this requires tempered glass with a thickness of 8 mm or more.
A bath door made of solid glass usually uses frosted or tinted glass
The only thing you can do with your own hands is to install a finished door.
At the entrance to the sauna you can install a glass door with a magnetic lock
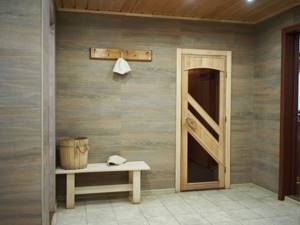
A door made of glass inserted into a wooden frame is safer and more reliable when used in a steam room.
Tree
You can completely make a bath door yourself in a home workshop only from wood: the material is accessible and easy to process. You should choose those types of wood that are most resistant to rot and absorb the least amount of water. These are oak, ash, larch, pine and spruce.
Resin from coniferous trees does not cause any trouble - it is released in small quantities and is easily removed.
By using coniferous wood, you will no longer have to worry about the door warping
You can use different lumber to make a door.
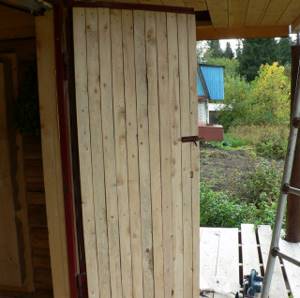
Thick tongue and groove boards
The easiest way to make a door is from tongue-and-groove boards: they are easily assembled into a shield, around the perimeter of which a timber frame is made.
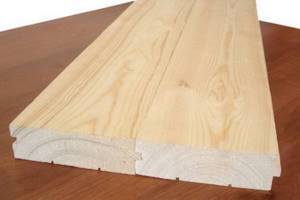
The canvas, assembled from tongue-and-groove boards, is strengthened with crossbars, then the surface is processed
Such a bath door is usually attached with crossbars - dowels that prevent deformation of the panel.
Two crossbars are cut into and slightly recessed into the door leaf, then glued
Also, to strengthen the structure, fastening boards are nailed diagonally.

There can be several fastening diagonal boards: they are laid out in a pattern across the entire door leaf
For a Russian bath with wet steam, a massive door is best suited.
Lining
It is used in two cases:
- To make a frame door, the frame is assembled from bars, and the lining is used as cladding. The cavity of such a door is filled with a heat insulator, so it turns out to be very warm.
- For decorative door trim made from low-grade wood. This makes it possible to reduce the cost of door production: the door leaf is assembled from boards of cheap wood, and resistance to temperature and humidity is ensured by clapboard cladding, for example, made of oak.
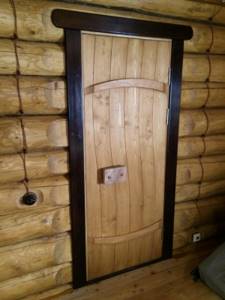
Curly inserts
Doors assembled from such elements are called paneled. But the doors are made of panels:
- quite difficult to manufacture;
- are more likely to become deformed due to temperature changes.
Therefore, you should only take them on if you have sufficient experience in carpentry, and install them at the entrance to the bathhouse or relaxation room, but not to the steam room.
The paneled door is beautiful, but difficult to make with your own hands
Fabrication
The simplest version of a door to a steam room with your own hands is a shield made of solid wood. To make it, you need to select tongue and groove boards and lay them out on a flat surface. At the ends there are curved stripes - traces of the annual rings of the tree. Adjacent parts should be positioned so that the direction of the rings is opposite to each other. This way the door strips will not be damaged by moisture.
The grooves of the boards and their protrusions must be connected so that a minimum gap remains. Cut 2 bars, the length of which is equal to the width of the door leaf. The bars are mounted on a board panel at the top and bottom of the structure. The connection can be made in different ways:
- Place the block on the surface of the boards in the transverse direction. Fasten with self-tapping screws, screwing them in from the side of the block so that there are no traces of fasteners left on the front side. Sometimes they do it differently and drive the fasteners into the front side of the door, recessing the heads into the wood. The recesses are covered with a special composition of glue and small sawdust. For the strength of such a structure, it is advisable to install a jib located diagonally between 2 parallel sections of the bar.
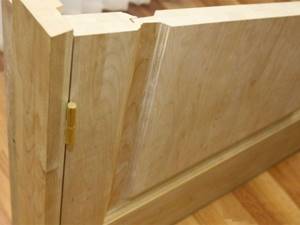
- Connection without fasteners is more difficult. To make a canvas, connect the boards and place a 5x5 cm block on top, cut on both sides. Its profile resembles a trapezoid. The narrowing is 1.5 cm and is performed smoothly along the entire length of the part. Draw lines on the canvas corresponding to the profile of the bar. Cut out a groove, deepening it by ½ the thickness of the block and observing the angle of inclination of the side surfaces. Remove the wood from the groove with a chisel and level the surfaces. Push the bars in from the wide side of the groove. In a room with high humidity, the mount will not dry out.
From lining
To assemble a door from a lining, you need boards at least 2.5 cm thick, with selected quarters on the sides facing the inside of the panel. The length of the vertical bars of the strapping should be equal to the height of the canvas, and the horizontal bars - to its width. Connect the frame parts using the half-timber method, selecting part of the wood at the ends of the planks. Lubricate the recesses with glue, connect the parts and tighten them with clamps. After drying, drill through holes and insert wooden dowels into them using glue.
Cut the lining into equal sections. Their length is equal to the distance between the boards in the selected quarters (vertical or horizontal). Cut off the side with the groove at the outer lining, and place the part in the frame, in the groove of the selected quarter. The remaining elements are joined, pressing the tenons tightly into the grooves. Cut the last board so that it fits tightly into the remaining gap. Attach a wide glazing bead around the perimeter of the frame.
Frame-panel
When making such a sheet, it is worth considering that in order to insulate it, a heat-insulating layer must be placed inside the door. Therefore, you need to prepare an EPS sheet or other material in advance. Make the frame from a 3x3 cm block:
- choose ½ thickness at the ends for a length of 3 cm from the edge;
- connect long and short bars into a frame, placing the selected parts on top of each other so that the joining surfaces form one plane;
- screw the screws into the joints of the planks;
- make 1-2 transverse spacers, choosing a groove in the long planks in the same way as at the ends.
Insulation
If the entrance door to the bathhouse is made of boards or lining, then it must be insulated to reduce heat loss during heating. For insulation, felt, batting or polyethylene foam is used. The material must be measured according to the size of the door, cut and secured to the canvas with furniture staples or nails, leaving free edges at least 5 cm wide.
Leatherette is good for door trim. The material is cut in such a way that the edges can be folded under the insulation by 2-2.5 cm. To ensure that the upholstery lies flat, the material must be fastened from the middle. The fasteners are decorative upholstery nails with large heads. To form a convex pattern between the nails, you need to pull the line tight.
Along the perimeter of the door you need to attach leatherette rollers, inside of which there is insulation. The edges of the rollers are nailed to the door with decorative nails in small increments (5-10 cm). The seam can be made decorative: hammer nails tightly, in 2 rows, in a zigzag, etc.
Installation
The door frame is installed using anchors if the bathhouse is made of concrete or brick. The box must be fixed in the opening with wedges, aligned vertically in two planes. Check the horizontality of the threshold and the top bar. Drill 2 holes in the sides for the anchors and insert the fasteners. Fill the gaps with polyurethane foam.
If the bathhouse is made of a log house, then on the inside of the sidewalls you need to make a groove for the previously installed casing. To do this, parallel cuts are made, and the wood is selected with a chisel. The box is attached to the beam, and not to the logs of the log house. The threshold and top cross member must be nailed to the casing strips. This design of the doorway in the bathhouse is not ventilated, and the gaps cannot be foamed.
After installing the frame, you need to hang the bath door. When using shaped hinges, the blade should be installed in the opening and secured with wedges to obtain a uniform gap of 2-3 mm around the perimeter. Attach the hinge bracket to the frame with nails or self-tapping screws, and the shaped strip to the canvas.
If the hinges are overhead, then you will need to make recesses for them on the edge of the canvas and in the vestibule. Attach the hinge cards in the recesses so that they do not protrude above the surface of the wood. The pin parts are fixed on the frame with the pins facing up, and the mating part is fixed on the canvas.
Finally, platbands are attached around the box, which cover the junction of the wall and the box. Door handles are placed at a comfortable height. If necessary, install a padlock, latch or hook for locking.
The door to the bathhouse should be as airtight as possible and have low thermal conductivity. Modern tempered glass products are airtight and beautiful. These can be seen in saunas. But a simple wooden structure will not be able to cope with the task of preserving heat. It will dry out and let the cold into the steam room. It is necessary to perform additional insulation of the bathhouse door. Our experts will tell you in this article how to insulate a bathhouse door with your own hands using various methods. The information will be useful to beginners and experienced professionals.
The door to the bathhouse must be insulated.
We insert a door made of impact-resistant fireproof glass into the bathhouse
Glass doors are quite specific, so making them yourself is very difficult, since this requires certain skills. Therefore, they will have to be ordered from the workshop. But you can install them yourself.
Glass selection
There are several types of glass doors. Modern convenient pendulum designs can open in two directions. Usually a magnetic closer is installed on such a door, which helps the structure close more smoothly.
Fireproof glass doors in the steam room
Traditional swing doors open only in a certain direction, and installation is carried out in a wooden frame using durable hinges.
The canopies are made only of stainless, anti-corrosion metal, and the handles (brackets, coupes or knobs) and the box are made of non-coniferous wood.
Stainless steel hinges for glass door
The thickness of impact-resistant glass should not be less than 7–8 mm, since the temperature in the steam room is quite high, which the glass sheet must withstand.
If necessary, the transparent canvas can be made matte using a special sandblasting machine. In a specialized workshop such work will be carried out in the shortest possible time.
Frosted glass doors with a pattern
Glass doors must be installed only before the walls are finished, and the tighter they fit to the frame, the less heat loss there will be in the steam room.
When choosing a glass sheet, it is necessary to take into account the future conditions of its operation. Fireproof impact-resistant glass can be of three categories: A1, A2 and A3.
The best option would be doors measuring 1900x700 mm, category A3. They can withstand an impact of 3382 kgf/m and a fall of a human body from a height of about 10 meters. Such characteristics are achieved thanks to a special hardening process, in which the glass mass is softened, changing the state of the crystal lattice. During its subsequent cooling, residual stress is formed on the surface of the glass, which increases the heat resistance and mechanical strength of the product.
Material calculation
To install a glass door, you must prepare all the necessary materials.
- Cloth made of impact-resistant fire-resistant glass.
- Linden timber - 42x80 mm.
- Stainless steel hinges.
- Wooden fittings.
- Closer.
- Silicone seals.
- Platbands.
- Fasteners.
- Thermal insulating and water-repellent material.
- Impregnation for wooden elements.
Step-by-step instructions for making a glass door
- We assemble a wooden box without a threshold, so that there is a gap of about 5–7 mm between the floor and the canvas. This is necessary so that the door can move easily.
- We install the door frame, observing the exact geometry so that the glass sheet can fit into it accurately. We level it and fasten it to the wall with special anchors. In order to subsequently align the box, its dimensions should be slightly smaller than the door opening.
- We fill all the gaps with foam, and when it dries, we cut off any excess with a knife.
- We place silicone insulation in the grooves of the box.
- We mount metal hinges on the glass sheet in holes specially made for this purpose. We place silicone gaskets under the hinges.
- We expose the canvas and screw the hinges to the jamb.
- Then we attach the handles with silicone gaskets to the holes provided by the manufacturer.
- We close all the gaps between the opening and the frame with platbands.
- We treat the box with special impregnations, and then cover it with waterproof varnish.
Video: how to install glass doors in a bathhouse
Only through proper installation of wooden and glass doors can you count on their long service life. A bathhouse is a specific structure, inside of which there is often high temperature and humidity. And since wood is subject to deformation, it is necessary to be precise and careful when installing doors made of this material.
Construction of a drain for a Russian bathhouse with your own hands How to insulate the ceiling in a bathhouse
Category: Construction and repair