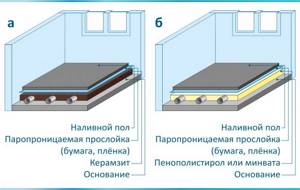
Which insulation to choose
The parameters for choosing an effective insulation under the screed must meet the following requirements:
- light weight;
- fire resistance;
- environmental friendliness;
- resistance to rotting;
- ease of installation;
- good thermal conductivity;
- affordability.
The most commonly used types of floor insulation are the following materials:
- foam plastics;
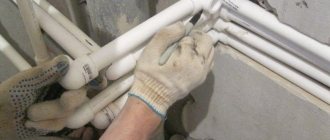
- polyurethane foams;
- mineral wool;
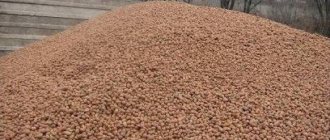
- expanded clay;
- sheet foam.
Which one is better to choose?
Today, when insulating floors under concrete screeds, penoplex is most often used. This insulation has high strength, as well as a number of other characteristics that make it so popular:
- does not absorb water, does not allow steam to pass through;
- resists mechanical damage;
- ease of installation and handling;
- does not respond to the influence of chemical components;
- does not emit harmful components into the atmosphere and is completely safe for human life.
The installation process with penoplex is quick and easy. You need to lay out the insulation sheets on the floor surface, and then secure them with glue. At the same time, make sure that there is no gap between the plates of material. All installation must be carried out end-to-end.
When the installation has been completed, you can apply another layer of insulation. Using penoplex, it becomes possible to refuse waterproofing, because the material has clear indicators of this parameter. Then you can move on to finishing.
On the video, which insulation is better for the floor under the screed:
You can insulate the floor under a concrete screed using rolled materials. Read more about roll insulation for walls and floors in our article.
The most common and accessible types are:
- cork mats;
- isolon or penofol.
Thermal insulation of concrete floors is based on the use of cork mats and underlays. These materials serve as a kind of addition to the existing insulation. But they cannot act as an independent heat insulator. Cork mats are produced with a thickness of 3-10 mm, thanks to which installation can be carried out under any covering - laminate, parquet.
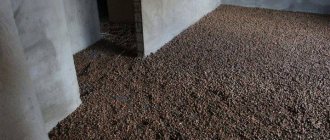
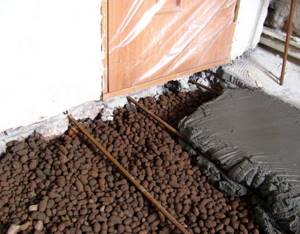
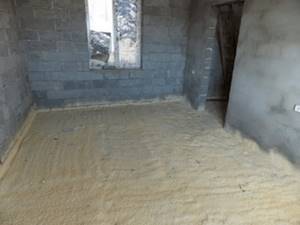
Using expanded clay under floor screed
Expanded clay has a number of positive properties - fire resistance, environmental friendliness, and relatively low weight. The material is quite fragile, so care and precision are required when filling it under the future screed. Destroyed granules lose their thermal insulation properties.
In rooms with low ceilings, the use of an expanded clay pillow will increase the field level by at least 15 centimeters.
A smaller thickness of expanded clay will not provide sufficient strength characteristics of the floor. In addition, expanded clay should be protected with water-repellent compounds or special materials for waterproofing - the material absorbs moisture well. It will be necessary to reinforce the layer of expanded clay insulation before laying the screed. The advantages of expanded clay include its low price.
Materials for screed insulation
When deciding which type of insulation to choose, keep in mind that for each type of construction in a certain climatic zone, the material for the floor screed is selected individually.
Expanded polystyrene and foam plastic
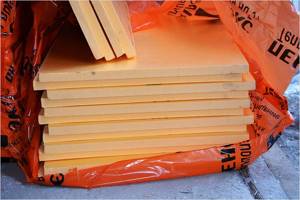
Penoplex
Recycled material (recycled polystyrene foam). Used in construction and repair work. It has high compression resistance, does not decompose, and is practical to install.
In addition, among the advantages of expanded polystyrene it should be noted:
- prevalence;
- cheapness;
- low thermal conductivity coefficient.
The disadvantages include:
- low fire resistance;
- low porosity (which promotes moisture accumulation on the surface);
- long period of decomposition (causes significant harm to the environment);
- the presence of impurities, the evaporation of which is harmful to health.
Despite the fact that manufacturers indicate the service life of polystyrene foam is 50 years. The first signs of wear appear much earlier.
Used for floor insulation and foam. Its peculiarity is that it can “play” when installed. Cutting it in places under which there are voids helps to avoid this. However, it will still not be possible to achieve a perfect fit of the foam to the floor surface.
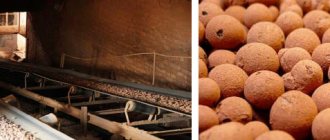
Expanded clay
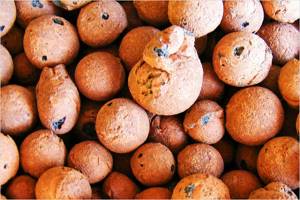
Eco-friendly and natural material, which is made from clay-based composites. It is the most suitable option when it comes to insulating the floor on the ground. Since this type of insulation undergoes heat treatment (firing), it is durable. By varying the size of the granules, you can select the required level of thermal conductivity. In addition, this material is an excellent soundproofing material.
The advantages of expanded clay include:
- prevalence;
- low cost;
- porous structure;
- environmental friendliness;
- durability.
Of the significant drawbacks, we note one - in areas with a predominantly cold climate, the required layer of expanded clay is up to 15 cm. This height of insulation significantly reduces the area of the room.
Foil insulation
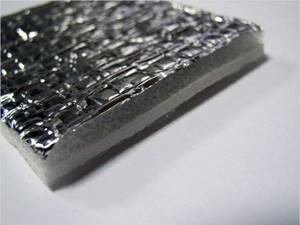
Penofol
Insulation covered with a thin layer of foil. The foil coating can be on one or both sides. It is most often used as insulation of walls and ceilings of rooms, but can also be used for insulation of floor coverings and under a heated floor system.
Despite the fact that this material has good thermal conductivity properties, the use of foil insulation under floor screed is impractical due to the high density of the material. The absence of a porous structure leads to the appearance of condensation, further accumulation of moisture, which leads to deformation of the coating and the appearance of fungus in the room.
Do not forget about the foil coating, which reacts with liquids and chemical elements. The occurrence of reactions with unprotected aluminum entails its destruction.
Foil insulation has the following advantages:
- low thermal conductivity;
- availability;
- lack of water absorption (suitable for insulating rooms and bathhouse structures).
Flaws:
- labor-intensive floor installation due to high requirements for laying a layer of foil insulation;
- lack of natural air circulation;
- flammability;
- destruction of foil under the influence of external factors.
Mineral wool
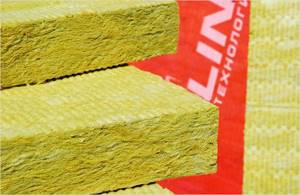
Mineral wool slabs
This insulation is common in various fields of construction. Meets all requirements for reliability and safety. It is an environmentally friendly material, able to withstand high temperatures and changes in ambient temperatures. It has a fairly high density. The use of this type of insulation is possible under various types of screed (dry, wet, under floating floors on which large equipment is installed).
Mineral wool has the following positive characteristics:
- fire safety;
- high thermal insulation performance;
- frost resistance;
- vapor permeability;
- high compressive strength;
- soundproofing properties;
- accessibility;
- ease of use.
But it has the following disadvantages:
- Requires additional space in height.
- Some types of mineral wool (glass wool) require additional insulation due to its flowability.
- In some cases, a waterproofing coating is required (for types of insulation that lose their original properties when exposed to moisture).
Glass wool is rarely used for insulation.
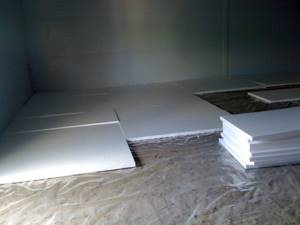
Polystyrene foam as floor insulation
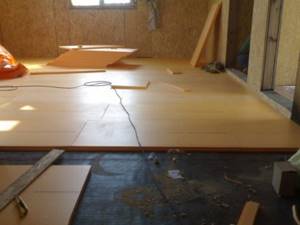
Sheet foam is used as thermal insulation under floor screed. The sheets are laid on the prepared base in a checkerboard pattern, the joints are sealed with tape or putty.
Polystyrene foam can be used for screeding and in the form of granules. To do this, parts of cement and granules are mixed in equal proportions. A solution is made which is used to fill the screed. In this case, the thickness of such a screed must be at least 20 cm. Otherwise, the strength of the coating and its thermal insulation are reduced.
Fixing the foam can be done either with adhesive mixtures or using special disc-shaped dowels.
Polystyrene foam has good thermal conductivity, is a very light material, does not allow moisture to pass through, and is affordable. It can be easily processed and cut with an ordinary construction knife.
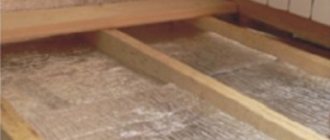
Mineral wool under the screed - an experiment
One of the options for soundproofing the floor in an apartment is mineral wool under the screed or a “floating screed” on mineral wool. We are talking about special high-density mineral wool for soundproofing the floor. For example, Rockwool FLOOR BATTS or TechnoNIKOL TECHNOFLOOR STANDARD.
The question arose: is it necessary to lay a film between the mineral wool and the screed being poured? Manufacturers write in the instructions what is needed. To prevent moisture from the liquid screed solution from getting into the mineral fiber. Even if the soundproofing slabs are not laid tightly, the solution can leak between them and create “sound bridges”.
But there are also opinions that film is not needed. This is due to the fact that if the film is laid, and somehow moisture gets into the mineral wool, it will not come out, or will come out for a very long time. Moreover, if a vapor barrier is laid under the mineral wool. Getting mineral wool wet will negatively affect the sound insulation (and thermal insulation) of the floor.
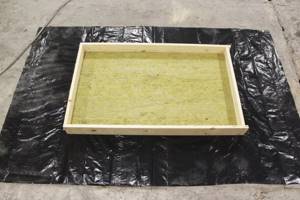
I decided to conduct an experiment - make formwork around a slab of mineral wool, fill it with a cement-sand mixture (screed) on top and watch what happens.
This experiment is not a recommendation or instruction for action when installing this type of screed. It is imperative to take into account regulatory documents and instructions from material manufacturers. And in each case, it is necessary to evaluate the circumstances and technical conditions.
Important: clause 9.11 SP 51.13330.2011 Noise protection. Updated edition of SNiP 23-03-2003: “When designing a floor with a base in the form of a monolithic floating screed and gaskets made of mineral wool, glass wool slabs or mats, a continuous waterproofing layer (for example, glassine, waterproofing, roofing felt, etc.) should be placed over the soundproofing layer. ) with an overlap at the joints of at least 20 cm. There should be no cracks or gaps at the joints of soundproofing boards (mats).
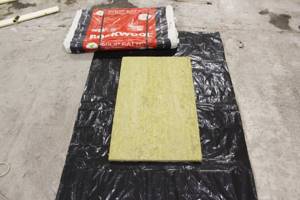
Preparation and pouring of the experimental screed.
I had several Rockwool Floor Butts mineral wool slabs. Additionally, I purchased additional boards for formwork and cement-sand mixture (CPS) brand M150.
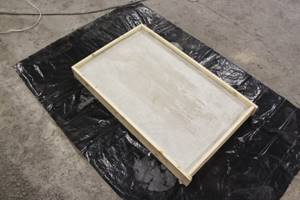
Preliminarily laid a cut garbage bag at the work site.
I assembled the formwork along the contour of the soundproofing slab. I taped the inside with masking tape to prevent the boards from drawing water out of the solution.
Then I laid an experimental screed on mineral wool. Water for kneading was added strictly in accordance with the instructions and without excess.
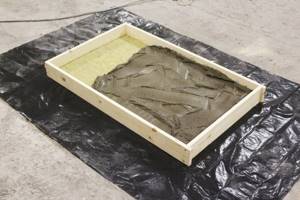
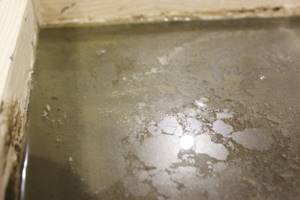
Some time after laying the mixture, water came out from above:
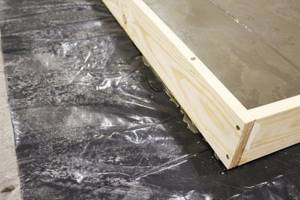
Subsequently, a little water leaked in several places through leaks along the edges of the formwork:
A few days after pouring:
Experiment results.
A few months later I cut the experimental tie.
The section shows a clear separation of the layers. The cement-sand mixture did not saturate the mineral wool slab.
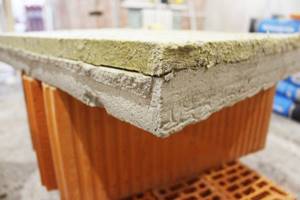
With a little effort, the layers can be separated and you can see how the structure of the soundproofing board is “imprinted” on the screed. In the mineral wool itself there are no fragments of the cement-sand mixture.
Mineral wool under the screed without film. Conclusion.
Thus, from a properly prepared screed, water does not leak down through the mineral wool. On the contrary: water is displaced to the top as the lightest element of the mixture. Leakage of liquid mortar during the installation of a screed without a film can occur between the mineral wool slabs if there are cracks. Or in the area of the walls where the horizontal and vertical sections of soundproofing slabs meet (“wall approach”). In this case, water can saturate the side section of the mineral wool, which will dry out after some time.
Video on this article:
Mineral wool for thermal insulation screed
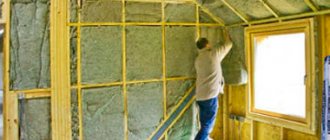
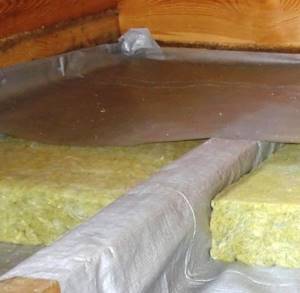
Mineral wool is used quite often as insulation. Moreover, this material has good sound insulation properties. The disadvantage and very significant is the high ability to absorb moisture. When moisture penetrates, mineral wool ceases to function as a heat insulator. Protecting mineral wool from water is the most important task. Therefore, high-quality waterproofing of the material must be performed. The technology for laying mineral wool mats is as follows:
- the base is prepared (cleaning from dirt, dust, debris);
- cracks and large gaps are sealed with mortar or other materials;
- a layer of waterproofing coating is laid;
- mineral wool mats are laid for waterproofing;
- a vapor barrier layer is laid on top of the wool;
- clamps are installed to provide a ventilation gap;
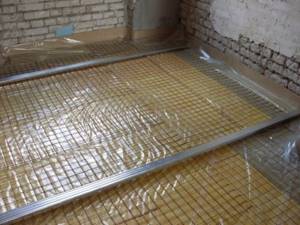
- a reinforcing layer of metal mesh (minimum 3 mm wire) is installed on the clamps;
- concrete screed is poured.
The technology takes a lot of time, but if followed, the effect of significantly reducing heat loss through the floor is achieved.
Instructions for floor insulation with mineral wool
Several instructions have been developed for insulating the floor with wool made from glass and basalt fibers:
- insulation of the floor with basalt wool under the screed;
- floor insulation along joists on a concrete base;
- floor insulation along joists in a wooden house.
Insulation under the screed
The high compressive strength of basalt mats makes it possible to lay them under a screed. With this insulation technology, the effectiveness of thermal insulation depends not only on the insulation, but also on the quality of the preparatory work carried out. Here you need to perform the following operations:
- using a hammer drill, remove the old screed (it will take several days to remove it manually), since cracks and potholes appear on it due to time and operational loads;
- the concrete floor is removed from debris and dust. The garbage is put into bags, and the dust is removed with a construction vacuum cleaner;
- after wet wiping, the base of the floor is inspected to identify defects;
- the identified damage, as well as the connecting seam between the floor slabs, are sealed with a repair compound. To improve the adhesion of the cement mortar to the floor concrete and prevent the growth of cracks, all damaged areas are poured with cement “military” or primed with a deep penetration primer, small cracks are expanded, large cracks are reinforced.
After the repair mortar has completely dried, the base of the floor over the entire surface is primed twice, preferably with Concrete Contact. At the next stage, work is carried out to protect the insulation from moisture, which forms in the form of condensation on the surface of the concrete floor. The work can be performed with any waterproofing material. The process of waterproofing a concrete base is described in detail in the work “Waterproofing the floor before screeding”.
Basalt mats are laid on top of the waterproofing layer. In this case, each subsequent row is mounted with a shift so that the transverse connecting seams do not coincide. This is the so-called “staggered” laying or, as it is also called, brickwork.
The joints are taped with metallized tape. A reinforcing mesh is attached on top of the mats. To fix it, you can use CERESIT CT190 glue.
Attention: more complete information on preparing the subfloor for insulation is given in the material “Preparing the subfloor for floor screed.”
The screed is poured onto the dried glue.
Insulation of concrete base along logs
The technology of insulation using joists for a concrete base consists of preparatory work, waterproofing the floor, installing joists, insulation, and vapor barrier of the insulating layer.
The preparation of concrete for insulation is discussed a little higher, in the previous section. Therefore, we will break the order of considering the technology and go straight to laying the logs. You can do this using:
- U-shaped profile;
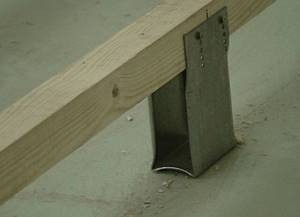
- hairpins;
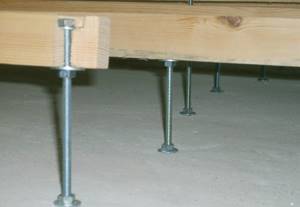
- battens.
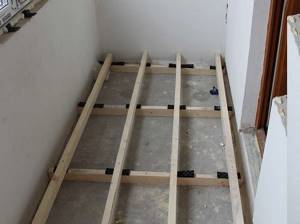
The timber is attached at a distance of 2-3 cm from the wall and 50-60 cm between each other.
The instructions for attaching the joists to the concrete base are discussed in detail in the material “Insulation of the floor on the balcony.”
Mineral wool with mat sizes 5-10 mm larger than the cells is laid between the lags so that the installation is done by surprise. In this case, the logs should be 4-6 cm higher than the insulation to form a ventilation gap.
The insulation and logs are covered with a vapor barrier film, overlapping the walls by 10-15 cm (all excess will be cut off after installation of the floor covering). The canvases should overlap each other by about 20 cm. The seams are taped.
Extruded polystyrene foam for screed
Compared to polystyrene foam, polystyrene foam has high strength and greater density. The closed structural cells of the material give expanded polystyrene foam almost complete protection from moisture. The material is difficult to burn, which makes it possible to use it when insulating wood floors.
It is advisable to apply insulation with extruded polystyrene foam on the ground. Before this, the soil level should be leveled and compacted.
A layer of crushed stone is poured and compacted. Sand bedding is made and compacted. The base should be as level as possible on a horizontal plane. Sheets of material are laid out on the prepared base at intervals. The joints are sealed with tape. A layer of waterproofing is required. A reinforcing mesh made of metal or plastic reinforcement is laid over it. The floor base prepared in this way is poured with concrete mortar.
Features of insulation under the screed
Thermal insulation of this type is considered one of the most labor-intensive, and it requires the master to have not only a theoretical basis, but also practical skills. In the case of this type of insulation of a concrete floor, it is not enough to be able to hammer nails or drill holes with a drill; you must be able to pour the screed perfectly evenly, focusing on the beacons.
First of all, it is important to choose the right insulation that will be used under the floor screed.
There are 4 main types of heat insulators for screed:
- expanded clay;
- foam granules;
- mineral wool;
- extruded polystyrene foam.
They all have their own advantages, so they deserve special attention.
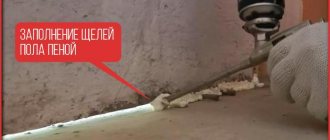
Application of polyurethane foam insulation
The use of liquid material - polyurethane foam - is an ideal option from the point of view of workability. Thermal insulation of the floor in this case is ensured by 100%. There are no cold bridges, there is no need to use hydro- and vapor barrier materials. The work is carried out according to the principle of spraying onto the surface of the subfloor. The thickness of the layer of such insulation, even in minimal values, makes it possible to achieve good, effective insulation of floors.
After drying (3-4 hours), a continuous hard shell is formed. You can pour screed over it without mesh reinforcement.
Cement screed for insulation.
The need to screed the insulation arises in the following cases:
- Warm floor.
- Floors on the ground or on an insulated balcony or loggia.
- Significant thickness of the screed when leveling the floor in an apartment to one level.
- The need for additional sound insulation.
They began to make (massively) such a screed relatively recently. Therefore, there is a lot of fantasies and speculation - the technology has not been fully developed.
Everything that will be said next is an attempt to understand the details of the insulation screed, and not to give 100% technology.
Not enough time has passed for error information to accumulate.
Which insulation is better?
Taking into account all the expanded clay and vermiculite bedding, as well as various additives to the solution, extruded polystyrene foam is the most popular insulation material. Its strength is beyond any doubt. It would be possible to stop at this option, but its price forces us to look for alternatives.
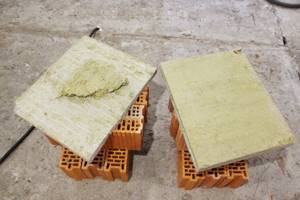
Laying the other two insulation materials (stone wool and ordinary polystyrene foam) on the floor under the screed raises concerns among many. This comes from ignorance of the varieties (brands) of these materials. Crumpled pieces of foam underfoot and mineral wool in rolls intuitively suggest that under a layer of mortar they will look even worse. If you clearly see the strength of the insulation intended for this purpose, then doubts disappear. The durability is impressive. This is more than enough for a screed in an apartment:
The second panel (crushed by a wheel) is filled with low-density mineral wool, which is used as a thermal insulation layer in facade systems. Not to be confused with stone wool samples intended for floating screed. You need to know, albeit superficially, the technological characteristics of the materials for laying under the screed and the one you have chosen. This is so that later, you don’t have to look for the reason why the screed bends.
Every brand that produces thermal insulation has this type of insulation. Also, it can be included in the name as a soundproofing material for the floor, under the screed:
- So Thermolife has slabs “TL Pol” and “TL Pol-S”.
- TechnoNIKOL has three types of such slabs: “Technoflor soil”, “Technoflor standard” and “Technoflor prof”. Each has its own purpose, characteristics and cost.
- ROCKWOOL has slabs “FLOOR BUTTS”, “STEPROCK ND”, “STEPROCK HD”.
- PAROC has a plate “PAROC SSB 1” and “PAROC SSB 4”.
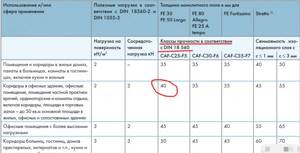
All of these products have high density. From 110 kg/m³ (PAROC SSB 1) to 160 kg/m³ (Stroprock). Another indicator is compressive strength at 10% deformation. This value varies, from 20 to 40 kPa (PAROC SSB 4).
If we compare the cost of replacing (on large layers) cement screed with insulation, we will get approximately the following price ratio per conventional cubic meter of material:
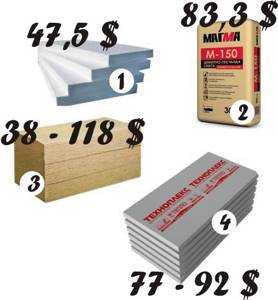
APPROXIMATE PRICE RATIO.
Replacing a partial layer of DSP screed (2) with a sheet of extruded polystyrene foam (4) will have almost no effect on costs. Or perhaps a slight increase in price. But taking into account all the factors - delivery, labor costs for lifting and laying, weight for covering, insulation - the extruder wins by a small margin.
Savings are possible only by using ordinary polystyrene foam (1). With basalt wool (3) it is impossible to say for sure. Significant price range.
Calculations are approximate and depend on the quality of the material, the delivery area, and the characteristics of the work in the given area.
The thickness of the insulation screed and whether mesh is needed.
According to DIN (EU) construction standards, the thickness of the screed on the separating layer (in our case, insulation) must be at least 35 mm.
Screed thickness according to DIN standards.
In all KNAUF designs this requirement is met. And reinforcing mesh is not provided as a prerequisite:
Only the lack of reinforcement raises concerns.
But if you look at the example of a screed using an extruder (UZIN company - UK), you can accept that this is possible:
What details can be noted:
- The solution is thick and wet. It does not look like a semi-dry screed solution. After leveling, the mixture squeezed water onto the surface. This is the ideal moisture content of the screed solution. Such a screed does not have the disadvantages of a semi-dry screed, when a loose structure is formed at the base. At the same time, it does not crack, as often happens with regular, wet ones.
- The sand is coarse, which promotes rapid shrinkage and squeezing moisture onto the surface.
- Perhaps they use additives (plasticizers) - the water that is added to the mixer is cloudy and not of a natural color.
- The base is made of extruded polystyrene foam.
But such conditions cannot always be maintained. Practice shows different results and therefore, there is a different opinion:
There is also a peculiarity in how to lay the reinforcing mesh. You can do it like here:
If the mesh does not overlap, cracks appear along the joint. In such cases, the screed does not work in one piece.
This may not have any effect on the installation of laminate or linoleum. And perhaps it will somehow appear when laying ceramic tiles (the grout will crumble in individual seams). But this is guesswork. If you record (photo, video) such changes on the tiles after laying the mesh in the screed without overlap, then you can draw conclusions.
Laying insulation under the screed.
With the installation of insulation, a lot of fantasies also arise. Do I need to attach it to the base? And what to fasten it with? Many people think it’s better to fix it - it won’t get worse. And they are attached depending on the wealth of imagination: with glue, with polyurethane foam with plastic dowels, or simply with sand or crushed stone.
An interesting solution from KNAUF on this topic. Sheets of foam plastic are laid on a bedding of expanded clay and expanded clay sand. Backfill is a kind of invention by KNAUF and is called “Fill for prefabricated floors”.
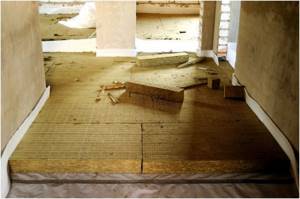
The main thing you need to pay attention to in this process is preparing the base from bulk material using an aluminum rule. The length of the tool and the presence of at least some level on it allow you to get a good, even plane. This is necessary so that thin foam plastic sheets do not break, and durable EPS sheets do not sway:
The backfill can be replaced with sand, or even better, DSP. A mixture with cement is better because it will draw moisture out of the screed and harden. Well, just in case. The thickness of the leveling bedding can be minimal, within a centimeter. Careful preparation of the base allows the slabs to be laid (with rubbing) without voids. Then it becomes possible to make a screed using EPS without reinforcement.
Film for floor screed.
There is also confusion with film. Is it needed and where, on the insulation or under the insulation.
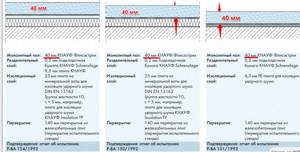
If we look at the working drawings of floating screeds from various manufacturers, the separating layer of film is placed only on top of the mineral wool slabs. Some call it a vapor barrier, some call it a film to protect the insulation from leakage of the solution.
And polystyrene foam (KNAUF recommendations) is covered with Schrenzlage lining paper. This is kraft paper coated on both sides with film. It is not a waterproofing or vapor barrier and is installed under a monolithic self-leveling floor in accordance with DIN 18560-2.
Similar recommendations for protecting foam plastic from cement mortar can be seen in some sources. The reason is that the alkaline environment destroys it. How then to deal with the insulation of all facades? When is a cement-based mixture applied to the exposed surface of polystyrene foam?
One more detail. KNAUF does not recommend the use of film due to the formation of wrinkles. Perhaps this is a marketing ploy - “nothing has been invented better than our lining paper.” But the last video (at the end of the article), where folds appear on the plastic mesh when pouring the Weber-Vetonit mixture, is thought-provoking.
Similar solutions for sound insulation from TechnoNIKOL and Ceresite:
What can be summed up:
- Ceresit allows screeding on mineral wool without reinforcement, but using its own mixture “Ceresite CN 175”. At the same time, the thickness of the screed (judging from the video) is solid - the maximum allowable for this mixture is 60 mm.
- KNAUF has a similar solution.
- Weber-Vetonit has a similar soundproofing floor design. Instead of film - geotextiles. The thickness of the self-leveling screed “Weber-Vetonit 4310” is 15 – 25 mm, “Weber-Vetonit 4350” 25 – 30 mm. Additionally, reinforcement is provided with WEBER R108 fiberglass mesh.
Use of lightweight heat-insulating screeds
Providing good thermal conductivity is achieved by using a material such as perlite in concrete screeds. Lightweight concrete with perlite is environmentally friendly, durable, and retains heat well.
The disadvantage is the fact that the perlite screed must be protected with water-repellent compounds. Perlite is a very hygroscopic material.
Choosing floor insulation is a rather complicated process. The variety of materials and their characteristics require a careful approach to the selection process. The price issue is also important. Choose the golden mean between consumer properties and price.
Floating screed technology
longBurn, if in the rest of the apartment the sad consequences did not appear within a month after pouring the screed, then leave everything as it is. Along the dismantled area. Let's estimate the thickness of the floor pie layers based on your information. Total thickness 85-90 mm. The thickness of the mineral wool is 25 mm. 60-65 mm remains for the screed. This thickness is very suitable for high-quality performance of DSP screed. The only thing is, what year was your house built? Weight of DSP 10 mm thick. is ~20 kg. per 1 sq.m., which corresponds to ~ 120-130 kg. in your case. Without going into details, for relatively old houses this is too much in terms of weight per sq.m. If there is any doubt in this regard, it is better to return to the expanded clay layer and reduce the thickness of the DSP to 45-50 mm. Well, quite correctly, this is ordering a project and its approval
Regarding the waterproofing between the wool and the DSP screed. This is a very important element of the pie. Without it, the cotton wool will suck moisture out of the laid DSP solution. Rapid loss of moisture from the screed is a guarantee of an unsatisfactory result.
Regarding reinforcement. Needs reinforcement. For the final result, it doesn’t matter what. Can be wire mesh. You can use a basalt mesh. You can use a polymer mesh. Possibly with fittings. Possibly fiber. Fiber is the cheapest. Both in terms of the cost of the fiber itself and in terms of work. One thing: not everyone knows how (or does not want) to follow the technology for working with it. There are certain tricks and nuances. If you are not confident in the qualifications of the performers, if I were you, I would choose wire mesh: you must try to break the technology of working with it (the only requirement is that the mesh should be located in the thickness of the screed, and not at the very bottom), and any viewer inexperienced in construction will be able to clearly control the work process.
Regarding the material for the DSP screed. The best way to make a good screed is to make it yourself. Take sand, the quality of which can be pre-controlled (fraction size, absence of impurities) and the freshest (ideally two to three weeks from the date of manufacture on the package) cement from a large manufacturer. As for sand in Moscow (you're from there, right?) I don't know where to get it, but it's better to buy cement in large construction markets (Leroy rules), where you yourself select the bags in the sales area based on their date. I can’t really say anything about ready-made DSP mixtures (M300, M150) that are sold in Moscow. Several times I was invited to order in Moscow, I went and chose all sorts of different mixtures, a lot of things that I don’t have in my city. Plus, even products of well-known common brands can be produced at another plant. In my city, if there is an urgent need for a ready-made mixture, lately I have been leaning towards AHTON sand concrete from Leroy (produced in Zhukovsky Moscow Region). The quality of the mixture is IMHO a C, but stable, without tricks or surprises. Plus you can always take bags 5-7 days old.
Regarding the care of the screed. You pay hired specialists not for the amount of work performed immediately when the screed is poured, but for the result that will appear some time after pouring. Gaining the design strength and minimizing the shrinkage deformation of the screed made from DSP directly depends on its subsequent care for several days. Decide for yourself who will take care of the screed, but in any case, this is a necessary step in which the following must be taken into account. The basis of care is the creation of a very humid microclimate in the room, preventing the transfer of water from the screed to the external environment. Let’s remember physics from a school course or a trip abroad: in dry Egypt you won’t have time to get to the sun lounger, you’re already all dry, but in humid Southeast Asia your swimming trunks don’t dry overnight on the clothesline. Here are the main points: First, there must be no air movement at all: windows/doors are closed, cracks under them are sealed, hoods are plugged, etc. And it is better to extend this rule to the entire apartment, and not just to the room with the screed. Secondly, prevent direct sunlight from falling on the screed. Thirdly, if there is at least some opportunity to lower the temperature in the room (turn off the radiators), do it. Fourthly, water the screed with water from the next day, preferably less (remember the neighbors below), but more often. If there is no final repair on the walls, you can spray the walls, you can place wide containers of water in the room. Fifthly, after watering, cover the screed with film (or even better with sawdust, but this is already exotic). Ideally, you can control the humidity in the room with at least some device, a cheap Chinese one. Humidity should not be below 90% (and under the film it is 100%). Follow the care regimen for up to a week.