How to replace a crane axle box with your own hands
1.
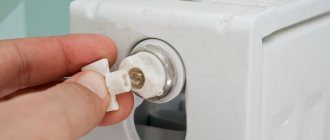
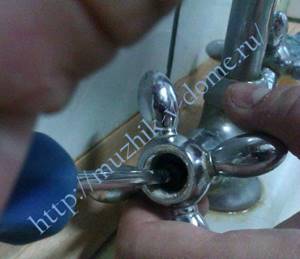
The topmost cap must be removed from the flywheel. It may not be easy to do this during long-term use, so pliers will help in this case. Under the cap inside the flywheel there is a bolt that must be unscrewed to remove the faucet valve.
2.
Often, in order to unscrew the valve, a lot of effort is required, because the metal under the constant influence of water forms an oxide, which, sometimes, tightly holds the parts of the mixer together. After the valve is removed, it is necessary to clean the thread to which the bolt was attached - during the period of operation, debris could probably have accumulated there. The flywheel itself must also be cleaned from the inside.
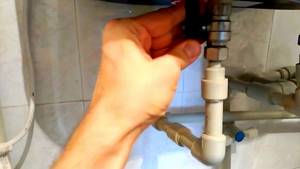
3.
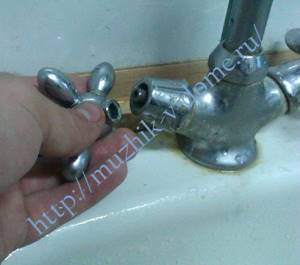
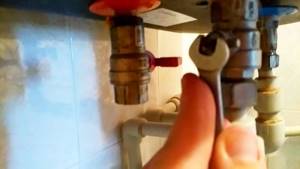
Next, you should start unscrewing the faucet fittings, which may also not give in the first time. For convenience, you need to take sliding pliers, and in order not to scratch the glossy surface with them, you can put a piece of dense material under them.

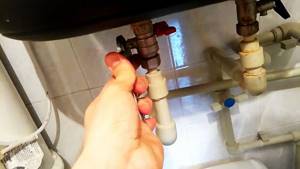
4.
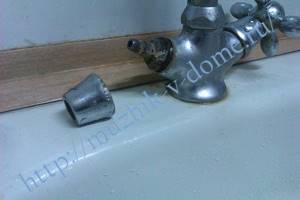
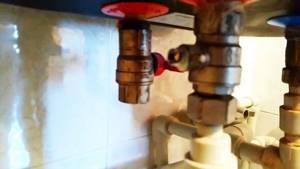
After removing the fittings, you can see the axle box screwed into the mixer. Before unscrewing it, be sure to check whether the supply of hot or cold water is shut off (depending on what kind of water was regulated by the failed faucet).
If the water is not shut off, it will gush out immediately after removing the axle box from the mixer.
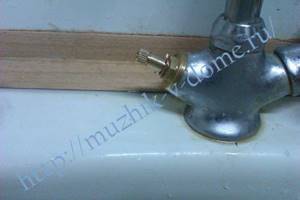
5.
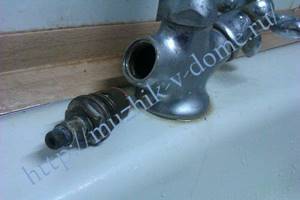
When the axle box is unscrewed, it is necessary to thoroughly clean the threads of the mixer. This is necessary so that the new valve axlebox fits tightly along the threads, otherwise, if debris remains there, water will leak not only from the nose of the gander, but also at the base of the flywheel. A card brush is suitable for cleaning.
6.
For each mixer, a certain type of faucet axlebox is suitable. It is necessary to select this part so that it matches the thread, size and material (ceramic or rubber). For convenience, you can simply take a broken axlebox with you to the store.
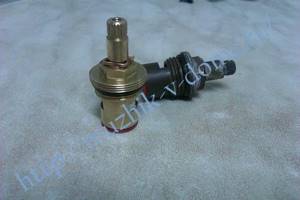
7.
We screw the new axlebox into the place where its predecessor stood. If the mixer thread is cleaned normally, then there should be no problems with further assembly of the flywheel.
Since the faucet is often used in the bathroom and kitchen, it will be useful to have the skills to replace the faucet axle box, because most often it is the cause of water leakage. And, thanks to step-by-step instructions with photos, not only a man, but also a housewife who does not have the opportunity to contact a plumber can cope with this.
I also suggest watching a video on how to replace a faucet axle box with your own hands.
3 comments on Replacing the faucet axle box in a two-valve mixer - step-by-step instructions
And yesterday I had to go to the plumbing store twice because at first I was too lazy to take the unscrewed handle with me. It turned out that identical-looking crane axle boxes have different numbers of slots. They gave me two samples and then I had to drag myself a second time to return the extra one?
Some say that crane axle boxes with a rubber gasket are much easier to maintain (repair) - change the rubber, and that’s it. Others say that ceramic faucet axle boxes are more durable. Which crane axlebox option is more optimal in your opinion?
Ceramic faucet axle boxes begin to leak water over time, the faucet begins to drip, sometimes after just a few months of use. For example, you have to not tighten the valve all the way to stop the leak. This is about durability. For those who find it easier to throw it away and buy a new one, this is the best option. You can repair ceramic faucet axle boxes with your own hands, but it is not as easy as with simple rubber gaskets.
Preparatory activities
Before you start directly fixing the leaking faucet, take care of the main thing - turn off the water on the riser, otherwise flooding of the apartment - both yours and the neighbors below - will be added to all your problems. Then, having turned off the water, you can begin repairs.
To carry out repairs you will need the following materials and equipment:
- a vessel for collecting water;
- adjustable wrench;
- silicone seals;
- screwdrivers (flat and Phillips);
- fluoroplastic sealing tape;
- pliers;
- new gaskets;
- wrench;
- cleaning agent, sponge;
- rags.
All this is quite enough to fix a faucet leak on your own.
Note! If you recently purchased a faucet and still have a box left of it, it may contain a repair kit and detailed instructions with diagrams. If so, the repair will speed up significantly.
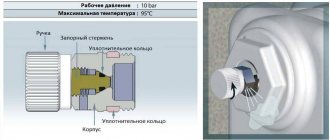
Technique for restoring shut-off valve functionality
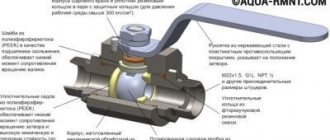
When planning to restore the functionality of a ball valve, you should ensure not only the availability of the necessary tools, but also good lighting.
When restoring the operation of the faucet, you should first unscrew the self-locking nut (in some cases you should simply unscrew the screw that holds the rotary handle). All this can be easily done using a size 8 or 10 spanner wrench, and an open-end wrench also helps in this matter (everything initially depends on the crane model).
From Sherlock Holmes to Leo Tolstoy: who he played and how K. Plummer is remembered
Studies have shown that excess vitamin D is harmful to the kidneys.
Train, filming, home to her daughter: Asmus told how her working day went
Next, you need to carefully remove the faucet handle. This, as a rule, is not easy, only after its gradual rocking, accomplished by alternating pressure on one or the other side of the structure. In this case, it is important not to knock on it - this will lead to the integrity of the flags and their breakage.
Now you should select the most suitable key, and then try to turn it, alternately changing the direction: first you can try to do it clockwise, and then counterclockwise. When carrying out the described actions, it is important to monitor their amplitude - it should be low, because with great effort there is always a risk of breaking the rod or tearing off the edges.
As soon as movement is noticed, the amplitude of the movements and their scope can be increased. When performing this work, it is very important to ensure that one of your hands holds the head on the rod, and the other turns it.
How Derevianko lives after breaking up with Myasishcheva, who bore him daughters
Yana found unsent letters in her grandmother's old house. They turned her life around
Was there an affair with Bondarenko and who owns the heart of the beautiful Fattakhova: photo
As soon as the rod moves as freely as possible, at this point you can put on the handle, and then secure it with a screw (or nut). Now you should continue the rocking process until the water supply is completely blocked.
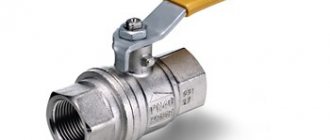
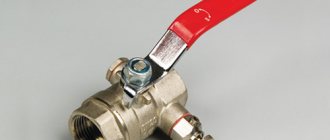
A little about terminology
Judging by the reviews, beginners often confuse a faucet with a valve. Therefore, before unscrewing the tap, you should understand the terminology. The valve and the faucet are completely different elements. For example, the first one is equipped with threads at both ends and is mounted into a pipe break. Water cannot flow through it, since the valve’s job is only to shut it off. The tap is installed at the very end of the pipe. Attach it to pipes or fittings. In the sink and sink, it is connected to the system through a special hose, which is equipped with a thread at one end. Through the second, water is removed from the system. Taps are installed above sinks, in bathrooms and showers. The inside of the device is equipped with a special mechanism whose task is to regulate the water supply. There is also a device that mixes hot and cold water. This explains why it is also called a mixer. It can be equipped with either two separate taps or a single integrated one. How to turn off the tap? What will you need for this?
Effective recommendations on how to unscrew a stuck axlebox tap
You can dismantle the axlebox crane using one of several options. This variety makes it possible to choose the most wonderful option based on a specific situation: Chemical. The implementation is as simple as the world. The part is well lubricated with an acid-containing solution (WD-40, Cilit plumbing product or vinegar), and after a couple of hours you can try to dismantle it. In problematic situations, you should try to pour the chemical into the problematic compound (for example, with a syringe). Moreover, experts advise trying to boil the completely removed device for 20 minutes in a soda solution - this often helps to turn on a stuck valve. WD-40 Thermal. It is worth using when the method described above did not bring the desired result. It is based on the fact that the valve head and the parts of the water tap with which it touches are, in most cases, different. Based on this, they have different degrees of magnification. The treatment is carried out with a hairdryer for construction work, with which the thread is thoroughly heated until the bolt moves. Tapping. In most cases, it helps when dismantling an alloy grand axlebox that is leaking. It is performed with light repeated blows of a hammer or a mallet on the body along the fastening connection in the form of a thread. Lime deposits and corrosion should go away, and the jammed part should be easily dismantled. Rocking the bolt. Used in situations where the edges of the bolt have become “slipped.” You need to tightly grasp the bolt with a pipe wrench and try to break it by swinging it
At the same time, it is important not to use excessive force - this is dangerous due to thread breakage and part malfunction. Drilling out a stuck grand axle box Drilling out. Is the most drastic way; used when others have not helped
The protruding part of the bolt is cut off with a metal file, after which the remaining parts in the middle are drilled with a suitable drill. Instead of a drill, you can use a cutter. Then the thread will have to be cut anew.
How to prevent possible breakdown in the future
No matter how expensive a two-valve mixer is, without proper care and careful handling, damage is inevitable.
Basic rules that can extend the service life of your crane:
- You need to open and close the valves calmly, without sudden movements, so as not to break the tap.
- It is better to install a silicone gasket, since it has increased wear resistance compared to rubber.
- Regularly inspect connections for leaks.
- At the first signs of leaks, it is necessary to immediately replace the gasket, so that later you do not have to change the entire plumbing fixture, which will be much more expensive.
- When disassembling the structure, it is necessary to clean the parts from contamination.
By following these simple rules, you can extend the performance of your faucet for several years.
If a malfunction of the faucet in the bathroom is detected, it is recommended to carry out timely repairs so that in the future you do not have to buy a new device. The repair process is shown in the video:
It is better to do the replacement yourself, since this option is much cheaper than calling a plumber. And you may have to spend a little time and effort, but you will be confident in the reliability of the design.