15569 0 28
Mullvatt September 6, 2016Specialization: Capital construction work (laying a foundation, erecting walls, constructing a roof, etc.). Internal construction work (laying internal communications, rough and fine finishing). Hobbies: mobile communications, high technology, computer equipment, programming.
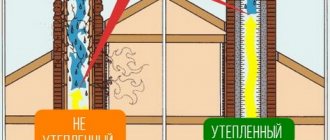
A cinder block house cannot be used in winter without proper insulation.
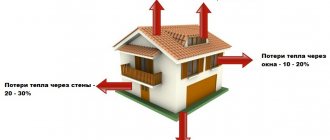
A dwelling made of cinder blocks, in its appearance and strength, strongly resembles the castle of a medieval baron or duke. And in order to convert it into a cozy and energy-efficient country residence, you need to know how to insulate a cinder block house.
Today I want to tell you how to insulate such a building with your own hands. And do this with minimal effort, money and time.
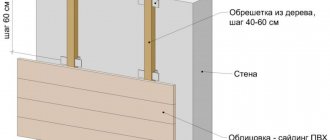
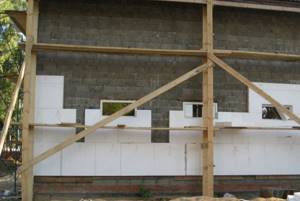
Curtain facade
At its core, a curtain facade is a false wall on a metal frame, which is located at some distance from the main wall.
It is on this false wall that the finishing material is subsequently hung. The positive aspects include the fact that you can insulate the walls of the house from the outside, without thus taking up the space of the room. Also, such insulation options are very relevant for cinder block houses.
. In addition, there are a large number of finishing materials on the market, which is also a positive aspect.
When cladding, metal and vinyl siding are most often used; these are the most popular finishing materials
. Ceramic panels and porcelain tiles are used much less frequently.
Despite the fact that vinyl siding is an inexpensive and very practical way to give the facade of a house a decent look, it should be said that plastic has an electrostatic property that attracts dust. In addition, metal or vinyl siding will not help you create an aesthetically pleasing home, as the striped appearance of this siding does not look good enough.
The market for fiber cement and ceramic panels offers you a wide range of textures and colors, various imitations of the structure of wood, timber or decorative plaster. You can find all this on the building materials market. Some varieties of metal siding and porcelain tiles are not far behind in this race. In this case it is not possible to provide any specific recommendation. In some situations, it is worth proceeding from the guarantees offered by the manufacturer and from personal choice.
Insulation using a spray solution
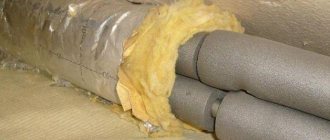
In order to simplify the thermal insulation process and achieve its high efficiency, modern insulation methods are being developed. These include treating walls with a special material – polyurethane foam. In addition to reducing the thermal conductivity of walls, it functions as a protective coating, which greatly simplifies and speeds up surface treatment.
Its peculiarity is that there are no fastening elements, which creates the effect of a continuous coating, without the presence of “weak points”: seams, dowel installation points, etc. The use of polyurethane foam is possible for the purpose of external and external thermal insulation.
It is worth noting that the sprayed surface will already have the most even structure for further processing, and the small thickness of the material will preserve the internal space of the structure and reduce the cost of purchasing external finishing elements.
The disadvantages include cost, but in some cases the use of sprayed thermal insulation will even be economically beneficial (if you take into account the additional characteristics of the material). The manufacturer also claims the durability of the coating (about 30 years), but the product is new and there is no actual confirmation of such statements yet. When choosing a material for insulating a cinder block house, pay attention not only to the allocated budget, but also to the compliance of the material with the needs of a particular case. You should also not forget about the advice of experts and the level of harmful substances in some insulation materials. Always try to insulate the exterior first, and only then, if absolutely necessary, insulate it from the inside.
Regardless of what material the house is made of, it always requires insulation. Therefore, taking into account the material of construction, one or another insulation material should be selected. To insulate a cinder block house, you must first decide on the possible options, their installation technique and, of course, cost.
Here it should be taken into account that when coming from the inside, the dew point will move and stop between the wall and the coolant. As a result, moisture will appear on the surface, which will inevitably lead to fungus. And this, in turn, has a detrimental effect on the quality of thermal insulation of the house, not to mention the loss of usable space inside.
Therefore, by insulating the house from the outside, all these negative aspects are avoided. In many cases, experts note that this method is even better compared to work on internal walls.
Insulation of a slag-filled house. External insulation
We will begin to consider methods of insulating a cinder block house with external thermal insulation. Experienced specialists, whose field of activity is the insulation of buildings, claim that external finishing of cinder block walls with thermal insulation materials increases the ability to retain heat by 70%. Therefore, it is precisely this solution to the problem, which can reduce the thermal conductivity of the building frame, that will achieve a good result.
In most cases, the exterior of cinder block walls is finished with foam. The purchase of material implies a minimum level of costs (if you take into account the cost of polystyrene or penoplex), in addition, its thermal conductivity allows you to achieve a high thermal insulation effect.
Please note that if the ability of the walls to let air through (breathe) is important to you, then it is better to replace polystyrene foam with mineral wool. External thermal insulation with such material has another great advantage - ease of work.
It is enough to attach the foam to the wall surface using dowels. The length of the latter must be selected based on the thickness of the sheet. The length of each dowel should be equal to twice the width of the foam
External thermal insulation with such material has another great advantage - ease of work. It is enough to attach the foam to the wall surface using dowels. The length of the latter must be selected based on the thickness of the sheet. The length of each dowel should be equal to twice the width of the foam.
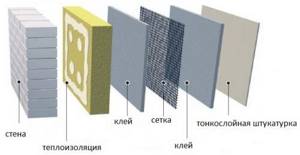
Insulation scheme with mineral wool or polystyrene foam on glue
It should be taken into account that insulation with foam plastic from the outside requires that each sheet fits as tightly as possible to the wall surface. If the latter has some unevenness, then you can simply use additional glue during installation, which will help compensate for this deficiency. If damage appears on the cinder block wall before insulation, the surface must be puttied.
Conventionally, the entire insulation process can be built in the following algorithm:
- Leveling the surface (putty).
- Fastening insulation sheets.
- Installation of reinforcement mesh.
- Second alignment.
- Primer.
- Preparation before painting – finishing with “Finish”.
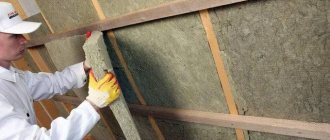
Insulation with mineral wool under siding
If you plan to paint the walls after insulation, you should use acrylic or silicone plaster to level the surface.
Insulation of the outside of a cinder block house can be done with mineral wool, but this will require additional financial investments - it is difficult to prepare such a surface for painting, so this means covering the walls of the house with siding or other facing elements.
Painting or siding
The most affordable and cheapest option for insulating a cinder block house from the outside is installing foam plastic slabs, finishing it with plaster and then painting it. If you are dealing with an old house, then you need to carry out repair work. Seal all cracks and uneven areas. Then you insulate the walls with foam plastic. Secure them with dowels 2 times larger than the thickness of the foam sheet.
A more modern insulation material is polystyrene foam, made from the same raw materials as polystyrene foam. The effect is produced by a different production technology. Both of these materials have the same thermal conductivity, but polystyrene foam has much lower water absorption. When insulating with this material, there is no need to install a vapor barrier layer.
Stages of work on insulating a cinder block house:
- Wall plastering work.
- Foam fastening.
- Installation of reinforced mesh.
- Leveling, priming and finishing walls.
- Painting.
Note!
If your project involves painting the walls, then most likely you will need to use acrylic or silicone plaster, but the latter will cost you much more.
The advantage of acrylic plaster is that it is applied in color. Mineral plaster needs to be painted after application. Painting will have to be repeated every 3 years. Colored plaster will last you a very long time; it is usually painted when you want to change the color of the house.
If you have the financial means, insulate your house with mineral wool, which you then cover with siding.
Choice of insulation
Usually, options are considered that allow installation of a heat insulator in a minimum amount of time. An important role in the choice of material is also played by its price. The greatest demand is:
- Various types of foam;
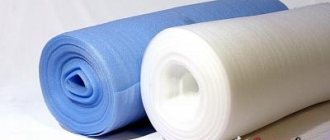
- Glass wool – mineral wool and fiberglass.
Each of these thermal insulators has low thermal conductivity, ensuring heat retention in the premises. They are not fire hazardous because they do not support combustion.
When some types of foam are exposed to high temperatures, toxic substances are released from it, which causes poisoning. This drawback did not prevent polystyrene foam from becoming a popular insulation material. The reasons for its popularity were ease of installation, low price, and moisture resistance.
There is a danger of damage to the foam by rodents making their nests in it. Therefore, penoplex is more often used in construction. It costs more, but rodents ignore it.
The peculiarity of glass wool is its composition, which includes absolutely non-flammable materials. This insulation protects against low temperatures and street noise, having a high noise insulation rate.
A significant disadvantage of glass wool is its sensitivity to moisture. Wetting the material worsens its physical properties, which makes additional installation of waterproofing necessary.
Facade thermal panels
This type of building material appeared on sale relatively recently. Facade thermal panels have the properties of a heat insulator and external finishing material. They are used as additional insulation.

Thermal panels are a two-layer material. The first layer is made of a hard heat insulator, the second layer is made of durable finishing material. Both polymer and mineral insulation are used as a basis. Their physical characteristics depend on the choice of material for thermal panels.
On the walls of houses built from slag concrete, it is better to use thermal panels based on mineral wool, complemented by a vapor-permeable finish. They are attached to previously prepared surfaces with glue. Installation of thermal panels significantly reduces the cost of insulating a house.
Wall insulation with polystyrene foam
Laying foam plastic is carried out in almost the same way as installing mineral wool.
The first stage is surface preparation. Elimination of defects and application of primer. Next, after preparing the adhesive solution, we proceed to installing the insulation sheets.
After laying the insulation boards on top of them, you need to fix the reinforcing mesh. Next, this entire cake is carefully primed and puttied, after which you can proceed to the final stage - applying a decorative coating.
When a house is insulated from the inside, the interior space of the room is significantly reduced. However, this fact is not critical for abandoning insulation completely and suffering from low temperatures outside during cold seasons or throwing money down the chimney to heat the house.
Before answering the question of how to properly insulate a cinder block house from the inside, you need to understand the materials that construction stores offer. Today the market offers insulation based on foam plastic and mineral wool. Installation of both one and the other does not require any specific skills from the performer.
We insulate a cinder block house with polystyrene foam
The difficulty of installing this material lies in the preliminary alignment of the walls on which they will be glued. In the case of a brick wall, plastering and puttying will be required. Wallpaper must be removed from the walls and paint residues must be removed.
Every owner of an apartment or house undoubtedly has a dominant desire to preserve the final result for as long as possible. That is why the use of a waterproofing underlay, even inside the house, should be indispensable. For what? In order to thus prevent the accumulation of condensate that destroys the foam.
To work you will need:
- five-centimeter foam;
- comb or notched spatula;
- glue (usually Ceresit).
Installation work is extremely simple. Insulation plates purchased from a building materials store are attached to the prepared wall using diluted glue. Then they are tapped thoroughly to remove any possible air bubbles from under them. In this matter, an important point is to apply the adhesive mixture directly to the wall and in no case to the foam sheets themselves. They should always be dry.
Next, for optimal insulation of the house, all cracks and loose fits of the material should be treated with polyurethane foam. This must be done in order to isolate the glued layer from changes in humidity in the room.
In the process of fastening foam boards, you can also use special fastening dowels. However, an adhesive solution will be sufficient. The final step will be the front finishing of the walls and their possible painting.
Quite a fast and practical way. Its most important advantage is the elimination of the stage of preliminary leveling of walls. The thing is that mineral wool slabs are installed in a specially created metal structure. Then, step by step, the entire frame is covered with plasterboard slabs, which will give your wall a perfectly flat surface.
So, a special structure is assembled from metal or wooden profiles - lathing. Plasterboard slabs are installed on it. Next, the joints are puttied and the wall is either painted or wallpaper is applied to it.
Installation technology
Now let's look at how to insulate a cinder block house from the outside. I divided all the work into several steps, which are depicted in the diagram below:
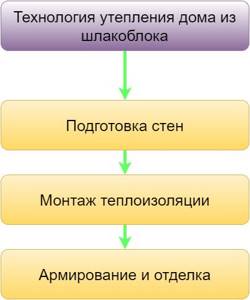
Technology of insulation of cinder block walls.
However, each of these steps consists of many sequential stages, which I will try to describe in as much detail and detail as possible.
Step 1 - Preparing the Walls
I recommend starting with carefully preparing the walls of the house for further insulation. This is done as follows:
- I level the surface of the cinder block masonry. It is necessary to remove protruding parts and seal cavities with cracks:
- Using a chisel or hammer drill, remove pieces of the mortar that was used to lay the cinder block.
- Then you need to fill the through seams in the cinder block masonry with mounting mortar.
- Large chips in wall blocks must also be leveled flush with the surface using a cement repair compound.
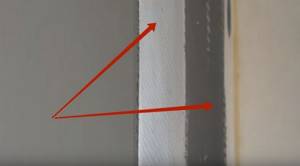
- If significant defects are found (cracks, distortions), it is necessary to get rid of them before installing the heat-insulating layer.
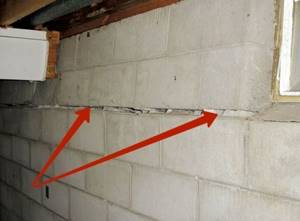
The cracks indicated in the photo not only lead to heat loss, but also threaten the integrity of the entire house.
- I clean the surface of cinder block walls from dust and debris. To do this, you can use a regular brush. If you do not clean the walls, difficulties may arise during the subsequent priming of the enclosing structures.
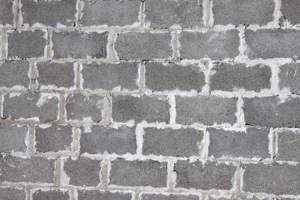
Cinder block masonry, ready for insulation.
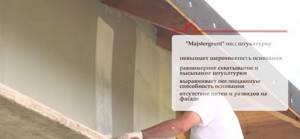
- Prime the surface of the walls with a penetrating primer. To work in the case I am describing, I used the MajsterGrunt composition. The work is performed in the following sequence.
- First, you should pour the primer composition into a bucket, and then dilute it with clean water in a ratio of 1 to 1. With this solution, I pre-treat the walls to reduce the absorbency of the surface.
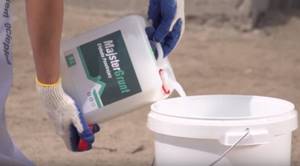
It is better to dilute the primer for the first layer with water.
- I apply the first layer to the walls of the home using a sprayer. Thus, the time for processing cinder block masonry is significantly reduced. After this, you need to give the primer 2-3 hours to partially dry.
- Then I prime the walls a second time using a paintbrush, with which I carefully rub the liquid into the cinder block. A deeply penetrating primer improves wall adhesion, evens out the absorption capacity of slag blocks, strengthens the base and removes dust from the wall.
- I mount a starting profile on which the entire insulating layer will rest. It is a perforated galvanized metal piece that is installed at the junction of the base and the walls of the house and supports the polystyrene foam during its gluing. Another purpose of the strip is to protect the insulating layer from damage by rodents. It is installed as follows:
- Using a laser or water level, a strictly horizontal line is drawn around the entire house along the wall, which will serve as a guide for installing the starting profile for the insulation.
- The profile is attached to the wall with screws and dowels, which are inserted into pre-drilled holes.
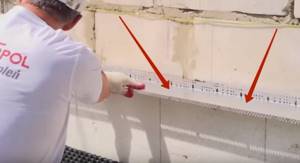
Setting up a starting profile.
- There is no need to join adjacent parts closely. There should be a gap of 2-3 mm wide between the individual elements of the starting profile to compensate for possible thermal expansion of the metal.
- After installation, I recommend once again checking the correct installation of the part using a long water level.
Checking the correct placement of the starting profile.
At this point, the preparation of cinder block walls for subsequent insulation can be considered complete. And it’s time to move on to gluing polystyrene foam.
Step 2 - Installing Thermal Insulation
I'm starting to install thermal insulation. The instructions for carrying out the work are as follows:
- I am preparing the adhesive composition. The correctness of all subsequent work depends on how correctly this seemingly insignificant stage is performed:
- To glue polystyrene foam in the case I am describing, I will use the dry construction mixture Styrolep K, which can be used for gluing and reinforcing foam inside and outside the building.
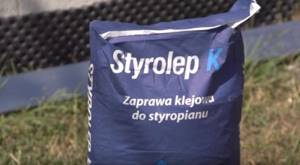
Mixture for gluing foam plastic.
- To prepare the solution, you need to pour a certain amount of water into a bucket (in my case, 6 liters), then pour the powder from the bag into it and mix it using a low-speed drill with a mixer.
- As soon as the solution becomes homogeneous, you need to leave it alone for 5 minutes so that various additives are activated, improving its quality and performance properties. After this time, the mass should be mixed again.
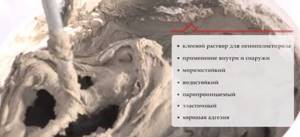
Properties of the finished adhesive solution for polystyrene foam.
- I apply glue to sheets of polystyrene foam. This process significantly affects the reliability of the installation of insulation boards. Therefore, I will talk about the process of applying glue to insulation in more detail:
- The finished adhesive composition is applied to the edge of the polystyrene foam board using a trowel. In this case, you need to work so that the solution does not get on the end of the part (the place that will form the seam).
- After this, 3 slides of glue are placed in the middle of the insulation board so that after its distribution during gluing, more than 40% of the surface of the foam is covered.
Applying glue to insulation.
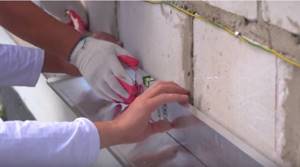
- I glue the insulation panels to the block wall. The essence of the process, I think, is clear without much explanation. I’d rather dwell on those nuances that are not obvious to a novice master:
- When gluing the first row, it should be rested on the starting profile, carefully monitoring the correct installation (vertically and horizontally). All subsequent rows rest on the first, so if you glue the first insulation belt crookedly, the rest will also be installed incorrectly.
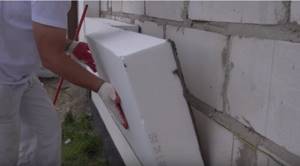
Gluing foam.
- The seams of the top row should not coincide with the seams of the bottom, but should be staggered with an offset relative to each other by a distance of at least 15 cm.
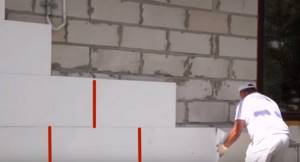
Displacement of seams when gluing polystyrene foam.
- When joining sheets, you must ensure that they fit together as tightly as possible. If necessary, the end of the insulation can be slightly cleaned with a foam float or coarse sandpaper. Otherwise, there is a danger of cold bridges appearing, reducing the energy efficiency of the home.
- When gluing expanded polystyrene boards in the area of windows, the sheets must be positioned so that the seams of the insulating layer are not a continuation of the slope of the window opening. To do this, you need to cut out L-shaped parts from polystyrene foam and glue them to the corners of the window.
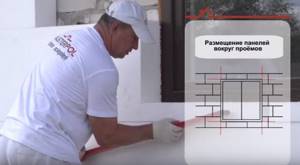
Window opening design.
- At the corners of the building, thermal insulation slabs are installed using the gearing method. This means that the slab of the top layer should hang over the slab of the bottom and so on in order until the very top. Moreover, the part of the slab that protrudes beyond the cinder block wall should not be larger than the area on which the glue is applied. It's difficult to describe in words, but you can clearly see everything in the illustration.
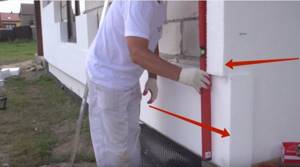
Gluing foam to a corner using the gearing method.
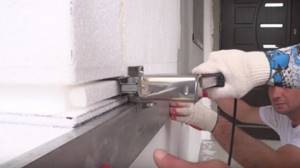
- After 12 hours (the time for the adhesive to partially harden), it is necessary to seal the seams between the foam sheets using polyurethane foam adhesive (for example, Ceresit). You need to seal the seams using a gun so that the foam fills the entire joint space - from the cinder block wall to the surface of the polystyrene foam.
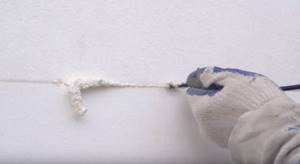
Sealing seams with polyurethane glue.
- After the foam has hardened, it is necessary to cut off the excess sealing compound flush with the surface, and then finally clean the surface of the insulating layer with a float. It is necessary to ensure that there are no protrusions or irregularities on the foam (especially in the area of the seams).
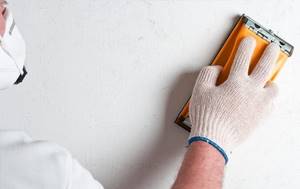
Surface grinding.
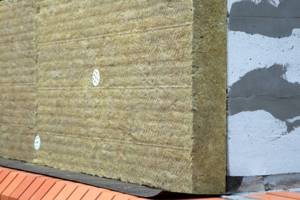
- Additionally, I secure the polystyrene foam to the cinder block wall using dowels. Dowels can only be used on surfaces that experience increased wind load. It is mandatory to use dowels on buildings with a weakened foundation or with walls more than 12 meters in height. The operating rules are as follows:
- The installation of dowels must begin 72 hours after gluing the polystyrene foam boards.
- The consumption of dowels should be 4 pieces per square meter of insulated surface in the central part of the wall and 6 pieces near corners and window openings.
- Before fastening, a hole is drilled in the polystyrene foam with a special drill with a round disk, which makes a recess in the surface sufficient to place the dowel head there.
- After this, a dowel is inserted inside into which a plastic core is hammered. In this case, the dowel head must be recessed into the surface of the polystyrene foam.
- Then the hole is closed with a circle of foam. It all looks like this:
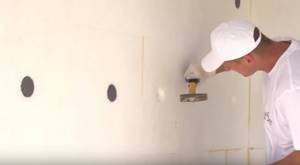
Strengthening the insulating layer with dowels.
By following the tips given above, you can easily paste cinder block walls with sheets of expanded polystyrene. After which you can safely proceed to reinforcing the insulation layer and final decorative finishing.
Step 3 - Reinforcement and finishing
For reinforcement you will need glue, which I used to glue polystyrene foam, fiberglass mesh for outdoor use and various profiles. However, I’ll tell you about everything in order.
- I reinforce the external corners of the building. For this purpose, special perforated profiles with fiberglass mesh attached along the edges are used. The strengthening process is carried out in the following order:
- I measure the corner of the building using a level, after which I cut off all the protruding parts of the polystyrene foam boards that were not removed during the gluing process.
Trimming foam at the corners of the building.
- After trimming, I clean the surface again using a perforated metal float or coarse sandpaper.
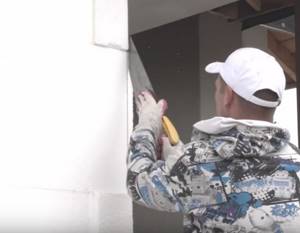
- I coat the corner of the building with an adhesive mixture. I apply a layer 1 cm thick and 10-15 cm wide. Here you can not be afraid to overdo it with glue, since its excess will be removed through the perforation in the corner.
- I apply the corner profile to the smeared area, then press it deep into the glue and press it firmly against the polystyrene foam surface.
Installation of corner reinforcing profile.
- I remove excess glue from the profile, and press the mesh attached to it into the glue, after which I smooth the solution onto the wall with a trowel.
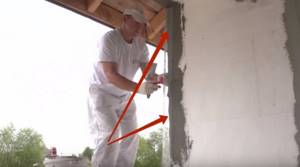
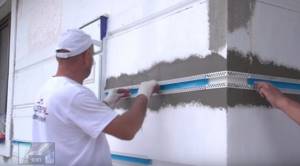
- I reinforce window and door openings. These are sections of walls that are subject to increased loads during operation. Therefore, increased attention must be paid to strengthening them. The sequence of actions is as follows:
- I install gussets made of fiberglass mesh at an angle of 45 degrees relative to the horizontal at the corners of the window opening on the surface of the walls. To do this, you need to coat a section of the wall with a reinforcing mixture, attach a piece of mesh to it, then press it into the solution with a trowel and smooth the surface.
Gluing scarves.
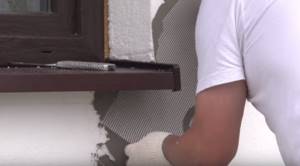
- I glue self-adhesive reinforcing profiles with the mesh already attached to the window blocks. To do this, you must proceed according to the following scheme: Clean the window unit from dust and debris to ensure a tight fit of the parts to each other.
- Degrease the surface of the window block with an alcohol-containing solution
- Remove the protective tape and press the part firmly against the window. This can be done only once. If you glue it unevenly, you will have to replace the part with a new one.
- Coat the surface of the window slope with an adhesive composition, then attach the mesh from the profile to them, and then use a trowel to deepen it into the glue so that the fiberglass does not rise above the surface of the glue.
Gluing the profile to the window.
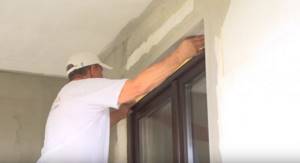
- I strengthen the corners of window and door openings using perforated profiles. The process is described in detail in paragraph 1, so I will not repeat it.
- Installing decorative elements. We are talking about specialized profiles in the shape of the letter P, which are mounted in a foam layer and serve as facade decoration. They are fixed as follows:
- Using a building level, I draw a strictly horizontal line on the wall, which will serve as a guide for further cutting out a groove in the polystyrene foam.
- I'm cutting out a groove. For this I used a special device, but it can be replaced with a regular stationery knife or other suitable tool. Although in the latter case the labor intensity of the process will increase slightly. I should immediately note that if the decorative profile passes through the corner of the building, then it must be secured before gluing the corner reinforcing part (point 1)
Cutting grooves in foam plastic.
- I insert a special aluminum or plastic profile inside the groove. To connect parts to each other and arrange angular turns, shaped parts are used. The parts are fixed to polystyrene foam using an adhesive solution.
Installation of decorative profiles.
- I reinforce the entire surface of the building walls. For this I use fiberglass mesh for exterior work, which prevents the destruction of the decorative layer due to temperature fluctuations of the insulating layer and external mechanical influences. The work flow is as follows:
- I clean the surface of the polystyrene foam from dust and foam granules that stuck to the walls during the installation of thermal insulation boards.
- I cover the entire surface of the polystyrene foam with the reinforcing compound Styrolep Z, and then spread it evenly using a notched spatula. The solution must be applied starting from the top of the wall in strips, the width of which is equal to the width of the reinforcing mesh used.
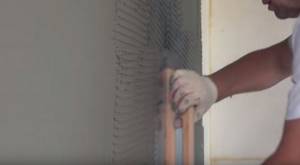
Applying a reinforcing compound to the walls before installing the mesh.
- I apply a strip of mesh to the wall, and then press it into the mortar using a plaster float. At the inner corners of the insulating layer and at the junction of adjacent mesh elements, it must be positioned so that an overlap of 10 cm wide is formed. During work, I recommend that you be especially careful not to damage the fiberglass with the working part of the plaster float.
Installation of reinforcing mesh on walls.
- After pressing the mesh into the reinforcement compound on top, I apply another layer of mortar and smooth it so that the fiberglass mesh is not visible on the wall surface.
- I prime the walls before applying decorative plaster. This must be done after the reinforcing layer on the insulation has completely dried. I selected the primer in such a way that its color was as close as possible to the shade of the future façade plaster. Priming the reinforcing layer is necessary to improve surface adhesion, ensure uniform setting of the plaster and level the absorbency of the walls.
Priming the reinforcing layer is a mandatory step before decorative wall finishing.
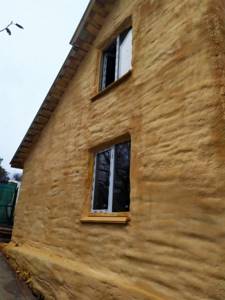
- I carry out the final decorative treatment of the walls. To do this, I took silicone “lamb” type facade plaster from the MajsterTynk brand. Its features are high vapor permeability, resistance to destructive external phenomena and good antiseptic properties.
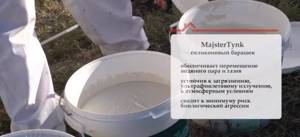
Plaster for insulated facade.
The process of plastering facades is described in detail in other articles on this site, so I will not dwell on it in detail. I’d rather show you a house whose decorative decoration was almost finished. Only small details remain.
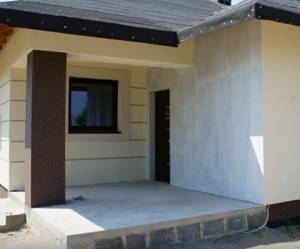
The house is in the process of decorative finishing.
Is it necessary to insulate a cinder block house?
Construction of walls of the required thickness significantly increases the estimated cost due to the need to strengthen the foundation and increased consumption of cinder blocks. This method of heat conservation worsens the appearance of the building and increases the cost of its construction.
Door and window openings, deeply recessed into the walls, look very strange. An insufficient amount of daylight penetrates into the house through the windows, which causes not only increased energy consumption to illuminate the interior, but also discomfort for the people in them.
Insulating walls allows you to reduce their thickness. After installation of thermal insulation, decorative finishing is carried out, giving the building individuality.
Difficulties and possible errors
The main mistakes that can be made when arranging the insulation of external walls with your own hands are as follows:
- Working with low-quality materials. The heat insulator will not perform its functions, and all costs for consumables will be in vain. You need to buy insulation only from trusted manufacturers working with a range of Russian industrial products. The manufacturer must provide a quality certificate.
- Working with an unprepared surface. A dirty wall, covered in dust and remnants of masonry mortar, will contribute to poor adhesion of the insulating material to the adhesive. The adhesive composition will be detached from the surface. Therefore, high-quality cleaning of the panels and mandatory primer (double) are necessary here.
- Using wet insulation or working with a damp surface. A dry surface and the same material are required, otherwise it will not be able to adhere well to the panel.
- Applying insulation to plaster. It is best to use polyurethane glue, since the plaster composition will experience stress from the products during temperature changes, expand and contract due to condensation, and fall off.
Knowing about possible mistakes in construction, you need to try to avoid them. If you work according to the technology of GOSTs and SNiPs, then no difficulties will arise in the process.
Spray insulation
Insulation of the house is done in order to minimize heat loss. Manufacturers do not stop and are constantly searching for new insulation materials. One of these new insulation materials is polyurethane foam. You can use it in the form of insulating spray or filling.
The mixture, consisting of two components, is sprayed using special equipment and a gun. As a result, you will have a coating without seams; cold air will not be able to penetrate through it at the joints of the cinder blocks.
You can use polyurethane foam for external and internal insulation. In addition, the material, in addition to insulation, provides walls with a vapor barrier, increases the reliability of structures and protects wooden parts from rot. Polyurethane foam insulation, according to manufacturers, has a service life of 30 years.
The use of cinder blocks in the construction of structures is economically beneficial and the dimensions of the material elements allow achieving high speed of construction of the walls of the house. But its insufficient thermal insulation properties and the ability to lose strength under the influence of critical temperatures forces thermal insulation, with the help of which the required level of durability of the structure will be achieved, as well as the ability of the structure to accumulate heat will be increased.
Insulation methods
Try to insulate the house externally. If this cannot be done, then you will have to install thermal insulation from the inside.
From the inside
For these purposes, the same materials are used as when carrying out similar work outside the house.
Insulation with polystyrene foam is simple and quick, but the use of such material has a number of disadvantages:
- the interior space of the room decreases;
- During the combustion process, hazardous substances are released.
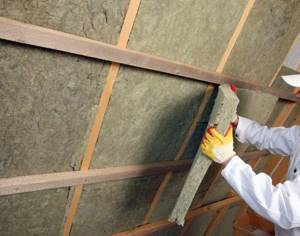
Mineral wool is more preferable for indoor use. It has low flammability and does not contain substances harmful to the health of the body.
Its disadvantage is high vapor permeability, but this can also be an advantage. If you insulate the walls on both sides with mineral wool, they will breathe and provide the correct microclimate in the house, but this will negatively affect its thermal insulation characteristics.
The foam inside the building is fixed in the same way as outside, the mineral wool is fixed with special brackets.
Internal insulation of the house.
Spray insulation
Polyurethane foam simultaneously acts as a thermal insulation material and a protective coating for walls. It can be used both inside and outside the house.
A small amount of polyurethane is applied to the insulated surface (inside the house), which does not take up useful space). The surface is smooth, which simplifies the process of further finishing.
Application technology:
- 2 components are supplied to the sprayer in a given dosage;
- under the influence of compressed air they are mixed and thrown to the surface through a nozzle;
- the material is applied in a thin layer, and after a few seconds it begins to increase in volume and hardens.
Depending on the chemical composition of the components, polyurethane foam with a density of 15 to 70 kg/m³ is obtained.
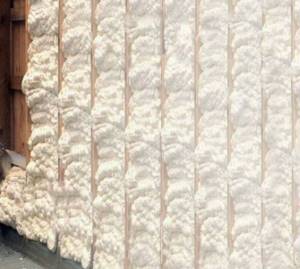
Sprayed polyurethane foam.
External insulation
Insulating a house from the outside can increase its thermal insulation qualities by up to 70%.
To do the work yourself, it is better to choose foam boards. They are not only cheap, but also easy to work with. The sheets are fixed to flat walls with dowels, the length of which should be 2 times the thickness of the insulation. If there are small irregularities, the slabs are glued with a special solution and then fixed with dowels.
If such a characteristic as the ability to pass air is important, then it is necessary to insulate it with mineral wool. It is difficult for a beginner to prepare its surface for painting, so siding or similar materials are often used as cladding.
Which insulation material to choose
Most often, polystyrene foam, mineral wool or polyurethane foam are chosen as thermal insulation materials. Each of them has advantages and disadvantages that you need to be aware of.
Styrofoam
Its use allows you to quickly insulate your house without spending a lot of money.
Among the advantages of polystyrene foam it should be noted:
- low thermal conductivity coefficient;
- light weight, facilitating delivery of the material and its installation;
- low coefficient of water absorption (foam placed in water absorbs no more than 4% of its mass);
- resistance to damage by insects and mold;
- long service life (if protection from natural factors is carried out correctly, it is 50 years or more).
When choosing this insulation, we must not forget about its disadvantages, including:
- vapor permeability (“thermos effect”);
- loss of characteristics at low temperatures and moisture ingress;
- installation only on leveled walls;
- release of toxic elements when exposed to open fire;
- instability to damage by rodents.
We decorate the house with polystyrene foam.
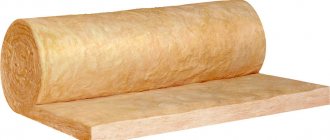
Mineral
A popular option for building insulation is mineral wool.
There are several types of it, and all of them are suitable for external insulation:
- glass - consists mainly of molten glass;
- basalt or stone - consists of molten rocks, most often volcanic rocks;
- slag - consists mainly of melted blast furnace slag.
Many craftsmen prefer this material for insulating cinder block buildings.
Its advantages:
- low thermal conductivity;
- high sound insulation characteristics;
- fire resistance;
- Possibility of installation on uneven walls.
The main disadvantage of mineral wool is its high water absorption, therefore, when using it outside a building, both sides of such insulation are treated with hydrophobic glue. If installation rules are violated, mineral wool may settle, which reduces its thermal insulation characteristics.
Insulation of walls with mineral wool.
Polyurethane foam
This is a relatively new method of insulation that allows you to do the job quickly and efficiently. The use of such insulation does not require the use of fasteners, which simplifies and speeds up the process of its application. The result is a continuous coating that does not have such weak areas as seams and fastening points.
The main disadvantage is the high cost, but given the advantages of the material, it is more economically profitable to use it.
The use of polyurethane foam for home insulation.
How to insulate a cinder block house with polystyrene foam: features
The method of laying polystyrene foam is in many ways similar to the method of insulating walls with mineral wool. The sequence of actions is as follows:
- First of all, the wall must be properly prepared. As in the first case, the surface is completely cleaned, puttied and primed.
- Next, glue is prepared according to a similar scheme and according to the instructions on the package. It is also necessary to take care of waterproofing, as it will provide protection from water.
- The wall of the house is covered with overlapping material, without allowing any cracks.
- After the wall is ready, it is reinforced with mesh. Next, give it time to dry and prime.
- The last stage is puttying the cinder block walls. Then you can start painting.
The insulation procedure is important from the point of view of the comfort of life in the house, and also helps to save on heating.
Mineral wool insulation scheme
Mineral wool or fiberglass should only be laid on a previously primed surface. The best option in terms of speed is the so-called “wet” installation method.
First you need to prepare the surface - remove existing defects (cracks, chips) and prime it. You also need to build a base that will serve as a support for the first base row.
The next step is preparing the glue
In this case, it is important to follow the instructions on the package. After the glue is prepared, you can begin installing the insulation.
Thermal insulation is glued in a checkerboard pattern, like brickwork. Using a building level, we check the evenness of the masonry. Thermal insulation sheets are additionally secured to the wall using umbrella dowels. After the mineral wool has covered the entire wall, you need to lay a layer of glue, drowning the reinforcing mesh into it.
Which GOST standards establish the requirements?
According to current legislation, it is not required that the cinder block exactly meet the requirements of GOST. However, many manufacturers issue a certificate of conformity for their products, since such cinder blocks are in greater demand among buyers. Manufacturers undergo this certification in a certification laboratory, which checks the compliance of products with established standards.
Current standards according to GOST regulating the production of cinder blocks:
| № | Document registration | The year of publishing | Name | Note |
| 1 | GOST 4.233 | 1986 | Masonry mortar | Requirements for indicators |
| 2 | GOST 6133 | 2019 | Concrete wall stones | Basic specifications |
| 3 | 2003 | Dry mixes | Basic specifications | |
| 4 | 2007 | Dry mixes | Release Requirements | |
| 5 | 2007 | Autoclaved concrete | Basic specifications | |
| 6 | 1985 | Wall materials | Methods for establishing strength indicators | |
| 7 | 2016 | Concrete building blocks | Basic specifications | |
| 8 | 1999 | Concrete wall stones | Basic specifications |
Tools and materials
Before work, you need to prepare your tools. Since the installation of the heat insulator is carried out with additional fastening with dowels, you will definitely need a hammer drill to drill holes for fasteners. To prepare walls for installation, you need to have a set of tools, which usually includes trowels, floats and rules.
When installing insulation, you will also need the following materials:
- Primer for treating walls before installation. It removes dust from wall blocks while reducing glue consumption;
- An adhesive composition that is used to attach insulation boards and perform their surface reinforcement;
- Fiberglass mesh for external reinforcement;
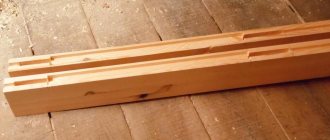
- Profiles securing the outer corners of the insulating layer and window slopes;
- Galvanized starting profile, which serves as support for the lower part of the thermal insulation layer;
- Umbrella dowels with a plastic core;
- Decorative facade plaster – finishing of thermal insulation.
What is sawdust concrete?
Sawdust concrete is a thermal insulating concrete in which cement and lime are used as a binding element, and sand and sawdust are used as filler. Sawdust concrete is similar in its qualities to natural wood - it has excellent vapor permeability and sound absorption, and the sanitary and hygienic indicators of sawdust concrete are completely ideal.
This material is used in the construction of objects for various purposes - industrial, commercial or residential. Country houses, bathhouses, dachas and other low-rise structures and buildings are built from it. The production of sawdust concrete does not require large heat and energy costs. Therefore, its cost is relatively low. Sawdust is used in the production of the product, which allows us to simultaneously get rid of waste from the wood processing industry.
Preparing the walls
The following operations are performed:
- Leveling the surface by removing protruding parts and filling depressions;
- Filling through joints with mounting solution;
- Repairing chipped cinder blocks with cement mortar;
- Cleaning cinder blocks from debris and dust;
- Two-stage treatment of cleaned surfaces with a penetrating primer.
Installation of the starting profile, carried out by attaching it to the facade along a pre-marked horizontal line. The profile is secured with screws and dowels inserted into pre-drilled holes.
The starting profile is attached at the junction of the walls and the base of the building, becoming a support for the insulation, while simultaneously protecting it from rodent infestation. Its installation becomes the final stage of preparing the surface of cinder blocks for insulation.
The installation of each type of insulation is carried out differently, so it is worth getting acquainted with the technologies of each of them separately.