When is it time to disassemble your water heater?
For the first two years, the structure can be operated without maintenance if the quality of the tap water is satisfactory. The simplest and most obvious signs of poor quality water:
- rusty shade;
- the presence of sand or other suspended matter;
- gray or yellow scale in the kettle;
- unpleasant smell.
If the water supply is heavily contaminated, a new boiler will need to be cleaned within a year.
High-quality or filtered water forms a minimum of scale on the walls of the tank and the heating element (heating element). However, after two or three years, even this small layer reduces the heating time of the water and increases electricity consumption. At this stage, it is better to remove the deposit crust: the installation is forced to first warm up the deposit, and only then the water. Over time, as the coating thickens, the pipes gradually overheat, and the heating element fails.
Tip: to reduce the amount of scale, you do not need to set the temperature limit on the temperature relay. Let the water be hot, but not reaching the boiling point (sixty to seventy degrees).
After the first two years of operation, cleaning is carried out every year. In some cases, more often (every six months) or less often (every year and a half). Here are guidelines indicating that you need to hurry up with disassembling the installation:
- when turned on, the heating element begins to make a slight hissing noise;
- the water heater often turns on and off;
- water takes longer to heat up;
- small pieces of scale come out of a warm tap;
- when touched, an electric shock is felt;
- the body is leaking.
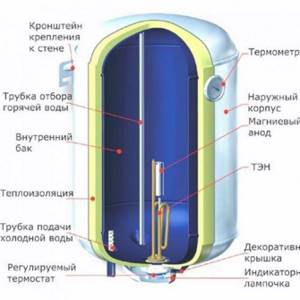
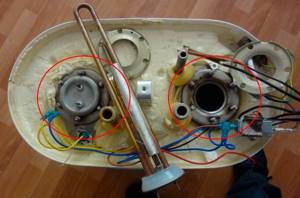
Water heater device
In addition to preventive cleaning, regular (about once every two years) replacement of the magnesium anode is necessary. Its presence provides protection against corrosion and extends the life of the unit. From time to time, other parts need to be replaced: gaskets wear out, heating elements break.
Main types of breakdowns
The functionality of the device may be impaired for a number of reasons. Characteristic signs indicate problems with the heating element.
Types of faults
The following phenomena are observed:
- The water takes a long time to heat up.
- The liquid does not reach the required temperature.
- The user is “pinched” by an electric current.
- The heating element turns on frequently.
- A hissing sound is heard as the water heats up.
- At the outlet, the water has an uncharacteristic odor and color.
If the water takes a long time to heat up and does not reach the required temperature, this indicates a breakdown.
You should stop using the boiler and carry out repairs.
Causes of malfunctions
Heaters are susceptible to the following types of breakdowns:
- Burnout.
- Scale fouling.
- Insulation breakdown.
Scale is a loose solid formation of calcium and magnesium salts. They crystallize on hot surfaces.
The substance has low thermal conductivity, as a result of which:
- The heating element is overheating.
- The rate at which heat enters the water decreases, which increases the operating life of the product.
If the scale is thick, the heater may burn out.
Water with a high content of magnesium and calcium salts is called hard. To reduce its effect on the tubular heater, a magnesium anode is used.
This is a consumable material: it gradually dissolves and therefore requires regular replacement. The average service life of this part is 15 months.
What you might need
- Adjustable wrench - for disconnecting pipes.
- Wrench – for unscrewing the bolts securing the unit to the wall (not required if the mounting is on hooks).
- A hose to the return valve or to the water inlet - for draining (not required if you use containers to collect water).
- Phillips screwdriver for unscrewing the protective cap.
- Two flathead screwdrivers: needed to lift a protective cap that is too tight.
- Gas wrench number two or hub wrench 55. Sometimes a socket wrench is preferable for tightening nuts.
- A thin screwdriver for unscrewing and removing power cables.
The dismantling of boilers is preceded by the following preparatory stages:
- de-energizing the installation;
- draining;
- removal from the wall.
First, the device is disconnected from the outlet. Then you need to lighten it as much as possible by removing the water. An eighty-liter heater weighs about twenty kilograms. With water its weight approaches a hundredweight.
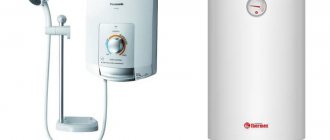
Replacing the heating element in an Electrolux water heater
The most common malfunction of boilers from this manufacturer is the failure of the electric heater. Moreover, some models are not equipped with a magnesium anode to protect internal steel parts and coating.
Replacing the heating element here is also not difficult; you can use the above dismantling and installation diagram.
How to install a magnesium anode in a water heater? >>>
How to lighten a boiler
The unit has pipes: through one, cold water flows into the device, from the other, hot water flows out. Water inflow and outflow can be through pipes or flexible hoses. Typically, the pipes are equipped with taps.
A simple way to drain - through a safety valve
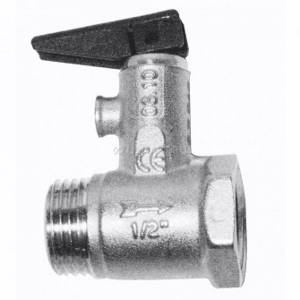
Safety (check) valve
There is a valve on the cold water pipe in front of the fitting. It is needed to discharge water when the pressure inside the device exceeds the permissible limit. Works automatically. The valve is equipped with a spout (water comes out of it in case of an accident) and a valve similar to a handle. The handle is checked every month to ensure the functionality of the valve. Normally, when the handle is open, water drips from the spout.
When it is necessary to empty the unit of water, first stop its supply at the entrance to the house.
Next, unscrew the hose from the “hot” pipe. This ensures free air entry. On the safety valve, the valve handle is opened. At the same time, water will flow from the spout. You need to place an empty container with a volume of at least twelve liters under the stream. You can attach a hose to the spout and drain the water into the sink or bathtub.
Draining water through the valve takes a long time, at least two hours. When the valve is partially clogged, drainage can take up to four hours. Water does not flow from the valve spout at all when it is completely clogged or damaged. The boiler will have to be emptied differently.
The optimal way to drain is through the cold water pipe
First you need to make sure that the installation is de-energized and the water supply to the apartment is shut off. Then close the tap on the “hot” pipe. Place a container for drainage. Using an adjustable wrench, unscrew the joint between the safety valve and the cold water supply pipe and disconnect them. Then unscrew the nut connecting the valve with the “cold” pipe. Water almost does not flow out of the boiler because the air is blocked.
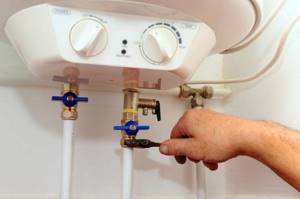
The joint between the valve and water entering the installation is unscrewed
If you open the tap on the hot water pipe, air begins to be sucked in and water flows from the “cold” pipe. Adjust the flow of water by closing the tap. If there are no valves on the pipes, air can flow through an open common hot valve. In this case, all the water from the tank is drained quickly, in five minutes. You can verify this by watching the video:
The boiler is not always located directly above the bathtub. Then you will have to pour about ten buckets into the sewer yourself. The matter is simplified if you put a hose on the cold water pipe to drain it into the bathroom.
A quick way to drain - through both pipes
First, the “cold” pipe is freed from the connections, and then the “hot” pipe. Water instantly drains from both holes and empties the tank in a maximum of two minutes. It must be borne in mind that in this case it is impossible to control the water flow, so the method is only suitable when the heater is located directly above the bathtub.
Note: after draining the water, a small part of it still remains inside.
You can remove water dry if you disassemble the water storage tank. However, this is not necessary. In order to dismantle the installation, the drained volume of water is sufficient.
How to extend the service life of heating elements
- Installation of a magnesium anode is required for long, high-quality operation of the electric heating element. It will soften the water, preventing the metal from corroding so quickly and the lime from hardening on the heating element. It is not recommended to run equipment without an anode.
- Reduce water hardness. Cleaning filters installed in front of the boiler will soften the water environment, preventing lime from forming in such large quantities and destroying the heater.
- Carry out preventive inspections of equipment regularly (at least once a year).
- Purchase high-quality heating elements that are suitable in all respects for modifying the boiler.
- Economical use of the heating element's resource will also protect it from premature failure. Constantly running your water heater at full power will cause rapid wear and tear because the heater will be turned on more often to keep the heated water at a high temperature.
Installing a new heating element for a boiler is not a difficult process, if you take into account some nuances, follow safety rules when working with electrical appliances, purchase high-quality components, and conduct regular preventive inspections. At the same time, it is equally important to operate the device in such a way as to reduce the factors contributing to untimely breakdown of the heating element.
How to remove a water heater from the wall
At the back of the boiler there is a plate with holes for mounting to the wall. At the same time, anchors with hooks are fixed in the wall, on which the unit is suspended through these holes. The heater, freed from water, is disconnected from the pipes (using an adjustable wrench) and raised so that it can be easily removed from the hooks.

Fastening the boiler to the wall with hooks
Sometimes a device suspended from a wall is additionally secured with bolts. In this case, you will first have to unscrew the bolts with a wrench and then remove the installation from the wall. The removed boiler is turned over and placed on the floor with the pipes facing up - this will make it easier to dismantle it.
Note! Ariston models with oval flanges cannot be turned upside down, since the heating element may fall inside. They are dismantled without removing them from the wall.
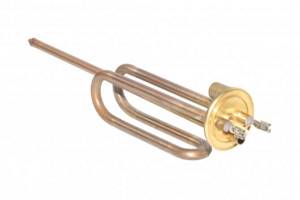
Features of heating elements for Termex water heaters
Heating element for Thermex boiler
Heating elements differ from each other in diameter, power, length and voltage
If we talk about power, then this value ranges from tens of watts to tens of kW, while the length can reach from several centimeters to 3 m. The voltage varies from 12 to 660 V. The diameter is 8,10,12,13 and 16mm.
With proper operation, the service life of the heating element will reach 5000 hours during continuous operation.
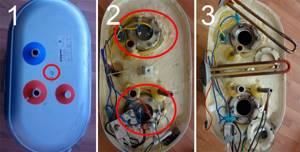
Removing the Housing Cover
Inexpensive heaters without adjustment devices usually have two screws on the bottom cover of the housing. They need to be twisted with a Phillips screwdriver and the cover removed. If the cover is too tight, you can pry it off with flat-head screwdrivers.
A special place is occupied by models with oval flanges. They are dismantled directly on the wall; it is not advisable to turn them upside down with the fittings. Near the fittings (they are marked in blue and red) there are two bolts, unscrewing which you can remove the cover.
On some models it is not immediately possible to immediately find the screws to remove the cover. They are hidden under stickers. After removing the stickers, you can unscrew the housing cover. Sometimes, before removing the cover, you need to remove the plastic shields and plugs from the screws.
Boiler malfunction
If the magnesium anode is replaced periodically (on average, once a year), then the electric heater is replaced with a new one only as the need arises. This means that when the water heater stops working, it may be due to a faulty heating element. Most common situations:
- The water does not heat up when the power indicator is on.
- The boiler automatically turns off when you try to start working.
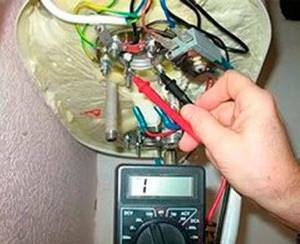
Before replacing the heater, other options are excluded. After removing the equipment cover, a multimeter is used to check the functionality of the thermostat. If everything is fine with it, the heating element is checked. The multimeter determines the internal resistance of the heating coil of this element. The value does not correspond to the required one - the faulty heater needs to be replaced. Replacement is also required if a breakdown in the insulation is detected.
Installing a new heating element is easy if you follow the instructions below. They are universal and suitable for working with many models of boilers from different manufacturers. Let's look at the most common differences using the example of popular equipment modifications.
What's under the lid
When the cover is removed, the wiring of the heating element is visible, which needs to be disconnected. Before doing this, you need to sketch or photograph the original position of the wires. This will come in handy during the reverse assembly stage. After photographing, you can unscrew the bolts of the wires.
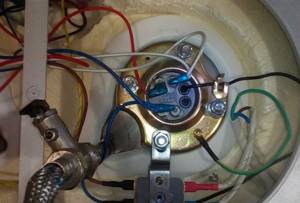
Wires under the removed housing cover
Many models have a thermostat under the cover. To remove the device, you need to grab it firmly and pull it down. It is better to do this with a sharp but precise movement. You can watch the video in detail:
Some Ariston models have a thermometer on the body. To remove it, after disassembling the electrical circuit, the device is pryed off from both sides with flat screwdrivers. This allows it to pop out of the nest with a click. Next, carefully pull out the wires disconnected from the thermostat.
Some boilers are designed in such a way that a non-return valve may prevent the removal of the lid. Then you need to unscrew it. A temperature sensor is sometimes attached to the back of the cover. It must be removed by disconnecting the contacts from the heating element.
In Termex boilers, an electronic control board (power unit) is located under the lid. It is secured with self-tapping screws and is also easy to remove. The control board and the external sensor board are connected by connectors that need to be unscrewed. The grounding attached to the nuts is also disconnected.
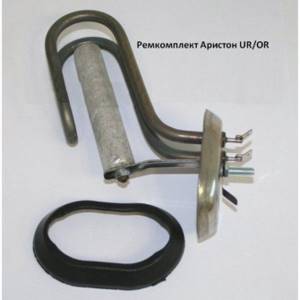
Features of replacing heating elements in an Ariston water heater
Structurally, water heating devices from this manufacturer are similar to their counterparts. Therefore, replacing a water heater is also similar. But there is a difference - an oval flange.
This distinctive feature affects the nature of the removal of the electric heater. The flange has the shape of a funnel and is installed inside the tank. There is a clamping bar on the outside that holds the flange.
To remove the heating element, you need:
- Unscrew the nut that secures the flange (it is secured with only one nut).
- Remove the clamping bar.
- Push the flange with the heater inside the container.
- Turn the heater inside by hand so that the flange is at the top.
- Tilt and pull out the heating element.
Next, the process of replacing the Ariston electric heater follows the same path as in Thermex water heating devices.
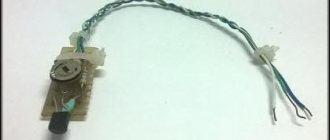
How to remove the touch screen from a Thermex water heater
The control and external boards are connected by a ribbon cable. It is disconnected from the power unit and a thin half-meter cord is tied to it. Next, carefully and carefully peel off the sticky plastic sticker of the touch screen from the front side of the case.
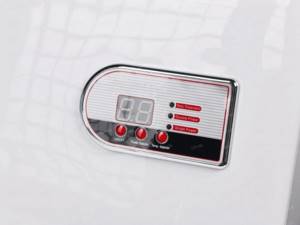
Plastic Touch Screen Sticker
In the opened socket there is a display module panel secured with self-tapping screws. By unscrewing them, you can carefully remove the module and pull out the ribbon cable. If the cable gets stuck, you can use the tied cord to pull it down and try to remove it along with the module again.
How to disassemble
The main working element of the water heater is the heating element, and if a malfunction occurs, it is this that needs to be checked first.
To check the serviceability of the heating element, it is necessary to disassemble the water heater in order to gain access.
The device is disassembled as follows:
Water supply is cut off
When installing the water heater correctly, there should be a valve at the bottom of the body to shut off the water; using a tee, if installed, or a valve, it is necessary to drain all the water from the boiler. De-energizing the water heater, after which it must be completely disconnected from electricity. Carefully remove the protective cover using a straight screwdriver. If it sits tightly, then it is slowly removed with movements reminiscent of opening a tin can. During this operation, it is important not to damage the enamel. Use an indicator screwdriver to check the voltage at the terminals
The disassembler must touch the iron cap of the screwdriver and ring the contacts in sequence. The light in the screwdriver should not light up in any case. The boiler tank is emptied of water. The heating elements are thoroughly cleaned of scale. In some cases it is necessary to remove the water heater from the wall, but in most cases this is not particularly necessary. It is necessary to photograph or sketch the connection diagram, and then disconnect the wires. The nuts securing the heating element and thermostat are unscrewed one at a time. This is necessary in order to allow any water that may remain in the tank to glass gradually.
After removal, the heating element and thermostat should be wiped with a dry cloth. Check the wear of the gasket on the heating element flange. If the gasket has surface defects in the form of tears, dents, etc., it must be replaced with a new one.
You may be interested in an article about Thermex storage water heaters.
Read an article on how to properly disassemble a Termex water heater here.
- https://domikelectrica.ru/zamena-tena-v-bojlere/
- https://sovet-ingenera.com/otoplenie/vodonagrevatel/kak-pomenyat-ten-v-vodonagrevatel.html
- https://santehnicheskij-mir.ru/tehnika/ten-dla-vodonagrevatela-termeks.html
- https://foundmaster.ru/heating/kak-zamenit-ten-v-vodonagrevatele-poshagovye-rekomendatsii.html
- https://aqua-rmnt.com/otoplenie/boilery/remont-vodonagrevatelya.html
- https://technosova.ru/klimaticheskaja-tehnika/vodonagrevatel/kak-snjat-zamenit-i-proverit-tjen/
- https://vannadecor.ru/remont-i-otdelka/santekhnika/menyaem-ten-v-vodonagrevatele-samostoyatelno.html
- https://sandizain.ru/otoplenie/kotly/remont-tena-kak-provesti-zamenu.html
- https://teplo.guru/vodonagrevateli/zamena-tena-v-termeks.html
How to remove the heating element
In the simplest case, the heating element is held on a single nut, which is unscrewed counterclockwise with a fifty-five hub wrench. If the heating element has difficulty coming out of the hole due to large deposits of scale, it may be better to replace it.
In devices with an oval flange, you will first have to unscrew the nut on the bar holding the flange with the heating element. The heating element is pulled out after some scrolling. In this case, it is necessary to place a container under the tank, since some of the water is still inside and will spill out when the part is displaced.
Sometimes the flange is held in place by five or six nuts. It is convenient to twist them with a socket wrench. There can be two heating elements. In this case, before disassembling the connection, it is better to record it in a photo. This will make the installation procedure easier.
How to check
You can check the heating element for operation in three ways:
- If there is a spare heating element, they replace the one they want to check and connect the unit. If after replacing the heating element the water begins to heat up, then the fault was in the heating element itself. If the heater still does not work, then the reason is something else.
- The heating element is checked using a test lamp, which is assembled in series with the heating element and connected to electricity. The illuminated light will serve as an indicator of the integrity of the heating element. If the lamp does not light up, then such a heating element is faulty and must be replaced.
- The heating element is checked for resistance using a tester. If the ohmmeter shows zero, it means a short circuit. If there is infinite resistance, there is an open circuit. In both cases, the element must be replaced.
Replacing a heating element is not a particularly difficult operation, but there is a high probability that in addition to the heating element, the magnesium anode will also need to be changed.
Actions after dismantling
The tank is descaled and washed. The coating is carefully removed from the heating element without damaging the coating (for example, with a plastic knife). Then the part needs to be kept in citric acid for a day, which will remove those layers that cannot be removed mechanically. If necessary, the heating element is completely changed. If necessary, replace the magnesium anode.

Cleaning the heating element
When assembling the unit, all parts are dried. It is convenient to use a hairdryer for this. It is worth paying attention to the integrity of the gaskets so that the seal is completely restored. When installing electrical equipment, you should always refer to photographs that were taken before repairs or cleaning were carried out. This will help restore the system correctly.
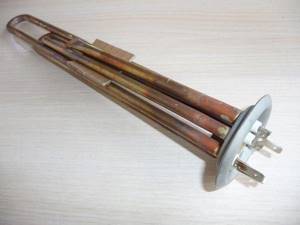
Heating element design
The product consists of the following main parts:
- A metal tube filled with quartz sand, ground ceramics, periclase or other dielectric material with high thermal conductivity.
- A nichrome spiral placed in it.
- Terminal block with flange.
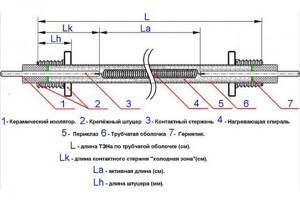
Heating element diagram.
When current flows, the nichrome spiral heats up because it has high electrical resistance. Its ends are connected to the terminal block contacts.
Heaters are available with a ceramic body instead of a metal tube.
Do-it-yourself Termex boiler repair
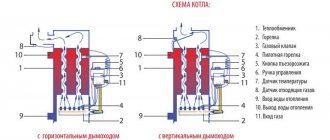
Before you begin the repair, first gather the necessary tools: a set of wrenches, an adjustable wrench, electrical tape, various screwdrivers, pliers. After this, turn off the water by closing the inlet and outlet valves to the water heater. Then drain the water from the boiler tank and disconnect it from the power supply.
The next step is to remove the protective cover. If you have a vertically located boiler, then the lid is located at the bottom, and in the case of a horizontally located one, it is on the left or in front.
When removing the cover, pay attention to the stickers. Often the screws for fastening it are located under these stickers
If you have unscrewed all the screws and the cover still does not come off easily, check the stickers again.
Replacing the heating element
First, perform all of the above steps and remove the tank cap.
To make it more convenient to work, you can even remove the tank from the wall.
It is worth noting that most Thermex models have not one, but two heating elements. Therefore, it is imperative to remember how and in what sequence the parts need to be connected. It’s better to photograph the whole process.
To remove the heating elements from the Thermex water heater, remove the top cover by unscrewing the bolt; disconnect all plugs and unscrew the bolts securing the heating elements.
The heating element itself is turned off as follows:
- After removing the cover, find the protective thermostat, remove the tips from it;
- also remove the tips (3 pieces) from the heating element;
- cut the plastic clamp;
- Unscrew the screws, removing the sensor;
- now disconnect the cable and unscrew the four screws;
- then you need to dismantle the nut on the clamping bar and pull out the heating element.
After dismantling the heating element, it is necessary to clean the surface of the tank from dirt and scale. Only after this can you install a new heating element and put everything back together.
Do not forget that the heating element does not always need to be changed. If the water in the tank still heats up, but it happens slowly, then, most likely, scale has formed on the heating element. Then dismantle it and descale it. Then install. The problem should go away. Also, do not forget that it is advisable to clean the heating element with chemicals rather than scrape off the dirt. In the latter case, there is a possibility of damage to the part.
To clean the heating element, you can use a solution of citric acid or vinegar (its percentage in the solution should be about 5%). The part must be immersed in liquid and wait until the scale falls off. Then you need to wash the heating element.
Faulty thermostat
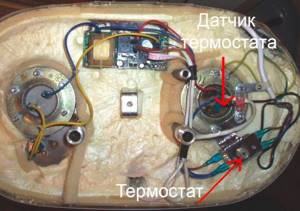
The thermostat in Termex water heaters is located under the cover, next to one of the heating elements, and its sensor is located inside the tank.
Sometimes the thermostat fails. This element cannot be repaired; it must be replaced. To perform the replacement, you need to do all the preparatory steps, remove the cover, then remove the thermostat. But before dismantling, we recommend checking this part. To do this, use a lighter to heat the tip of the sensor (copper). If the thermostat is working properly, you will hear a characteristic click, which means that the protection mechanism has activated and the circuit has opened. Otherwise, you will have to replace the part.
Tank leak
No matter how trivial it may sound, but first you need to find where the water is coming from. A lot depends on this, since if the tank is rotten, you will have to buy a new water heater. So:
- if water oozes from the side seam, then the container is rusty and repairs will not be possible;
- If water comes out from under the lid at the bottom, then you need to disassemble the tank.
If traces of leakage are found in the places where the heating elements are attached, then your water heater is not hopeless and can be saved by replacing the gasket.
In the case of the second option, complete all preparatory steps, then remove the plastic cover. Next, take a close look at where the water is leaking. If it comes out near the flange, then the rubber gasket has deteriorated (less often this is a problem with the heating element). Otherwise, the tank is rusty and the boiler can be thrown away. To replace the gaskets, you need to remove the heating element. But it is necessary to carefully examine the heating element itself. If it is cracked, it is also better to replace it.
Other faults
If you have checked and replaced all the parts, but the boiler still does not work, then it is quite possible that the electronics have failed. The control board cannot be repaired, and it will be extremely difficult to find a similar one in a store. Therefore, in this case, we recommend contacting specialists.
How to replace a “dry” heating element
Previously, we looked at how to remove the heating element and replace it in a situation where the element is in direct contact with water. But you can also find “dry” type boilers on sale. In them, the electric heater is located in a special compartment in the shape of a glass.
The main advantage is that you don’t have to drain the water when replacing. There is no such amount of dirt as is the case with “wet” modifications. In general, boilers of this type are considered more reliable, but heating elements in them sometimes burn out.
Replacing a “dry” electrode is easier. The owner needs:
- Disconnect the equipment from the power supply.
- Remove the protective cover.
- It's common practice to take pictures of the insides to avoid connection errors.
- Disconnect the heating element terminals, unscrew the screws and remove the heater.
The owner of the boiler may encounter the fact that the glass in which the element is placed is filled with special mineral oil or quartz sand. According to the manufacturer's idea, they save energy. If it is necessary to replace the heating element of a water heater, the owner must first carefully remove the filler and then return it to its place.
Checking the serviceability of the heating element
The above testing method using an ohmmeter is not the only method for determining a breakdown. There are two more options that allow you to identify all sorts of problems and correct them in a timely manner, preventing complete failure of the device. Let's look at them in more detail.
Visual inspection of the element
In this case, it is necessary to disconnect the equipment from the electrical network and drain the water from it. Then disassemble it and clean the heating element from scale if it is present on its surface
It is important to inspect the component for coating integrity
If even small cracks, chips or damage are detected, the part can be safely thrown into the trash. After all, in this case it will no longer be possible to repair it. The only thing left in this situation is to replace the heating element with a new one.
The reason for damage to the coating of an element most often lies in the low quality of the materials used for its production. As a result, after just one or two years of operation, such a heating element is literally torn to shreds and cannot be restored.
Checking with a tester
One of the methods for detecting a heating element malfunction was given above. But if the ohmmeter did not give results, and nothing could be found during a visual inspection, then the last check is to look for a breakdown.
To do this, you need to disconnect one of the terminals of the measuring device and move it along the surface of the water heating element. If the ohmmeter shows the exact resistance value, then there is a problem and the heating element needs to be scrapped.
The best way to test your boiler is with a digital multimeter or tester. In this case, you can determine as accurately as possible whether there is a malfunction or not.
If everything is in order with the heating element, then you should start checking the thermostat. To do this, you need to connect the terminals of the measuring device to the contacts of the temperature sensor, which are used to supply electric current.
If the measuring device showed an accurate value or made a bell, then the component is fully operational. Otherwise, the thermostat is broken and needs to be replaced. And you don’t even have to drain the water from the boiler to do this.
To restore functionality, disconnect the device from electricity, remove the panel, disconnect all wires from the thermostat and connect a new part. Remember that if you do not solve this problem, there is a risk of getting an electric shock if you touch the tank.
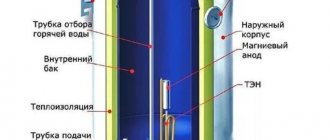
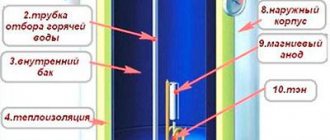
Boiler device
Before we begin repairing the boiler with our own hands, let’s look at the design features. The design of the water heater is quite simple, the main components are as follows:
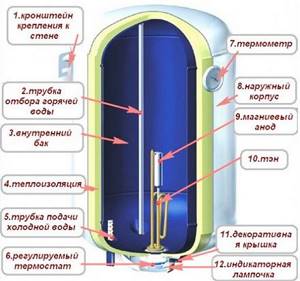
Diagram of the Termex water heater
- body made of steel sheet with stainless steel coating;
- Inner tank made of alloy steel, durable and corrosion resistant;
- the steel flange is a platform on which the elements of the device are attached: heating element, magnesium anode, thermostat;
- a large magnesium anode is a metal rod that is coated with a magnesium alloy; thus, the element reduces the corrosive activity of water, protecting the tank and increasing the durability of the water heater;
- stainless steel tube for releasing hot water;
- thermal insulation made of high-density polyurethane foam;
- The heating element, which, in fact, heats the water;
- a thermostat that acts as an auto-regulator of water temperature (turns off the boiler when the water is heated, and vice versa);
- cold water supply tube made of stainless steel.