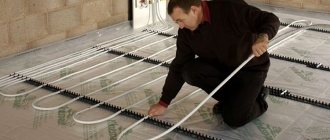
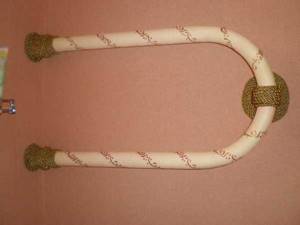
Almost every bathroom has a heated towel rail, which is a small plumbing fixture. It is intended for efficient heating of the room, and is also used for drying towels or other small items. The design is available in numerous types, differing in size, shape, installation rules and other parameters. Some models are ineffective and uncomfortable, so replacement often becomes necessary. Often, replacing a heated towel rail may be necessary because the old structure breaks down or becomes clogged, and therefore ceases to cope with its functions, and therefore either does not heat up or creates problems in the performance of the water supply system. Replacing the coil can be done on your own, but to do this you need to carefully understand its design, as well as study the correct sequence of actions.
Connecting a water heated towel rail to hot water supply or central heating
Heated towel rails can be connected to a hot water supply (DHW) or heating system.
The first option allows you to dry bath accessories throughout the year, because... hot water is not turned off during the warm season. The dryer pipes heat up only when the coolant is consumed, so the device cools down completely overnight. Copper and brass heaters must be marked as galvanized and suitable for water supply risers.
Installation in a riser
The dryer is inserted in the following sequence:
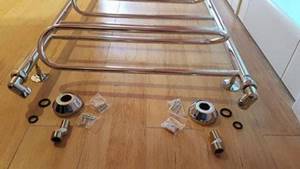
- Preparation of materials and tools. To install a water heater you will need an adjustable wrench, a grinder, dies for threading, a low-speed drill, telescopic brackets, dowels and screws, American type taps, a Mayevsky tap (for air release), straight and corner fittings (depending on the type connections), sealant and sealant for joints. The system itself is assembled from a heated towel rail, a bypass jumper and several pipes, the length of which is selected depending on the layout and location of the device.
- Dismantling of old equipment. Work to remove the old device and/or install a new one will require permission from the management company (MC). Its employee closes the common hot water or heating riser for a regulated time. If there is an old dryer, it is removed from the threaded connections or cut off, and then removed from the mounts (brackets). If you are just planning to install the device, then a gap is cut out in the riser, which is slightly larger than the width of the heater.
- Preparation of bends and lintels, laying tiles. Ball valves are installed on the branches after the bypass. You can fix the system before finishing the room, but in this case the thickness of the glue and tiles is added to the distance to the wall.
- Marking for fastenings. It is carried out taking into account the slope of the branches, the horizontal position of the heater and the distance between its parts. After checking the markings, you can drill holes, screw in dowels and install brackets.
It is recommended to install a towel dryer during a major renovation of an apartment or when replacing a water riser. This will allow you to choose more reliable material options and a convenient connection diagram.
Self-installation of a simple configuration
Installation of the coil is carried out after completion of the preparatory work. Branch pipes, angles and fittings are connected to the finished bends. Each connection is sealed with fum tape or silicone gasket.
Installation of the heated towel rail is carried out simultaneously on the bends and installed brackets. The device is secured with screws.
Upon completion of work, the system is tested for functionality and tightness. The DHW or heating riser is temporarily opened, filling the heater with water. If the connection is made correctly, it circulates freely in the system, the joints do not get wet, and the metal surface remains hot.
Before installing the system yourself, you should watch training videos with instructions for installing the dryer (step by step and with all fittings).
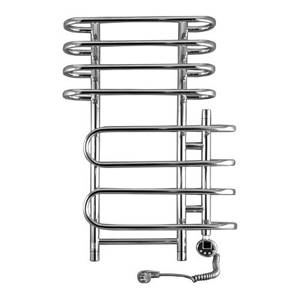
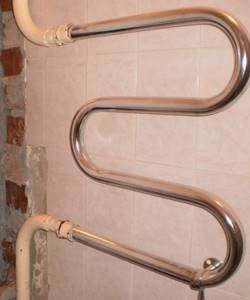
Technology for working with the “Ladder” model
For heated towel rails of the “ladder” type, predominantly lateral and diagonal installation schemes are used. For bottom connections, you can install rotating angles and additional pipes on the bends, which will allow pipes to be brought in from the side.
Connection to a centralized heating system
Tapping into the heating system can only be done outside the cold season. To do this, you will have to obtain permission from the management company, shut off the riser and drain the cold water.
To prepare the bends, it is better to invite a specialist from the management company. Having a document with a list of work performed will allow you to relieve yourself of responsibility in the event of an accident. The risk of leaks on the heated towel rail itself is minimized by shut-off taps after the bypass.
A significant disadvantage of tapping into the heating system is a delayed leak test.
Tools for work
In order to do the work of replacing the dryer yourself, you will need the following tools:
- angle grinder (grinder);
- thread cutting tool (die);
- perforator;
- building level;
- adjustable wrench.
Fastenings and connecting elements are most often included in the heated towel rail kit. Depending on the type of finishing, the design and size of the device, the diagram and method of its connection, additional tools and materials may be required. Therefore, it is better to think through a technical solution to these problems in advance.
When connecting an electric heated towel rail, you will need tools for laying the cable and socket - a screwdriver, staples, a multimeter.
This is interesting: Sewer smell in the bathroom: what are the causes and how to eliminate it
How to replace the gasket in a heated towel rail yourself
To replace the gasket in a heated towel rail you will need:
- Find out what your heated towel rail is connected to: central heating or the hot water system;
- Write to the Housing Office to have the riser turned off;
- Pay for the service of disconnecting the riser;
- Start replacing the gasket;
- Remove paint from American women;
- Unscrew the nuts;
- Replace gaskets;
- Attach your heated towel rail and screw in the nuts;
- Make sure there are no leaks.
You can choose the right heated towel rail, as well as the parts for its installation, without any problems, since there are now quite a few manufacturers of heated towel rails. And you can choose a heated towel rail based on design and price. And now all you have to do is enjoy the work of the heated towel rail, because it is so useful in our modern world.
Decorating the installed device
All defects formed during the work must be eliminated after completing all installation work on installing a new towel dryer.
If you plan to build a plasterboard or plastic frame structure, then you should follow some rules:
- leave small, inconspicuous channels at the junction of the box and the floor, which will perform the function of drainage and indication in case of possible future leaks of the system;
- provide in the future design the presence of an opening small door located opposite the locking elements.
A convenient and aesthetic door will provide instant access to taps that allow you to shut off the coolant supply to emergency heating devices.
Bypass installation
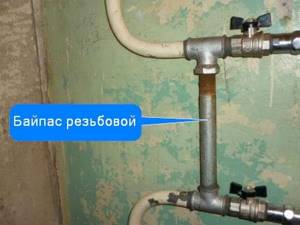
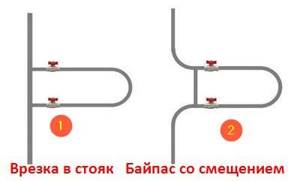
The second option is replacement with the installation of a bypass. A bypass is a plumbing jumper installed on a common hot water pipe to cut off your heated towel rail from its neighbors and make its connection not serial, but parallel.
You need a bypass so that when servicing the heating of the bathroom, you do not need to turn off the hot water every time and disconnect all residents of your section from the hot water supply.
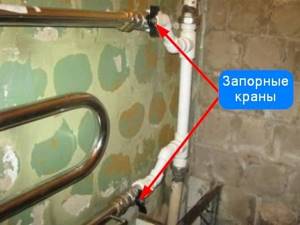
For these purposes, shut-off valves are placed on the pipes after the jumper. By closing these two ball valves, you turn off the heating of your bath without disturbing the hot water supply to your and other apartments.
There are several nuances worth noting about installing a bypass:
1. Bypass or jumper, for metal pipes, can be threaded using threaded fittings or welded. When choosing a jumper installation method, you need to consider the following nuances.
2. If the pipes in the house are old and the connections are weak, then it is preferable to install a bypass by welding. Screwing in threaded connections can break the hot water pipe at the upper or lower neighbors.
3. The normal condition of the pipes allows you to do without welding and install a bypass on the threaded connections. For this, tees are used, which allow you to install a bypass jumper.
Bypass jumper diameter
The choice of the nominal diameter of the bypass jumper pipe depends on the type of new heating device. If it is simple, single-pipe, then the diameter of the jumper should be equal to the diameter of the DHW riser pipe.
If the new dryer is complex, for example a staircase, then the choice of the diameter of the bypass jumper pipe involves many factors. Its diameter depends on:
- connection diagrams,
- location of tie-ins in the riser,
- from the displacement of the bypass relative to the riser pipe,
- supplying pipes to the heated towel rail from the riser,
- depending on the type (upper or lower) of water supply to the riser.
In some options, the method of narrowing the bypass is used, that is, its diameter is made one step smaller than the diameter of the DHW riser pipe. For example, 1" riser, ¾" header.
Important! The narrowing option and the supply diagram to the device itself depends on many factors, ranging from the upper or lower water supply to the level of installation of the heated towel rail in relation to the riser outlets. These issues must be resolved by qualified specialists
If you live in Nizhny Novgorod, then you will find a qualified plumber in Nizhny Novgorod in. Prices for installation of heated towel rails are reasonable, the quality of any plumbing work is guaranteed.
What to pay attention to
Replacing a heated towel rail in a bathroom requires paying attention to the following important details:
- Try to avoid diagonal connections. The towel dryer is not a heating radiator;
- Never make a diagonal connection to a complex heated towel rail if the lower/upper point of insertion into the riser is located above/below the heated towel rail pipe;
- Lead the pipeline to the heated towel rail with a diameter of at least DN=20 mm (25mm for plastic or 3/4″ for metal pipes);
- The diameter of the bypass shut-off ball valves is at least 3/4″;
- The distance of the device from the riser made of polypropylene pipes is no more than 4.5 meters;
- Installing a third valve on the bypass jumper itself is prohibited. With it you can independently shut off the hot water supply of your neighbors in the section.
Important! When installing the liner, a heated towel rail must be purchased and shown to the master. The installation diagram depends on its type
Why are heated towel rails replaced?
Any renovation work in the bathroom is an update. Updating old finishes, replacing tiles, changing plumbing fixtures. The plumbing fixture called a heated towel rail is no exception.
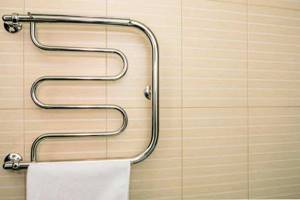
Essentially, a heated towel rail is a heating radiator made from plumbing water pipes, welded or simply bent in various designs. For connection, the device is equipped with union nuts with a diameter of ¾ inches (G 3/4″).
When choosing and purchasing a multi-pipe heated towel rail, it is important to pay attention to the location of the connection nuts. If the nuts are located at the bottom, such a device is considered a bottom connection device, if on the side, it is a side connection device. The location of the connection nuts determines the choice of connection diagram, pipe connections to the heated towel rail and, as a result, its normal operation.

Dismantling of heated towel rails in apartments and offices in Kyiv
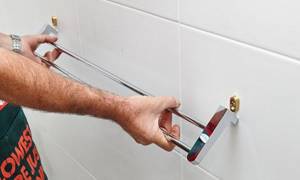
If your bathroom is due for renovation or you are not satisfied with an outdated heated towel rail (for example, it has poor heat transfer or there is not enough space for drying things), it’s time to replace it. And the first thing that needs to be done is to dismantle the old device.
In fact, the procedure for removing the structure is not very complicated, however, if you do not have the necessary skills, experience and the necessary tools, it is better to entrust the dismantling of the heated towel rail to professionals. Our company’s specialists have everything necessary to carry out such dismantling in Kyiv. The price for our services is always lower than in other companies. Experienced plumbers will quickly and efficiently complete all the work.
Most often, our client does not need to order turning off the water from the housing office - the craftsmen themselves turn off the water in the apartment or office and use special tools to remove the metal structure of the heated towel rail. Completion of all work by our specialists takes on average about two hours. We carry out dismantling of this plumbing equipment in apartments and office premises in Kyiv at the highest level. We have been successfully engaged in this activity for quite a long time.
When starting dismantling, the master first turns off the water supply and drains it from the pipe system. Next, the necessary dismantling work is carried out to remove the device. If your apartment has old pipes, the craftsmen will carefully cut off the heated towel rail and cut a new thread for installing a jumper on the riser (if it is necessary to install a new device).
If your heated towel rail is connected directly to a hot water system that does not have a shut-off valve (continuous circulation system), the entire system must be switched off to block the flow of water in your room. This fact should be kept in mind when planning work to dismantle the heated towel rail.
Dismantling old equipment can be difficult due to the threads of the couplings, which have become rusty over a long period of use. The limited time of shut-off water in your water supply system imposes additional demands on our specialists on their work speed. Remember that correct, high-quality and professional dismantling of the old heated towel rail is the key to long-term and trouble-free operation of the new device.
Recommendations for replacement
First of all, you should check the equipment of the new heated towel rail and study the instructions. Although most devices have a similar structure, the manufacturer can regulate the installation features of their product.
Dismantling the old device
The heated towel rail can be connected to hot water pipes or heating. The first option is the best, as it allows you to maintain a favorable microclimate in the bathroom throughout the year. Since only a housing department plumber has the right to shut off the liquid in the riser, you will have to contact this organization.

When installing pipes, do not forget to check them for the presence of water.
If the device will be connected to the heating system, then replacing the heated towel rail in the bathroom should be carried out in the summer. However, you first need to check the presence of water in the system. To do this, open the valve on any of the radiators, placing a container under it to collect liquid in advance.
After this, you can begin to dismantle the old device. If threaded connections were used to attach it to the pipes, then after removing water from the system, you can simply unscrew them. However, in some situations this cannot be done, for example, when the heated towel rail to be dismantled was welded. In such a situation, it must be cut out using a grinder, and then threads must be cut on the pipes.
To simplify the task, the cuts on the supply pipes should be in a vertical plane. To do this, you must first mark the location of the cut using a building level. At the ends of the cut pipes, it is necessary to make small chamfers at an angle of 45° to ensure free movement of the die. It should be remembered that dismantling must be carried out by two people - one works with the angle grinder, and the second supports the old device.
Installation of a heated towel rail:
Threading
To ensure a reliable connection, threads must be cut on the remaining parts of the pipes. The easiest way to perform this operation is with a die attached to a ratchet with a long handle. The pipe must first be coated with lubricant. When cutting threads, the tool is turned forward a half turn and then a quarter turn in the opposite direction. This is a responsible operation and there is no need to rush here. When installing a new device, the following types of pipes can be used:
- Plastic ones are the best option, as they are reliable in use. To weld them, you will need a soldering iron, which can be easily rented.
- Metal ones are a less preferable choice due to their heavy weight and susceptibility to corrosion. In addition, when working with steel pipes, a lot of welding may be required.
- Copper ones are expensive and require soldering to connect them.
Once the thread is cut, the fittings are put on it. These structural elements can be sealed using plumbing flax. If you use waterproof sealants, the connection will be permanent.
Connecting a water heated towel rail:
Working with polypropylene pipes is quite easy. When installing them, various fittings, couplings and angles are used. The welding soldering iron comes with instructions that describe the soldering process in detail. However, there are some points worth paying special attention to:
- It is strictly forbidden to rotate polypropylene pipes during soldering.
- Plumbing linen is not recommended for use as a sealant for this type of pipe.
- The supply must be made so that the distance between the coil and the wall is at least 35 mm. If the diameter of the device exceeds 23 mm, then the indentation should be increased to 50 mm.
- Plastic fittings are tightened using special strap wrenches.
- A Mayevsky valve will have to be installed in the system to bleed air if necessary.
- During installation, it is worth using “American” fittings that connect structural elements using a union nut.
Moving a heated towel rail to another wall:
Bypass installation
Bypass is a jumper , thanks to which if a leak occurs in the heated towel rail, there is no need to shut off the water in the riser. If you do not install it, the process of stopping the water supply to the device will take a long time. In addition, do not forget about the consequences of possible flooding of the apartment. Thanks to the bypass, the water supply to the heated towel rail can be quickly shut off without disrupting the circulation of liquid throughout the house.
This device is a bypass pipe installed at the point where the coil is attached to the riser. However, the bypass must be installed before the taps that regulate the flow of liquid into the heated towel rail. You should also remember that you should not install a tap on the bypass. Otherwise, the circulation of liquid in the riser may deteriorate.
Installing a heated towel rail on ready-made communications:
Attaching a new heated towel rail
First, you should screw the “American” response elements into the purchased device. It is extremely important to reliably seal all joints. Then the coil should be attached to the wall and the attachment points should be marked. At the next stage, holes are drilled for installing brackets, which are most often mounted on dowels.
Then the heated towel rail can be connected to the riser and fixed to the wall, leveling it. Fasteners should be tightened carefully so as not to damage the threads. If they are not sealed enough, then a leak will appear after water is supplied. When all work on installing the device is completed, you can check its functionality. The fluid supply taps should be opened slowly to avoid water hammer.
This is interesting: Hot water flows from a cold tap: reasons
Automatic air vent
The design of the auto air vent is as simple as a manual device.
The float, which is connected to the spring-loaded valve, is not able to allow the valve to open if there is no air. If there is air in the device, then the float goes down. This opens the valve and allows air to escape. The valve closes automatically under the influence of water. In this case, the device must be installed at the peak point - otherwise there will be no reliability in good operation.
The article presents all the reasons for the formation and method of eliminating air plugs in the coil
It is important to use the Mayevsky tap and there will be no problems in the heated towel rail
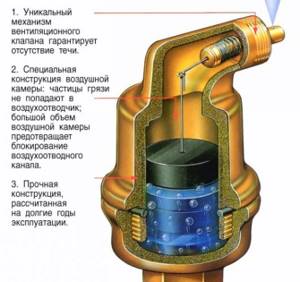
Automatic air vent design
If problems occur frequently, you need to check whether the heated towel rail is connected correctly. There is often a situation in which bad plumbers interfere with the operation of common house systems. Because of this, even calling a technician will not guarantee correct installation. At the same time, certain types of devices, due to their shape, can inhibit the flow of water, as a result of which they do not warm up well
In situations like these, it is important to consider changing your device. A correctly selected and installed coil will require virtually no manipulation of the air bleed
Where to go to replace the structure
Diagram of the heated towel rail
If you don’t want to deal with replacing the heated towel rail yourself, then you have several options for further action. The easiest way is to contact the housing office and order installation of the device there. However, not everyone is ready to entrust their home to employees of a management company.
The second option is to order installation in the same place where you will buy the heated towel rail. Large companies also provide such services. Moreover, wanting to attract customers, they often offer favorable conditions for their clients.
If you turn to the housing office for help, you will have to pay from 1.5 to 2 thousand rubles for the work. But this is only if alteration of the hot water supply riser is not required. Otherwise, the price for the work will increase many times and range from 5 to 15 thousand rubles. Bypass installation is calculated separately: from 4 to 8 thousand rubles.
Don't chase too low a price. As a rule, those who underestimate the price are those who do not hope to attract clients with quality, experience and recommendations. But an inflated price does not guarantee high quality.
How to properly install a water heated towel rail with your own hands
The installation of water-type equipment differs from the installation of electric heated towel rails.
There are several schemes for inserting equipment.
Below is a detailed process for installing a water heated towel rail with your own hands.
Connection options
There are two ways to install the device:
- Connect to the heating system. In such a situation, after removing the old device, it is necessary to install special taps, bypasses, and American valves. The equipment is connected in parallel with the heating system.
- Connect to the hot water supply system. The dryer is connected to the water supply system, connected in series. This is done directly inside the apartment itself; no additional work is required. There is one caveat to this connection - it reduces the temperature of the hot water.
Dismantling the old
The first thing that needs to be done is to dismantle the old equipment, but it is important to coordinate your actions with the housing office so that you can turn off the riser. Dismantle the equipment as follows:
- If the device does not form a single structure with the hot water main and is connected using fixing elements, then they are unscrewed.
- If the coil is welded to the riser, then a grinder is used to cut it. This must be done in such a way that the remaining part of the pipe is sufficient for threading.
- In both cases, the last step is to remove the dryer from the brackets.
Reference! The height of the riser cutout must be greater than the distance between the pipes of the new device by the length of the used couplings and fittings, which will be required in the future for installing the bypass.
Pipe withdrawal and welding
To connect the device to the water supply system, it is recommended to use polypropylene pipes
In the process, it is important to carry out high-quality welding or soldering of pipes to the water supply
Certain skills will be required to carry out such work. The pipes are connected to the coupling immediately after working with a soldering iron. It is recommended to raise the temperature of the soldering device to 260 °C.
How to make a bypass in front of the device, installation of American valves and taps
To install a bypass, you will need to make threads at the end sections of the pipes. If after removing the previous device the threads remain, then they just need to be cleaned and driven out using a die. This will improve the connection. If there is no thread, it is cut using such a die. After preparing the pipes, stop valves are installed using welding. Any shut-off valves, American valves or bypasses are installed in the same way.
Installation on polypropylene pipes with all fittings
Installing the device and connecting it to the wall is the last thing you need to do. Work is carried out according to the following scheme:
apply markings under the brackets;
prepare holes and insert dowels and brackets into them, screw them to the dryer;
fix the dryer with screws;
Fittings are used to connect equipment to polypropylene pipes, and it is important to wrap a sealing flax wrap around the threaded connection for a reliable connection and to prevent leaks.
Important!
When attaching the coil to the wall, it is important to do it level and maintain the horizontal position of the device
Features of electric heated towel rails and their installation
There are 2 ways to connect electric dryers to the network: through an outlet or directly to a junction box. The latter is safer for the bathroom. But the master will have to trench the walls to make the correct wiring.
An acceptable alternative is to make a moisture-proof outlet, placing it at a distance from water.
To install the device you will need:
- tile drills;
- roulette;
- building level;
- marker.
Stages of work:
- You need to mark the attachment points of the device on the wall, check them with a level, make holes and insert dowel nails into them.
- According to the diagram in the instructions, you need to assemble a heated towel rail.
- If installation is carried out directly to the electrical wiring, you need to connect the wires. The joints are protected with shrink film.
- Finally, you need to hang the heated towel rail on the mountings and tighten the screws.
Do not hang the device upside down; its performance will be impaired. After installation, you need to turn on the electricity and check whether heating has started.
Typical connection diagrams for heated towel rails
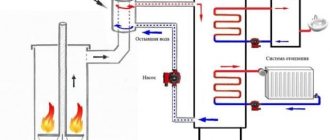
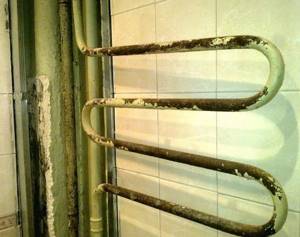
In houses of the old housing stock, a section of the riser curved in the shape of the letter “C” or “M” was used to heat bathrooms and bathrooms. The simplicity of such a PS, however, has a number of advantages. Being connected in series to the DHW circuit, the device ensures constant temperature, eliminates interference in the operation of the system by other residents and has virtually no effect on the hydraulic resistance of the main line.
A heated towel rail in the form of a riser section, although it has an unsightly appearance, is at the same time the most unpretentious heating device
With the advent of more aesthetically pleasing stainless steel heated towel rails, the need arose to replace previous devices with the least interference in the operation of the heating system. The ideal situation can be considered when the internal diameter of the riser is equal to the cross-section of the contour of the new substation. Of course, if the heating device is installed using couplings and bends of the appropriate diameter.
A complete replacement of a simple heated towel rail with a modern device made of stainless steel is only possible if fittings with a full flow area are used - there is no question of installing ball valves
If taps and fittings are used to connect the heated towel rail, or if the new heating device consists of pipes of smaller diameter than the riser, then it is necessary to use a bypass. Being, in fact, a workaround for the coolant, this simplest device makes it possible to:
- maintain coolant circulation through the riser even if the substation is connected with pipes of minimum diameter;
- regulate the temperature of the substation or dismantle it without affecting the general heating system or hot water supply (installation of shut-off valves or a thermostatic device is required);
- By passing the main coolant flow through itself, the bypass ensures a constant coolant temperature for all apartments in the house.
Depending on the installation diagram, a straight (1), narrowed (2) and offset (3) bypass is used
Over time, developers abandoned the installation of simple substations, leaving residents the right to choose and install a heating device. To do this, they began to make connections on the riser for the heated towel rail, while simultaneously ensuring normal coolant flow through a direct or offset bypass. It must be said that there is absolutely no reason to worry about the performance of such schemes - water is guaranteed to circulate through the heating device thanks to the “gravity pump” principle. It is based on the fact that the cooling coolant falls down and is replaced by masses of hotter water coming from above.

The thermogram of a heated towel rail operating on natural circulation indicates the high thermal efficiency of the “gravity pump”
For the same reason, the installation of a substation is considered the most effective, in which the coolant is supplied to the upper part of the heating device and taken from the bottom. This condition can be ensured with both lateral and diagonal connections.
The opinion that the latter method has an advantage in terms of flow rate and thermal efficiency is greatly exaggerated. However, one of the best schemes is considered to be the one in which the coolant is supplied to the near upper corner, and the return is connected to the remote lower corner.
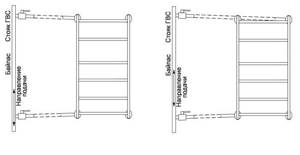
A lateral direct or diagonal connection will not cause any surprises if the connection is made taking into account the required slopes
In this case, the performance of the substation does not depend on the speed and direction of the coolant supply, and the risk of airing the device tends to zero. The only condition is that slopes of at least 3 mm per 1 linear line must be observed. m highway.
With a lateral connection, it does not matter at all whether the substation is located between the supply and return points or protrudes beyond them. The only thing that needs to be taken into account is a significant increase in the risk of airing the device if its upper part is located above the branch along which the heated towel rail is connected to the riser
Installing a heated towel rail above the point of insertion into the main increases the risk of air locks - in this case, you will need to install an air vent (Mayevsky tap)
The bottom connection of the heating device is considered less efficient and may cause its unstable operation.
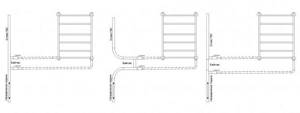
The operation of heated towel rails with bottom connections very much depends on the pressure and direction of coolant supply, so several connection schemes are used - with a straight, offset or narrowed bypass
This type of installation is recommended for use only with top supply, as well as in systems with forced circulation of coolant.
Preparatory stages
In addition to the actual work of replacing the device, it is worth knowing how to properly prepare. To do this you need to do the following:
- Coordinate repair work with the Housing Office.
- Find a suitable new product.
- Purchase all the necessary tools.
- Study in detail the nuances of dismantling and installing a heated towel rail.
Organizational issues: who should replace and at whose expense

Before proceeding with the replacement, you will need to coordinate the work through the Housing Office.
To do this, you need to contact the local housing office and write a statement, outlining your request, so that authorized persons turn off the hot water in the house on the appointed day.
If the device is being replaced in a Khrushchev building, then at the same time you need to find out the pressure level in the pipeline. Depending on the pressure parameter, pipes for connecting the device are subsequently selected.
When a heated towel rail is replaced in a privatized apartment, the owner of the apartment pays for the replacement and all work, if this device does not form an integral structure with the water supply or heating system. That is, if it has threaded connections and is disconnected from the water supply system, then housing and communal services employees are not required to replace it free of charge.
Important! If the heated towel rail is an integral system with hot water supply, then all work on repairing and replacing the device is carried out free of charge by housing and communal services workers.
Preparing instruments before changing
Required:
- PVC pipes;
- apparatus for welding and soldering polyvinyl ;
- perforator;
- spanners;
- level;
- roulette;
- marker;
- scissors for cutting PVC pipes;
- fittings and couplings for connection;
- ball valves, Mayevsky valve.
Coil connection
Installation of such equipment is carried out in several stages. The first step is to shut off the riser and drain the water from it. If you live in an apartment building, then specialists from the housing office will deal with this issue. To do this, you must first write an application to turn off the riser.
After the riser is ready for use, the old heated towel rail must be dismantled. Sometimes it is simply cut off using a grinder. Then new equipment is installed in its place.
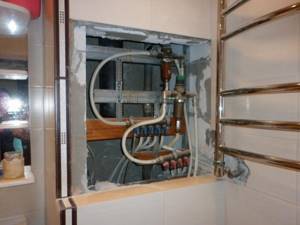
In general, in such conditions, the best option is to replace not only the heated towel rail, but also the riser. If you change it to an option made of polypropylene, you can immediately weld the necessary fittings to it, which will ensure the possibility of switching to threads and, accordingly, ease of installation of the equipment.
The main thing during such work is to ensure that the required diameter is available. The pipes should not be smaller than the previous ones, otherwise this can lead to serious problems in the hydraulic system. After installation, the new or old riser can be disguised using a decorative box. The heated towel rail itself, as well as its connection points to the main pipe, remain visible.
Even with such a simple installation procedure, mistakes are often made. The first of them is the use of press fittings with subsequent narrowing of the internal diameter of the pipe. In this case, the hydraulic resistance, of course, becomes higher, which is why the performance of the riser sharply decreases.
The second mistake is installing shut-off valves in front of the heated towel rail. In general, these devices are necessary, because with their help, if necessary, you can turn off the equipment for repair or dismantling.
But in the case of a coil, the valves installed on it will shut off not only the heated towel rail, but also the entire riser. In this case, the neighbors are unlikely to thank you, since you will immediately turn off the heating in the bathroom of everyone who lives above and below you.
However, stopcocks are still a good thing, so you shouldn’t give them up. In this situation, installing a bypass will save you. This is, in fact, an additional pipe that can ensure continuous circulation of water through the riser if the shut-off valves are blocked.
For this purpose, the bypass is located in front of the taps. Moreover, it can either connect sections of the riser directly or be shifted towards the bend of the coil. The idea is to give hot water an extra path when it can't get through to the heated towel rail. This way its circulation will not be disrupted.
Again, keep in mind that it is strictly forbidden to install a valve on the bypass itself as it is on the riser itself. The reason is the same: you should not be able to cut off your neighbors' hot water supply to the bathroom heating system. Of course, if you live in a private house, you can place shut-off valves anywhere. But in apartment buildings you will have to take into account the existing rules.
Location options
Often a new coil with unusual sizes and shapes is selected for replacement. However, it is not always possible to install it in place of the old structure. Therefore, the question arises as to which option for its location should be chosen.
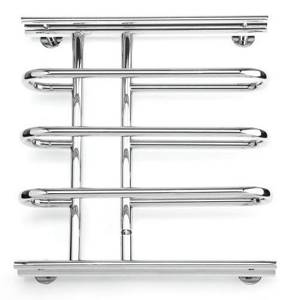
You can buy different types of heated towel rails:
- water - considered the most popular, as it is easy to install and operate;
- electrical - its installation is complicated by the need to connect it to the power supply system with the obligatory use of an RCD and grounding;
- combined - comfortable and convenient, as it will work during interruptions in the supply of electricity or hot water from centralized systems.
Water
Combined
Electric
The most common choice for replacement is a water device, and it can be connected to heating or hot water supply. If it is required that the product be hot all year round, then the second connection scheme is selected. If you choose a heating system, you can only enjoy the opportunity to dry things on a heated towel rail during the heating season. In winter, it will not be possible to change the design, since it will be impossible to shut off the system in the house.
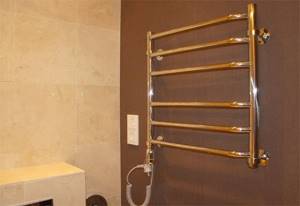
Often, instead of a regular old appliance, a heated towel rail equipped with a side connection is chosen. Installing it is quite a difficult job, but it turns out to be a beautiful and interesting design in the bathroom. To install it, you need to understand the method of connecting it, and this option is most often chosen if the main structural elements are recessed into the wall, so there are only exits from the outside.
If, when replacing a heated towel rail, it is moved to another place, then the recommendations of specialists are taken into account:
- it is important to choose not only a high-quality, but also a convenient coil for the bathroom, so that there is no need to move it or repair it;
- since during the work process it is necessary to completely turn off the hot water riser, it is advisable to warn neighbors about this in advance so that disputes and conflicts do not arise with them;
- if you plan to connect the product to the heating system, then work is allowed only in the warm season, when the radiators do not heat up;
- for an attractive appearance of the bathroom, it is advisable to hide all structural fastening elements in the wall, and you can also use a false wall or various decorative panels;
- the project for moving this product must be agreed upon with the management company, and this is done before the actual work is performed, so that conflicts do not arise with utility workers;
- When choosing the location of the heated towel rail, it is taken into account that a lot of free space should be left for unhindered maintenance of the product.
Moving the coil additionally takes into account that it should be convenient to use for the owners of the premises.
How to replace a heated towel rail: method
A bypass in front of the shut-off valves of the heated towel rail is correct.
So, as promised, we describe a method for replacing a heated towel rail with your own hands. First, let's look at where it is installed. There are few options:
- on the DHW circulation pipe;
- on a high temperature heating system.
It is almost always installed on hot water supply systems. The advantages of such an installation are that the heater is hot even when the radiators are cold, that is, when the central supply of warm water to the heating system is stopped. Minus - if there is no hot water, the heated towel rail is cold. It is also possible that there is still hot water, but it still does not heat. What's the salt in this? The fact is that some housing offices turn off the circulation in the DHW circuit during the summer.
Signs of this phenomenon: warm water begins to flow from the tap a few minutes after turning it on. This means that the DHW circuit operates in open mode, without return. And the towel is placed right on it, it is also called the circulation pipe.
In this case, replacing the heated towel rail with your own hands will begin with the fact that you will need to drain the water from the riser. Then you cut out everything unnecessary and install the new heating device on the American ones through ball valves.
Just keep in mind that if you turn off the taps, the circulation in the hot water system will stop. Therefore, it is better to add a bypass (a pipe one step smaller in diameter than the heating device itself and the main line) in front of the taps. If there are taps, then replacement becomes completely simple. How to change a heated towel rail in the bathroom:
- remove the old heating device, having first disconnected it from the circuit;
- attach a new towel with American taps to existing taps;
- mark the holes for fastening;
- remove the dryer and drill holes in the wall;
- install the fastenings, and the heating device itself is on them;
- You clamp American ones without pre-packing the threads.
Before changing the heated towel rail, you need to count the number of turns of the fittings so as not to unscrew it when tightening it. The threads are then packaged and the taps are installed on the circuit. Further work is carried out according to the above scheme. For a heated towel rail in a heating system, the installation is no different from installing a regular battery. We have already written about the installation of heating radiators in one of our previous articles.
Proper preparation is the key to success
Dismantling a heated towel rail requires preliminary preparation. First of all, you need to coordinate your actions with the institution responsible for the water supply. Then they start purchasing tools and materials.
Immediately before starting work you will need:
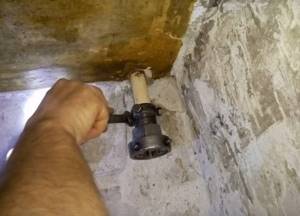
- shut off the supply of hot water;
- in the basement, find a return valve and release the water;
- remove the old structure by unscrewing the nuts or cutting it off with a grinder.
To work you need to prepare special tools:
- welding machine;
- pipe cutting equipment;
- wire cutters;
- fitting;
- fixing elements;
- Ball Valves.
Before starting installation, you should make proper calculations. The new heated towel rail should be located at a distance of 35 cm from the wall with a diameter of 23 cm; if the diameter exceeds these parameters, then a space of 50 cm must be provided. The structure should be 2 meters away from the hot water supply riser. Make marks on the wall with a pencil in the places where the mounting holes will be made. Holes for the system are made using a drill, then plastic dowels are inserted into them.
When starting work, you need to soberly assess your capabilities and calculate the power of the system. Mistakes can have serious consequences. If you plan to replace the entire structure with your own hands, you need to have the necessary equipment, and most importantly, be able to use it. Expert advice will help you install the system correctly.
If you plan to move the heated towel rail to the side in relation to the hot water riser, you will need permission, which is obtained from the Housing Office. The further away the structure is placed, the lower the water pressure will be throughout the house.
How to change a heated towel rail in the bathroom
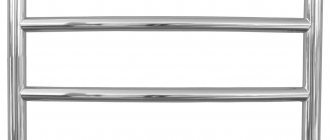
One of the indispensable attributes of a bathroom is a heated towel rail. It has several functions: heating (hot water circulates through it, transferring its heat to the room), drying clothes, and complementing the interior. But, like any other equipment that is forced to be in conditions of high humidity, typical of a bathroom, the device eventually becomes unusable and needs to be replaced. This operation is not too complicated, so it can be done on your own. The main thing is to know the sequence of how to change a heated towel rail in the bathroom with your own hands.
What are the approximate prices for labor to replace a heated towel rail?
After all the bureaucratic problems are completed, you can begin installing a new towel dryer. There are three ways to mount the unit :
- if the center distance and pipe diameters completely match, there is no need for alteration (the simplest method);
- the use of welding work in the absence of alignment and poor condition of pipes;
- use of threaded connections (the most common option).
At the moment, the approximate cost of replacing a heated towel rail is:
- installation on a ready-made pipe line without adjustment - 1,500 rubles;
- installation on a ready-made eyeliner with adjustment - 12,000 rubles;
- replacement of the unit with installation of a jumper and two taps up to size 3/4 – 15,500 rubles;
- moving the device with pipe connections without bypass – 14,000 rubles;
- moving the unit with pipe connections and installing a bypass – 19,000 rubles.
Otherwise, we can say that the cost of the work depends on the complexity of the entire structure.
To save your own money and save your nerves, if possible, you should resort to the services of companies that have an SRO certificate and take all the hassle of obtaining permission from the housing office. You can use another alternative option to avoid unnecessary problems - an electric towel dryer.
Additional information for self-installers
Sometimes inexperienced craftsmen make mistakes and these omissions lead to the fact that the heated towel rail remains cold despite the proper operation of the hot water supply system, and the whole problem is an incorrect connection.
To prevent this from happening, you need to pay attention to the correct and accurate connection diagrams, especially for electrical and combined devices for drying towels. The water supply to water and combined towel dryers can be:
The water supply to water and combined towel dryers can be:
- lateral (both pipes are directed either to the right or to the left)
- vertical (the upper pipe is directed upwards, the lower one is directed downwards)
- lower (both pipes point down).
In houses with central heating, all connections in the bathroom are first made under a water heated towel rail. In order to install a ladder dryer, you will need to carry out work to move the pipes.
And also, the water pipe must be equipped in the upper part with an air valve (Mayevsky valve), which is needed to remove air in the pipe. If this is neglected, an air lock may occur and the heated towel rail will not be able to operate at its full available capacity.
Dismantling
Serial Soviet coils are connected to the main line by means of a threaded coupling or by welding. The first method allows for disassembly: loosen, screw the locknut all the way, and twist the coupling with a gas wrench.
Paint on the threads that interferes with the operation is removed with a metal brush (brushing) or burned with a torch. The thermal method is suitable for major renovations of a bathroom, otherwise the lining is protected with an asbestos sheet.
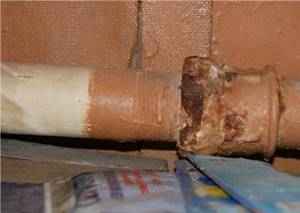
The welded elbow is cut off with a grinder. Do the same with brackets attached to pipes. To avoid damaging the finish with flying abrasives, place plywood or cardboard between the knee and the wall. The latter is convenient to attach to the tile with tape.
Replacing an unusable heated towel rail without updating the bathroom line is irrational. The chrome ladder will serve properly, and fistulas will appear on the steel riser and inlets, so think about plastic.
Cutting the steel route near the ceiling and floor is a bad idea: pipes tend to leak in the ceiling. It is better to agree with your neighbors to jointly replace rusting pipes with fiberglass-reinforced polypropylene pipes. If the answer is negative, leave nozzles protruding 100 mm above the plate so that the thread-cutting tool can fit. Sometimes you have to dismantle the tiles to free up space.
If the riser is not touched, as a rule, they try to choose a towel that is identical in its center-to-center dimensions. For bent modifications of other dimensions, the insert will need to be moved. Sometimes they redo the plastic wiring, then they make do with plastic scissors. When cutting off the existing one, take into account the need to install taps and lintels.
Attaching a new heated towel rail
Installation of the heated towel rail is carried out as follows:
- The American counterparts are screwed into the purchased heated towel rail. All joints are sealed.
- The coil is applied to the wall, and attachment points are marked.
- Holes are drilled in the wall for attaching brackets, which are usually mounted on dowels.
- The heated towel rail is connected to the riser, after which the fastenings are fixed to the wall. It is recommended to first level the coil. Connections must be tightened carefully so as not to damage the threads. But their insufficient compaction can lead to the system leaking.
- To check the tightness, we fill the coil with water. The taps must be opened smoothly to avoid water hammer.
- If leaks are detected in the pipes, we turn off the shut-off valves and eliminate any deficiencies.
Thus, knowing how to replace a heated towel rail, you can do the work yourself or supervise the work of professionals.
What is the procedure for replacing an old heated towel rail through the housing office?
How to choose a contractor?

If you decide to entrust all the work to professionals, then you need to seriously think about their choice - you should not trust the first one you come across.
Here, naturally, the cost of services and the time of their provision play a big role. However, we must not forget about the reputation of the company. Moreover, they must provide documentation that gives them the legal right to carry out such work. The main documents are the SRO certificate of approval and the contract. It is the SRO certificate that is important, since the license has been canceled since 01/01/2010.
Of course, replacing a heated towel rail and the price for performing the work in this case will be higher than that of ordinary performers. At the same time you receive the following benefits :
- qualified order execution;
- high-quality components;
- contractor's liability;
- warranty obligations.
All this can be lost if the replacement is made by a “left” plumber. It’s good when negative consequences can be avoided, for example, a simple leak, after which you will have to redo not only all the work, but also carry out repairs for flooded neighbors. Therefore, it is better to immediately contact a company with relevant experience and documentation.
Let's go to the housing office

So, the choice of the master has been made, but this is only the beginning of the process. Now there is a not entirely simple procedure for disconnecting the riser to which the towel drying device is connected. Some companies, when replacing an old heated towel rail through the housing office , take on this hassle, although they require a certain fee for this.
However, not everyone is able to pay for this service, so we will consider the process in more detail. The procedure is as follows:
- contact the housing department with an application containing a request for permission to change the old towel drying device;
- upon receipt of permission, contact the dispatcher and agree on the time for the work to be completed;
- install the unit and check its operation;
- invite a representative of the housing department to check the compliance of the work performed with the permit.
Housing department employees do not have the right to refuse to disconnect if the contractor’s company has all the permits. The reasons for refusals are always related to attempts to impose their services, and at inflated rates. In case of refusal, the reason must be indicated, and if the illegality of the actions of the office manager is discovered, a lawsuit should be filed.
Disposal of an old drying plant
Towel dryer replacement diagram
After all, if a sudden leak occurs in a pipe, the emergency service will not arrive immediately, and the liquid that has escaped during this time may well damage not only your repairs and bathroom equipment, but also simply flood the neighbors living below you.
In fact, the jumper is an ordinary PVC pipe, which is most often mounted vertically at the connection points (input/output) of the heating riser to the heated towel rail. At the same time, ball valves (so-called shut-off valves) are fixed at the ends of the heated towel rail itself, which, if necessary, will block the flow of hot liquid passing through the entire structure without disrupting the circulation of the main riser in the system.
Installation and installation of a new towel dryer
Independent consists of the following actions:
- Selection of installation type - water, electric or combined.
- Select the connection method - to hot water or a heating riser.
- Fixing a pre-assembled structure (coil-towel rail), purchased at a hardware store, onto brackets and connecting the ends of the installation to a hot water or heating riser.
- Calculation of the distance from the wall to the axis of the aluminum coil pipe, which depends on the diameter of the pipe itself. For example, if the diameter of the coil pipe is less than 23 mm, then it is recommended to take the standard distance to the wall at least 35 mm, with a larger pipe diameter - more than 50 mm.
- Checking the tightness of the coil mounted on the brackets.
- When installing the coil, observe a special slope (about 5-10 mm) so that the water coming from the heating riser or hot water pipe moves according to the pattern from top to bottom.
This event is quite complex and responsible, so if you are unsure of your capabilities, it is best to entrust the change of the coil in the bathroom to professional plumbers. They will perform the installation efficiently, with a guarantee, much faster than you and for an affordable price.
How to install or replace a towel dryer?
As already reported, such work is completely doable with your own hands, only in this case all responsibility for the quality of installation will rest with you. Connecting the device in apartments is carried out using two methods :
- to a central or autonomous heating system (CO);
- to the hot water supply system (DHW).
At the height of the heating season, connecting to a central heating system is extremely difficult, one might even say impossible.
The connection process consists of the following points:
- dismantling a faulty device;
- welding or soldering of pipes;
- bypass installation;
- installation of a new device.
But this is not all that the apartment owner will have to face.