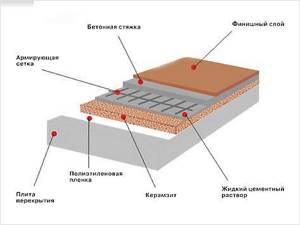
Warm floors are an opportunity to provide maximum comfort in the home. Thanks to this system, you can easily control the temperature in the room and do not depend on central heating. But for this, installation must be carried out in full compliance with technology, and all materials must be correctly selected. One of the most important points is the installation of a protective top layer over the heating pipes. Having studied how and with what to fill a warm water floor, you can get to work.
How to fill a warm water floor
Preparatory actions
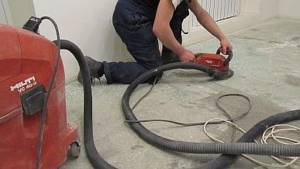
Sometimes, when preparing the surface for screed, people do not pay attention to important details that, in fact, play a big role. The rough surface must be thoroughly cleaned of debris and small stones.
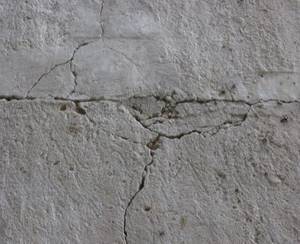
Before properly pouring the heated floor, a damper tape with a thickness of at least 40 mm is laid along the walls of the room in a circle. It is needed in order to prevent future cracks in the concrete layer from the effect of thermal expansion. The damper tape should not be neglected under any circumstances. Cracks in concrete will damage the heating system very quickly. It is necessary to make a heated floor cake on concrete according to all standards.
When the room area is more than 40 square meters. meters, or one of the sides is more than 8-9 meters, the concrete coating must be divided into zones using thermal joints. To do this, use a T-shaped damper tape. It is laid before concrete work begins. Each zone must have its own heating circuit; this should be designed in advance.
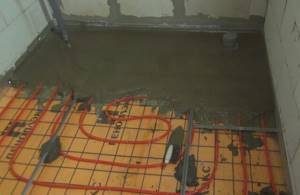
Sometimes craftsmen lay reinforcing metal mesh on top of the insulating board. If the heat insulator is durable and the load on the heated floors is not very large, such a mesh can be ignored. The mesh is attached to the concrete through a layer of insulation. The water circuit is twisted with mesh rods. This method is convenient, but not justified in all cases. If the reinforcing layer is laid directly on the heat insulator, the mesh will not withstand the vertical pressure on the floors. It will perform a single function - convenient fixation of the water pipeline.
When using durable insulation (foam glass), the situation will be different. If soft insulation (foam plastic) is used, the screed must be additionally reinforced. Reinforcement, which is placed on top, and not in the concrete itself, neutralizes only horizontal deflections. To prevent the formation of splits, the mesh is placed closer to the center of the concrete covering, above the pipes.
Sometimes they use an option where two meshes are laid: on top of the pipes and under them.
There is another way using one grid. It is raised above the heat insulator by 15-20 mm using pads. The pipes are laid on top.
A screed where the water circuit is completely embedded in concrete will be stronger. But the cost of constructing a heated floor is increasing. The total thickness of the concrete layer will be 20-30 mm greater.
On a note. Before starting concrete work, water should be poured into the circuit, creating working pressure in the pipes. Sometimes they use compressed air. It is prohibited to heat the pipes.
How to make a water floor correctly - step-by-step installation instructions
In fact, anyone can independently make a warm water structure in a private house on a concrete floor.
The main thing is to strictly adhere to the technology during installation, purchase good quality material and prepare an installation diagram for the water system.
How the device works
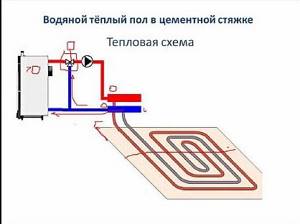
Before you start designing heated floors yourself, you need to understand the principle of operation of the heated floor system.
The process is simple: water is heated in a boiler and, under the action of a pump, enters the mixing unit. In it, the coolant is combined with cooled, waste water to the required degree (40 - 50), and sent to the distribution unit, to which all loops of the water floor are connected.
The supply device directs water into the pipeline. The pipes transfer heat to the screed and the finishing coating, after which the cooled water is returned to the collector and from there to the boiler for heating.
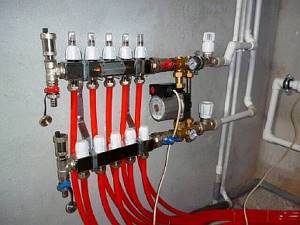
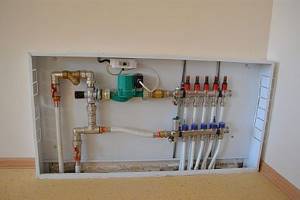
Arrangement of the manifold cabinet
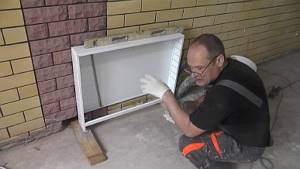
You need to start installing a warm water structure in a private house with your own hands by placing the manifold cabinet in the planned location. If you want to recess a cabinet into the wall, then you need to hollow out a niche for it, and also make passages for pipes through the building slabs.
The cabinet is placed at the same distance from all floor hinges. All this dirty work must be completed before laying the “pie”.
In addition, the manifold cabinet should be equipped with all required parts (manifold, pump, vent and drain valve). The mixing unit must be placed between the collector and the heating boiler. It is also recommended to install a shut-off valve between the manifold and the pipeline.
Installation of the first layer - subfloor
If you plan to carry out the installation yourself at the stage of building a house, and the construction of the “pie” will be on the ground, then you need to pour a rough concrete screed.
Before this, you need to lay and compact a layer of sand, cover it with plastic film, and only then pour the solution.
If there is already a concrete floor, then you need to clean it of debris and eliminate all unevenness. Only minor flaws are acceptable.
Second stage - damper tape
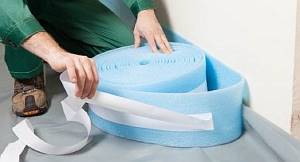
The purpose of the damper tape is to compensate for the temperature expansion of the concrete solution. She needs to tape off the perimeter of the room.
There is no need to neglect this process, as this will affect the quality of the floor.
The third stage - thermal insulation
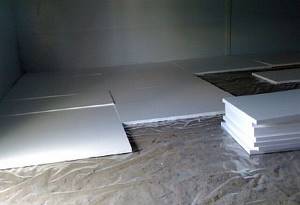
Before laying the insulating layers, stripes are cut on the wall, reflecting the level of the future finishing coating. If there is a damp basement below, it is recommended to lay a layer of waterproofing film. It needs to be laid with an overlap, overlapping the walls.
After this, you can lay an insulation product on it - polystyrene foam boards. Laying should begin from the farthest corner of the room, and place the material close to the walls with the marked side up.
If, when installing the floor yourself, you use mats with a lock, then they should be placed so that the protrusions of adjacent elements coincide and snap together to form a single canvas.
The slabs must be placed strictly horizontally; this can be checked with a laser level. When laying the second layer of insulation, it is positioned perpendicularly.
The slabs are fixed with disc-shaped dowels to the concrete rough surface at the joints and in the center of the sheet, and all joints are taped with construction tape.
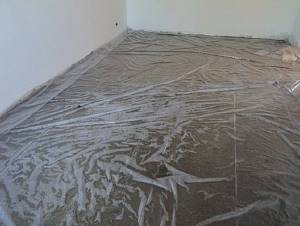
The fourth stage - marking and waterproofing
When placing a water floor heating element, in order to simplify the process, you need to mark the slabs of heat-insulating material yourself, according to the developed diagram. If profile mats are used, then they already have markings.
For waterproofing, polyethylene should be laid over the entire area of the room - this will give the device reliability and durability. An overhang of 50 mm should be made on the walls; this excess should be carefully compacted with a spatula between the “pie” and the walls.
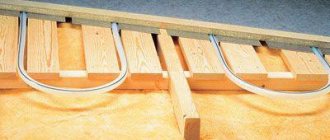
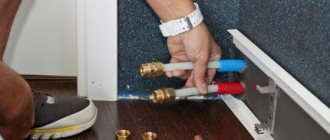
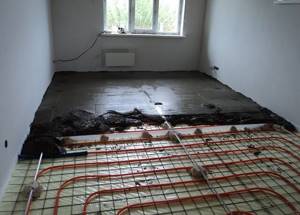
Fifth stage - installation of pipes
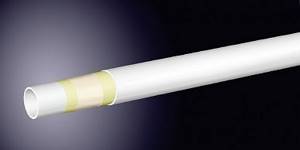
You need to start working on installing the heating element yourself by unwinding 15 - 20 meters of the circuit, and putting a heat-insulating sleeve and connecting fitting on its end.
Important! Since there is a risk of the tubular product breaking when unwinding it, it is recommended to use a special tool for unwinding the coils. Doing it yourself is much longer and more difficult.
The pipe must be placed on the floor surface in accordance with the markings made. The laying of the pipeline should begin from the manifold cabinet, according to the “snake” or “snail” pattern, and end with the output of the second end also to the manifold.
The contour is placed freely, without tension, and fixed with harpoon staples. The so-called transit pipes that pass through walls or transition areas are additionally insulated.
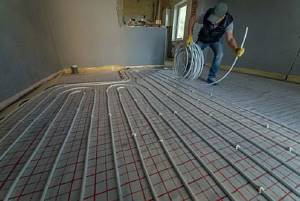
The standard laying step is 30 - 40 cm, at turns 15 - 20 cm. Bending the contour must be done carefully so as not to cause a crease
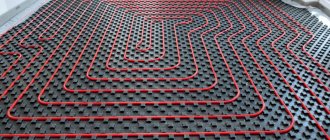
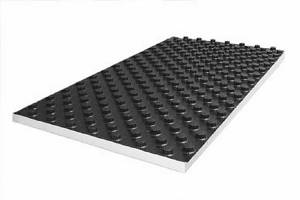
When using polystyrene foam boards with bosses, the pipe installation process is greatly simplified.
The heating element is placed in the grooves between them, and thereby tightly fixed.
Sixth step - connection and crimping
Both ends of the circuit, placed in a heat-insulating sleeve, are connected to the corresponding outlets of the collector using fittings. One to the supply output, the second to the return. Thus, it is necessary to connect all floor contours.
Crimping involves checking the quality of the laid line. This should be done without fail, since after filling the screed it will not be easy to fix any problems that arise.
Pressure testing is filling the system with water under high pressure. The test pressure should be 2 times greater than the working pressure. During the first 30 minutes, it is allowed to reduce the pressure by no more than 10%, in the next 2 hours by 15% of the original value, while the water temperature does not change. Verification time is 24 hours or more.
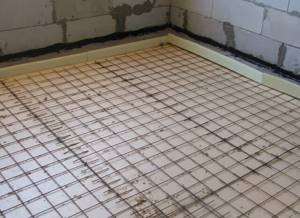
Seventh step - reinforcement
When building a warm water floor in a private house with your own hands, you need to remember that the structure should not be movable. Therefore, it is necessary to carry out work on reinforcing the floor, that is, laying a reinforcing mesh. The size of the mesh cells is equal to the laying step of the contour. A product with a rod diameter of 3 mm is suitable.
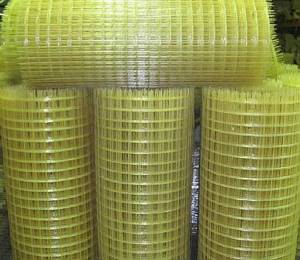
The mesh needs to be laid over the heating elements, overlapping one cell on top of the other. The products should be connected to each other using plastic clamps or wire. Additionally, the mesh must be secured with clamps to the pipe in several places.
For your information! It is better to use a metal product, the reinforcement is rough and can damage the surface of the contour.
A good option would be a plastic mesh, it is not expensive, it is soft, so it will not harm the underfloor heating pipes, it is available in rolls, which simplifies the installation process.
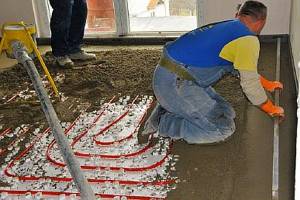
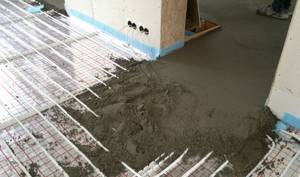
Eighth step - pouring the screed
It is necessary to pour a concrete screed onto a warm water floor if there is a pressure in the system of 5 bar. For this, any ready-made mixture with good thermal conductivity properties is suitable.
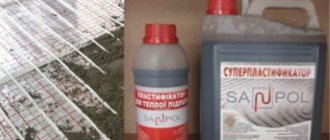
When making the solution yourself, you can use cement grade M300 and higher. Since there will be a large mechanical and temperature load on the screed, it is necessary to add plasticizers and fiber to the composition, they give mobility to the mixture and the strength of the future surface.
The mobility of the solution is very important when pouring a heated floor, because the composition must adhere well to the pipes on all sides. The ratio of cement to sand in the mortar for pouring the screed is 1 to 3. And 0.45 water is needed per 1 kg of cement.
The screed mortar must be of high quality, so when making it yourself, you need to use special equipment: a concrete mixer or a construction mixer. The time for mixing the composition in a mixer is 5 - 7 minutes, in a concrete mixer 3 - 4.
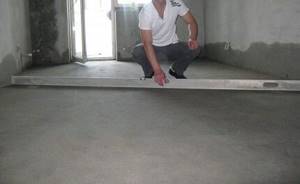
If you plan to apply the solution yourself, it is recommended to use beacons to ensure the floor is level. For this, a metal profile is suitable; it is quite rigid and has a smooth surface. The height of the beacons should be equal to the level of the finished floor, minus the finishing coating.
To fix the profile, you can make “bumps” from concrete mortar into which the beacons are embedded. Beacons should be placed at a distance of no more than 30 cm from the wall, and the interval from each other should not exceed 1.5 meters. Otherwise, the solution will settle, which will lead to the formation of pits.
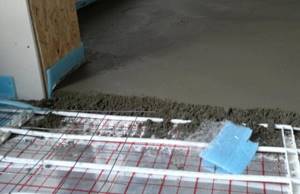
The screed needs to be laid at one time, so if you are doing the work yourself, you will need an assistant so that the process is not interrupted. The room in which the screed will be installed should not have a draft or direct sunlight.
Filling should begin from the far corner of the room, in stripes. Each section should be immediately leveled and unevenness should be eliminated; a rule is used for this. After 48 hours, it is necessary to clean the surface and trim off the excess damper tape. The next day, the beacons need to be removed, and the recesses should be sealed and leveled.
Then, the screed is wetted and covered with film. The floor should be sprayed periodically for 10 days. After which, the solution is left alone until it sets completely. In total, from the moment the screed is poured until it dries, it will take about 28 days.
Important! It is prohibited to turn on the device until the solution has completely hardened.
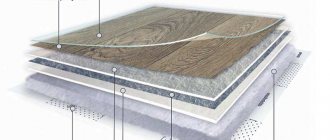
Stage nine - finishing
Owners of private houses install various floor coverings on warm water floors. When choosing a material, you need to familiarize yourself with the characteristics of the product, with the presence of markings on the packaging that allow it to be laid on heated floors. More often, tiles or laminate are installed on the water system. The tiles can be fixed to the surface using a special adhesive.

When laying laminate flooring on a heated floor, a heat insulator is not required. The main thing is that the material has a quality certificate and is combined with heated floors, since when it is heated, harmful substances can be released. In addition, when using laminate flooring, it is necessary to provide the floor with ventilation gaps. To do this, indentations from the walls of 10 - 15 mm are made, which are then covered with plinths.
The laminate should lie on a warm floor to become equal in temperature, and only then can it be laid.
A mixture of cement and sand
How to properly fill the floor under heated floors with a water circuit? The most common type of screed is made of cement and sand. It is easy to work with; sand particles act as an excellent plasticizer.
Typically, for concrete work in living rooms, cement-sand mortars of grade 150 are used. For installing a water floor, it is recommended to use M200. With increased loads on the floors, you can use a higher brand:
- M200-M250 when installing floors in retail premises or public buildings;
- M300 is used in warehouses and garages.
Factory mixtures, which will be delivered to the repair site, are purchased at mortar units. In stores they are packaged in bags. You can make the mixture yourself. This is a more labor-intensive way, but economical. You need to maintain the dosage of the components and find river sand with a coarse fraction.
Cement-sand mixtures for damp, wet rooms (bathrooms, swimming pools) are made with M400 cement. M500 cement quickly gains strength and is suitable for rooms with dry floors. The recommended thickness of underfloor heating screed is about 40 mm. In this case, laying a water-heated floor in a screed will be carried out without difficulty.
How to properly fill a warm water floor so that it lasts a long time? It must be resistant not only to mechanical, but also to thermal stress. It is recommended to add polypropylene fiber to the solutions: 900 grams per 1 cubic meter. The cost of such an additive is small, but it will increase the level of strength of the screed and prevent the appearance of small cracks. You should be aware that the fiber additive does not replace the reinforcing mesh.
Calculation and selection of materials
According to the rules, a heated water floor in a private home must be used for several decades, so the choice of components must be approached with all responsibility.
You should not save excessively on material, buying something that is not expensive and of low quality. Preference should be given to products with a long service life, because a structure filled with concrete is difficult to repair.
Choosing pipes
When installing water systems with your own hands, cross-linked polyethylene pipes of the PE-X and PERT brands are most often used. The advantage of PE-X products is that they have a high crosslink density, which provides a memory effect.
That is, a contour stretched or deformed under the influence of a heated coolant is able to take its original shape. In addition, this model is equipped with axial fittings, so it can be safely walled up under a concrete screed.
But PERT products have collet fittings, which means installation is permissible only in a “dry” way. Therefore, these pipes are recommended only when screeding a single piece of the product, when the fittings are located at the points where the circuit is attached to the manifold.
Many people are attracted to polypropylene pipes because they are not expensive, but they are often of poor quality, so experts do not recommend them.
A good option is copper, they are durable and have high heat transfer, but their cost is quite high. But metal-plastic pipes are excellent value for money. They do not form corrosion, are lightweight and easy to install, as they bend easily.
For your information! Professionals do not recommend using a composite contour with aluminum foil, because the metallized surface may peel off.
If increased insulation is required, it is better to use a product with an internal coating of polyvinylethylene.
For water heating devices on a concrete floor, the pipes should have a wall thickness of 2 mm and a diameter of 16, 17, 20 mm. This information can be found on the products themselves.
When choosing a circuit, you should give preference to proven and well-known manufacturers: Rehau and Valtec, Tece, KAN, Uponor. In addition, when purchasing, it is mandatory to check the availability of a certificate of conformity for the product.
It is also necessary to purchase clamps with which the heating element will be attached to the concrete base. In cases where mats with bosses are used as insulation, there is no need for them.
Read a detailed article on how to choose the right pipes for a heated floor system.
Insulation
Thermal insulation material is an important layer of a heated floor. It is designed to separate the heat generated by the pipes from the concrete base and direct it upward. Recommended substrates from:
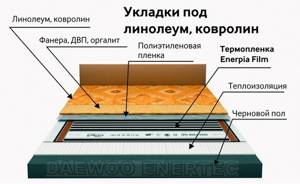
- foil polyethylene - especially for floors with minimal thickness;
- profile polystyrene mats - it is better to take a product with protrusions for laying pipes and the presence of locks for fixing the sheets together - this will facilitate the installation process;
- extruded polystyrene foam boards - they have increased strength and a good level of thermal insulation.
Mineral wool is not recommended for placement in a “pie” of a heated floor laid in a “wet” manner, since it absorbs some of the moisture from the solution.
For your information! The thickness of the thermal insulation material depends on the characteristics of the room.
On the ground floor, the thermal insulation layer should be thicker. On average, the size when laid on the ground is 10 cm, above an unheated basement - 5 cm, above a warm room - 3 cm.
In addition, you will need to buy fasteners with which the insulation will be fixed to the floor (dowels).
Components for manifold
The collector and mixing unit is the center of the entire structure; the coolant is distributed and directed into the main line. In addition, it helps monitor the operation of the device and regulate the temperature.
The collectors are not sold as a complete set, so you will need to purchase components separately. It is better to trust a specialist, but if you decide to do it yourself, you should remember that the following assembly parts are needed:
- manifolds with tuning valves;
- fittings for connecting the circuit - they are selected individually;
- automatic air vents;
- brackets for attaching the device to the wall;
- drainage taps;
- metal cabinet;
- mixing tank and pump to ensure coolant circulation;
- thermometer to determine the temperature level.
Correctly selected parts of the collector assembly contribute to the efficient functioning of the device.
In addition, to install a heated floor you will need to stock up on cement, sand, plasticizers for preparing concrete mortar, damper tape measuring 100 - 150 mm wide and reinforcing mesh.
Screed from dropouts
If you pass crushed stone through a construction sieve, you will get a fraction of particles up to 1 cm in size. This is screening. It is similar to sand with a coarse fraction, but the grains of sand are round in shape, while the particles of screenings are chipped, with sharp edges. This structural feature significantly increases the strength of the mortar compared to sand. This solution is more difficult to install, but the effort is ultimately worth it.
A warm floor under a solution with this composition is reliable. You can save money by using the M150 mixture. No fiber need to be added.
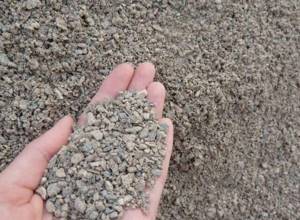
The inconvenience is that it is difficult to find a concrete layer from screenings at mortar units. Large fractions may be present in the purchased solution. This will significantly complicate the process of leveling the screed. Pebbles larger than 2 cm are acceptable according to GOST, so manufacturers produce such a solution in accordance with the standards.
If you are concerned about the question of how to properly fill a heated floor in a house, it is more advisable to prepare the solution using a home concrete mixer, using fine screenings.
Cement-sand screed
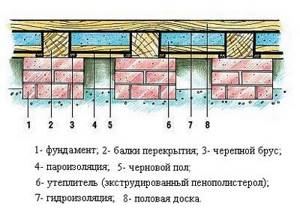
Scheme of floor insulation in a bathhouse.
Filling is carried out after laying the contour and completing hydraulic tests. Recommended concrete is from grade M300. The thickness of the screed should be 3 cm above the pipe. This is due to the fact that, in addition to achieving the required strength, it results in a uniform distribution of heat over the floor surface. If the thickness of the screed, according to calculations, is assumed to be 15 cm or more, then additional calculations of the operating mode of the floor will have to be made using correction factors. When creating a concrete floor with your own hands, you need to remember the main nuances of the technology:
- the thicker the screed, the longer it will take to bring it to real operating mode after starting the thermal circuit;
- the greater the thickness of the cement screed, the higher the inertia of the entire concrete floor heating system;
- The less thermally conductive the screed is, the higher the temperature of the coolant will have to be raised.
Heated floor installation diagram.
Typically, concrete involves dividing the entire heated area into separate areas with expansion joints. In this case, the pipe passing along the seam is placed in a corrugated pipe. The technology for installing heated floors allows the use of plasticizers to be added to concrete. To carry out further work, it is necessary that the surface reaches a humidity of 85% (not higher). Laying a wooden finishing layer (for example, parquet) requires that the concrete dry to at least 60%. The average drying time for a slab is 3-4 weeks.
Self-leveling solutions
You can use a self-leveling mixture to screed a warm water floor.
This building material is not cheap. Labor costs are noticeably reduced. Simply add water to the dry mixture, stir, pour it onto the floor and you don’t need to do anything else. The mixture will even out on its own.
The advantage of self-levelers is the harmoniously selected components of the solution, mixed in the factory. The mixture is already enriched with the necessary additives and plasticizers.
The finished leveling solution is poured onto previously prepared floors and stretched over the beacons. If you follow the manufacturer's recommendations, you will get a durable surface that is resistant to temperature changes.
There are some subtleties here that you should be aware of before purchasing a self-leveler. It sets very quickly, and you will need a lot of solution. If you fill the floors in small bathrooms, then there will be no problems. The mixture can be stirred with a drill mixer. But how to quickly mix, at one time, a cubic meter of solution for a room of more than 20 square meters? This is impossible to do in a regular trough. If you fill it in parts, in layers, the quality characteristics will deteriorate. To make such a solution, you need special equipment, a compact mortar mixing plant.
In order to fill large volumes, you can buy or rent such equipment. But under normal conditions, for apartment renovation, this is impractical. The self-leveler will still have to be leveled manually.
Such a solution will pay off in a “burning” facility if you have an unlimited budget. Or when laying heated floors in a small area. There are brands of self-leveling that can be laid in a thick layer. You should know: despite the fact that such a solution sets quickly, it reaches “standard” within 7-15 days, no less.
Types of heated floors
Water
The heat source of such a system is hot water. How does a water floor work? A heating pipe (part of the mechanism) is installed on it; hot water circulates in it for heating. A pipeline is connected to the central heating system or to the purchased gas boiler. This is how the floor heats up.
Tip: connect the pipeline to the boiler so that heating does not depend on seasonal heat supplies, temperature or pressure changes.
Advantages:
- cost-effectiveness (you only pay for the equipment, installation does not require significant financial costs);
- the system of such a floor can be combined with other types of bases (carpet, tiles, laminate, linoleum);
- autonomous use;
- saving heat and energy;
- alternative to central heating system;
- the floor temperature does not depend on electricity (in autonomous mode).
Flaws:
- In multi-storey buildings, this type of heating is impossible. Suitable for private premises only;
- it is impossible to regulate the heating;
- the house/apartment may flood if a crack in the pipeline is not detected.
Return to contents
Electric
This heating system is carried out using special wires (they consume electricity), which heat themselves and, accordingly, heat the floor. The concrete used to pour the surface is made from special mixtures to increase the level of thermal conductivity. The mechanism can be installed in apartments with central heating.
Advantages:
- can be connected to a central network;
- no additional materials for installation;
- used for 40-50 years;
- provides comfort;
- local repairs can be carried out.
Flaws:
- you should select a special coating with the required markings;
- risk of varicose veins, leg diseases, varicose veins;
- the room warms up for 3-4 hours;
- It is recommended to place wooden furniture in a room with a warm electric floor;
- It is required to obtain permission to install such a floor from regulatory authorities.
Return to contents
How to fill with a “wet” screed
If a lot of water is added to the solution, you get a “wet” screed. The solution will be plastic.
The component ratios are as follows:
- When laying heated floors in a dry living space, an M200 solution using M500 cement is suitable. You will need 1 part cement, 3 parts sand and 1-1.4 parts water.
- When laying heated floors in a damp room (in a bathroom), you need an M200 solution based on M400 cement. Take 1 part cement, 2.5 parts sand and 1-1.4 parts water.
- In reality, the volume of liquid depends on the moisture level of the sand and the amount of dust in it. In this regard, water is added gradually, mixed and plasticity is controlled. The result should be a mixture similar to thick sour cream.
- The solution is leveled between the pipes and compacted, removing air bubbles.
On a note. Metal-plastic pipes can become deformed if you walk on them. Polyethylene is more durable in this regard.
The process of leveling the mixture is facilitated by a long rule and pre-placed beacons. The recesses are filled with the mixture and leveled again.
The screed is made from the screenings in the same way. But everything is done more carefully, more labor will be required. The advantage of the “wet” method is the plasticity of the solution, which is easy to level with a rule.
Reinforcement mesh and rails
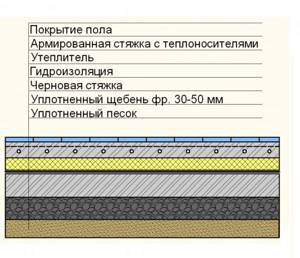
Diagram of a heated floor with waterproofing.
The technical characteristics of this layer of the overall cake depend on the purpose of the room, the expected load on the floor surface and other features. If the design is standard, then a concrete mesh is usually used, having cells of 15x15 cm and a rod thickness of 4-5 mm.
The reinforcing mesh is laid out directly on the thermal insulation layer, forming part of the basis for the thermal contour. The pipes are attached to the mesh using plastic clamps. If higher strength is required, then double reinforcement is possible; The 2nd layer of mesh is mounted on top of the laid pipes.
One of the ways to lay a warm contour is a “snake”. It is most common in Europe. Therefore, during installation, the rails with special clips are laid out on polystyrene. The pipes are snapped into the mounting rails (less commonly, U-shaped plastic anchors are used for fixation); in this situation, one reinforcing layer is used, located on top of the pipes. In Russia, the heating circuit layout in the form of a “snail” is more popular; in this case, it makes more sense to use a mounting grid.
"Semi-dry" method
There is much less water in the solution for the “semi-dry” method. If the mixture is made correctly, it will be moist but not runny.
They check it this way: squeeze a little semi-dry solution in your palm. It should form into a plastic lump without cracks. This is the consistency of a factory-made solution. It is more difficult to level, but then you can rub it to a shine, and ultimately get a surface that is dense and durable in structure.
If you order such a solution ready-made, you need to explain for what purposes it will be used. This concrete layer can withstand heavy loads. It is of higher quality than when laying concrete using the “wet” method.
You will have to grout very carefully; this requires skill and patience. You will need a long trowel or trowel. Semi-dry mixtures from screenings are practically not amenable to smooth grouting, so it is ground with sandy mortar.
Preparing to pour concrete
There is no need to rush to immediately pour concrete into the building.
Initially, the height of the floor is measured, the soil is compacted, a so-called cushion is made and waterproofing is carried out. Otherwise, the construction of the concrete floor will be defective.
You will need:
- Vibratory rammer;
- Building level;
- Polyethylene film / roofing felt;
- Polystyrene foam / expanded clay / basalt;
- Restriction slats;
- Reinforced mesh.
The first step is to determine the zero level. This must be done to avoid unevenness.
So, starting from the wall with the entrance, a line more than a meter high is drawn along the perimeter of the house or a cord is stretched. A level or level will help you describe the line.
If concrete has already been laid at the base of the house, then the previous layer is beaten off with a hammer. Experts do not recommend laying a liquid floor directly on the old one.
Video:
When the ground under the house is lumpy, it is smoothed and pressed to a depth of 5 cm. The surface should be as straight as possible.
Then they begin to compact the soil - concrete will be used sparingly, the floor will not settle, and cracks will not appear.
The soil is compacted with broken bricks using a vibrating rammer. If this device is not among your tools, you can compact a small area with your own hands.
When preparing to lay concrete, do not forget to build a cushion - a kind of reservoir for communications hidden in the floor. Wires and pipes are pre-closed in a box.
The construction of a pillow with your own hands begins with laying gravel in a layer of 5 cm. It needs to be leveled and moistened.
It will be easier to fill the next layers using pegs driven into the gravel (then they are removed).
Sand is poured onto the gravel; the layer thickness should be about 10 cm. The layer is compacted again and watered with water.
Lastly, another 10-centimeter layer of gravel is laid, lightly sprinkling it with sand. The cushion will drop by one third, becoming lower than the laid layers after constant compaction.
In order for the concrete floor to serve without any complaints, waterproofing is carried out. Various building materials protect from moisture.
A membrane film or polyethylene is suitable as a barrier against groundwater.
It is wiser to apply the material about 2 cm. It is better to lay it with an overlap of 20 cm, gluing the film sheets with PVC tape. Waterproofing concrete floors in toilets and bathrooms is mandatory.
To ensure that waterproofing done by yourself is thorough, roofing felt is often used instead of polyethylene. With it, waterproofing will be perfect.
If there is no doubt that streams will not seep into your home, limit yourself to polyethylene. When a building needs waterproofing, it all depends on your finances and wishes.
Waterproofing does not always require material. It is enough to glue the slab boundaries and cracks well with mortar. An undetected crack will cause the floor to leak, try to be careful.
How to properly lay a “semi-dry” concrete screed
In order for the concrete layer to be perfectly smooth, you need to position the beacons correctly. The distance between the beacons is left such that the one and a half meter rule can be used. That is, a distance of no more than 140 cm should be maintained between the beacons.
Types of beacons:
- Mortar beacons made of narrow ridges of cement-sand mortar (gypsum cannot be used). Not the most effective method, since the ridges must dry out, and this takes time. In addition, a rule can accidentally “knock down” such pointers.
- Lighthouses made of metal pipes. Pipes or other rigid profiles are strengthened at the required height. A day after laying the concrete, they are removed and the recesses are filled with mortar. Pipes are used several times for this purpose. The only condition is that they must be perfectly even. Both round and rectangular profiles are used.
- Galvanized guides for plaster. The stronger the beacons, the better. The optimal size is 1-1.4 cm. After they have performed their function, they can be left in place or removed after the solution has set. Such beacons are disposable. If you have the skills, you can set them as evenly as possible. Strengthen with mortar, adjusting it to the level using a piece of tile or a brick fragment. The distance between the beacons is 40-50 cm. Sometimes they are installed on special supports that can be adjusted.
Nuances of control check
When installing a wet screed made of concrete or a cement-sand mixture, a hired team should not rush and immediately pay for their services. You have to wait until the artificial stone hardens completely. Moreover, for the first 2 weeks the surface is covered with a film and periodically moistened with water in order to saturate it with moisture as much as possible.
Then you need to wait time, which is about a month, for the composition covering the underfloor heating pipes to crystallize. The period depends on the thickness of the layer - this is an individual indicator for each case.
As soon as the allotted time for hardening has expired, you can inspect the surface, which was developed by the hired team. There are some nuances that should be checked when accepting their work.
The first step is to carefully examine the surface - the presence of cracks clearly indicates mistakes have been made. This kind of work cannot be accepted
When inspecting, you need to pay attention to each section of the screed in all rooms - the presence of shine is undesirable, the top layer should be smooth, uniformly gray, without chips or cracks.
Then the evenness of the surface is checked with a two-meter strip - the rule. It is applied in several places to the screed. The norm is if the gap does not exceed 4 mm. This is SNIP 3.04.01-87, table 25.
You should check the horizontal slope - with a length of 4 meters, a deviation from the horizontal of no more than 0.2 percent is permissible. It turns out that in this case the permissible slope level is 8 mm
To tap, it is better to take not a hammer, but a wooden block and tap the end. The entire surface is checked - the sound is the same, ringing. If it is deaf, then there are detachments of the screed from the base.
If the surface has passed the test with honor, the work can be accepted and the crew can be paid their honestly earned money. If this is the result of independent work, then you can be proud of it.
Now all that remains is to carry out thermal tests. It is important to remember that they are launched in a month, not earlier. Start at 25 with a daily increase in temperature by 5 degrees until it reaches the design value, not forgetting to monitor the pressure loss.
Rules and examples of calculations for a water floor heating system are given here. We recommend that you familiarize yourself with useful, systematic information.
What thickness should the screed be?
To understand what the thickness of the concrete screed for water heated floors should be, the following points should be taken into account:
- The concrete layer should not interfere with thermal radiation. The water circuit must perform its function.
- In order for the screed to be strong enough, the thickness of the self-leveling compound should not be less than 2.5 and 4.5 cm.
- The thickness of a regular concrete layer reaches 6-7 cm.
- In total, the thickness of the water-heated floor will be 15 cm.
- If you increase the thickness of the screed, this will lead to the risk of splits in the concrete layer. To prevent this from happening, it is necessary to provide expansion joints.
Preparing the room, installing the heating circuit
The concrete floor must be smooth: protrusions and irregularities cannot exceed 10 mm. Where the thermal contour will be laid, unevenness should remain within 5 mm. In addition, the degree of readiness of the premises implies that:
- plastering work (hammer, walls) is completely finished: no debris, dust;
- doors, windows installed;
- the floor was marked at the level of the “clean” coating;
- connection points for sewerage, water, electricity have been removed;
- niches intended for distribution cabinets have been prepared;
- floors located in rooms in contact with the ground have good waterproofing.
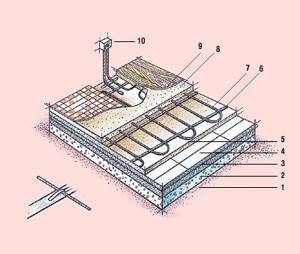
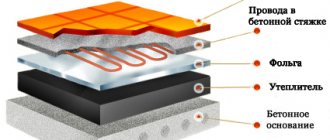
Layout of the main heated floor: 1. Soil. 2. Compacted gravel. 3. Thermal insulation. 4. Plastic film. 5. Reinforced concrete slab. 6. Mounting plate. 7. Heating cable. 8. Leveling concrete. 9. Surface material. 10. Thermostat.
First of all, you will need to lay a vapor barrier layer. For this, polyethylene 0.2 mm thick is usually used. The film will protect polystyrene from moisture, which worsens its properties. The source of unnecessary moisture is usually the concrete floor (floor slab), where air condensation occurs. The material is laid with an overlap of 10 cm; In this case, the joints must be taped with adhesive tape. You can do without film if you use a different, more modern insulation. Such products are already provided with a vapor barrier layer made of polystyrene or lavsan.
Caring for wet screed
After the concrete layer is poured, the screed requires maintenance. The room temperature must be maintained at least 5 degrees above zero. The screed must not be allowed to dry out. A day after installation, it is covered with plastic film. The concrete needs to be moistened from time to time for about a month. The strength of concrete depends on this. You can begin installing the water circuit for heated floors no earlier than 28 days later. All this time, the working pressure must be maintained in the pipes, but the heating cannot be turned on.
Heated floor screed
Return to contents
Preparation of materials/tools
Both water and electric floors are filled with concrete, but with one difference: in the case of an electric floor, special substances are added to the concrete for thermal conductivity. All materials and tools that will be used for floors should be carefully prepared before starting work. Concrete should be poured and then the surfaces should be treated with putty. Then they put the required material for the surface (parquet, linoleum, etc.).
Tools to use during installation:
- building level;
- spatulas;
- bucket for solution;
- perforator;
- concrete mixture;
- reinforcement network;
- tester (to check the connection);
- rolled foil.
Install the heating system using concrete pouring and the above tools. Please use the attached instructions. For an additional fee, you can hire a team of builders who will install your heating system efficiently and quickly.
Return to contents
Installation of beacons
After the first stage, proceed with the installation of the concrete floor. The first priority is to install beacons. For beacons, use metal profiles:
- Lay the reinforcing mesh.
- Place lumps of cement mortar along the room (50 mm high).
- Place the slats on the lumps (use a spirit level for accuracy).
- Mount the beacons on the floor (on opposite walls).
Return to contents
Preparation of the solution
The next step is concrete mortar, so-called screeds. Do not use pure concrete for screeding (it has low thermal conductivity). This applies to both water and electric floors. Buy a dry mixture for preparing screed at a specialized store.
Preparation consists of only 2 steps:
- sift the concrete (fractions should be 5-7mm);
- fill in the plasticizer (for thermal conductivity and plasticity of the screed).
Return to contents
Fill
Once the water or electric concrete floor system has been assembled and the mortar (screed) has been mixed, pouring can begin. Floors must be poured at a temperature of 5 °C (or higher). If the temperature is lower, the screed may begin to crumble and crumble. For heated floors, you should select a special thermal element. He must constantly be under pressure. If the pressure weakens, the pipes begin to deform; during deformation, they heat up and begin to harm the floor, destroying the composition.
The room is left for 28 days so that the necessary processes take place in the warm field. The concrete will become strong and stable during this period, the solution will harden, and only after this should the heating system be started. If you don’t have the time or desire to wait, you can use a special dryer. The surface will reach the required parameters after 10 days. There is no fundamental difference between floors (water and electric) in further care. The temperature should be increased gradually until performance characteristics are achieved. Adjust the system temperature manually.
Return to contents
Results
When installing heated floors, the installation technology is strictly followed. All stages, starting with the selection of building materials, design, installation of the water circuit, laying the screed, require knowledge and experience. It is necessary to select pipes that can withstand the pressure in the system. The water circuit must have acceptable bends so that the coolant circulates freely.
There are many subtleties that, at first glance, are not significant, but can lead to emergency situations if the technology is not followed. You can only undertake the installation of heated floors yourself when you are completely confident that everything will be done correctly. In another situation, it is better to turn to experienced craftsmen.
Features of laying the heating circuit
If installation is carried out using a profile heat-insulating pipe, then additional materials and tools are not required. Everything can be done with your own hands quickly and efficiently. But you must adhere to a number of rules:
Scheme of an insulated concrete floor.
- the thermal power of a floor in which concrete is used will be higher if pipes are laid more densely along the walls that face the outside;
- The minimum density of pipes is from 10 cm; further compaction can lead to overuse of pipes in the absence of an effect of increasing heat transfer. Maximum – 25 cm. This will ensure uniform heat distribution.
- the thermal circuit should be at a distance of 15 cm from the walls;
- one loop of the heating circuit should not be longer than 100 m, otherwise there will be significant hydraulic losses;
- Installation of the circuit at the junction of overlapping slabs is not allowed. In this case, it is necessary to lay 2 separate contours on both sides of the seam. If the pipe crosses the joint, then it must be “packed” into a metal sleeve having a length of 0.3 meters.