A well-known saying when installing thermal insulation should be: “Count seven times, insulate once.” The meaning of the saying is clear: “Think more than once so that you don’t have to redo it.” Before you start insulating, you will need to climb with a tape measure and ruler, work with paper, pencil and calculator. Before starting work you need to know:
- insulation area;
- insulation thickness;
- number of slabs (packs);
- mass of adhesive composition;
- number of disc dowels;
- time to carry out work;
- and, of course, the cost of materials and labor.
How many positions did you get? Seven. So the saying is true. Despite the importance of the remaining initial data, the dimensions of the penoplex are still the basis for calculations.
Only two lengths
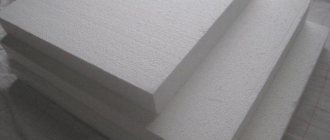
The length of the slabs has two standards. Thermal insulation with a density of 25 and 35 kg/m3 has a linear length of 1200 mm. The area of such a sheet is 0.72 m2. Insulation with a density of 45 kg/m3 has a slab length that is 2 times greater, equal to 2400 mm. The area also increases in direct proportion to 1.44 m2. Sheets of short length can be transported even in the cabin of a passenger car, and large ones can be transported in the trunk of the same car (just remember to secure the sheets longitudinally during transportation in order to avoid breakage of the plates under the influence of the oncoming air flow).
Unknown Penoplex – 7 questions and answers
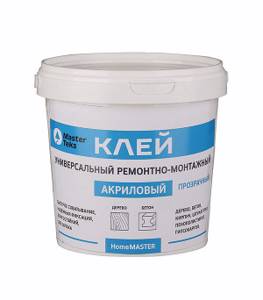
| Acrylic glue. All acrylic compounds are water-based; therefore, foam boards are perfectly glued to them. Moreover, this glue is suitable for both external and internal work, the main thing is that during installation the temperature is above +5ºС. You can work on all types of bases - metal, wood, concrete, etc., but acrylic glue is expensive, so it is not very popular. |
| Questions | Recommendations |
| Question No. 1. |
What should I use to glue penoplex to the wall?
· To install penoplex in a wooden house, acrylic glue is used;
· Penoplex is glued to concrete and brick walls using mineral mixtures;
· It is recommended to mount the plates to metal using foam adhesive;
· For roofing felt and other similar waterproofing materials, bitumen mastic is used.
Is it possible to glue EPS with polyurethane foam?
Advice! The umbrella dowels used to fix the EPS on the facade will not hold the mounting foam; they will simply rip out.
Any thickness to choose from
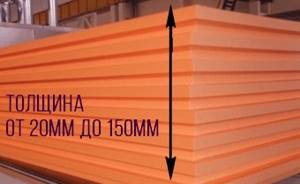
The most important indicator of penoplex is thickness.
The range of thicknesses of mineral insulation does not pamper the consumer and greatly limits his choice. The lack of materials of the required thickness on sale often dooms to forced overconsumption of material with inevitable material losses. After all, it is impossible to put a thinner layer of insulation; there will not be the required insulation coefficient. Insulation materials made from extruded polystyrene allow you to “go wild” and are available for sale in slabs of various thicknesses, which allows you to set a thickness close to the calculated one.
A foam board with a density of up to 35 kg/m3 comes in a thickness of 20; thirty; 40; 50; 60; 80; 100; 120; 150 mm. Penoplex sheets with a thickness of 40; 50; 60; 80; 100; 120; 150 mm have a density of 45 kg/m3.
The presented range of thicknesses with the same length and width allows you to combine different installation options to achieve maximum insulation efficiency. The required layer of insulation can be easily obtained by adding two layers of insulation, especially since this installation option is recommended by the manufacturer. Materials with a thickness of 20 and 30 mm are used mainly for internal thermal insulation, which allows saving the internal volume of insulated rooms. It should be remembered that the selected size of insulation does not have an L-shaped protrusion.
Installation Tips
Installing penoplex is not a tricky matter, since there are different types of adhesive composition, and accordingly they are applied in different ways. It is better to apply mineral glue with a notched trowel with a comb height of 5 - 10 mm.
The polymers are applied in a random pattern, with a continuous strip drawn along the perimeter with a gap from the edge of 10 - 20 mm. There is also a mop method, which is used for unloaded surfaces.
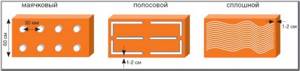
The choice of method for applying glue to foam boards depends on the degree of surface congestion and the type of composition
Before gluing the penoplex to the walls, a starting support strip is mounted below. For facade work and foundation insulation, a metal profile with an anti-corrosion coating is used. In interior spaces, any support is attached to the wall, for example, a wooden block or lathing.
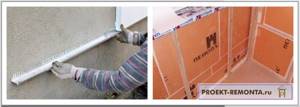
When producing facade insulation, the starting strip must be made of stainless steel or have an anti-corrosion coating
Important! When working with any glue, before installing the foam board, the base must be covered with primer and dried.
First we count, then we insulate
The parameters necessary for making the right decision are defined at the beginning of the article and do not cause difficulties in calculations. The only catch is the thickness of the penoplex slabs. What should it be like? It is impossible to act at random in resolving such an issue. But there’s nothing difficult about it either. A page in a notebook, a pen, or a calculator will help you calculate the thickness.
We determine the required heat transfer resistance of the building envelope. You can find it in table 1b of SNiP II-3-79, having previously calculated the degree-day in a particular case, multiplying the number of days of the heating period by the room temperature.
For the sake of simplicity, we will assume the furnace firing duration is 180 days and the room temperature is 20 degrees Celsius. We get the number 3600. Using the table, we find the required coefficient for walls equal to 2.8, for floors – 3.7 (only part of the table is presented here to understand the order of calculations).
| Buildings and premises | Degree-day | Required heat transfer resistance of enclosing structures Rotr, m2 °C/W | ||
| heating season | walls | coverings and ceilings over driveways | attic floors, over cold crawl spaces and basements | |
| Residential buildings | 2000 4000 6000 8000 10 000 12 000 | 2,1 2,8 3,5 4,2 4,9 5,6 | 3,2 4,2 | |
7,2 8,2
6,4 7,3
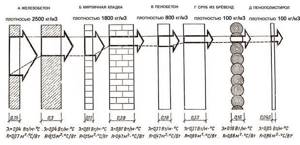
The area of all materials that make up the enclosing structures, and, consequently, the insulated surface, is the same. Only the coefficients of specific thermal resistance of the materials used in the construction of the object differ.
| 2,8 3,7 | ||
| Material | Material thickness (mm) | Calculated thermal resistance |
(m2x°C/W)
It is necessary to calculate the heat transfer resistance value of each construction material by multiplying the coefficient by the layer thickness. All materials used in construction must be included in the calculations.
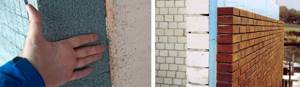
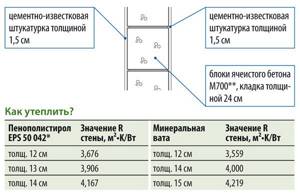
For example, a wall is made of white sand-lime brick 1.5 bricks thick and aerated concrete blocks.
In this case we get:
- for the brick part of the wall the value will be 0.16 units (0.44x0.38m);
- for the aerated concrete part - 0.22 units (1.1x0.2).
From the required coefficient of 2.8, we subtract the obtained values of the available materials. We get 2.42. We must obtain this required resistance to heat transfer when using insulation.
The calculated coefficient of resistivity of penoplex is known from its technical characteristics and is equal to 0.028 m2x°C/W.
By multiplying these numbers (2.42x0.028) we get 0.068 m or 6.8 cm. To insulate the walls, we will use an insulation thickness of 7 cm, combining slabs with a thickness of 40 and 30 mm.
In a similar way, you can calculate the required insulation thickness for any structure made of any material. Having made insulation based on calculations and obtained the necessary insulating effect, we save money without overpaying for:
- excessive thermal insulation with greater thickness;
- heating when it is insufficient.
Information on the purpose of the calculator
Online insulation calculator
, designed to calculate the amount and volume of insulation for external walls and the side surface of building foundations. The calculations take into account window and door openings, as well as the cost of insulation and additional materials.
When filling out the data, pay attention to the additional information with the Additional information sign
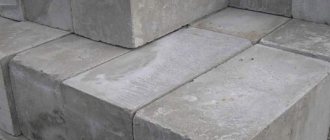
Expanded polystyrene (EPS) and Extruded polystyrene foam (EPS)
It is one of the most affordable and effective lightweight insulation materials. More than 90% consists of air, which is the best heat insulator. Conventional PPS is used to insulate the external walls of buildings, but since it is a moisture-permeable material, it is not recommended to use it for insulating foundations. For these purposes, EPPS is best suited, which also serves as a moisture-proof layer when insulating foundations.
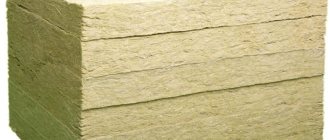
Stone (basalt) wool mats
Currently, the most famous manufacturers of stone wool slabs are TechnoNIKOL.
The most important advantages of this material are its ease of processing; to work with it you do not need any special equipment, just a knife or saw with fine teeth. It is worth remembering that the wool slabs must be joined very tightly, but it is forbidden to tamp them or compress them. The inside of the mats is covered with a vapor barrier membrane, and the outside with a windproof film, this is necessary in order to protect the wool from moisture.
With strong moisture, stone and mineral wool loses its heat-saving characteristics
Sprayed insulation
This method of insulation is not yet very widespread in our country. Polyurethane foam is mainly used to insulate the walls of frame houses. It consists of two liquid substances that turn into foam under air pressure, and after the entire space is filled, its excess is cut off. Working with such material is reminiscent of working with polyurethane foam.
Ecowool
Recently, the use of insulation such as cellulose fibers or ecowool has become very popular. It is made from natural material and does not require additional protection; this type of insulation is most suitable for those who want to make their home environmentally friendly.
There are two known installation methods: the dry method and the wet method.
- Dry method
- Wet method
— Using a special machine, the wool is blown into an insulated layer until the required density is achieved. The disadvantage of this method is that over time it may shrink and begin to transmit heat in the upper layers. Although many manufacturers guarantee that there will be no shrinkage for at least 20 years.
- can be done using special equipment; ecowool is “glued” under pressure both to the walls and to each other, this avoids shrinkage. The main disadvantage is that wet laying of ecowool must be carried out outside before covering the walls.
The following is a complete list of calculations performed with a brief description of each item. If you haven't found the answer to your question, you can contact us via feedback.
How to calculate the thickness of thermal insulation?
Before purchasing insulation materials for your home, it is worth calculating the thickness of the insulation. No amount of recommendations or experience from your neighbors will help determine how much protection your home specifically needs. The reason is that the effectiveness of thermal insulation is influenced both by the climate in a particular region and by the characteristics of the frame or roof of the house itself. The main goal of such calculations is to determine the required layer of insulation, which will allow, at minimal cost, to provide reliable protection against heat loss through the building envelope.
How to do it?
Any online calculator program will help simplify the task for inexperienced builders. These are easy to find on construction portals or on the official websites of manufacturers of thermal insulation materials. Or you can try to do all the calculations yourself. In any case, you need to know the requirements for thermal protection of buildings in your climatic region. They are in SNiP 02/23/2003 and on the Internet in the form of summary tables, which provide data for all major cities of Russia.
For example, let’s take the data for Moscow and the region – 3.14 m2 °C/W. This is the resistance that all layers of the main structure, air and insulating layers, as well as the exterior finishing should provide in total. We will build on the given figure, not forgetting that we are talking about the minimum acceptable indicator.
Here, the thermal engineering calculation of the required insulation thickness begins with an analysis of the selected building material and the strength of the load-bearing walls:
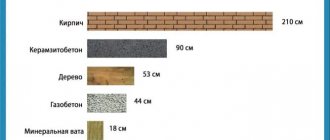
- Concrete has the highest heat transfer coefficient - 1.5-1.6 W/m °C.
- Brick has a relatively low thermal conductivity of 0.56 W/m °C, but in masonry this figure actually doubles and is already 1.2.
- Good performance for cellular concrete and gas blocks is about 0.2-0.3 W/m °C.
- Wood (depending on the selected species) – 0.10-0.18 W/m°C.
However, these figures in themselves only give an idea of the thermal insulation characteristics of different materials. For calculations, it is also necessary to take into account the thickness of the structure. Dividing it by the heat transfer coefficient, we get the resistance of real walls.
Let's take a standard 30 cm thick aerated concrete masonry: R = 0.3 m ÷ 0.2 W/m °C = 1.5 m °C/W.
We arm ourselves with a calculator and find that for thermal protection of the walls of such a house built in Moscow, it is not enough: 3.14-1.5 = 1.64 m ° C / W.
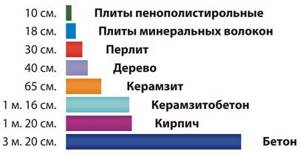
Now you can choose insulation for walls by considering several materials with different thermal conductivity values, but giving the same effect due to thickness:
- Mineral wool (0.04 W/m °C) – 1.64x0.04 = 0.0656 m or 66 mm.
- Foam plastic (0.05 W/m °C) – 1.64x0.05 = 0.082 m (82 mm).
- Penoplex (0.03 W/m °C) – 1.64x0.03 = 0.0492 m (50 mm).
Next, we include the cost of materials in the calculation and do not forget about the logic. Penoplex, although it shows the best characteristics, is simply not suitable for aerated concrete walls, so you will have to choose between mineral wool and polystyrene foam. A cubic meter of inexpensive basalt insulation, which is suitable for insulating a facade, will cost about 2,500 rubles. If we take slabs with a thickness of 70 mm, for this amount it will be possible to cover 14.3 m2.
PSB-S-25f costs 2600 rub/m3. At first glance, the difference is small, but let’s recalculate how much area the slabs will cover if the thermal insulation thickness is 100 mm. It should be explained here that 80 mm sheets do not meet the minimum thermal protection requirements, and 90 mm sheets are not commercially available. So, in fact, for 2,600 rubles you can insulate only 10 square meters. It turns out that the difference in price between polystyrene foam and mineral wool is 4%, and in the insulated area – 43%. However, it's worth doing one more calculation on the calculator. It will show how much a curtain wall will cost to protect the mineral wool itself, and how the cost will change after plastering and painting the PSB.
For pitched and flat structures, similar calculations are performed, but here you will have to take into account all the working layers in the overall pie. Thus, the insulation for the roof and its thickness are obtained by subtracting the resistances of all other elements from the norm according to SNiP (adjusted by 0.16), after which we simply multiply the difference by its own thermal conductivity coefficient:
Instead of worrying, you can find recommendations for roof insulation for your region. In Moscow, 200 mm of basalt wool is considered the norm. From here, through the proportion of the thermal conductivity of the materials, we obtain an equivalent replacement: 250 mm of foam plastic or 150 mm of Penoplex.
The same calculation rules apply here, but the standard value of R changes. If we are talking about floors above a cold basement, in MO they should have a total resistance of 4.12 m2 °C/W, but adjusted for the coefficient of thermal uniformity of the slabs (for reinforced concrete products this is 0.8, for wooden floors 0.9). The figure 0.17 is also subtracted from the resulting figure according to SNiP requirements. Then the resistance will be equal to:
R = R ÷ 0.8 – 0.17 = 4.12 ÷ 0.8 – 0.17 = 4.98 m2 °C/W.
Again we subtract the thickness of the ceiling divided by its thermal conductivity, and multiply the finished result by the conductivity of the insulation itself. For example, for Penoplex on a slab with a cement screed with a total thickness of 26 cm, we get a layer of 160 mm. From here it is already possible to calculate the thickness of mineral wool (215 mm) and foam plastic (265), which could replace it.
Insulation of the floor above the basement (underground)
Homes often have basements and crawl spaces designed to be used for storing various items that do not require room temperature. Heat loss through the uninsulated floor of the first floor can reach 10%.
To reduce heat loss and ensure the required temperatures on the floor surface, it is necessary to insulate the floor above the cold basement or underground. In this case, the temperature on the floor surface should be no more than 2–2.5 °C (SNiP 23-02-2003) lower than the air temperature in the room.
From the point of view of thermal protection of a building, suspended floors are very ineffective protection, since the outside air that enters under the floor through the necessary ventilation ducts is much colder in winter and much warmer in summer than the ground temperature, which remains almost unchanged in summer and winter. In this regard, the floors of the first floor should be insulated as carefully as the external walls.
If there is a heated basement under the house, there is no particular need to insulate the ceiling.
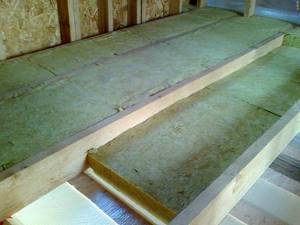
Insulation of wooden floors
To insulate floors above cold basements and crawl spaces, soft slabs and mineral wool mats are used, which are installed tightly (with slight spacer) in the space between the beams or joists. If the thickness of the selected slabs is not enough, the insulation is laid in two layers with joints spaced apart.
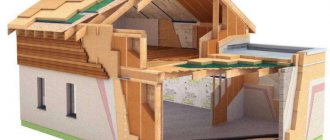
Insulation scheme
- Floor covering
- Vapor barrier film
- Floor beams
- Mineral wool
- Bottom floor cladding
Through the ceiling, as well as through the external walls, diffusion of water vapor from warm interior spaces to the outside occurs. Since the cold underground is located under the ceiling of the first floor, the direction of movement of water vapor will be from top to bottom.
To protect the insulation from moistening with water vapor, a layer of vapor barrier made of polyethylene film is laid on the warm side with an overlap of adjacent panels of at least 10 cm. The edges of the vapor barrier panels are brought to a height of 10 cm above the surface of the insulation and attached to the wall with a plinth.
Floor boards and floor coverings are laid on wooden joists.
Insulation of reinforced concrete floors
The load-bearing part of the floor above a ventilated underground or basement can be a reinforced concrete slab. In this case, the floor above the ceiling can be arranged along joists, and its insulation can be done with soft slabs or mineral wool mats laid on the slab between the joists.
Insulation scheme
- Floor covering
- Vapor barrier film
- Lags
- Mineral wool
- Floor slab
Floor insulation on a rigid base
You can insulate a slab floor above a cold basement using polystyrene foam boards with a density of at least 25 kg/m3, extruded polystyrene foam, or rigid mineral wool boards.
In this case, heat-insulating boards are laid on a pre-leveled floor surface.
A vapor barrier film is laid over the thermal insulation layer and a monolithic screed or prefabricated screed is made from two sheets of gypsum fiber board, OSB, or DSP. In this case, the thickness of the reinforced cement-sand screed must be at least 4 cm.
Insulation scheme
- Floor covering
- Cement-sand screed
- Vapor barrier film
- Extruded polystyrene foam
- Floor slab
To ensure possible thermal expansion, at the junction of monolithic screeds made along the thermal insulation layer with other building structures (walls, partitions, etc.), gaps 1 - 2 cm wide should be provided for the entire thickness of the screed, filled with elastic material (for example, foam polyethylene foam).
The total thickness of a prefabricated screed made of two gypsum fiber sheets is 2 cm. When joining a prefabricated screed made of paired gypsum fiber sheets, a continuous layer of PVA dispersion or adhesive mastic is applied to the folds of the laid screed elements, followed by fastening the folds with screws no less than 19 mm long, located in increments of 30 cm.
At the junction of the prefabricated screed with walls, partitions, etc. designs should provide a 1 cm thick gap, which is filled with edge tape.
Then the floor covering is made of ceramic tiles, linoleum, etc.
Calculation of insulation thickness for walls, floors, roofs
After the completion of the construction of a residential or commercial premises, there comes a time when the issue of wall insulation becomes relevant. Thanks to the development of the construction industry, there is now a huge selection of thermal insulation. And each type of building material should be approached with precision and at a professional level, and a correct calculation of the thickness of the insulation should be made.
Main indicators for choosing building materials:
- insulation thickness;
- type of insulation;
- wall thickness;
- the material from which the walls are built.
Accuracy of calculation of insulation thickness
Using these indicators, it is very important to correctly calculate the thickness of insulation for walls, roofs and floors. This process must have a correct calculation of the dew point in the thickness of the walls and insulation.
This parameter affects the freezing of walls and the thermal insulation of the house, therefore, in no case should you save on the purchase of insulation products.
When choosing, you need to take into account: thermal conductivity indicators, layer thickness. Thanks to these data, it is necessary to accurately calculate the temperature resistance of the material using the formula R=d/k.
Note: d is layer thickness, k is thermal conductivity.
It should be noted that this formula is used exclusively to calculate the thickness of insulation in a single-layer structure.
The thermal conductivity parameter of the building material can be found in the attached documentation or on the Internet.
The second and most important indicator for the correct calculation of insulation thickness is the external temperature indicator.
Calculation of insulation for walls
When calculating, you should use the following indicators:
- wall thickness;
- material used to build walls;
- temperature difference between outside and inside.
Using the technical data of all layers and average calculations, the heat transfer coefficient of the walls is 3.5. As practice shows, the thickness of the insulation depends on the thickness of the walls in the room. As a rule, the calculation of the thickness of insulation for walls is calculated in inversely proportional order. Therefore, with a lower thermal resistance coefficient of the walls, the thermal insulation layer must be larger.
Calculation of insulation material for floors and roofs
As practice shows, special insulation should be used for these surfaces. The load that will be placed on the roof depends on the calculation of the thickness of the roof insulation. If the calculation is incorrect, it is very easy to make the structure heavier.
- The thermal insulation value for the roof and attic floors is 10-30 cm.
- Basements use an indicator of 6-15 cm.
Before installing insulation for the roof, it is mandatory to use waterproofing after the construction of the attic space.
Thanks to it, all load-bearing walls and ceilings will be protected from the penetration of fungus and mold.
Insulation of a wooden floor - calculating the thickness
Many private houses are often built on columnar or pile foundations. Naturally, with such a basis, the floor of the first floor turns out to be “floating” in the air, that is, not having direct contact with the ground. By the way, quite often the same technique is used when building on a strip foundation. But the fact that the floor is separated from the ground by an air gap does not mean that its insulation is unnecessary. The underground space must be ventilated, that is, the temperature there will be comparable to the air temperature outside. And in order for comfortable living conditions to be maintained in the room, and the floor structure itself to be durable, thermal insulation is mandatory, for example, insulating the foundation with foam plastic.
Insulation of a wooden floor - calculating the thickness
The spaces between load-bearing floor beams and/or joists are a very convenient place to place thermal insulation material. But even at the construction planning stage, a logical question should arise - what should be the thickness of the insulating layer? After all, this can directly affect the cross-section of lumber from which the load-bearing parts of the floor structure will be made.
The issue is important, so it was decided to include it in a separate publication. So, let's look at the problem: insulating a wooden floor - we calculate the thickness of the thermal insulation.
Calculator for calculating the thickness of wall insulation with Penoplex
Penoplex is a popular brand of extruded polystyrene foam, the name of which has become a household name. This material is characterized by excellent thermal insulation and strength characteristics, excellent durability and resistance to negative external influences, which makes it a universal insulation material for a wide variety of building structures, from the foundation to the roof.
Calculator for calculating the thickness of wall insulation with Penoplex
Very often it is used for wall insulation. But here’s the question: Penoplex is available in a fairly wide variety of thicknesses, from 20 to 150 mm. Which option should you choose for your home? The best thing is to carry out some calculations, with which the calculator for calculating the thickness of wall insulation with Penoplex will help us
Some explanations on the calculations will be given below the calculator.
Calculator for calculating the thickness of wall insulation with Penoplex
Explanations for calculations
The “work” of any insulating material is that, when included in the overall structure of the wall, due to its significantly low thermal conductivity, it would compensate for the “deficit” of thermal resistance necessary to achieve the normalized value. These heat transfer resistance values are established by the current SNiP for various types of building structures and for different regions of Russia, depending on local climatic conditions.
- It will be more convenient for the user to determine the desired value using the diagram map located below. Please note that each region has three different values. In this case, we are naturally interested in the indicator “FOR WALLS” - it is indicated in purple.
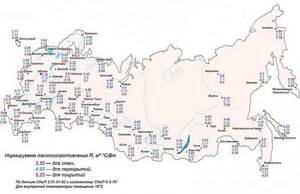
Schematic map for determining the required value of thermal resistance
- The thermal conductivity coefficient of penoplex is already included in the calculation program and does not need to be specified.
- Next, you need to enter the thickness of the insulated wall and indicate the material of its manufacture: each building material has its own thermal characteristics.
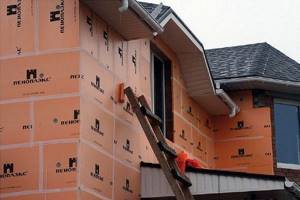
- The next item is the external wall decoration:
— If a decorative cladding scheme is used according to the “ventilated facade” principle, then the finishing layer will not have any effect on the overall insulation of the wall, and it is not taken into account.
— When using the “wet facade” technology, that is, with the application of a reinforced plaster layer and then external decorative plaster, the finishing can be taken into account in the overall calculation, since its thermal resistance will be added to the overall indicator of the wall.
- Similarly, you can take into account the finishing made from one or another sheet (panel) cladding, if there is no ventilated gap left between it and the penoplex.
- The last block of the calculator contains similar questions, but this time concerning the interior decoration of the wall. It is clear that some materials, for example, a thin layer of putty followed by painting or wallpapering, will not bring anything significant to the insulation “piggy bank”. But wooden cladding (or wood composite materials), cork finishing, plastering, especially using “warm” plasters, can seriously affect the required thickness of external wall insulation, and it makes sense to take them into account.
- The result will be given in millimeters. It is easy to compare it with the standard thickness of penoplex in order to select the desired type of insulation boards.
If suddenly the calculator showed a negative value, then this indicates that external insulation with Penoplex is not required at all.
How to insulate a wall yourself with Penoplex?
The technology cannot be called too complicated, but it will still require strict adherence to all recommendations, otherwise the insulating layer on the wall may simply “shoot off” and collapse. The nuances of the technology are described in detail in an article on our portal dedicated specifically to the insulation of walls with Penoplex .