About the reducer and the location of the membrane
A device called a water reducer is part of almost any design of gas heat exchangers.
This part may have different configurations depending on the model of the water heating apparatus, but the principle of operation of such devices remains unchanged.
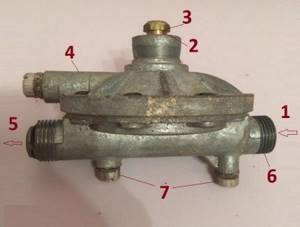
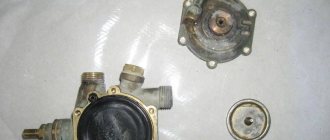
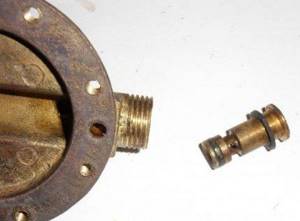
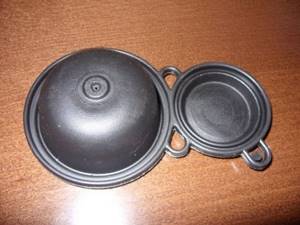
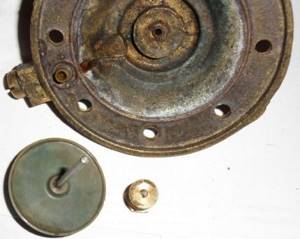
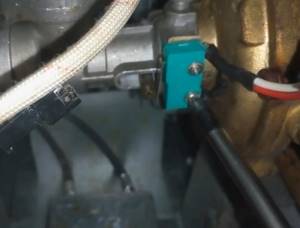
Gas water heater reducer, where the membrane is located: 1 – water inlet; 2 – rod head and stuffing box group; 3 – rod; 4 – ball valve; 5 – water outlet; 6 – nozzle; 7 – plugs for draining water from the internal areas of the device
A water reducer installed on a gas water heater serves to stablely maintain water pressure directly in the water heater heat exchanger system. Due to the uniformity of pressure, a uniform flow is ensured, which means the same uniform heating of the liquid.
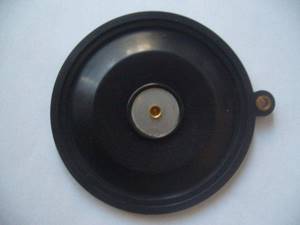
A part of the gearbox that facilitates smooth pressure regulation is a rubber membrane. This gear component, made in the form of a gasket, usually based on technical rubber, has the shape of a circle. It is installed inside the gearbox housing.
Due to the long-term operation of water heating equipment, being constantly in motion, the membrane gradually wears out. Wear of technical rubber in some places leads to tears in the material. Accordingly, the function of regulating water pressure stops operating according to the specified algorithm.
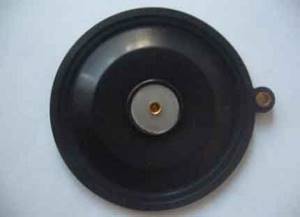
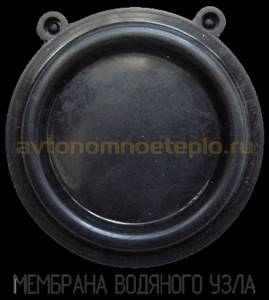
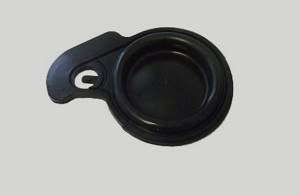
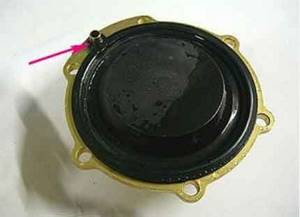
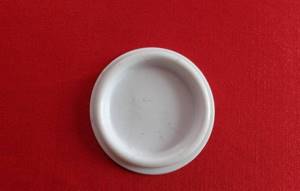
A prototype of a classic membrane based on technical rubber. The shape of the plate is round, the surface has a characteristic feature - a convex central part. Similar accessories are used on most geysers
In such cases, it becomes inevitable to replace the rubber membrane of the reducer in the gas water heater, because the water heater does not work properly.
The quality of sanitary water heating decreases sharply, and in other cases the column simply cannot be put into operation. Comfort for the user is lost.
Purpose and structure of the water unit
The membrane is an important part in regulating the gas supply. To understand its purpose and operating principle, you should study in detail the structure of the water block of the column, of which it is a structural element. This knowledge will help when replacing the membrane, because in order to get to it, you have to dismantle the entire assembly and disassemble it.
We also recommend that you become familiar with the general structure of a geyser to make it easier to find a water block in its design. But first things first.
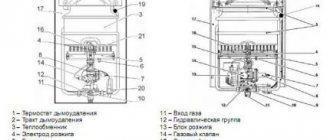
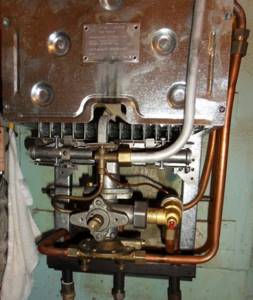
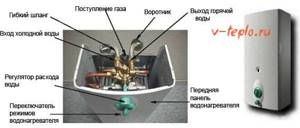
Water reducer device
One of the components of almost any gas heat exchanger is a water reducer (water unit - WU, water regulator). It is designed to regulate the uniform supply of water and gas. The practically designed shape of the regulator (in common parlance – “frog”) facilitates compact placement of the unit in the speaker body. The technically simple device works automatically.
The functions of the gearbox are as follows:
- starting and stopping the operation of the gas water heater when opening/closing the tap;
- regulation of water and gas supply;
- protection of the column from overheating when there is insufficient water pressure.
The design of the gearbox is well thought out and visually uncomplicated. The body is made of brass, polyamide (containing fiberglass), silumin or plastic.
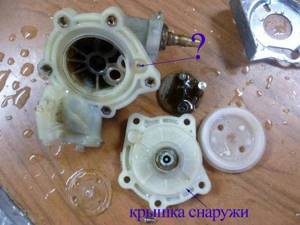
Parts of the water unit: cover (1) and base (2), connected with screws; plate (4); rod that opens/closes the gas valve (5); membrane (6); Venturi fitting (7); gland nut (8); water outlets (9); adjusting screw (10); mounting screws (3); strainer (11); retarder ball (12)
Operating principle and importance of the regulator
The hollow cavity of the gearbox, divided in two by a membrane, is filled with water. Water enters the cavity from the water supply. From the lower part, passing through the Venturi fitting, it enters the upper compartment through the bypass hole. However, water coming from the water supply to the lower part always presses on the membrane with the force of water pressure in the pipeline, and in the upper part the pressure force changes, depending on whether the water flows through the heat exchanger.
The fact is that in pipelines that have narrowed sections, the pressure of the flowing liquid in a bottleneck decreases. When the tap is opened and water passes through the Venturi fitting, the pressure in front of the local narrowing (nozzle) of the fitting increases.
Due to the increase in flow velocity in a bottleneck, the pressure decreases both in the fitting and in the upper cavity of the frog. This is similar to flattening the end of a garden hose. With a difference in the diameters of the nozzle of the fitting (0.3 cm) and the main chamber (2 cm), the pressure drop reaches 1 atmosphere. This is enough for the membrane to bend upward and press on a plastic plate rigidly fixed to the axis of the rod. The rod presses forcefully on the gas valve, causing the valve to open and gas to flow to the gas burner.
When the membrane is lifted, water from the upper compartment begins to exit through the bypass channel, where the steel retarder ball is located. The ball, moving to the right, partially blocks the channel, so the gas is turned on and supplied to the burner smoothly. Smoothness is adjusted using an adjusting screw.
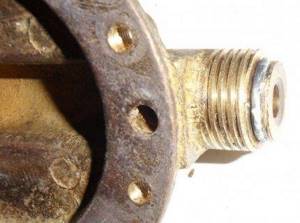
The Venturi nozzle is located in the outlet pipe (on the right side of the frog). This is a local narrowing that provides a pressure drop when the tap is opened. A clogged fitting must be cleaned
When the hot water (HW) tap is closed, the flow of water stops and the pressure in the Venturi nozzle is compared with the pressure in the cavity under the membrane. Due to the action of the springs, the rod together with the plate moves down, and the membrane returns to the middle position.
The gas valve closes automatically. The gas valve is turned off quickly, since the reverse flow of water in the culvert moves the ball to the upper cavity (to the left) and ceases to impede the flow of liquid. We recommend that you look at the information on what to do if the gas valve does not work.
If the hot water flow rate is less than 2-3 l/min, the required pressure drop does not occur, and the springs do not allow the rod to open the gas valve at all or enough to fully heat the water. Also, the necessary pressure difference does not arise when the integrity of the membrane is violated.
The water regulator, based on the principle of operation of the Venturi nozzle, is a safety device, as it allows the water heater to be turned on only when there is sufficient water flow through the heat exchanger. Thus, the reducer automatically protects the geyser from overheating.
The overflow hole connects the Venturi nozzle and the upper cavity of the frog. This hole must be left open when installing the diaphragm for the gearbox to operate correctly.
How does a membrane in a column work? What is it responsible for?
The water regulator is actually the heart of a gas water heater. The unit in which the rubber gasket (diaphragm) is installed regulates the flow: it opens and closes the gas supplied to the burner device.
The principle of operation of the membrane in a gas column is as follows:
The water regulator is a metal assembly with an empty cavity divided into two parts by a diaphragm.- The first compartment is necessary for filling with water. After opening the hot water tap, liquid flows into the connected part of the regulator. Pressure is created inside the assembly, bending the gasket.
- The membrane in the gas column presses on the rod located in the adjacent section of the regulator. A metal rod opens the gas valve and at the same time gives a signal to electrically ignite the burner (in automatic dispensers).
- After closing the hot water tap, the pressure drops. There is a spring on the metal rod that returns it to its original position. The gas supply is interrupted. The burner goes out.
The design of the membrane on the gas water heater may vary depending on the model of the water heater, but the basic principle of operation remains unchanged. Over time, the diaphragm wears out, becomes insufficiently elastic or breaks, which leads to failure of the heat generator.
The membrane in a flow-through gas water heater is responsible for supplying gas and turning on the automatic ignition of the burner device. A malfunction of the water regulator (frog) immediately affects the performance of the equipment.
Types of membranes for columns
The gas water heater diaphragm is a round gasket made of black rubber or silicone. Depending on the speaker manufacturer, the membrane may contain hard plastic or metal elements. Some diaphragms are reshaped.
Gas water heaters made by European manufacturers use diaphragms that are difficult to counterfeit. For example, the Ariston Fast GIWH has a so-called “figure eight”, while the Electrolux GWH or Vaillant MAG has a diaphragm with a special eye. You can only purchase such a gasket at an official service center. A frog membrane for a European water heater costs from 200-500 rubles. For comparison, a repair kit for the domestic NEVA Lux 5013 (5016), together with plastic parts, costs only 150-200 rubles.
If we talk about the material from which diaphragms are made, there are several types:
- The black rubber membrane is a classic look. Most manufacturers prefer to make gaskets from black rubber. Such a diaphragm will last 7-8 years, provided that there are no defects.
- Silicone membrane - guaranteed to work for 10-12 years. On the market you can find gaskets for domestic and Chinese equipment. Owners of European water heaters will have to make do with black rubber diaphragms.
- Red membranes - low quality material is used. The rubber breaks after turning on the speaker several times. Suitable as a temporary measure. It happens that the necessary gasket has to be ordered directly from the manufacturer. Having installed the red membrane, you can continue to use hot water while awaiting delivery of the original part.
You can fully find out which diaphragm is used in the technical documentation supplied with the instantaneous water heater or after disassembling the water regulator.
Signs of a membrane failure in the column - how to check
Diaphragm wear is fairly easy to determine. There are signs indicating that the membrane has failed. When servicing a water heater, technicians pay attention to the following:
- The water regulator is leaking - in normal condition, the gasket completely covers the part of the unit in which water circulates. It only starts to drip if the membrane is torn.
- It takes a long time from opening the hot water tap to turning it on - if the unit is working properly, the burner lights up after 1-2 seconds. There are several reasons for the long response time:
- The membrane is leaking - provided that the leaking small column will work for some time. Over time, water will begin to drip from the regulator.
- The membrane has stretched - in this case, the pressure on the rod will not be enough to open the gas supply. The same problem occurs when the gasket becomes rough due to hard water.
- The microswitch rod of the electronic unit does not turn on - another characteristic sign that the diaphragm has become unusable. The column shows no signs of life.
The membrane on the column fails due to poor water quality. The surface becomes rough and loses elasticity. Over time, microcracks form that allow water to pass through.
Detailed replacement instructions
Next, we’ll look at how to properly replace the diaphragm. But before starting work, it is important to remember that working with gas equipment belongs to the high-risk class. Therefore, repairs to the column must be carried out by a qualified specialist.
You should not overestimate your skills and strengths - if in doubt, you need to contact the gas service. It is also necessary to contact gas specialists if you smell gas in the room, because if safety measures are ignored, the dispenser may explode.
What you need to know before starting work
In other words, owners of gas water heaters are prohibited from carrying out work on gas equipment themselves. And even taking into account that the water reducer is theoretically not related to the gas system, disassembling this structural part and changing the membrane with your own hands is also prohibited.
We recommend: Elevator unit of the heating system: what it is, how to maintain it and determine the number - the principle of operation of the device, diagram and dimensions
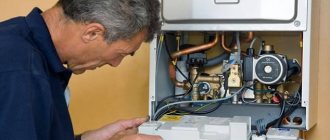
Gas water heater servicing by a specialist. According to the service rules, any service or repair work is carried out only by representatives of specialized companies
Sometimes the desire to do everything yourself, without having practical experience in performing this kind of work, can result in disastrous consequences. As evidenced by the numerous accidents associated with household gas equipment.
However, premature wear of the membrane and other components of the water heater under pressure can be prevented by promptly cleaning the equipment with your own hands or by a gas service representative.

A bitter example from life when, due to self-repair of a water dispenser, a gas explosion occurred.
As a result, the destruction of a significant part of a multi-storey residential building. And many such cases are recorded every year. Often there are craftsmen who are ready to independently change the membrane of the reducer on a gas water heater. Moreover, it is, in fact, not at all difficult to perform such an operation if you have plumbing skills.
Do this easy job as follows:
- Using documentation or by opening the column housing and examining the internal contents, determine the brand (model) of the installed gearbox.
- Based on the technical information obtained, they purchase a new membrane on the market.
- If the equipment is imported, you may have to purchase the membrane only to order.
- If there is a membrane, shut off the gas supply to the equipment and close the cold water supply tap from the central heating system.
- Drain the contents of the gas heater heat exchanger using the service drain valve, the location of which is determined according to the documentation.
After these operations, you can begin dismantling the gearbox. However, there is no need to rush here. You need to work carefully and carefully so as not to damage other nearby parts of the gas water heater.
Membrane shapes and materials
The design of geysers is varied. Accordingly, a change in the design of the pressure reducer cannot be ruled out. Therefore, the existence of reducing membranes of various shapes also seems to be an obvious phenomenon.
If a round-shaped product, which can often be found when disassembling the valves of domestic geysers, is considered standard, imported devices are often equipped with “exotic” ones.
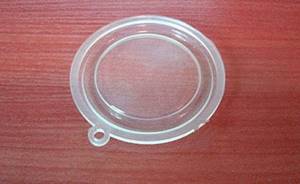
The so-called exotic version of the rubber membrane. As a rule, most often products of this kind are found in imported designs
One such example is the geysers of a well-known foreign company that produces household appliances under the Electrolux brand. Many models of equipment from this brand are equipped with figured membranes in the form of a “figure eight”.
The devices of the foreign company Vaillant are somewhat less popular compared to Electrolux, but they also stand out from the entire range of household geysers due to the non-standard production of gear membranes. When disassembling their valve, there is a chance of colliding with the flag membrane.
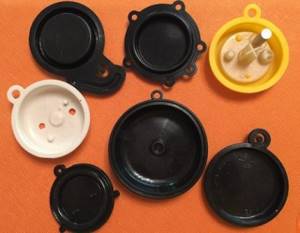
Another “exotic”, not so expressed figuratively and quite a bit different from the classics, but still. Such accessories are also used on foreign devices
For the sake of objectivity, it should be noted: products of non-standard shape show finer regulation of flow pressure, however, in terms of long-term performance, they are often inferior to standard ones. Often the degree of durability is determined by the quality of the material.
In practice, it has been noted that silicone membranes last longer than rubber ones. However, for silicone, an important criterion is careful filtration of network water. Even a small amount of sand or rust that gets into the area where a silicone product is located will dramatically reduce the service life of the material.
Manufacturing a membrane using a relatively new material – silicone.
In terms of the quality of work, an accessory in this design is characterized by more expressive parameters compared to technical rubber. Technical rubber is less sensitive to the effects of suspended particles, but for the most part “suffers” from insufficient chemical resistance. That is, if the composition of the water has an aggressive component to some extent, under these conditions, products made from technical rubber usually do not last long.
Stage #1 - preparatory work
First of all, cut off the flow of gas and cold water to the column. The gas must be turned off before starting work, even if you do not plan to inspect the gas part of the equipment. The water unit is connected to the gas unit, and if you touch it, you can get into big trouble.
Water is drained from the system by opening the tap into which hot water flows from the boiler. If several hot water taps are connected to it, open the one located below the device. Then the maximum amount of water will drain from the system. To drain the remaining water, place a basin under the water regulator.
There is no need to mention that the replacement membrane needs to be purchased ahead of time. It is also better to purchase gaskets to seal the rod and union nuts of both pipes. You can purchase a complete repair kit.
It is best to install a silicone membrane when replacing. This is not easy to find right away for all modifications of geysers. Often you have to take the option from stock that suits your speaker model
Prepare tools for work: screwdrivers, wrenches or gas wrenches, pliers. Fine-grit sandpaper may be useful. It is also worth stocking up on rags and a rust dissolving agent (frog screws often turn sour).
To open access to the water unit, open the column housing. Removing the casing is usually not difficult; it doesn’t take long to find and unscrew the mounting screws.
Finding the water regulator is also not difficult - it is the first block on the path of cold water entering the column.
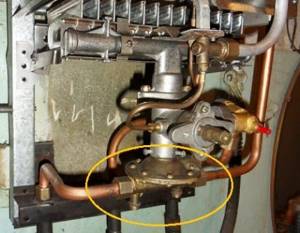
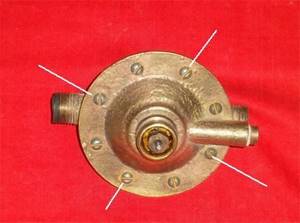
The water regulator of the Neva Group of Companies is located under the gas block. On the left, cold water enters the reducer through the inlet pipe. Through the right outlet pipe from the frog, water flows to the heat exchanger
Stage #2 - step-by-step description of membrane replacement
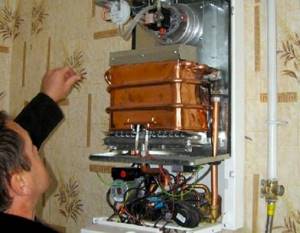
You can get an idea of the process of replacing a worn membrane in a gas water heater using the example of a household flow-through heat exchanger “Neva”.
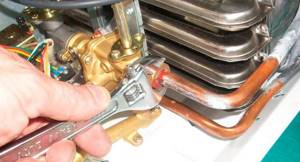
When unscrewing the union nut of the outlet pipe with a wrench, as well as unscrewing the screws connecting the water block to the gas block, hold the frog with your hand
Next, consider the process of dismantling the water unit:
- Armed with a wrench, first unscrew the union nut of the inlet pipe on the left side of the gearbox. We take the phone away so that it does not interfere with further actions.
- Holding the frog with your hand, unscrew the nut of the outlet pipe. Let the water drain.
- Using a screwdriver, unscrew the three screws connecting the water and gas blocks. It is not necessary to completely unscrew the fastener; just release the rod. We remove the gearbox.
Now we unscrew the screws securing the cover and base of the block (8 screws). If the bolts are soured, use WD-40. We open the cavity of the block and remove the damaged membrane.
We inspect the condition of the removable parts - plates, rod and bushings, filter mesh, fittings. If necessary, clean the cavity and other surfaces of the frog and its parts from scale or rust. We replace unusable parts or install old parts in the appropriate places.
It is important not to forget to check the condition of the retarder ball. Just shake the lid like a rattle and listen to whether the rolling steel ball is knocking
We install the membrane, not forgetting to accurately align the hole in the rubber part with the hole in the bypass channel. If the channel is blocked, then water will not flow into the upper cavity. The water pressure on the gasket from below will keep it in a curved position, the gas will be open by the rod even when there is no water flow.
We recommend: The cost of heating a private house per m2 on a turnkey basis with different fuels and work
We return the cover to its place, install and tighten the fastening screws crosswise (one against the other). After making sure that everything was done correctly, tighten all the screws in the same sequence.
Then we install the assembled block:
- We mount the gearbox in the reverse order. It is advisable to install new sealing gaskets with a diameter of half an inch on the pipes.
- We check the quality of the connection by opening the hot water tap. If there are no leaks when the tap is open, turn off the water and check for leaks under pressure. Then turn on the gas supply. After applying a soap solution to the gas connections, we check for gas leaks.
- If no leaks are found, we check the column in all operating modes.
After making sure that everything is done correctly and the column is working, we mount the removed housing cover.
The gearbox should be dismantled in the sequence indicated by the numbers, tightening all connections in turn. Only after completing this step can you carefully remove the water block. After replacement, its installation should be performed in the reverse order.
Stage #3 - putting the entire water block in order
To avoid the situation that you replace the gearbox gasket, and in a few days you will need to disassemble the water heater to eliminate another malfunction, it is more rational to linger and do preventive maintenance.
While the gearbox is removed, in addition to replacing the membrane, you need to check the ease of movement of the rod. The rods of the water and gas units interact.
Due to leaks, the gearbox rod may become covered with scale or become sour. It must be cleaned, polished with 240-grit sandpaper, and lubricated with mineral oil, such as lithol. The stroke of the rod should be smooth and easy.
It would be a good idea to inspect the stem bushing and seals to prevent leaks. The seal on the stem bushing must be changed periodically. In order to change the seal, unscrew the nut and remove the bushing. If there is scale, it is cleaned off. After replacing the seal, reassemble the assembly in the reverse order. The rod seal should be replaced every three years.
You should also check the Venturi nozzle (fitting) for cleanliness. Even slight contamination greatly affects the performance of the frog. You can clean the fitting with a thin wooden stick. The O-rings on the Venturi tube may need to be replaced.
Then it is advisable to check the following elements:
- Check the operation of the magnetic switch button. If the button is working, but the burner does not ignite due to lack of gas supply, the reason may lie in the reed of the switch. It can be slightly pressed to ensure a tight fit.
- Replace the defective filter mesh or install a new one if it was missing before.
Preventative inspection of the water unit should be performed at least once a year. Likewise, you should not forget about cleaning and regular maintenance of all structural elements of the gas water heater.
Instructions for replacing the membrane
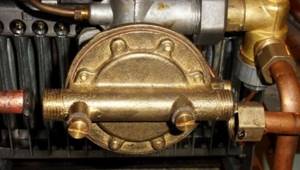
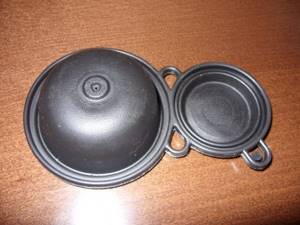
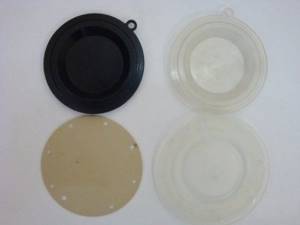
The removed pressure regulator will need to be disassembled to get to the rubber (silicone) membrane. The disassembled part looks roughly like a plate.
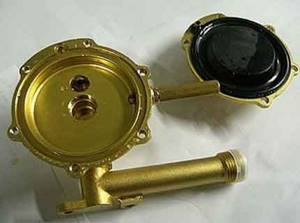
The two halves of the disc housing of the pressure regulating device, inside which the membrane is located. Now the defective accessory can be easily removed and replaced with a new one
Disassembly/assembly sequence:
- Unscrew the fastening screws on the top of the plate;
- carefully use a flat-head screwdriver to bifurcate the plate;
- remove the defective membrane;
- install a new one;
- articulate the halves of the plate;
- secure the joint with screws in a circle.
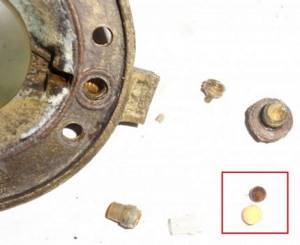
The correct location of the membrane on the gear plate is determined by a special “key” recess or pin, which, in turn, is located on the radial edge in the same row as the holes for the mounting bolts.
You need to align the membrane “key” with this notch before connecting the plate halves and screwing in the screws.
The same pin on the body of one of the halves of the body, thanks to which the membrane is precisely fixed in place. The accessory itself has a hole for mounting on a pin.
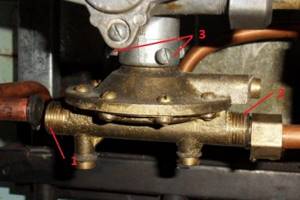
The moment of screwing in the mounting screws is a traditional action. However, you should keep in mind the uniformity of tightening of the gearbox parts. Technically competent tightening is performed using the “crosswise” method. That is, first, four screws located one opposite the other are tightened sequentially, and only then all the others are tightened.
The assembled gearbox, equipped with a new membrane, is installed in place in the reverse order. Carefully insert the rod inside the tube of the control device, align the device to the level of the water pipes. The nuts are then manually screwed onto adjacent sections of the pipe.
The picture shows the uniform distribution of screw tightening torques when connecting two parts of the housing. This condition must be adhered to in order to avoid water leaks through leaks in the future.
As a rule, pipe connections require the presence of sealing gaskets and their correct installation. This point must be taken into account when installing the gearbox at the installation site. Next, all that remains is to tighten the fastening nuts, applying a little force and do not forget to tighten the drain plugs under the plate.
Membrane functions, causes of malfunction
An elastic membrane is located at the base of the water unit and reacts to pressure changes in the system. As soon as you open the faucet, the rubber element bends under pressure and pushes out the stem. The rod in turn actuates the gas valve. This is how the fuel enters the burner.
With intensive use of the “Vector”, “Neva”, “Oasis” columns, the membrane wears out. Rubber stretches, becomes clogged and damaged. As a result, fuel does not enter the burner: the column does not ignite or ignites, but immediately goes out.
Signs of breakdown
How do you know when it's time to change the rubber diaphragm? You need to pay attention to:
- The pressure force of gas and water in the system. Open the tap and count how many liters are consumed per minute. Normally there should be at least two to three liters. The gas supply can be calculated visually by looking at the strength of the fire.
- Flame location. In devices with wick ignition, the fire should burn from the edge of the burner and be at least 3-5 centimeters high. Does not match? Then check the jets for blockages. After cleaning, look at the flame again. If the situation does not change, the problem is in the diaphragm.
- Equipment with piezo ignition should click when the button is pressed. This means that the diaphragm has worked. If you do not hear any sounds, the part may be damaged or torn.
- In some models, a rod that controls the operation of the control unit will help determine the breakdown. Remove the protective cover and open the water. If the rod does not move, the diaphragm needs to be replaced.
Once you have found the breakdown, you need to select the correct replacement part.
Methods and means of cleaning
The instructions must describe in detail the rules for cleaning the components of the device, deviating from which can be life-threatening. If, during the process of descaling or burning, damage to one of the elements of the device occurs and a gas leak occurs, you must immediately contact the emergency gas service.
If, after weighing all the pros and cons, you have decided to clean the device yourself, we suggest that you familiarize yourself with industrial preparations and folk remedies that will allow you to effectively get rid of contaminants.
In the video below you can see in more detail how to flush a water heater radiator using citric acid:
Before starting work, be sure to turn off the gas and water supplies.
You can clean it with your own hands:
- burner for soot and soot;
- internal parts from dust;
- anti-scale heat exchanger;
- water pipes.
Basic cleaning products:
| Problem | Folk recipe | Industrial product |
| Scale in the heat exchanger | An aqueous solution of citric acid (100 g of substance per 0.5 l of hot water) | Calgon, "Antinscale" |
| Carbon deposits on the heat exchanger | A solution of table vinegar and warm water (1:3) | 7-10% hydrochloric acid solution |
| Dust on internal parts | Warm soap solution | Regular household vacuum cleaner |
Descaling
You can remove scale using chemicals, following the manufacturer's recommendations, as well as folk remedies.
If the second option is chosen, you must adhere to the following procedure:
- disconnect the device from gas and water;
- disconnect the heat exchanger, remove it from the wall, drain the water;
- using a bulb or syringe, pour a cleaning agent (soda or vinegar solution) into the heat exchanger pipes;
- then we immerse the entire part in a deep basin with the same mixture and leave it for several hours.
After the contaminants have been completely removed, the heat exchanger is connected back and the column is started. The water pressure will finally clean the inner surface of the pipes, making them perfectly clean.
The heat exchanger can be cleaned without dismantling. To do this, remove the front panel and disconnect the device from the water supply hose. After that, the cleaning solution is poured into the pipes through the inlet. The device is left in this form for 2-3 hours, after which the liquid is drained and everything is returned to its place.
Removing soot and soot
You can clean the surface of parts from soot without disassembling the column in just a few minutes. To do this, you must adhere to the following procedure:
- turn off the gas and remove the front part of the housing;
- wipe the internal parts with a damp cloth or vacuum;
- put the column back together.
From the video below you will learn how to quickly and effectively clean soot from burners:
Cleaning the injectors
If the column begins to burn weakly, most likely the nozzle is clogged. You can find it on the gas manifold near the pressure sensor. For cleaning, use a thin wire or a stiff brush.
After the work is completed, it is necessary to check the column and eliminate the possibility of gas leakage. To do this, lubricate the burner with soapy water and make sure there are no bubbles.
Cleaning the water intake unit
In addition to the water heating part, any geyser is equipped with a water intake unit, the main task of which is to prevent large solid particles from entering the heat exchanger. Over time, the mesh filter and membrane, which is responsible for the automatic supply of gas when the water is turned on, become contaminated.
To clean the water inlet, you must:
- remove it from the column body;
- rinse the filter under running cold water;
- inspect the membrane for bends and bulges (if there are defects, the membrane must be replaced with a new one).
After examination and washing, all parts are installed in place, and the water inlet is closed with a lid.
This is interesting: Installation of plasterboard partitions with your own hands - we’ll describe the main thing
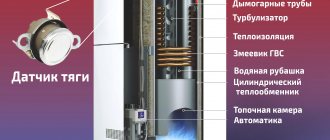
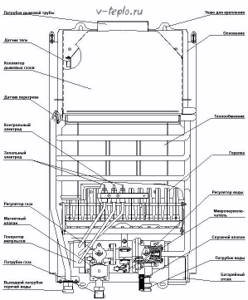
Column device
How to understand the location of water heater components? Don't worry, the diagram will help you. It is created based on columns.
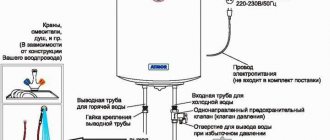
External device:

- Metal casing;
- Control window;
- Gas flow regulator;
- Water regulator;
- Digital temperature display;
- Cold water connection (thread G 1/2);
- Hot water outlet pipe;
- Pipe for connection to the gas main (cylinder);
- A pipe for removing combustion products is connected to the chimney;
- The basis;
- Back wall;
- Installation holes;
Internal equipment:
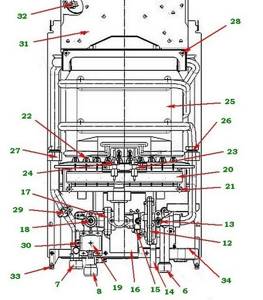
- 6, 7, 8 - continuation, pipes, as indicated above;
- 12 — water unit;
- 13 — water adjustment rod;
- 14 - drain plug;
- 15 - microswitch;
- 16 — control unit;
- 17 — gas unit;
- 18 — fuel adjusting rod;
- 19 — solenoid valve;
- 20 - collector;
- 21 — manifold mounting screws;
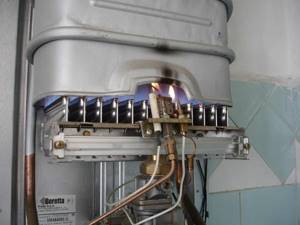
- 22 — burner nozzles;
- 23 - spark plug;
- 24 — ionization sensor;
- 25 - copper heat exchanger;
- 26 — output to the water unit;
- 27 — output to the gas unit;
- 28 — mounting bolts;
- 29 — thermal relay;
- 30 - thermometer;
- 31 — gas outlet device;
- 32 — traction sensor;
- 33 — brackets for installation;
- 34 — battery compartment;
Having understood the design, you can begin troubleshooting.
Disadvantages of Vector water heaters
Don’t think that for modest money you will buy newfangled equipment that will last for decades - this is not so. You need to understand that budget options are not designed for long-term use and cannot offer innovative technologies that are present in expensive analogues. It happens that after a season of use, equipment requires repairs and replacement of parts.
Another drawback is heat exchanger burnout. Although it is made of copper, its layer is quite thin. Therefore, over time, the heat exchanger can no longer withstand high temperatures and the equipment breaks down.
Even these shortcomings do not stop buyers and the heaters are actively selling out. Some people think that they are much better and of higher quality than models from the more expensive segment. In any case, you cannot say for sure about the quality without testing the water heater yourself.
What you need to know
Over time, even the most reliable membrane becomes unusable - this is one of the most common problems for geysers. It is quite possible to replace a worn-out element with your own hands. If you strictly follow the instructions in the instructions, even an ordinary person can easily cope with this.
However, it should be remembered that repairing gas equipment involves a certain risk. Mistakes may not only result in equipment failure, but can also lead to injury, gas leaks, or fire.
Part wear usually occurs over time as a result of intense use, but it can also happen suddenly. Be that as it may, a microcrack appears in the barrier, through which water begins to leak from the adjacent cavity of the water regulator. The flow of water causes a drop in pressure levels, and the column cannot function normally. Over time, the gap increases, further reducing the pressure. As a result, the system shuts down completely.

Membrane for geyser Beretta Aqua
Conclusions and useful video on the topic
The video demonstrates the personal experience of one of the heater owners - that is, do-it-yourself repair of the water pressure regulator. In particular, all repairs come down to replacing the membrane. We remind viewers once again: independent repair of gas systems is unacceptable!
It’s easier to find and buy a new membrane for a geyser, replace this accessory according to the instructions described above and sleep peacefully. Moreover, replacement, in most cases, does not require significant financial costs. On average, 200-300 rubles are enough to purchase a complete accessory.
Please leave comments, post photos related to the topic of the article and ask questions in the block below. Tell us about how you selected and changed the membrane in a gas water heater. Share useful information and technological nuances that will be useful to site visitors.
Where is the membrane located and how to get to it
To remove the membrane and check its condition, you need to find the entrance to the water and gas water heater. Depending on the type of water heater, there may be a fine water filter in front of the water-gas unit. If it is not there, then you need to install it. This does not have to be done in the housing at the entrance to the column. It is best to install a coarse and fine filter at the water inlet into the apartment. Thus, all water entering the apartment will be purified.
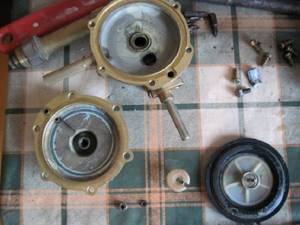
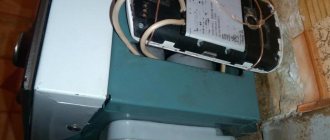
Water block disassembled
Water block disassembled
Remember: The fine and coarse filter traps large and small particles of sand, silt and other impurities in the water. It cannot protect the water-gas group from dissolved calcium salts. The mesh filter, which is equipped with a unit for receiving water, often becomes clogged with rust or debris from the incoming water. Rinse it under strong running water.
Essential elements
The structure of a gas water heater looks something like this.
- Water flow regulator.
- Connection to the chimney.
- Power control.
- Heat exchanger.
- Water node.
- Hood for hood.
- Switch.
- Back panel.
- Gas valve consisting of membranes.
- Ignition.
- Gas unit.
Two pipes are connected to the gas water heater. The first of them is intended for supplying gas, the second is for supplying cold water. In addition, there is a pair of burners located below, one auxiliary, one main.
Important! The design of a gas water heater can be different, depending on the ignition method - it (ignition) can be electronic, manual or using a piezoelectric element
Signs of malfunction and wear of the geyser membrane
- Insufficient water heating . (Loss of power with the onset of cold weather).
- Hot water in the first seconds of operation . (Loses temperature in the process).
- We reduce the pressure by closing the water tap . water is heated.
- When you open the water tap, the column does not turn on . (The wick continues to burn.)
Membrane replacement tool:
- Phillips screwdriver (+);
- Flat-head screwdriver (-);
- Adjustable wrench.
How to choose a new part
For each column (Termet, Ariston, Beretta), the membrane is selected individually. For foreign models, it is most difficult to find a replacement, since the product can only be purchased from an official supplier. In this case, you have a choice: spend money on a new element or buy a new speaker.
With domestic technology everything is simpler. Replacements can be found in stores or ordered online.
Experts recommend choosing a silicone diaphragm. It is more elastic and durable.
If you think that the principle of construction of all membranes is the same, this is not so. For example, in Ariston water heaters special elements are installed - “eights”. They are made of dense rubber and have a special shape. Their cost ranges from 300 to 500 rubles.
The membrane in Electrolux devices works according to the figure-eight principle. But its price is much lower - from 200 rubles.
The easiest membranes to operate and replace are “Neva” and “Astra”.
There are also universal options, but they are only suitable for temporary installation. It is impossible to fine-tune equipment without factory parts.
How to get rid of limescale?
Experts recommend regularly turning on a stream of hot water at full power and leaving it for 20 minutes. This method allows you to remove the top layers of limescale. Additionally, you can clean it yourself using thin, hard copper wire.
To effectively clean the water heater, a washing solution is made from several types of detergents. They are mixed in equal proportions in one liter of boiling water. Then, using a funnel, you need to pour the liquid into the coolant until it flows through the other pipe.
The cleaning agent is left in the heat exchanger for two hours, adding new portions of the cleaning solution through a watering can every 30 minutes.
At the end of the process, you need to connect a shower hose to one of the pipes by disconnecting the funnel. Then turn on a strong flow of clean water to thoroughly flush the system.
In addition to regular cleaning, the use of a water filter helps increase the service life of a gas boiler. In this case, it is necessary to call gas service specialists at least once a year for a complete diagnosis of the equipment. Only they are able to carry out high-quality cleaning, troubleshoot problems and replace the necessary component in a gas boiler.
Advantages of the membrane for the geyser "Neva"
To replace a broken membrane yourself, you will need certain knowledge and skills. Repair of the Neva-4513 dispenser can be performed with the help of service center specialists, but it will cost many times more.
Before purchasing a part, it is important to study the structure of a specific geyser.
The rubber diaphragm, designed to regulate the flow, is designed for use for five years. The actual time of its serviceability largely depends on the quality and hardness of the water, the intensity of the column operation
When purchasing a membrane, it is important to pay attention to the ratings and reviews of the product manufacturer
Membrane advantages:
- Consists of high quality rubber.
- There is an arched branch shaped like an ear.
- If the membrane is damaged, the geyser does not produce hot water.
No matter how high the quality of the membrane, over time it will become unusable. Modern technologies allow you to purchase the highest quality membrane without leaving your home. The membrane can be ordered online on specialized websites. You can also purchase the membrane in specialized stores, where you can consult with a specialist in real time.
Gas water heaters in our country are represented by a large number of manufacturers. At the same time, the speakers themselves are almost no different from each other in terms of internal functional content. The disadvantage of many speakers is that the membrane often breaks.
Many users claim that after replacing the rubber membrane with a silicone one, problems with water heating and leakage stop. But it is also impossible to guarantee the long service life of such a membrane. Therefore, many users ask questions about whether it is possible to repair a membrane made of silicone.
Silicone membrane repair:
- Try to seal it with sealant.
- Use Pentoelast.
- Choose a silicone sealant that has a high stretch coefficient.
- Try gluing the patch.
- Apply tape.
Many agree that the silicone membrane simply needs to be replaced. This approach may be justified, since constant repairs will lead to a waste of time, effort and nerves. Replacing a part is not that difficult if you know how to handle the column in general. The most common speaker models for which users are looking for new membranes are: “Vector”, “Beretta”, “Oasis”.
Tips for choosing
You can purchase a silicone membrane rather than a rubber one to replace it. This part is more elastic and lasts longer (from 10 years).
A white or red rubber membrane is the least preferred option, since such a part wears out very quickly. Sometimes it breaks immediately after replacement.
- When choosing a suitable membrane for a gas-powered water heater, you need to take into account the brand of the device, since some columns have round diaphragms, while others have parts with a rather complex shape.
- If you were unable to find a round diaphragm specifically for your speaker, it is permissible to purchase and install instead a part of the same diameter for a speaker from another manufacturer, for example, a membrane with a diameter of 73 mm.
- If the column has been serving you for more than five years, buy the membrane immediately with the plastic parts that are adjacent to it (over time, plasticizers are washed out of them, which leads to fragility).
Repair of geyser Neva
Most models of Neva geysers have proven themselves to be simple and easy-to-repair water heating devices. They are far from the reliability of European models, but repairing them is much cheaper, and you can almost always do it yourself.
Failure and subsequent repair of a spark plug is considered by the rules to be an atypical case of breakdown, therefore, after performing repair work, it would be correct to look for the cause of the defect. Most often, plastic burnout occurs due to condensation flowing through the ventilation system onto the body of the gas burner.
How to repair a heat exchanger union nut
One of the most common defects of Neva geysers for almost all models is the low quality of the metal of the heat exchanger. According to the rules, the heat exchange circuit through which water moves should not come into contact with aluminum parts, for example, a gas burner or a control unit. Any such contact can cause electrochemical corrosion of the copper walls, and then repair will simply be useless.
In addition, the rules for tightening the union nuts that secure the heat exchanger to the regulator and outlet pipe are not always followed. With each heat exchanger removal and repair, the nuts cut a thin, barely visible path into the copper wall. Ultimately, the flared end and part of the copper pipe simply break off the tenth time of twisting.
In this case, you have to trim and level the area of the breakdown, install a new nut with an external thread, and connect the heat exchanger to the control unit with a regular flexible hose. Any other repair option, as practice shows, turns out to be short-lived.
Repair of a microswitch in the geyser starting system
A situation similar to the Oasis with dead batteries also happens with the Neva gas water heater. When you try to start the Neva, the indicator board lights up, but the gas burner does not ignite. Sometimes the column can be turned on 4-5 times.
In this situation, repair of the microswitch is required due to premature wear of the part or improper adjustment of the unit.

The switch is located next to the water pressure control unit. When the column starts, the membrane on the block pushes out the rod, which unlocks the switch contact. Unlike the Oasis, all parts of the unit, including the rod, are made of brass, so there is no corrosion; the microswitch itself must be repaired and replaced.
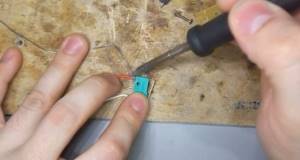
To perform repair work, you need to disconnect the connector, unscrew two M3 screws and remove the switch housing from the strip, as in the video
Replacing the microphone is easy. You can buy an original part for 400-500 rubles. in a specialized salon or purchase an analogue for 50 rubles. in any radio parts store. There is no difference for repairs; in both cases they will sell a part from Chinese consumer goods.
In order to carry out the repair, you will need to unsolder two wires with a connector from the switch legs, put on a heat-shrinkable tube and solder them to the contacts of the new part.
At the final stage of repair, the switch is screwed with old screws onto the mounting strip on the block. Next, you need to adjust the position of the microswitch body so that the rod completely releases the contact when moving. This is done using mounting screws. One of the screws bends with a radius; accordingly, by rotating it, you can move the switch body in the desired direction.
Tips for owners of gas water heaters
In addition to its positive qualities, a geyser is a source of increased danger. In order to protect yourself from troubles, follow simple rules:
- Do not install a tankless water heater yourself. Installation can only be done by a specialized organization for the project.
- Periodically check gas connections with soapy water.
- Perform annual maintenance on your instantaneous water heater.
If you have no experience, it is better to entrust the disassembly and replacement of the diaphragm in the block to a specialist.
Maintenance work
In order for the geyser to function properly and not pose a threat to either the premises or the health of residents, it is important to carry out the following manipulations annually:
- Removing carbon deposits and soot from the burner.
- Cleaning the heat exchanger, which includes removing soot, as well as flushing the pipes to remove scale, if necessary.
- Cleaning the internal components of equipment from dust.
- Cleaning the water intake unit.
- Assessing the tightness of the main dispenser systems (water and gas) with replacement of seals in these systems.
- Assessing the serviceability of the draft sensor.
- Lubrication of all moving parts if necessary.
Water leaks
Inside the flow-through heater, water tubes are connected to various components using union nuts and rubber O-rings. Homeowners who have not maintained their units for years may find water dripping under the unit. If this is discovered, then repairing the gas water heater consists of checking all connections and replacing the seals.
There are other places where water can leak, for example, through the operating rod of the water unit. This suggests that, at a minimum, the seal on the frog rod needs to be replaced, which will require its removal and disassembly. In models equipped with a safety valve, the latter may also leak, especially if it has been released several times. Finally, the most unpleasant situation is a damaged heat exchanger in which a fistula has formed. Buying a new one is very expensive; it’s easier to repair the old one, which is discussed in the next section.
Model features
Let us highlight a number of advantages that this speaker can please a potential buyer:
- Compact and ergonomic. The dimensions of the unit are very modest and amount to 565x290x221 mm. At the same time, the entire design is maintained in accordance with the best ergonomic standards - a convenient control panel and minimalistic design are characteristic features of the model.
- High performance. The design of the NEVA 4511 geyser took into account the fact that the equipment will work primarily in the difficult conditions of the Russian climate. Because of this, it was made to be hardy, strong, durable and highly productive. In addition, model 4511 is adapted to work in conditions of low pressure in the water supply system, which can be considered an important plus for users in our country, where interruptions of this kind occur quite often.
- Safety and reliability. The unit is equipped with a flame control sensor, which reduces the risk of an unexpected accident hundreds of times.
Replacing the membrane for a geyser (video)
Gas water heaters are so common today that few people don’t know how to handle them. However, when devices break down, many fall into despair. There are types of breakdowns that can be quickly eliminated. To do this, you can either contact a special service or do the repair yourself. But you should be extremely careful. Often, the cessation of heating by the water column is affected by the breakdown of the membrane. It is she who passes water to the heating device. Membranes can be made of rubber or silicone, but they all tend to wear out.
Speaker malfunctions
Let’s immediately make a reservation that we will consider the problems of flow-through heaters with an open combustion chamber, of which there are a great many installed in apartments and houses. We will bypass the repair of fully automated turbocharged dispensers with power supply from the mains and ignition from a hydrogen generator. These devices are quite complex and intervention in their design by an ignorant person is contraindicated. Troubleshooting of supercharging units should be carried out by service or gas services.
The list of malfunctions inherent in geysers after several years of operation is as follows:
- smell of gas;
- problems with ignition and starting of the main burner;
- turning off the heater during operation;
- various leaks.
If you smell gas, whether constantly or periodically, you must immediately turn off the appropriate tap, open the windows and call the emergency service. Explain to the dispatcher the nature of the problem, and he will make a decision - to urgently send a team to your home or simply send a technician on a first-come, first-served basis
There are no other options; fixing methane leaks on your own is strictly prohibited.