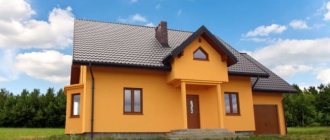
Hello, dear friends! We are discussing wet façade technology. Specifically, I am interested in plaster over insulation.
The insulation material performs quite the expected function. But it is impossible to leave the walls simply covered with these panels. The insulation itself needs protection. Plus, plastering allows you to give your home a finished appearance.
I want to tell you what pros and cons this technology has, what insulation materials can be used, and also what plaster mixtures should be used. Well, I’ll tell you step by step how the façade finishing itself is done.
Different teams have their own rates. I cannot say what the final cost of the work will be. But this is a rather delicate task that not everyone can do. You shouldn’t trust the first craftsmen you come across from a newspaper ad. And if you have experience and skills, you can do the work yourself.
The choice of mineral wool and the technology of insulating facades with mineral wool for plaster
Energy and heat saving depends on the quality of the building façade. Highly efficient developments coupled with durable modern building materials will help achieve real reliability and functionality of facade structures. The technology of facade insulation with mineral wool incorporates several fundamental advantages:
- Weather resistance;
- Advantageous thermal and sound insulation;
- Non-flammability;
- Resistance to deformation;
- Light weight;
- Hydrophobicity;
- Long-term operation;
- Air permeability;
- Environmentally friendly.
- Which mineral wool to choose
- Installation technology
- Required Tools
- Materials for work
- Features of preparatory work
- Securing the starting profile
- Application of adhesive solution
- Fastening insulation with dowels
- Formation of slopes and corner areas
- Reinforcement of mineral slabs
- Application of decorative plaster
- Cost per square meter of work
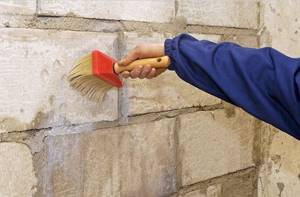
Preparing the surface for application
The process of plastering penoplex is preceded by certain preparatory work. The surface must be carefully leveled, and this can be done by grouting.
If the process is carried out correctly, all bumps and pits can be effectively removed. It is at the grouting stage that the surface of the external walls must be carefully worked on. This is a very important requirement, since after applying the plaster, all remaining problems and defects will be revealed to the eye.
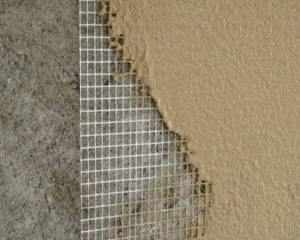
Working with mesh
After grouting, work related to attaching the plaster mesh is carried out. This is an important and obligatory stage during plastering, since without a mesh the plaster will quickly crack or simply slide off . At this stage, you can use a mesh that is intended specifically for facade work. The mesh density should average 140 – 160 g/m2.
It is the density of the mesh that directly determines how even the plaster layer will be . In other words, the higher the density, the better and smoother the plaster layer will be.
NOTE!
Mesh for facade work should be used that is alkali-resistant, since the foam base often contains cement.
The purchased mesh is attached using a special adhesive mixture, which is applied with a thickness of 2-3 mm . The composition is simply applied to the surface and the reinforcing mesh itself is immediately applied.
The product must be pressed into the composition by about half, that is, the adhesive mixture must completely cover the surface of the mesh. The glue must be applied gradually, it is important that it has time to fully set; the mesh itself is attached in small sections.
The mesh must be pressed down with a smooth spatula during application. In this case, the strips must be glued strictly overlapping, and not less than 10 cm. Everything must be glued very carefully, since un-glued compounds or applying the compound only to the joints will appear even through the final finish.
Leveling the surface
As soon as the layer with the mesh is completely dry, you can grout the surface. Here a specially prepared sandpaper cloth or a construction float is used.
This should be done after the coating has completely dried . The time of this drying depends entirely on the weather. The higher the temperature and the drier the air, the faster the applied plaster will dry.
If work is carried out in the summer, on average it may take up to three hours . If the finishing of the building is carried out in the cold season, you can start grouting in about a day.
In any case, there is no need to rush, since the plaster will not be of the required quality and appearance. The grouting itself is carried out without any effort; it is enough to carry out special circular movements and counterclockwise. The process ends after all defects are completely smoothed out.
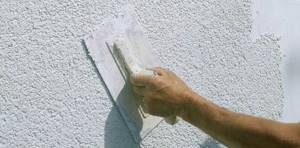
After this, the surface is leveled and another layer of plaster mixture is applied. Penoplex plaster is produced using the same mixture as in the previous stages. When carrying out these processes, you need to use a spatula with which the mixture will be applied. The plaster layer should be approximately 3 mm thick.

Upon completion of this work, final grouting is carried out. It begins only after the previous layer has completely dried, this is no less than a day after the last layer has completely hardened.
CAREFULLY!
While waiting for complete drying, you should not go to extremes, since if you wait more than four days, the coating will become very hard , so it will be very difficult to process it.
Applying plaster on mineral wool
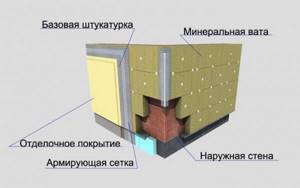
The technology for finishing a facade insulated with mineral wool involves the use of two layers - reinforcement and plaster. The first layer is a durable fiberglass mesh. This material must have maximum alkali resistance. Thanks to this reinforcement, the coating will gain maximum strength. Also, the fiberglass mesh will provide excellent adhesion between all layers.
A small layer of a special primer should be applied on top of the reinforcing fabric. It is often sold together with plaster. You can also purchase it separately.
Important! It is not recommended to use other types of primer, as they will not provide the necessary adhesion.
Once the primer has dried well, you can begin applying the finishing coat. To do this, use a wide spatula. The layer thickness must be at least 3 mm. If you do not adhere to this indicator, the facade will soon become unusable.
For those who decide to plaster mineral wool with acrylic mixtures, the work must be carried out as quickly as possible. This will allow you to get the same shade in all areas.
When plastering, it is important to pay special attention to the corners of the building, windows and doorways. An additional layer of mesh should be installed in these areas. It should also be remembered that plastering of any type of mineral wool should be carried out at a temperature not lower than +5 0 C.
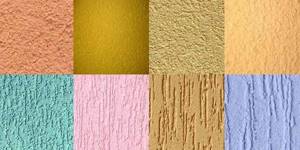
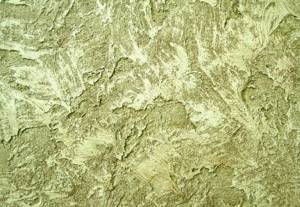
Giving the façade a “bark beetle” texture
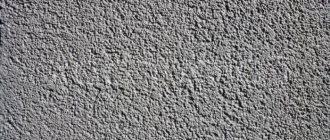
If you decide to give the surface an unusual texture, you can use a mixture with the addition of mineral fractions. These are small pebbles, the size of which ranges from 2 to 3 mm. In the process of rubbing such putty, small furrows will appear on the surface, randomly located.
As for creating a “fur coat,” you can use a roller or trowel to carry out the work. In the second case, the tool will need to be pressed tightly to the surface and torn off sharply.
Tools and equipment for work

A set of tools for plastering a facade using insulation.
To organize the automatic application of material to the facade, plastering units or stations are used. The dry mixture is poured into the bunker, and water is also supplied there. The solution is supplied to the surface through injection hoses with a tip. The process uses rules, trowels, and spatulas.
The technology for plastering facade insulation using the manual method is different and requires the use of tools:
- falcon for carrying the solution;
- ladle, spatula, spray scoop;
- smoother, trowel - distribution of solution;
- grater - smoothing and grouting;
- level - quality control.
A corner trowel is used to align internal and external corners. The solution is prepared in special tubs made of metal or plastic.
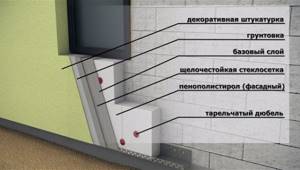
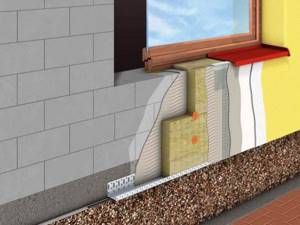
Technology of applying decorative finishing to insulation
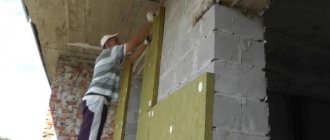
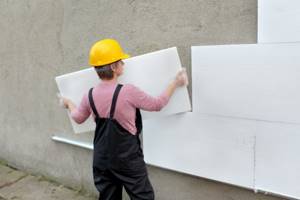
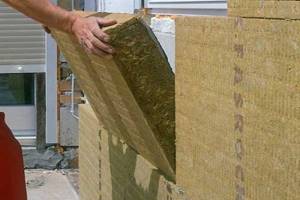
Work on thermal insulation of the facade begins with priming the walls and installing guides. The insulation boards are fixed simultaneously with glue and umbrella dowels. After completing the installation of all the thermal insulation material, finishing begins.
The technology for applying decorative coating provides for certain temperature conditions from +5º to +30ºC. Work should not begin in rain or windy weather.
The solution is applied with a metal spatula, and to level the plaster you will need a rubber tool and a trowel.
The process includes several stages:
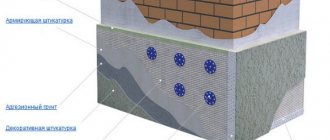
- The surface of the insulation is covered with glue used to fix it to the wall.
- The fiberglass reinforcing mesh is pressed into the adhesive layer and remains until it dries.
- The surface is treated with a primer, the composition is applied with a roller or brush.
- Apply decorative plaster with a wide spatula or metal float.
- The size of the layer depends on the size of the filler fraction.
Drying of the composition takes 48-72 hours, but the exact time depends on weather conditions.
Execution of work
For clarity, the “wet facade” technology can be analyzed using the example of insulating a log house with mineral wool slabs, followed by finishing with acrylic plaster.
Preparing the wall
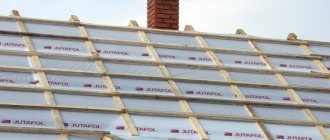
Before starting insulation, it is necessary to prepare the foundation for the work. To do this, inch boards with a width of about 10 - 15 cm are placed on the surface of the log house at equal intervals.
The installation step must be calculated in such a way that during subsequent installation of the slabs, all joints fall in the middle of the board.
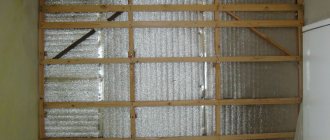
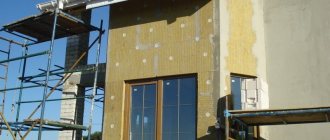
Installation of insulation
The standard option of fastening slabs with glue is not suitable in this case. The insulation is attached to the installed boards only mechanically using plastic dowel-nails with a wide head.
Work begins with the installation of a support profile along the perimeter of the external walls. It is installed exactly horizontally and acts as a support and level for the first row of thermal insulation. The next row is installed with a slight offset of the seams. Visually it looks like brickwork.
It is very important to correctly frame the installation areas of windows and doors. Insulation boards must be installed in such a way as to overlap the perimeter line of the opening. After final fastening, excess thermal insulation is cut off with a hacksaw.
To prevent cracks from occurring, all protruding corners and tops of openings are reinforced with fiberglass mesh.
Applying plaster
In order for the plaster to hold firmly, it is necessary to first prepare the base for its application. A leveling layer of base plaster is applied to the surface of the mineral wool. Until it hardens, a reinforcing mesh is embedded in it (the same one that was used to strengthen the corners).
After a day, when the layer has hardened, you can proceed to applying acrylic plaster. The work is done using a wide spatula and grout.
The recommended technology for applying acrylic compositions involves covering the entire surface of the wall in one go. With a long break, there is a high probability of a clearly defined interface.
If desired, the surface of the walls can be painted in any color by adding the desired shade to the working solution.
Final wall decoration
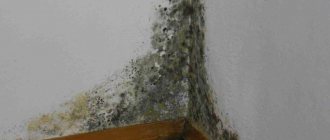
Decorative plaster decorates the building and protects its walls from the appearance of fungus and mold. It is applied in one of three ways:
- Stamping. The plaster is applied with a regular roller covered with a patterned mesh;
- Trimming. To apply the plaster, use a sponge soaked in water. The surface after trimming imitates natural stone;
- Bouffant. A metal brush with bristles is used. It is used to comb the wall after applying the plaster.
After the procedure, the insulated surface should be protected from rain and snow for at least a day.
Necessary materials
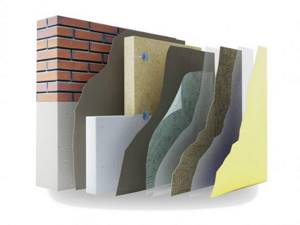
Wall insulation
The main types of insulation for walls outside the house:
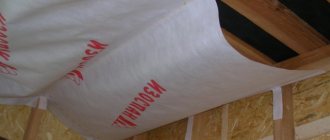
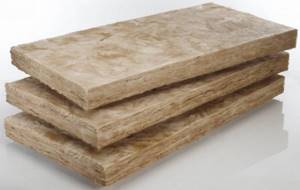
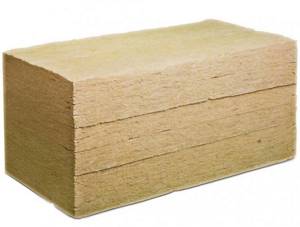
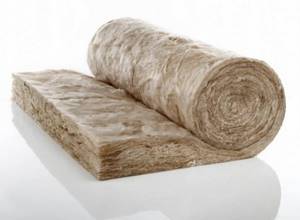
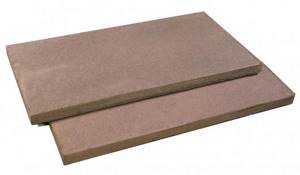
- Mineral wool . It is an inorganic fibrous thermal insulating material. Available in rolls and slabs. For facades, only the second option is suitable. There are glass wool, stone (basalt) and slag wool. It is recommended to insulate the facade with basalt mineral wool. It has the lowest thermal conductivity, almost does not absorb moisture, but at the same time it is vapor permeable (“breathes”), which allows it to be used for rooms made of aerated concrete. Heat retention is ensured by the air inside the stove. To increase moisture resistance, mineral wool is impregnated with water-repellent agents. For the “wet facade” technology, slabs with a density of 130-160 kg/m3 are chosen so that they can withstand the weight of the plaster.
- Styrofoam . The most affordable insulation. 98% consists of air, the rest is foamed polystyrene. Available in the form of rectangular slabs with smooth edges or with a groove at the end. The second option is more convenient for installing exterior decoration of the house. Polystyrene foam can be easily cut with a regular hacksaw or construction knife, is lightweight, and is a good sound insulator. Service life up to 50 years. Disadvantages: it is flammable, emits toxic smoke when ignited, and is susceptible to damage by rodents. There is a whole list of substances that cause polystyrene to melt upon contact, but they are not used when installing on facades under plaster.
- " Penoplex ". It is an improved polystyrene foam (expanded polystyrene). It has all its advantages, but is much stronger and almost waterproof. Water can only penetrate through mechanical damage to the sheets.
- Shelter EcoStroy Facade. Made from 100% polyester fibre. It has high rigidity, is not susceptible to rotting, fungi and mold. DOES NOT absorb moisture.
A few examples of expanded polystyrene and mineral wool manufacturers:
TechnoNIKOL; Knauf; Izover; Ecover; URSA; Penofol; Penoplex
Facade plasters for thermal insulation
It is impossible to use ordinary cement-sand plaster mixtures for constructing a “wet facade”, because due to poor adhesion they will quickly peel off from the surface of the insulation. For plastering a heat-insulating layer on slabs, many manufacturers of building mixtures have special compositions. That’s what they call it - plaster on polystyrene foam, on polystyrene foam, for mineral wool. They contain substances that increase adhesion. They are designed to create a main (not finishing) layer on the surface of thermal insulation boards. Several brands that offer similar mixtures:
Ceresit (ST 85). Plaster-adhesive mixture for polystyrene foam
Knauf Sevener universal mixture
Osnovit Caverplix is suitable for polystyrene foam and mineral wool
Unis Warm adhesive universal composition for wet facades
A variety of plaster mixtures is “ warm plasters ”. They differ from ordinary ones in that instead of simple sand, they contain expanded clay powders, pumice, perlite sand, vermiculite, polystyrene foam granules or other substances that reduce thermal conductivity as a filler. This is the best option for insulating and finishing walls using the “wet facade” system
Mixtures for decorative plastering
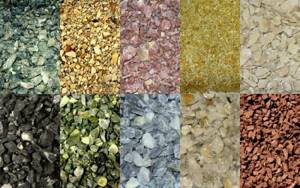
Mosaic (pebble) plaster.
Silicone plaster composition. Durable but expensive.
Silicate mixtures for finishing external walls.
Acrylic facade plaster.
For “wet facades” special decorative plasters are used. Examples of brands:
- Ceresite. For plastering over insulation, pebble acrylic mixtures ST 63, 64 or 60 (for tinting, color of choice), mineral ST 35 (bark beetle) or ST 137 (pebble), silicate-silicone ST 174 or 175 (pebble) are suitable. Versions of decorative plasters: white, paintable and winter.
- Knauf. Mineral structural decorative plaster of the Diamant brand is used for insulation. It matches the paint. Compressive strength 3.5 MPa, frost resistance 50 cycles. Designed for use in combination with a Knauf Sevener base coat.
- Stolit. The AF brand plaster mixture is a structural acrylic mixture that gives the surface a “lamb” relief.
Acrylic plasters are the most resistant to weathering.
Advantages and disadvantages of bark beetle plaster
Bark beetle plaster is a natural, environmentally friendly material that has a number of advantages:
- reasonable price;
- not afraid of temperature fluctuations, moisture, frost;
- does not fade or collapse in the sun;
- has excellent decorative properties;
- has self-cleaning properties in the rain;
- it is a durable material;
- does not mold, does not burn;
- reliably protects the inner layer of insulation from any adverse factors.
But there are also several disadvantages. The main thing is that the decorative properties of the “bark beetle” directly depend on the professionalism of the plasterer. The plaster must be applied to the surface in one go; if finishing work is done in pieces, the seams will be noticeable. Before applying the finishing layer, it is important to level the walls very carefully, otherwise the decorative effect of the design will deteriorate significantly. Work can only be carried out in good weather: heat, rain or frost are unacceptable.
Another drawback is that if the wall is damaged, it is very difficult to restore the decorative layer; the damaged area will be noticeable even after repair.
But, as practice shows, “bark beetle” is the most popular material. With care and proper application, plaster retains all its properties for twenty to thirty years, without causing inconvenience or problems to home owners.
Types of plaster
A distinctive feature of the finish is that plaster over insulation creates a uniform, seamless coating over the entire surface of the wall. The technology does not require special fasteners that create cold bridges to weaken the thermal insulation properties of the insulating layer.
Various application technologies are used to create an attractive decorative coating. Materials have different qualities.
Mineral
Options for additives for mineral plaster facades
Cement, sand and active additives form the basis of the composition; pigments are introduced into the finished mixture during application. Mineral plasters are durable, but cannot withstand strong liquid pressure, for example, when washing the facade with liquid under pressure. To reduce water permeability, technological additives are used.
The material is packaged in bags in the form of a dry mixture, which is diluted with water at the workplace. Mineral compositions are among the popular types due to their relative cheapness. Fungi and microorganisms do not multiply on the finishing surface. The downside is the small selection of colors.
Acrylic
The plaster contains mineral components based on acrylic polymer resins in the form of an aqueous solution. The surface layer is elastic and serves for a long time without loss of integrity. Requires regular cleaning because... acrylic accumulates dirt and attracts dust.
Acrylic material for facade finishing is sold ready-made in plastic containers. The coating is of a vapor-permeable type, so the wall releases excess moisture into the atmosphere, and there will be no dampness in the rooms. Additives in the composition protect against microorganisms.
Silicate
This material is found between acrylic and mineral plasters. The composition is based on liquid glass or potassium silicate. Acrylic resins are introduced to provide flexibility. Mineral components in combination with glass fibers create a coating of average strength and elasticity.
The mixture is sold in polyethylene containers and is ready for use. The advantages include high vapor permeability without the ability to retain moisture inside. The material does not accumulate static electricity; final finishing is done by painting.
Silicone
The finishing layer creates a coating with high elasticity, while withstanding the shrinkage of the building without collapsing. The silicone coating of the facade is self-cleaning during operation and does not attract dust. Dirt is removed during rain or wind.
Vapor permeability is low, but is at an acceptable level for partial removal of internal moisture. The disadvantages include the high price. The final coating is done with polymer paints.
Acrylic
Silicate
Silicone
Other wall insulation technologies
Companies producing construction and finishing materials offer innovative methods of surface cladding. Plaster with insulation is inferior in performance to classical technology, but can be used in warmer latitudes. The most widespread type of finishing material is one in which foamed vermiculite is used as a filler.
Insulating plaster with granulated polystyrene foam is suitable for external and internal work. The main parts of such mixtures, in addition to the heat insulator of this composition, are binding components: gypsum, cement or lime and fillers made from sifted and washed sand or other minerals.
Mixture preparation and material consumption
The solution is mixed strictly according to specific instructions. The only thing is that the mixture should be a little thinner than shown, this will help to attach the plaster to the surface as conveniently and firmly as possible. More details about consumption in this article.
As for manufacturers, it is not worth using different mixtures to cover one building, since each of them may have a different composition, which will lead to a decrease in the overall quality of the coating.
Universal plaster is consumed as economically as possible from 4 kg/m2 for gluing reinforced mesh and up to approximately 6 kg/m2 for complete leveling of the external walls of a building.
The mixture must be diluted sufficiently liquid, it should drain from the spatula. At the beginning of the work, a solution is prepared, after which you can begin gluing the mesh itself on which the penoplex plaster will be installed.
Polymer boards and their features
A distinctive feature of polymer thermal insulation boards is their low weight, so even when insulating multi-story buildings, they do not create a serious load on the foundation of the building.
There are two types of polymer insulation for external walls:
- Styrofoam. This type of thermal insulation material is a rigid board consisting of many air-filled granules. Thanks to the treatment with fire retardant, the foam does not support spontaneous combustion, but is capable of melting when a powerful source of fire is close. Polystyrene foam is cheaper than other types of polymer insulation, but has low vapor permeability and is gradually destroyed by prolonged exposure to direct sunlight.
- Extruded polystyrene foam is an insulating board with a fine-porous structure. This material is quite durable, so it is sometimes used as a building material to form interior partitions. Expanded polystyrene is resistant to deformation, practically does not allow water to pass through and provides high-quality wall insulation.
When choosing a material for insulating a building, it is necessary to take into account the characteristics of the walls of a given building. For surfaces with low thermal conductivity and good vapor permeability, such as wooden beams, aerated concrete or cellular foam concrete, choose a thermal insulator that allows air to pass through well, i.e. mineral wool slabs. To insulate building materials with high thermal conductivity, such as brick, cinder block or concrete panels, you can use any thermal insulator.
What types of insulation are there?
The warmth inside the house will depend on the choice of insulation and other components of the system. The following materials are mainly used for facade finishing:
- Mineral wool
Mineral wool
Consists of non-flammable materials and is fireproof, which is very important when insulating houses that use stove heating. It has good sound and heat insulation properties, is moisture resistant, safe, and durable. - Stone wool
Rock wool
The composition is the same as that of mineral wool - it consists of rock alloys. It is fireproof, does not allow steam to pass through, and has good heat and sound insulation properties. Protects against moisture, is geometric, environmentally friendly and durable. - Glass wool
Glass wool
A type of mineral wool. Made from waste from the glass industry. It has increased strength, vibration resistance and elasticity. - Styrofoam
Foam plastic
is a foamed material with gas inside. This is one of the cheapest materials for facade insulation. This material is easy to install, retains heat well, but has increased fragility, poor fire resistance, and is also toxic. - Expanded polystyrene
polystyrene
Made from polystyrene and natural gas. A special feature of this material is its moisture resistance. But to use this insulation, the house must have good ventilation. - Basalt slab
Basalt slab
Made from basalt, diabase, clay, dolomite and limestone. It has sound and heat insulation, fire resistance, does not deform, is not flammable, and is environmentally friendly.
Installation of the selected optimal insulation on the wall
Installation of insulation is carried out in dry weather at temperatures from +5° to +30° . This range is most favorable for adhesives and for people doing installation.
The best options are polystyrene foam or basalt slab mineral wool. In terms of physical properties (strength, size, etc.), both materials are close to each other, so the installation procedure for them is almost the same:
- The facade is cleaned of external lights, slopes, drainpipes and other hanging elements.
- Old paint or other coating is removed.
- The wall surface is inspected. Detected cracks, dents or other defects must be puttied; in particularly difficult cases, leveling plastering is used. The maximum size of the surface “wave” is 1 cm per 1 m of length. If there are crumbling areas, a deep penetration primer is used.
- Installation of insulation begins. It is recommended to install a special profile as a support for the bottom row of slabs , which will make it easier to fix the insulation and ensure horizontal alignment. The slabs are installed using a special adhesive, which is applied to the wall and immediately leveled with a notched trowel. Then the insulation board is pressed against the wall for tight contact and fixed with special dowels - fungi.
- The laying of the slabs is done as tightly as possible; there should be no cracks or gaps between the slabs.
- The next row is laid out of order so that the joints of the slabs of the first row overlap the entire slab of the next one.
Subsequently, the metal profile will serve as guides for the plaster rule and ensure an even surface of the coating. This method is used on large facades, where the possibility of errors when applying plaster is very high.
Sectional structure