Selection of plaster
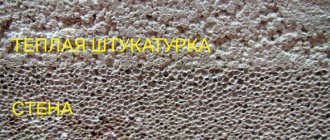
When selecting a protective coating for finishing the surface of penoplex, you should take into account the technical characteristics of the insulation. According to experts, silicone compounds are best suited for this purpose. The surface of such coatings is highly resistant to precipitation in the form of rain, snow and hail.
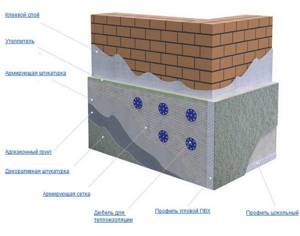
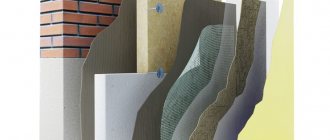
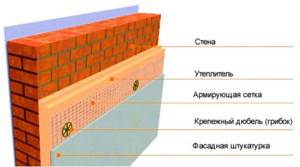
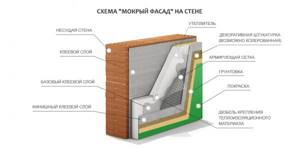
Scheme of facade plastering using penoplex
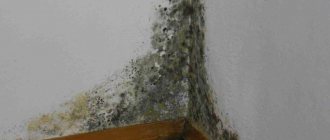
A good result can be obtained by finishing the surface of penoplex with mineral plasters, to which polymer components have been added. Such solutions are quickly fixed to the base, have low water absorption rates, and resist the appearance of fungus and mold.
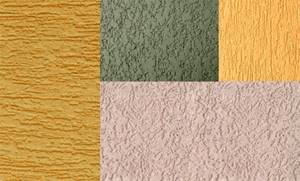
Now let’s look at the features of specific types of decorative plaster.
Bark beetle
This solution contains white powder and small stones. According to the builders, the final pattern painted on the wall will depend on the size of these pebbles and the movements carried out by the plasterer.
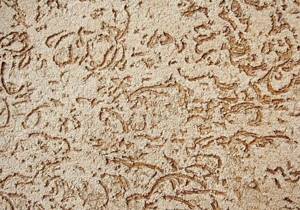
Plaster type "Bark beetle"
Typically, granules with a particle diameter of 2.5 millimeters are added to such mixtures. Bark beetle is a mineral plaster with polymer additives. Its advantages are excellent frost resistance and the absence of harmful additives.
Pebble plaster
It is a textured coating consisting of small pebbles, similar in appearance to pebbles. For the manufacture of the material in question, such types of natural raw materials as marble or granite with a particle size of up to 4 millimeters are used.
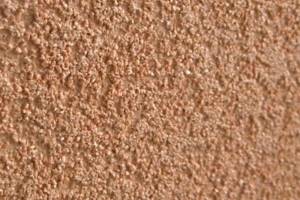
The structure of pebble plaster
This mixture is held together using a binder and sand. The main advantages of pebble mortars are resistance to sunlight and moisture, plasticity of the composition and strength with respect to mechanical loads.
Lamb plaster
It is supplied to hardware stores in the form of a dry mixture, which consists of white cement, as well as fine aggregates such as marble, quartz and dolomite. The material is well fixed to the base surface, has excellent water-repellent properties, and resists mechanical stress and the effects of fungus and mold.
Mosaic decorative plaster
It is made on the basis of acrylic resin with the addition of colored chips. Such compositions have good elasticity and mechanical strength.
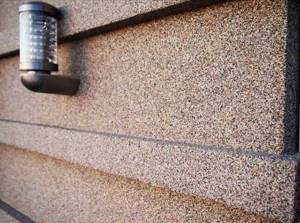
Mosaic plaster
To finish the facade of a building using insulation, solutions with a diameter of colored particles from 1 to 3 millimeters are used.
Plaster for the facade: make the right choice
General characteristics of the market offer
You can use different materials to finish the walls. This can be facade facing tiles, textured paint. The most popular among the population is decorative plastering of surfaces. When choosing any of the options, you need to remember that working with insulation has significant differences from traditional plastering. The polystyrene base of the boards requires the use of special mixtures, with characteristics adapted to the heat insulator, ensuring stable adhesion at the time of application and surface strength.
Some manufacturers produce a separate fixing solution for the mesh and a mixture for facing. In this regard, it would be correct to use plaster products of one brand for the improvement of a specific building. And the technology for working with a specific material will be indicated on the packaging.
Overview from the point of view of practical application
Before plastering the façade of a polystyrene foam house, you need to decide on the choice of finishing material.
- The best option in terms of price-quality ratio is mineral compositions containing pure river sand, cement and water in the preparation recipe. As an option, acrylic plaster cladding. Its main component is acrylic resins. It is impossible to give an unambiguous answer about the preference of one type of composition over another: each of them has both its positive aspects and disadvantages.
- On the one hand, one can hear complaints about cement-sand mortar that it does not have the necessary plasticity, as a result of which cracks appear on the facade during the operation of the building. This happens quite often also because the affordable, inexpensive composition, its simple preparation and simple application have made this type of cladding accessible to anyone who wants to try their hand at construction.
- On the other hand, while noting the positive aspects, it must be recognized that natural plaster is capable of allowing air to pass through without clogging the structure of the material. High vapor permeability promotes “breathing” of the walls. And it is much more economical to plaster a house with a sand-cement composition, especially since if the work technology is followed, the coating turns out to be quite durable and reliable.
- The disadvantage of mineral mixtures is that insufficient elasticity is completely absent in the acrylic analogue. Although it is more expensive, the color of the surface loses its freshness over time, but working with plaster based on acrylic resins is a pleasure. Foam plastic on the facade with such a top layer of any color and shade will serve faithfully for at least a quarter of a century.
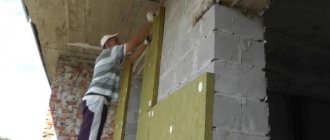
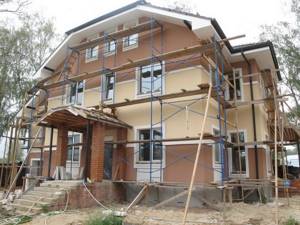
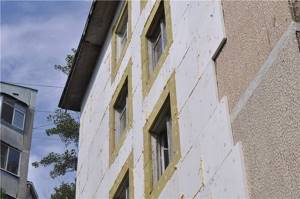
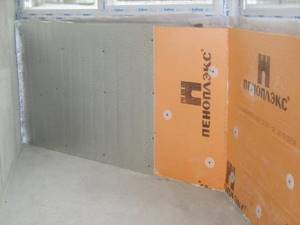
Preparing the base and gluing the slabs
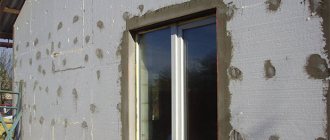
Penoplex slabs serve as the base surface for applying plaster. This material must be attached to the wall using a special glue, and the products must be located on the surface of the facade according to the principle of brickwork.
The joints are sealed with special polyurethane foam for penoplex. The remaining protruding foam can be cut off with a sharp stationery knife. This type of insulation will prevent the formation of cold bridges.
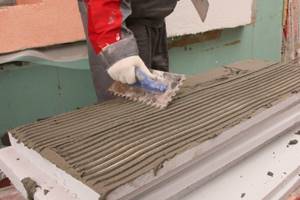
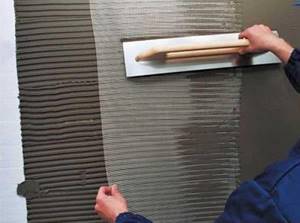
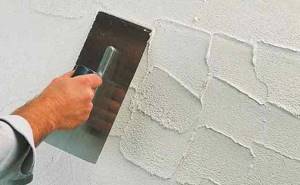
The adhesive mixture is applied with a notched trowel, after which the slabs are secured to the surface. If the surface of the walls is uneven, then the required layer of mortar is glued onto the insulation boards, then the product is fixed to the surface according to the building level indications.
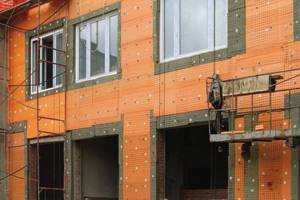
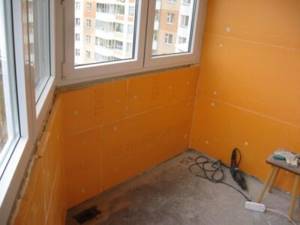
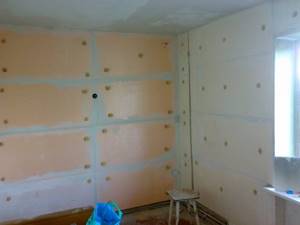
The final fixation of the insulation is carried out with plastic dowels made in the form of a parachute, but this work is carried out the next day after gluing the insulation boards. At the end of the work, we should have a perfectly level base. The places where umbrellas are hammered are sealed with mortar, with 5 dowels for each sheet.
Features of insulation
You can save a little on heating costs by insulating your home with polystyrene foam. How exactly? Let's take foam plastic for this.
Polystyrene foam has many uses these days:
- It is used to make packaging for transporting fragile and easily breakable items;
- life jackets are made from it;
- in refrigerators it is used as a heat insulator.
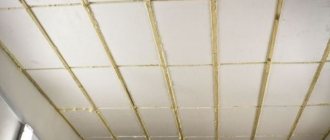
Recently, polystyrene foam has been widely used to insulate the walls of buildings, since it is a good heat and sound insulator, very easy to install and relatively inexpensive. It is attached to the insulated surface using a special adhesive mixture or plastic fasteners, popularly called “umbrellas”. They can be seen in the photo.
After the foam is attached to the walls of the house, it will need to be plastered.
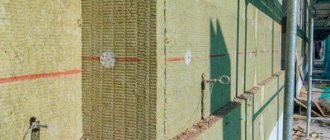
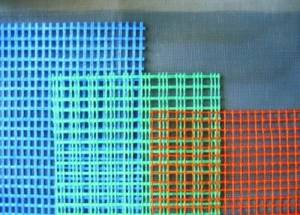
Mesh reinforcement
To securely fix the decorative finishing layer, it is necessary to lay a special mesh on the surface of the insulation. For this purpose, it is recommended to choose materials with a density of 140 to 160 grams per m2.
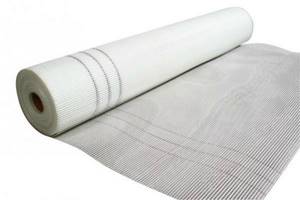
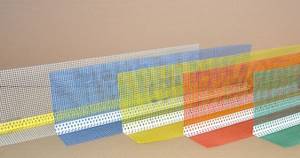
Mesh for reinforcement
This mesh has sufficient density to obtain an even layer of plaster. Similar products can be used for pasting corners.
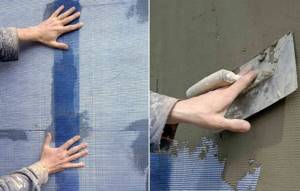
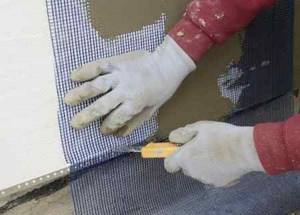
Installation of the mesh begins with the corners of the building, as well as slopes on window and door openings. To glue the material in these places, cut a 30-centimeter piece with a length equal to the length of the slope. We bend the strip in the middle and apply it to the corner part. After this, using a spatula, apply a universal adhesive mixture with a thickness of 2 to 3 millimeters.
At the next stage of work, it is necessary to attach the mesh to the solution and carefully press it with a spatula. The reinforced fabric is attached to the surface by smoothing from the center to the sides. To cover the rest of the surface, cut the mesh into equal pieces 1 meter in length, then apply the adhesive mixture over the area of the product and apply reinforced fiber.
We press the mesh against the wall using a spatula from the center in the upper and lower direction. We glue the materials overlapping, matching the joints by 5 centimeters. It is recommended to avoid joining the mesh to the joints of thermal insulation boards.
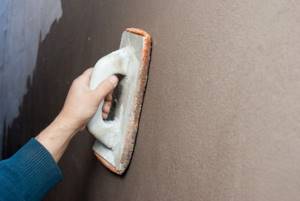
Next, the surface is grouted using a special trowel with an attached emery cloth. The wall treatment should be carried out using a dried adhesive solution. If in warm weather such a mixture dries within 2-3 hours, then in cloudy weather with low air temperatures, you need to wait at least a day to carry out such operations.
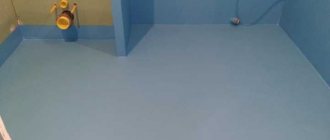
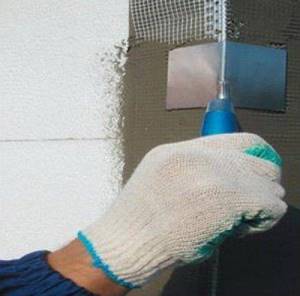
Surface treatment
Next, preliminary leveling of the base is carried out, which will allow you to obtain a high-quality plaster finish. The described work is carried out in the following sequence:
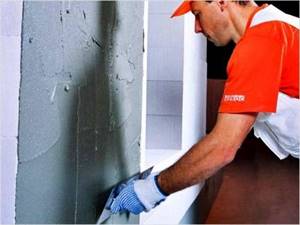
- Apply small portions of glue to a wide spatula;
- Apply the solution to the wall with light movements;
- After the adhesive mixture has dried, the surface is thoroughly grouted.
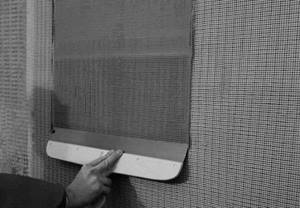
Mesh installation
To significantly increase sound and heat insulation in a private home, it is advisable to apply the plaster in a thick layer. But the low adhesion of polystyrene foam does not allow a thick layer to be firmly fixed; the plaster will fall off faster than it has time to harden. Even if it dries, a slight blow to the wall can cause it to peel off and fall off. That is why installing the mesh is an important step in plastering if you choose to finish the facade with foam plastic.
First of all, this element is installed on corners and difficult areas around window and door openings. Measure the width and length of the desired area, cut the appropriate piece of mesh.
Now apply the first layer of plaster to the wall - a relatively small one, a couple of millimeters is enough. Level it out. You need to act quickly, because a thin layer will set in a matter of minutes; if you don’t have time to do all the work in this time, you will end up with unnecessary trouble.
Immediately after this, press the cut mesh against the wall covered with plaster and press with a wide spatula from top to bottom. The mesh will be pressed into the soft plaster, covered on all sides with an even layer of the mixture and will provide a reliable base for the subsequent thick layer of plaster.
After this, the work is done in exactly the same way on the rest of the surface. The process of installing the mesh is simple, the main thing is to do it quickly and in small areas - you should not hope that you will have time to apply plaster to the entire surface of the facade, and then install the mesh.
When installing two parallel meshes, it is necessary to make a slight overlap, 3-5 centimeters is enough for reliable fixation. At the same time, it is undesirable to leave even small areas of the mesh without a layer of plaster; after applying the final finish they will be noticeable.
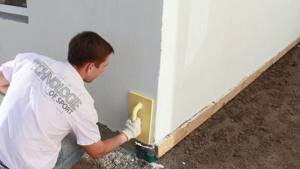
Application of decorative plaster
To securely attach the plaster layer, it is necessary to prime the surface. When using a primer, the base receives protection from the effects of mold and mildew, and surface adhesion increases.
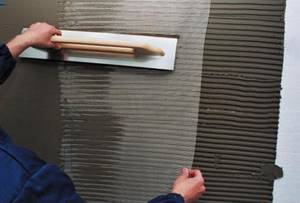
The finishing mixture is applied to the facade using a wide spatula. During this work, you need to ensure that the solution is placed on the wall in an equal layer. Its value will depend on the fraction of plaster grains.
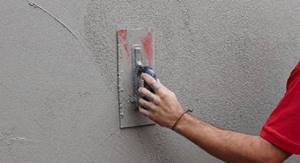
Final application of plaster
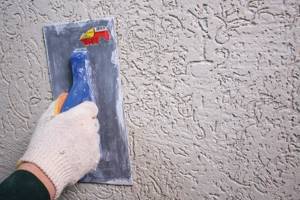
To obtain a textured surface, rollers or sponges are used. Such tools are especially effective when laying bark beetles. At the last stage of work, after the finishing layer has completely dried, the facade is painted or additional protection of the coating is done with colorless varnish.
Some nuances of the process of facade plastering using penoplex:
- It is recommended to carry out the work in the warm season at positive air temperatures;
- Plaster adheres better to the facade if a mesh with small cells was used for reinforcement;
- When finishing, you need to use plaster, adhesive mixture and primer from the same manufacturer;
- Allow some time for the individual layers to dry;
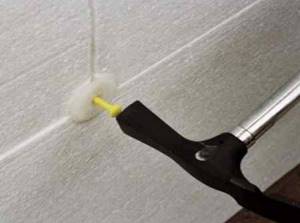
- The primer is applied using a short-haired paint roller;
The absence of a reinforcing mesh will soon lead to peeling of the plaster.
Why plaster polystyrene foam?
If the technology for plastering polystyrene foam, or simply put, polystyrene foam, was similar to the technology for conventional plaster, the life of builders and repairmen would be much simpler. However, this process has many differences and nuances, which we will now consider together with you and reveal in detail. Perhaps, to begin with, let us recall what polystyrene foam is and what types of it exist. Its structure is a porous material, which is made by filling styrene granules with gas under high pressure and repeatedly heated with water steam.
At high temperatures and pressure, the granules swell and tightly merge with each other. Under the influence of atmospheric phenomena, and simply over time, the bonds between the granules weaken, and the finished polystyrene foam board can crumble into small pieces . And “fresh” material cannot boast of high strength - even a child can break it. However, its thermal insulation properties are excellent, and its extremely low cost compared to other insulation materials forces builders to put up with its shortcomings. But simply putting up with it is not enough, that’s why this insulation is plastered.
There are different types of polystyrene foam: regular, fire-resistant, extruded. Perhaps, when the latter is mentioned, many nod in understanding - they have seen one like this on the market. Extruded polystyrene foam is a more advanced form of this insulation; moreover, the USA even banned the production of conventional polystyrene foam, completely replacing it with extruded foam. This term hides a rather complex process of converting polystyrene by extrusion. In fact, granules melt inside special mechanisms, which form a homogeneous viscous mass.
In this way, manufacturers do not receive separate granules, as in polystyrene foam, but a single substance with strong intermolecular compounds.
If we examine extruded polystyrene foam under a microscope, we will see many closed, fused cells filled with gas. These cells are impenetrable because they do not have micropores in their structure, which means that the penetration of steam and water into their structure is excluded. The influence of the atmosphere occurs only on the uppermost layer of cells and at the cut points. Based on this description, the use of extruded material is much more preferable, although the difference is difficult to notice by eye - it will only appear over time.
How to apply plaster to a façade insulated with penoplex?
To insulate the facade, foam plastic, penoplex or polyurethane are often used. These synthetic materials perform their functions well, but they need to be protected from external adverse factors.
This may include wind, rain, snow and hail. To create a protective barrier and at the same time give the building an attractive appearance, facade plaster using penoplex is used.
How to plaster extruded polystyrene foam technology
If insulation boards are installed on the walls of a building, it is necessary to cover them with finishing as quickly as possible. Professionals recommend doing this immediately after the glue used to fix the material has dried.
Carrying out calculations
It is better to buy material for plastering with a reserve. I wouldn’t want to run for an extra bag in the midst of work. But how do you know how much materials you need? To do this, carry out a simple calculation:
- calculate the area of the walls being processed without taking into account window and door openings;
- on the packaging of the decree the approximate consumption of the mixture per square meter. For different compositions it fluctuates in the range of 4–6 kg;
- multiply the indicated value by the area to be treated and obtain the required amount of mixture;
- We add another 10% to the resulting value - this will be the final amount.
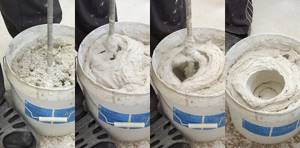
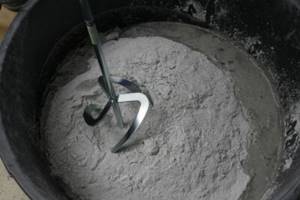
Preparation of plaster mixture
Usually the manufacturer provides instructions for preparing the solution, so be sure to study the packaging and recommendations. If you are plastering polystyrene foam for the first time, do a small batch first to get used to the solution and the execution process.
- Pour the dry mixture into the container.
- Add water in small portions.
- You can mix by hand, use a hammer drill with an attachment or a construction mixer.
- When the consistency is completely satisfactory, leave the solution for 5 minutes to ripen and stir again.
In some cases, it is necessary to make the solution a little thinner than indicated in the instructions.
Pasting with reinforcing mesh
First of all, corners and slopes are processed. To do this, cut the reinforcing mesh into strips so that there are 10–15 cm of material on both sides of the corner.
- a thin layer of mortar is applied to both sides of the corner;
- apply a mesh and smooth it from the corner so that the material is completely immersed in the solution;
- if the length of the piece is not enough, make an overlap of 10 cm; you cannot glue it to the joint.

Next, proceed to the total area of the wall. They work in the same order:
- The wall is covered with mortar.
- The width of the strip is slightly larger than the size of the reinforcing mesh.
- Apply the material and smooth it using a wide spatula or smoother.
- The next layer of mesh is located on the previous one, by 10–15 cm.
Grouting plaster mesh
The first layer must dry completely. After this, use a grater and sandpaper to process the surface using light circular movements. This will remove small unevenness and help you use less leveling solution.
Leveling the surface
We prepare a new solution and begin leveling the plastered polystyrene foam. Now work with a wide spatula:
- a small amount of solution is collected onto a wide spatula;
- applied to the wall using arc movements from top to bottom;
- layer thickness no more than 3 mm.
Make sure that the surface is as smooth as possible.
Grouting the second layer
Grouting is started only after the layer is completely dry. They work with the same grater and sandpaper. Just be sure to select fine grain to remove small flaws. Otherwise, you can simply ruin the whole job.
Primer
This stage should not be neglected. If you do not coat the base with a primer, the decorative layer will either be poorly applied or quickly lose its attractiveness. The composition of the primer depends on the finishing method:
- Further decorative plastering - a composition containing quartz sand is used, it helps to increase adhesion.
- Painting - a composition without sand, makes the base even smoother.
Finishing
Having chosen one or another finishing method, they act strictly according to the plan provided by the manufacturer. Both painting and decorative plaster have their own nuances and methods of applying the material. Therefore, you will have to study a few more articles to figure out how to do everything correctly.
Mixtures
Construction stores offer several types of plaster mixtures that are suitable for working with penoplex. It can be:
- Mineral. The composition includes Portland cement and various polymer additives. They make the mixture more plastic than, for example, ordinary sand and cement, so the solution is easier to apply. This plaster resists precipitation well and is not affected by fungi and mold.
- Silicate. Excellent elastic plaster. Permits moisture from the room, but does not absorb water from the atmosphere. Has antistatic properties. Manufacturers claim that such compositions can be used for both external and internal wall decoration.
- Acrylic. This option is perfect if the plane can be deformed or located in a place where there is constantly high humidity. Both the liquid solution and the frozen layer are elastic. The plastered surface repels atmospheric moisture and perfectly resists ultraviolet radiation, so it remains attractive for a long time.
If the home owner does not know which option to choose, then you need to pay attention to the service life of the plastered surface. Acrylic compositions are considered long-lived. Their service life can exceed 20-25 years. But this takes into account the fact that all the work was carried out correctly. Then come the silicate ones and then the mineral ones.
The duration of service will depend on the invoice. Ideally smooth surfaces lose their original attractiveness much faster. But rough and textured ones are much less susceptible to deformation.
Sequence of work
If the choice of insulation for walls falls on penoplex, you need to protect it from mechanical stress, humidity, air temperature , as well as ultraviolet radiation by plastering with a special selected mixture.
This is not easy for a person unfamiliar with such activities, since it is necessary to comply with all the rules and regulations. The process itself has several stages in the following order:
- preparation of plaster mixture;
- gluing mesh to walls;
- grouting the wall;
- applying mass for leveling;
- grouting the leveling layer;
- padding.
If everything is done correctly, the plaster of the walls using penoplex from the outside will be reliably protected, performing the functions assigned to it during the heating season - retaining heat inside the house.
Preparing the mixture
In order to prepare a plaster mixture for applying it to penoplex, you need to completely follow the manufacturer’s instructions, since in each specific case the process is carried out with certain nuances.
The general description of the technology for preparing penoplex plaster is almost identical for its type, while specific numbers vary everywhere.
It is very important to carry out work on an entire house with only one type of material, without changing from one manufacturer to another in the process. This is important because differences in the properties of different types of plaster mixtures can have a detrimental effect on each of them, causing them to cease to perform their functions.
Manufacturers can produce one or two different mixtures for finishing penoplex. If there is only one plaster on the store shelves for these purposes, it means that it is universal and can be used for different jobs - for attaching insulation to the wall and for protecting it from external influences.
The two different materials are designed strictly for their own purposes. It is easiest to apply universal structural mixtures, since there are fewer difficulties with them.
To approximately calculate the amount of material for finishing the wall, a figure in the form of 4 kilograms of material is used for the first stage, which consists of attaching the reinforcing mesh. About 6 kilograms of material are needed for a leveling layer for the same area.
The practical use of facade plasters has shown that it is necessary to prepare the mixture somewhat more liquid than the manufacturer recommends. This allows, among other things, to slightly reduce material consumption and save money.
In addition, it will be easier to work with such a mixture than with thicker plaster.
Gluing mesh to walls
Before you stick the foam on the wall, you need to do a few things to ensure that the fastening happens well and reliably. For this, reinforcing mesh must be used .
Construction practice shows that it is best to choose a material with a density of about 150 grams per square meter.
Among the variety of finishing materials for construction on the domestic market, the most popular is considered to be Rotband putty from the well-known company Knauf. By clicking on the link, you will become familiar with its technical characteristics.
Wall panels for the bathroom are quite easy to install, they are durable, cope with temperature changes, last a long time, and can be easily removed if dismantling is necessary. Here's all about the different types and installation methods.
When carrying out certain repairs, it is worth understanding that the foundation must be strong and reliable. Dry floor screed - quickly, efficiently and cheaply.
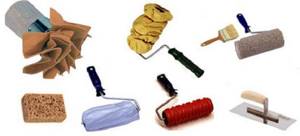
Inventory
If the owner of the house decided to apply facade plaster using penoplex with his own hands, then he will need to purchase the following materials and tools:
- Mixture for plastering.
- Reinforcing fiberglass mesh for outdoor use. It is better to choose with a density of 140–160 g/m2.
- The spatula is wide and narrow. The first is for applying the solution to the wall, the second is for laying the mixture on a wide spatula.
- Grinding grater with hard blade.
- Roller.
- Tools for creating texture. It may be a hard sponge or a special roller. Texture can also be created using a spatula.
If everything is clear with the tools, then how to calculate the required amount of mixture for plastering. Professionals recommend using the following data:
- 4 kg per square meter when securing reinforcing mesh
- 6 kg for finishing and creating texture.
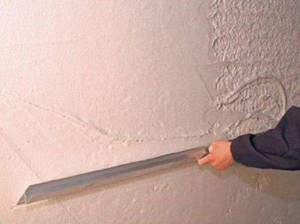
Applying a leveling layer
Leveling walls with plaster is done in the following way: perform plastering using a wide spatula (350-400 mm) or using beacons and a rule. The second option is a reliable way to obtain a flat surface, which can be difficult to achieve with other methods without sufficient experience.
Applying a leveling layer
When finishing with a spatula, the mixture is applied to the wall with smooth movements and leveled over the surface. If it was not immediately possible to achieve a smooth surface, then after drying you should apply another layer of plaster to the plaster. After high-quality grouting, it will be enough to apply a layer 3 mm thick.
The dried surface is rubbed using the same principle as the mesh.
Step-by-step instruction
After the penoplex is glued and secured with dowels, you can begin applying facade plaster. When a person is applying plaster for the first time, he needs to try it on some surface. For example, on the remaining sheet of penoplex. Then you can understand how comfortable it is to hold the instrument.
Kneading the mixture
It is very important to approach the first stage responsibly. You need to prepare the mixture according to the instructions, which must be on the package. If you are doing this kind of finishing for the first time, do not prepare a large volume at once. The solution hardens quite quickly, and if you don’t have time to handle it, you’ll just have to throw it away.
To secure the reinforcing mesh, professionals recommend preparing the solution a little thinner than indicated on the package. Then you can slightly reduce the material consumption, and the mesh will be fixed much easier.
Installation of reinforcing mesh
First you need to cut the mesh into small pieces 30 cm wide. I fold them in half. These pieces will be used for laying on the corner, or you can buy ready-made corners with a mesh at a hardware store. It is from the corner of the house that they begin to install the reinforcing mesh on the penoplex.
After this, you can begin finishing. On both sides of the corner, at a distance of 15 cm, apply a plaster solution. The thickness should not exceed 3 mm. Then the bent reinforcing mesh is laid. It needs to be smoothed with a spatula and pressed a little into the solution. You need to move from the corner, starting from the top. The slopes of windows and doors are processed in the same way.
Then they work on the surface of the wall. A layer of solution is also applied that will correspond to the width of the mesh. Then the reinforcing layer is laid. Each piece should overlap the previous one, by 5–8 cm. Smooth the surface with a spatula and press the mesh. On a flat surface, move from the center of the piece.
How to align a layer
To create a final even layer you need to do a few more manipulations.
- About a day after completing the installation of the reinforcing mesh, you need to sand the surface. This is exactly how long it takes for the layer of plaster to dry well.
- A grater with sandpaper removes unevenness that could have formed when smoothing the mesh with a spatula. You need to rub in a circular motion with slight pressure.
- Then you need to apply a layer of primer. There is no need to skip this step. The primer will help the dried layer of plaster and the finishing layer adhere more firmly. In addition, if you choose antibacterial and antifungal properties, you can protect the coating from the effects of microorganisms.
- Now apply a leveling layer. The mixture is prepared according to the instructions. Apply with a large spatula, no more than 3 mm thick. Individual sections should not coincide with the joints of the reinforcing mesh.
- Then the layer is left to dry for 1–3 days. Drying time depends on the mixture itself and weather conditions. If the ambient temperature is high, it will dry out faster.
- Then you need to use the grater again. Remove small bumps and depressions.
Finishing
If you get a perfectly smooth wall surface and this texture suits the owner of the house, then you can leave this façade. To give it a more attractive look, you can use acrylic paint. A wide color palette will allow you to turn your wildest ideas into reality. But you can create a more original surface of the facade walls. Special decorative plasters are sold for this purpose. They are applied in a thin layer, and the texture is created by small inclusions.
You can also use a regular plaster mixture and special texture tools (roller, sponge, spatula or improvised materials). The texture is created from the raw surface, both with decorative compositions and with ordinary ones. After hardening, it will no longer be possible to create a drawing.
Preparing the surface and attaching the mesh to foam plastic
Plastering on polystyrene foam includes several important stages, the proper execution of which determines the durability of the finish. First of all, care should be taken to level the surface on which the foam will be attached. If the walls of the house are already insulated, then you can skip this stage and move on.
Today, there are various building mixtures for foam plastering. The most common of them are bark beetles, bayramix and others. By the way, you can read about how to apply bark beetle to polystyrene foam by going to another section of the site.
Also, before plastering the foam, be sure to take care of the necessary tools to do the job. First of all you will need:
- Graters and metal spatulas;
- Master OK;
- Empty containers for solution;
- Drill with mixer attachment for mixing plaster mixture.
So, you will initially need to prepare the surface of the foam before applying plaster.
Here it is important to take into account the correct alignment of the joints with each other and the absence of any gaps between them. If they are, then it’s as easy as shelling pears to seal them with regular polyurethane foam.
Next, you need to attach the reinforcing mesh to the foam. You should not refuse to use it, since dried plaster can simply fall off the surface of the foam over time. It is better to use a strong reinforcing mesh for foam plastic, the installation of which should begin from the corners of the building.
After installing the reinforcing mesh, you need to wait 2-3 hours, after which you will need to rub the surfaces with a float or not too coarse sandpaper.
Do I need to prime the foam before plastering?
Priming the surface will increase the subsequent adhesion of the finishing material to it. The foam should be primed using a roller or a wide brush. The tool should have a small pile, and it is best to use foam rubber.
It is imperative that after the primer is applied to the foam, you need to give some time for the surface to completely dry. Only after this can you begin plastering the foam.
Recommendations from experts
In order for the end result to please the owner for a long time, everything must be done by adhering to the following recommendations. This applies not only to plastering a facade insulated with penoplex.
- The packaging of the plaster indicates in what temperature range it can be worked. You should not ignore it, otherwise the layer will not be as strong as the manufacturer predicts.
- Be sure to use reinforcing mesh. If it is not there, the plaster will simply fall off after a short period of time.
- You need to buy a plaster mixture from one manufacturer for the entire facade and preferably with a small margin.
- Manufacturers also indicate the time for complete drying. The recommended time frame should be adhered to.
- And don't forget about the primer.
Facade plaster - advantages and disadvantages
Plastering walls finished with foam plastic cannot be done using conventional plaster . This risks the fact that after drying, the mixture may simply fall off and plastering will have to be done again.
In this regard, it is extremely important to choose the right plaster that will fit well on the foam and can last for a long period of time. Let's consider which plasters are suitable for this purpose and will turn out to be the most suitable.
Before making a choice of plaster, let's study the foam itself . The following two important indicators can be distinguished:
- this material has a smooth and even surface, so there may be problems with the adhesion of the mixture;
- not every composition has a sufficient level of viscosity and can cling to a smooth surface. That is why it is important to choose facade plaster designed to work with polystyrene foam.
Experienced craftsmen recommend using the well-known and popular brands of finishing compounds Ekomix and Ceresit, however, it is worth noting that absolutely any plaster that has high adhesive properties to polystyrene materials can be used . The most important thing is to use a mixture from one manufacturer on the entire working surface to be plastered and not mix compositions of different brands.
The next thing you need to pay attention to is that some manufacturers recommend using foam gluing compounds followed by applying a protective layer. Others make universal mixtures suitable for all types of finishing work. The second option is suitable for those who want to save money, however, you should not count on the high quality of the finished finish.
This issue is especially relevant if we are talking about painting the facade, and not about additional finishing with decorative putty.
The following plasters are best suited for finishing facades:
If we talk about cost, then the most expensive compositions are polymer ones, however, they are the most durable and do not crack during application, as well as after drying. Each type of plaster has virtually no disadvantages, and buyers should choose the composition based on cost, features of the necessary work and ease of use. The easier it is to apply the composition, the faster the work will be completed.
Penoplex plaster application guide
Penoplex is considered one of the most popular types of insulation on the domestic market. The material is actively used for finishing interior walls and facades of residential buildings and industrial premises. Since synthetic heat insulation is not a finishing coating, it needs to be covered with special Penoplex plaster. The application technology is not very difficult, so it is quite possible to cope with the work on your own.
Selection Guide
Penoplex facing material – reliable protection of thermal insulating boards from biological and mechanical damage, extending their service life. Inside the room, plaster not only protects the insulation from fumes, but also serves as an effective decoration. Therefore, before you buy a finishing material, you need to study its composition and find out the nature of the surfaces being treated.
1. Mineral plaster - a combination of Portland cement and polymers shows high resistance to biological aggression and precipitation. The solution is suitable for cladding walls outside and inside the building. It has good adhesion and is easily and evenly applied to the base.
2. Acrylic finish is a material with good elasticity, moisture resistance and resistance to solar radiation. The use of acrylic resin plaster is recommended for deformed surfaces and areas with high humidity.
3. Silicate composition - elastic plaster has antistatic properties, excellent vapor permeability and resistance to precipitation. The instructions contain recommendations for use on the external and internal finishing of Penoplex.
The service life of solutions varies, so special attention should be paid to this indicator. Acrylic mixtures show the best resistance to mechanical stress and durability. The service life of such cladding is 15-25 years. The next in order are silicate and mineral. The durability of the finish also depends on the texture of the coating. Rough and embossed surfaces have increased resistance to various types of deformation.
There are several main brands of special-purpose materials on the Russian market.
1. Ceresit - the company presents a large assortment of Penoplex finishing mixtures of all types. Adding granular fillers to the composition allows you to obtain textured surfaces. A package of 25 kg of cement plaster “Pebble Winter” costs 660-990 rubles on the market. An acrylic type with the same texture will cost 1300-1500. The cost of the most expensive silicone solution is 1760-1900. For acrylic plaster called “bark beetle” you will have to pay approximately 1350-1580 rubles. The price of a similar texture made of silicone is 570-850.
2. Ecomix - application technology provides for high-quality processing of external and internal surfaces made of Penoplex. The Economy mixture is effective in filling cracks, seams, and irregularities. The average cost of plaster is 140-170 rubles per 25 kg. “Bark beetle” costs 90-120 rubles.
3. Stolite – the basis is Portland cement M-500. It features excellent performance characteristics and aesthetics. A package weighing 25 kg of bark beetle costs 300-390 rubles. The textured composition “lamb” with polymer modifiers costs 1120-1300.
4. Bergauf Decor - a classic version of decorative finishing using Penoplex on the facades of residential buildings. The cost of the “bark beetle” is 390-580 rubles. Dry mixture “pebble” is offered for 560-640, “fur coat Diadema” for 395-520.
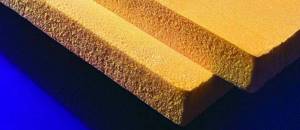
Types of plaster for foam plastic
Dry mixtures must be kneaded yourself
Foam plaster differs from standard compositions. The finishing mixture is sold dry in paper bags. Prepare wall plaster over polystyrene foam by diluting the dry mixture with water.
Finishing mixtures are divided into two types according to their purpose:
- façade;
- for interior work.
Facade
For exterior plastering of polystyrene foam, special compositions are used, which include various frost-resistant and moisture-proof additives. Foam plaster for facades is divided into two types:
- mineral;
- acrylic.
Mineral
The basis of the mineral mixture is cement, gypsum and sand.
This composition for external use is attractive due to its fairly low price.
It should be noted that with the slightest deviation from the coating technology, the plaster may crack and collapse in places after 2-3 years.
Acrylic
Acrylic mixtures are suitable for creating decorative finishes
Acrylic coating for polystyrene foam has high adhesive and protective properties. Decorative coatings are formed based on the acrylic mixture.
Finishing mixtures are well painted in different colors, which allows you to decorate building facades in a wide range of colors.
Plaster for interior finishing of foam plastic
The coating for interior work does not require the addition of frost-resistant and especially moisture-resistant ingredients, so the mixture is much cheaper than the façade coating.
Just like facade finishing, interior plaster has a mineral and acrylic base.
Preparation for plastering
The implementation of the technological scheme for finishing Penoplex begins with calculations of the required amount of materials. In accordance with practical knowledge, construction specialists offer the following consumption rates per 1 m2:
- 4 kg – for installation of reinforcing mesh;
- 6 kg – for creating and leveling the finishing layer.
To plaster Penoplex with your own hands, you should purchase several tools:
1. wide spatula (at least 350 mm) - for basic work;
2. narrow spatula - for applying the solution;
3. grater with a hard cloth - for grating over a grid;
4. foam rubber or fur roller with short pile - for priming;
5. hard, large-pored sponge - for decorative plaster.
You can also create texture on the facade yourself using a grater or spatulas.
How to plaster Penoplex with your own hands?
The technology of application to the facade includes several stages.
1. Preparation of the adhesive solution - the sequence of actions is usually indicated in the instructions on the package. First pour water into the container and only then add the dry mixture.
2. Starting coating - evenly distribute the plaster over the Penoplex slabs in a layer of 1-2 mm. Move the spatula from bottom to top, maintaining an angle of inclination to the wall of about 30 degrees.
3. Reinforcement - attach the end of the roll with the mounting mesh to the treated area, starting from the corner. Unroll gradually, pressing the material against the wall with a spatula. Smooth out from the middle of the fabric, moving from top to bottom.
4. Creating a leveling layer - the dried surface is rubbed with sandpaper and a fresh solution about 3 mm thick is applied. Apply the leveling layer in parts. Check the joints of the plaster and the mounting mesh to ensure they do not overlap.
5. Priming - when the mixture dries well, carefully level the surface with a float. After this, cover with a primer composition, leaving no streaks.
6. Applying decorative plaster - apply the finishing layer of mortar in small fragments, maintaining the same layer thickness. Form the decorative texture on a damp surface. Leave the finished finish to dry for several days.
7. Painting - indoors the plaster layer is covered with a protective varnish. Acrylic paint is more suitable for decoration on the outside.
1. The finishing technological scheme provides for the mandatory use of fiberglass mounting mesh. It provides reliable adhesion of the smooth surface of Penoplex to the façade plaster. It is advisable to choose a material with a density of 140-160 g/m2. The smaller the cells, the stronger the adhesion.
2. If work on Penoplex is carried out in the summer, then you need to take into account that the solution on the facade dries out very quickly in hot weather. Therefore, it should be applied in fragments, not exceeding the width of the roll. It is better to invite an assistant to secure the reinforced mesh.
3. To glue the mounting mesh onto Penoplex, use a mixture with a thinner consistency than indicated in the instructions. The same composition is used for finishing leveling.
Grouting of treated walls is carried out only after the plaster has completely dried. The duration of setting outside depends on weather conditions, inside - on the temperature of the room. The technological scheme allows a time period from applying the solution to grouting for a period of no more than four days. Otherwise, the plaster will harden greatly and it will be difficult to sand.
Consumption of façade plaster on polystyrene foam
If styrofoam plastering is done with a universal facade mixture, then the consumption per square meter will be 10 kg. Using two types - adhesive and leveling plaster, prepare 4 and 6 kg per square, respectively. The same consumption - 9-10 kg will be if a polymer composition is used. Of these, 3.5-4 kg will be needed for gluing the insulation, the rest will be needed for plastering on foam plastic. An online calculator will help you calculate the consumption of leveling plaster.
Insulating a house with polystyrene foam is becoming more popular every year. Having familiarized yourself with how to plaster polystyrene foam, what materials are better to purchase for the facade, which façade insulation is preferable to room insulation, you can easily solve many problems that arise during repairs or construction. Plastered thermal insulation will last longer if it is promptly tinted and repaired if the integrity of the “shell” is damaged. Your home will be safer, and you will be warmer and more comfortable in it.
DIY repairs. All about penoplex plaster
Penoplex is made from extruded polystyrene and is used for thermal insulation of the ceiling, floor and walls of the house. After the installation of the material is completed, the question arises - how to properly plaster it. The advantage is that this is a fairly simple process that does not require any special skills. However, it is simply necessary to know all the stages of plastering. In this article we will look at all the subtleties and nuances of penoplex plaster.
Consumption of façade plaster on polystyrene foam
If styrofoam plastering is done with a universal facade mixture, then the consumption per square meter will be 10 kg. Using two types - adhesive and leveling plaster, prepare 4 and 6 kg per square, respectively. The same consumption - 9-10 kg will be if a polymer composition is used. Of these, 3.5-4 kg will be needed for gluing the insulation, the rest will be needed for plastering on foam plastic. An online calculator will help you calculate the consumption of leveling plaster.
Insulating a house with polystyrene foam is becoming more popular every year. Having familiarized yourself with how to plaster polystyrene foam, what materials are better to purchase for the facade, which façade insulation is preferable to room insulation, you can easily solve many problems that arise during repairs or construction. Plastered thermal insulation will last longer if it is promptly tinted and repaired if the integrity of the “shell” is damaged. Your home will be safer, and you will be warmer and more comfortable in it.
Why cover insulation with plaster?
Now let’s take a closer look at what exactly a layer of plaster provides for insulation:
- Protection from physical impact. Plaster gives the surface additional strength and protects it from the appearance of random dents and cracks, which will lead to peeling of the material and deterioration of its heat-insulating properties.
- Overheat protection. The problem is that when exposed to high temperatures, the insulation releases styrene, which is a toxic substance. A layer of plaster will protect residents from this unpleasant side effect.
- Weather protection. Without a protective layer, penoplex can collapse in one season under the influence of temperature changes, humidity and direct sunlight.
- Additional thermal insulation. The joints between sheets of insulation can allow cold to pass through. A plaster coating will help avoid this.
Types of plaster mixture that can be used for application to foam plastic
Let's take a closer look at what types of plasters there are that are suitable for application to polystyrene foam.
Since we are talking about exterior finishing, the plaster must withstand low and high temperatures , as well as various atmospheric conditions.
In this regard, gypsum compositions should be immediately excluded from the list of suitable mixtures.
So, we have already noted that the best option would be cement or polymer compositions, but not those prepared by mixing cement, sand and water at home, but those sold in hardware stores.
The thing is that additional components are added to special compositions, which provide the plaster with strength and durability. Let's consider which compositions are most preferable for application to polystyrene foam.
The following types of compositions exist:
- Mineral. Sand, water and cement are used to create them. They are not durable, but have a low cost.
- Acrylic. The mixtures are based on acrylic resins. The material perfectly allows air to pass through and allows the material inside to “breathe”. It has high vapor permeability.
- Silicate. This plaster is sold in buckets, and it has an alkaline reaction. You need to work with it very carefully.
- Silicone. They have increased elasticity and, when applied, form a uniform, beautiful layer.
In addition to the varieties, there are a few more important points. It is better to use thin-layer materials that are easy to apply and spread . Cement-sand compositions are characterized by low plasticity and cracks may form during application. All of these compositions are characterized by increased resistance to mold, fungi and algae.
Do-it-yourself technology
Next we will look at the process of plastering walls. But in the same way you can apply the plaster mixture to any surfaces insulated with penoplex.
Before plastering, you need to prepare all the necessary tools:
- Plaster.
- Construction mixer.
- Spatulas of different sizes.
- Grater.
- Sandpaper.
- Reinforcing mesh.
- Dry plastic container for diluting the mixture.
- Gloves.
- Roller.
Now you need to choose a plaster mixture. For plastering the facade of a building, it is better to choose mixtures with cement. Moreover, it should be a connecting component, and not the main one.
The use of ordinary cement mortars is unacceptable, as they can corrode the surface of the insulation in one season. To finish the interior surfaces of a room, you can choose not only cement, but also gypsum mortars. It is also necessary to choose the right reinforcing mesh. This material must be sufficiently dense and resistant to alkaline environments.
Keep in mind that very rigid meshes are not suitable, as they are difficult to install in corners and openings . Therefore, the most suitable option is a mesh with a density of 160 g per square meter. m.
How to properly insulate the facade outside the house?
The plastering process consists of several important steps, none of which should be skipped.
Preparation
When the installation of insulation on the walls is completed, sand its surface using sandpaper. This is necessary to remove any irregularities, bumps and depressions that can cause rapid destruction of the plaster layer. The protruding parts of the construction foam that connects the joints between the foam panels must be cut off. Do this carefully so that there are no dents or bumps.
Installation of reinforcing mesh
This stage cannot be skipped, since without a façade mesh the plaster layer will begin to crack and quickly collapse . Apply a layer of special glue, no more than 2–3 mm thick, to the rubbed surface of the insulation, and glue the mesh onto it. The following points must be taken into account:
- Press the mesh into the adhesive base and immerse it completely, but no more than to the middle of the layer. This should be done using a smooth spatula.
- The mesh should only be glued onto fresh adhesive.
- Sheets of material must be laid overlapping each other. In this case, the allowance should be at least 10 cm.
- Pasting the walls must begin from the corners, as this is the most difficult stage of the work.
- To properly glue a corner, you need to take sheets of mesh 30 cm wide and about 1 meter long, bend it in half, and attach it in this form to the corner.
Preparation and application of the solution
The mixture must be prepared according to the instructions on the packaging, which always indicates the consumption of plaster per 1 square meter. m of wall, based on the thickness of the applied layer. Please note that the thickness of the applied layer of plaster for penoplex should be from 3 to 5 mm.
- Multiply the mixture consumption rate by the thickness of the applied layer, and you will get the required volume of finished plaster per 1 square meter. m. walls (we told you how to correctly calculate different types of plaster here).
- After the calculations are ready, pour cold water into a plastic container, add the required amount of the mixture and stir everything with a construction mixer.
- Now apply the plaster to the wall using a trowel and trowel and smooth it out using the rule. It is better to start this process from corners or from doorways.
Try to place the joints of the plaster mixture so that they are in the middle of the sheets of reinforcing mesh. This will help make the joints less thick and noticeable.
- 45-60 minutes after completing the process of plastering the walls, level and trim the dried layer using a trapezoidal rule or a wide spatula. Also, do not forget to check the evenness of the plastered surface using a building level.
- Now wait until the wall is dry. This will take from 1 to 4 days.
Technology of wall putty on polystyrene foam
After you have glued the thermal insulation to the wall and secured it with “umbrellas”, the most crucial moment comes - putty and finishing. But first you need to stick a reinforcing mesh onto the insulation, otherwise the leveling mixture will crack or begin to fall off after 2-3 years.
Mesh installation
It is believed that the higher the mesh density, the stronger the plaster layer. But very dense material is difficult to glue, so choosing a mesh with cells measuring about 5 mm would be optimal. The technology of work is as follows:
- First, all corners, door and window slopes are covered with mesh. To do this, cut a strip about a meter long and 30 cm wide and bend it in half lengthwise to form an even rib;
- Then apply tile adhesive or a universal mixture with a layer of 3-4 mm to the corners to be glued, apply a mesh to them and press it, smoothing it and pressing it into the solution with a spatula using a herringbone motion - from the corner down and to the sides;
You can use a special angled spatula, as in this photo
Advice. It will be easier to work if the adhesive solution is made a little less thick than the manufacturer recommends.
- Having dealt with the corners, they begin to paste the walls. Since the adhesive solution dries quite quickly, this should be done in small areas of about one square meter, accordingly cutting the mesh into pieces;
- Cover part of the wall with the same layer of 3-4 mm and, using a wide spatula, press the mesh into the damp mortar using movements from the center down and to the sides;
- It should completely “drown” in the solution, so if necessary, you can put a little more mixture on the spatula;
- The next piece of mesh is glued with an overlap of 10 cm over the previous one;
Do-it-yourself polystyrene putty with reinforcing fiberglass mesh - reinforcement stage
Advice. To ensure that the joints do not stand out, glue the first piece of mesh so that there is a free edge 5-10 cm wide. Apply the solution under it before gluing the next piece.
When the mixture with the mesh glued into it has dried, the walls are rubbed with a trowel to remove obvious bulges and irregularities.
Applying putty
Before you begin leveling the insulated wall with putty or finishing it with decorative plaster, the surface must be treated with a deep penetration façade primer. It will give it greater strength and provide good adhesion to the finishing layer. Some craftsmen miss this point, believing that the adhesion of materials is already satisfactory. Indeed, if the putty is made with the same universal mixture that was used to glue the mesh, and especially if the work is carried out indoors, you can do without a primer. But if you ask how to properly putty polystyrene foam on an external wall, the answer will be clear: it needs to be primed! The puttying process itself is quite simple: the leveling mixture is transferred with a small spatula to a large one, 35-40 cm wide, and it is distributed over the surface with smooth movements in a layer of 3 mm to a centimeter.
Note. The thickness of the putty should be convenient for work. The mixture should not fall off the spatula as a whole mass, but should slowly drain from it
The mixture should not fall off the spatula in its entirety, but should slowly drain from it.
The technology for applying the leveling layer depends on what kind of surface you want to get:
If it is to be painted or wallpapered, then the wall is drawn out as a rule;
If you want to create a textured surface with your own hands, then after applying the putty to a small area, you need to form a decorative texture without allowing the mixture to dry. To do this, use various devices: a grater, a comb, a sponge with large pores, special stamps and rollers.
Creating texture with grout
After the leveling layer has dried, it is rubbed over, as is the case with the mesh. This work should be done no later than 3-4 days after completion of the work, otherwise the putty will become too hard and it will be difficult to rub it off. After grouting comes priming and final decorative finishing - painting, decorative plaster, wallpapering, etc. depending on the operating conditions of the surface and your desire. The choice of primer also depends on the type of finish. If ordinary primer is used for wallpaper and paint coatings, then for decorative plaster the instructions require the application of mixtures containing fine-grained quartz sand. By creating a rough surface, it ensures high-quality adhesion of the finishing layers.
Features of various types of finishes
The application of plaster may vary depending on the area and conditions of its application.
Finishing the base with plaster
The basement part of the building is located directly on the foundation, so it requires enhanced protection from moisture. To prevent the base coating from being destroyed by water and to prevent cold bridges from forming inside, the plaster is applied in a fairly thick layer. This will reduce the risk of mechanical destruction of the finish due to high load. It is best to apply an even more durable coating on top of the plaster, for example, cover the base with tiles, stone, or cover it with a layer of pebble mixture. If the finishing is heavy, it is worth pre-reinforcing the base with metal mesh.

Plastering penoplex indoors
In some cases, the house is insulated with penoplex not from the outside, but from the inside. This has a number of significant disadvantages, including a reduction in the usable area of the room. Typically, this technique is used when insulating balconies, loggias, and terraces. To perform such work, it is possible to use gypsum plasters with or without preliminary reinforcement
It is important to wait for the cladding to dry naturally and not to use devices to speed up drying - this can cause cracking of the plaster layer. For finishing, compositions are suitable for both internal and external work.
External plastering of penoplex
For this purpose, special facade mixtures are used on a mineral or polymer basis, and frost-resistant adhesives are used for reinforcement. It is worth buying only those plasters that have sufficient adhesion to smooth materials, for example, Ceresit ST-85.
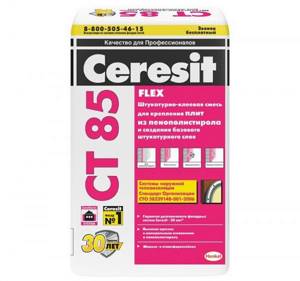
Plaster-adhesive mixture Ceresit CT 85