I've been thinking about insulating the ceiling in my garage for a long time, but never got around to it. It seemed to me that it was expensive and time-consuming. I didn't know what material to choose. There were many excuses. The mood changed after a conversation with a neighbor. He boasted that he insulated the ceiling in his garage for pennies. According to him, he spent 1,500 rubles on everything.
The cheapest insulation of a garage ceiling from the inside
To understand, both mine and my neighbor’s garage are located in a garage cooperative. The walls are half brick and the ceiling is wooden. They are not insulated with anything. Both he and I have stoves. In severe frost, the stove saves little. When it is -25 outside, in 5 hours of continuous heating it is possible to warm up the garage to +10. The next day the heat was gone. There are no working conditions. Anyone who has repaired a car in cold weather understands.
In general, in winter I cursed everything in the world and promised myself, as soon as it got warmer, I would take up the issue of insulating the ceiling. As we know, most of the heat leaves through it due to the fact that warm air is lighter than cold air and goes up. It turns out that the stove heats the street more than the room. In the spring, of course, the winter inconveniences were forgotten. I was working on the dacha and had no time for repairs in the garage.
A neighbor reminded me of a promise I made to myself. On the weekend, as usual, I went to the garage. And there the neighbor is busy with work. I looked in and we started talking. He showed how he insulates the ceiling from the inside with ordinary 50-gauge foam. I bought it for 1500 rubles. Cheap and cheerful. Actually, this is something that I didn’t dare to do for a long time. Many people criticize polystyrene foam - they say it burns, mice chew it, chickens peck. But in fact, you won’t find warmer and cheaper insulation!
Surface preparation and lathing creation
The first step is to prepare the surfaces for installation of materials. To do this you need:
- Free the sashes from all foreign objects - brackets, hangers, and other elements that are often installed on the sashes. Only the upper and lower latches of the fixed sash and the lock are not removed, which in any case are attached directly to the metal and cannot be moved;
- The surface of the gate is cleaned of old paint, peeling or crumbling areas. It is most convenient to use a drill with attachments - a wire brush or an emery wheel;
- Detected cracks or deep corrosive potholes are repaired by welding. In difficult cases, patches are welded in, after which the seams are carefully cleaned flush with the main surface;
- The prepared surface is covered with a protective layer of bitumen mastic using a brush. The coating is applied in 2 layers in the transverse direction.
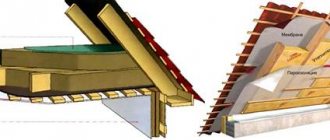
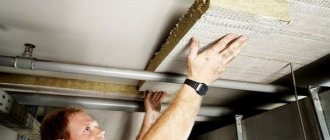
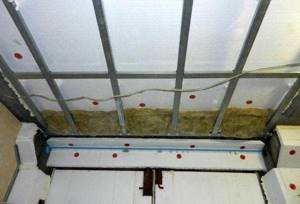
After the protective layer has dried, they proceed to installing the sheathing. It is a system of wooden bars installed around the perimeter of each door with several lintels inside.
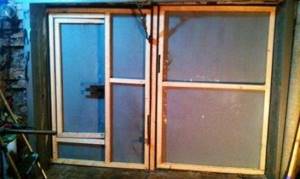
The sheathing serves as a support system for installing the sheathing, which protects the heat insulator and gives the sashes a neat appearance. After finishing, the inside of the gate can look much more impressive than the outside.
To install the sheathing, a reinforcing corner is used, welded along the perimeter of the sashes, in which holes are drilled for self-tapping screws. In some cases, you have to make holes directly in the sashes, which is acceptable, but undesirable.
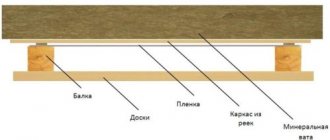
The bars under the sheathing must have a thickness no less than the selected heat insulator
This is important because after installing the material, the sheathing will need to be attached to the bars. The internal cavity formed by the sheathing and sheathing must be sealed and not allow air to pass through, so the sheathing must be equal to or even slightly thicker than the insulator. When installing the sheathing, it is necessary to leave the upper and lower latches with a lock and bolt free. These elements are subsequently provided with their own protective covers that cut off contact with warm air. The sides of the bars adjacent to the sashes must be covered with a strip of polyurethane foam before direct fastening.
This will ensure the tightness of the sheathing and prevent the formation of cold bridges. All joints between the bars are also insulated with polyurethane foam. The finished sheathing should completely cover the perimeter of each sash. Inside, the lintels are installed based on the area of the sash and the degree of rigidity of the cladding. Sometimes one jumper is enough, but usually several bars are used. It must be taken into account that installing strips too frequently reduces the effectiveness of insulation and makes work more difficult.
These elements are subsequently provided with their own protective covers that cut off contact with warm air. The sides of the bars adjacent to the sashes must be covered with a strip of polyurethane foam before direct fastening. This will ensure the tightness of the sheathing and prevent the formation of cold bridges. All joints between the bars are also insulated with polyurethane foam. The finished sheathing should completely cover the perimeter of each sash. Inside, the lintels are installed based on the area of the sash and the degree of rigidity of the cladding. Sometimes one jumper is enough, but usually several bars are used. It must be taken into account that installing strips too frequently reduces the effectiveness of insulation and makes work more difficult.
After installing the sheathing, installation of the heat insulator begins.
I'm telling you how I insulated the garage ceiling from the inside for pennies.
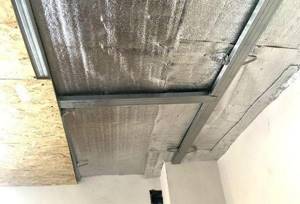
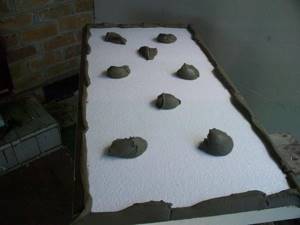
After watching how my neighbor insulated his ceiling, I went to the market. I bought a set of foam plastic boards 1000x2000 cm, 5 cm wide. They cost me a little more than what my neighbor bought - 1650 rubles. Plus I used round white washers for the screws for the insulation. Spent 1780 rubles.
There is, in fact, nothing to explain further. Installation on a wooden ceiling is very simple:
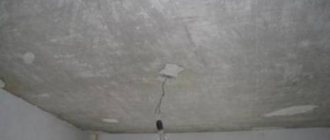
- I prepared the ceiling: I walked over it with a stiff brush to remove dust and dirt. He brushed away the cobwebs.
- I started the installation from the far corner. I pressed the foam with a self-tapping screw in the center, and then screwed in 4 more in the corners. This is how I laid slab to slab. I cut it where necessary with a cutter.
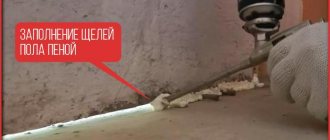
- As a result, there were cracks here and there and gaps near one wall. I cut out the necessary polystyrene bushes for them. I foamed all the cracks.
We recommend: Checklist: what needs to be done in the apartment before leaving for the country for a few days
It was possible to glue foam onto foam. But it seemed longer to me. Until everything sets, you will have to stand and hold the stove with your own hands. Or look for something to support the foam in several places. I slowly insulated the garage ceiling over the weekend. I worked for 4 hours. I have zero experience in construction and insulation.
Pros and cons of ceiling insulation with foam plastic
Before deciding to insulate the garage ceiling with polystyrene foam, I heard a lot of different “horror stories”. I won't even list them. I think you know everything yourself. I will only write what I noticed myself. I'll start with the positive points:
- Inexpensive. Insulating the ceiling in a garage costs less than 2,000 rubles (pennies compared to other options).
- Easy. During work, your hands practically do not get tired.
- Easy to install. You can insulate the ceiling without special tools and assistants.
- Fits well. You can remove excess on the go with a cutter.
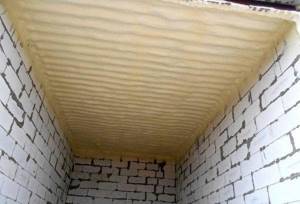
- Excellent heat retention. The garage has become warmer, and it is noticeable.
I read somewhere that 5 cm of foam plastic is equivalent in thermal conductivity to a meter of brick laying! Now regarding the disadvantages of insulating the ceiling with polystyrene foam:
- The material is fragile. You have to work carefully. If you accidentally hit the ceiling with something hard, it will leave a depression. But it can be foamed.
- Steals ceiling height. My ceiling is already low, but with insulation it became even lower. But that's how it is.
- The foam shrinks in size.
You need to buy it about a month before the planned work. This is what my neighbor advised and he turned out to be right. The foam plastic has indeed shrunk somewhat, if you can call it that. If I had insulated the ceiling with it right away, cracks would have appeared. I strongly advise you to let him rest!
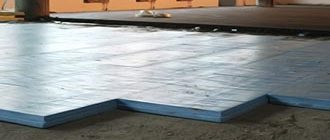
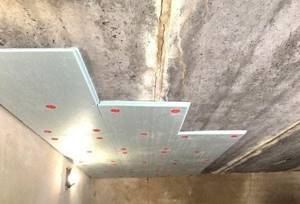
How to glue foam to concrete on the ceiling
When it is necessary to attach foam directly to concrete, the choice of adhesive is a key issue. Unlike primers, concrete does not have such high adhesion, so you need to approach the choice of the binding element more carefully.
For gluing concrete with foam plastic slabs, the following are suitable:
- special glue for foam plastic;
- liquid Nails;
- dowels;
- glue-foam.
Make sure that there are no gaps between the surface and the slab. If a gap is found, then use sealant to eliminate it.
How to insulate a garage ceiling correctly
Covering the garage ceiling with foam plastic from the inside has nothing to do with rules and safety precautions. And this needs to be understood. In case of fire it will burn out instantly. But what’s worse is that when polystyrene foam burns, it produces phosgene, a poisonous gas. Inhaling it is life-threatening. Just a couple of breaths, and he’s already a non-resident.
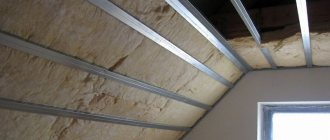
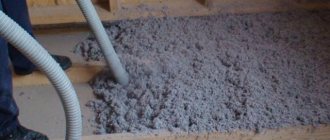
To insulate the garage ceiling more or less correctly, you would have to dismantle the roof, install a water barrier and use something non-flammable as insulation. For example, mineral wool and profiled metal sheets. They have fire resistance for several hours. While cars are burning in neighboring garages lined with foam plastic, yours will have time to wait for the firefighters to arrive.
We recommend: How to remove scratches from watch glass? 3 best ways
The bad thing is that such insulation will cost more, and installation will require a lot of effort and time. And working with mineral wool is also a pleasure. I've dealt with her before, that's enough. No matter how you defend yourself, you still get itchy. Again, disassembling everything, insulating it with high quality, and reassembling it is a considerable amount of work and a big investment. It's too expensive to spend two days a week in the garage.
If you want to do everything according to the rules, you can study the sixth section of SNiP 2.07.01–89. It describes all the requirements for premises where vehicles are stored.
What is better penoplex or polystyrene foam?
Experts say that when insulating private houses, the heat insulator most often used is penoplex.
Penoplex appeared on the market relatively recently and in recent years has been displacing the familiar foam plastic from the building materials market. These are identical, very similar materials, both are made from polystyrene. Penoplex is used for insulation of wooden and concrete ceilings.
When insulating the ceiling with penoplex from above: first, a subfloor is made along the joists, and penoplex is placed on top. A 1-2 cm screed is poured directly onto the insulation boards. The flooring material is laid on top of the screed.
How to make a ceiling fireproof?
You can use expanded polystyrene (penoplex) instead of polystyrene foam. It is impregnated with some kind of fire-fighting compound and goes out on its own. I tried to set fire to this one. Indeed, it burns worse than polystyrene foam, but it also burns out quite well before going out. In my opinion, in a severe fire there is little difference between the two.
I decided for myself that it would be better to cover the foam with plaster, as time and desire allow. And the appearance of the ceiling will improve, and there will be no protection from fire.
You can't do without ventilation
Without which it makes no sense to insulate the garage ceiling, it is without normal ventilation. At a minimum, it is needed to remove exhaust and fumes. I think everyone has a memory of someone accidentally suffocating in a garage. In our garage cooperative, three men got poisoned in different years.
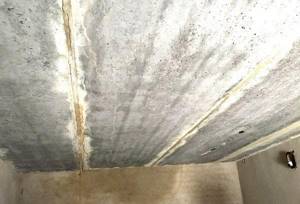
It is basically impossible to properly insulate a garage ceiling from the inside. Insulation is always placed outside. Otherwise, you end up with a thermos with all the consequences - the dew point moves inward, the floor slab becomes damp, the fittings rust, etc.
Without ventilation, we get an ideal environment for condensation, corrosion and mold to develop. The garage may simply be overgrown with “moss.” Therefore, after insulation, this issue needs to be given enough attention. My ventilation is normal.
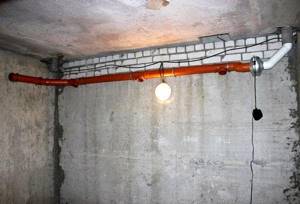
But I’m thinking about making it forced (installing a fan). I'll see if condensation forms in the winter. And then I’ll decide.
I hope my experience will be useful to someone. I finally accomplished what I wanted, and I’m very pleased. The cheapest and most inconspicuous ceiling insulation with polystyrene foam is better than nothing at all.
In winter, not only is it incredibly cold in an uninsulated garage, but the heated car is also covered in condensation. The result is corrosion. Both the body and electronics deteriorate. Ceiling insulation reduces temperature differences. The garage is already noticeably warmer. No drops of moisture were noticed. In general, I'm glad.