20-30% of heat is lost through the ceiling space in private homes. There are two ways to cover losses:
- put thermal insulation materials on the roof;
- insulate the ceiling, which is several times simpler and cheaper.
Therefore, homeowners most often choose the latter: insulate the ceiling. It should be remembered that the insulation requires protection from water in a vapor state: with increasing humidity it loses its thermal insulation properties, and under certain conditions it can become wet due to condensation. And this is a favorable environment for the development of mold and mildew.
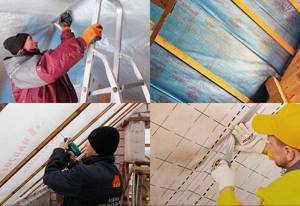
Practice shows that home craftsmen either ignore vapor barriers or violate installation rules: they use the wrong type of film. To help owners carrying out repair and construction work on their own, we will tell you in detail how to properly install a vapor barrier on a reinforced concrete and wooden ceiling.
Why do you need a ceiling vapor barrier?
In modern homes there is much more moisture in a vapor state than, for example, half a century ago. Its sources are the bathroom, kitchen, indoor plants, etc.
Part of the moist air escapes through the ventilation ducts (if the natural one cannot cope, you need to install forced ventilation). But even with optimal air exchange conditions in an apartment or house there will be higher humidity than outside (with the exception of a few days when the humidity outside is about 90%). But even in this situation, due to the higher partial pressure indoors (it’s simply warmer inside an apartment or house), steam molecules will break through the structural elements of the building (floor, walls, ceiling) to the outside.
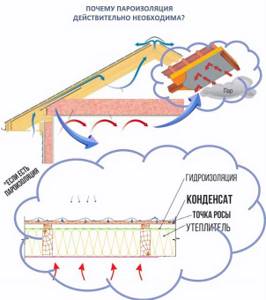
As a result, the uninsulated ceiling under a cold roof will freeze. After thermal insulation, a second problem arises: the dew point shifts into the insulation, creating a new headache (what the “dew point” is and the processes occurring inside the insulation layer are described in the article “Rules for the selection and technology of installing vapor barriers for the roof”).
Attention: for those who do not want to look at the link, let us clarify a little: vapor barrier is not needed when insulating the ceiling between the floors of a residential building and between the living and attic premises - there is no critical temperature difference that causes the formation of condensation.
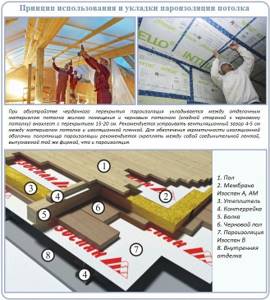
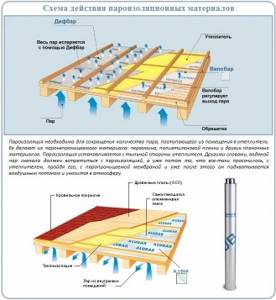
Scheme of vapor barrier from inside the room.
A vapor barrier film helps prevent the accumulation of moisture in the insulation - it puts a barrier in the path of steam molecules. It allows:
- extend the life of the ceiling, especially wood;
- eliminate the problem of accumulation of vaporous moisture in the insulation, preventing the formation of condensation in the winter;
- keep the insulation dry - any material in a dry state holds heat better.
Is ceiling vapor barrier necessary at all?
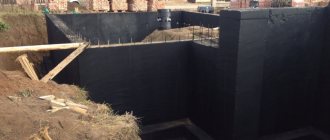
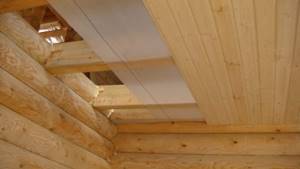
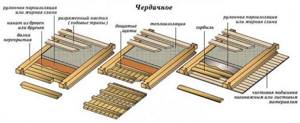
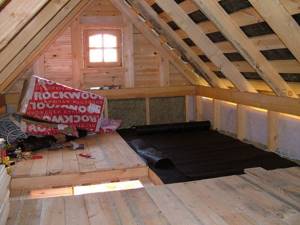
If it is not planned to install a heated attic within the roof structure, there is no point in worrying about reducing heat loss through the slopes. The thermal insulation layer is then laid on a slab reinforced concrete attic floor, placed in the spaces between wooden joists or in box sections installed close to each other in panel versions.
Regardless of the insulation method and the type of base being installed, a vapor barrier material must be laid under the heat-insulating layer. It will prevent the penetration of steam into the roofing pie, which is regularly released during breathing, cooking, cleaning, etc., and will protect the wooden elements of the roof frame from the appearance of fungus and premature failure.
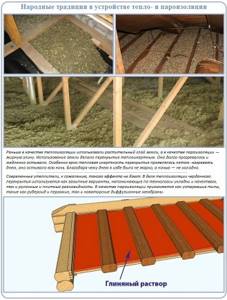
Previously, when there were no insulating materials that are popular today, oily clay played the role of protection against evaporation. It was this that was applied in a continuous layer to the ceiling. A soil-vegetative layer was laid on top of the ceiling as insulation.
The thermal effect of such a design was the most effective. Neither frost, nor water, nor heat penetrated into the housing. Wooden elements, adjacent to natural organic matter, served for a hundred or more full years.
Now the ancient technology, together with its natural components, has been replaced by new techniques and a wide range of all kinds of insulating materials. However, they do not have an effect equal to the clay-soil tandem.
In addition, their production uses synthetic sources, the direct contact of which with wooden structures is extremely undesirable. Therefore, when laying insulating layers on the floor, you should strictly follow the technological requirements that will be discussed in this article.
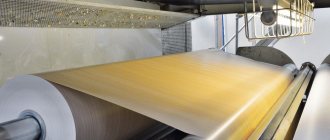
Types of vapor barrier films
Vapor barrier materials differ in the material from which they are made, the principle of operation and the level of vapor permeability, which must be kept in mind when choosing a vapor barrier for the ceiling.
Type of material
For the ceiling, you can use roll and coating (painting) vapor barrier.
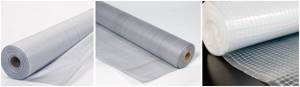
Rolled vapor barrier materials. Various types of vapor barrier films are classified as roll insulators. They can be in the form:
- films - do not allow steam to pass in both directions. This is a silent, although sometimes relative, vapor barrier. The vapor barrier film for the ceiling can be one-, two-, or three-layer, with or without reinforcing mesh;
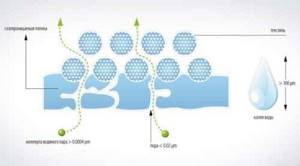
- diffusion membranes that allow vapor to pass through from the side of higher partial pressure. Construction specialists and manufacturers sometimes say that these are membranes with one-way flow, which is fundamentally wrong. If you look at the material in cross-section (the diagram is shown below), you can see that vapor molecules can move in any direction. They cannot get to the insulation due to the higher vapor pressure in it. Therefore, the membrane can be laid on the ceiling on either side;
- foil films - used as reflective vapor barriers. Produced for baths, steam rooms and saunas. They are not used for residential premises - acquisition costs are disproportionate to the functions performed. Simply put, simple, cheap plastic wrap will work just as well.
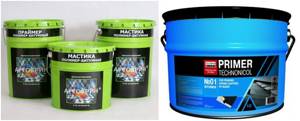
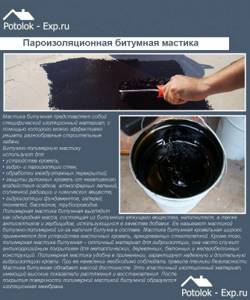
Coating vapor barrier. Coating vapor barrier materials are represented by various types of mastics on a bitumen-polymer base. They can only be used outside and on concrete floors.
For a ceiling that is also a flat roof, in addition to mastic, liquid rubber is sometimes used.
Principle of operation
Vapor barrier film for ceilings can be of several types: A, B, C, D, F.
- A (some manufacturers mark it with the letters AM) - creates an insurmountable barrier to water molecules and allows steam to pass in both directions. Used to remove steam from the insulating layer;
- B is a typical representative of vapor barrier materials: does not allow steam to pass in both directions;
- C is a type of film B, only reinforced;
- D - laminated polypropylene;
- F - foil film.
Vapor tightness
Based on the level of vapor permeability, films are divided into classes:
- Class I - foil and foil films;
- Class II - vapor barriers made of propylene;
- Class III - soft material with a high coefficient of vapor permeability.
Sometimes, instead of a class, marking with the letters “SD” with a digital value of vapor permeability is used. For example, SD 50 means that in an hour, steam equal to 1 molecule of water will break through 50 m2 of film. For the ceiling, this indicator should be at the SD level of 30-40.
Choosing the right material
Typically, one of the many materials specially developed for this purpose on the market is used.
There will be a large choice here, despite the fact that many owners of future houses do not even know about the existence of some of them.
The most popular are:
- Various special film membranes
- Polyethylene film
- Glassine
- Various types of liquid vapor barrier in the form of mastics or varnishes
- Films with foil surface
All types on the market can be used, but some of them are more preferable in terms of performance. You can choose which vapor barrier is best for the ceiling in your home based on its main characteristics.
Glassine. Almost the cheapest way is to install a vapor barrier. But, as often happens, it is also the most short-lived. The service life of such coatings is very short. Adding to the negative connotation is the fact that the microclimate created in the house by such a coating is very far from ideal.
This is due to the fact that the resulting layer, which protects the structure of the house from moisture and is a barrier to heat leakage, simultaneously “clogs” the house, preventing steam from passing through. The coating does not breathe at all, creating an ever-increasing level of humidity in the premises of the house.
Without very strong and high-quality ventilation, this material can quickly lead to the appearance of mold, fungi and other unpleasant “neighbors”. It cannot be recommended for use, but in extreme cases it can be used. Just don’t forget to ventilate the premises.
Polyethylene film. It has all the same disadvantages that are characteristic of glassine, only the negative aspects are revealed even more strongly. It is strictly not recommended to use it as a vapor barrier.
The only advantage of such a solution may be a very low price, but this advantage is offset by the fact that after some time it will be necessary to carry out repairs in rooms insulated with this material.
Film membranes. The most effective insulator in terms of steam removal. Films with a membrane effect can allow steam and moist air to pass through only in one direction, ensuring that excess moisture escapes from the premises.
Membranes with variable vapor transmission factor are especially effective. The higher the humidity level in the house, the greater the mass of steam that can pass through such a membrane.
This method of installing a vapor barrier layer will be the best choice for a private home. The cost of films can vary, depending on the amount of steam that it can pass through.
Mastics and varnishes. As a vapor barrier, bitumen mastic or various varnishes with a vapor barrier effect are often used. They are quite effective, inexpensive and combine protection from the external influence of water with the ability to allow excess moist air to pass out. They are suitable as a fairly inexpensive way to ensure reliable vapor barrier of the ceiling inside the house.
Foil coverings. One of the most successful options for solving several problems in one fell swoop. Such vapor barriers allow moist air from the room to the outside through themselves, and the foil layer reflects heat into the room, preventing it from escaping outside.
By retaining heat, at the same time, such coatings help maintain a normal level of humidity in the house. A good inexpensive option.
The methods and materials presented above help solve several problems when building your home. This includes establishing a normal level of humidity and optimal microclimate, protecting building structures from the effects of water vapor, and saving heat.
The combination of all individual qualities and factors will have a significant impact on the choice of materials that are suitable for each specific building. You need to take everything into account at once - the cost, the quality of the materials, and their service life.
Based on all the considered characteristics of various types of materials, it will be easier to choose which vapor barrier to use for the ceiling of your home. A very important point will be not only the price of the product, but also its ability to provide a good microclimate inside the building.
Taking into account the fact that factors such as the formation of harmful fungi and mold, normal humidity levels and heat retention may depend on a high-quality vapor barrier layer, this significantly affects the health of those living in the house. Therefore, it is not worth saving on this element of construction.
Vapor barrier materials
Vapor barriers are produced by specialized enterprises and, according to their performance, are divided into the following groups:
- sheet products;
- rolled materials, including films;
- paint and varnish compositions.
Dry cement-based mixtures are also used as vapor barriers, mixed with water before application to the base.
Sheet materials for vapor barrier
Making vapor barriers from sheet materials is widespread. This is due to the fact that some finishing materials also have vapor barrier properties, so their use solves two problems simultaneously: finishing and vapor barrier.
Examples of such finishing are sheets:
- asbestos-cement (including corrugated slate);
- plaster-based cladding (moisture-resistant dry plaster);
- wood-fiber (hard).
Rolled vapor barrier materials
This group includes polyethylene and polypropylene films (regular, reinforced, foil), aluminum foil and many modern vapor barrier materials with high performance, which are varieties and combinations of these films.
Conventional polyethylene film has high vapor barrier properties in all directions, but is fragile. Film reinforced with mesh or fabric has increased rigidity, which simplifies the installation process and makes the material more durable. There is a perforated type of polyethylene film, which is used where it is necessary to create conditions for the evaporation of condensate.
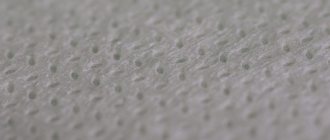
Polypropylene vapor barrier film has a fleecy cellulose-viscose layer on the outside of the impermeable shell, the pile of which prevents the condensate that forms on it from draining and ensures its gradual evaporation.
There are also so-called “breathing membranes”, which are used as a one-way vapor barrier - they are impermeable to water when open, since they have pores tens of thousands of times smaller than a drop of water, but are permeable to steam in the opposite direction.
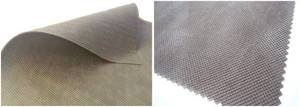
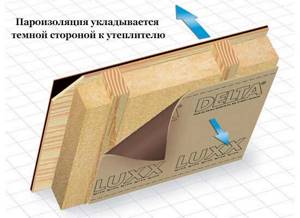
This coating is used to insulate wooden roof structures - precipitation does not penetrate through the roof, and steam from the inside is freely removed to the outside. It is also used to protect ceiling insulation from steam, but from the base side, and the material must be laid in a certain way - with the markings facing outward, and the plain side facing the heat insulator.
Paint and varnish compositions
In rooms with low aesthetic requirements for ceiling finishing, various types of bitumen-based polymer mastics are effectively used as an effective means for vapor barrier of wooden ceilings. The advantage of this coating is the ease of application even on complex surfaces and the absence of the need to use frames and fasteners.
Which insulation is better to choose?
The choice of insulating material is directly related to the type of base, its evenness, the purpose of the room and the thermal insulation materials used.
For wooden ceiling
Rolled products are suitable for wooden surfaces, which prevent moisture from penetrating into structures and at the same time do not interfere with the effective ventilation of wood materials.
They cope with this task:
- polyethylene and polypropylene films;
- foil insulators;
- glassine;
- vapor barrier membranes.
Some of the listed materials, for example, polyethylene films, require the creation of a ventilation gap between it and the finishing layer, which will allow moisture condensing on the surface to evaporate without damaging the finish.
For concrete ceiling
To insulate concrete ceilings from moisture, materials that can be attached directly to the base surface are suitable. These are insulating mastics, varnishes and paints, foil insulators.
It is worth noting that foil vapor barriers can be attached either directly to a concrete ceiling surface or to a supporting wooden frame. The latter method is convenient because you can subsequently attach a ceiling made of plasterboard, plastic or wooden panels to the frame.
Features of vapor barrier installation
An important stage in protecting insulating materials is laying a reliable vapor barrier layer. All work is carried out during the repair or reconstruction of a finished building or during the construction of a new building. To correctly install a vapor barrier, you need to understand how to connect membrane sheets and which side to fix them to the insulating base.
Preparatory work
At this stage, work is carried out to select the appropriate type of vapor barrier, taking into account the features of the installation process, operational characteristics and material requirements.
Before laying a vapor barrier, careful surface preparation will be required. It is important to consider the type of material used in the construction of floors, walls, ceilings and roofing structures.
- During the construction of a log house, all structural elements are treated with protective antiseptics and fire retardants.
- When carrying out repair and reconstruction work, complete dismantling of the finishing, cleaning and preparation of surfaces is carried out:
Wooden elements are treated with compounds against aging, rotting and burning. Concrete, block and brick surfaces are treated with deep penetration antiseptic compounds.
Proper preparation of surfaces will ensure a long service life of the insulating material and the entire structure.
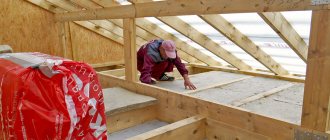
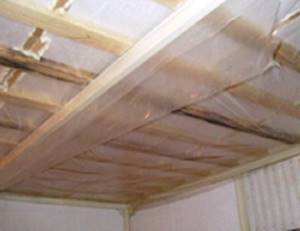
Technology for laying vapor barrier on the ceiling
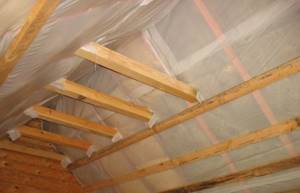
If the roof structure and interfloor ceiling are made of wood, then the installation of a membrane for waterproofing is carried out on a prepared base.
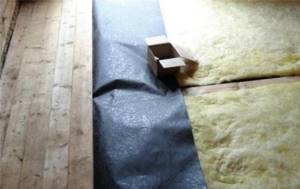
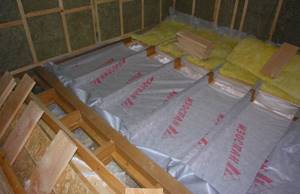
Roll or block insulation is installed in the space between the rafters and joists; the best option is mineral or basalt wool. Next, you can lay vapor barrier protection on the ceiling surface.
When the thickness of the insulation is equal to the height of the logs, an additional slatted counter-lattice is installed to maintain natural ventilation.
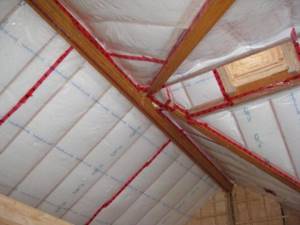
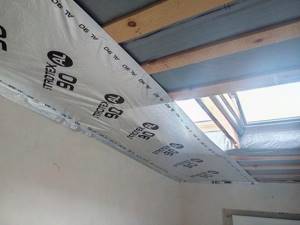
It is necessary to install a vapor barrier on the ceiling with a slight overlap on the walls around the perimeter, and special attention should be paid to the corners. It is better to place the joints on the joists and glue them on both sides with tape on a reinforced base.
Important! When installing a vapor barrier, sagging and deformation of the panels should be avoided.

To thermally insulate a flat roof or concrete ceiling, a waterproofing film is mounted from the inside on a self-adhesive tape, then a sheathing made of wood or metal is installed.
The height of the sheathing is determined based on the thickness of the thermal insulation material and the minimum technological gap for ventilation. The installation step is 3 cm narrower than the width of the heat insulator, which allows for high-quality installation of the insulator into the prepared sheathing cells.
Technology for laying vapor barrier on the floor
The installation scheme for vapor barrier protection on the floor is similar to how the material is laid on wall and ceiling surfaces.
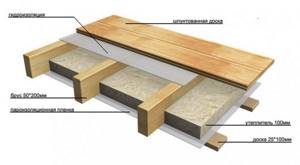
The wooden floor is insulated using joists, on which a waterproofing layer is laid. Next, insulation is placed in the space between them - wool on a mineral or basalt basis. After this, vapor barrier material is laid.
The rolled material must be laid with an overlap of 12 cm, with the joints carefully sealed with metallized tape on both sides. A properly laid vapor barrier should completely cover the floor surface with an overlap of up to 10 cm on the walls.
To install a vapor barrier on a concrete base, you will need to install a sheathing, in the cells of which a waterproofing layer and a heat insulator will be laid.
Features of vapor barrier of various surfaces
Depending on the base on which the vapor barrier is attached, there are rules and features for its installation.
Concrete ceiling mount
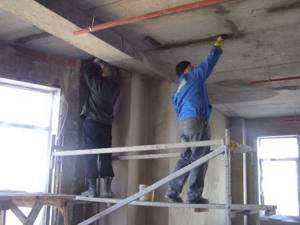
Step 1. When installing a vapor barrier on a concrete ceiling, special attention must be paid to surface preparation. After cleaning from dust and dirt, you need to carefully seal all the seams with putty solution. Work must be carried out with high-quality material and with special care to prevent moisture from entering the seams from the outside.
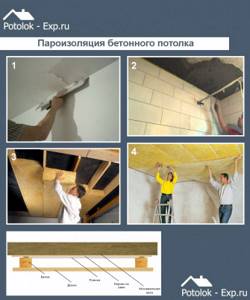
Stages of vapor barrier of a concrete ceiling
Step 2. After sealing the seams, the ceiling is waterproofed. The easiest way is to apply polymer mastic. This material will provide protection against leaks from above.
Step 3. To attach the vapor barrier material, first install a sheathing, under which it is advisable to lay insulation. Laying must be carried out in such a way that no gaps or cracks are formed between the surface and the insulation.
Step 4. The frame is fixed to the ceiling with self-tapping screws. A vapor barrier material is attached to the prepared sheathing. Rolls unfold from one side to the opposite. First, the material is fixed around the perimeter, then along all intermediate slats.
Laying vapor barrier material on the ceiling
Step 5. As a rule, one roll is not enough to cover the entire surface of the ceiling, so the next roll is overlapped with an overlap of 10-15 centimeters. The edges of the strips are fixed with vapor barrier tape. The best option is double-sided self-adhesive tape.
Important! During further finishing, a ventilation gap must be left between the vapor barrier and the finishing layer, so a counter-lattice is attached to the vapor barrier. from a block (50x50) treated with an antiseptic.
Video - Vapor barrier and ceiling padding
Vapor barrier for wooden ceiling
A wooden ceiling is a system of logs and beams placed on a rough base. Such ceilings are found in both wooden and brick houses.
Table. Stages of arranging a wooden ceiling.
| Steps, illustrations | Description of actions |
| Step 1 | The top layer is the attic floor. It protects the structure from dust and dirt, allowing you to move freely around the attic without the danger of damaging the heat-insulating layer. |
| Step 2 | The attic floor is laid across the floor beams on counter beams laid along the beams. These bars press a layer of vapor barrier against the beams. As a result, a ventilation gap is formed between the floor and the film. |
| Step 3 | A layer of heat-insulating material is laid between the floor beams. For this, slab or roll insulation is used (foam plastic, expanded polystyrene, stone, basalt or mineral wool). Board materials are preferable because they do not wrinkle over time, and polystyrene foam and expanded polystyrene practically do not absorb moisture. True, they are flammable, so it is also not advisable to use them. Thus, the most effective and safe are slab materials - stone or basalt wool. You should pay attention to their density and thickness. At winter temperatures below -250 °C, a material with a bulk density of at least 500 kg/m3 should be used. |
| Step 4 | The rough ceiling boards are attached to the floor beams below. They are the basis for subsequent finishing of the underlying premises. A layer of vapor barrier is attached to the sub-ceiling. |
| Step 5 | The vapor barrier layer is pressed against the rough ceiling using lathing, which is made from wooden blocks or metal profiles (if the ceiling is finished with plasterboard). |
| Step 6 | The bottom layer of the ceiling is the finishing of the ceiling, which is made from any materials - wooden slats, lining, wood boards, plasterboard, etc. |
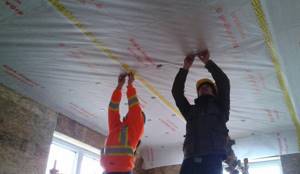
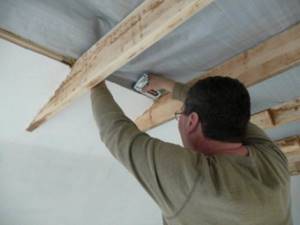
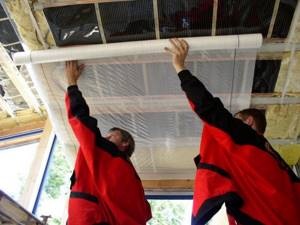
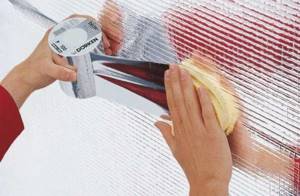
It remains only to consider how exactly the vapor barrier material is attached. Rolled vapor barrier is attached to the sub-ceiling and pressed with lathing or metal profiles. When rolling out a roll, stripes are formed. When joining them, you must overlap each other by 10-15 cm.
For high-quality sealing of joints, manufacturers recommend the use of special joining self-adhesive tapes. Thus, the vapor barrier is sealed. It is most convenient to work with three people. Two people lift the strip of material and press it to the ceiling in the right place, level it, the third secures it.
Prices for self-adhesive tape Rockwool
self-adhesive tape Rockwool
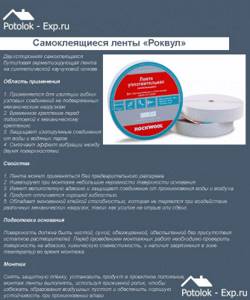
Self-adhesive tapes "Rockwool"
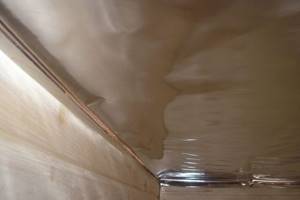
Important! When laying a vapor barrier membrane, the smooth side faces the rough ceiling, and the rough side faces down!
Strips of material can be secured to the ceiling using a construction stapler, punching them, for example, through pieces of thin cardboard. The vapor barrier membrane is carefully leveled. After strengthening the vapor barrier film, it is finally pressed against the rough ceiling using sheathing bars. Junctions to walls must be sealed using self-adhesive film.
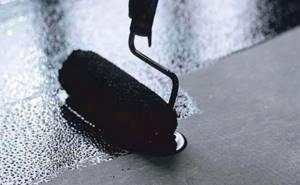
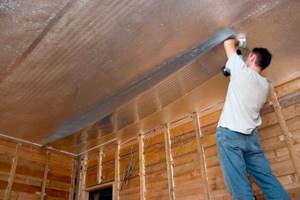
Application of liquid materials
Liquid vapor barrier materials are traditionally used for concrete ceilings and are easy to apply because they do not require fixation with lathing. Liquid vapor barrier is applied by brush, roller or cold spray method. Vapor barrier compounds are completely ready for application; they do not need to be heated or diluted. The air temperature during work must be at least +6°C. When covering the ceiling with an insulating layer, the vapor barrier is applied directly to it.
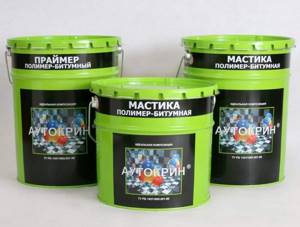
Polymer mastics for hydro- and vapor barrier
The most modern material is liquid rubber. It is applied by spraying in a layer of 1 mm, while reliably protecting the surface of the ceiling. Liquid rubber does not emit harmful substances, so it can be used in any room. This coating is durable and not afraid of mechanical damage.
Prices for liquid rubber
liquid rubber
The face or the back of a vapor barrier?
If a breathable membrane is used to create a protective barrier, the main thing is to determine which side to lay the vapor barrier on - face or back.
The vapor barrier cake must be placed so that the protection is directed towards the heat insulator on both sides with the smooth back side, and with the rough front side facing the inside of the room.
The rough surface provides protection from moisture penetration into the insulation, and the smooth surface promotes maximum heat accumulation.
Requirements for a moisture-proof layer
On interfloor and attic floors, insulation is used simultaneously as a soundproofing layer. Hydro- and vapor barrier are designed to protect all internal structures and the floor pie from moisture.
Basic requirements for a moisture-protective layer:
- waterproofing characteristics should not change over time, the protective layer should not react to temperature changes, heating or other external factors;
- the material should help preserve everything embedded inside the ceiling and maintain the wear resistance of the structure;
- environmental friendliness and safety, absence of toxins and fumes hazardous to humans or the environment;
- absence of flammable substances, fire resistance;
- there should be no obstacles to coating with finishing materials, plaster, etc.;
- easy application, good adhesion, quick drying of the layer.
For wood, special waterproofing materials are used that are suitable exclusively for wooden surfaces.
Types of waterproofing materials
To protect against moisture penetration into a wooden surface, several types of waterproofing are used. The choice depends on the conditions where the material is used:
Painting .
These include bitumen, polymer and other types of mastics, as well as emulsions and pastes. They are applied in several layers. They can be used at any indoor temperature. The advantages include a continuous layer after application, the absence of seams and joints.- Pasting .
These are rolled floorings and may have a film structure. They cover horizontal surfaces with overlap, so that there is no open space between the pieces of material. Pasting materials include: roofing felt, various membranes, isoplast, brizol, hydroisol and the like. They are mounted using mastic or special glue. Requires repairs periodically. - Cast materials . They cover the prepared surface covered with roll waterproofing. They are distinguished by their reliability, lack of seams and ease of application. Cast waterproofing is only possible on a reinforced surface. The use of a backing is mandatory.
- Impregnating materials . They are also called penetrating. The surface absorbs them, the molecules fill the loose structure of the wood and block the entry of moisture.
Types of vapor barrier materials
There are several options for steam protection, which differ in the structure of the material:
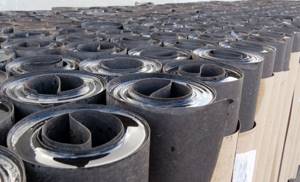
- Glassine . Thick cardboard impregnated with petroleum bitumen has been used for a long time and is productive. Suitable for baths.
- Polyethylene films . Used on floors that border between cold and warm rooms. This material is the most impenetrable; steam does not pass through it (the parameter is called the diffusion coefficient). There are also films with a foil layer; they are used in baths.
- Polypropylene films . Resistant to sunlight. It is recommended to use if construction is delayed and the floors are exposed to the open air for a long time.
- Membranes . This type of material can simultaneously be used as a hydro- and vapor barrier. They may have several layers, one of which will allow steam to pass through, but moisture will not seep through in the opposite direction. Correct installation is important here.
There are also breathable membranes. Their peculiarity is that steam can move from bottom to top and in the opposite direction. Thus, the insulation always remains dry and, with the same efficiency, the overlap pie will be thinner.
Nuances for attics
Under standard weather conditions in Russia, steam moves from the room into the atmosphere. With rare exceptions, in the summer, traffic may be reversed. Therefore, the vapor barrier in the attic is laid as the first layer, after which the heat and waterproofing layers are installed.
To maintain the optimal temperature in this part of the building, which according to the joint venture should be 5-7 degrees, several ventilation holes are created.
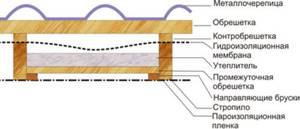
The floor pie in the attic looks like this:
- 1st layer – vapor barrier, choose the densest material, most often polyethylene film or membrane, lay it directly on the ceiling;
- 2nd layer – thermal insulation;
- Layer 3 – waterproofing, here a diffusion membrane or perforated polyethylene is used, followed by the floor covering.
If the attic is not planned to be used as a living space and no finishing will be done, the ceiling will not be waterproofed. In this case, protection from moisture is transferred to the roof, to the slopes and helps prevent water from getting from the roof into the room.
Features for interfloor
For the upper floor the floor will be the floor, and for the lower floor it will be the ceiling. Protection from moisture and steam is installed on both sides. If both rooms inside the spans are heated, additional thermal insulation is rarely used, but a layer of sound insulation is required so that every step from above is not heard below.
Therefore, the floor on the top floor will consist of:
- 1 layer – vapor barrier;
- 2nd layer – sound insulation;
- 3rd layer – waterproofing and finishing coating on top.
As for the ceiling of the lower span, it may require enhanced waterproofing if there is a bathroom, kitchen or sauna on the upper floor. Also, protection from moisture is necessary for the ceiling above the attic, and for rooms above which the roof is located immediately, without an attic. It is recommended to carry out waterproofing only in the warm season.
Installation of interfloor vapor barrier - in the video:
For the basement
Before installing waterproofing on the ceilings covering the subfloor or basement, it is necessary to create a barrier from moisture in the cellar or basement itself.
If you do not plan to store anything under the wooden floor, then the layer of earth is first leveled, then laid with a film, on top of which roofing material is laid (you can use old one from the roof or other places).
Next, the protective layer is covered with sand, making sure natural ventilation is created . After this, steam and waterproofing of the ceiling begins.
Initially, the floor above the basement is covered with a windproof layer with a vapor barrier side, which is located inside the room. This way, moisture from the insulation will not condense inside or penetrate from the outside of the ceiling.
The floor of the first floor suffers most from moisture. Its waterproofing needs to be given special attention, regardless of what is underneath, the subfloor or empty space.
What you need to know about steam and waterproofing basement floors:
- For implementation, it is recommended to use two-phase materials. These are membranes consisting of two or more layers that can serve as both hydro- and vapor barriers.
- To ensure reliable protection, a vapor barrier layer is installed both before and after the insulation. Only the finishing finish is installed on top of the vapor barrier.
During installation, workers may confuse the layers of material and lay it down incorrectly. An error leads to the opposite effect of vapor and waterproofing.
How to figure out which layer to put the two-phase material up if there are no instructions:
- The roll is rolled from the outside inward. Accordingly, the part that is located on the outside of the roll is placed on the insulation.
- Hydro- and vapor barrier looks like a double-sided material. One side is with a pile, the other is smooth. The one that is uneven is a barrier to moisture; it should be located on the outside, closer to the floor covering. The smooth side is closer to the insulation.
- If the color of the sides is different or there are inscriptions, the dark one is considered external. The light side of the material is placed against the insulation.
For the bath
Things to consider:
- The hydro- and vapor barrier of the bathhouse must be thought out; for this, the most reliable materials are used - pasted or cast.
- The hydrobarrier is installed not only on the floors, but also on all surfaces of the bathhouse. This is especially true for the roof; the quality of its protection from moisture directly affects the result of the waterproofing of the floors.
- The ceiling is covered with a vapor barrier made of film material with a high permeability coefficient. It is recommended to choose a reflective film, which additionally helps to retain heat inside the steam room. Next, the insulation is laid and a waterproofing layer is placed on top of it.
- For a water barrier, it is recommended to use polypropylene films with good permeability of 1200-3500 g/m2/day. The inscription on the film should look into the room, then the desired effect will be achieved.
It is strictly forbidden to use polyethylene film as waterproofing in a bathhouse. It creates a greenhouse effect, as a result the insulation gets wet and mold and rot occur.
For the floor in the bathhouse, you can use flooring made from adhesive waterproofing or cast materials. It is laid in the same order as for the ceilings of the cellar.
How to choose a high-quality vapor barrier based on technical characteristics?
So, today there are many materials that have high resistance to vapor diffusion and low vapor permeability. For a long time, ordinary polyethylene films were very popular, which, in principle, do their job, but still do not please with high vapor permeability, low breaking characteristics and fragility.
Therefore, modern manufacturers, following their policy of import substitution, produce quite interesting technological solutions, among which there are even metallized membranes. There are many such materials and it is worth studying their characteristics to understand: what is the best vapor barrier for the ceiling of your home?
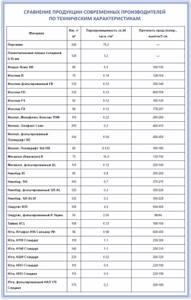
Let's list the most important characteristics for a vapor barrier:
- Vapor permeability is a characteristic of films and membranes from 0 to 3000 mg per square meter per day. This indicator tells you how many grams of water in the form of steam can pass through each meter of film per day. And the lower the number, the better, of course. If the numbers show vapor permeability in hundreds or thousands of grams, then you have a vapor-permeable membrane in front of you, and it should be placed not under the insulation, but on it.
- Durability . This characteristic significantly influences how easy your installation work will be. Cheap vapor barrier films are quite easy to tear; they lose their integrity even during installation, when tools fall on them or when they are touched. On the other hand, durable vapor barrier also tolerates temperature changes well.
- Water column pressure. The vapor barrier film is designed to retain water. This indicator is mainly important for a vapor-permeable membrane, which can literally get rained on. For the ceiling, this, of course, is not critical, although attic leaks should never be ruled out.
- UV resistance. This indicator varies from several days to a month. Surely you have observed how polyethylene, which has been on the street for a long time, becomes brittle and breaks. But high-quality material retains its strong performance for a long time. This is valuable if your installation work involves storing the exposed vapor barrier film on the ceiling for a long time without internal lining.
And in order to figure it out and clarify whether you have chosen the right vapor barrier for the ceiling according to the technical characteristics, carefully examine the pictograms shown on the packaging. And trust the brand that is known and trusted in the domestic market. Among such brands are Izospan, Izover, Technonikol, Delfa and others.
Is vapor barrier necessary?
The purpose of a vapor barrier is to block the penetration of condensate from the room into the under-roof space and back.
This is necessary to: extend the life of building materials; protect against fungus, mold and rot; control humidity.
Air moves from an area of higher pressure to an area of lower pressure. The first arises due to temperature differences, which is true for heated rooms. The masses carry with them steam that appears during human breathing and activity. If the air does not meet barriers from the insulation, it ends up on the floors and roofing material. The temperature of the latter is lower, which leads to the appearance of condensation. As it accumulates, it becomes a medium for the development of fungus, mold and rust.
If insulation is installed in the ceiling, the dew point moves into it. Mineral wool gets wet, which increases thermal conductivity. In late spring and summer, the air temperature outside is higher, which leads to the opposite effect and moisture from outside enters the house, settling on surfaces and destroying the finish. To level out diffusion, use a vapor barrier, which is mounted on the ceiling.
2
Vapor barrier materials - overview of popular types
In order for the ceiling protection to be of high quality, you need to approach its arrangement in a comprehensive manner. It is necessary to make several technical layers to protect against steam and condensation, to preserve heat, namely heat, steam and waterproofing. To construct insulating layers, various rolled materials are used, which have similar characteristics and can be used for different layers.
Polyethylene film is considered a universal material for arranging vapor barriers. Thanks to the reinforcement with a special mesh or fabric, the film has high strength. There are two types of vapor barrier available: perforated and non-perforated. This doesn't matter for performance. The polyethylene film must be laid with an overlap, and the joints must be fastened with a special connecting tape.
A good paraisolator is foiled polyethylene film. On one side it has a metal surface and is reinforced with a special mesh. Thanks to this feature, the film performs two functions at once - it protects against steam and retains heat. When installing the ceiling, the material is laid with the metal side down. The heat that comes from the room is reflected from the surface and returned back. Thus, it is possible to significantly reduce heat loss.
Polypropylene film has a moisture-absorbing layer, which is a cellulose-viscose fiber. Condensation and evaporation do not settle on the surface, but are absorbed by the fiber. Thus, moisture cannot enter the insulation layers. Since there is a gap between the layers of vapor and thermal insulation, the moisture gradually evaporates completely.
A vapor barrier that is becoming increasingly popular is a waterproofing membrane. This material is distinguished by high vapor permeability. The membrane has a coating that absorbs moisture. As a result of this, evaporation and condensation are absorbed by the membrane and do not penetrate into the thermal insulation layers.
Modern material isospan
Modern vapor barrier materials made using the latest technologies include penotherm or isospan. Its composition includes a layer of aluminum and foil, foamed propylene foam. Penotherm has the following advantages:
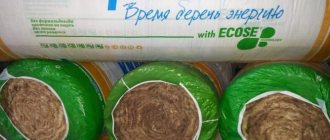
does not absorb moisture; high resistance to heat transfer; low conductivity; reliability and durability.
Modern vapor barriers include Izovek, Izolike “B”, and Utafol “Silver”. Ceiling vapor barrier can be made with inexpensive materials such as cardboard, paper and ecowool, which are impregnated with wax or drying oil.
Which vapor barrier is better for the ceiling of a wooden house
For wooden houses, as a rule, a vapor barrier membrane or polypropylene film is used. As for the first type, it is worth paying attention to the “smart membrane” - a modern material that can independently regulate the level of humidity in the room. But its cost is much higher than that of others, but maintaining the correct microclimate is ensured. Experts advise choosing the following types of vapor barrier materials when forming a ceiling in a wooden house:
- Penofol A is an easily installed vapor barrier due to the presence of a self-adhesive layer.
- Penofol B has a foil side for better heat retention in the room.
- Penofol S is a vapor barrier for the ceiling in a wooden house, similar to the first two groups with the presence of a self-adhesive layer.
- Izospan is a material with two layers and an improved system for evaporating moisture from the surface.
- Alucraft is a vapor barrier film with three layers, used in rooms with high humidity.
Why do drops of condensation appear on the vapor barrier?
If drops appear on the ceiling vapor barrier, this is due to a violation of its installation technology. This usually happens when laying foil insulation overlapping, which should not be done. Because of this, moisture collects between the layers of material and flows down the surface.
Sometimes this indicates an incorrect choice of insulating material. In some structures, the appearance of condensing moisture on the vapor barrier is a natural process. If instead of smooth films you use special membranes or films with a viscose coating, then the problem will no longer bother you.
Polypropylene and polyethylene film
The cheapest option of all the above materials are thin polyethylene and polypropylene films. However, low cost does not mean poor quality and low efficiency; such materials provide controlled release of steam from the room.
Reinforced polyethylene film can be of two types: perforated and multilayer foil. Both options are used with great success to create a vapor barrier layer in houses with wooden ceilings. The foil material simultaneously performs a heat-reflecting function. As a result, heat remains in the room, which allows for some savings on heating costs.
Polypropylene film contains hygroscopic fibers, so it simultaneously allows steam to pass through and absorbs moisture. Thus, moisture penetrates the fibers and, gradually evaporating, comes out.
Films made of polyethylene and polypropylene are presented to the consumer in roll form, which determines the method of their installation. Solving the question of how to make a ceiling vapor barrier involves performing the following steps:
- The film is cut into pieces of a certain length.
- Lay the canvases on the ceiling, making an overlap of about 15 cm.
- The joints are hermetically sealed with wide self-adhesive tape.
- Fix the edges of the vapor barrier material using a metal profile or construction staples.
Izospan V has the best vapor barrier characteristics in this group of materials. However, despite the excellent vapor permeability, this isospan for the ceiling in a wooden house has a rather significant drawback - the lowest strength characteristics. This property greatly complicates installation work. When using Izospan B, you should be careful and careful.
The material “Izospan B” is a two-layer polypropylene non-woven fabric. Its top layer has a smooth surface, the bottom layer is fibrous and rough. It is the villi that prevent condensation from penetrating into the insulation and the ceiling. When choosing this material for arranging a vapor barrier layer, you should know one feature: its installation is carried out before the insulation. When vaporizing a ceiling in a wooden house, first of all, lay the Izospan B film, pointing its smooth side down.
The process looks like this:
- The roll is unpacked and the canvas is rolled out. Measure and cut pieces of a certain size.
- The strips are laid with an overlap of 15-20 cm in the horizontal and vertical directions.
- Elements for fixing the canvas are selected depending on the material from which the decorative ceiling will be made. For example, for a plasterboard ceiling, metal profiles are used, for a ceiling covered with clapboard, wooden slats are used.
- Regardless of the material used, it is recommended to purchase self-tapping screws with an anti-corrosion coating.
- The joints of the canvases are sealed with adhesive tape, and this must be done tightly enough.
- The insulation is attached to the ceiling using plastic disc dowels or galvanized self-tapping screws.
- Another layer of Izospan V vapor barrier is installed on top of the thermal insulation.
- Finally, the finishing material is installed. In this case, a free space of about 4 mm should be left between the vapor barrier material and the decorative structure.
Options for completing insulating materials
The schematic diagram of the construction of an insulated ceiling pie is applicable to all types of insulating materials. True, depending on their ability to pass steam, there may be some deviations, for example:
- When using extruded polystyrene, laying a vapor barrier on the ceiling located above rooms with “dry” operating conditions is not necessary. This type of insulation has almost zero vapor permeability and therefore does not require additional protection.
- When arranging the ceiling of rooms with “wet” operating conditions, a vapor barrier is installed in any case, regardless of the insulation layer used in the construction and its characteristic properties.
- When using mineral wool of all degrees of hardness and polystyrene foam, the ceiling must be protected with a vapor barrier layer.
The vapor barrier material is laid in the form of a kind of pallet, the “walls” of which should be higher than the thickness of the insulating layer. If the panel ceiling is assembled from boxes with insulation, then the vapor barrier material in exactly this form is placed in each of them. If thermal insulation is planned to be laid in the space between the joists, then they are wrapped with a vapor barrier membrane.
When using polyethylene film or glassine as a barrier, there should be a ventilation gap of 2 - 3 cm between the insulation and the vapor barrier. To do this, slats are fixed on the ceiling from the side of the premises, which at the same time serve as the basis for lining it with clapboard, decorative panels or plasterboard.
You need to think about how best to lay a vapor barrier on the ceiling when designing a house. It is at this stage that you need to choose the optimal installation option and think over the fastening scheme.
However, now there is always an opportunity to correct the shortcomings of builders and designers that appeared during the operation of the house. For example, you can correctly glue a polypropylene membrane to the ceiling. You just need to understand the characteristics and technological features of suitable materials.
Stages and methods of installation of various materials
Before laying the vapor barrier material, it is necessary to prepare the base for its fastening. If roll vapor barrier is used, the surface is pre-puttyed. If a liquid paint vapor barrier is used on a concrete base, it is enough to smooth out the unevenness. Then the surface is primed, and after drying, a vapor barrier can be applied.
Preparing a concrete ceiling
The materials, which are panels, are attached to the base with a construction stapler. Particular attention should be paid to the corners. Insulation panels are attached along the perimeter of the ceiling with an overlap of 10-15 centimeters.
The film spreads with tension, without allowing sagging of more than 1.5 centimeters. To ensure reliable fastening, the panels are fixed with tape. For fastening between beams, nails with a special enlarged head are used. The pitch between nails is 30 centimeters. The joints are additionally taped with construction tape. If the vapor barrier is attached after the insulating material, slats are attached with screws on top of it.
Sealing ceiling vapor barrier joints
The sheet vapor barrier is laid on an aluminum profile frame, which can be purchased at retail outlets. The profile can be replaced with thin bars, but experts advise preferring a factory profile, which already has grooves for attaching vapor barriers. After installing the solid sheets, all joints are glued with PVC film.
Rolled materials are rolled out from the bottom up and secured with profiles or slats.
Foil materials are placed with foil inside the room. The purpose of this installation is to reduce heat loss due to the reflective effect.
Advice! When purchasing vapor barrier material, it is important to correctly calculate its quantity. It is definitely worth considering that the rolled material is laid overlapping and with allowances, so its size increases accordingly.

Tools for installing ceiling vapor barrier
Review of materials
Modern industry offers a wide selection of vapor barriers, the choice of which depends on the financial capabilities of the buyer and the material used to make the ceiling structures. The choice is also influenced by the microclimate of the room. In artificially heated rooms, a partial vapor pressure is created that is significantly higher than atmospheric pressure. Particularly intense penetration of steam into ceiling structures occurs inside baths, kitchens, and bathrooms. The insulation of the ceiling inside them must be approached with special responsibility and the highest quality material must be selected.
Selection of vapor barrier material
Vapor barrier can be of several types, let’s get acquainted with them.
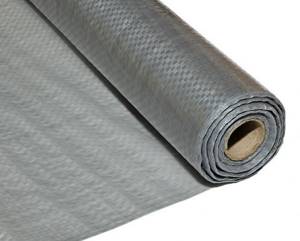
Option 1. Plastic film. For vapor barrier, a film reinforced with a special mesh is used.
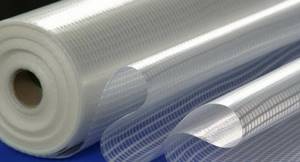
Reinforced vapor barrier film
Such material can be
- perforated – used for rooms with high humidity, as it performs an additional waterproofing function;
- non-perforated - used for relatively dry rooms.
The advantage of this material is its low cost. However, it has significant drawbacks. The film is difficult to install and has a fragile surface. To properly install the polyethylene film without damaging it, you will need a team of several people. A significant disadvantage of the film is the effect of moisture accumulation on the surface.
Option 2. Polypropylene film. One of its sides is covered with viscose, which prevents moisture accumulation and drainage due to the gradual absorption and evaporation of water. Compared to polyethylene, polypropylene is much stronger. The cost of such material is higher, but the service life and ease of installation compensate for the costs.
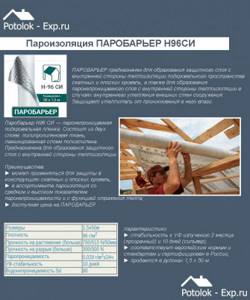
Vapor barrier polypropylene film Vapor barrier N96SI
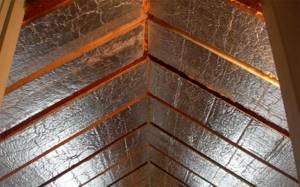
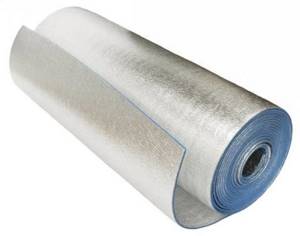
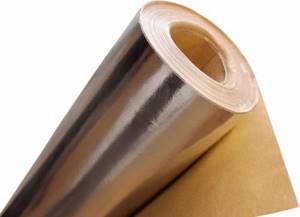
Option 3. Materials based on aluminum foil. They are foil applied to a base made of paper or polyethylene foam. The foil vapor barrier additionally serves as an insulating layer. The use of such material is especially recommended for vapor barrier of saunas and baths.
Prices for vapor barrier film
vapor barrier film
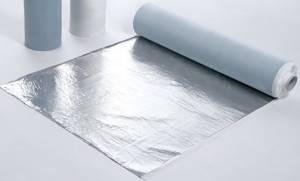
Foil vapor barrier film
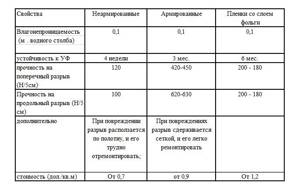
Table of properties of vapor barrier films
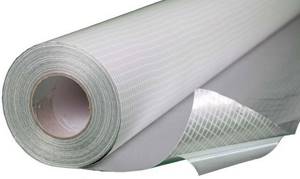
Option 4. Membrane film. The most modern material, consisting of micro-perforated fabric, a polypropylene layer and a polymer film. All moisture after evaporation is retained by this material and gradually evaporates without draining or getting inside the ceiling structure. The most effective in this regard are double-sided membranes.
Megaspan S – hydro-vapor barrier membrane
Option 5. Varnishes and mastics with a membrane effect. They are used for concrete ceilings; they do not allow moisture to enter the premises and do not prevent its outflow to the outside.
Polymer mastic bitumen
Option 6. Glassine. Paper-based material with bitumen impregnation. Recommended for vapor barrier of wooden structures. This material is elastic and therefore easy to install. In addition, the low cost makes glassine quite affordable.
Glassine
How to lay a vapor barrier on a ceiling
Vapor barrier materials are very diverse. To install them correctly for maximum efficiency, the following factors should be considered:
- side of laying the vapor barrier - for some materials this does not matter, but if, for example, a double-sided membrane is used, attention should be paid to this issue, such a film does not allow water to pass through only on one side;
- docking - the vapor barrier coating must be solid; for this, different techniques are used;
- ventilation gaps - vapor barriers cannot be laid close to the ceiling insulation.
The purpose of the room and the nature of the wooden ceiling are also important: it separates the heated rooms or living room and attic.
Which side to put the vapor barrier on the ceiling
Which side to lay the vapor barrier on the ceiling depends on the type of vapor barrier chosen. The exception is coated and painted material, since in this case the functionality is ensured by the vapor barrier composition.
For all other options, the following recommendations apply:
- with a double-sided film, one side is rough and the other is smooth; the material is laid with the rough side outward and the smooth side inward; the outer layer retains moisture but allows it to evaporate; the smooth layer is impenetrable to steam and does not allow moisture to pass into the insulation;
- one-sided polypropylene film with a laminated layer is mounted according to the same principle: the smooth side inward, towards the insulation, and the regular side outward;
- ordinary plastic film has both smooth sides, so how exactly it is laid does not matter;
- foil sheets are laid with a metal layer outward, this option is designed to retain heat in the room, and it is the foil layer that reflects thermal radiation back into the room.
Important! There are always exceptions. For example, Izospan film is laid contrary to generally accepted recommendations: with the rough side inward and the smooth side outward.
How to install a vapor barrier on the ceiling
The vapor barrier coating must be a solid structure. Even fastening with nails can disrupt its vapor barrier properties:
- if a coating vapor barrier is used, then make sure that there are no untreated areas left; it is necessary to also cover the upper section of the wall in order to isolate the joints between the ceiling and the walls;
- films and membranes are laid with an overlap of 8–15 cm and the joints are taped, the sheets are laid as closely as possible to each other, the seams are taped.
If a sheet vapor barrier is performed, then a special profile can be used. The latter can be done with your own hands.
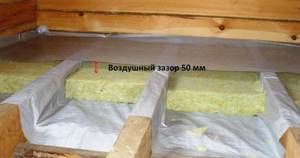
Ventilation gap when installing ceiling vapor barrier
There should be a ventilation gap of 50 mm between the layer of insulation and the vapor barrier on the ceiling. If the height of the logs is greater than the thickness of the insulation, such a gap is formed automatically. If the values coincide, then a wooden sheathing 50 mm high is first attached to the logs, and then a vapor barrier is laid on top.

A ventilation gap should also be maintained between the vapor barrier coating and the finishing of the ceiling. They use the same technique for this: install a sheathing of thin slats.
The need for a vapor barrier in the ceiling
A vapor barrier for a wooden ceiling is necessary. This will prevent the penetration of vapors into the thermal insulation layer. The materials will be protected from the destructive effects of moisture. This will avoid contact of moist air with the insulation. If you neglect these rules, it will become covered with mold and mildew. At the same time, the entire building will last much less. After all, structures must be reliably protected from negative influences.
The presence of a vapor barrier layer allows not only to protect materials from water, but also to reduce heat loss. If coatings with a foil layer are used, they will reflect most of the heat, sending it back into the room. But moist air will be able to escape freely. The main task of such a coating is to protect the thermal insulation from the accumulation of moisture in it.
How to attach a vapor barrier to the ceiling
Ceiling installation includes 3 stages: waterproofing, insulation and vapor barrier. This is the last layer before finishing. Its installation is determined by the type of material used, as well as the design of the ceiling.
Fasteners for proper installation of vapor barrier on the ceiling
Construction staples are preferable for fastening the covering. They are much thinner, provide the same reliable fixation of the film, but do not violate the vapor barrier properties of the coating. Thick cardboard or other similar material should be placed under the staples.
It is allowed to use nails with wide heads. It is better to choose galvanized ones, as they are resistant to moisture and will last much longer.
Scotch tape also serves as a fastening element. It is used both for attaching film to joists and for vapor barrier of joints. In special cases, a profile is also used to connect sheets to each other.

How to install and secure different types of vapor barrier on the ceiling
In order for the vapor barrier to effectively perform its functions, it is necessary to follow all the rules for waterproofing during installation:
- during installation, it is allowed to use vapor barrier materials that are less resistant to water than waterproofing materials;
- it is very important to achieve a solid surface; for this, the film is laid overlapping, the sheets are glued with tape, and so on;
- it is necessary to exclude moisture in the vapor barrier coating; work cannot be carried out during snowfall, rain, or fog;
- when laying rolled vapor barrier, the material must first be kept in a warm room for at least 20 hours;
- The film should not be stretched too much, it should sag slightly;
- When vapor barrier corners, be sure to use solid material.
Important! When choosing different types of coatings, the list of rules is supplemented with recommendations from the manufacturer.
Which vapor barrier to choose for the ceiling
The type of vapor barrier for the ceiling affects the speed, ease of installation and service life. The material is divided into 4 categories:
- standard;
- foil;
- controlled action;
- variable action.
A standard insulator is used indoors. It is mounted on the inside of the ceiling to prevent warm air from escaping outside the room. The second option traps steam and redirects infrared radiation, reducing heat loss. A controlled action vapor barrier is stretched over the insulation. It partially lets steam out of the room, but prevents it from getting back. Variable action canvas is installed in rooms used seasonally, where there is no heating, but there may be temperature changes. At normal humidity, such a membrane is open and allows air exchange. As soon as the moisture percentage rises, the pores close.
Vapor barrier film for ceiling
Film vapor barrier for the ceiling is made from:
Polypropylene is an environmentally friendly material that has no harmful emissions or odor. It is distinguished by its durability and resistance to ultraviolet radiation. It is used in open construction and, if necessary, to freeze the work for a while. Elasticity and strength do not suffer from temperature changes. One side of the polypropylene film is smooth, the other is fleecy. The smooth one is turned towards the insulation, and the fleecy one - into the room. The task of the latter is to collect and retain moisture, which is removed through ventilation.
Polyethylene film may have an odor after installation, which will disappear after a week. It is a solid or perforated fabric. The strength of the material is increased by mesh reinforcement. The advantage is a low coefficient of vapor permeability compared to other materials. Disadvantage: mechanical instability. The vapor barrier for the ceiling can be damaged by a sharp object; it is destroyed by rodents or fallen objects.
Vapor barrier membrane for ceiling
Vapor barrier membranes for ceilings are divided into:
The difference is the installation method. The latter need a ventilation gap 3-5 cm high above the insulation. To ensure this, additional lathing is made of timber. The advantage of the former is the lower height of the ceiling pie compared to breathable ones. The membrane is a combined material that acts as a hydro- and vapor barrier. It blocks moisture from entering wood, concrete and insulation, but ensures its outflow from them, eliminating condensation. Manufacturers produce two-layer and multi-layer canvases for ceilings.
Vapor barrier with foil
Foil vapor barrier for the ceiling is made of polyethylene. In this case, it is represented not by a thin film, but by a foamed mass. The advantage is additional thermal insulation. A cushion is formed in the air pores, retaining heat in the room. The lower part of the material is covered with a layer of aluminum foil. The latter reflects thermal radiation emanating from heating devices.
Glassine
Glassine is a multi-layer barrier consisting of sheets of cardboard. They are impregnated and glued with purified bitumen. The advantage is the price, which is lower than the options listed above. Disadvantages - service life and environmental friendliness. Glassine breaks due to mechanical stress. When heated, the fabric releases substances harmful to the human body. The product retains moisture no matter which side it is mounted on.
Liquid vapor barrier
Liquid vapor barrier for ceilings is divided into 3 groups:
The first option is used for concrete surfaces. The mixture penetrates the pores, fills them and forms insoluble crystals that allow air to pass through, but stop water. The second category is bitumen-based compositions. They come in one-component, ready-to-use, and two-component versions. The latter last longer, but require following the instructions when mixing with a solvent. Vapor barrier properties of coloring compounds are provided by purified bitumen, latex or rubber. The advantage is decorative properties and environmental friendliness. The disadvantage is the service life.
How to properly install a vapor barrier on the ceiling: step-by-step instructions
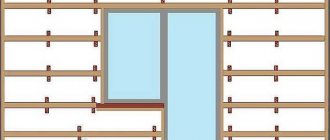
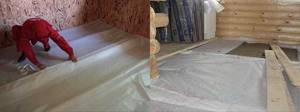
The finished vapor barrier in appearance resembles a pallet with sides. The coating should cover not only the insulation on the ceiling, but also the gap between the heat insulation and the walls. In addition, the film must cover each beam.
The first stages of finishing the ceiling are carried out as usual. The wooden surface is cleaned, treated with antiseptics and fire retardants, and communications are installed. Then the ceiling is waterproofed and insulation is laid on it.
- Laying begins from any wall. The roll or sheets are cut to size and secured to wooden beams with staples. In this case, a gap must be maintained between the heat insulator and the vapor barrier. If necessary, pre-attach the sheathing.

- The film or membrane must cover each beam. There are two ways to do this. A simpler option involves fastening the material around the beams. In this case, the canvases are laid perpendicular to the beams, taking into account some recess into the interblock space. If the length of the film is not enough, gluing the vapor barrier is allowed.

- Another option: cut the film into fragments of the appropriate size; you need to wrap each compartment separately. All seams and joints are additionally taped with tape. As a rule, this method is used for vapor barrier of panel-box ceilings. Laying is done with an overlap. The tolerance on walls is 10–15 cm.
- The joints are sealed with tape according to the following scheme. First, glue the seams between the canvases. To do this, bend the overlap, secure the edge of the vapor barrier with tape, then remove the protective strip from the adhesive tape and attach the overlap on top. The joints with the wall are sealed in the same way. In this case, you cannot stretch the film; it should sag by about 2 cm.
- Then the second and third layers of vapor barrier are laid, following the same rules. Make sure that the joint of the next layer does not coincide with the seam on the first layer. The displacement should be at least 30–40 cm.
Foil material, especially sheet material, is mounted according to a different scheme.
Step-by-step instructions on how to insulate a bathhouse with isolon
Before work, it is necessary to calculate the amount of isolon according to the area of the walls and ceiling of the bathhouse. To do this, you need to multiply the length of the wall by the width and multiply between them. The resulting figure is 4. Add the ceiling area to the result and subtract the doorway. The material is laid without overlap, so metallized tape is purchased for a hermetically sealed connection.
For work you will need materials and tools:
- A construction stapler with 10 mm staples or a hammer with thin nails.
- Izolon.
- Foil tape.
- Scissors, stationery knife (necessary for adjusting the insulation).
After everything has been purchased, we proceed to insulating the walls and ceiling.
How to make a vapor barrier for a cold attic ceiling
Do-it-yourself slatted suspended ceiling installation and video instructions
Vapor barrier of the ceiling of the last floor is an obligatory part of complex work on insulating the ceiling of a cold attic. For concrete bases, it is enough to seal the seams hermetically, lay a continuous layer of vapor-proof film on top of the slabs, then insulation and a waterproofing membrane. Vapor barrier and insulation of wooden floors are done differently.
Why do you need a vapor barrier?
- protect the insulation from moisture vapor entering it along with warm air from the heated room,
- prevent the creation of conditions for structural materials to get wet,
- protect living spaces from mineral wool particles entering them.
And if the last point is aimed at providing comfortable conditions for humans and is a consequence of the properties of the material, then the first two are mandatory according to current standards.
The entire structure of the “pie” of the insulated ceiling of a cold attic must meet the requirements of SP 23-101-2004, which regulate the design standards for thermal protection.
According to clause 8.5 of the general provisions, technical solutions must ensure reliable waterproofing of thermal insulation materials and limit the penetration of water vapor into them as much as possible. And the relative arrangement of the layers should eliminate the prerequisites for the accumulation of moisture and create conditions for its weathering.
Installation rules
Wooden ceilings are beams filled with boards or panels of the rough ceiling on the side of the room. This device determines the specificity of the order of layers. If on a concrete floor the vapor barrier is laid on a slab under the insulation (the same as when insulating a flat roof), then in this case it must still protect the wooden elements of the structure.
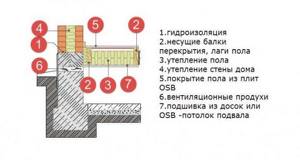
The sequence of layers and installation of vapor barrier will be as follows:
- They arrange the ceiling - a rough ceiling is attached to the beams (number 8 in the diagram).
- On the side of the room, the false ceiling is covered with a vapor barrier film (number 9 in the diagram). If it is a reinforced vapor barrier (with a two- or three-layer structure) or heat-reflecting vapor barrier, then the anti-condensation rough surface or metallized layer should face the inside of the room.
- The overlap between the panels, regardless of the direction of laying, is 15 - 20 cm.
- The edges of the vapor barrier layer along the perimeter are brought out onto the walls and fixed to them.
- The joints of the canvases and the perimeter are taped with vapor-proof tape.
- A gap is required between materials with an anti-condensation or reflective surface and the finishing of the ceiling. It is provided by stuffing the slats with a thickness of 4–5 cm.
Insulation of the ceiling of a cold attic is carried out as follows:
Between the beams, mineral wool (in soft mats or in rolls) is laid on the surface of the false ceiling. The insulation layer is calculated so that the total reduced heat transfer resistance of the entire floor structure is not less than the standard value.
In accordance with the requirements of clause 8.20 of SP 23-101-2004, waterproofing of insulation is required along the perimeter of a cold attic for a width of 1 m or more. In private houses, with a relatively small building area, the procedure is simple - a waterproofing membrane with a high vapor permeability (superdiffusion) capacity is laid over the entire surface of the heat-insulating layer. The vapor permeability of waterproofing is needed to ventilate excess moisture from the insulation when the temperature and humidity level of the atmospheric air changes.
The membrane is laid without tension close to the thermal insulation with the white side. Attached to floor beams and around the perimeter. The overlap between the panels is 15–20 cm.
Counter slats 4–5 cm thick are placed on the beams (number 3 in the diagram), which are ensured by the ventilation mode of the heat-insulating layer.
The floor is laid along the counter slats.
What you need to know to prevent dripping from the ceiling
Insulation of an unheated attic can only be carried out if it is ventilated (clause 8.19 of SP 23-101-2004).
- For a continuous pitched roof, ventilation openings must be at least 0.1% of the floor area.
- On a pitched roof made of piece roofing materials, you can do without ventilation holes - there are enough gaps between the roofing elements.
You can turn on the heating only after the insulation of the floor and the vapor barrier of the ceiling have been completed in full.
How to make a vapor barrier for a cold attic ceiling
Ceiling vapor barrier technology for insulating the ceiling of a cold attic. The order of laying layers and features of installation of vapor barrier materials on wooden floors.
Insulating a wooden ceiling with mineral wool - is a vapor barrier necessary?
It is necessary to insulate the ceiling of a wooden house; currently the ceiling is made in the form of boards nailed from below to the ceiling joists.
I want to lay 150 mm thick mineral wool insulation on top of the boards, in the space between the two joists. On the boards on top, under the insulation - is a vapor barrier needed to prevent the insulation from getting wet from steam from the room? Will this cause the boards to rot? Or just put a wind barrier (isospan) so that the fibers do not fly into the room? mitin, if there is a cold room above - an attic, a vapor barrier is needed. Already on top
In everything I want to get to the very essence.
Thank you. 1. Will ordinary polyethylene film be used as a vapor barrier?
- Probably there should be some kind of ventilation gap so that water vapor escapes and the boards under the mineral wool do not rot?
- Is there any difference between putting three layers of mineral wool 50 mm thick or one layer 150 mm thick?
1 will work, but the risk of tearing is greater. 2 when using Izospan A type hydro-wind protection, a gap is required; if a Tyvek or Izospan AM diffusion membrane is used, a gap is not needed. 3 with 2-3 layers, the next layer will cover the joints between the plates. You can take 100+50.
In everything I want to get to the very essence.
Thank you. Be so kind as to tell me which of these materials will replace Izospan AM for the layer between the ceiling boards and the insulation (so as not to create a ventilation gap)? Izospan AR is not there, unfortunately
mitin wrote: for the layer between the ceiling boards and the insulation
from below the insulation? Izospan V. There is no need for a gap
In everything I want to get to the very essence.
VVV wrote: from below the insulation? Izospan V. There is no need for a gap, what is it?
Sorry, I found Izospan AM there. Those. As I understand it, the cake will look like this: boards with isospan B on them, then insulation, then just on top without a gap isospan AM.
mitin wrote: the cake will look like this: boards with isospan B on them, then insulation, then just on top without a gap isospan AM.
In everything I want to get to the very essence.
I also forgot - it is possible to insulate with Ursa Pure One material (the one that does not emit phenol - after all, this is a living space, but its thickness is only 50 mm, it will have to be done in three layers) or with ordinary Ursa mineral wool (it is already available 150 mm thick). The price will be approximately the same, Pure One is more environmentally friendly, but there will be more problems with 3 layers of flooring.
- Will ordinary polyethylene film work as a vapor barrier?
No. use building materials intended for these purposes, and not garden covering material.
mitin wrote: there will be more hemorrhoids with 3 layers of flooring.
what is the distance between the beams?
in the production process, in operation IMHO they are all the same + -, especially in a cocoon from Izospan. Everything else is advertising fluff.
In everything I want to get to the very essence.
Hello! I have a related question - how to insulate the floor in a country house made of wood. When lying down, you can feel dampness from the floor, as well as a slight draft. There are 600*1200*50mm penoplex slabs (extruded polystyrene foam) available for free. At first I wanted to insulate them with them, but I thought that they were very flammable and vapor-tight... i.e. If you close the tree from the basement, there will be no natural ventilation at all - it will rot faster. Then an idea was born - cover it with penoplex, but lay it on the floor boards themselves, and on the cross beam (see photo), so between the floor boards and the insulation there will be an air gap equal to the thickness of the beam, it would seem the problem is solved, but then the beam itself will suffer from a lack of ventilation, or more precisely the place where it adjoins the penoplex), which is in direct contact with the penoplex. or is it not scary? You will only have to insulate the outside, i.e. from the basement.
- It’s stupid to cover the ground in the basement with expanded clay or sawdust.
- Use mineral wool instead of penoplex. but it will be a bit expensive with all the wind and waterproofing... and it’s not entirely advisable to insulate it from the basement. If it were inside, then yes.
- Use foil penofol 1 cm thick. But the same problem with ventilating the boards. In general, I don't know. Because “Penoplex” - I have it lying around, I’m more inclined, of course, to it. but I will consider all options.
photo 1 " > photo 2 " >
wall chaser1, I also insulated the floor in my house with penoplex. The idea is this: there are vents in the basement, the bottom and top are ventilated. And with mineral wool, one can put a vapor barrier. It may be wrong, but I haven’t found any convincing arguments against it.
When is a vapor barrier necessary?
It is definitely enough to simply formulate the condition of whether a vapor barrier is needed. When insulating with mineral wool, protection from water vapor will be needed when there is a possibility of contact with air coming from the room.
To ensure effective operation, each layer of the thermal insulation “pie” must allow air to pass through to one degree or another. In the direction from room to street, this ability should increase.
Thus, warm air from the room very slowly seeps between the fibers, displacing cold air from there.
There is a small ventilation gap of 1-2 cm under the internal decorative lining. The insulation is installed inside the structure between the supports.
These can be vertical frame posts, floor joists or rafters. A wind-waterproofing barrier is installed on the outside (external) side, protecting from the effects of precipitation and strong direct wind.
This scheme is valid when constructing frame walls, floors, attic roofs, and the ceiling of a residential floor in the presence of a cold attic above.
Internal partitions and ceilings between living spaces require a slightly different approach. In this case, humid air can penetrate the mineral wool from any side. To maintain the thermal characteristics of the structure, a vapor barrier is installed on both sides.
Another case when protection from internal moisture is necessary is external insulation of wooden log houses made of timber or logs. A vapor barrier is installed between the wall and the insulation slabs.
Excess moisture is removed through a ventilation gap left under the outer decorative facade.