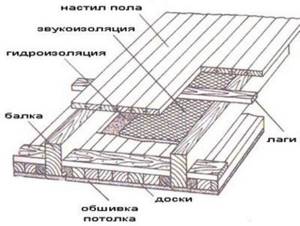
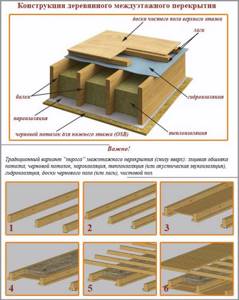
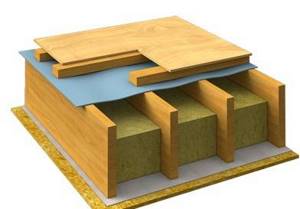
In a private house, any ceiling design resembles a layer cake. It usually consists of the following components:
- rough ceiling;
- vapor barrier layer;
- waterproofing;
- insulating layer, which is also sound insulation;
- finishing surface.
Regardless of what material the house itself is made of, the ceiling for it is formed in the same way. The only difference is the method of attaching the material to the floors. So, the concrete base is first drilled and each hole is provided with a dowel. It is much easier to work in a wooden house, since all you need are screws or nails and a screwdriver with a hammer. No preliminary preparation of holes is required.
According to the design, ceilings in a private house can be:
- hemmed;
- flat;
- panel.
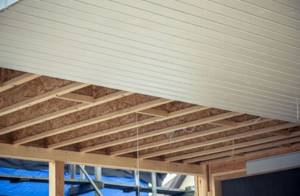
The first type is a surface attached directly to the ceiling beams in a private house. Usually this ceiling is classified as a rough ceiling, but when decorated with high-quality slats and proper insulation, it can play the role of a finishing coating.
As for the second option, the name here speaks for itself. Ceiling boards are laid on the beams, and not hemmed to them from below.
A panel ceiling is essentially a variation of the first two options. To form it, shields assembled from several boards are used.
First of all, it doesn’t hurt to figure out what type of ceiling covering is – both by type and purpose.
So, according to the design solution, the load-bearing part of the ceiling partitions is:
- beamless, consisting of a homogeneous material (panels or slabs as flooring);
- beam, which involves the use of beams in the form of a load-bearing surface, as well as filling of a certain type (depending on the circumstances).
According to their purpose, floors are divided into the following groups:
- attic rooms separating the living space and the unheated upper part of the house (attic);
- basement, as opposed to attic, separating the heated space from the cold underground;
- basements separating the house and the cellar;
- interfloor - a buffer between residential floors, including the attic.
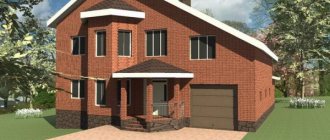
Covering a house with foam blocks - the main requirements
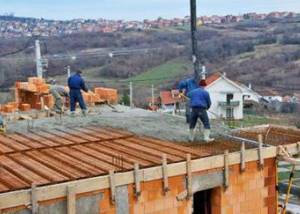
Taking into account the properties of foam concrete blocks, the number of floors of a foam block house should not exceed three floors. The low strength characteristics of the porous material do not allow its use for the construction of multi-story buildings.
If the building is built using materials such as aerated concrete or foam block, the ceiling can be installed using several technologies
The ceiling structure for a building made of cellular blocks proportionally distributes forces on the main walls and performs a number of tasks:
- ensures the rigidity of the frame of the building being constructed;
- securely binds the walls, increasing the strength of the structure;
- effectively absorbs external noise;
- accepts the mass of building structures while maintaining integrity;
- insulates the living space, making it difficult for cold air to enter;
- increases fire safety through the use of non-combustible materials.
Useful tips
Beams in this design rest on the frame of the external walls and on the partitions between them, if any. It is very difficult to make continuous single beams (the size from one outer wall to another) from whole lumber, but if there is a load-bearing partition in the gap, then the line of the beam continues along the partition without a joint on it. In the event that there are no load-bearing walls, in order to achieve a sufficient load-bearing structure, laminated veneer lumber can be used.
You can do ceiling repairs yourself; you don’t need any special skills to do this.
However, if you decide to do the repair yourself, you should take into account the fact that the joints cannot be covered with ordinary cement, since when it dries, it will not only lose volume, but may also crack. If the design has minor defects, it is best to use silicone sealant or epoxy putty
They make such an overlap without significant material costs, which, of course, is one of the main factors in their popularity. It should be noted that if you need to get a flat ceiling or attic floor, then the beams used are given some bending, which is called the building volume. At first, such a structure will look somewhat curved in the middle, but then, after a short amount of time has passed, the ceiling will become even, as the upper elements act on it.
As you know, wooden elements can rot, so you need to leave free space (but not too much) between the beams and the wall. All materials that are made of wood must be carefully prepared before starting work: they are treated with an antiseptic at both ends, then they must be thoroughly dried, covered with resin and wrapped in two layers of roofing material. Do not tar or wrap with roofing material on the end sides. If the surface of the ceiling is not finished with plaster, then the rolling sheets can be sharpened. The work, if done in good faith, following the instructions, always gives a satisfactory result, and the ceiling will be reliable and durable.
Floor installation
After all the necessary materials have been purchased and all preparations have been completed, you can begin construction work directly. The construction of interfloor slabs can be divided into several main stages.
Installation of beams
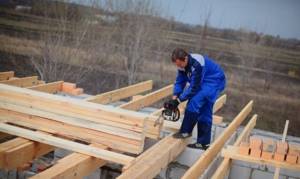
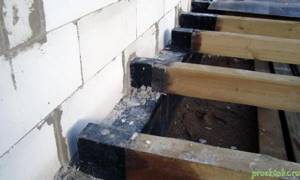
The part of the beam inserted into the wall is wrapped in three layers of waterproofing material. The installation of load-bearing beams is most often carried out at the stage of erecting the walls of the building.
Before laying the load-bearing beams, their surface is treated with all necessary impregnations. Then their ends are cut at an angle of 60° and the part that will be walled up in the wall is wrapped in 2-3 layers of rolled waterproofing.
The ends of the beams are usually also coated with waterproofing compounds, but some experts advise leaving them open to allow the moisture contained in the wood to freely escape.
The depth of the beams inserted deep into the wall should be at least 15 cm. The laying step of the beams is usually taken at 0.6 m, but depending on the expected load on the floors, as well as on the thickness of the beam section, this figure can be reduced or increased.
If the top flooring is supposed to be made of inch boards, plywood or chipboard, then the distance between the beams should not exceed half a meter, otherwise the floors will sag when walking. For more information about installing beams, watch this video:
Floor joists must lie in the same plane
The installation of load-bearing beams begins from the two outer walls, while the beams should be located at a distance of 5 - 10 cm. After installing the two outer beams, we install the rest, observing the required interval.
When laying beams, special attention should be paid to the horizontal slope: all floor beams must lie in the same plane. To do this, place an edged board between the two outer beams, or pull the twine tightly
If the base on which the beams are laid is uneven, then mortgages should be installed under the ends of the beams to level the horizontal level. For mortgages, a material is used that is resistant to rotting and physical stress - metal plates, pieces of tile, etc.
The load-bearing beams are attached to the wall using anchor bolts and steel corners.
Fastening the support bars
After all the floor beams have been exposed, bars with a cross section of 5 x 6 cm (the so-called “cranial” bars) are attached to them. They serve as a support for laying the subfloor and are attached along the entire length of the supporting beam, on both sides.
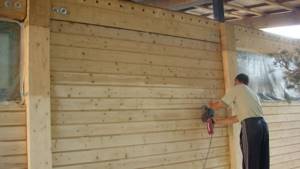
Installation of subfloor
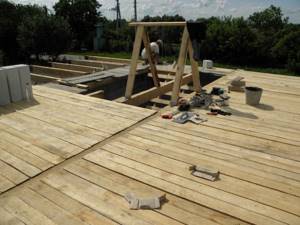
Most often, the subfloor is made from inch boards. To construct the subfloor, edged boards are taken and laid across the beams on support bars. Since the distance between the beams usually does not exceed 0.6 - 0.8 m, then an inch or thirty board is quite suitable for subfloors: the pressure on them will be limited only by the weight of the insulation.
You can also use a trimmed slab for these purposes. You can also combine the subfloors of the second floor with the finished ceilings of the first floor or basement. In this case, the edged boards are hemmed from below, from the side of the first floor to the beams. For more information about the draft field, watch this video:
Thermal insulation flooring

After installing the subfloors, compartments are formed between the beams, which, if necessary, can be filled with thermal insulation materials.
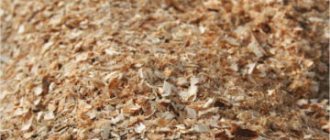
To do this, a hydro- or vapor barrier (roofing felt, isospan, etc.) is laid on top of the subfloor boards, and then mineral wool, polystyrene foam, slag with sawdust, etc. are laid.
It is also advisable to lay waterproofing on top of the insulation, which will protect it from moisture leaks from above.
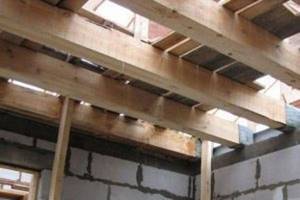
Ceiling structure in a private house
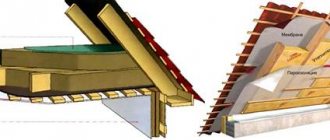
Most often, when they talk about do-it-yourself ceilings, they mean constructing the ceiling of the first and only floor, above which there is an attic, which is usually unheated. Its structure, as well as the sequence of actions during construction, practically does not depend on the type of building - frame, brick or log. It is recommended to use wooden beams as a material, since it is much lighter, but at the same time provides sufficient strength and reliability for a one-story private house.
The basis of the ceiling is a beam system made of timber - the parameters of the latter are determined by the dimensions of the span to be covered. Calculations should be made using tables. Then skull blocks are attached to the beams with self-tapping screws, and a rough ceiling made of boards is laid on top. It is advisable to use the same wood. If the beams remain visible and also serve an aesthetic function, it is recommended to treat them with varnish.
Vapor barrier - heated air, rising to the ceiling, cools on the surface, which contributes to condensation. In order to protect the ceiling from moisture, it is waterproofed, that is, covered with a layer of vapor barrier material - polyethylene, for example.
Insulation is an absolutely necessary action, since it is through the attic and roof that most of the heat is lost. Thermal insulation can be achieved in different ways.

In a living room - in this case, the heat insulator is located between the beams on a layer of waterproofing. Most often, foam plastic or penoplex is used, since this material, with good insulation properties, is very convenient to work with: the slabs are installed in a spacer between the beams and do not even need fastening. At the same time, foam plastics are very light, low-flammability, and resistant to fungi and mold. Mineral fiber in rolls is no less often used. With similar characteristics, mineral fiber is completely fireproof, but is less resistant to moisture. It is somewhat more difficult to install it, since the material has a loose structure.
If the method described above is used, then the heat insulator from above, up to the finished ceiling, is covered with another layer of waterproofing.
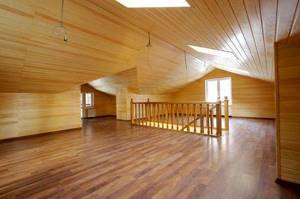
Insulation in the attic - the heat insulator in this case is placed “on the other side,” that is, on the floor of the attic. As a rule, bulk is used - expanded clay, slag, clay with sawdust, and so on, but mineral fiber is also used. The heat insulator is covered with a layer of waterproofing material on top, and then floors made of plywood, OSB or boards are laid on the logs.
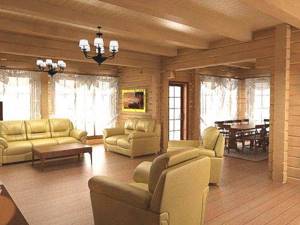
Ceiling lining - in principle, any material can be used for lining, the level of vapor permeability of which is more or less close to that of wood - otherwise it is impossible to prevent the situation with the loss and accumulation of condensation. However, there are also some aesthetic requirements that it is advisable to fulfill.
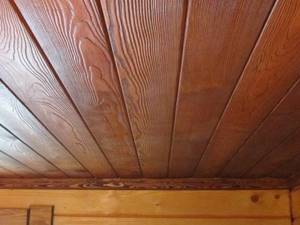
Wooden lining is the best option, whose technical and aesthetic characteristics perfectly match the log structure. For finishing, it is advisable to choose the same type of wood as for the walls. Drywall - most often, slabs painted in light colors are placed between the beams, forming a design in the style of a chalet, hunting lodge, Provence, and so on. This option is highly preferable for small rooms, as it visually expands the space and raises the ceiling. You should not cover drywall with wallpaper - this is an option for a brick building.
Plastic lining - glossy, light colors and seamless is allowed if used in exactly the same way. Seamless plastic lining, especially next to log walls, looks extremely ridiculous. For the same reasons, it is recommended to abandon foam plastic boards - the material does not at all correspond to the aesthetics of a wooden structure.
Tensile structure - more suitable for a brick or frame house with appropriate wall finishing.
Timber laying algorithm
During the construction of walls intended for laying timber, they are covered with their own hands in several layers of roofing material. 1 day before laying, the timber is treated with a fire retardant solution to protect it from fire.
The ends of the wooden beams are wrapped in waterproofing material and placed in niches. The distance from the ends of the beam to the walls of the niche must remain at least 4 cm. This device is filled with foam plastic or mineral wool.
Do-it-yourself ceilings in a timber house
If the wall is brick and the thickness of the wall is less than two bricks, the space is filled with cement mortar. Every third beam is fixed with an anchor protruding from the wall by 20 cm, laid during the construction of the wall. First, a device for an anchor corresponding to the diameter and depth is drilled into the beam with your own hands.
The beams are laid from the walls to the center, checking the evenness of the laying with a level. Having discovered an unevenness, it is eliminated using tarred boards adjusted to the width. It is forbidden to cut the timber or place it under wood chips, as this will lose the strength of the structure.
Note
The outer beams are never placed close to the wall, leaving at least 10 cm. The beam is never installed directly next to the chimney pipe.
Preparing for installation
This operation mainly consists of leveling the seats for the beams. Using measuring instruments, a level, a tape measure and a cord, the plane of the upcoming ceiling is determined. There are two main installation methods, although the structure of the ceiling does not fundamentally change. In the first case, tarred wooden spacers are installed on top of the upper cut of the wall to level the plane. The operation is simple and not labor-intensive. Subsequently, the gaps between the beams are filled with material similar to that used in the construction of the wall. For installation using the second method, seats are made. Using the markings, openings are cut into which the ceiling elements are then laid. Ideally, these are grooves that repeat the shape of the beam in the lower part and coincide with the level of the future ceiling.
Features of wooden floors
Based on location, the following types of floors are distinguished:
- attics;
- interfloor;
- basement
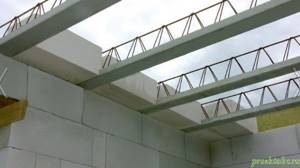
The photo shows finished I-beams.
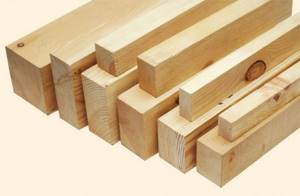
The materials for their beams can be:
- beam;
- edged boards;
- logs;
- laminated veneer lumber;
- finished I-beams.
The floors are distinguished by the filling between the beams. It can be a roll of boards or shields on cranial bars nailed to the bottom of the beams. Additionally, the filling can have layers of insulation, vapor and waterproofing.
The sheathing materials also differ.
It could be:
- GKL;
- boards;
- plywood;
- OSB;
- chipboard;
- wooden lining, etc.
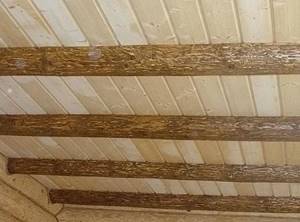
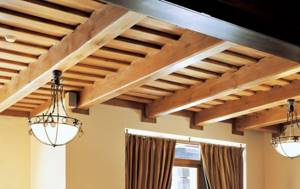
Often the beams are not sewn up and are decorative elements of the room. Then only the spaces between them are lined.
What is taken into account
- Construction of houses with wooden floors is possible with a span width of no more than 8 m.
- Most often, beams made of timber with sides from 5×15 to 14×24 cm or logs (barked) of sufficient diameter are used as load-bearing elements.
- The pitch between the beams is selected during calculations and is usually 60-100 cm.
- Only coniferous wood is used for load-bearing elements. Their bending strength is much higher than that of deciduous varieties.
- The length of the logs or beams must be such that they rest firmly in the nests of the log house or masonry.
The process of creating a floor
The work looks like this. First of all, you need to take care of the safety of wood materials, that is, coat them with an antiseptic. This is done to ensure that the tree does not rot and is not afraid of wood pests. At each end of the beam, they are wrapped with roofing felt in two layers.
Scheme of a monolithic floor.
Next comes the installation of horizontal beams, which will be located at the edges. In this case, you should use a building level to avoid any distortions in the future. After this, to make it easier to navigate, a thread is pulled between them and intermediate elements are laid along it.
To create a more interesting ceiling model, you can use false beams, which will create a feeling of visibility of the ceiling. Or you can process it using an electric planer, and then varnish it. This option in a private home will look very interesting.
As soon as the work with installing the timber is completed, you can move on. After this, the cranial bars are screwed in with self-tapping screws, on top of which the subfloor is laid. Its main task is to serve as a support for the future insulation. I would like to immediately note that if it is created, then insulating material is not laid between the beams. Experts recommend replacing it with sand, which is laid in a 5-cm layer. This creates additional sound insulation. If you make such a coating, then before pouring it, the base must be well covered with a film, which is connected with tape.
Vapor barrier diagram for a monolithic floor.
The next step is vapor barrier. To prevent the insulation material from being affected by moisture, first lay a vapor barrier film. It is covered with insulation on top, placing it in the space between the beams. This creates double protection.
Next you can work with the insulation. To select the right material, it is necessary to carry out a thermal engineering calculation at the very beginning. This is done in order to choose the correct layer thickness.
A flooring of boards is made on top of the vapor barrier film. If this is an interfloor ceiling, it is recommended to make the flooring from tongue-and-groove boards of the 1st category. In the case where there is only a roof on top, you can stop at the 3rd category of boards. If the house is located in a climate zone where it is often cold, then it would be a good idea to take care of additional insulation. To do this, a sawdust layer is laid on the flooring, but the main thing is that they are dry, otherwise moisture will cause rotting of the wood materials.
Construction and classification of floors
The floors are both prefabricated - from load-bearing beam elements and enclosing structures - and solid. Regardless of the design, it is the load-bearing and enclosing part of the house, subject to increased loads. The requirements for floors vary depending on the type.
- Basement.
- Attics.
- Interfloor.
The basement floor must withstand 200 kg/m², and for the attic floor 100 kg/m² is usually sufficient, since the load on it is less. In addition, basement, basement and attic floors meet the scope of application - coupled with strength and rigidity, high thermal insulation parameters. This is achieved by using specialized insulating materials (insulation, membranes) in the “pie”.
For interfloor ceilings, temperature and humidity conditions are not as critical as resistance to static and dynamic loads, especially when it comes to wooden beam structures. Miscalculations in the design and installation of wooden interfloor ceilings lead to the “trampoline” effect. The thermal insulation layer maintains a uniform, comfortable temperature on each floor. Thermal insulation combines minimal thermal conductivity with soundproofing properties - one material both retains heat and dampens sound. Of course, silence cannot be achieved only with thermal insulation; complex solutions are used for these purposes, but it is possible to achieve a sufficient level of comfort.
How to choose the right floor beams
In order for the ceiling to be reliable, you need to approach the choice of beams as responsibly as possible. The opinion of professionals says that round wood is the best material for flooring, as it is very resistant to deformation.
Timber floors cannot guarantee such strength, since they are made from wood core, which does not differ in its density. The same can be said about plank materials.
Alternatively, the surface to be covered can be filled with wood that has been air-dried for at least three years.
There are a small number of requirements related to wood floors:
- When installing ceilings between residential and non-residential premises, they must be insulated, otherwise the living room will not retain heat well.
- The floors must be strong enough, since they bear a large load.
- There is no such thing as too much sound insulation; to enhance it, the joints are reliably sealed.
- Ventilation must be installed at the basement level.
Two options for ceiling insulation. Advantages and disadvantages
Insulating the ceiling in a private house with your own hands can be done in two ways - from inside the room or from the outside (from the attic). Let's look at them from the positive and negative sides.
Application of different materials
When insulating from the inside, mineral wool is chosen, and for the external method, almost any insulation offered on the building materials market is suitable.
Interbeam insulation
Floor height in the house
For interior work, installation of a suspension system is required. It is also worth starting from your personal feelings whether a material similar to glass wool will suit you in the room, and how it will fit into the format of the room. During external work, this factor can be ignored.
Complexity of work
Not every person will be able to insulate the ceiling in a private house without professional skills. This especially applies to suspended structures, which must be not only reliable, but also aesthetically attractive. And external insulation will require less effort and is much easier to do.
Budget planning
There are cases when the laying of floor slabs in a house is done crookedly. The most current way to hide this misunderstanding is to create a suspended ceiling, which will lead to additional costs. For external insulation, any material for a smaller amount is suitable, for example, polystyrene foam, expanded clay or other similar materials. Let's take a closer look at some of them.
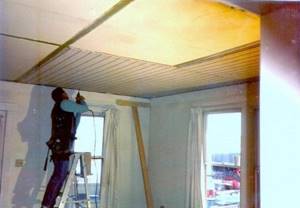
Installation of a panel ceiling in a private house
Panel ceiling is a universal design that is suitable for landscaping any type of premises. The name “panel” does not imply the installation of plastic or other panels, but the installation of pre-assembled boards from boards. Placed next to each other, they form the base of the finished ceiling. Such structures also have a second name: “panelboard”.
Before starting work, lumber is prepared. Each beam and board is inspected for rot, treated with an antiseptic and dried well. If there are cracks, they are covered with wood putty.
Panel ceilings are often rough and need to be finished. There is one requirement for such structures: the surface of the boards on the room side must be flat. Panels are assembled in any convenient place, but most often on floor beams during the construction of a house.
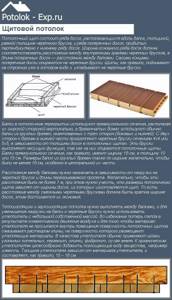
With this type of ceiling arrangement, rectangular beams are used as floor beams, to the underside of which cranial bars with a cross section of 4/4 cm or 4/5 cm are nailed. The thickness of the board should correspond to the size of one of the sides of the bar. Each panel is a row of boards, the length of which is equal to the distance between the cranial bars. At the top of the shield, thinner bars are nailed perpendicular to the direction of the boards. The bottom of the panel remains flat and smooth.
Each shield is placed in the openings between the beams so that it is supported by cranial bars. When viewed from above, such a ceiling consists of a series of cells, the recesses of which are filled with thermal insulation material. This can be expanded clay, mineral wool, polystyrene foam, sawdust.
Before laying the heat insulator, all the resulting “boxes” are covered with vapor barrier material so that the floor beams are also covered. In this case, the film sheets (membranes) are laid with an overlap of 10-15 cm.
If the ceiling is interfloor, boards are sewn on top of the beams to form a subfloor. If the ceiling is of the attic type, a backfill heat insulator is most often used and can be left open. The thickness of the backfill depends on how severe the climatic conditions of the region of residence are. Panel ceilings are built not only in private homes, but also in bathhouses, utility rooms, and country houses.
Slab type floors
This type of floors is used in the construction of multi-storey buildings, industrial and public buildings. As for private housing construction, slab elements are usually laid on sheds, garages and other similar buildings. They are difficult to install because they have significant mass.
But at the same time they have advantages that beams do not have, these are:
- fire resistance;
- durability;
- high mechanical strength.
Also, ceiling tiles allow you to obtain a smooth rough surface that practically does not require sanding. Of course, to do this, covering the ceiling with your own hands must be done exactly following the instructions.
To construct a slab base, hollow or solid products from different types of concrete (heavy and light) are used. In private construction, it is recommended to use hollow core slabs, since they not only have less weight, but also have better sound and heat insulation parameters.
Prefabricated floors are also divided into two types: bonded and welded. The tied ones have a frame made of reinforcing rods, which are tied at intersections with soft wire no more than 2 millimeters thick. Welded floors are made on the basis of welded reinforcement.
When creating a floor, a concrete slab is usually laid on a load-bearing wall. The thickness of the supporting surface should be at least 10-15 centimeters - only in this case will a high level of reliability of the foundation be ensured. The maximum span width for such a slab floor is 3 meters.
If it is necessary to make a span 6 meters wide, then a ribbed ceiling is made, consisting of slabs of a special shape. To create large openings, additional reinforcement is used using a transverse beam.
When creating a slab floor, embedded parts are mounted to the reinforcement frame of concrete slabs. They are needed so that later you can easily line the ceiling with clapboard.
Undoubtedly, concrete ceiling bases are much better than beam ones. But their disadvantage is that it is impossible to make ceilings with your own hands - you will have to resort to the services of specialists and lifting equipment.
Installation of floors
It often seems that it is almost impossible to build a ceiling with your own hands, but this is far from the case.
Floor beams must be placed on load-bearing walls. One step is carried out at a distance from one to zero point six meters, and the width of the structure must be at least one third of the span itself.
To begin with, a board or panel board is placed, on top of which a layer of sand is laid, providing good sound insulation. Only after this comes insulation and floorboards. The top flooring consists of two layers: cardboard is laid on top of twenty-millimeter boards.
Mineral wool, expanded clay, and so on are used as insulation.
There are situations when beams are located close to chimneys. In such cases, it is recommended to make a distance of about thirty-eight centimeters from them; if you can do more, do it, it won’t do any harm, but everything is within reason.
In a brick or stone house, where the span width reaches more than three meters, construction should be carried out with reinforced concrete beams.

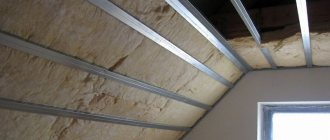
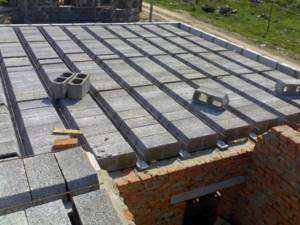
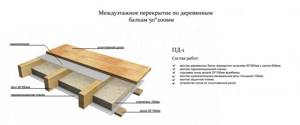
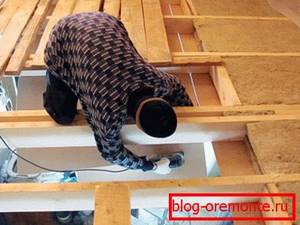
The process of insulating the interfloor ceiling using wooden beams
For this we chose corners with a shelf of 100 mm and a width of 90 mm. They decided to fasten all this equipment with self-tapping screws and special dowels for foam concrete.
To make your life easier, after it became clear where the holes were located, we made a template from a piece of unnecessary board.
Corners were attached only around the perimeter of the house. Due to the fact that the width of the house is 12 m, and the beams need to overhang by 30 cm on each side of the house, in order to cover the entire width of the house, three 6-meter beams are needed, which are bolted together. In the place where the porch is planned, overhangs were made about one and a half meters
We installed the beams with an overhang of a little more than 30 cm, so that later we could pull the thread and saw it off smoothly.
Pay attention to the left side of the house: according to the project, the kitchen is a full meter longer than the adjacent room and boiler room. Question: what should the beams be supported on? After all, the roof should cover the house completely. At our own peril and risk, we put these corners 70x70x5 (pictured below) 3.5 meters each - 2.5 meters lies on the wall and is pressed by beams, and the meter sticks out, and the two outer beams rest on it
For clarity, I am attaching a screenshot from a sketchup. The corner on it is depicted in blue
At our own peril and risk, we put these corners 70x70x5 (pictured below) 3.5 meters each - 2.5 meters lies on the wall and is pressed by beams, and the meter sticks out, and the two outer beams rest on it. For clarity, I am attaching a screenshot from a sketchup. The corner on it is depicted in blue.
Additionally, we strengthened these hanging beams as follows: in an area 3 meters from the corner of the future roof, we cut off not a 30 cm overhang, but a 25 cm one. Afterwards, we screwed a 3-meter piece of timber similar to the beams to the perpendicularly lying beams... (it’s green in the pictures) .
Phew... I hope I wrote it clearly)) Thus, we have an even more rigid structure, and those beams that rest on the corner also rest with their ends against the beam and are rigidly connected.
The picture shows that the beam runs along the edge of the kitchen, this is not scary, because according to the project there will be a veranda there.
Now let's move on to the other part of the house.
Since the pediment is planned to be wooden, it needs to be visually separated from the brick wall. To do this, it was decided to make a box that would be equal in height to the hemming box and recede from the wall by the same 30 cm from the house. Perpendicular to the main outer beam, we screwed beams of shorter length onto the perforated corners. We did the same with the outer beams (green in the picture).
This creates a plane that covers the house and corresponds to the edges of the future roof. At this point, the installation of the beams was completed.
Next we started making the rafter system
When building a house, many people prefer to use wooden beams or joists instead of reinforced concrete interfloor slabs.
This is completely justified. After all, wooden floors with joists are much lighter than reinforced concrete ones, and with low bearing capacity of the soil, it becomes possible to build less massive foundations.
Many people ask the question “How to calculate floor beams?”, “What cross-section should the beam have?”, “At what distance should they be installed?”
In this article, we will try to answer these questions, and also tell you how a wooden floor is constructed using beams, how they should be properly fixed in the wall, and we will provide a table from which you can easily calculate floor beams.
Let's start with the main load-bearing element - floor beams. As a rule, the beam is a wooden beam, with a height of 100 mm to 300 mm and a thickness of 75-200 mm. It is laid in increments of 60 to 100 cm. The section of the beam is selected individually in each individual case and depends on the length of the span and possible loads. A table will be presented below for calculating wooden floor beams.
In addition to timber, for wooden floor beams you can use boards nailed together and placed on edge. The most economical option would be to use logs hewn on three sides as beams.
Reinforced concrete floors
Products of this type may be:
- Prefabricated hollow-core concrete slabs. They are manufactured in a factory, so standard models with a width of 1.0, 1.2 and 1.5 meters are available. The thickness of the products is 220 mm. The length can be from 2.4 to 9.0 meters. Plates of this type are heavy. One “square” of such a slab will weigh at least 300 kg. Therefore, you need to understand that the supporting structures must support their weight. In addition, you will have to free up space near the house, since the products are delivered and then installed using a truck crane.
- Monolithic reinforced concrete slabs. They are flat or ribbed. For their installation, formwork must be built and reinforcement performed. The thickness of monolithic slabs is slightly less - 200 mm. They are also only suitable for spans less than 4.5 m. But despite the smaller thickness, one “square” of such a slab will weigh more - 480 kg. If you want to use lightweight structures, then you should choose ribbed slabs. But in this case it will be necessary to perform more complex formwork.
- Combined floors, which are called prefabricated monolithic. The design of such products may vary. But most often, builders use the option when they use load-bearing monolithic beams made of rolled profiles.
Installation of fittings
To enhance the strength of the poured monolith, it must be reinforced
To enhance the strength of the poured monolith, it must be reinforced. You will have to tie two meshes of steel rods with a cross section of 10-12 mm. The meshes are knitted with cells of 20x20 cm. It is worth considering that, most likely, the length of one whole rod may not be enough to cover the length of the mesh. And therefore you will have to sharpen the reinforcement. Here the rods are joined with a viscous tie with an overlap of 40 cm.
- The tied reinforcement (two meshes) are connected to each other by longitudinal rods so that the mesh is covered with mortar by 2-3 cm from the lower and upper edges of the concrete.
- The reinforcement is installed on supports special for this purpose.
- It is also worth remembering that the mesh rods should extend onto the walls of the house by 15 cm (for brickwork) and 25 cm (for masonry made of foam and aerated concrete).
- The end ends of the rods should not touch the walls of the vertical formwork.
- And in order to calculate the distance between two grids, it is necessary to subtract from the total height of the slab the distances from the top and bottom edges (20 cm + 20 cm = 40 cm), as well as 4 thicknesses of the rod used.
- Longitudinal fasteners between the meshes are knitted in increments of 1 m and only in a checkerboard pattern.
- It is also worth installing end clamps. They are mounted on the ends of the mesh in increments of 40 cm to enhance the supporting ability of the slab on the walls of the house.
- Additionally, a connector is installed for both grids. It allows you to evenly distribute the load on the slab throughout its thickness. The connector is attached in increments of 40 cm in places where the slab rests on the wall, and at a distance of 70 cm from the walls of the house in increments of 20 cm.
Interfloor ceiling in a silicate brick house
I have a building, a former warehouse for a construction organization, made of white sand-lime brick, the walls are one and a half bricks, the height is 6 meters, the ceiling is twelve-meter floor slabs.
In one part I want to make a living space on two floors. It turns out that the size of this room is 6 meters high, 5.6 meters wide and 12 meters long, three walls (5.6x5.6x12) one and a half bricks long, and the fourth partition 12 meters long, half a brick (made of red brick). I want to add a wall of one brick to a half-brick partition and tie them together with anchors for reinforcement (am I right?). And I want to know what should I use for the interfloor floor beams, which will be 5.6 meters: timber or iron I-beams, what size and what is the required span between them?
Alexey, Novosibirsk.
Hello, Alexey from Novosibirsk!
A very unique design of your future symbiotic building, combining housing and industrial and utility premises. However, recently such complexes are becoming more and more common in our country. And they are quite viable due to convenience. Unless, of course, you install a forging hammer or a multi-ton press, which with their work can make the vibration of the walls prohibitive, even to the point of their destruction. /I say this because I have encountered such problems./
Reinforcing walls with anchors is a completely reasonable solution. In addition, a masonry mesh should be installed in the brickwork. It is laid in several rows to increase the strength and stability of the walls, especially when they are large in length and height.
Regarding the use of floor beams. They are made both from wooden beams of sufficient cross-section, and from channels and I-beams. That is, you have complete freedom of choice.
In the materials on my website I already provided a table of sections of wooden beams for different spans of buildings. You can look in more detail if you wish.
For your span, it should be about 25/18 centimeters (installed on edge) with a distance between beams of a meter. Or approximately 20/15 with distances between beams of 0.6 meters.
It is allowed to make beams assembled from edged boards of the appropriate section with through fastening with nails or studs with a distance between fasteners of no more than 1 meter.
If you use an I-beam, it is advisable not lower than No. 14 with a step of one meter. I’m speaking purely intuitively, since calculating according to SNiP (11-23-81) is quite a long task.
This is quite enough for a living space (the load per square meter is no more than 400 kilograms).
In this case, metal plates with a thickness of at least 5 millimeters and an area of about 0.05 square meters are used as supports for the extreme points of the beams. meters or reinforced concrete lintels. With appropriate treatment and waterproofing.
The wood is impregnated with antiseptics a couple of times, and the laying areas are wrapped with roofing felt.
The metal is primed, waterproofing is also applied, and can be treated with bitumen mastic.
The ends of the beams are inserted into the walls to a depth of at least 15 centimeters.
If you want more qualified calculations, then go to a design workshop (there are a whole bunch of them in Novosibirsk and they will charge no more than a few tens of thousands of rubles for the work).
Construction in Moscow and Moscow region
Wide range of construction services. Foundation, walls, ceilings, roofing, turnkey!
Other questions on the topic of gender:
Construction in Moscow and Moscow region
Wide range of construction services. Foundation, walls, ceilings, roofing, turnkey!
Construction in Moscow and Moscow region
Wide range of construction services. Foundation, walls, ceilings, roofing, turnkey!
Construction in Moscow and Moscow region
Wide range of construction services. Foundation, walls, ceilings, roofing, turnkey!

Semenych (author of materials)
Our site is regularly updated with interesting and unique materials and articles on the topics of lumber, building materials and works, the author's opinion and knowledge of a real coven with more than 15 years of experience are provided. There is a section - funny stories of shabashniks. If you would like to receive information about this, subscribe to our website's newsletter. We guarantee that your address will not be shared with third parties.
Apartment renovation in Moscow and Moscow region
Wide range of repair work. Professional craftsmen.
Monolithic floors
Unlike prefabricated reinforced concrete slabs, monolithic floors do not have seams and do not require the use of lifting equipment. Monolithic floors in houses without a basement are usually interfloor, since it is not practical to cast the floor itself - it is more logical to either build a slab foundation, immediately obtaining a subfloor, or to pour the floors over the ground during the process of finishing the house.
Monolithic type ceiling - a solid reinforced concrete slab, supported by load-bearing walls and partitions; if necessary, support columns are also cast or laid out. All characteristics of the monolith are calculated during the design process of the house. The thickness of the floor is determined based on the size of the largest span (typical ratio 1:30), but not less than 15 cm. For spans up to 6 meters in length, the average thickness is about 20 cm; if it is necessary to fill a floor with spans larger than this value, reinforcement with stiffeners will be required. Pouring the slab is carried out in several stages.
- Preparation - assembling formwork from panels and supports, homemade formwork is usually made of thick (from 20 mm) moisture-resistant plywood, but it can also be plastic or metal. If a suspended ceiling is not planned, in which a flat plane is not necessary, the surface of the boards should be smooth. Supports can be specialized (metal, telescopic) or homemade (logs, beams with supports). Homemade formwork is assembled using hardware and timber; ready-made collapsible structures have factory fastenings. To seal homemade formwork, it is covered with thick plastic film; the prefabricated form is airtight, but to simplify the removal of formwork it must be lubricated. The assembled form is checked for compliance with the level so that it does not warp.
- Reinforcement - a spatial reinforcement frame is knitted from steel reinforcement, the diameter and mesh cell are calculated during design. To knit the reinforcement, use wire 1.2-1.5 mm thick; rigid fixation (welding) is unacceptable. To maintain the protective layer when pouring, the frame is installed on special clamps. During the assembly of the reinforcement frame, mortgages for communications are also installed.
- Pouring - the use of self-mixing mortar for concreting a monolith is rare; it is a necessary measure if it is not possible to order a ready-made mortar. Basically, the slab is filled with factory-made mortar (from M200), in one go, using a concrete pump: the mass is evenly distributed over the entire area and compacted with a vibrator.
- Caring for the slab - until the monolith reaches brand strength, it is cared for like other concrete surfaces, with the difference that instead of abundant watering, wetting.
Installation of wooden floors
In private buildings, a ceiling made using wooden beams is much more often used. Wooden beams are used for flooring in a private house due to the fact that it has a number of advantages:
- such a ceiling does not weigh down the structure,
- there is no need to use special techniques,
- is durable and environmentally friendly,
- the price of the material is moderate.
The only significant drawback of wooden beam floors is the limitation of the span width when overlapping, to a maximum of 6 meters.

Note! When using a chimney in a private house, the beams are installed so that there is no intersection with the pipe flow; a distance of 40 cm must be maintained.
Deciduous and coniferous tree varieties are used in the manufacture of beams. The wood must be sufficiently dried and checked for rot or cracks. Rejected beams cannot be used during construction.
Installation procedure
Due to the fact that wooden interfloor ceilings do not have a huge mass, they allow you to save on the construction of a foundation with increased capacity.
To correctly complete the ceiling, you need to study all the nuances of this process, perhaps watch a video.
If the work is carried out correctly, it is possible to ensure high levels of structural strength and comfortable conditions for heat and sound insulation.
Requirements for the ceiling
Regardless of the material from which the ceiling is made, it must meet a number of requirements:
The ceiling must have a load-bearing capacity corresponding to the design operating loads
- The rigidity of the ceiling must be sufficient so that when exposed to loads at the upper limit of the load-bearing capacity, deflection and deformation of the ceiling do not occur.
- An important factor is also the heat and sound insulation characteristics of the ceiling. Thermal insulation is especially important in cases where there is an unheated attic above the ceiling or no room at all. But sound insulation is more relevant for interfloor ceilings.
- Among other things, the ceiling must provide a high level of safety, and first of all, be fire resistant.
General information
Types of floors
All wooden floors can be divided into several types according to their purpose and the type of material from which they are made. According to their purpose, they are attic, interfloor, basement and basement. Depending on the type of material, beams are made of laminated and solid wood. The span between floors must be reliable and durable, so vapor barrier and soundproofing fillers are placed between the floor and ceilings in the internal volume. The ceiling part must be covered with the required materials, and the floor must be laid on top.
The attic floor can be installed as a roof element, and then it will be part of the rafter system. It can be set as an independent element. To retain heat, be sure to use layers with thermal insulation and vapor barrier. The ceiling of the basement and basement must be very durable and able to withstand heavy loads. Such spans are also insulated and layers of vapor barrier material are laid so that the cold does not penetrate from the basement into the house.
Beams differ in types, each of which has its own advantages and disadvantages. In order to make solid beams, hardwood is used. A big drawback is solid wooden beams, since they have a length limitation of no more than 5 meters. Beams made of laminated wood perfectly combine aesthetics and high strength. Their use helps to significantly increase the maximum length, which can be up to 20 meters and is ideal for covering large spans. Considering that this material looks very beautiful, it is often not covered with a ceiling, and it is a design element.
Advantages
There are several significant advantages, which include:
- Easy to install.
- Ability to cover large spans.
- Light weight.
- Long service life.
- High level of fire safety.
- The material cannot be deformed.
The overlap between floors with beams is made of a material with a rectangular cross-section, which is typical for a board or timber, or a round one is used, which is made from a log.
Requirements for floor beams
The installation of timber beam floors may entail a number of special requirements that must be taken into account.
They consist of the following:
- Beam products must be made of coniferous wood, since they have a high margin of safety. In this case, the wood moisture content should be no more than 14%, since otherwise the logs under load will have a large deflection.
- It is prohibited to use wood that has been subject to disease, fungus, or has been damaged by insects to create floor beams.
- Before installation, elements for creating beams should be treated with antiseptics.
- To prevent the floor or ceiling from sagging due to load in the future, a construction lift should be made. To do this, the ceiling of the lower floor must have a slight rise - this will not disturb you; on the contrary, under load everything will level out and be in the desired position.
- If you plan to lay beams with great frequency, then instead of them you can use boards, which must be installed on the ribs.
Calculation procedure
Before you begin installing a wooden floor with beams, you should perform some calculations, thanks to which you will know the size and number of beams.
To do this you will need:
- Determine the length of the span on which the installation will be carried out.
- Make calculations for the expected load that will occur after installation.
- With the specified data, you can perform calculations for the section of beams and installation pitch. To do this, use special online calculators or tables.
The length of the beams will be the sum of data such as the length of the span that should be covered and the stock of beams that will be installed in the wall itself. You can find out the span using any measuring instruments, and the supply of beams that will be installed in the wall directly depends on the material from which the wall is made.
Important! If the building is brick, then the margin of beams should be at least 10 cm for beams made of boards and at least 15 cm for beams made of beams. Wooden buildings must have special grooves, the depth of which must be at least 7 cm and even more for laying beams. If the beams will serve as the basis for the roof, then they are made 5 cm longer than the span.
The most popular span option, which is covered with beams, is from 250 to 400 cm. But keep in mind that the longest permissible length of beams made of boards or timber cannot be more than 600 cm. If the span length is greater than the permissible size, we recommend make beams from laminated timber. In addition, to cover a span of more than 600 cm, you can install a special wooden truss. The load that goes on a wooden beam generally consists of the weight of the span parts (internal filling, beams, floor and ceiling cladding) and the weight of temporary elements (household appliances, furniture, people present in the room).
Timber laying algorithm
During the construction of walls intended for laying timber, they are covered with their own hands in several layers of roofing material. 1 day before laying, the timber is treated with a fire retardant solution to protect it from fire.
The ends of the wooden beams are wrapped in waterproofing material and placed in niches. The distance from the ends of the beam to the walls of the niche must remain at least 4 cm. This device is filled with foam plastic or mineral wool.
Do-it-yourself ceilings in a timber house
If the wall is brick and the thickness of the wall is less than two bricks, the space is filled with cement mortar. Every third beam is fixed with an anchor protruding from the wall by 20 cm, laid during the construction of the wall. First, a device for an anchor corresponding to the diameter and depth is drilled into the beam with your own hands.
The beams are laid from the walls to the center, checking the evenness of the laying with a level. Having discovered an unevenness, it is eliminated using tarred boards adjusted to the width. It is forbidden to cut the timber or place it under wood chips, as this will lose the strength of the structure.
Note
The outer beams are never placed close to the wall, leaving at least 10 cm. The beam is never installed directly next to the chimney pipe.
Recommendations for selection
It is worth paying attention to a few more points. If the ceiling is planned to be installed between a cold basement and the first floor, then it is better to choose reinforced concrete structures. If the basement is not heated, this will lead to a large temperature difference (the living space will be guaranteed warmer). This means that a lot of moisture will form, which the wood cannot cope with.
But between the top floor and the attic, on the contrary, it is recommended to install wooden floors. They will not create additional load on the entire building. In addition, the attic is not a living space; residents do not climb into it very often.
If it is not possible to organize an access area, then there is no choice; you will have to work only with wood. Or pay the workers even more and come up with an option with a winch.
It is necessary to take into account the characteristics of the soil on the site where the house is being built. If the soil contains soils with very weak bearing capacity, then it is better that the floors are not so heavy. This means you need to choose wood and generally abandon the construction of a multi-story building made of brick or concrete and the construction of a monolithic foundation.
Every person who has ever encountered the construction of buildings or structures with their own hands knows that one of the most difficult elements is the ceiling.
You can do without a foundation when building a house, a bathhouse, or a gazebo without impenetrable walls, but the construction of the ceiling must always be of high quality.
The ceiling is divided into three types - slabs, monolith and wood. Each of them has its own advantages and disadvantages, and the installation process varies greatly.
Styrofoam
Foam plastic has become one of the most common materials for thermal insulation. It has earned its place in the top three thanks to its very attractive price.
The use of this insulation in an individual home provides the following advantages: high degree of protection; resistance to rotting and the occurrence of mold and mildew; low degree of water absorption; ease of installation and no need for complex tools and protective equipment; the low weight of the material does not allow excessive load on structures and allows carry out insulation from below. The material is suitable for insulating the ceiling of the upper floor due to its low vapor permeability. Disadvantages include low strength and the risk of falling apart into individual balls when simultaneously exposed to moisture and low temperatures. In addition, polystyrene foam is a flammable material, which is not very desirable when constructing a wooden building. More information about working with this type of material can be found in the article “Floor insulation with foam plastic.”
Slab floors
Such ceilings are practically not used for private houses due to the large weight of the material. The slabs are mainly used in the construction of large high-rise buildings or industrial buildings.
Sometimes tiled ceilings are used in the construction of brick private houses. It is distinguished by a number of significant positive qualities: long service life, the ability to achieve a perfectly even coating, structural strength and fire resistance.
Various types of slabs are used: hollow or solid. Hollow-core products, which have less weight and increase the level of sound and heat insulation, are more often used in the construction of ceilings for private houses.
The slab floor can be monolithic or prefabricated. Prefabricated slabs differ in the method of connection: some are connected using wire, others - welded - are connected by welding.
The disadvantage of using solid panels is their significant dimensions and weight. Their installation requires the help of special equipment.
Note! Such slabs have a certain size, and it is necessary to build a room for it, or order individual production of slabs of the required size.
Ways to strengthen floors
There are two ways to increase the load-bearing capacity of interfloor beams: by strengthening them or by unloading them.
Beam reinforcement
There are several ways to strengthen the floor beams of the second floor.
Increasing the cross-section with wooden overlays.
The most effective solution would be to increase the cross-section of the beams along the lower horizontal plane with the obligatory condition of creating support for the linings. To do this, you need to either deepen the support sockets in the load-bearing walls, or use special steel fasteners or corners. Boards of the calculated thickness are nailed to the bottom edge of the beam along its entire length.
Galvanized steel support angleSource i.ytimg.com
With a slight deflection, it is possible to increase the section by installing 50 mm thick side plates on the beam. Before this, a support is installed under the point of its maximum deflection and raised with a jack until the beam is level. Then fix it in this position by installing boards on both sides and tightening them with pins.
Side reinforcementSource i.ibb.co
Beam floor
Beam processing
This type of flooring is very popular in individual construction. When building your house, study well the method of constructing wooden beams.
Wooden beams resting on the load-bearing walls of the building form the basis of the beam floor.
Calculate their cross-section depending on the length of the step between them and the distance between the load-bearing walls, overlapped by the beams and, of course, on the expected load on the ceiling. Supporting beams on a wooden purlin
Take the choice of wood for beams seriously.
When building a ceiling, remember that beams can be made from different types of trees. The main thing is that they are well dried for 100 days. This largely determines their quality. Before starting floor construction work, check the beams. Check to see if there is rot, cracks or other damage to the wood. Do not use rejected beams in construction. Diagram of the opening in the ceiling
- Place the beams on the walls and level them flat. Do this using tarred board pads of varying thicknesses. Never use wedges made from untreated wood for this job.
- To strengthen the joints of beams on interior walls, secure them with metal brackets and clamps. Instead, you can use wooden overlays made from boards at least 40 mm thick.
- According to fire safety rules, floor beams cannot be placed closer than 400 mm to the chimney.
- Be sure to treat the ends of beams that are embedded in load-bearing walls with an antiseptic, tar them and wrap them in roofing material. These measures will protect wooden beams from the occurrence and development of rot.
- To impart rigidity to the ceiling, fasten every second beam to a metal fastener embedded in the masonry.
- To make a rough ceiling, prepare skull blocks, then secure them to the side edges of the beams. Attach the material of your choice to the bars, forming a rough ceiling.
Video description
How reinforcement is performed with a steel channel is shown in the video:
Carbon fiber reinforcement.
A canvas made of this modern composite material, glued in several layers, allows you to very efficiently solve the problem of how to strengthen a wooden floor beam. The carbon fiber is glued with epoxy glue, covering the joints of the strips with transverse layers. After the glue hardens, it turns into a strong and rigid frame, almost as good as metal and perfectly resistant to loads.
The advantage of this method is its ease of installation and the absence of the need for installation tools.
Carbon fiber is used to strengthen a wide variety of structuresSource u10.filesonload.ru
Prosthetics with steel reinforcement.
This method is more suitable for cases where the ends of the beams are damaged, which often occurs when they are poorly waterproofed in the support sockets. They are replaced with prostheses made from paired trusses made of steel reinforcement with a cross-section of at least 10 mm.
Before strengthening the ceiling in a house with wooden floors, a temporary support is installed under the damaged beam and the floors are dismantled from the bottom and top 1.5 meters from the wall.
The rotted end is cut off, and the prosthesis is inserted vertically into the opening. Then it is unfolded, placed in a horizontal position and pushed onto the beam, after which the free end is pushed into the support socket in the wall. The prosthesis is secured to the beam with nails.
Installation diagram of a steel prosthesisSource i.ibb.co
Load redistribution
You can reduce the load on load-bearing joists by installing supports under them or by installing additional beams under the ceiling.
Installation of intermediate supports or struts.
With this method, the load is partially transferred through the supports to the underlying floors or side walls, so you must first make sure that they can withstand it. It is rarely used to strengthen the floors of the second floor, since the racks and struts are difficult to fit into the interior of the first floor, and they also create inconvenience for movement around the room. But this is the best solution to strengthen the floor joists from sagging in a wooden house.
Columns made of blocks or concrete act as supports for the logs. Source 3.bp.blogspot.com
Installation of additional beams.
The larger the lags on which the ceiling lies, the less load falls on each of them. By installing additional beams of a suitable cross-section between the existing ones, you can not only remove excess load from them, but also increase the total weight of the floor. Which consists of the weight of insulation, floor and ceiling coverings, furniture, equipment and people on the floor.
Floor joists and floor beams between floors may not be reliable enough due to mistakes made during the construction of the house, as well as due to aging of wood, its deterioration, and increased load on supporting structures. They begin to sag, which over time can lead to the collapse of the ceilings. In such cases, it is urgent to decide how to strengthen the floor in a wooden house. To do this, different methods are used: they strengthen the beams with wooden and metal plates, reinforce them with carbon fiber, install steel trusses and vertical supports, or increase the number of logs. Which one to choose is decided individually, depending on the labor intensity of the method, its cost, and the need to dismantle the interior decoration.
Beam system: nuances and construction process
If you are building your own “nest”, then it is certainly better to choose wooden ceilings; this is the best option for a private home.
What is such a system? This is a series of equally spaced beams, on which infill elements are in turn laid. Beams can be metal, wood, or even reinforced concrete.
Of course, a wooden ceiling in a timber house is the most reliable tandem, meanwhile, even with such “family” relationships there are limitations, namely:
- timber can be used if the width of the interfloor span does not exceed 5 meters, and the attic – 6 (in other cases it is better to use metal beams);
- for covering it is better to choose coniferous and deciduous wood;
- Only dried wood is allowed to be used (the minimum period for such a procedure is 3 months);
- material on which cracks, rot and other defects have been identified is not suitable for work.
Pay attention to the processing of the ends of the beams
Features of the work
What is needed to make a ceiling in a wooden house? Get acquainted with the list, calculate the quantity and go shopping at a hardware store.
So here's your list:
- beams;
- antiseptic;
- polyurethane foam;
- solution;
- roofing felt;
- insulation;
- tools;
- work uniform.
This is what a beam ceiling looks like.
First of all, you should treat the wood with an antiseptic in order to avoid fungal damage to the material. If the beams rest against a wall made of stone/concrete, then their ends need to be wrapped with roofing material (possibly in several layers). Please note that the ends of the beams must be beveled, and “sockets” filled with polyurethane foam must be prepared on the wall.
The elements are stacked and aligned. Sometimes it is necessary to place boards of suitable thickness under the ends of the beams. Every second beam should be attached to the load-bearing wall using steel brackets. The distance from the wooden elements to the chimney must exceed 35 cm.
Insulation of the ceiling is one of the important stages of work. A lot of materials are suitable for these purposes, for example, expanded clay, polystyrene foam, mineral wool, straw, sawdust and even sand. If your budget allows, then it is certainly better to give preference to mineral wool, which is durable in use, easy to transport, and, unlike foam, can “breathe.”
The thermal insulation layer is laid on a fixed roll. First, a layer of roofing material is laid, and then the insulation itself. If the overlap is between floors, then the thickness of the layer should be 10 cm; when installing a partition between a living room and an unheated room, the thickness should be doubled.
Glued laminated timber
To increase the strength or size of solid beams, they are fastened together manually during installation of the floors. For the same purposes, laminated veneer lumber manufactured at enterprises is used. It consists of several bars connected to each other. The thickness of an individual element is regulated by the number of products glued together. Glued laminated timber is produced at the factory by pressing, its length reaches 12 m.
Finished products retain the characteristics of solid lumber and can be nailed without loss of strength or cut into pieces of the required size. The only drawback of such structures is their high cost. It is necessary to carefully calculate everything before installing the first floor ceiling on wooden beams.
Note! Glued laminated timber is often used in construction for the installation of arched ceilings.
What kind of wood is best to choose for wooden floors and how to lay the beams correctly?
In relation to our topic, these words would sound like this: no floor, no ceiling. And indeed, rooms without ceilings would have neither one nor the other. But the main thing is that this structural element connects the enclosing walls of the building with each other and is to a large extent responsible for its reliability
One of the types of floors is wooden beams (there are also monolithic, prefabricated, coffered, etc.). They are built both in timber, log and frame houses, and in those built from brick or concrete blocks. First, let's figure out what characteristics the floors should have.
In the first place, of course, is strength,
because in addition to their own weight, the floors bear loads from furnishings and people in the room. In accordance with the requirements of SNiP 2.01.07-85, they must be designed for a uniformly distributed load of at least 150 kgf/m² (when designing, its value for interfloor ceilings is usually slightly overestimated, and for attic floors, on the contrary, underestimated). If you plan to install, for example, a boiler, a billiard table or a piano in a room, then the concentrated loads they exert must be taken into account in engineering calculations.
The second important characteristic is rigidity,
that is, resistance to deflection under loads: no more than 1/200 or 1/250 of the span for attic and interfloor floors, respectively. In addition, the structure must be stable and not “react” to people walking, rearranging furniture, etc.
Floors are also assigned tasks such as protection
from the transmission of airborne and impact noise from one room to another; preventing heat leakage from a heated room to a cold room (attic, basement) when the temperature difference in them is ≤10°C; as well as creating obstacles to the spread of fire in the building.
Pros and cons of wooden floors
The undoubted advantages of such structures are ease, speed of construction and relatively low cost. Well, the disadvantages are typical for wood. Firstly, beams are sensitive to changes in temperature and humidity conditions, which can lead to their deformation. Secondly, the tree is susceptible to various biological damage (rot, fungus, etc.). For this reason, for the manufacture of beams, you should use well-dried material with a moisture content of no more than 8–12%, which must be treated with special antiseptic preparations, which will significantly extend the service life of structures. In addition, an effective measure to prevent premature damage to wood is to maintain a constant level of temperature and humidity in the house.
Metal ceiling
When constructing a ceiling using metal beams, low heat and sound insulation, as well as the possibility of corrosive changes at high air humidity, should be taken into account.
The advantages of such an overlap are the high strength and durability of the structure, and the ability to overlap over a larger span area.
For the ceiling you will need:
- metal beams,
- reinforced concrete slabs, lightweight concrete or wood,
- plaster mesh,
- waterproofing material,
- plaster,
- plank flooring.
Advantages and disadvantages
The wooden blocks that are used for flooring have their strengths and weaknesses.
The main advantages of beams made from boards are:
- minimal weight of structural elements, which reduces the load on the load-bearing walls and foundation of the building;
- beautiful appearance;
- the possibility of installing a plank floor without additional preparation;
- high speed of installation work without the help of lifting mechanisms;
- It is possible to repair the ceiling during the operation of a residential building.
The disadvantages of wooden structural elements include:
- the need to impregnate wood with antiseptics and fire retardants; such solutions prevent rotting and combustion of the material;
- lower strength indicators compared to metal or reinforced concrete products;
- deformation and shrinkage of the structure as a result of sudden temperature changes or under the influence of high humidity.
Note! The installation of a wooden floor is possible on enclosing structures made of aerated concrete, brick or on walls made of any other material.
Strengthening methods
Using steel plates you can strengthen beams
Steel auxiliary materials
Steel plates fixed on different sides of the beam will help strengthen wooden beams. Steel tools must be treated with a solution that prevents corrosion, otherwise they will not last long.
Carbon fiber
The material, also called carbon fiber, is a modern technology in the construction world and is actively used during beam ceiling reconstructions. It comes in the form of plates, ribbons or threads.
This plastic material is applied in several layers to a wood surface, ensuring ease of work and reliable quality, which makes it quite popular.
Prostheses made of wood or metal in the end areas
Due to variable temperatures, beams in the area of the load-bearing wall are significantly weakened. It is necessary to make the main timber beam stronger to prevent negative consequences in the future, as well as to avoid repeated reconstruction in the near future.
To do this, additional prostheses made of metal or wood are attached to the edges of the wooden base, which are placed in the brick recess of the wall, thereby providing reliable protection for the central beam.
Installation of prostheses for a rotten floor beam
Supports for load-bearing beams
This method involves placing additional support structures under the load-bearing ceiling beams to distribute the load evenly.
Additional beams
If the work is completed, but the weight is distributed incorrectly, then the finished structure must be covered with additional beams that will take on the excess weight.
It is important to remember to protect additional elements of the structure, for example, to protect fresh ends with roofing material.
It is quite possible to bring ceilings to life with your own hands, but to do this you need to familiarize yourself with the necessary information in order to minimize unpleasant moments during work, as well as build a high-quality model that will last for many years.
Choosing the type of floor for a one-story house
The type of floor depends on its location in the structural scheme and the type of building. For a one-story house with floors on the ground, only attic floors are made. If there is a basement or attic in such a building, interfloor ceilings are made that carry a large load.
Often, when constructing one-story country houses, a system of wooden beams and flooring is used to cover the attic and basement spans. In more permanent structures, as a rule, floors for a one-story house are made of monolithic or precast reinforced concrete.
Each type of floor is suitable for a certain type of structure. Wooden structures are the most inexpensive and least labor-intensive. They can be used for any type of vertical separation exclusively in wooden houses and small cottages.
Monolithic reinforced concrete can be used in almost all buildings, except wooden ones. Such floors are stronger, fire-resistant and durable than wooden structures. But they are also more expensive. Their installation requires significantly more labor. In one-story houses, this technology is used to install basement and attic floors.
The easiest to implement, but also the most expensive type of flooring is prefabricated reinforced concrete slabs. In addition, they cannot be used in wooden buildings and buildings with a load-bearing structure thickness of less than 200 mm. They are used in one-story construction mainly for basement and attic floors.
Building a house with your own hands is always a very labor-intensive and difficult process. One of the important points is the correct choice of ceiling. There are several options for how to make a ceiling in a private home. It is necessary to take into account all the features of different types of structures.
How to complete the work
Calculations
Accurate calculations for the load-bearing capacity of beams are usually performed by special organizations with sufficient experience. When performing calculations independently, the following system is used :
- An attic floor with a lining, the insulation of which is mineral wool, has a constant load of 50 kg/m2. According to SNiP standards, with such a load the standard will be 70 kg/m2 if the safety factor is 1.3. So, it’s easy to find out the total load - 1.3*70+50=130 kg/m2.
- If you are making calculations for an attic room, then you should take into account the weight of the material from which the floor is made and the objects that are in this room. In this case, the load will be 350 kg/m2.
- If wooden floor beams play the role of interfloor spans, then the load value will be equal to 400 kg/m2.
Determining the pitch and section of beams
When data on the length and load of the beams is known, the installation pitch and section size/diameter can be determined.
Please note that the indicators are interrelated and can be calculated according to established rules:
- The height and width of the beams should have a proportion of 1.4:1. Please note that the width of the beams should be from 4 to 20 cm, and the height from 10 to 30 cm (this is based on insulation material). Logs for flooring must have a diameter of 11 to 30 cm.
- The installation step must necessarily have a limit of 0.3 to 1.2 meters (taking into account the material for insulation and the material for filing). If the house is frame, then the step must be the same as between the frames.
- You can determine the cross-section of wooden beams using special tables or programs. When calculating the section, it should be taken into account that the maximum permissible bending of beams in the attic is 1 from 200, and for interfloor beams 1 from 350.
Installation of a monolithic slab
Monolithic ceilings are the most durable, but also the most expensive and labor-intensive.
It is also not suitable for all building structures. This option is the most expensive, its device is not suitable everywhere, but it is one of the most durable, even for those cases when other floors simply cannot withstand. The only caveat is that it can only be poured in low-rise construction, since the house can turn out “golden”, and the load on the foundation is unbearably huge; for example, for a bathhouse this ceiling will be completely useless. Installing such a partition takes about 40 days in total and consists of 7 steps:
Installation of monolithic slabs takes up to 40 days. And their load on the foundation is enormous.
- Creating a drawing of the future ceiling and preparing the scene for work (cleaning, viewing the weather forecast for precipitation for the week ahead). You should definitely pay attention to the construction of load-bearing walls.
- Creation of formwork. The formwork is assembled at the level where it will be installed and its calculation is carried out along the perimeter of the external walls. Its preferred height is 30 cm, so that the floors are sufficiently dense and reliable.
- Immediately after installing the formwork, care should be taken to ensure its reliability. For this very reason, from below the first floor it is supported by wooden logs at the rate of 1 piece per 1 sq.m, as well as metal spacers that you can make with your own hands, at the rate of 1 piece per 2 sq.m.
- Once the supporting system is installed, it can be tested. To do this, you should climb into the formwork and walk there a little. If all is well, then the floor is covered with an even layer of roofing felt for waterproofing, and then pressed down with something just in case, for example, remnants of timber.
- Creation of reinforcement. The lathing follows the criss-cross principle in half-meter increments. The first level is located at a height of 23-28 mm above the level of the formwork, the second - 23-28 mm below the upper level of the future slab. To hold it suspended, improvised brackets are used, which you can make with your own hands from the same reinforcing rod. All connections are rewound with soft wire, but as tightly as possible. After completion, you should check the reinforcement for mobility and, if after a good physical impact everything remains tight, then the work is done correctly.
- The solution is poured using automixers, which can be ordered in every city. This is the only stage when you should not try to do everything yourself, because it will take a lot of effort and time, and then it will not give the desired result. You shouldn’t pour it all at once, but plow each layer with a shovel to avoid air getting in. The lowest level should be plowed as carefully as possible so as not to damage the roofing felt. Another nuance that should be taken into account is that it is necessary to pour in different directions if possible, but not at one point. The reason for this is the enormous load on the supporting system, which is created during the fall of the solution.
- After pouring, cover everything with plastic wrap and let the solution sit for a month. A month later, the wooden beams and metal struts are removed, the formwork is torn off with a crowbar and you can begin building the next floor, or simply mothball the construction site.