The growth in private housing construction indicates an increase in the well-being of our compatriots. The younger generation finds it hard to believe that not so long ago they had to wait 30–40 years for housing, and the outcome of the wait was still unknown. Even those who had the opportunity to immediately pay for cooperative housing had to sign up as members of these communities due to great connections; the volume of such construction was miniscule. This is for those who idealize the times of the USSR too much, but did not live then.
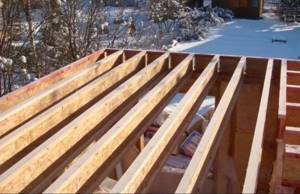
Second floor floor on wooden beams
Today the situation has changed dramatically, a large number of our compatriots can buy ready-made apartments in high-rise buildings, and those who do not want to breathe in the city smog are being built outside the city. The building materials and technologies existing on the market make it possible to create unique projects that architects could not even dream of before. But not all developers have enough knowledge to choose the right option for arranging floors along beams on the second floor. Let's try to figure it out.
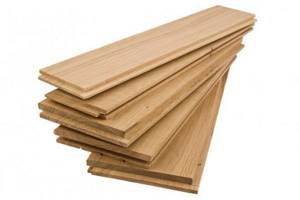
The most popular material in private construction is wood, due to its affordable cost and ease of processing.
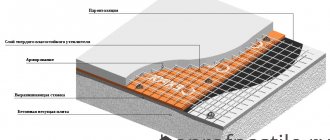
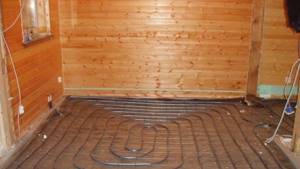
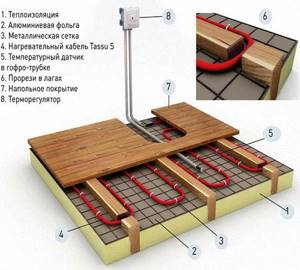
Installation of wooden floors with electric heating
Electric underfloor heating in a house can be installed in two ways:
- install heating mats;
- Place a heating cable on the floor.
In the first case, you can do the work yourself; installing a heated floor is easier and faster.
The floor rises no more than 3 mm. This means it is ideal for rooms with low ceilings. However, such a heated floor system is characterized by low power, so it is used only as an additional source of heat. When laying the heating cable, the floors are raised by more than 30 mm. It is not recommended to install them yourself under a wooden floor. It is advisable to consult a specialist.
Both types of heating can be done under any floor covering.
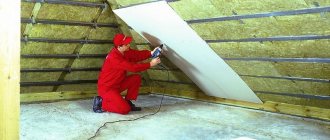
To install infrared mats, take the following steps:
- prepare a wooden base: eliminate floor unevenness, significant defects, prime;
- lay a layer of heat-insulating material;
- spread strips with heating elements evenly;
- install a heated floor temperature sensor;
- fix the cable;
- spread a thin layer of leveling mortar over the mats;
- then lay the flooring or lay tiles;
- Be sure to install a floor heating thermostat.
If you plan to lay tiles on boards with warm electric heating, it is recommended to apply leveler in 2 layers.
The heating cable is usually laid on a concrete screed made on a reinforcing mesh. It can be done over wooden floors. It should be taken into account that the floors will become higher by about 30 mm or more.
- a thermal insulation sheet or a heat-reflecting substrate is placed on tightly lying boards without obvious defects;
- then they throw the reinforcing mesh;
- a heating cable is attached to it with plastic stitches;
- concrete solution is poured on top and distributed in an even layer;
- after it hardens, waterproofing is spread;
- Next, they place a layer under a certain floor covering: under the tiles - glue, under the laminate - underlay.
In addition, you should install a temperature sensor in the corrugated tube and a thermostat.
There is another option for laying a warm electric floor on a wooden base: in a concrete screed created on top of the boards, on a mounting tape.
During installation and subsequent operation, it is important to follow safety rules, since electricity can harm people’s health and property.
Follow the instructions. Do not change the length of the cables on your own. Observe the temperature in the room: it should not be lower than -5 degrees. Before turning on the system, it is important to ensure that the screed is completely dry. The underfloor heating cable should not be located under heavy furniture.
Among the many advantages of an electrically heated floor, there are disadvantages of such a device. The main thing is high energy consumption during operation. If there is a need to create warm floors in the house, it is worth calculating everything several times and determining the possible benefits
It is important to find out the total cost of the system and electricity costs
Basic methods of arranging floors
To answer this question convincingly, we need to recall a few elementary rules of heating engineering.
- Heated air rises and accumulates under the ceiling. This is the warmest zone in the room, the air temperature here is about 5–8°C higher than at the level of 1.5 m from the floor and 9–11°C higher than on the floor. From the point of view of heating engineering, space heating by heating the floor is considered the most effective; to ensure the most comfortable temperature at a height of 1.5 m, a minimum amount of thermal energy is required. This is an axiom; there is no need to prove its correctness.
- Warm air from the ceiling of the room on the first floor automatically heats the floor of the second floor. The heat is not lost anywhere, but warms up additional rooms. Of course, if they are residential and not cold attic spaces. The question arises: why build insulated structures and, at your own expense, worsen the comfort of living, lose additional funds to heat the second floor, and remove heat from the first floor using ventilation?
Most professional builders strongly do not recommend installing insulated floors on the second floor if its premises are used as residential premises. You need to know that in addition to unnecessary losses of money and thermal energy, another problem may arise. If the technology is violated, the heat-insulating material increases its humidity, and all wooden elements are used in very difficult conditions.
Heat plus moisture is an excellent environment for the development of fungi and rot on load-bearing wooden elements, and no modern impregnation can protect them for a long time. Over time, you have to deal with very unpleasant premature repairs. We hope that this information will help you make the best decisions in each specific case.
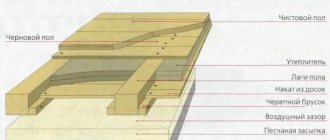
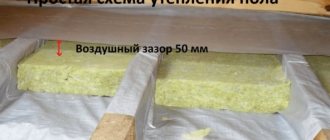
Wooden floor insulation scheme
There are two options for installing a wooden floor: if the house is one-story, then the floor is mounted on logs, and if it is multi-story, then the floor of each subsequent floor is mounted on wooden beams. Although, depending on the design and in a one-story house, it is possible to attach a wooden floor to wooden beams. Therefore, the point is not in the choice of technology, but in the structural features of the building.
In order for the floor to be of high quality and last a long time, you should decide on the number of beams.
To do this, you can use special programs, but developers take a different path, relying on standard approaches:
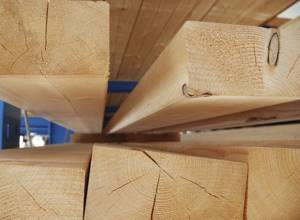
- A timber with a section of 150x150 mm or 200x200 mm is selected.
- The beams are located at a distance of 0.6 m from each other.
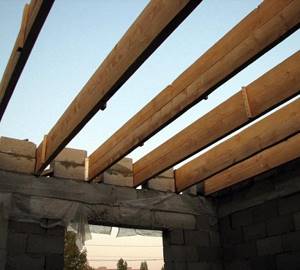
As a rule, pine is chosen as the most inexpensive and accessible construction wood. Depending on whether the building is brick or wooden, the floor beams are fastened. In a brick house they are embedded in the brickwork. In a wooden structure, they are laid on a wooden base and secured with metal brackets.
This process requires a special approach, which may be based on certain rules:
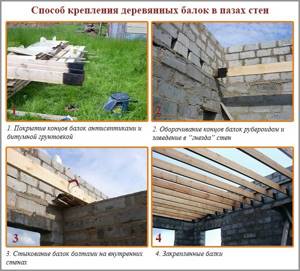
- All wooden structures, including beams, should be treated with antiseptics and fireproof materials.
- Do not coat any wooden structures with resin as this may cause condensation.
- The first beam should be installed at a distance of 5 cm from the wall and no more.
As mentioned above, installation of floor beams is carried out depending on the structural features of the building.
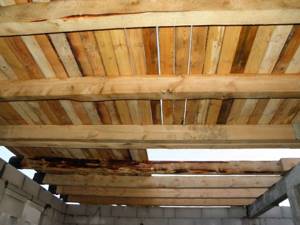
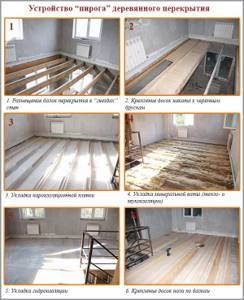
The floors on the second floor of a private house are arranged as follows. First you need to attach the bars on all sides of the beams. The bars are fastened in such a way that when laying the boards they are flush with the beams. The fastening must be reliable, since you will have to walk on the floor.
The ceiling is completely sewn up from the bottom, which will subsequently serve as the ceiling of the first floor. The boards are fitted very tightly so that there are no gaps. After this, the upper side of the lining is covered with a layer of waterproofing or ordinary clay-sand mortar.
Its advantage is that this mixture does not burn, so it is ideal for such purposes. The solution is applied in a thin layer, after which you need to give it time to dry. As an option, you can lay roofing felt. Such technological operations increase the service life of the insulation.
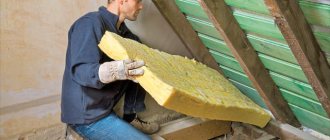
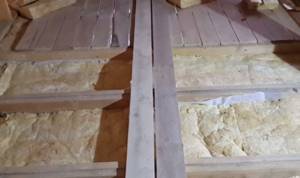
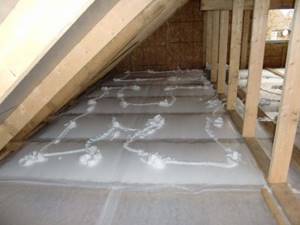
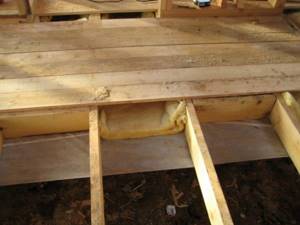
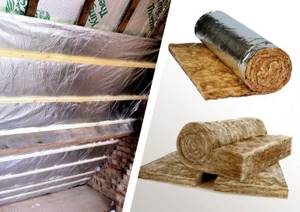
The floor of the second floor in a wooden house must be warm, and for this purpose thermal insulation should be laid between the beams.
The following can be used as insulation:
- ordinary slag, which is poured into the spaces between the beams;
- mineral wool;
- Styrofoam;
- expanded clay or sawdust.
In most cases, mineral wool is used due to its low cost, lightness and ease of installation. This material is placed between the beams, very tightly, so that there are no gaps, especially since working with mineral wool allows it to be compacted. This will allow you to obtain a high-quality thermal insulation coating, without all kinds of cold bridges.
Finally, the surface can be covered with a vapor barrier, although this is not necessary if there are financial difficulties.
As an option, you can use polystyrene foam, but you should remember that it has positive flammability, despite its unique thermal insulation characteristics.
If we talk about materials such as sawdust, expanded clay or slag, these are bulk materials and it is not so easy to bring them to the second floor in sufficient quantities.
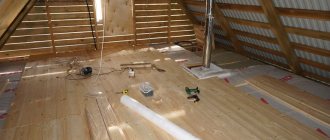
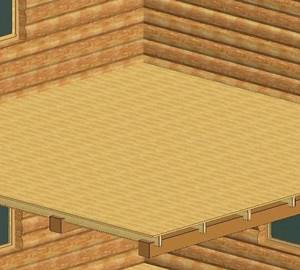
Once the insulation has been installed, production of the final flooring on the second floor can begin. This is done using the same technology as the previous sewing of the space between the beams. But then the boards were attached from below, and now it needs to be done from above. The main thing is that the subfloor is flush with the beams.
There is another option for finishing the floor on beams. To do this, logs are attached on top of the beams and in a direction perpendicular to the direction of the beams. In this case, a ventilated space is obtained, which has a positive effect on the durability of the structure.
In addition, this approach allows you to install a floating floor, which can reduce the noise level several times.
A regular board or chipboard sheets are attached on top of the logs. In this case, gaps should be provided between the floor and walls. In any case, the installation of the floor can be completed with finishing, which can be linoleum, parquet or laminate.
The conclusion suggests itself: the option of a heated floor on the second floor of your house is the best choice. As a rule, this is additional comfort and coziness.
In the construction of houses there are often situations when the use of reinforced concrete slabs is impossible. In this case, wooden floors are arranged. These structural elements of buildings are advantageous in many respects: they are durable, convenient and easy to install, and provide the opportunity to provide the highest quality insulation of the building.
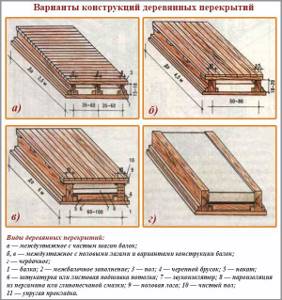
There are 3 types of floors for houses of different heights:
- basement (basement, lower);
- attic (upper);
- interfloor.
Any of them consists of 2 structural elements: supports (beams) and sheathing (flooring). Depending on the purpose of wooden floors, different materials are used for their construction. Since they all consist of wood, installation work can be done with your own hands, without involving complex lifting equipment.
Wooden floors can only be built if the span between the structural elements of the building is no more than 8 m.
The following materials are used as supporting elements:
- solid timber;
- knocked down boards;
- debarked logs.
The standard section of beams is 150/150 mm or 20/150 mm for timber, 140/240 or 5/20 mm for boards. You can use laminated veneer lumber. In terms of bending strength, it is not inferior to a solid one, and often exceeds it. Any material chosen for the installation of wooden floors must be well dried and free from defects in the form of cracks, knots and wormholes.
READ MORE: Application of different types of infrared heated floors
Logs are selected by tapping them with the butt of an axe. The tree should produce a clear and ringing sound. It is recommended to use coniferous wood, as they bend much better than hardwood. The length of the beams must be such that it is possible to place the support in the sockets in the walls intended for this purpose.
- the structure must be durable and flawlessly withstand the expected loads;
- all floor elements in a wooden house must be designed for a service life that corresponds to the planned period of operation of the building;
- interfloor ceilings must provide for the presence of heat and sound insulation components.
Calculation of expected load
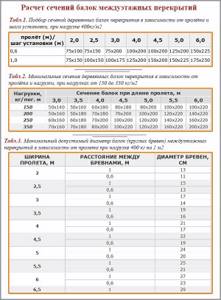
Before starting work, calculations are performed that help determine the required cross-section of beams, the pitch between them, and the amount of lumber. For this purpose, they either use special programs or focus on standard indicators. They are:
- For flights whose width does not exceed 2200 mm, beams with a section of 75x100 mm are used.
- For spans of 3200 mm - a section of 100x175 mm or 125x200 mm.
- For spans with a width of 500 mm - beams with a section of 50x225 mm.
The supports are laid in increments of at least 60 cm. If the beams are of a large cross-section, the distance between them is increased to 1 m. Installation of the floor begins from one of the short walls of the house. The beams (logs) should be laid perpendicular to the long walls.
One of the most important structural elements of any country house is the interfloor floors. They can be equipped using different methods. In any case, the assembly technology of such structures should be strictly followed. Not only the convenience of the people living in the house, but also their safety depends on this.
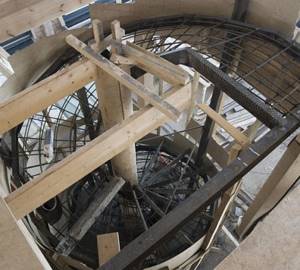
Sometimes monolithic floors are installed in country houses. They are mounted from ready-made reinforced concrete slabs. Such designs are characterized by a high degree of reliability and long service life. But at the same time, assembling them is quite expensive. After all, such slabs weigh a lot. Therefore, they have to be lifted onto the walls using a truck crane.
There is another type of ceiling for the second floor - filler. This structure is made of concrete mixture in formwork assembled on racks. This is also a fairly reliable type of flooring. You can also assemble it yourself. However, the technology for its manufacture is still very complex. Mistakes should not be made when pouring a monolithic slab.
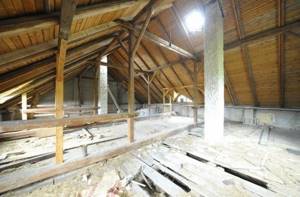
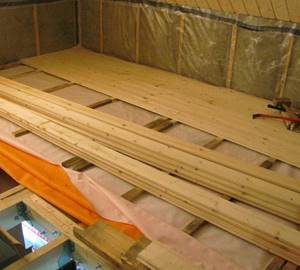
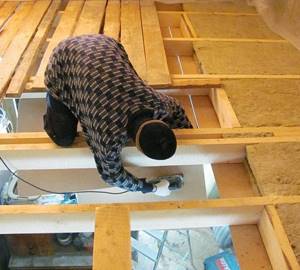
Subfloor on the attic floor
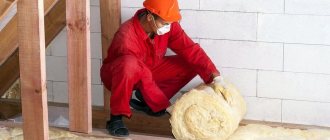
It has several options; for example, we will consider the most complex of them. It is better to file the ceiling before installing the subfloor, but this condition is not necessary. When working with mineral wool insulation, it is recommended to use a respirator or mask to protect the respiratory system, and wear rubberized gloves on your hands.
Since there is no ceiling covering, nail a vapor barrier membrane underneath. Attach it securely; at first it will support the weight of the insulation.
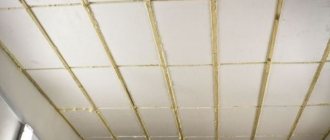
Step 1: Begin laying insulation into the space between the attic floor joists
We have already mentioned that when calculating the distance between beams, you need to take into account the standard width of materials for thermal insulation. Lay as tightly as possible; if there are two layers, their joints should be offset
Step 2.
Install a wind and vapor barrier membrane. Rolled mineral wool is easily blown through by drafts, and heat is removed along with the intake of fresh air. The membranes are fixed to the beams with a stapler. Professional builders do not recommend stretching the membranes too much; it is advisable that they lie loosely on top of the insulation. In case of leaks, water will not get onto the insulation through the holes made by the stapler staples.
Step 3.
Secure the membrane to the beams with thin slats. Lay subfloor boards on the slats. They can be screwed on with self-tapping screws or nailed.
Consider your roof design
The choice of usable area to be covered with flooring can largely be dictated by the design of the roof structure of your home or cottage. It can also indicate what needs to be done to complete the job.
Beam and rafter roofs
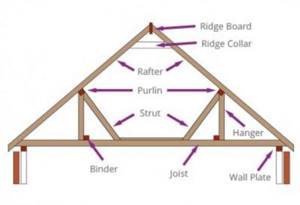
Beam and rafter or "split" roof design
Older homes with beam and rafter roofs usually allow for greater flexibility. These are usually large open spaces with few obstructions (other than chimneys) and diagonal roof braces.
- These features allow the use of larger floorboards (2500 mm x 20 mm thick), which significantly reduces the amount of cutting required. The attic floors are laid on wooden beams.
- The only problem you may encounter with large lofts is moving them. You can't do it without outside help.
Truss Roofs
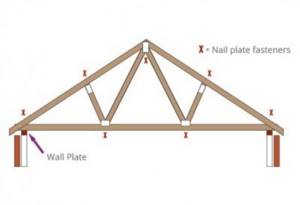
Attic flooring is more difficult on a truss roof.
Homes built in later years usually have a truss roof structure. They tend to limit the usable floor area and require a lot more work cutting the boards to fit neatly around the center points of the roof structure.
In such designs, floor materials have to be cut and adjusted more
How many attic floors do I need?
This is a good question to ask yourself before you start! Deciding how much floor area in the attic to cover depends on several factors.
Firstly, how much are you going to store in there, and please take into account how much more stuff might end up in there compared to what you have now. The installation of floorboards in the attic should only be carried out in the space being used
The installation of floorboards in the attic should only be carried out in the space being used
Second, use areas of the attic near the edge where the roof meets the wall. Since you won’t be physically moving there, it makes sense to cover the floor with a less expensive material. For example, chipboard or thin plywood, thereby saving on materials.
How to lay the floor in the attic of a house under an overhang
Some people sew up a small area around the perimeter of the attic hatch. This allows them to climb stairs and retrieve their items without going into the attic.
The next factor when deciding how much attic area to line is what will be in your attic. All you have to do is measure how much you need to sheath and leave the rest of the space empty.
Construction material
Before you begin installing the floor on the second floor using wooden beams, you should make a list of all the necessary materials. This will allow you to avoid unexpected downtime and delays during work caused by the need to purchase additional building materials.
Beams
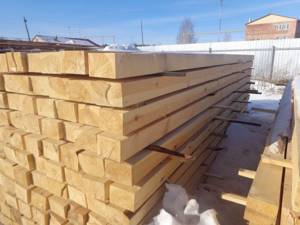
A beam section of 15 x 15 will be sufficient.
The basis of the entire structure of interfloor wooden floors is beams. They act as load-bearing elements, and the strength of the structure depends on them. For them, a beam or carriage with a section of 15 x 15 cm or 18 x 18 cm is usually taken.
This cross-section is usually enough to provide sufficient rigidity for a specific load of 400 kg per sq.m. In this case, it is necessary to comply with the parameters recommended by construction standards: the span length is 4 m, and the step between the beams is 60 cm. Based on these parameters, you can also calculate the required amount of timber.
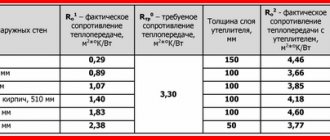
The table shows the recommended cross-sectional dimensions of the load-bearing beam for a certain span length.
| № | Span length (mm) | Beam cross section (mm) |
| 1 | 2000 | 75×150 |
| 2 | 2500 | 100×150 |
| 3 | 3000 | 100×175 |
| 4 | 3500 | 125×175 |
| 5 | 4000 | 125×200 |
| 6 | 4500 | 150×200 |
| 7 | 5000 | 150×225 |
However, in the absence of timber and small values of the expected loads on the floor, it is quite possible to use boards 50 or 40 mm thick, knocked together in pairs and placed on edge. This option is suitable for installing floors in an attic or in a small country house.
For the first floor of a residential building, this option is not suitable due to the low load-bearing capacity of the boards: to ensure the necessary rigidity, the pitch between the board beams will have to be significantly reduced, which will lead to an unjustified waste of material.
Pine is most often used as a material for beams.
This is the best option in terms of price-quality: its wood is quite affordable and at the same time has good technical characteristics. Beams made from wood of stronger species (larch, oak) can rarely be found on the open market, and their price is incomparably higher, and pine wood, after appropriate treatment with antiseptics, will be little inferior in durability to the same larch.
When purchasing timber, you should choose a material with dry wood. Otherwise, after installation of the beams, they may become deformed during the drying process - bending and twisting.
Flooring
Wooden flooring laid on the beams will be a rough base for the floor covering.
Typically, the flooring of interfloor floors is made in two tiers: below are rough floors on which insulation is laid, and on top is a pre-finish flooring mounted on top of the load-bearing beams. Decorative flooring is laid directly on it.
To determine the nature and amount of material for the flooring, you should clearly think through the design of the floors.
When constructing a subfloor, either 5 x 6 cm bars, packed onto load-bearing beams, or grooves made in the beams can be used as support for the flooring boards. The latter option is quite labor-intensive, so most often 5 x 6 cm bars are used to create support.
To calculate the required number of bars, it is enough to count the number of beams and multiply them by the length of each of them. We multiply the resulting footage (the total length of all beams) by two more (since the bars will be packed on both sides of each beam).
A wide range of materials can be used for finishing flooring. This can be plank flooring, plywood, chipboard panels, MDF, OSB, etc. Each of these materials has its own advantages and disadvantages, after reading which you can choose one of them. To calculate the required amount of material, simply calculate the area of the room.
When purchasing building material, you should always purchase it with a reserve of 10–15%, since during construction unforeseen material overruns are inevitable.
This will save you from having to interrupt your work and buy the missing part.
Impregnations

An antiseptic will extend the service life of wood.
To maximize the service life of wooden structures, they must be treated with antiseptic materials.
It would also be useful to treat the wood with fire retardants, which increase its fire safety.
To calculate the required amount of impregnation, you should read the instructions for its use - the approximate consumption of the mixture per sq.m. is always indicated there.
Waterproofing
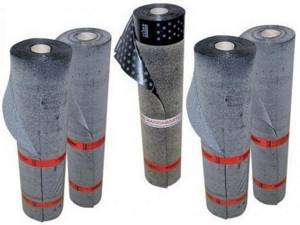
Since wood is afraid of moisture, waterproofing materials are always used during construction.
This can be a roll waterproofing used to create a water-repellent layer between wooden floor structures and the finishing coating, or between wood and brick (stone, cinder block, etc.).
To protect wood from dampness, you can also use coating waterproofing based on polymers or liquid bitumen.
Heat and sound insulation
If it is necessary to create a barrier to noise or cold, insulating materials are used in the construction of floors. Most often, mini-slabs or polystyrene foam are used for these purposes. Their total number in area should be approximately equal to the area of the room. For more information about floor insulation, watch this video:
Expanded clay or ordinary slag mixed with sawdust can also be used as an insulating material.
Fastening materials
To fasten wooden floor elements, you should purchase screws, nails, steel angles, anchor bolts and other consumables. When purchasing screws and nails, you should pay attention to their length.
According to the standards, for a strong connection, the nail must be 2/3 longer than the thickness of the element being attached (board, block). For self-tapping screws and self-tapping screws, this figure can be reduced to 50%.
Those. To securely attach a magpie board to a beam, you will need 120 mm nails or 80 mm long self-tapping screws.
Advantages and disadvantages of wooden structures
Wooden structures are used in private houses made of wood and stone of all types. This versatility is not inherent in concrete structures. In addition, wooden structures have other advantageous properties:
- the construction of wooden structures is much cheaper than concrete ones;
- To install monolithic concrete floors, special equipment and complex engineering work are required. And in the case of wooden beams, you can do without the help of professional builders. The minimum required skills are to work with a hammer and saw.
- Concrete floors are heavy. Their heavy weight puts a lot of pressure on the foundation, which cannot be said about the light weight of wooden structures.
- with low density, they have sufficient load-bearing capacity to support heavy furniture.
- higher rates of sound insulation and thermal insulation compared to concrete structures;
There are also disadvantages that also need to be addressed:
- wood has a shorter service life than concrete. Therefore, to increase their service life, beams are treated with antiseptic agents. Even so, under normal operating conditions, they can last more than 50 years.
- has the lowest fire resistance;
- the floor structure based on wooden beams is susceptible to moisture and rots under its influence.
But these shortcomings are indirectly related to the matter, because if properly used under normal conditions, the wooden floor structures of the first floor can last a good time.
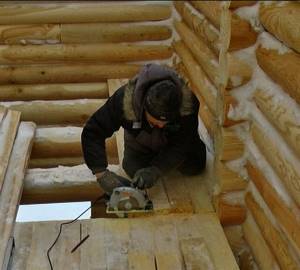
Technology for installing wooden floors
To complete the work you will need the following tools:
- axe;
- a circular saw;
- hacksaw;
- hammer;
- screwdriver;
- screws and nails;
- plane;
- waterproofing and thermal insulation materials;
- building level at least 80 cm long.
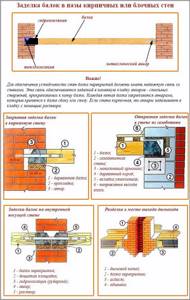
- When erecting walls, special openings or recesses for beams are formed in their upper part. Before starting work, these nests are cleaned of dust and debris and waterproofing material is laid in them. Roofing felt is most often used. If the walls are made of brick, the nests can be treated with bitumen or mastics based on it.
- The ends of the beams are coated with bitumen.
- Place the supports in pre-prepared openings.
If the structure is made of wood, the beams are cut into the upper crown. There is a way to attach support elements to the wall, like a dovetail. It is used in houses built from logs or timber. This connection method is simple and reliable. Metal brackets are required to secure the beams.
Insulation of interfloor solid wood floors
Wooden floors in the house are installed according to the following rules:
- the timber laid in the nest must be at least 4 cm away from the walls of the recess;
- the beams should be located at a distance of 40-50 cm from the chimney;
- every 3-4 beams are attached to the wall with anchors;
- The space between the timber and the walls of the nest is filled with tow or glass wool.
The installation scheme for interfloor ceilings provides for heat and sound insulation. Therefore, the gaps remaining after laying the beams are filled with polyurethane foam.
Depending on the location of the observer, the wooden floors between floors may represent either the floor or the ceiling of the room. There are special requirements for floor construction. Before proceeding with the installation of the flooring, each beam is hemmed on both sides with cranial bars with a section of 40x40 cm or 50x50 cm.
They will serve as support for the subfloor. The same can be done with the installation of the flooring that forms the ceiling. But the installation technology of this structural element does not have special requirements for performing such work.
Flooring device on wooden beams
The installation of floors on wooden beams begins by attaching unplaned boards with a thickness of 15 mm or more to the bottom of the supports. They will subsequently serve as a rough ceiling. A waterproofing material is laid on top of the flooring obtained during the filing process: roofing material, a special membrane or dense polyethylene. There is insulation on it.
The sheathing of the upper part of the floor is mounted on wooden beams. The boards are secured with nails or self-tapping screws. Knowing the sequence of work, it’s easy to do it yourself. The roof of the house must be a sealed, durable, high-quality insulated structure. This element of the building experiences the greatest weight loads, so only high-quality materials are chosen for its construction.
READ MORE: Do-it-yourself sanding of a wooden floor, work technology
The instructions for carrying out the work will be divided into several stages so that you can understand all the features as best as possible. And we will start by laying out the main supporting elements.
Fastening beams
Work in wooden buildings can be carried out in several ways; consider the sequence of required operations:
- First of all, you should prepare the products - clean them of dirt and bark residues, if any, and also coat them with a special fire-retardant composition. This will protect the wood from fire and damage from woodworms and will significantly extend the life of the structure.
It is most convenient to carry out the treatment before attaching the elements; if you have a sprayer, the work can be done with your own hands very quickly
- Next, all the necessary measurements are taken; if cutting of beams is required, then it is better to double-check all the dimensions, since cutting off the excess will simply ruin the product, the price of which is quite high. Cutting is easiest done with a chainsaw or other special woodworking device.
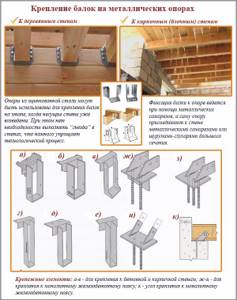
Fastening is carried out in three main ways:
- The first is cutting out recesses to fit the ends of the beams and securing each element in special recesses. This option has been very widely used for several centuries. It is important to cut the material carefully so that the laying level of all elements is the same, the joints are sealed and thermally insulated using tow, this helps protect all cutouts from the penetration of cold air.
Laying in recesses is convenient because each element is located in its place, which is prepared in advance
- The second solution is laying on the ends of the walls, with each of them fixed in a stationary position using staples or special screws. This option is applicable if cutting the recesses would be too time-consuming and complex, and the configuration of the building allows the beams to be laid with sufficient overlap on the walls so that they rest securely and provide high load-bearing capacity.
- The newest option - the use of special supports for timber - is used if it is necessary to make a partition anywhere on the wall surface without cutting out recesses or where the beams extend into the walls only a few centimeters. The work is simple: the fastening element is fixed to the base, after which the element is inserted into it and fixed using self-tapping screws.
The supports are highly durable and provide the necessary load-bearing capacity
After the beams are installed, you can begin covering the structure with rough flooring, the work is carried out in different ways, we will consider the simplest and most cost-effective option:
- The underside is filled with rough flooring, which is most often made from inexpensive unedged boards of the same thickness. The optimal solution is a 20-25 mm pine board. Its cost is low, and for this type of work it is ideally suited.
- The boards can be laid on a cranial block specially fixed at the lower level of the beams (50x50 mm in size) or screwed directly to the beams. We strongly recommend using self-tapping screws for these purposes; they are much more reliable than nails and will hold all the elements much better.
This is what the construction of the second floor floor in a wooden house using a cranial block looks like
- Next, the surface must be waterproofed, and if previously various options were used for this - from clay-based putty to roofing felt, then in our time special materials have appeared that release moisture from the wood, but prevent its penetration from the outside. These are so-called membranes, and we recommend using them.
Special membrane materials are an excellent solution for floors
- Now let's look at how to insulate the floor of the second floor of a wooden house. Previously, different options were used - from sawdust and slag to expanded clay and various mixtures. With the advent of mineral wool, all work has been simplified - this type of material is characterized by high performance properties and excellent heat retention. In addition, mineral wool is an excellent sound insulator.
Insulating the floor of the second floor in a wooden house using mineral wool is a quick and simple process; it is important to lay the material as tightly as possible
- From the outside, the surface is covered with another layer of waterproofing material, at which point this stage of work can be considered complete.
Floor construction
The floor of the second floor on wooden beams can be laid in two main ways:
- Directly along the surface of the structure, this option is applicable if the thickness of the insulation inside the structure is less than the height of the beams and there is a small cavity below for ventilation. If the mineral wool is located flush with the top edge of the beams, then it is better to use the second option.
- Logs are laid on the beams, which makes it possible to create a so-called “floating floor”, since it is not rigidly connected to the walls and can move slightly due to temperature changes. This option allows you to improve sound insulation in a wooden house.
The work also varies depending on the material used:
- If you decide to make a wooden floor, then purchase a special board 32 mm thick or more with a special tongue-and-groove fastening system. The work is simple: the board is secured with screws or nails through the recess, i.e. groove, then the next element is inserted so that the connection is tight; if necessary, you can tap the end with a mallet. This results in a smooth surface without nail heads or screws.
- If you decide to lay laminate, parquet or other covering, the easiest way to cover the surface is with sheet materials: plywood or oriented strand board. The second option has high moisture resistance, so it is used more often. The work is simple: the sheets are combined so that the connections go along the beams and are screwed with self-tapping screws.
Work goes much faster with sheet materials
Assembling the interfloor ceiling using wooden beams yourself is not at all difficult. The main elements of its design are:
- Actually the beams themselves. They are most often made from logs or timber.
- Sheathing. To assemble this element, an edged board with a thickness of at least 3 cm is usually used.
- Vapor barrier. Such a film is necessary to prevent moist air from the first floor from penetrating to the second. The use of such a film significantly extends the service life of such a structure as the ceiling of the second floor made of timber.
The design of the attic floor usually includes one more element - insulation. In this case, slabs of mineral wool and expanded polystyrene are installed between the beams. In some cases, polyurethane may also be used.
Sometimes a heat insulator is not included in the second floor ceiling design. But most often it is still used. In this case, it plays the role of a sound insulator. Mineral wool is most often used as a sound absorber in the ceiling of the second floor. This material, firstly, does not burn, and secondly, it emits fewer harmful substances, which is important for residential premises.
The ceiling of the second floor on wooden beams, described above, has the simplest design. The insulation used in this case, unfortunately, prevents only airborne noise from penetrating into the ground floor. Impacts are easily transmitted along a wooden frame (through beams and boards). If there are no small children in the house and there is no one to make much noise, such a simple design can be an ideal solution.
Types of floors on joists
A log is a beam with a rectangular cross-section; there are a huge number of types of timber:
- the smallest component is presented in the form of a log with a cross-section of 150 mm;
- a log, hewn on both sides, the cross-section of which is 150 mm;
- paired boards with a width of 100 mm and a thickness of 25 mm;
- a wooden beam with a rectangular section or another type of section in accordance with the load on the part (the minimum permitted section of the beam according to GOST reaches 100 × 150 mm with a distance of 60 cm);
- channel made of durable metal, I-beam;
- slats used for dry leveling and insulation;
- plastic components going to the screed.
Without exception, all logs are installed in order to lay the floor in a wooden house. They are installed on a mortgage crown, wooden parts, slabs, support, and soil.
Formation of floor covering
So, we have sorted out the questions of what is the best way to insulate the floor in a wooden house yourself, and what are the best ways to do this. It remains to give a little information on how to form the floor covering.
If the floor structure is a concrete screed, then covering it will require materials and technologies used for finishing concrete floors. Moreover, the floor itself is already insulated, so no additional measures are required.
What can you offer? Here are a few traditional options: linoleum, laminate with underlay, plank flooring with joists underneath, ceramic tiles, stone, etc.
Building a floor using floor beams is a little more complicated. If a plank floor is assembled, then it is carried out without additional operations and nested, that is, using standard technology. In order to lay laminate or linoleum over the beams, additional investments will be required in the form of plywood sheets or OSB boards. They are the ones that are first laid along the beams, leveled in one plane, and then the floor finishing can be mounted on them. In this case, the substrate layer must be treated with protective compounds, often drying oil.
Boardwalk under a wooden house
Before making an insulated floor in a wooden house, you need to think carefully about what technology and thermal insulation material is best to use. But keep in mind that you should not save on thermal insulation measures. The initial investment will pay off quickly by reducing energy consumption for heating a wooden house.
Floor installation without screed
Water heated floors without screed are used quite often today. A concrete base is certainly reliable, but it cannot be installed in every room. It is in these cases that an alternative heated floor system is used. Installation of such structures is easier than designing a screed, and in operation they are in no way inferior to it.
Underfloor heating system without screed
If the house is built of timber and the rooms have low ceilings, making a concrete screed can additionally “capture” an already small space. In addition, laying a concrete base is a labor-intensive and dirty job. In this case, the ideal solution for you would be a water heated floor in a wooden house with your own hands.
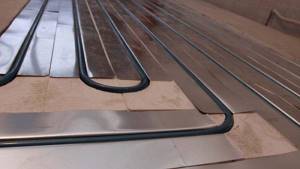
A water floor without a concrete base is installed on a wooden or polystyrene covering. Pipes are laid in special recesses. For better distribution of warm air, special metal plates are installed. The laid pipe system is covered with waterproofing material on top, and a finishing coating is applied to them.
Pipe system for wooden heated floors
Floors
0 votes
+
Vote for!
—
Vote against!
During the construction of a multi-story building, one of the main issues is the type of floor arrangement on the second floor. We will consider further how to calculate the correct load and how to make the floors of the second floor so that they have high performance characteristics.
Table of contents:
- Wooden floor on the second floor - recommendations for arrangement
- Warm floor on the second floor: installation features
- Construction of the second floor floor - concrete floor
- Floor covering of the second floor: additional recommendations
Wooden floor on the second floor - recommendations for arrangement
Installing a wooden floor on the second floor is appropriate in both a wooden and a brick building. Wooden floors make the room cozy, they are harmless to health and emit a beautiful light.
The technical parameters of constructing a wooden floor on the second floor differ in the following requirements for the floor:
- it must have maximum rigidity, and at the same time have a minimum amount of deflection;
- when installing a wooden floor, all technological requirements must be observed and at the same time the design must be simplified;
- the functional side assumes the stability of the floor against exposure to moisture, abrasion, durability and reliability of operation;
- wooden floors must be hygienic and fireproof;
- must provide heat and sound insulation;
- a mandatory criterion is the presence of hydro- and vapor barrier;
- full compliance of the load-bearing capacity with the operational load on the building.
The aesthetic aspect of constructing a wooden floor implies an attractive appearance and compatibility with the overall style of the room.
The floor of the second floor is subject to a certain type of load, furniture, people living in the rooms, heating appliances, etc.
We suggest that you familiarize yourself with the instructions for constructing a floor on the second floor using wooden beams.
Among the varieties of wooden floors, there are only two options:
- lagged,
- beam
A floor built on the basis of beams involves low cost of funds, since these materials are less expensive than logs. In addition, the beams provide a high level of resistance to loads, which means the floor will last a very long time.
The only drawback to constructing a floor on beams is its low level of sound insulation. The beams are installed in the frame part of the building, and therefore the noise level increases several times.
Before starting work on arranging the floor on beams, you should accurately determine the number of beams that will be required during the work process. In addition, you should correctly calculate the interval between the laid beams.
There are two methods that will help you do this:
- a computer program in which you need to indicate the floor area and some room parameters;
- standard section size, which is 15x15 or 20x20 cm.
The best wood option that is suitable for arranging the floor on the second floor is pine. Materials made on its basis are lightweight and durable at the same time.
To install timber in a building made of brick and wood, it is done in different ways.
When arranging a brick building, special recesses are provided in advance into which the timber will be installed. After installing the beam, the joints between it and the wall should be tightly sealed.
In addition, you should follow certain rules that are mandatory when working with wooden beams:
- before installation, the beams are treated with fireproof and antiseptic agents;
- do not use resin to cover the entire area of the beams, since the wood will not be able to pass air on its own, which means condensation will accumulate on the floor;
- the distance between the load-bearing wall and the beam is a maximum of five centimeters.
To install beams in a wooden house, you just need to cut out special cells in which the timber will be located. All previous requirements regarding wood processing also apply.
Instructions for constructing wooden floors on the beams of the second floor:
1. The first stage of work includes the installation of a subfloor made of ordinary boards or bars. They should be adjusted to the size of the room or the entire floor. Make sure the floor is even and the boards are laid properly.
2. The next stage involves waterproofing the flooring; for this, modern roll materials are used. A simpler method of waterproofing, which does not require special investments, is treating the subfloor using a clay-sand mortar. It is possible to lay roofing felt, the sheets of which should fit tightly to each other.
3. Next, it is necessary to carry out a number of works related to floor insulation. There are many options for insulating a wooden floor, among them the following should be highlighted:
- the use of simple slag poured onto the areas between the timbers;
- mineral wool;
- sawdust;
- Styrofoam;
- expanded clay
The most effective and common type of insulation is mineral wool, which is laid in such a way as to ensure a tight fit to the boards. This type of installation will help prevent the formation of cold bridges and will increase the energy efficiency of not only the floor, but the entire building as a whole.
4. After installing the insulation, proceed to the next stage - installing a vapor barrier. This option is not always installed when installing a wooden floor. Although it is better to take care of the presence of additional vapor barrier, which, firstly, will become an additional layer separating the floor and mineral wool, and in case of flooding or a small amount of water gets in, prevent its contact with the insulation, and secondly, will become an additional protective layer of wooden floor.
5. The final stage is the installation of the main floor. There are two options for carrying out this process:
- flooring,
- installing a lag floor.
To improve the quality of the installed floor, before installing the flooring, special boards are installed in the form of logs. With their help, additional ventilation underground space is created and the noise level in the room is significantly reduced.
It is possible to construct a floating floor, which is freely fixed in the walls and creates the effect of floating in space. Physically, this aspect is practically not noticeable, but it helps to significantly improve the soundproofing characteristics of the building.
It is recommended to use planed floorboards or chipboard as a finishing coating, and then carry out finishing work in accordance with the design of the room.
Warm floor on the second floor: installation features
Before you learn about the technology of installing water heated floors on the second floor, we suggest that you familiarize yourself with its advantages and disadvantages.
The advantages of installing a water heated floor include:
- uniformity of floor heating over its entire area;
- invisibility of all heating components used during the operation of the heated floor;
- ability to heat a large area with minimal expenditure of money;
- attractive appearance.
The main disadvantages of installing a water heated floor are:
- structural difficulties during the installation of the structure;
- presence of a water pump;
- difficulties in regulating the floor temperature;
- water pressure surges in the system;
- the possibility of a leak and the difficulty in finding it.
It is not recommended to use metal pipes when installing a warm water floor, as they are susceptible to corrosion and have a short service life. It is better to resort to an alternative option in the form of polyethylene, polybutylene or metal-plastic pipes. The service life of pipes of this type reaches forty-five years or more.
There are two types of systems for arranging water floors:
1. Concrete technology - consists of placing pipes on the floor, which is covered with a layer of concrete on top. When using this method, more material, labor and time investments will be required. Since the preparation of the solution will require the presence of cement and sand, and it will take at least three weeks for the screed to dry.
2. The floor type of water floor arrangement involves its installation using ready-made components that do not require drying time. Although this method is more expensive than the previous one. This method is divided into three subtypes: polystyrene system, modular installation, rack installation.
It is the latter option that is used in the process of installing a heated floor on the second floor.
It involves the installation of thermal insulation material in the space between the joists. In this case, mineral wool or polystyrene is used as a heat insulator. In the process of laying boards with a thickness of at least 2.8 cm, a groove space up to two centimeters wide is left. In this space, heated floor components in the form of aluminum plates and pipes will be placed. The final stage includes installation of the subfloor and finishing of the floor.
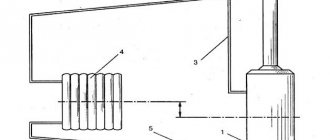
Another important step in the process of installing a heated floor is the installation of a collector group, which is sold on any of the construction markets. After installing the manifold cabinet, the supply and return pipes are installed. The main function of the first pipe is to provide the system with hot water, as it is connected to a boiler or hot water source. The second pipe is responsible for transporting cooled water to the place where it is heated. Sediment is used to circulate this process.
Tip: When choosing a location for installing a manifold box, you should stick to the center of the room and install it at the bottom of the wall. This procedure will ensure uniform heating of the heated floor.
Don't forget to install special valves on each of the pipes. They will help, if necessary, stop the operation of the system in order to carry out repair work on it or save money on floor heating.
The plastic pipe is connected to the shut-off valve using compression fittings. Then the collector is connected to the valve, a drain valve is installed at one end, and an air vent at the other. Installing a simple plug is less functional. When the collector cabinet is assembled, the work on installing the heated floors described above is carried out.
Construction of the second floor floor - concrete floor
The most durable option for constructing a floor on the second floor is to install a monolithic floor.
The main stages of this process are:
- installation of formwork;
- reinforcement;
- process of pouring concrete mixture;
- drying the floor;
- finishing.
The formwork installation procedure is quite complicated, as it requires special attention and preliminary calculations. It is necessary to calculate the distance between the supports and the thickness of the layer itself. This value directly depends on the floor area and the power of the building itself.
Let us give an approximate calculation of these indicators. With a concrete layer thickness of fifteen centimeters, the distance between the supports will be about 150 cm.
After completing the installation of the formwork, proceed to the next process called reinforcement. To do this, you will need a certain number of metal rods, the cross-section of which is 12 cm. It is necessary to construct a mesh from them, the size of each cell of which will be about twenty centimeters.

The preparation of the concrete screed must be treated with extreme caution, since the performance characteristics of the floor will depend on its quality. The advantage of the screed equipment is the ability to carry out almost any finishing work on it, such as installing ceramic tiles, parquet, laminate, linoleum, polymer flooring, etc.
Due to the fact that the screed is evenly laid on the interfloor covering, it helps to evenly distribute the load and increase the strength of the house.
The recommended grade of concrete for preparing concrete mortar is M400. The filler is sand or fine crushed stone. In this case, the ratio of concrete to sand is one to three. The screed is poured one time; it is prohibited to pour the screed in the same room on different days, as it will lose its strength.
The recommended time to use the solution is a maximum of two hours. At the same time, do not forget to use a concrete vibrator, which will help get rid of excess air and ensure strong adhesion of concrete and reinforcement.
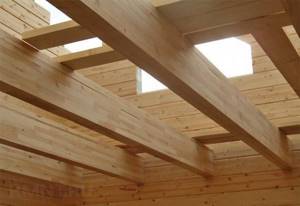
Floor covering of the second floor: additional recommendations
When constructing the ceiling floor of the second floor, it is recommended to use beams that are installed on the floor area. Then, they are planed using an electric planer, on the side that will be the ceiling of the first floor. This process will make the wooden ceiling more attractive. Next, you need to install the bars that will form the rough covering of both the floor and the ceiling. For finishing the ceiling, wooden lining is best suited, which will create harmony with the beams. And, for the installation of the floor, it is necessary to first lay a layer of waterproofing, thermal insulation, vapor barrier, and then proceed with the installation of the flooring and finishing.
Let's consider the option of finishing the floor of the second floor; to carry out the work you will need the following:
- laminate,
- drywall,
- insulation.
Laminate flooring is laid on the finished surface of a wooden or concrete floor. And the drywall is attached to the ceiling section.
Before installing the laminate, it is recommended to carry out a series of preparatory work to insulate the hydro- and sound insulation of the floor.
Tips for arranging the floor on the second floor:
- when installing a heated water floor on the second floor, before installing the pipes, it is necessary to lay out roll-type insulation and fill the inter-pipe areas with thick plasterboard, which will increase the rigidity of the structure, then another layer of insulation is installed and the laminate is mounted;
- when installing a real environmentally friendly wooden floor, you need to carefully select materials; for the subfloor, purchase ordinary boards with low humidity; for the main floor, it is necessary that the boards have no knots, dark spots, and they must be completely dry;
- when constructing a panel house, use panel-type floors as the floor, which will be finished with laminate; in this case, it is necessary to install a lining based on polyethylene foam, which will create a damping effect;
- adjustable floors will help increase sound insulation and provide a ventilated space under the floor, as a result of which there is no occurrence of condensation, fungi or mold.
What about attic insulation?
Different types of attic insulation
When you take on a new attic lining job, it is important to make sure that everything is fine with the existing attic insulation. Recommended minimum thickness is 270mm
Cold or warm attic
- If you're just using the attic for general storage, a "cold attic" is fine.
- If you store temperature-sensitive items or plan to spend time upstairs, you'll need a warm attic.
Basic attic insulation, required for both warm and cold rooms, is inserted between the joists or rafters. The floor is installed on top in a cold attic.
It can then be planked, but over joists, which would likely raise the height to 270mm
Therefore, it is important to raise the boards to prevent restriction of ventilation and overheating of electrical cables
Leaving a gap between the top of the insulation and the underside of the sheathing is important to maintain air flow and prevent condensation. For a warm attic you will also need insulation from the underside of the roof
It is subsequently sewn up with a beautiful finishing finish.
For a warm attic you will also need insulation from the underside of the roof. It is subsequently sewn up with a beautiful finishing finish.
Does insulating the attic help?
No, only in combination with lining of a quality insulating material such as mineral wool will you get proper insulation in your attic.
Additionally, there must be a gap between the sheathing and the insulation to allow proper air flow, otherwise condensation and related problems may occur.
Types of wooden beams:
• Timber
The most common material for making floor beams at home. Their height is 14–24 cm, and their thickness is 5–16 cm.
• Made from logs
The cheapest option. The log copes well with the additional load, but it is not a flexible material. To construct the floors of the house, only those beams that have been drying for about a year are used.
• Boards, logs.
The joists save money and the consumption of materials for laying the flooring of the house. They have low fire safety. Also, logs have low sound insulation and a short service life. They are used mainly for attic spaces. Those who still choose joists for flooring at home use this method to strengthen them: they fasten two boards together along the length. Self-tapping screws are used for fastening. This design copes well with loads.
Construction materials
rough floor covering the following materials:
- Edged softwood boards GOST 24454.
- Waterproof fiberboard sheets GOST 10632.
- Gypsum fiber board GOST 51829.
- Softwood plywood GOST 3916.2.
- Hardwood plywood GOST 3916.1.
- Bakelized plywood GOST 11539.
It is possible to use OSB and other wood boards with a low formaldehyde content no higher than E0 or E1. You can calculate the required thickness of the selected material using the table.
Table of calculations of structural materials most often used to cover subfloors.
The data from the table will help you accurately calculate the distance between the joists and will facilitate the selection of the required material when calculating the floor structure.
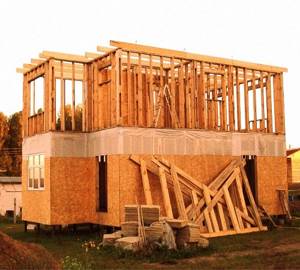
Installation of a frame in a wooden house
Make a subfloor
It is best to install the support beam and timber at the zero level of house construction, especially if a groove connection is used.
To do this you need:
- Use a level or spirit level to mark the lower trim so that they are at the same level.
- Mark and make grooves on the harness and timber.
- Install the timber in place.
- Level the installed beam using a level or spirit level.
- Carry out fastening work.
The installed beam is secured with nails or chrome-plated mounting angles using screws.
Table for calculating the cross-section of the joists and the distance between them, as well as the thickness of the board for the subfloor. If you plan to use sheets of plywood or OSB as flooring, then you should choose the minimum distance between the logs.
How is thermal insulation protected?
Various insulation and ventilation schemes may require limited air circulation in the space under the floor. This is especially true for houses on a pile-grillage foundation, where the insulation is in contact with street air and must be protected from getting wet.
To prevent mineral wool from losing its heat-saving properties when saturated with moisture, it is covered with a vapor barrier on top. The protective membrane is spread over the joists and insulation, then fixed to the wooden blocks with small nails or staples. The joints must be carefully glued on both sides; it is better if they are located exactly on the edges of the supporting floor system.
In those rare cases when the dew point may move above the insulation with the formation of condensation on the vapor barrier, it is necessary to provide ventilation under the board flooring. It is necessary to fill on top of the frame logs, covered with a vapor barrier, a counter-lattice made of boards of the same width as the logs themselves. The thickness of the vent usually does not exceed 20-25 mm, and the counter-latt itself does not in any way affect the quality of fastening of the board flooring.
Arrangement of the lower plane
Due to the design features of the attic, when arranging the lower plane of the attic, you need to remember that in order to climb to the second floor you will need to equip a hatch, which will subsequently connect to the stairs. To do this, you need to choose its location and leave enough space for its device. The algorithm for arranging the lower plane of the attic floor is as follows:
We carry out cleaning to prepare the base. To do this, we remove debris, tools and foreign objects from the surface. The next step is to check the strength of the floors
What is it for? It is the floors that bear the main operational load, so making sure of their strength and reliability is extremely important. We carefully examine the beams for integrity and absence of rotting. We prepare wooden logs
Their installation is a fundamental stage; the work depends on several factors. The choice of lag section and the distance between them during installation depends on the pitch of the floors, as well as the thickness of the board. The length of the logs must correspond to the dimensions of the roof space. Installation of the outer support strips. Installation and fastening is carried out using self-tapping screws or nails. The planks are fixed directly to the pediment or side partitions. The installation principle is determined by the location of the roof structure. It is necessary to place a strong crossbar along the edge of the proposed hatch. To ensure reliable fastening, you can use steel corners. After the final determination of the location of the hatch for the entrance to the attic floor, the remaining logs are installed, taking into account the design features. In this case, the wooden crossbars should be located in the same plane.
The presence of an attic floor in a private house allows you to make full use of its usable area. You must remember that the floor in the attic is the ceiling for the lower floor in the house. Therefore, the reliability of the floors and high-quality arrangement will be the key to comfort and safety for all household members. At this stage, preparatory work on the flooring has been completed
You can move on to an equally important part of the work - insulation
Wooden floors between the first and second floors - let's look at all the nuances
When constructing private low-rise houses made of wood, concrete blocks or brick, wooden floors are most often erected between floors. These structures, compared to alternative concrete slabs, have a number of advantages. Wooden floors do not overload the walls and do not require the use of lifting equipment during installation. In addition, they have high strength, durability and reasonable price. The installation of such ceilings is quite simple, so many home craftsmen do it themselves.
Floor design
The basis of a wooden floor is beams that are supported on load-bearing walls and serve as a kind of “foundation” for the remaining structural elements. Since the beams will bear the entire load during operation of the floor, special attention should be paid to their proper calculation.
For beams, they usually use solid or laminated timber, logs, and sometimes boards (single or fastened in thickness with nails or staples). For floors, it is advisable to use beams made of coniferous trees (pine, larch), which are characterized by high bending strength. Hardwood beams perform much worse in bending and can deform under load.
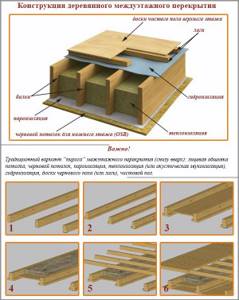
Rough boards (OSB, plywood) are fixed to the floor beams on both sides, on top of which a facing covering is sewn. Sometimes the floor of the second floor is laid on logs, which are secured to beams.
It is worth remembering that the wooden floor on the side of the first floor will be the ceiling, and on the side of the second floor (attic, attic) will be the floor. Therefore, the upper part of the ceiling is sheathed with floor materials: tongue-and-groove boards, laminate, linoleum, carpet, etc. The lower part (ceiling) - clapboard, plasterboard, plastic panels, etc.
Thanks to the presence of beams, space is created between the rough boards. It is used to give the ceiling additional properties. Depending on the purpose of the second floor, heat-insulating or sound-proofing materials are placed between the floor beams, protected from moisture by waterproofing or vapor barrier.
In the event that the second floor is a non-residential attic that will not be heated, thermal insulation must be included in the ceiling structure. For example, basalt wool (Rockwool, Parock), glass wool (Isover, Ursa), polystyrene foam, etc. A vapor barrier film (glassine, polyethylene and polypropylene films) is placed under the thermal insulation layer (from the side of the first heated floor).
If EPS, which does not absorb water vapor, was used as thermal insulation, the vapor barrier film can be excluded from the “pie”. A layer of waterproofing film is laid on top of heat-insulating or sound-proofing materials that absorb and can deteriorate from moisture. If during finishing the possibility of atmospheric moisture entering the attic was excluded, the insulation does not need to be protected with waterproofing.
If the second floor is planned as a heated and living space, then the floor “pie” does not need additional thermal insulation. However, in order to reduce the impact of noise that will occur when people move along the floor, a soundproofing layer is laid between the beams (usually conventional thermal insulation materials are used).
For example, basalt wool (Rockwool, Parock), glass wool (Isover, Ursa), polystyrene foam, ZIPS sound-absorbing panels, soundproofing membranes (Tecsound), etc. When using materials that can absorb water vapor (basalt wool, glass wool), a vapor barrier film is laid between the first floor and the sound insulator, and waterproofing is placed on top of the sound insulator.
Attaching beams to the wall
Floor beams can be connected to walls in several ways.
In brick or timber houses, the ends of the beams). If beams or logs are used, then the depth of the beams in the walls should be at least 150 mm, if the boards are at least 100 mm.
Parts of the beams in contact with the walls of the “nest” are waterproofed by wrapping them in two layers of roofing felt. The ends of the beams are cut at 60° and left uninsulated to ensure free “breathing” of the wood.
When inserted into a “nest,” ventilation gaps of 30-50 mm are left between the beam and the wall (on all sides), which are filled with thermal insulation (tow, mineral wool). The beam is supported on the base of the groove through an antiseptic and waterproofed wooden plank 30-40 mm thick. The sides of the groove can be covered with crushed stone or covered with cement mortar to a depth of 4-6 cm. Every fifth beam is additionally fastened to the wall using an anchor.
In wooden houses, beams are buried into the grooves of the walls by at least 70 mm. To prevent squeaks, waterproofing material is laid between the groove walls and the beam. In some cases, beams are cut into walls, making dovetail connections, etc.
Beams can also be fixed to the wall using metal supports - steel angles, clamps, brackets. They are connected to walls and beams with self-tapping screws or self-tapping screws. This fastening option is the fastest and most technologically advanced, but less reliable than when inserting beams into wall grooves.
Calculation of floor beams
When planning the construction of a floor, you first need to calculate the design of its base, that is, the length of the beams, their number, optimal cross-section and spacing. This will determine how safe your ceiling will be and what load it can withstand during operation.
Beam length
The length of the beams depends on the width of the span, as well as on the method of fastening the beams. If the beams are fixed on metal supports, their length will be equal to the width of the span. When embedding walls into grooves, the length of the beams is calculated by summing up the span and the depth of insertion of the two ends of the beam into the grooves.
Beam spacing
The distance between the axes of the beams is maintained within 0.6-1 m.
Number of beams
The number of beams is calculated as follows: plan to place the outer beams at a distance of at least 50 mm from the walls. The remaining beams are placed evenly in the span space, in accordance with the selected interval (step).
Beam section
Beams can have a rectangular, square, round, or I-section. But the classic option is still a rectangle. Frequently used parameters: height – 140-240 mm, width – 50-160 mm.
The choice of beam section depends on its planned load, the width of the span (along the short side of the room) and the spacing of the beams (step).
The load of the beam is calculated by summing the load of its own weight (for interfloor floors - 190-220 kg/m2) with the temporary (operational) load (200 kg/m2). Typically, for exploited floors, the load is taken to be 350-400 kg/m2. For attic floors that are not in use, you can take a smaller load, up to 200 kg/m2. A special calculation is required if significant concentrated loads are expected (for example, from a massive bathtub, swimming pool, boiler, etc.).
The beams are laid along a short span, the maximum width of which is 6 m. Over a longer span, sagging of the beam is inevitable, which will lead to deformation of the structure. However, in such a situation there is a way out. To support beams over a wide span, columns and supports are installed.
The cross section of the beam directly depends on the width of the span. The larger the span, the more powerful (and durable) beam must be chosen for the ceiling. The ideal span for covering with beams is up to 4 m. If the spans are wider (up to 6 m), then it is necessary to use non-standard beams with a larger cross-section. The height of such beams must be at least 1/20-1/25 of the span. For example, with a span of 5 m, you need to use beams with a height of 200-225 mm and a thickness of 80-150 mm.
Of course, it is not necessary to perform beam calculations yourself. You can use ready-made tables and diagrams that indicate the dependence of beam sizes on the perceived load and span width.
After completing the calculations, you can begin installing the floor. Let's consider the entire technological process, starting with fixing the beams on the walls and ending with the finishing cladding.
Wooden floor technology
Stage #1. Installation of floor beams
Most often, beams are installed by inserting them into the grooves of the walls. This option is possible when the installation of the floor is carried out at the stage of building a house.
The installation process in this case is performed as follows:
1. Beams are coated with antiseptics and fire retardants. This is necessary to reduce the tendency of wooden structures to rot and ensure fire safety.
2. The ends of the beams are cut at an angle of 60°, painted with bitumen mastic and wrapped with roofing felt in 2 layers (for waterproofing). In this case, the end must remain open so that water vapor can escape freely through it.
3. Installation begins with the installation of two outer beams, which are placed at a distance of 50 mm from the walls (minimum).
The beams are 100-150 mm, leaving a ventilation gap between the wood and the walls of at least 30-50 mm.
4. To control the horizontality of the beams, install a long board along their upper plane on the edge, and a bubble level on top of it. To level the beams, wooden dies of different thicknesses are used, which are placed in the lower part of the groove on the wall. The dies must first be treated with bitumen mastic and dried.
5. To prevent the beam from creaking and block the access of cold air, the gap is filled with mineral insulation or tow.
6. The remaining intermediate beams are laid out on the laid control board. The technology for inserting them into wall nests is the same as for installing the outer beams.
7. Every fifth beam is additionally secured to the wall using an anchor.
When the house has already been built, it is easier to install floor beams using metal supports. In this case, the installation process is as follows:
1. Beams are impregnated with fire retardants and antiseptics.
2. On the walls, at the same level, in accordance with the calculated pitch of the beams, fix the supports (corners, clamps, brackets). Fastening is carried out with self-tapping screws or self-tapping screws, screwing them into the holes of the supports.
3. The beams are laid on supports and secured with self-tapping screws.
Stage #2. Fastening the cranial bars (if necessary)
If it is more convenient to lay the “pie” of the floor structure from above, that is, from the side of the second floor, cranial bars with a section of 50x50 mm are filled along the edges of the beams on both sides. The bottom of the bars should be flush with the surface of the beams. Skull bars are necessary in order to lay rolling boards on them, which are the rough basis for the ceiling.
You can do without cranial bars if you hem the bevel boards from below, from the side of the first floor. In this case, they can be attached directly to the beams using self-tapping screws (nails are not suitable, since they are difficult to drive vertically into the ceiling).
Stage #3. Attaching the reel boards for the rough base of the ceiling
When installing from the second floor side, the boards are secured to the skull blocks with nails or self-tapping screws (it is possible to use OSB or plywood).
When fastening the roll-up from the side of the first floor, the boards are secured to the beams from below using self-tapping screws. If it is necessary to lay a thick layer of insulation or soundproofing material between the beams, the option of filing the boards from below is preferable. The fact is that the cranial bars “eat up” part of the space between the beams, and without their use the thickness of the floor can be completely filled with insulating material.
Stage #4. Laying vapor barrier (if necessary)
A vapor barrier is placed in the ceiling structure in front of the insulation (which can also serve as a sound insulator), if there is a risk of steam entering it or condensation occurring. This happens if the ceiling is arranged between floors, the first of which is heated and the second is not. For example, an unheated attic or attic is installed above the first residential floor. Also, steam can penetrate into the floor insulation from wet rooms on the first floor, for example, from the kitchen, bathroom, swimming pool, etc.
The vapor barrier film is laid on top of the floor beams. The canvases are laid with an overlap, bringing the edges of the previous canvas onto the next one by 10 cm. The joints are taped with construction tape.
Stage #5. Thermal insulation or sound insulation device
Between the beams, slab or roll heat or sound insulators are laid on top. Gaps and voids must be avoided, materials must fit tightly to the beams. For the same reason, it is undesirable to use scraps that have to be joined together.
To reduce the occurrence of impact noise in the ceiling (with a residential upper floor), sound insulator strips with a thickness of at least 5.5 mm are laid on the upper surface of the beams.
Stage #6. Laying waterproofing film
A waterproofing film is laid on top of the heat or sound insulation layer. It serves to prevent the penetration of moisture from the upper floor into the insulating material. If the upper floor is non-residential, that is, no one will wash the floors there and the penetration of atmospheric moisture will also be excluded, the waterproofing film may not be used.
The waterproofing film is laid in sheets, overlapping by 10 cm. The joints are taped to prevent moisture from penetrating into the structure.
Stage #7. Fastening boards (plywood, OSB) for the subfloor
A rough base for the floor of the second floor is sewn along the beams on top. You can use regular boards, OSB or thick plywood. Fastening is carried out using self-tapping screws or nails.
Stage #8. Covering the floor from below and above with finishing coatings
Any suitable materials can be laid on top of the rough base below and above the ceiling. On the upper side of the ceiling, that is, on the floor of the second floor, coverings made of laminate, parquet, carpet, linoleum, etc. are installed. When arranging the floor of a non-residential attic, the rough boards can be left without covering.
On the lower surface of the ceiling, which serves as the ceiling for the first floor, ceiling materials are sewn: wooden lining, plastic panels, plasterboard structures, etc.
Operation of floors
If the design used beams with a large margin of safety, laid with a small step, then such an overlap will not need repair for a long time. But you still need to check the beams for strength regularly!
If the beams are damaged by insects or as a result of waterlogging, they are strengthened. To do this, the weakened beam is removed, replaced with a new one, or strengthened with strong boards.
Materials and tools
To install a floor using joists, depending on the type of base, the following materials and tools may be required:
- A beam with a rectangular or square cross-section, the dimensions of which depend on the number of support points, the size of the span and the distance between the logs.
- Concrete blocks or bricks, waterproofing material (resin or roofing felt) for installing columns when constructing floors with an underground.
- Antiseptic compounds and fire retardants for processing wooden products.
- Crushed stone, sand, clay when laying a floor on the ground.
- Expanded clay, cement (concrete), gypsum fiber board or fiberboard when laying a floor on the ground with insulation.
- Insulation, the type of which is determined by the type of subfloor.
- Vapor barrier membrane, waterproofing film.
- Skull block and unedged board for constructing a subfloor.
- Brushes for applying antiseptics and fire retardants.
- Devices for tightening and fastening lags.
- Solid tongue-and-groove edged board or plywood.
- Level and roulette.
- Jigsaw, screwdriver, wood saw, hammer.
- Nails, screws.
- Putty for leveling the floor before laying the floor covering.
Advantages and calculation of beam floors
The entire structure consists of beams and boards, which are called rough. The beams themselves can be load-bearing, located simply next to each other, or fixed in a special way, which is much more reliable. The standard sizes of beams are 20-40 centimeters in height and 15 meters long, plus 8-20 centimeters in width.
Unlike reinforced concrete attic floors, wooden ones are installed dry. It is much lighter in weight, so in private construction it is better to use just such an overlap. On the other hand, wooden floors are the least soundproofed, so you will have to spend money on additional measures.
The beams are located at a distance of 60 centimeters to 1.5 meters. Of course, the more often you install them, the greater the load the attic will be able to withstand in the future, but the foundation of the house will also have to endure a greater load.
Light partitions are usually mounted on a wooden attic floor - most often frame ones, to which the attic rafters are directly attached. They need to be installed perpendicular to the beams or edgewise.
But if for some reason the internal walls of the attic have to be placed parallel to the ribs or beams, which is not at all according to the rules, then the structures in these places must be strengthened. Most often, fragments of boards are used as such elements, which are attached perpendicular to the ribs of the floor.
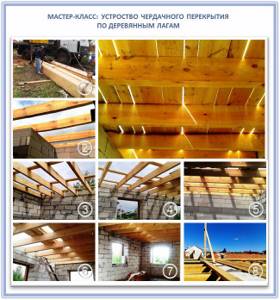
And this graph will help you calculate the required number of beams and the load on them:
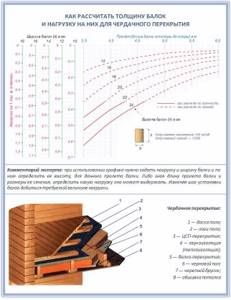
What else to consider
After calculating the floor beams and purchasing all the necessary materials, you can begin the actual installation of the structure. However, before this, it is advisable to carry out a number of preparatory measures.
Wood is a relatively short-lived material. Over time, due to dampness, paving beams and boards may begin to rot. To delay this process for as long as possible, before assembling the floor, all lumber should be treated with a special antiseptic. Such compositions usually also protect the tree from fungal infection.
In addition, timber and boards must be coated with a product that reduces the risk of fire. In the event of a fire, the material treated in this way will, of course, be damaged. However, timber and boards treated with such compounds do not burn, but smolder. Consequently, residents will have more time to leave the house in the event of a fire.
It is also a good idea to treat the boards and beams with insect repellent before assembling the floor. Grinder bugs can cause a lot of trouble for home owners in the future.
What if it's a bathroom?
If a bathroom and toilet are planned to be installed on the second floor, it is necessary to provide space for communications, in particular a sewer drain and water pipes, before pouring the concrete floor. If the floor of the second floor is wooden, it is necessary to take into account the loads that will act at the location of the bathroom.
The bath weighs about 200 kg, and the weight will double when filled with water. Accordingly, the normal load acting on wooden floors must be doubled. One way out is to increase the cross-sectional size of the beams and reduce the distance between them in the location of the proposed bathroom
Particular attention should be paid to moisture removal and additional protection of wood to prevent the formation of mold and, as a result, rotting of wooden structures
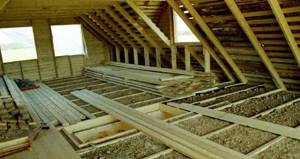
It is better to use a board for the floor from larch, elm or alder, since these types of wood, being in a humid environment, only become stronger and more durable. If the bathroom has a shower, it will be necessary to drain the water; as a rule, in this case a drain with a dry locking element is used. Installation must be carried out in such a way that all water that ends up on the floor of the shower room goes through the drain. Waterproofing materials must have high adhesion and sufficient elasticity.
How to make concrete floors on the second floor.
They are quite simple and quick to create. They are used exclusively if the floors are reliable and capable of withstanding significant impacts, since they have significant mass.
The entire process of forming a concrete floor is divided into the following stages:
- Formwork is being installed on the second floor. A lot of attention is paid to this stage, since it is important that a perfectly smooth and high-quality structure is obtained. It is formed using durable and well-dried boards. Its dimensions correspond to what parameters the concrete floor itself should have in the future.
- The formwork is being reinforced. A special frame formed from metal rods is placed into the finished formwork. The size of each cell in this design is approximately 20 cm.
- The formwork is filled with high quality concrete mortar. It is advisable to use the concrete grade M400 for this, since it is of high quality. The filler in it is sand, which can be replaced with small-sized crushed stone. Filling is done exclusively at one time. After this, it is important to use vibration equipment to completely eliminate any air bubbles from the composition.
- Optimal care of the created concrete surface is ensured. To do this, on the second floor the entire floor is covered with polyethylene, and it is also important to regularly water it with the optimal amount of water. This will prevent the formation of cracks and other problems on the surface.
- The concrete floor is being finished. For this, completely different types of finishing floor materials can be chosen, since concrete can easily cope with various loads.
Installation of the second floor floor on power beams
Installing timber on walls
- Cover the beams with antiseptics and fire retardants.
- Make openings in the walls for beams. If the partitions are brick or concrete, grooves (sockets) are made. In log structures, provide recesses with a depth of at least 150 mm (for beams) or at least 100 mm (for boards). The step between openings should be within 0.6-1 m.
- The first log is placed at a distance of at least 50 mm from the wall, the rest - evenly between the outer elements.
- Decks can be attached to the wall in other ways. For example, if you cut dovetail grooves in a partition, and make protrusions of the same shape in a log. Another option is to pre-fix the corners or brackets to the walls with self-tapping screws or anchors and place beams on them. The latter method allows you to quickly create an overlap, but in operation the connection is not very reliable.
- Cut the ends of the profiles at an angle of 60 degrees.
- Cover the ends of the decks that rest on the walls with bitumen and wrap them with two layers of roofing material for waterproofing. Do not insulate the cut ends; they must remain in this form for ventilation.
- Prepare scraps of boards 30-40 mm thick, soak them with waterproofing agents and antiseptics. Place the samples in the bottom of the joist recesses.
- Lower the beams onto the planks and leave 30-50 mm gaps between them and the walls on all sides.
- Check the level of the timber with a level. If necessary, make wooden dies of different thicknesses, coat them with resin and dry.
- Place shims under the edge of the beam and eliminate the slope.
- Put all the lumber in its place in the same way.
- Check the location of the upper surfaces of all products in the same horizontal plane using a building level. If necessary, remove tilts.
- Seal the gaps between the wood and the wall with mineral wool or tow, which will prevent cold air from entering. Fasten every fifth sample to the wall with anchors.
Assembly of the floor structure
- Fasten the cranial bars with a cross-section of 50x50 mm flush with the lower base of the beam.
- Place the subfloor elements on them and secure them on the first floor side with self-tapping screws. When installing, check the horizontal level of the bottom flooring.
- To protect against damp fumes, lay glassine or plastic film on the floor. They are laid over the logs with an overlap of 10 cm and secured with a stapler. Tape the joints with construction tape.
- Place roll or panel insulation material over the vapor barrier. Check that there are no cracks on the floor. When installed in two layers, the slabs must overlap the joints of the bottom row.
- Cover the insulation with plastic film and seal all gaps between the material and the base.
- After installing the insulation, subfloor boards are laid on the power elements. The material of the platform depends on the finishing coating. For example, linoleum or parquet boards are laid on plywood 10-12 mm thick.
- Laying the floor on the second floor is completed after making holes in the corners of the room for ventilation of the underground space.
Wooden floors
Regardless of the initial plans, when building a house, in any case, ceiling beams are present and, as a rule, they must be strong enough if the house is installed according to all the rules.
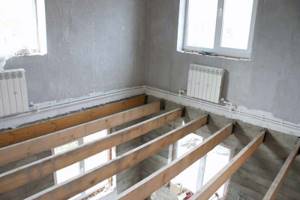
The construction of the second floor floor should begin with these beams. If the house is under construction and the project plans to use the second floor, you should remember that the size of the beams depends on the size of the span.
For example:
- beam section 75×100 mm with a span of 2200 mm;
- 100×175 mm or 125×200 mm with a span of 3200 mm
Sometimes they use boards that are sewn together to form an imitation of timber. But, as practice shows, in most cases beams of sizes 150×150 mm or 200×200 mm are used. The direction of laying the beams is chosen in the direction of the shortest distance between the walls. The beam with its ends must rest on the wall at least 90 mm. It is recommended to use beams made of pine, since materials made from this type of wood are quite lightweight, but at the same time can withstand heavy loads. In this case, the wood must be completely dry and of good quality.
Installation of the timber is carried out in pre-prepared recesses in the brickwork or also in the timber. It should be remembered that beams must be treated with appropriate protective compounds before installation. If the part will rest on a brick wall, waterproofing materials must be laid in the places where the wood touches the brick. If the house is wooden, it is recommended to lay tow or other material with the same properties in the recess in the wall where the beam will be installed.
Next, a subfloor is nailed to the beams, which also serves as a subceiling. If for some reason the parts are laid at a short distance, there are attempts to save on the rough board, and the finishing ceiling is immediately nailed to the beams. This should not be done, since the material used for finishing hemming is not always able to withstand the loads that arise after laying the insulation and protective components.
There is another option for installing a subfloor. A 40×50 mm or 50×50 mm block is attached to the beams on both sides along the entire length, and a subfloor is mounted on these bars in a size corresponding to the width between the beams.
A less common method is to make grooves in the beams into which subfloor boards are installed. With this option, the size of the beam must be selected taking into account the size of these grooves.
After laying the rough board, a thermal protective film should be laid (any type of this material can be used). The film is placed between the beams so that its edges overlap the part itself. It is advisable to secure the film using a stapler. It should be remembered that the film is laid with the smooth side up and the rough side down. Otherwise, it will not be able to perform its functions. In this case, you can use roofing felt or simply rasters made of clay and sand as cheap materials.
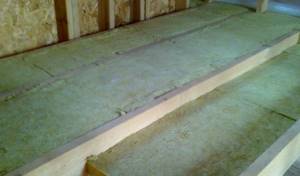
After the film is laid, the insulation is laid. Various materials can be used as it. The most common is mineral wool. As for this product, regardless of advertising promises and advice from knowledgeable experts, you must remember that it is made on a fiberglass basis, the binding element is phenolic resins. In any case, fumes will be present, and microscopic dust will also be present. In some cases, the space between the beams is filled with expanded clay, slag, sawdust, or polystyrene foam is laid. If it is necessary to provide increased sound insulation, it is advisable to use penofol and sand. A layer of penofol is placed in the space between the beams and covered with a layer of sand about 5 cm.
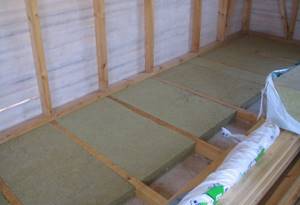
By the way, in the old days they used a mixture of earth and oak leaves as sound insulation - this is the cheapest way. In any case, it should be taken into account that the insulation layer must be at least 50 mm, otherwise it will not perform its functions. If the room on the second floor will be constantly heated and used as a living space, insulation in the interfloor ceiling can be eliminated (it is enough to ensure good sound insulation).
The next step is to lay another layer of film that acts as a vapor barrier. It can be laid directly on the insulation, but it is better if there is a small space between the insulation and the film. Therefore, the film is attached directly to the beams.
After all operations, laying the floor on the second floor begins. For installation, use an edged board without a groove if the floor is to be further covered with chipboard or other boards. Ideally, use floorboards with a groove. In this case, they fit tightly, without any gaps.
To save material, in some cases the boards are laid directly on the beams. But ideally, you need to lay bars with a cross section of 50x50 mm on the beams at a distance equal to the distance of the beams, and lay the floor on them.
Laying the subfloor
Boards/slabs are placed on the protruding parts of two joists and secured with self-tapping screws.
The following materials can be used for the subfloor:
- OSB (orientated strand board) is made from pressed shavings with the addition of resins. It is lightweight, durable, and has low vapor permeability.
- Chipboard (chipboard) - produced by hot pressing with the addition of non-mineral binders. Lightweight, durable material, easy to machine.
- Plywood is an environmentally friendly material made up of layers of glued veneer. Unlike OSB and chipboard, it does not contain harmful volatile substances and will not cause harm to health.
The recommended thickness of the subfloor is 20mm, this is enough to support the weight of the insulation.