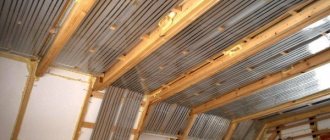
The specifics of insulating the second floor of a wooden house depend on the design of the room. At the design stage, it is determined whether this space will be occupied by a residential attic or whether a cold attic will remain.
The decision will affect the building insulation technology, the progress of construction and finishing work.

Insulation of the second floor requires technically correct execution of all work.
Benefits of wood
Wood is one of the most common building materials for building buildings, external and internal cladding. Its advantages:
- less weight compared to concrete, brick, stone and metal;
- high strength;
- low thermal conductivity;
- frost resistance;
- easy to glue and connect with fasteners, easy to process;
- environmental friendliness.
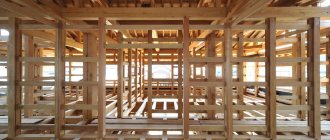
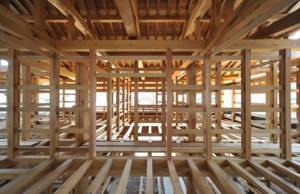
For private households, floors with wooden joists are most suitable.
They are installed simultaneously with the walls and the frame of the building before the cladding begins.
Design features of the room
The design of the room directly affects the planning of thermal insulation work. In cottages, the upper tier is occupied by an attic or a full second floor with an attic.
Attic
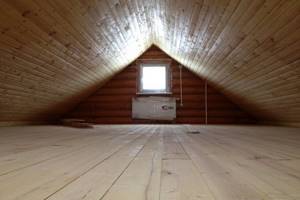
An attic is a simplified option to get additional living space instead of an empty attic.
Features of the room:
- The attic is located under the roof, completely or partially occupies the floor area of the upper floor.
- The geometry of the space directly depends on the roof, which determines the volume of the rooms and the height of the ceilings.
- Thermal insulation is required both inside and outside.
Attic is a usable attic space.
Full second floor
If the project provides for a full second floor, then there will be an attic between the ceiling and the roof. In this case, installation of waterproofing on the ceiling is not required.
Types of insulation
Insulation is designed to prevent the heat emanating from the building from mixing with external cold, and also protects against overheating in hot weather. Depending on the raw materials used for production, they are organic, inorganic and mixed. Based on their operating principle, they are divided into:
- Reflective - redirect warm air back into the room. To do this, they are equipped with a foil or metallized element.
- Preventative - contain most of the thermal energy within the protected surface.
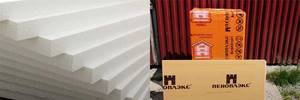
Styrofoam
Polystyrene foam has a number of disadvantages, due to which it is not always recommended for use in residential premises, bathhouses or cottages. Minuses:
- flammability;
- when heated above 30°C, it releases toxic substances;
- frequent habitat for rodents;
- contributes to the formation of the “greenhouse effect”.
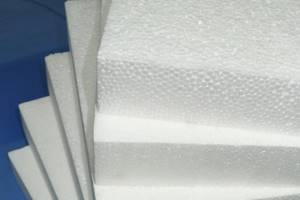
Foam plastic refers to foamed cellular materials.
Mount the foam on the frame or put it on glue.
Fiberboard
Fiberboards are resistant to temperature changes, have high sound insulation, and are excellent for insulating roofs and floors. They weigh little, can be easily processed with hand tools, are convenient and quick to install, and are not damaged by insects.
They have 2 sides - a smooth front side for finishing, a rough back side for better adhesion when gluing.
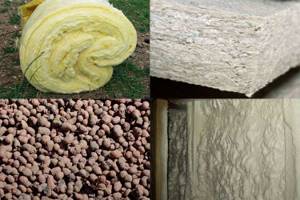
Glass wool
One of the cheapest insulation materials with high fire resistance. The material is elastic and easy to install. Due to its softness, it is susceptible to deformation; for a dense texture, several layers are made. When working, glass chips fall off, which forces the use of personal protective equipment.
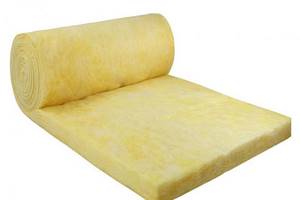
Glass wool is one of the cheapest insulation materials.
Minvata
The best option for insulating wooden structures. Mineral wool (stone wool) is environmentally friendly, does not deform, is resistant to weather conditions, vapor transmission is at an acceptable level.
Expanded clay
Safe raw materials that are not subject to rotting. It is an oval or round granule with a diameter of 5 to 40 mm. Pros:
- easy to use;
- does not burn;
- resistant to chemicals;
- unsuitable for rodents and insects;
- high thermal resistance;
- durable.
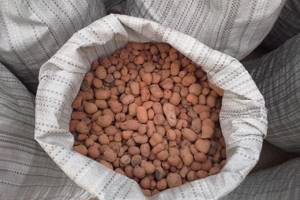
Expanded clay is a lightweight porous building material.
Expanded clay has a relatively large weight, which will depend on the thickness of the embankment. It is used for strong ceilings with support beams.
Polyurethane
Polyurethane is used on attic floors and in the basement. Using special equipment, it is applied to the surface and it turns into foam. Penetrating into all irregularities and crevices, it creates seamless protection against water, wind and heat loss. Easily adheres to various materials, elastic and durable, high fire resistance.
Sawdust
Used to fill the space between floor beams. To avoid rotting, they are treated with antiseptic compounds and mixed with lime.
Sawdust fills the space between the beams.
Expanded polystyrene foam
Sheets of different thicknesses are resistant to mechanical stress and weather factors, and are leaders in the thermal materials market. Advantages:
- easy;
- frost-resistant;
- sound insulation is above average;
- low thermal conductivity and flammability;
- non-toxic;
- low moisture absorption.
Expanded polystyrene is susceptible to destruction by rodents and reacts with various types of solvents.
Liquid penoizol
Modified foam plastic in the form of foam insulation with a high degree of adhesion to other materials. Penetrates into voids of horizontal and vertical surfaces. It has a low density, forms a monolithic layer, and allows water vapor to pass through.
Liquid penoizol is a thermal insulation material.
Ecowool
80% consists of cellulose, the remaining 20% includes fire retardants and other additives. It is a liquid mixture that is supplied from a hose under pressure or applied by hand. Sometimes they just pour it in, but it produces a lot of dust. Due to high hygroscopicity, during installation it is necessary to create a ventilated gap so that moisture escapes into the atmosphere.
Penofol
Reflective insulation with a foil top layer and a PVC foam base. Advantages:
- environmentally friendly;
- thickness is less than that of other heat-saving materials;
- does not absorb or allow moisture to pass through;
- flame retardant;
- Easy to install with any fasteners.
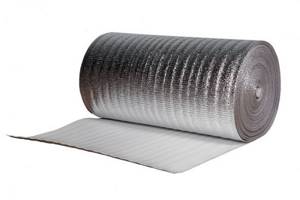
Penofol has a foil layer.
Penofol is not used outside the building, otherwise the accumulation of condensation will lead to dampness and fungus on the wall.
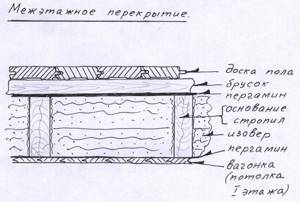
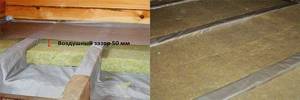
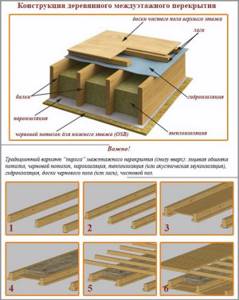
Correct floor design
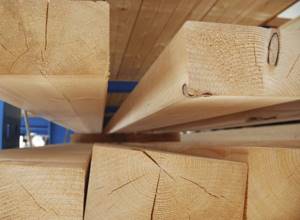
Interfloor wooden floors are arranged on beams. They are usually used as timber. The size of the section depends on the size of the span that needs to be covered, as well as on the size of the expected load on the floor and the types of wood used. Most often, timber with a section width of 100 mm and a section height of 150-200 mm is used.
Next, the ceiling itself is formed by installing the floor boards of the upper floor and hemming the ceiling materials of the lower floor. You can often see that floor boards are laid directly on beams, but it is more correct to first install logs on the beams, and then make flooring from the boards over them. The second option is the most preferable, as it will allow for proper interfloor insulation along wooden beams.
The fact is that in the pie, which the filling of the interfloor ceiling is so similar to, there must be layers of vapor barrier.
They are made of a special membrane with a certain coefficient of vapor permeability, and the top layer of the membrane allows steam to pass in only one direction - from the insulation into the air. Therefore, an air gap is needed between the membrane and the plank floorboard, which will remove steam from under the boards. Otherwise, the latter will simply begin to rot.
In this case, the membrane is laid on the interfloor floor beams, and the air gap is formed due to the thickness of the logs laid perpendicular to the beams.
Steam is removed from under the boards through specially cut holes in the floor or slotted skirting boards used to edge the perimeter of the room.
Note! The bottom layer of the membrane must be made of a material with a very low vapor permeability coefficient.
This is necessary so that moisture from the lower rooms does not seep upward through the interfloor ceilings, and also does not linger in the layers of insulation. All air from the floor should be vented into the atmosphere only through ventilation ducts or windows for ventilation.
Material selection criteria
To avoid making a mistake when choosing an insulator, take into account a number of features:
- climate of the region;
- the main building material of the building and the specifics of the design;
- installation features;
- cost of coatings for all types of insulation and cladding;
- operational features of insulation materials.
The choice of materials depends on the construction material of the building and the specifics of the design.
Indicators of toxicity and durability are not ignored.
Types of floors
Depending on the specifics of the building design, there are two types of second floor floors on wooden beams.
SNiP 2.03.13-88 dated 01.01.1989 Floors. Thickness, floor coverings, interlayer, screed and subfloor layers (click on link to open PDF in new window).
Table. Types of second floor floors based on wooden beams.
| Floor type | Description of technical and operational features |
| Such floors are now almost never used, but in vain. Below we will look at options when it is advisable to install non-insulated floors. In terms of cost, they are the cheapest; laying them is not difficult even for beginners. | |
| The design is complex from an engineering point of view and consists of several layers, each of which has a significant impact on overall performance. The cost is much higher than cold ones, but can significantly reduce heat losses. Due to this, the expensive design quickly pays for itself and begins to bring direct profit. But this is only possible under one condition - heated floors are laid in strict accordance with existing building codes and regulations. Otherwise, they quickly lose their original properties and require complex and expensive repairs. |
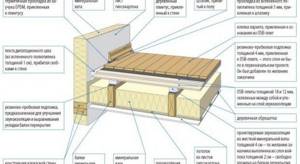
Scheme of interfloor slabs in a wooden house
Insulation layers
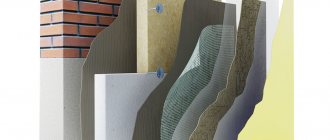
Components of the insulation design:
- finishing floor;
- screed;
- floor waterproofing;
- beams with heat and sound protection between them;
- ceiling vapor barrier;
- counter-lattice;
- ceiling cladding.
Ceiling vapor barrier is a component of insulation.
The interfloor ceiling is insulated if it divides the space into a living area and a basement or upper floor with an attic.
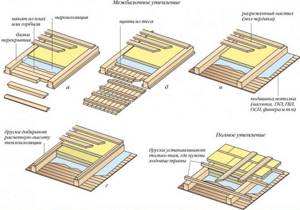
Work technology
The most effective will be the insulation of the interfloor ceiling if it is carried out during the construction process. It is in this case that all the subtleties can be taken into account and all available materials can be used.
If the interfloor ceiling is not yet ready, but only consists of a set of wooden beams laid on load-bearing walls, it is necessary to install a vapor barrier layer on the lower surface, and then hem the ceiling of the lower floor. As a result, if you look at the ceiling from the upper floor, it will look like several long boxes formed by the beams and ceiling covering.
It is in these boxes that you need to put the insulation. After the material is laid in the space between the beams, it must be covered with a second layer of vapor barrier. Sheets or panels must be overlapped and glued together. Logs are installed immediately along the top layer of vapor barrier, on which the floor boards of the upper floor will subsequently be laid.
If you are insulating a finished interfloor floor, as often happens during major renovations of residential buildings, the insulation will have to be installed on the underside of the floor. To do this, a frame is installed on the side of the ceiling of the lower floor or basement using wooden bars or metal profiles. Insulation is secured between the frame elements using special fasteners. Next, a lower layer of vapor barrier and a ceiling covering are mounted along the frame, close to the insulation.
Properly performed insulation will protect against frost and heat in the summer, and provide good sound insulation.
The growth in private housing construction indicates an increase in the well-being of our compatriots. The younger generation finds it hard to believe that not so long ago they had to wait 30–40 years for housing, and the outcome of the wait was still unknown. Even those who had the opportunity to immediately pay for cooperative housing had to sign up as members of these communities due to great connections; the volume of such construction was miniscule. This is for those who idealize the times of the USSR too much, but did not live then.
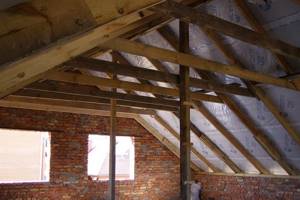
Second floor floor on wooden beams
Today the situation has changed dramatically, a large number of our compatriots can buy ready-made apartments in high-rise buildings, and those who do not want to breathe in the city smog are being built outside the city. The building materials and technologies existing on the market make it possible to create unique projects that architects could not even dream of before. But not all developers have enough knowledge to choose the right option for arranging floors along beams on the second floor. Let's try to figure it out.
The most popular material in private construction is wood, due to its affordable cost and ease of processing.
Types of jobs
The insulation of a wooden cottage or summer house is divided into internal and external according to the type of work. They can be combined.
External
All actions are carried out in dry and warm weather. Wooden structural elements are treated with an antiseptic, metal ones with an anti-corrosion compound. Damp areas are dried.
In private houses made of timber, waterproofing is attached to the rafters, after which the sheathing is made and the roof is mounted. From the inside, insulation is laid between the joists, a vapor barrier is fixed, and the finishing sheathing is made.
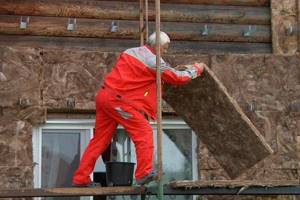
External work is carried out in dry weather.
For a soft roof, the sheathing is first covered with moisture-resistant plywood or OSB, and then a covering is created. If the roof slope has an inclination angle of up to 18°, then less protected areas from water need water protection:
- skates;
- overhangs;
- around pipes;
- valleys.
Domestic
If the decorative finishing of the house has already been done, then interior work will be a necessary measure. But with this option, the useful living space will be reduced.
Interior work reduces the area of the room.
Important points in the work plan:
- first attach the vapor barrier film, then the thermal material, leaving a 2-centimeter gap between the layers;
- It is advisable to lay 2 layers of insulation in the corners to further contain cold air;
- finishing the walls;
- seal around the chimney, entrance doors and windows.
Materials for work
To properly insulate the floor in a wooden house, you need to choose high-quality insulation that has all the necessary properties. Insulation can be carried out both from the inside of the room and from the cold air side.
To insulate an attic floor from the inside or a basement floor with your own hands, it is better to use lightweight materials that can be easily attached to the floor pie from below. In this case, it would be correct to use:
- mineral wool in rolls;
- Styrofoam;
- polyurethane foam.
These materials will ensure maximum convenience when insulating the ceiling with your own hands.
When insulating a frame house, a house made of timber or logs, you can carry out work from inside the room for the floor of the first floor and outside for the last floor. In this case, it is better to insulate the floor along joists or beams, since this will prevent the load from being transferred to the fragile material. For this type of work you can use the following materials:
More information about insulation with sawdust and expanded clay can be found in the articles “Insulation of floors with expanded clay” and “Insulation of floors with sawdust.” These materials have such advantages as natural origin and low cost, so if you need to reduce construction costs or insulation in an old building and ensure complete environmental friendliness, it is better to use them. However, they are less technologically advanced compared to other materials.
Recently, the method of insulating floors with foam (polyurethane foam) is also gaining popularity. This method is good for its low labor intensity and high efficiency.
Floor insulation with polystyrene foam also deserves attention due to the relatively low cost of the material and ease of installation. The method of floor insulation with Penoplex (extruded polystyrene foam) is less popular in wooden floors due to the high cost of the material - it is more suitable for insulation under screed.
Technologies used
Of all the technologies for insulating a wooden house, the most popular are the warm seam and the wet method. They are used depending on the situation.
Warm seam
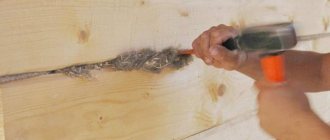
The method is used when the timber is a decorative part of the interior and the joints of the crowns require insulation. The method eliminates the need to caulk gaps between logs with tow, flax and other suitable materials. The new technology repeats the principle, but the effect is more durable and simpler.
Before starting work, the wood is sanded, primed and painted. An insulating cord made of polyurethane is placed into the gap, taking the desired shape and not losing it over time. Apply sealant over it and level it with a spatula or a damp brush.
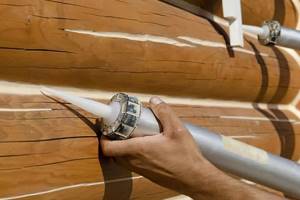
Warm seam is a technology that hides cracks.
Wet method
The method is used for houses with a flat facade surface, where external decorative finishing is planned. There will be no gap between the thermal insulator and the finishing cladding. Stages of work:
- a heat insulator is glued to the street side and secured with fastening dowels with plastic rods;
- attach a reinforcing mesh and perforated corners to the base layer of glue, level the mixture with a spatula;
- apply the finishing layer of the solution;
- After drying, they sand, prime, plaster, and paint.
Insulation materials
Various thermal insulation materials can be used as interfloor insulation for a wooden house:
- glass wool;
- basalt wool;
- slag;
- Styrofoam;
- penoplex;
- expanded clay;
- foamed polyurethane;
- shavings, sawdust.
The choice is based on the availability of the material, its cost, and characteristics. Thus, mineral wool and expanded clay are the most acceptable from the point of view of fire safety. At the same time, penoplex does not absorb moisture, does not cake, and has high thermal insulation properties. Sometimes materials are combined to increase thermal protection.
Various types of cotton wool
Most often, various types of construction thermal insulating mineral wool are used to insulate interfloor ceilings. They are made by melting and drawing fibers from raw materials. These fibers are then intertwined on special machines and formed into mats or rolls. In some cases, such mats or rolls are stitched with synthetic threads to increase the strength of the products.
For glass wool, the raw materials are waste and waste from glass production; for mineral wool and basalt wool, igneous rock melts are used. Slag is produced by melting blast furnace slag.
Different types of cotton wool have different properties. They have different densities and different thermal conductivities. These characteristics depend not only on the type of feedstock, but also on the specified production parameters.
Foam plastic and penoplex
These are two similar materials in properties and production method. The starting materials for their production are plastics of various compositions. During the production process, they foam and, when hardened, are formed into sheets of the correct geometric shape. The difference lies in the fact that during formation, penoplex is extruded through a special device - an extruder.
Both foam plastic and penoplex have closed pores filled with gas in their volume. Only in polystyrene foam it is ordinary air, and when foaming polystyrene foam, carbon dioxide is usually used. In terms of thermal conductivity, both materials are almost identical. But due to the fact that the pores in the penoplex mass are distributed more evenly and they themselves have almost the same size, its strength is much higher.
Very often, when forming sheets of penoplex, their ends are not made even, but in the form of two or more ledges. When insulating, two adjacent sheets, connecting to each other during installation, provide better insulation, since the joints are not blown through and retain heat well.
Expanded clay
Expanded clay is a building material that consists of many oval granules - pellets with an average diameter of 10 to 20 mm. The material of these granules is clay and shale sand. The pellets themselves are obtained by firing pre-prepared semi-finished products in special ovens. When heated, pores of different sizes appear in the volume of expanded clay, as a result of which it has a very low density. One cubic meter of bulk expanded clay can weigh only 300 kg. For comparison, it can be noted that one cubic meter of pine wood weighs 500-550 kg at natural humidity.
Note! Expanded clay is an environmentally friendly material. It is durable and will not rot or decompose.
Polyurethane
Foamed polyurethane is used, as a rule, for insulating basement and attic floors. It is simply applied using special equipment, and later it foams in air and takes on a three-dimensional shape. The advantage of using such material is that it fills all the leaks and cracks in the ceiling structure, allowing you to create a sealed water- and windproof thermal protection.
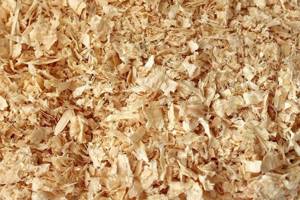
Sawdust
Wood shavings and sawdust have recently been used much less frequently, but more recently they have also been used to insulate interfloor ceilings, filling the cavity between the beams. To prevent such insulation from rotting inside the ceilings, it is treated with special compounds that kill putrefactive bacteria and woodworms. When laying, shavings or sawdust are mixed with lime.
Vapor barrier
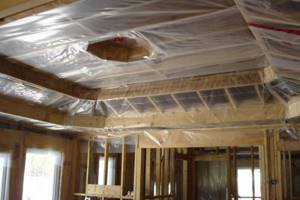
To properly insulate interfloor ceilings, it is not enough to use only materials with thermal insulation properties. If you do not protect the insulation from the action of moisture located in the interior of the premises, various microorganisms will multiply in the material, which can subsequently lead to mold or mildew. To avoid this phenomenon, it is necessary to make the correct vapor barrier for the insulation.
Any of the many options produced by industry can be used as a vapor barrier. Ready-made protective membranes are very widely represented on the building materials market. When building and insulating a private house with your own hands, you can use available materials if you know their strength and vapor barrier properties and use them correctly.
As the main layer, the coefficient of vapor permeability of which should be minimal, you can use ordinary polyethylene film or foil. This layer is laid below the insulation, preventing moisture vapor from the basement or lower floor from penetrating into it.
As the second layer, which will be on top of the insulation, you can use wax paper or glassine. These materials have greater vapor permeability than foil or polyethylene. They will facilitate the free release of vapors from the thickness of the insulation upwards.
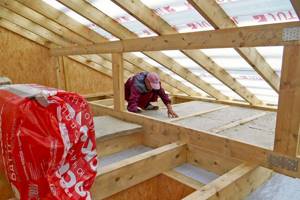
Insulation from the attic
Insulating the floor from the cold attic side of a two-story house requires less labor than from a living room. All types of heat insulators are suitable for use:
- bulk;
- cotton mats;
- foam slabs;
- folk
Industrial ones benefit from ease and speed of installation. If soft raw materials were used, then ladders are made from boards in the attic for maintenance and inspection. Bulk and crushable materials are loosened as they compact.
Use of mineral wool
When working with mineral wool, use a respirator, gloves and goggles, and wear closed overalls.
Insulation from the attic side requires less labor.
The cotton wool is cut so that each cut is at least 2-3 cm wider than the cell size. The sections between the joists are covered with a vapor barrier, with an overlap made around the perimeter of the walls, as well as on the beams. A piece of cotton wool is slightly compressed and inserted into place. She will straighten up and hide all the bridges of cold.
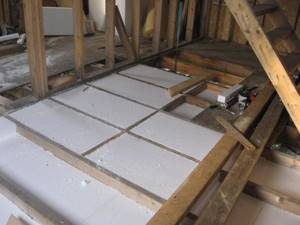
Thermal insulation with polystyrene foam boards
To adjust to the required size, polystyrene foam boards are cut. Incorrectly cut parts can cause gaps and heat loss.
When using polystyrene foam, be sure to first create a layer of vapor barrier, since it absorbs water. The slabs are laid in 2 layers. If there are chamfers, then they are not treated with anything. Seams and joints on polystyrene foam are sealed with sealant or polyurethane foam.
On the slabs, paths are made of gypsum fiber sheets or a partial screed up to 4 cm thick with a reinforcing mesh. For the second option, before pouring the solution, lay waterproofing in order to protect the insulation.
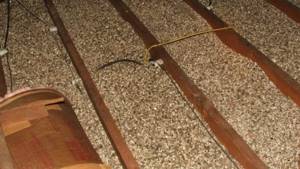
Arrangement with expanded clay gravel
Expanded clay is the most popular backfill material, which is used both for insulation and to lighten mixtures and insulating compounds.
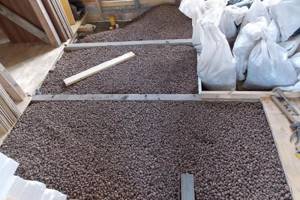
Expanded clay is a backfill material that is used for insulation.
Before backfilling, cover the floors with a vapor-proof film. In this case, the edges of the material extend onto the walls 10-15 cm above the expanded clay layer. It is periodically stirred with a rake to dry it. Moves for maintenance are made at will.
Bulk folk materials
Supporters of environmentally friendly materials use natural insulation materials. Before the development of the chemical industry, such raw materials easily coped with their task. Main advantages:
- There are no harmful components released. When replaced, they are disposed of or burned.
- It is extremely rare to provoke an allergic reaction in residents.
- Economically profitable and practical.
- Combination with natural building materials.
- Light weight.
There are also a number of disadvantages:
- Easy to flammable. Requires the use of fire retardants.
- Over time they cake, which leads to a reduction in thermal insulation properties.
- Attractive to rodents.
- If you don’t treat them with antiseptics and don’t stir them periodically, they will quickly rot.
Straw is a folk material.
Most of the natural raw materials are of the bulk type. They are laid over the ceiling and turned over as needed to dry. Folk materials include:
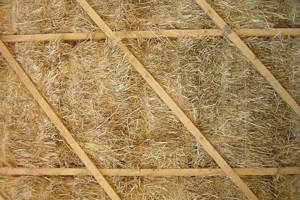
- Straw. The bundles are soaked in a 10% solution of copper sulfate and left until completely dry. Lay in a layer of at least 25 cm.
- Moss. It has antiseptic properties, perfectly absorbs moisture, and is durable. For insulation, a 10 cm layer is enough.
- Hay, dry leaves, pine needles. The raw materials are the most affordable; thermal insulation requires a thickness of 20 cm. The disadvantage is rapid saturation with moisture.
- Seaweed. Rarely used, mainly by residents of coastal areas. Laying layer up to 20 cm.
- Reed. Dry stems are tied with wire into mats 10-15 cm thick and filled with them in the spaces between the logs.
Materials with high environmental characteristics also include felt, coconut fiber, jute, flax, and clay.
Step-by-step instructions for building a floor
For example, we will take a complex option - a floor insulated with mineral wool. Floor beams made of 50x200 mm boards; according to calculations, such elements fully withstand planned loads and have a safety margin of approximately 40%. The reserve is required for all critical architectural elements of buildings; the ceiling is included in the list of such structures. For vapor barrier, modern membrane coatings and a subfloor made of 20 mm thick edged boards will be used.
Modern materials are used for work
Practical advice. In order to reduce the cost of construction, you can use OSB or plywood boards, used boards of the same thickness or various substandard sections for the subfloor. The decision should be made taking into account personal financial capabilities and the type of finishing flooring.
Wood that will be used for work
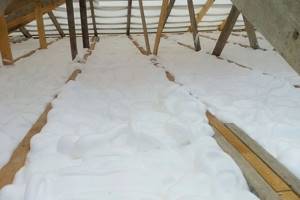
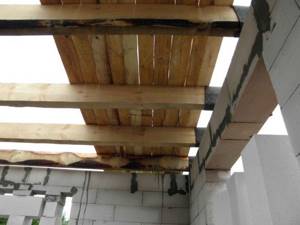
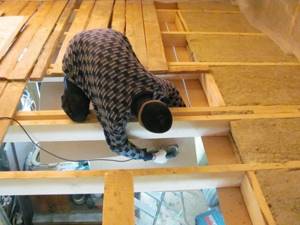
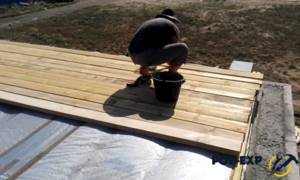
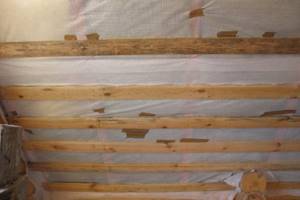
Step 1. Lay the floor beams on the load-bearing walls. We have already said that in order to reduce the force on deflection, they should be laid along the width of the room, and not along the length. Be sure to wrap the ends of the beams with roofing felt, there must be at least two layers. It is recommended to soak the boards themselves at least twice with an antiseptic. The specific brand does not matter, they all cope with their tasks quite effectively, except for obvious counterfeit products. The distance between the beams corresponds to the width of the mineral wool sheets. Standard materials have a width of 60 cm, which means the distance along the axes of the beams is also 60 cm. Thus, a clean niche with a width of 55 cm is obtained, this allows you to tightly insert the mineral wool and eliminate the appearance of cracks. Gaps are undesirable not only because they cause heat loss. There is another problem - condensation is constantly present in these places, the wood gets wet and begins to rot. There is no point in talking about the negative consequences of such a process.
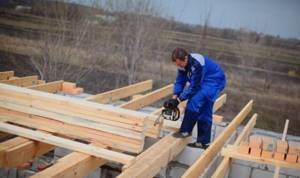
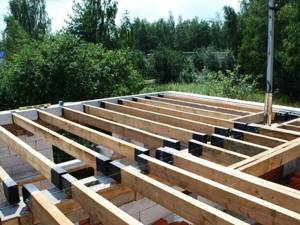
The installation of load-bearing beams is most often carried out during the construction of the walls of the building
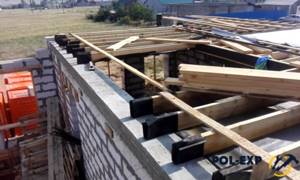
Be sure to wrap the ends of the beams with roofing felt
Options for fixing floor beams to wooden walls
There are quite a few ways; experienced builders make the final decision on site. Beginners can be recommended to use one of the listed methods.
- At the ends of the beams, recesses are made to suit the size of the logs . Advantages - the beams lie firmly on the wall; in many cases, additional fixation is not required. Disadvantages - cut elements lose strength; preparing each beam requires a lot of time. During calculations, it is necessary to take into account not the overall width, but only at the location of the cut. And there it decreases significantly, due to which the consumption of lumber increases.
- The ends of the beams lie on the line of the log house; special openings are made under them . A very simple and time-tested method, universally applicable. Professional builders always try to use this method of installing second floor floor beams.
Laying in recesses is convenient because each element is located in its place, which is prepared in advance
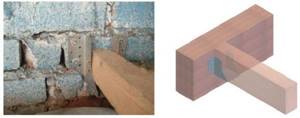
The beam support is open, a specialized fastening for the construction of wooden floors, serves as a connecting element when connecting load-bearing beams
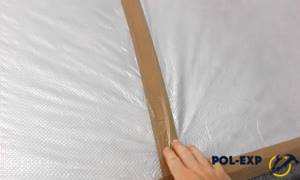
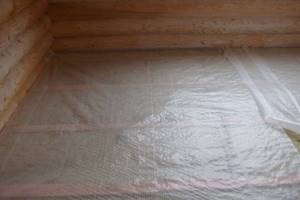
Step 2. Fix the vapor barrier to the lower planes of the beams with a stapler. The overlap is at least ten centimeters; all joints must be sealed with tape. We have already mentioned that it will not be possible to make the protection completely sealed; moisture will find cracks in any case. But this does not mean that it is unnecessary to take measures to minimize this process.
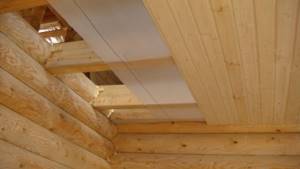
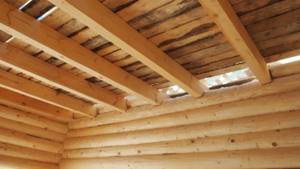
Construction of wooden interfloor ceiling
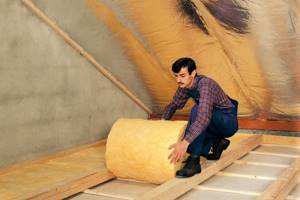
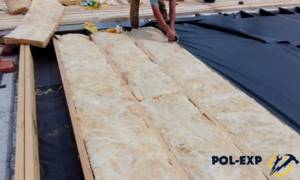
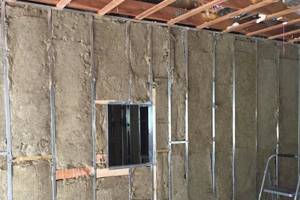
Step 3. Nail slats or boards to the bottom of the beams. The finishing of the finished ceiling will be fixed to them; the base must be strong. Thermal insulation material is laid on top of the slats. In our case, this is mineral wool, make sure that it fits tightly to the edges of the niche.
Practical advice. The thickness of the insulation is recommended to be at least ten centimeters. It is much more efficient to lay not one layer of insulation of this thickness, but two five centimeters each. Due to this, it is possible to shift the joints and completely eliminate the possibility of cold bridges appearing.
The photo shows the floor pie of the second floor
It is very important that the mineral wool does not get wet; if the house does not have a roof, then it must be protected with film. Wet material cannot dry on its own in a niche; it must be removed to dry. And this is not only unplanned loss of time, but also a large amount of unproductive waste. During dismantling, wet cotton wool breaks easily; some sheets must be completely replaced with new ones. As a rule, no one plans for such losses and does not take them into account when calculating the amount of insulation. As a result, a repeat visit to the hardware store is required.
Mineral wool is protected with a film
Step 4. Lay waterproofing on top of the insulation. We have already mentioned that for these purposes you need to use only a special innovative membrane; it allows steam to pass through and retains water. The membrane is also laid with an overlap and fixed with a stapler.
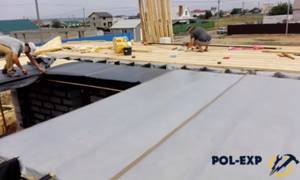
The membrane is fixed with a stapler
The joints are taped
Step 5. Lay the subfloor. Laminate was chosen as the finishing coating, and a solid base is required for it. Nail the boards tightly, but there is no need to specially tighten them with wedges. Gaps of no more than one centimeter are allowed. At least two nails must be driven into each board on each side, otherwise they will certainly bend during use. This is a very undesirable phenomenon, especially for laminate flooring - the light coating lifts, and extremely unpleasant squeaks appear when walking.
Subfloor boards are nailed
It is not easy to eliminate them; you need to completely remove the laminate, level the subfloor boards and re-lay the covering. As practice shows, it is much more profitable, both economically and time-wise, to strictly follow the recommended technologies than to then eliminate defects.
The subfloor on the second floor is ready, construction of the façade walls can continue. Finishing the coating is allowed only after finishing the installation of the roof, finishing the ceiling and walls.
Prices for floor boards
Video - Insulation of wooden floors
Options for insulating the second floor in a timber house
The second floor is being insulated in stages. First, work is done on the ceiling, then the walls and floor from the attic are insulated.
Floors between floors
They begin insulation on the upper floor in order to install it on the already sheathed ceiling of the lower one. Algorithm of actions:
- If there is a floor, it will be removed.
- Lay the vapor barrier film overlapping the panels and beams.
- Fill the voids with insulation, making sure there are no gaps.
- Waterproofing is laid on top.
- Lay the floor covering.
When insulating, a vapor barrier film is laid.
If it is impossible to carry out installation on the second floor, then the work is transferred to the first. Its sequence:
- The ceiling of the first floor is being dismantled.
- Attach waterproofing.
- Insulation is placed and secured with wooden slats.
- Another layer of vapor barrier film is made.
- Install the ceiling covering.
Ceiling
When there is no access to the attic, the second floor ceiling is protected from the inside. Expanded polystyrene boards, less often mineral wool, are used as insulation. This method takes away part of the height of the room, since it requires the construction of a frame made of metal profiles or wooden blocks. Sequence of layers:
- waterproofing;
- insulation;
- vapor barrier;
- counter-lattice;
- ceiling trim.
The ceiling of the second floor is insulated from the inside.
Thermal protection of walls
Walls are most often insulated from the outside. Internal installation is done when external protection is insufficient or impossible to perform. Disadvantages of the second method:
- reduction of useful floor area;
- the likelihood of condensation forming between the insulation and the wall;
- the façade remains cold.
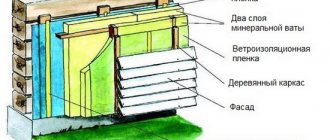
To minimize negative consequences, strictly follow the installation steps:
- The cracks are caulked and the surface is treated with antiseptic impregnation.
- Horizontal slats 2 cm thick are attached for a ventilation gap.
- Install a tension vapor barrier layer.
- Make a vertical counter-lattice with a distance slightly less than the width of the piece of thermal insulation.
- Insulation is laid between the racks and covered with a vapor barrier.
- Install decorative trim.
Indoor installation increases the likelihood of condensation.
Floor insulation technology
It is important to lay the insulation correctly, observing the correct order of all layers. The floor pie when insulating the attic floor, the floor of the second floor or the first has not always noticeable, but significant differences.
Insulation of the floor of the first floor from below
Scheme of floor insulation above a cold underground
In this case, when carrying out work with your own hands, the materials should be correctly laid in the following order:
- waterproofing;
- insulation;
- vapor barrier;
- ceiling design.
When building a house from timber or frame, the material is secured along the beams. After which the filing is performed. As a protection against moisture and steam, you can use ordinary polyethylene film. As a second option for waterproofing, moisture-proof membranes are used. If all layers are laid correctly, the structure will be reliably and competently protected from the cold from the point of view of heating engineering.
This method is very labor-intensive and is used only if it is not possible to insulate from the inside.
Also, for insulation from below, the method of insulating the ceiling with foam is perfect.
Insulation of the ground floor floor from the inside
Carrying out work under the ceiling is quite inconvenient, so When constructing a frame house or a building made of timber, insulation of the first floor floor is often carried out using beams from above. In this case, in addition to the previously mentioned materials, you can use bulk materials such as sawdust and expanded clay. When carrying out insulation with your own hands, correctly lay all layers in the following sequence:
- floor design;
- waterproofing;
- insulation;
- vapor barrier;
- clean floor.
The vapor barrier must be placed from the inside of the room, so it will work correctly, preventing damage to the floor along the timber beams.
Insulation of interfloor ceilings
In the first case, the insulation dampens airborne noise: human speech, music, etc. In the second case, the structure is also perfectly insulated from impact noise - steps, jumps, etc.
Proper sound insulation of interfloor ceilings is the key to comfortable living for all family members.
Insulation of the ceiling of the upper floor from the inside
Installing insulation from the inside does not provide maximum protection for structures, but it can be used as a second option for laying insulation. In this case, the insulation is mounted on the beams from below the floor. It would be correct to arrange the layers in this order:
- vapor barrier;
- insulation;
- waterproofing;
- beam-based floor structure.
Insulating the attic floor
When constructing and repairing a frame house, a house made of timber or logs, it is better to insulate the attic from above. This method has the following advantages:
- ease of installation;
- the possibility of using inexpensive bulk materials;
- competent thermal protection;
- insulation of not only the room, but also the ceiling along the beams of a house made of timber or frame;
- prevention of condensation in the thickness of the ceiling.
To ensure proper protection, the layers are laid in the following order from bottom to top:
- floor design;
- vapor barrier;
- thermal insulation material;
- waterproofing.
For waterproofing, a plastic film will be sufficient, but as a second, more serious option, you can use roofing felt. When building a house from timber or during frame construction, you can also read the article “Insulating the attic floor using wooden beams.”
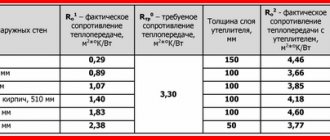
Calculation of insulation thickness
To perform a full-fledged thermal engineering calculation of the structures of a frame house or a building made of timber, it is not necessary to have a construction education. When performing calculations, it is important to know the thickness of all layers of the cake and their thermal conductivity. It's quite easy to find out.
Further on the network you can find the Teremok program, which is freely available.
The calculation will allow you to perform proper insulation of a house made of timber and prevent excess consumption of materials. All calculations, taking into account the search for source data, are unlikely to take more than half an hour. Typically, layers such as waterproofing and vapor barrier are not taken into account.
A competent choice of insulation method, type of material and its thickness can eliminate many problems during operation. When constructing multi-storey residential buildings, the question of insulation does not arise: it is required. The correct selection of thickness and the presence of measures for thermal protection of the floor, attic floor and walls are checked by an expert, which considers these calculations on a par with calculations of strength.
In private housing construction, no one checks the presence of proper insulation, but this does not make it any less important.
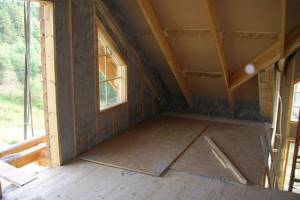
Ways to insulate the attic
The attic is used as a full-fledged living space. They are insulated so that the comfort of living in it does not depend on the time of year.
Floors
Floor insulation consists of the following steps:
- The vapor barrier is laid overlapping the beams, leaving a margin of 20-25 cm.
- They fill the subfloor.
- Lay the insulation in 2 layers in a checkerboard pattern so that there are no gaps.
- Cover with a vapor barrier membrane.
- Sew across the beams with a board in 10 cm increments.
- Cover with thick plywood or OSB slabs.
Insulation is laid on the floor and covered with a board.
Ceilings and walls
Insulation of the attic when the roof is adjacent to the floor:
- Lay waterproofing on the rafters from the ridge to the floor with an allowance of at least 20 cm.
- Make a sheathing with a distance of 50-60 cm.
- The inside is filled with insulation from the bottom up.
- Cover with a vapor barrier using thin slats. The joints are sealed with tape.
- Install the interior trim.
When there are walls, the diagram looks like this:
- Attach waterproofing.
- Install sheathing around the windows.
- A base beam is laid along the floor along the wall. Vertical racks are mounted to it. The voids are filled with thermal material.
- Attach a layer of vapor barrier.
- The counter-lattice is nailed with thin slats for ventilation.
- Finishing is carried out.

Ceilings and walls are covered with vapor barrier.
Door and window openings
The attic window block is insulated during installation with expanded polystyrene, basalt or mineral wool. The entire perimeter of the slopes is filled with material. The top is covered with a vapor barrier. You cannot use polyurethane foam, otherwise the frame will become jammed over time due to shrinkage of the rafters.
The gaps between the wall and the door frame are sealed, paying attention to the upper part of the opening and the threshold.
Gable
The principle of thermal protection is similar to insulating a roof or walls:
- Along the gable, beams are installed with a gap equal to the thickness of the insulation layer.
- Attach waterproofing.
- Place the insulation between the frame posts.
- Make a layer of vapor barrier.
- Sheathed with finishing material.
Plank and plywood floors on joists
The ideal option is one in which the floor insulation is carried out during the construction stage of the building. In this case, you can provide for all the nuances and avoid mistakes and unnecessary time and material waste. The maximum effect from insulation will be obtained only if the level of the wooden floor of the first floor is located at a distance of at least 25-30 cm from the ground level planned around the building.
Floors in wooden houses are arranged on beams, which are laid at the same level as the first crown of the log house. Logs are laid on top of the beams, and a board or plywood covering is placed on top of them. When insulating a wooden floor during construction, you can place thermal insulation material between the beams. To do this, along their entire length, skull blocks are nailed from below, on which board or plywood flooring rests. Between two adjacent beams a space is formed that can be filled with insulation.
Note! Before laying insulation, you need to lay a layer of vapor barrier.
In this case, it must be oriented so that water vapor from the insulation escapes into the underground. They are removed from the underground space through special ventilation holes, which must be provided in the foundation. In the winter, these vents are usually closed to prevent cold air from entering the space under the floor.
If there is a basement
If there is a basement under the first floor of the house, there may be no ventilation holes in the foundation. In this case, basement ventilation must be provided. This is often done by running the ventilation pipe up above the roof and installing it along one of the walls of the house.
Additional vapor barrier
After laying the insulation, it is necessary to install another layer of vapor barrier, the vapor permeability coefficient of which will be several times less than that of the bottom layer. To do this, you can use the most common polyethylene film or any rolled foil materials. In this case, the foil should be placed towards the internal volume of the room, then it will have a reflective effect for heat. Logs are laid over the top layer of vapor barrier, and boards or plywood are mounted.
The thickness of the logs will ensure that there is a mandatory air gap between the top layer of vapor barrier and the floor covering. Ventilation in this gap can be ensured by drilling several holes in the floor in the corners of the room or using special slotted skirting boards.
In the case of an old building
If you have to carry out insulation in already constructed buildings, the method described above is not suitable, since it is irrational to open up existing wooden floors. In this case, if the floor height allows, the old coating can be used as a subfloor. You need to lay logs with insulation on it and a new plank covering on top of them. Just as in accordance with the method described above, a layer of vapor barrier must be laid under the insulation and a denser membrane must also be mounted on top of the insulation.
Insulation of the roof of a wooden house
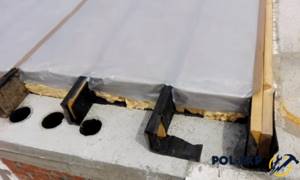
Before insulating the roof, the structures are inspected for integrity and the presence of mold. If necessary, areas are cleaned and impregnated with special compounds or replaced. Operating procedure:
- Attach waterproofing to the rafters. The joints are taped. The use of a superdiffuse membrane will provide protection from moisture, reflect heat and create partial sound insulation.
- A counter-lattice is nailed along the beams, and horizontal slats are placed on top of it. The roof covering is attached to them.
- Install a heat insulator between the rafters.
- Stretch the vapor barrier with an overlap of 15-25 cm.
- Make horizontal lathing for finishing.
Methods for getting rid of condensation
Condensation accumulates under the roof due to temperature changes. It can worsen the thermal insulation properties of materials and shorten the service life of roofing elements.
The problem is common in houses and cottages with a cold attic, an unheated attic, or after violations of the roof installation technology. If there is no ventilation between the waterproofing and the coating, the structure is dismantled and a ventilation gap of 1-3 cm is made. If there is no moisture protection, then it must be laid.
A second layer of thermal insulation is added to the ceiling. In the attic, ventilation windows are made at the ridges of the roofs and under the eaves.