Probably everyone knows about the existence of infrared heating. But not everyone knows its main features. Today this is the newest way to heat any room. This article will talk about the types of infrared heating and its pros and cons. This information will help users when choosing heating devices.
general description
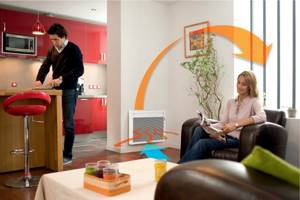
Until recently, heating of premises was carried out using convector heating, in which the air is first heated, and from it the heat is transferred to people and objects located in the room.
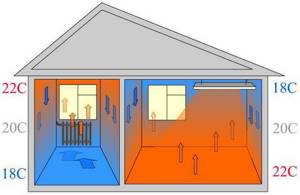
Ultraviolet heating works on a different principle - its waves first act on objects, transforming them into heat accumulators, which subsequently release heat to the air. A person in a room heated by infrared rays feels heat from all sides, including the floor and ceiling. Because of this, there is a feeling of more complete heating, so the temperature necessary for a comfortable stay in the room can be reduced by several degrees - and this is already a significant saving in heating costs.
True, we can talk about noticeable savings only if the house is well insulated. Of course, if heat losses are minimized, any heating system will be more economical - but heating with infrared heaters in this regard is characterized by maximum efficiency, since the optimal temperature for living can be reduced without loss of comfort.
In addition, all infrared heaters for heating rooms are equipped with a thermostat, which allows you to maintain the desired temperature. If the room temperature exceeds the upper permissible value, the heating is switched off, thereby avoiding unnecessary energy costs. When the room gets colder, heating starts again.
Selection of panels and their installation in the apartment
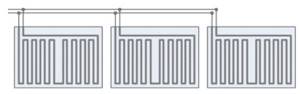
The power of panels for a home is selected at the rate of 1 kW per 20-25 cubic meter of space. Knowing the dimensions of the room, it will not be difficult to calculate which panels will be required for it.
If heating radiators are already installed, and the panels will play a secondary role, it is necessary to reduce the power and choose the most compact equipment. The efficiency of such heaters reaches 90%: this means that they use electricity as efficiently as possible, so their installation will be much more efficient than the installation of conventional radiators or convectors.
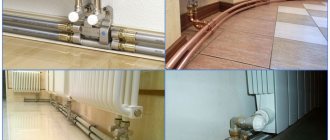
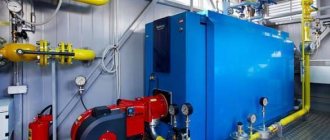
To heat the coolant in the system, not only electricity can be used. Gas heating will be much cheaper, and if this is possible, you can consider connection options. The coolant will be heated in the exchanger, and then flow through pipes into the panels, which will distribute soft heat throughout the room. However, this is a rather complicated option: equipping a conventional system with a heating element is much easier.
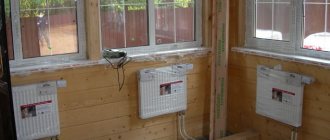
Externally, the wall panel is a thin plate; it can have different sizes. You can purchase regular products, or you can order designer panels, whose outer surface will be decorated with bright multi-color designs.
Such products can be placed in any part of the room, and they will look good in the interior. Having chosen a place to install the panels, you can proceed directly to installation:
A kit is purchased, which, in addition to the panel itself, includes a cable, a thermostat and a sensor system that will allow you to monitor the temperature in the room. With their help, it will be possible to maintain a stable heating level, which will be regulated without human intervention. In this case, you can select several panels that differ in power: thanks to the operation of the thermostat, they will be able to maintain the optimal temperature regime. You need to determine the location for the panels. The best option is walls between the windows: this will allow the warm flow to be directed into the room, and the radiation will ensure uniform heating. You can hang them on the walls like paintings, or install them on the ceiling in accordance with the design project. A set of sensors and a thermostat are installed in the room, the system is connected by cable into a single unit and connected to the network. The cable can be put into a box and mounted on the wall to give the room a neat appearance.
Installation usually takes a minimum of time; even a home craftsman who has not previously worked with such systems can easily install such panels. Manufacturers provide their products with detailed instructions describing how the system operates. You can calculate at which point in the room it is consistently coldest, and that is where it would be appropriate to place the infrared thermal panel.
If self-installation causes difficulties, it is better not to take risks, but to seek the help of a specialist. In addition, it is advisable to protect the electrical network from sudden voltage changes using stabilizers. Infrared panels negatively tolerate sudden increases and decreases in the electrical system, so they can fail for a long time even with a single failure.
An important advantage of such panels is their versatility. Equipment of the required power can be selected not only for a living room, but also for a production workshop, assembly hall, or any other large room in which uniform heating can be ensured on all sides
Thanks to high energy efficiency, it will be possible to minimize heating costs and at the same time create the most comfortable environment in the room.
You need to enable JavaScript or update your player!
The essence and advantages of the method
Traditionally, wood and gas stoves, convector heaters, and water heating are used for heating greenhouses and greenhouses. All these methods require large material and physical costs for installation and maintenance.
Features of infrared heating
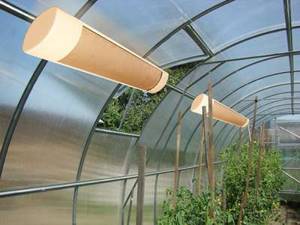
The infrared heating system for greenhouses differs from the traditional methods listed above in that it does not heat the air, but all objects located in the radiation field - the ground, plants, walls, etc. This radiation is similar to solar energy: heated earth and other objects emit infrared photons, which are reflected back by the walls of the greenhouse.
All other methods are aimed specifically at heating the air, the warm vapors of which rise upward, practically without warming the soil and leaving the plants cool.
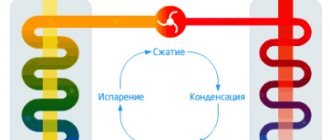
The fundamental difference between convective and infrared heating is clearly visible in the diagram
For reference. The situation can be corrected by installing water pipes buried in the ground. But the price of such a system is very high, which increases the cost of grown products, and it is quite difficult to control the soil temperature.
Infrared heating systems for greenhouses are distinguished by the fact that their radiation is directed from top to bottom and affects plants and soil, which is important for rapid germination, development and fruiting. Numerous studies have proven that, thanks to them, seed germination increases by 30-40% precisely due to warming up the soil, in which the air does not heat up so much
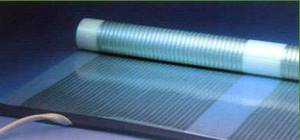
In addition, infrared heating for greenhouses can also be installed under a layer of soil - special films are designed for this.
Advantages of the method
The main advantage of an infrared heating system for greenhouses is its high efficiency, reaching 95%. This impressive result is explained by the fact that all the radiated heat is spent on heating the soil and plants, and not the air surrounding them.
It, in turn, warms up due to the reflected energy. Other advantages are no less significant.
This:
Significant reduction in heating costs both due to directed radiation and due to the small amount of electricity consumed.
Note. Compared to convector-type heaters and cable electric heating, infrared heating systems for greenhouses consume 40-70% less energy
- There is no need for additional air humidification, since these heaters do not dry the air.
- The operation of the system is similar to solar radiation and therefore is completely safe for both plants and people working in the greenhouse.
- The heaters do not make noise and do not glow, so they do not create any discomfort.
- Fast heating: you can raise the air temperature in the shelter to the specified parameters in a matter of minutes.
- The ability to create several zones with different temperature conditions in one greenhouse. Depending on the needs of a particular crop, you can change the power and height of the heaters above them, thereby creating the optimal temperature in the growing area.
The photo shows that the radiation extends only to the area under the heaters
- Simplicity of installation and dismantling - heaters are easy to install with your own hands or with the help of one electrician, which also allows you to save money compared to installing heating systems.
- The presence of a thermostat (see Thermostat for a greenhouse - choosing the right one) is a very important option for growing plants that require different regimes at different stages of the growing season.
- Fire safety due to the absence of open flames and heating elements.
- Mounting on walls or ceilings frees up valuable greenhouse floor space.
Saving space is especially important for small greenhouses
Features of installing infrared heaters
Each type of infrared heater has its own lifting height (2.2 -3.5 meters). It is better to install it at the maximum height, so that it is further from the head of a standing person. You should also not install the device in an area where people are frequently present, and the heaters themselves should be moved away from the bed. To reduce the condensation and more uniformly heat the entire room, it is recommended to install a larger number of heaters. You should not place the heater directly near a window, as this will cause heat loss.

Figure 4: Infrared ceiling heating
Use of materials is permitted only if there is an indexed link to the page with the material. For any questions please contact
In the modern world of scientific and technological progress, the heating appliance market is increasing every year and expanding its range. Against their background, infrared heating systems stand out at a very rapid pace.
Selection of equipment and materials
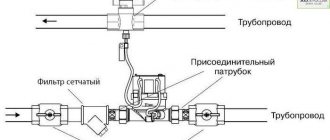
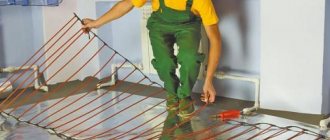
The infrared floor is connected according to the following scheme:
- preparation of the base;
- fastening of insulating material;
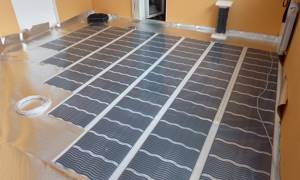
- laying film/mats;
- installation of protective material;
- flooring (with or without screed).
How to lay infrared heated floors depends on the type of heating system. There are film and rod structures. The basis of the former is a heating carbon or bimetallic element that supplies IR rays and anions to the room. It is protected from external influences on both sides by additional layers. The material is produced in rolls of a certain width and length. Heated infrared film floors can be installed in the shortest possible time. Of all heating systems, it is the most economical in terms of size and floor load. By the way, the film can also be used for walls with ceilings.
The basis of the rod structures are flexible carbon rods connected by wire. They come in the form of mats that look a bit like a rope ladder. Installation of an infrared floor of this type can be carried out either with or without a finishing screed. The advantages of rod systems are the ability to self-regulate and the ability to install in high humidity areas. That is, the film cannot be placed in areas where heavy objects will stand, or in the bathroom, but mats can.
In both cases, the installation of infrared heated floors is carried out according to the above scheme. Damage to the coating is also eliminated in the same way: by replacing the problem area (strip or mat). Rod systems are much more expensive than film systems. Their energy consumption is approximately comparable, and directly depends on the quality of the thermostat and temperature sensor.
Thermostat
The connection diagram for an infrared heated floor through a thermostat is classic. There is an option to activate the heating elements directly through the network by connecting to the panel, but such a solution can hardly be called practical. Firstly, you have to turn the system on/off every time, which in itself is inconvenient. Secondly, manual control leads to unnecessary energy consumption.
Connecting an infrared heated floor to a thermostat is not that expensive, so such a device is almost always installed. Using temperature sensors, the thermostat automatically turns off or activates the system. The regulator can be:
- electromechanical;
- electronic;
- programmable.
If you need to decide how to connect an infrared heated floor to a programmable controller, it makes sense to seek help from specialists. These are expensive and complex devices that are very sensitive to any error. Such a device is capable of controlling the system according to a given program. Such models help to use energy most efficiently.
If the installation of infrared heated floors is carried out in a technical room, bathroom or on a balcony, a cheap and reliable electromechanical regulator is quite suitable. Electronic thermostats are the “golden mean” in terms of cost and functionality, therefore they are always in stable demand. Thermostats are usually installed on the wall, at a height of 1.0-1.5 m. The power of the device is determined by the parameters of the heating system. It is recommended to use a separate thermostat for each room.
Finish coating
Installation and connection of infrared heated floors must be carried out taking into account the finishing coating. This equipment can be considered universal. It is suitable for heating tiles, parquet, porcelain stoneware, laminate, as well as soft carpet and linoleum. For heating systems located in bathrooms, toilets, and kitchens, tiles are usually chosen. If you plan to install infrared heated floors yourself, then in this case it is better to lay mats. The rays they generate easily pass through the screed and dense surface material. The tiles can also be laid on film structures.
Quality of sales and prospects for the development of solar technologies
The modern market and its sales technologies do not leave the buyer with an unambiguous assessment. Especially high-tech equipment and devices. This also applies to the market for the sale of solar power supply systems. Since production technologies themselves are very energy-intensive, if you want to purchase solar panels or buy a solar power plant for your home, the price in both cases will call for a detailed analysis not only of technical and technological features, but also of economic justification.
Voltage stabilizers for the home: reviews. Which converter is better to choose?
Main technical characteristics of devices. Review of modern models. Connection and repair of rectifiers.
An important factor when purchasing FSE is the quality of sales services. If by the price of a product we understand only its check face value, then by cost we can, within the framework of the article, also agree to understand all types of overhead costs, the reliability of the seller and the product, as well as the cost of time and moral strength.
Thus, the cost of solar panels for a home or the cost of a set of solar power plants for a home from the same manufacturer can differ significantly from different sellers. The reason may be as follows:
- The seller does not carry out preliminary engineering calculations. This means you need to go elsewhere. And this is time and transport;
- the seller does not carry out design work. You will have to spend money, use additional time and transport;
3D diagram of solar panel installation
The seller does not have some components. You will again have to look for the product in another store, which may be more expensive and will again require additional time and transportation; The seller simply does not have installation teams to install the equipment. Time costs again; the seller does not deal with logistics
This means that a situation is possible when everything will be assembled, but one important element will have to wait an unknown number of days. And so on.
Helpful advice! Choose a seller with a full package of services, ranging from assistance in the project, high-quality equipment in the provision of professional installers to warranty service.
The future belongs to alternative energy sources
The rapid penetration into our lives of new technologies for the use of alternative sources of electricity and heat directs our choice to increasingly purchase solar power plants, solar collectors (heating stations), domestic wind and hydroelectric power stations, as well as to use heat pumps and a variety of electric generators. Thus, in recent years, significant experience has been gained in the use of photovoltaic power supply systems in many areas of business. This applies to the use of solar panels and solar collectors in domestic conditions: in private homes and dachas.
The use of solar energy is the optimal solution for home and garden
In conclusion, we can say that the solar technology market currently offers a wide range of different equipment. And most importantly, taking into account the reasonable cost of solar panel kits for the home, reviews of their high quality and long period of reliable operation, we can conclude that the use of this equipment is becoming more feasible and allows participation in large-scale environmental projects and programs.
How to calculate the power of IR heaters
In this section we will mainly talk about ceiling heaters, which are planned to be used as the main heating of the room.
If the area of the room is large enough and the ceiling is not too high, as is often the case in unheated country houses, it makes sense to install several less powerful ones instead of one powerful heater. This will, firstly, make the heating more uniform, and secondly, eliminate the possibility of overheating a separate section of the floor.
The general recommendation for the total power of heaters is 80-100 watts per square meter of area. It is clear that this value is approximate; it can be influenced by many factors: ceiling height, wall insulation and much more. But as a starting point, such a value is quite suitable.
As for other types of heaters, calculating power does not make sense for them, because they are used only for additional heating.
Heating a country house with IR heaters
Heating a private house or cottage is very convenient and profitable to organize using infrared heating.
To do this you need to have the following information:
- the total area of the house, the size and number of rooms in which heating will be carried out;
- number of windows, their sizes;
- what kind of thermal insulation is there in the house;
- power allocated to the building;
- What is the maximum voltage in the electrical network? If necessary, install stabilizers.
Heaters should not be installed near a window to avoid heat loss, in areas where people are constantly occupied, and at a height of less than 0.5 m above the head. The efficiency of the heating system is calculated as 100 watts of power per 1 square meter.
Based on the calculations, a specific model with the required power level is selected. After that, all that remains is to carry out the installation work of the heaters in the room.
Advantages of infrared heating
The main advantages of infrared heating include:
- efficiency;
- no noise or odor;
- maintaining the humidity level in the room;
- the air in the room warms up very quickly;
- resistance of infrared film to mechanical damage;
- simple installation does not require special knowledge;
- voltage surges will not affect the operation of the heating elements;
- can be used not only indoors , but also in open areas, for example, for heating a gazebo or veranda;
- no harmful effects on the human body.
Cons of infrared heating
But in addition to the positive properties of infrared heaters, there are several negative ones.
The disadvantages of such heating include:
- purchasing and installing heaters will require significant costs;
- before installation, additional design must be carried out to calculate efficiency;
- high ceilings are required to install heaters;
- ceiling heaters are visible to the eye and do not always fit into the interior;
- To install infrared film in an office, you will need permission from the fire department.
Ceiling infrared heating
Under ceiling infrared heaters goes from? before ? ceiling area. The remaining space is enough to accommodate lighting fixtures and communications. Decorative finishing material, plasterboard panels, suspended ceilings, etc. do not interfere with functioning and do not deteriorate themselves.
Diagram of an IR heating film device
- Stage 1. Installation of a heat-reflecting screen
- Initially, a foil heat-reflecting screen (folgoizol, penofol, etc.) is installed on the entire ceiling surface of the room. This achieves an almost twofold increase in the downward heat flow. If thermal insulation is insufficient, it is better to use insulation with a thickness of 10 mm, otherwise insulation with a thickness of 5 mm is sufficient.
- Fastening to a wooden surface is done with metal staples or a regular furniture stapler.
- Fasteners are placed on the concrete floor in increments of 0.5 meters. Most often this is a wooden sheathing. The strips are attached with an overlap of 2-3 cm, followed by gluing the joints with foil tape.
Advice: whether you work alone or with an assistant, it is easier to use a 60 cm wide roll of thermal insulation and film material: it is easier to hold and there are fewer mistakes.
- Stage 2. Installation of film heaters.
- A pre-calculated number of heating elements is attached similarly to heat-reflecting material. It is only necessary to install brackets or other fastening elements in specially designated places so that the infrared film for the ceiling is not damaged at other points.
- Stage 3. Electrical installation.
Connecting individual elements
- The wire cross-section is selected according to the total power of the connected heaters.
- All wires are hidden in the cable channel.
- Thermostats are installed in each room at a height of 1.1 - 1.4 m. For a small heated area, up to 5 m2, they are connected “into the break” of the line.
- A larger area requires a high-power heater, and the thermostat is connected exclusively through a magnetic contactor.
- The lines, hidden in the corrugation, pass to the distribution board, in which the power and control wires are connected to the circuit breakers and magnetic contactors.
- The first testing of the system is carried out after connecting the common “Input”.
Installation of heating panels
The total load power is calculated, wires and boxes are selected. After this, a panel with differential automatic machines is installed. There are as many differential circuit breakers installed in the panel as there are rooms planned to be connected. Wiring is laid from the shield.
Ceiling infrared panels can be installed independently. Installation of infrared ceiling heating panels follows the procedure for installing fluorescent lamps.
Calculation of infrared heating power
It is not difficult to independently calculate the required equipment. For a 10 m2 area with ceilings of 2.5-3 m, a house with good thermal insulation requires infrared ceiling heaters with a power of 1 kW. More rigorous figures can be obtained using data from a specific device. Of course, we are not talking about constant electricity consumption: during operation, the equipment, maintaining a given mode, works for approximately 20 minutes out of every hour. Effective power consumption for a house with an area of 55 m2 is about 2 kW, which is quite a bit!
Panel heaters
Such installations are most often mounted into the wall. The main aesthetic complexity in this case is determined by the need for appropriate decorative design. The structure is secured using construction hardware and fastening elements.
Panel heaters can be hidden under various elements of the room, including paintings, tapestries and other decorative items. Functionally, they can be used both for heating the entire home and for its individual zones, depending on the location.
Infrared heating of greenhouses in winter
But there is also infrared heating of greenhouses. This method can be called one of the latest technological achievements in terms of heating communications. This method is good because heat rays emit from the device, which transfer thermal energy to objects around. In this case, the air does not receive heat. The advantages of infrared heating include absolute harmlessness in relation to nature. The humidity level does not decrease. And by heating objects rather than air, it is possible to save money, even though the network runs on electrical energy.
The choice is large. There are many nuances that should be taken into account when choosing. In order not to get confused in the proposed methods, contact our specialists who will help in word and deed! — a guarantor of reliable and high-quality heating of a greenhouse and any other facility. We are professionals, and you can trust us with your greenhouse heating system. Call!
Disadvantages of infrared heating systems
Against the background of these advantages, we should also list the disadvantages of an infrared heater when using it.
The main disadvantages of film and panel systems are their likely difficulty during installation, as well as the impossibility of using them for full heating of large rooms.
The tubular type more than solves the problem of less powerful heaters, but it also has more disadvantages:
- Restriction on installation height (at least one and a half meters from the floor) due to the risk of damage to the floor covering.
- Restrictions on choosing a safe distance from people and pieces of furniture and decor, including the use of the product if there are suspended ceilings in the room.
- The need for installation in a special reflective housing so that thermal energy does not escape into the ceiling.
We recommend an indirect heating boiler. How it works and why it is needed. Tips for choosing
Infrared heating: history, properties and device
Despite the perception of this type of heating as a novelty, infrared rays have been used for a long time.
- The beginning of the 19th century was marked by the unique discovery of the infrared range of light by William Herschel.
- In the twentieth century, Henry Ford put this discovery to good use by using radiation to dry cars in a factory after they had been painted.
- Since the mid-sixties, the forerunners of modern versions of these devices, created in Switzerland, demonstrated all the advantages of infrared heating in Finnish baths.
And only recently have entrepreneurs paid attention to the possibility of using infrared radiation to heat rooms
Properties of infrared radiation used in heating
Solar radiation spectrum
Based on the principle of solar heating, when the Sun warms the Earth, and not the air of the planet, scientists created the first infrared heaters
It is important that the achieved ability to exclude intermediate media in the process of heat transfer from source to consumer has made it possible to significantly reduce their power indicators. This ensured a reduction in energy consumption by heaters
They don't heat the air. People, things, furniture - everything receives heat from such a heater. These objects, cooling for a long time, transfer the accumulated heat to the air, which increases the period of comfortable stay in the room.
Thus, there is no need for a powerful heat source, which must first heat a large volume of air space in the room. To make sure that the efficiency of infrared heating is significant with minimal energy consumption, it is enough to compare the characteristics of this equipment and electric heaters. So, when heating a room of 16 m2 with an infrared heat source, a power of 900 W will be required. At the same time, effective heating of the same volume of space using electric heaters will require the latter to have a power rating of 2 - 2.5 kW!
IR heater design
Understanding the operating principle of such equipment and the properties of this type of radiation itself will ensure its correct placement and effective use. Humans cannot see infrared radiation. But the thermal effect is felt instantly. The wave range of this radiation is quite wide - from 0.75 to 100 microns. Therefore, it is divided into three main groups:
- close to the visible spectrum;
- average;
- far or long wavelength, located in the range of 5.6-100 microns.
Long-wave infrared heating of the house is mainly used for heating, reviews of which are of great interest to everyone who wants to get an effective source of heating
It is worth paying attention to the fact that the human body emits heat at wavelengths from 6 to 20 microns, and PLEN radiant heating is in the range from 9 to 15 microns
The design of the heater itself is based on a plate made of aluminum. The heating element built into the heater ensures heating of the plate. It can heat up to 250°, but the body never becomes the object of such heating. A conventional two-phase power supply is used for power supply.
Effect of IR heaters on humans
Prolonged exposure to infrared radiation dries out the skin. Time-limited infrared radiation is used for medicinal purposes, but constant exposure, for example in production, is harmful to the body.
To minimize harmful radiation when installing heating in a house, it is necessary to adhere to certain standards. To avoid constant exposure of heating elements to a person’s scalp, they are not placed too low above the head and away from the person’s resting area.
The impact of short waves on humans is harmful, long-wave radiation has a beneficial effect on the body and increases immunity. It is best to install infrared heating in rooms where people do not live constantly. This could be a loggia, veranda, or utility rooms.
Radiation intensity
Infrared radiation is generated by any heated body, the temperature of which determines the intensity and spectrum of the emitted electromagnetic energy. Also, not only the temperature of the heated object matters, but also the distance to it.
The intensity of infrared radiation directly depends on the wavelength; the shorter it is, the more intense the radiation. If the radiation is as intense as possible, it can cause harm to the body.
Long-wavelength waves slightly increase body temperature and even help strengthen the body’s defenses, while short-wavelength waves can increase the temperature of a person’s internal organs.
Exposure to short waves on the human brain can cause heatstroke and other more serious complications; when radiation enters a person's eyes, cataracts occur. Of course, we are talking about long-term impact. For a comfortable stay of a person in a heated room, the radiation intensity should not exceed 120-150 W/kW.m.