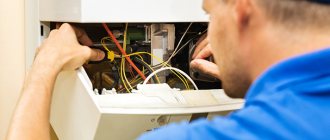
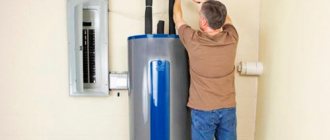
Have you ever seen household appliances that have been working for many years without failure? We are sure not. Refrigerators, air conditioners, microwave ovens require periodic attention...
Moreover, you should not be upset if you need to repair your Neva gas water heater. After all, it can be done quickly, and there will be no problems with spare parts. Our article explains exactly how to identify and fix faults.
We will introduce the design features of Neva brand equipment used in heating water for hygienic and sanitary consumption. The useful information we provide will help you accurately find the cause of the breakdown. Following our advice, you can easily restore the column’s functionality.
Gas water heater "Neva 4511": do-it-yourself repair (detailed instructions)
If you live in a private house or spend some time a year visiting your summer cottage, then you can provide your family with hot water using a gas water heater. When the house is not connected to the central hot water supply and heating system, such a solution becomes the only correct one. Today's market is constantly being replenished with new units that satisfy consumer needs. Modern equipment only vaguely resembles its heavy predecessors.
Ignition of the column
- manual ignition;
- piezo ignition;
- electronic;
- microturbine.
Manual ignition is a rarity for modern speakers. Older models required matches to ignite the gas. Today such models are rare.
Piezo ignition. By analogy with piezo electric stoves, to ignite the gas you need to press a button on the column panel. This method is still used in modern models.
Electronic. The most convenient and popular way. Reliability and economical gas consumption make such models a little more expensive. By analogy with a car, a spark is created by a small battery; batteries are often used. The NEVA 4511 column belongs to this model range.
As for microturbines, the current in them is generated by a hydrodynamic generator controlled by a water flow. The cost of such copies is much higher.
Columns with electric ignition are easy to use. The gas is ignited automatically when you open the water tap, thereby saving gas consumption.
Overview of repair options
The devices are equipped with the latest automation, they are protected by multi-stage systems and provide very high safety during operation.
Neva gas water heater is considered one of the most popular
4511”, you can repair this equipment yourself if you read the information below. But professionals do not advise undertaking such work on their own, this especially applies to those people who are not very well versed in such equipment. It is not recommended to do this if the warranty period has not yet expired, because DIY repairs will void the manufacturer’s obligations. However, if the device was purchased quite a long time ago, then it is necessary to take into account that its design is simple, thanks to which any home craftsman can handle the repair work.
Malfunctions
Qualified experts say that in 8 out of 10 cases of geyser breakdowns, the problem lies in the water unit. As a rule, this is contamination or deformation of the membrane in the assembly. Namely, the deposition of various clogs and salts occurs, as well as the formation of cracks in the housing, etc.
You should know that a damaged node cannot perform its functions fully. If the membrane is damaged, it cannot stretch enough to allow gas to pass through.
There are models of geysers whose membrane needs to be changed regularly. According to reviews, this is a device from the manufacturer Neva. In order to prevent breakdowns, from time to time you need to disassemble the gearbox in order to clean it. Then you can notice the deformation of the membrane in time. Filters in the water unit often become clogged.
The wear of the gearbox is explained by frequent switching on/off; this greatly affects the membrane in the unit, seals, etc. When the seal wears out, water begins to leak out of the gearbox.
We can conclude that the reducer for a gas water heater is an important part that needs to be maintained, which means it must be in such a position that there is constant access to it. Such maintenance of the gas water heater or, if necessary, repairs can be carried out independently, since these manipulations are not complicated. To replace or clean the gearbox you do not need to have special skills.
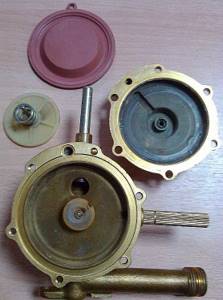
Rice. 4 Water unit for the column, the body of which is secured with 8 bolts
Refusal to ignite
Neva gas water heater , which you can repair yourself if you refuse to ignite, is considered a budget and fairly standard model. Very often, the problem mentioned above can be caused by the fact that the ventilation system suffers due to lack of draft. If this is the case, then the damage can be removed by cleaning the channel. If the batteries are low, a problem may arise with the power supply; this issue can be solved by simply replacing it. Geyser _
"
Neva 4511", a review of breakdowns of which is discussed in the publication, may experience failure to ignite due to low water pressure in the system. In this case, the buyer can wash the filters and also clean the device from combustion products. If this approach does not solve the problem, then you need to contact the utility service with a question about the low pressure.
Neva
gas water heater still does not light up , you can carry out independent repairs by adjusting the temperature of the coolant. This decision is important if the balance between cold and hot water is considered incorrect.
Types of faults and their elimination
As you know, a perpetual motion machine has not yet been invented, and even the most reliable and high-quality equipment may experience malfunctions.
There are minor problems in the gas water heater Neva 4511, which can be corrected without the help of a specialist.
Let's look at some of them.
The device turns off periodically
- Clean the chimney and check the entire system, as an option to strengthen the sealing
- Very high water temperature. Increase water supply, reduce gas supply level.
- Carbon deposits have formed. Just clean it.
The tap is turned on, but the water heater does not work
- The batteries are dead. Replace
- The inlet and outlet valves are not fully open.
- Not enough liquid. Adjust flow
- Poor pressure. Question with utilities
- The filter is clogged and scale has formed. Perform cleaning.
There is a spark, but the device does not start
- Check the gas supply valve, it may be closed
- There was air in the pipes. A problem with the first start-up or a problem that arose as a result of the dispenser being idle. Open the water supply tap for a few seconds (5-7). Close. Perform the manipulation several times.
- The spark does not reach the gas stream. The system is subject to adjustment.
The problem of ineffective water heating
If your home has gas water heater Neva
4511”, you can carry out independent repairs of this equipment. This also applies to the case when the water does not heat up very well, as required. If the equipment turns on, but the water temperature cannot reach the desired level, then the equipment simply may not meet the power needs of the consumer. The second assumption is that the column is dirtier. In this case, the equipment loses productivity. In order to solve the issue of ineffective water heating, you can adjust the coolant supply tap or seek the help of a professional service center, he will be able to clean the equipment.
Malfunctions of the water reducer of the column, repairable by yourself
1) The column does not turn on at operating water pressure.
- the elastic membrane is torn;
- the rod is stuck.
- a torn membrane is replaced by a whole part;
- the locked rod is lubricated and developed manually.
2) Weak hot water pressure.
- weak cold water pressure;
- The strainer is clogged.
- weak cold water pressure is checked in the water pipes or the information is clarified with the relevant authorities;
- a clogged filter is changed or cleaned, and replaced.
3) Delay in turning on the column when opening a hot water tap.
- clogging of the retarder ball channel;
- Incorrect adjustment of the retarder stop.
- clogged channel - cleaned;
- Incorrect adjustment of the stop can be corrected by screwing in the adjusting screw 2-3 turns.
4) The geyser does not operate at full capacity or goes out.
- the integrity of the membrane is compromised.
- the damaged part is replaced.
More serious faults are repaired by gas service technicians or the reducer for the gas water heater is replaced.
When using a gas water heater, pay attention to the stability of the gearbox installed on the gas water heater. If necessary, perform a preventive inspection of the unit, lubricate rubbing parts, and replace worn parts.
By following these simple rules, you will increase the service life of your geyser.
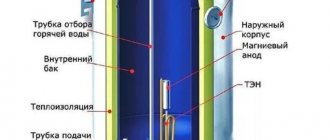
A geyser is a water heating device that comes with many different devices. Let us note the operation of the water reducer of the gas water heater. It is also called a water block or knot. It is installed in the device in front of the heat exchanger.
According to the material of manufacture, water reducers are divided into those made of:
It should be noted that brass is copper and zinc, that is, an alloy of these metals; this material is often used for the manufacture of plumbing fixtures. Plastic units (Fig. 1) are durable and practical. Polyamide is a material that is very similar in composition to plastic, but its durability can be explained by the presence of glass fiber in the composition.

Rice. 1 Plastic membrane water unit
The functioning of this device in a gas water heater is no different from other gas water heaters. That is, the main difference lies in the material of manufacture.
Membrane reducers for gas water heaters can withstand fairly high pressures, as for household appliances. Namely, it is from 0.5 to 3 m3/hour.
Heat sensor failure problem
Geyser _
“
Neva
4511” (automatic) is protected by a multi-stage system, but even with this, it happens that
the column
does not ignite.
The culprit for this is considered to be a bimetallic temperature sensor; it is designed to protect equipment from overheating. In most cases, a breakdown occurs in the fact that the burner goes out, and the column
works for a certain time, but then stops, and attempts to ignite do not achieve results.
After 20 minutes, the column can be turned on again, the burner will light up, but after a similar time period it will go out again. This may be caused by the sensitivity of the equipment. This case is guaranteed; moreover, the problem appears only in summer or winter; it appears at extremely low or excessively high temperatures when the windows in the kitchen are closed. Under these circumstances, the room temperature is elevated and the equipment is not cooled. If you have Neva gas water heater , a breakdown in the sensors can also be expressed by a chaotic shutdown of the device. Sometimes it doesn't ignite at all. The behavior may indicate deterioration of the sensor conductor insulation. A short circuit to the housing causes the safety valve to operate. In this case, it is useless to call gas workers, since the problem is not related to the gas part. There is also no way to solve it with your own hands, so the best thing to do is contact the warranty center.
Operating principle of the column water block
The hollow frog device is divided into two parts using a rubber membrane. One half of the reducer is connected to the cold water supply, the second has a rod connected to the gas valve. On the metal rod of automatic water heaters there are “wings” connected to the electric ignition unit.
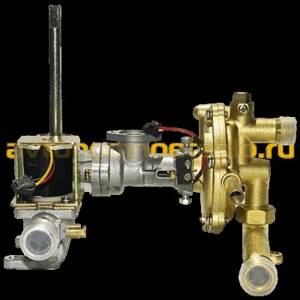
The operating principle of the gas water heater unit is as follows:
- when the cold water tap is opened, one of the cavities is filled with water;
- under the pressure of water, pressure is exerted on the membrane of the water unit;
- the diaphragm bends under pressure and presses on the rod located in the second cavity;
- a metal rod presses on the valve, opening the gas supply;
- in automatic dispensers, there are ears on the stem connected to the ignition unit;
- a spark is supplied to the burner, igniting the flame;
- after closing the DHW tap, the structure and internal parts of the unit begin to move in reverse;
- the rod returns to its original position thanks to the spring and closes the gas supply.
The design of the gas water heater reducer may differ depending on the model of the gas water heater, but the general principle of operation of the unit remains unchanged. Any malfunctions result in equipment malfunctions. A breakdown can be determined by several characteristic signs.
Replacement of membrane tissue
Before replacing membrane fabrics, turn off the equipment and turn off the cold water and gas. One of the hot water taps opens, which will make it possible to relieve pressure in the pipes. In another step, the column casing is removed, and then the screws for fastening work, which are located under the decorative overlays. The technician should confiscate the water regulator; to do this, the motor nuts are unscrewed. Now we are starting the procedure for replacing membrane tissue. Neva gas water heater repaired?
4511" with your own hands, the main thing is to ensure that the component being replaced does not have to be placed upside down. The main thing is not to close the bypass channel. Then you can assemble a gas-type column, proceeding in the reverse order. The main thing is to install all the gaskets in place, so you need to treat this step with great attention, but if you have experience, these actions will take no more than 15 minutes.
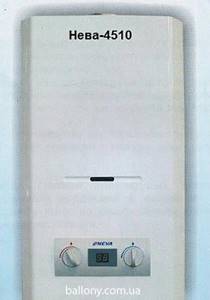
Technical characteristics of Neva-4511
- Capacity 11 l/min. (+25 degrees)
- Energy resource consumption: natural 2.2 m3/h, liquefied 1.66 m3/h
- Camera - open type
- Power 21 kW
- Ignition type – electronic
- Chimney diameter 11-12.5 cm
- Efficiency – 87%
The flow heater "Neva" 4511 is used for instant heating of cold water in homes not equipped with a central hot water supply. Installation is carried out vertically with connection to the chimney. The water heater can provide hot water to 1-2 points. Natural or liquefied gas serves as an energy resource.
The unit has a classic shape, a simple design and small dimensions of 55.6 * 22.1 * 29 cm. Its weight is 10 kg. On the front panel there are rivers/relays for adjusting the water supply and the amount of gas, as well as an electronic display that shows to what temperature the water in the tap has heated up.
The heat exchanger is two-tier. Manufacturing material is copper. Its pipes are deliberately made of a larger diameter - this significantly reduces the amount of scale.
Stainless steel was used to manufacture the burner, which significantly increases its service life.
The device starts automatically when the “hot” tap is opened. The spark is automatic electronic and runs on batteries. Directed towards the incoming gas stream.
Repair, installation and breakdown of the Neva gas water heater.
It is necessary to consider how the column , how to repair the column, its structure. I am repairing dispensers running on Neva in Stalingrad.
Column
Neva brand is a fairly common water heater . A lot of them were produced, and they were installed in Stalingrad too. At one time, VPG Neva captured the market with its affordable price, reasonable quality and commonality. From my own experience, I can say that breakdowns on the Neva in most cases occur within the 5th-6th year of use. This is associated either with a broken microswitch, or with a leak in the water block rod seal, or with the fact that the membrane fabric is torn. the column usually does not light up. Spare parts for the Neva are not a problem; it is not difficult to purchase them in Stalingrad and other regions of the country. Today I will briefly tell you about the structure of the column. After reading the publication, you will be able to repair the Neva
.
We see the entire view of the speaker with and without a housing in the photo below.
Column
consists of a gas block – 1,
water block 2,
groups of ignition and ionization electrodes 5,
battery compartment -6
and ignition and column control unit (brains) -7
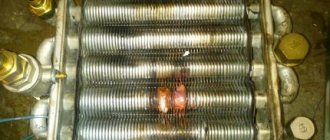
In this case, the heat exchanger on the column burned out. This can be seen even without removing the housing from the spot on it, but the appearance of the heat exchanger itself does not need any comment.
Difficulties with models
In many ways, leaks in geysers are caused by the same reasons. But in devices of different brands, specific breakdowns more often occur, leading to similar problems.
For example, the Neva gas water heater leaks most often for the following reasons:
- Membrane failures.
- Rod seal leaks.
- Violations of the integrity of the rod plate
Automatic budget models of this brand, such as Neva 4510, often leak due to heat exchanger failures. It has an aluminum body and is not very durable.
In such units, gas often leaks due to the thin-walled igniter tube and drying out of the seal.
It is also extremely difficult to eliminate a leak in the rod seal, since the connecting bolts of the gas and water compartments are very difficult to unscrew, as well as the microswitch. These fasteners often break during disassembly.
Water drips from the Junkers geyser for the following reasons:
- Radiator failures.
- Drying the O-rings (more common in older models).
- Cracks in the place where the frog is attached (flow regulator).
- Membrane wear.
You can solve these difficulties with your own efforts. Point 1 can be corrected by carrying out soldering work. P.2 – replacing these rings. This is also one of the ways to correct step 3.
In general, we need high-quality and timely repair of the water unit of the Junkers geyser.
At home, you will need to disassemble the column and remove this unit. In most cases, the problem lies in a worn membrane and cover. These elements need to be replaced.
Such problems most often occur with models of the Junkers W 275 1 line. And if replacing the problematic parts does not bear fruit, you need to contact the specialists.
Quite often, customers contact the service - owners of Bosch speakers, the membranes of which wear out quite quickly. Experts recommend always having several of these products in stock.
Owners of Ariston speakers often complain about leaks from below. This is due to a worn flange gasket. It has to be replaced. To do this, the device is de-energized and all the water is drained from it. The cover is removed, the flange is taken out, the gasket is changed.
The second common reason for models of this brand is a violation of the sealing of the connecting sections. The solution is to coat these areas with a powerful sealant.
The same problem is relevant for Oasis speakers. They also often leak from under the flange and due to scale accumulation. The owners of this equipment need to change the anode 2-3 times a year. Otherwise, the heating element will leak or completely collapse. Therefore, you should regularly clean the device from dirt and scale.
Owners of Astra gas water heaters often complain about leaks in the connecting areas and wear and tear of the maintenance equipment. A temporary solution to the problem is soldering. Effective - purchasing new maintenance.
In Electrolux speakers, the most common causes of leaks lie in the radiator. The solution is quick and high-quality soldering.
Vaillant models often have problems with gaskets and maintenance. It is logical to replace these elements.
Whatever type of gas water heater you have, regularly remove dirt and scale from it. If problems are discovered, fix them immediately if you have the necessary experience. Most often, the most effective method of solving a problem is to replace a particular part or assembly.

So, let's begin disassembling and repairing the Neva column:
1. Unscrew the union nuts on the tube connecting the heat exchanger with the water block of the column and remove the tube.
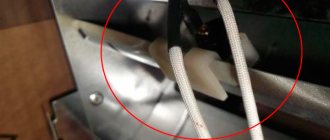
2. Separate the wires on the connectors that fit the solenoid valve (1) and the microswitch wire connectors.
3. Unscrew the screws that attach the gas
column block to the body.
4. Remove the battery compartment (you need to unscrew the two self-drilling screws under the cover). Unscrew the screws that secure the column water block to the housing.
5. Unscrew one self-drilling screw on both sides of the gas column burner and remove the completely water-gas gas assembly with the burner.
6. Now you can easily get to the self-drilling screws that secure the column heater to the housing from below.
7. Next, unscrew the draft meter from the cap.
8. Now let’s unscrew the overheating temperature meter from the heating device.
9 Unscrew the self-drilling screws that attach the cap of the Neva
to the heat exchanger and housing.
10. Unscrew the temperature sensor from the heat exchanger and unscrew the screws that secure the section of the heat exchanger pipe to the column body.
Actually, the large-scale disassembly is done. I hope this article will be useful to you when repairing the Neva .
If you would like to call a geyser technician in Stalingrad, then call or leave a request on the resource. Neva gas water heaters in Stalingrad and nearby villages. I will repair your gas water heater. Spare parts for the Neva are available.
Neva gas water heater useful. Download
Rules for dismantling and disassembling the gearbox
Regardless of the modification of the geyser, before starting repairs or preventive maintenance, turn off the supply of gas and cold water to the unit.
To drain water from the system, open the hot water tap, located below all water taps powered from the column. We place a wide container (basin or bucket) under the dismantled water unit, where the remaining water from the gearbox will be drained.
Removing the gearbox from the column
Often the frog can be removed separately. But in some columns this is impossible, so you will have to dismantle both blocks together. There are models of instantaneous water heaters in which, in order to gain access to the insides of the frog, it is not at all necessary to dismantle it - just remove the cover.
Dismantling the frog of the Neva 3208 water heater
In the Neva 3208 column, it is easy to dismantle the gearbox, as in other similar devices. To do this, you need to unscrew the union nuts on the inlet and outlet pipes of the housing, and also unscrew the three screws that secure the frog to the gas unit. When unscrewing the nuts and screws securing the water regulator, hold the unit being removed with your hand so as not to accidentally deform the parts of the gas unit.
When dismantling the water regulator, use a wrench to unscrew the 2 union nuts of the pipes in the indicated order, then unscrew the 3 screws with a screwdriver
The procedure for removing the Neva-Transit gearbox
To repair the water reducer, it must be removed from the column housing. Let's look at how to do this using the example of dismantling the Neva-Transit dispenser, since the fastening of gas-water units in many modern models is very similar. First, remove the adjusting knobs on the front panel. They are simply put on stock.
After that, unscrew the screws and remove the front panel
Please note that the digital display on the front panel is connected using detachable terminals to the electronic devices of the column. Therefore, by pulling the panel towards you, disconnect the terminals and only after that remove the panel completely
Do you have a Neva gas water heater? We recommend reading in more detail about typical faults and how to fix them.
Disassembling the water regulator
Having freed the frog and drained the last water from it, unscrew the lid. Often the screws are soured. To make the work easier and to avoid tearing off the splines, we use the special tool WD-40. After unscrewing the screws, remove the cover, remove the membrane and inspect the condition inside.
We replace parts that have become unusable, clean and rinse the insides (surfaces, channels, if necessary, clean the outside of the body), install the parts in place and reassemble the frog in the reverse order.
Reassembling the frog
It is especially important to set the aperture correctly. The bypass hole must exactly coincide with the holes of the same name in the cover and base
If the channel connecting the cavities of the base and cover is blocked, the column will not work.
After installing the cover on the base, tighten the screws. We install the assembled gearbox in place (also in reverse order), not forgetting about the sealing gaskets on the pipes and on the connection of the water-gas unit with the gas burner leg platform.
The screws should be tightened and tightened without any misalignment. To do this, they are installed and baited in pairs, crosswise, and similarly screwed in until it stops.
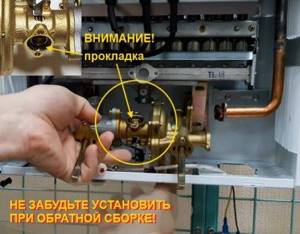
A gasket is installed in this place (between the burner and the gas unit). Be careful - the safety of the gas water heater is ensured by the tightness of this unit
Testing a repaired unit
After installing the repaired frog, we check the operation of the water part without connecting the gas by opening the hot water tap.
We observe:
- whether drops have appeared on the connections;
- Is the flow rate the same when turning on hot and cold water separately;
- does the burner igniter click?
- Does the rod move normally when opening and closing the tap?
If not everything is going as it should, you should double-check your work. However, sometimes the reason may lie not only in the water node.
Only after the mounted frog has passed the test can gas be supplied to the column. But do not forget about the safety rules when using the speaker. And if you smell gas, you should immediately turn off its supply, arrange ventilation and call the gas workers.
Design and working principle of the Neva 4511 model
It is impossible to repair a home appliance on your own without knowing how it works and what it is made of. Unlike old-type water heating devices, this series of gas-powered water heaters is equipped with a controller and electric ignition, which makes it possible to remove the regularly burning pilot wick. Otherwise, the design remains very simple and repairable. It consists of the following important elements:
- Housing with hinges for wall installation process.
- Diffuser – a collection of combustion products with a piece of pipe for smoke exhaust.
- Copper heat exchanger.
- Installation of gas burners.
- Water node.
- A serviceable membrane component (in other words, a frog).
- Gas
valve with an electromagnet, combined by a common rod with a water unit. - Controller.
- Microswitch for supplying power to the electronic unit.
- Water supply pipes.
- Ignition electrode.
- Flame (ionization) meter.
- Additional electrode for igniting the burner.
- The tap is a flow regulator.
- Adjustment of combustion intensity and heating temperature.
- Connecting a draft sensor placed in the middle of the diffuser.
- Compartment for power components (batteries).
The diagram above shows the structure of the Neva
with numerical designations of parts corresponding to the list.
Automated switching on and heating are controlled by the water unit simultaneously with the controller, and a solenoid valve connected to a draft sensor is responsible for the non-hazardous gas supply. The operating method of a water heating device looks like this:
- After opening the hot water tap, pressure appears at the inlet of the “frog”, acting on the rubber membrane fabric of the assembly. It moves the rod, which opens the gas
valve and closes the microswitch contacts. - When the electrical circuit is closed, power from the batteries is supplied to the controller. It gives 2 commands simultaneously: open the solenoid valve to allow gas to pass through and create a spark at the ignition electrodes. As a result, the burner ignites.
- The flame meter detects the occurrence of a fire and transmits an impulse to the electronic unit, which interrupts sparking. The heater goes into operation mode.
- When the valve on the mixer is closed, the pressure in the network disappears and the spring throws the membrane fabric of the “frog” back, simultaneously closing the mechanical gas valve. The limit microswitch is triggered and the controller is deprived of power, and at the same time the electromagnet is deprived. The fuel supply ends and the burner goes out.
Important point. The solenoid valve is combined into one circuit with a traction sensor (item 16 of the diagram). If, for a variety of reasons, the draft in the chimney disappears or weakens, the meter will heat up and open the circuit, de-energizing the electromagnet. The final one will return to the “closed” position and shut off the gas supply to the burner device.
To eliminate the permissible overheating of water in the heat exchanger, the manufacturer has implemented a conventional technical solution: a temperature sensor connected to the controller is mounted in the pipe wire. If the flow heats up to a critical level (about 90 °C), the gas supply will automatically end and the burner will go out. the Neva 4511 column is shown more clearly
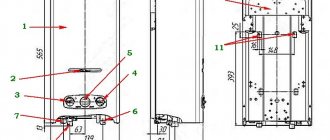
Column device
How to understand the location of water heater components? Don't worry, the diagram will help you. It is created based on columns.
External device:
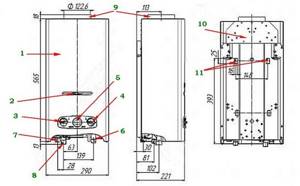
- Metal casing;
- Control window;
- Gas flow regulator;
- Water regulator;
- Digital temperature display;
- Cold water connection (thread G 1/2);
- Hot water outlet pipe;
- Pipe for connection to the gas main (cylinder);
- A pipe for removing combustion products is connected to the chimney;
- The basis;
- Back wall;
- Installation holes;
Internal equipment:
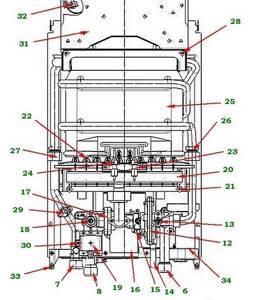
- 6, 7, 8 - continuation, pipes, as indicated above;
- 12 — water unit;
- 13 — water adjustment rod;
- 14 - drain plug;
- 15 - microswitch;
- 16 — control unit;
- 17 — gas unit;
- 18 — fuel adjusting rod;
- 19 — solenoid valve;
- 20 - collector;
- 21 — manifold mounting screws;
- 22 — burner nozzles;
- 23 - spark plug;
- 24 — ionization sensor;
- 25 - copper heat exchanger;
- 26 — output to the water unit;
- 27 — output to the gas unit;
- 28 — mounting bolts;
- 29 — thermal relay;
- 30 - thermometer;
- 31 — gas outlet device;
- 32 — traction sensor;
- 33 — brackets for installation;
- 34 — battery compartment;
Having understood the design, you can begin troubleshooting.
Water heater repair
Neva geyser with your own hands , you need to identify it correctly. Over the years of using a water heating device, one part of the parts wears out and requires replacement, while others require periodic maintenance. In this case, various breakdowns appear, characterized by specific symptoms. We recommend dividing all emerging problems into groups according to the following criteria:
- The burner does not ignite when the DHW system tap is opened;
- After working for 5-10 seconds, the device turns off;
- the flow-type heater starts up and functions properly, but does not heat the water well;
- other breakdowns.
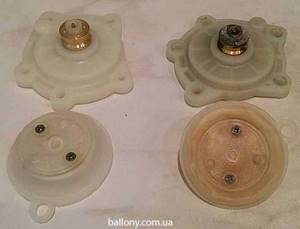
Advice. Very often, in geysers, the rubber membrane fabric of the water unit fails - it stretches, cracks or breaks. This is a consumable spare part that you should always have in stock. A sample part is shown in the photo.
What to do if the column does not light up
When the water heater does not respond at all to turning on the hot water, you need to do the simplest thing - check the condition of the power components and battery compartment contacts (they may oxidize). Clean them with sandpaper, install a new set of batteries, and then try to ignite again.
Decisive moment. A glowing home appliance monitor does not indicate that the power components are fully charged, because it does not consume much energy. If the batteries are low, there may not be enough voltage to trigger the electromagnet and create a spark. According to the properties posted on the manufacturer's official website, the set of components lasts approximately 250 working hours.
Placement of the battery compartment - bottom view of the device
Is everything okay with the electrical supply? Then continue checking the gas water heater using this method:
- Make sure that there is enough pressure in the water supply to turn on the device. Perhaps someone accidentally closed the shut-off valve or control valve on the heater itself (on the right side).
- If there is a strainer on the incoming water supply, you need to check its condition and clean it if necessary.
- Remove the front panel of the device and open the DHW tap, observing the stem. If it does not move at normal water pressure, the reason is hidden in the membrane tissue of the “frog”.
- The rod has moved, released the switch button, but nothing happens? There is a problem with electrically powered circuits. It is necessary to check the microswitch and test other wires supplying the controller and solenoid valve.
Advice. When repairing the Neva , which involves disassembling the unit, just in case of fire, shut off the gas main.
To dismantle the front casing, you need to remove the plastic handles from the control valves and disconnect the monitor connection connector. The panel is held at the back by 2 self-tapping screws located at the bottom of the device. Unscrew them and remove the casing by pulling it towards you and pulling it upward.
To check the limit switch, you need to disconnect the connector and test it using a multimeter or lamp tester. When the button is pressed, the circuit should be open. As for the wiring, it rarely fails, unless you come across a broken wire, which is easily fixed.
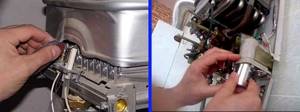
To replace the membrane fabrics in the Neva 4511 column, it is necessary to remove and disassemble
water unit at the same time as the gas unit, following the instructions:
- Close the cold water and gas supply, unscrew both supply pipe sections with a wrench. Also disconnect the copper pipe leading to the heat exchanger.
- Disconnect the controller and microswitch connectors.
- The entire water- gas block is fixed with 2 screws to the flange of the burner device. Unscrew them with a Phillips screwdriver and remove the assembly.
- Disassemble the “frog” and change the membrane fabric, and at the same time the tiny O-ring shown in the photo.
Note. The replacement can be done without dismantling the entire block, but performing the operation in this position is very uncomfortable. The described disassembly technique is also suitable for other models of gas-powered dispensers - Neva Lux 4510, 5611 and so on.
How the membrane fabric of a flow-type water heater changes, see in the next video:
There is a spark - no ignition
When sparking is noticeable at the glow plug, but the burner is inactive, you need to check the following points:
- whether the spark electrode has moved relative to the nozzle;
- whether the traction or overheating meter, which opens the solenoid valve circuit, has failed;
- whether a high-voltage wire penetrates the housing;
- whether the spark has weakened due to a clogged spark plug or discharged batteries.
The electrode should be located directly above the nozzle of one of the burner sections at a distance of no more than 5 mm from it. Violation of the position of the candle can be corrected by simply bending it. Occasionally, it is enough to clear the end of the electrode of soot to increase the spark power.
The operation of traction and overheating sensors is studied by directly closing their contacts. Set the jumpers on each device in turn, including the water on the mixer. If a flame appears, replace the broken meter.
After starting the burner goes out
If the flame in the column ignites properly simultaneously with the onset of water intake, and goes out after 5-10 seconds, then the possible reasons are as follows:
- the ionization meter does not work (does not detect fuel combustion);
- there is no draft in the chimney, which causes the suitable meter to overheat and open the electrical circuit;
- The highest heating is set with low water consumption, which is why its temperature can quickly reach 90 ° C and the overheating meter is triggered.
The last 2 breakdowns do not depend on the water heater and are removed by the client individually. Sometimes the damping effect is performed by an overstretched membrane fabric: at the first moment after water supply, it moves the rod, and when the pressure in the pipe normalizes, it releases again.
The flame meter fails for three reasons:
- The electrode is covered with a thick layer of soot and requires cleaning.
- The “spout” of the device has bent down due to prolonged exposure to temperature and needs to be slightly bent upward, as shown in the video.
- The device has stopped working and needs to be replaced.
There is another situation: the hot water tap is turned off, but the burner continues to work. There is a jamming of the rod, which can be eliminated by disassembling and cleaning the water-gas block.
How to remove low heat
There are two reasons for this phenomenon: dirtier burner nozzles and deposits in the tubes of the heat exchanger. In the first option, the blue color of the flame changes noticeably to yellow or reddish, and the gas burner device begins to smoke. To fix it, it’s best to call a gas service technician, but if necessary, you can handle it on your own:
- Shut off the gas supply.
- Remove the burner by unscrewing the clamping nut on the gas pipeline and 4 screws, not shown in the photo.
- Blow dust off the assembly using an accessible method, and then wash with a weak soap-based solution.
- Dry the device and reassemble the column in reverse order.
If the burner operates properly, but the water does not heat up, then it is necessary to wash the heat exchanger. The manufacturer provides for the simplest removal of the element: drain the water from the column, unscrew the two connecting nuts on the tubes (shown in the photo with green arrows) and the 2 mounting screws on top. Then immerse the heat exchanger in a bucket of citric acid solution (100 grams per 1 liter of water) and wait until it eats away the scale. After careful washing and drying, reinstall the component.
Advice. When reassembling the heat exchanger, it is best to replace the rubber gaskets located in the middle of the union nuts.
What can you repair in a gas water heater with your own hands?
Of course, a gas hot water heater does not always wear out or break so thoroughly and irrevocably that it is impossible to do without the help of a specialist. According to reviews from the same mechanics of the gas maintenance service, in 70% of cases, repair of geysers comes down to routine maintenance and elimination of minor defects, usually associated with low quality parts or incorrect adjustment.
The list of works available for repairing geysers at home can include the following:
- Minor repairs and repackaging of coupling and nut joints of pipelines;
- Replacing the elastic membrane in the water-gas column regulator;
- Cleaning and adjusting the operation of the draft sensor;
- Cleaning and washing the heat exchanger;
- Ignition board repair.
A separate category can include such operations as repair and soldering of heat exchangers.
It is clear that there is a certain category of expensive hot water heaters, full of automation and electronics, which there is simply no point in even trying to repair at home. For example, repairing Electrolux or Vaillant geysers will cost less at a service center due to the high cost of spare parts. The exception is particularly important components, such as a three-way valve or ignition board; it is better to buy them from an authorized dealer, even if the price is higher. This is the only chance to carry out repairs and not destroy an expensive Italian or German speaker with substandard spare parts.
The column does not ignite initially
Before you climb inside the water heater, you should perform a number of basic steps:
- Replace the batteries and clean the contacts in the power compartment.
- Make sure there is natural chimney draft and normal pressure in the cold water supply system.
- In a turbocharged dispenser powered by mains power, check the fuse. Try switching an imported unit by turning the plug in the socket - some models are sensitive to phase location.
- Clean the dirt filter installed on the cold water supply pipe. Sometimes the mesh at the inlet is provided by the design of the water heater itself.
- After opening the DHW mixer, observe the ignition electrodes - a spark should jump from them. In a turbocharged apparatus with a closed chamber, the clicking of discharges can be clearly heard.
Heater repair begins with cleaning the electrodes and installing working batteries
Advice. If there is external access to the ignition electrodes through a window, immediately clean their working part with a long brush.
Did the above measures not produce results? Then remove the column casing and proceed to troubleshooting, following the step-by-step instructions:
Video on geyser repair
A small addition. I found a very good video on disassembling the water block of a gas water heater. The location of components and the causes of malfunctions are shown in detail.
Be sure to check it out here:
- Repair of the power supply unit of the Tricolor GS8300 receiver Repair of the Tricolor GS8300 receiver Hello everyone. Today I will show you a solution to what turned out to be a common problem. One fine morning, while getting ready to watch TV, I was saddened […]
- Features of the NTFS file system.Features of the NTFS file system Recently, due to cheaper hardware (in dollar equivalent), an increasing number of computer users are receiving […]
- DIY Samsung washing machine repair. Replacing drum bearings. DIY washing machine repair Hello everyone. Let me present you with a short instruction in which I will tell you how to replace faulty washing machine drum bearings. […]
- The site and I have moved to a new domain. Change of domain Hello everyone. My website hs.aspu.ru has moved to a new domain Kapten.ru, please love and favor! In 2006, I became eager to start my own website. Since my […]
- Scaling images in Google+. Changing the size of pictures in Google Plus Hello everyone. Google+ has pleased us with another update. The image scaling function is now available. When you read the feed and see [...]
- Wiring out the COM9 connector.COM9 connector Below is a picture of the connector wiring. It will help determine the purpose of the terminals for repair or other [...]
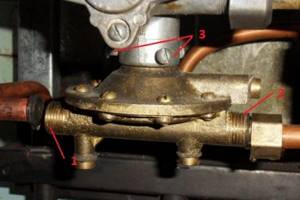
Water block repair and maintenance
In order to carry out any manipulations with the gearbox, or to understand whether the problem lies precisely in this part, you need to unscrew it from the copper pipes, that is, the nuts are unscrewed. Next you need to unscrew the reducer from the gas unit. As a rule, it is located under the gas valve and is secured with three bolts. Often in new models the gearbox is secured with one bolt. While unscrewing, the device must be held so that it does not fall.
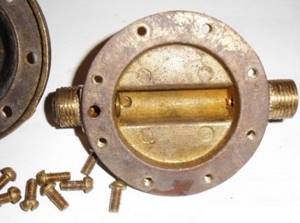
To open the gearbox, you need to unscrew the bolts that hold two parts of the housing, usually there are 8 of them (Fig. 4). They are located in a circle. Next, you should check the integrity of the rubber membrane in the middle and the integrity of the body. If the membrane is clogged, it needs to be cleaned and put back in place, and if it is deformed, you should buy a new one. A new membrane is inserted in place of the previous one. Today, membranes of different qualities are sold; you should not buy something that is too thin, as it may break in the near future. There are good quality silicone membranes, but don’t be lazy, but go to several stores and find one.
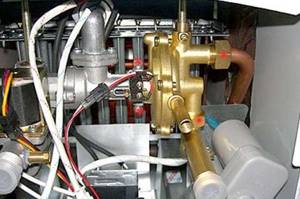
Rice. 5 Water unit included in the column configuration
To install the gearbox backwards, it is important to determine which pipe connects where. If you look closely, the inlet and outlet pipes are different in diameter. The hole through which water is supplied to the gas water heater reducer is larger than the one through which water exits the device. If the gearbox is installed incorrectly, problems will arise with the membrane and, in general, with the operation of the entire unit.
Next, the two parts of the housing are bolted and screwed to the inlet and outlet pipes. The nuts that screw the assembly to the pipes are equipped with rubber gaskets for sealing. When installing a water unit, you need to check them carefully. Sometimes you need to replace them too. Next, you should test the water unit by starting the column.
How to disassemble and reassemble the NEVA LUX geyser
Before starting repairs, be sure to turn off the gas and water supply taps.
To remove the casing of the gas water heater, you first need to unscrew the two screws located in the right and left corners of the lower part of the rear wall using a Phillips screwdriver from below, from the side of the pipe inlet.
The left knob for piezoelectric ignition of the igniter and rough adjustment of the gas supply cannot be removed. The right handle for fine adjustment of gas supply is held only by the casing with two clamps. You don't have to take it off either. But I usually remove it before removing the casing. In addition, so that the handle rotates easily when adjusting the temperature, I filed it along with the clamps in a circle where the handle touches the casing. Now it no longer clings to the casing and rotates easily.
Next, you should pull the casing towards you until the handles are recessed and, when the casing does not touch them, move it up. The upper slots of the casing will come out of the hooks located on the base of the gas column, and it will easily separate.
The geyser casing is installed in place in the reverse order. First, put it on the upper hooks with the slots, for which you will have to stand on a raised platform, then get the hole onto the adjustment handle and at the same time make sure that the holes located above the holes for fastening with self-tapping screws hit the guides. Screw the two screws into place.
The photo shows the appearance of the NEVA LUX-5013 geyser without a casing with a new heat exchanger.
Features of Neva water heaters
Neva high-tech geysers are varied, allowing you to choose an option for any situation.
The company's basic lines are E and E(I). These are modern heaters with water-controlled auto-ignition and advanced protection systems. The automation and auto-ignition system runs on two 1.5 W batteries. The gas is ignited when the hot water tap is opened.
All speakers in these series are made of tinned copper, which extends their service life. Copper itself quickly oxidizes in air. Tinning is a coating with a thin layer of another metal, tin, which is indifferent to external influences. In addition, this process gives the heat exchanger a pleasant silver color.
Both of these series are intended for use in rooms with a chimney. And the main difference between one and the other is that the columns of the E(I) line have a display indicating the outlet water temperature.
The E(M) series is also intended for rooms with a chimney, but differs from the previous ones in that it is equipped not only with a temperature indicator, but also with the ability to regulate it. Also, a special unit is installed in these columns, allowing you to maintain the set temperature with an accuracy of one degree. Expensive models of European equipment are often equipped with such equipment. And Neva-Transit equipment costs significantly less.
If the apartment is not equipped with a chimney, then it is better to take a closer look at the E MT and E MT(I) series. Like other Neva gas heaters, these are equipped with all the necessary protections and water-controlled ignition. And besides this, they have a system of forced exhaust gases.
Both series are equipped with temperature indicators, and the E MT also includes a unit that allows you to regulate this temperature.
Other malfunctions of flow-through heaters
In addition to the problems listed above, speaker owners have to deal with the following problems:
- weak sparking, sometimes single discharges slip through, the gas does not flare up;
- ignition is accompanied by a strong bang;
- after closing the DHW valve, the burner continues to operate until the electromagnet cuts off the fuel supply due to strong heating (at the command of the sensor);
- spontaneous ignition after connecting to a power source;
- insufficient heating;
- Water is leaking from the water heater.
Advice regarding weak discharges on electrodes. If the batteries and contacts are in order, try cleaning the ends of the electrodes and adjusting the gap between the needles and the plane of the burner (the value is indicated in the technical data sheet of the product). If there is no result, call a specialist - most likely the reason is in the pulse block.
Problems with sparking cause popping noises - gas has time to accumulate in the combustion chamber before a sufficiently powerful discharge is formed. If the spark remains weak, the fuel-air mixture ignites when it reaches a high concentration, which is accompanied by a micro-explosion. There have been cases where the pops damaged the heat exchanger, disrupted seals and normal contact in the electrical circuits of the sensors.
Continuing heating after turning off the water is a rather dangerous malfunction. If it coincides with a failure of the overheating sensor, a vapor phase will form in the heat exchanger that can rupture copper tubes and honeycombs. The reason is the jamming of the “frog” rod that opens the gas valve. How to repair:
- Remove the water module according to the instructions above.
- Disassemble the “frog” and remove the plastic plate.
- Unscrew the nut (or screw) in the left half of the membrane chamber and remove the pusher.
- Change the seals, thoroughly clean all parts from deposits, including the spring monostat (located on the right side of the “frog” behind the membrane).
Recommendation. Before assembly, check how freely the rod moves inside the new seals. For details on disassembling and repairing the speaker, watch the video:
Spontaneous start of heating without turning on the water is a consequence of sticking of the pusher. When the burner of the device does not turn off and the thermostat trips, the user temporarily turns off the power source. Since the rod remains pressed, after the power supply is restored, the column turns on itself, without opening the DHW tap. The “treatment” method is described above.
The reason for low heating is total contamination of the main elements of the unit - the heat exchanger and burner. The column needs to be completely disassembled and serviced; it is better to entrust such work to a specialist. In case of burnout and leakage, the heat exchange unit must be removed and properly soldered, which is not always possible to do at home.