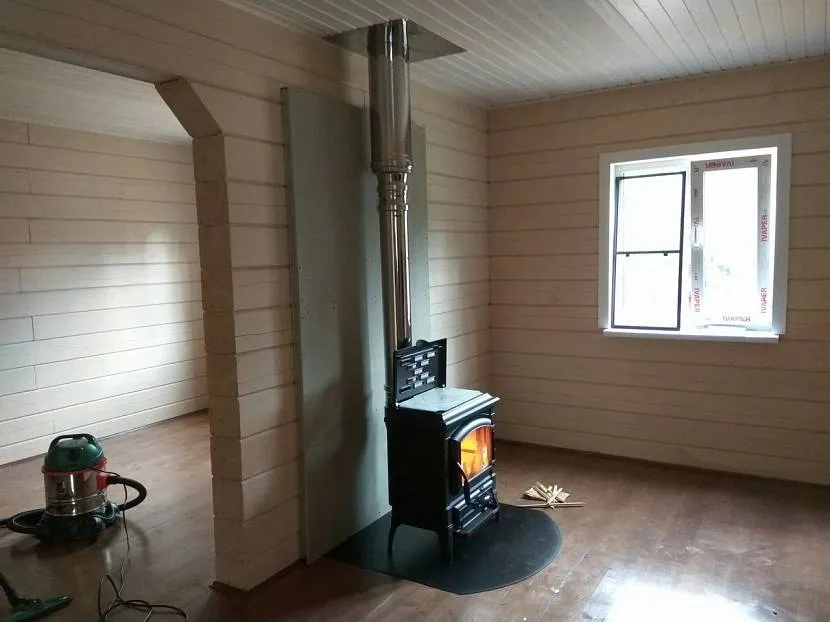
Design Features
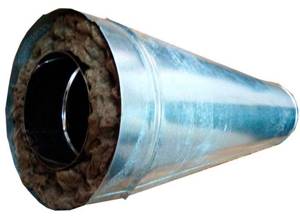
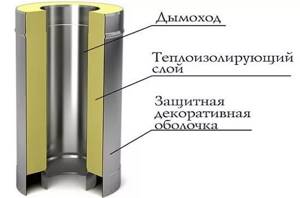
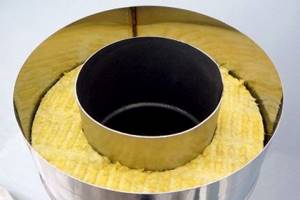
The reliability of the design of lightweight systems is ensured through the use of several layers of modern building materials. The design is called “Chimney Sandwich” in honor of the English sandwich, in which several ingredients are combined in layers. It consists of two pipes made of high-quality steel alloy.
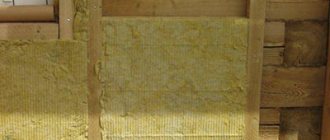
The diameter of the outer pipe is significantly larger than the diameter of the inner one. A layer of thermal insulation material is laid between them, usually non-flammable stone wool. The outer pipe provides protection against damage and mechanical stress. The inner tube can withstand high temperatures. A cushioning layer of mineral wool compensates for the difference in temperature conditions. The thickness of the thermal insulation layer depends on:
- differences in diameters of the inner and outer pipes;
- temperatures during operation;
- the diameter of the stove opening to which the chimney is connected.
Important! Stone wool is a non-flammable material. Therefore, in the event of deformation of the internal steel contour, it will be able to protect against combustion products from entering the chimney.
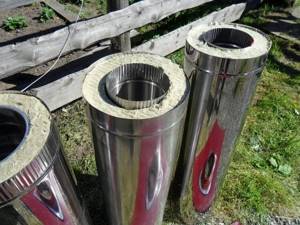
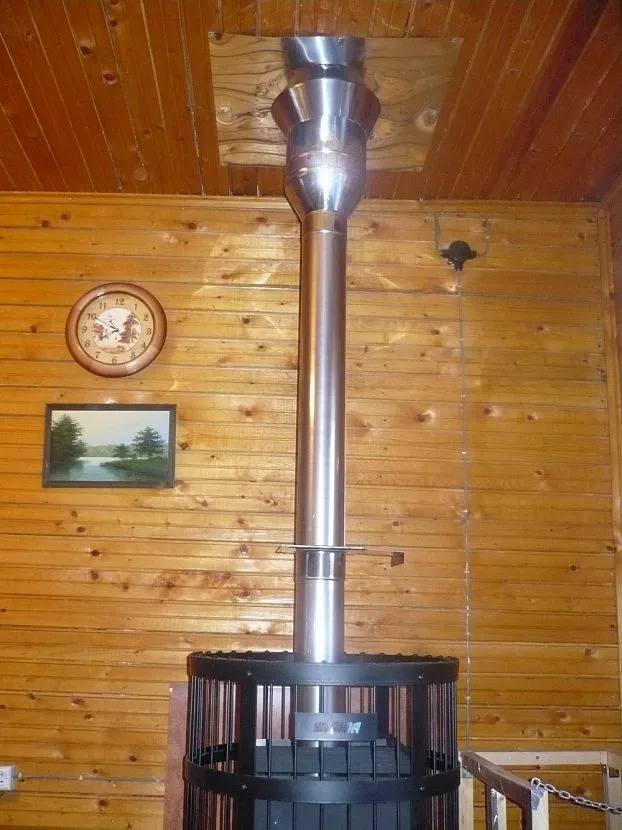
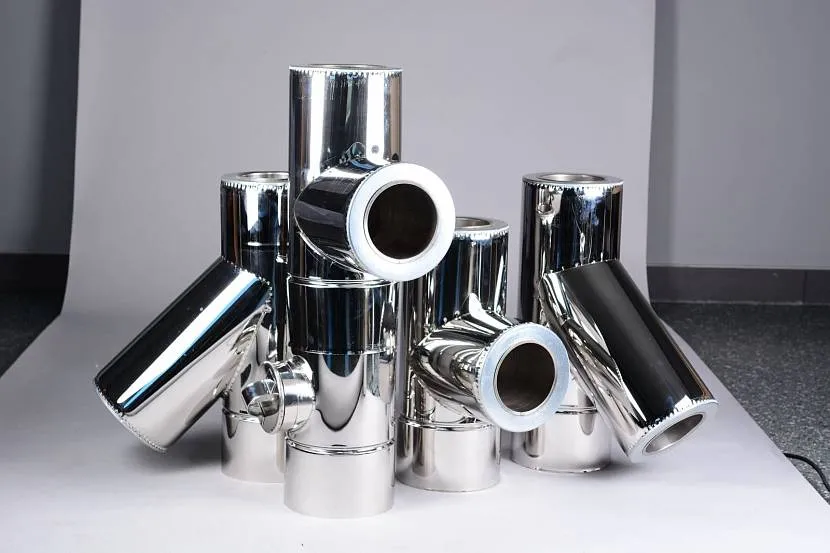
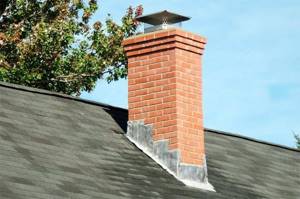
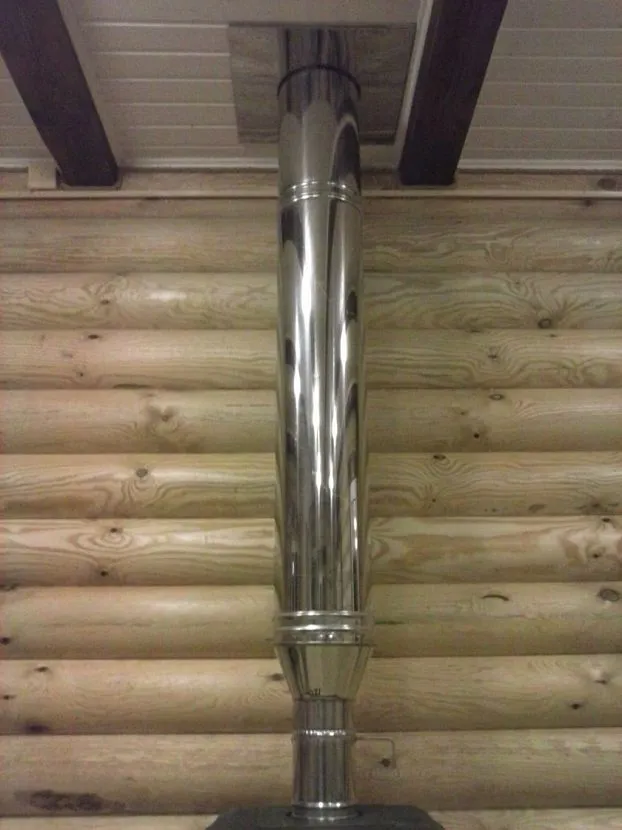
Sandwich chimney pipes Source i1.wp.com
The principle of assembling a chimney is identical to that of a constructor. You can invite a specialist, but after learning how to make a sandwich pipe for a chimney with your own hands, you can carry out a complex of work yourself. The system consists of parts that are equipped with fasteners for a strong connection with each other. The elements have two types of connections that allow installation using:
- corrugated end elements, which allow easy assembly, but require the use of expensive sealant;
- socket connection, complex due to the need for careful adjustment of parts, but more airtight if installed correctly.
A properly installed sandwich chimney will last 15 years or more. But you need to remember that to prevent soot outbreaks, the system must be cleaned regularly.
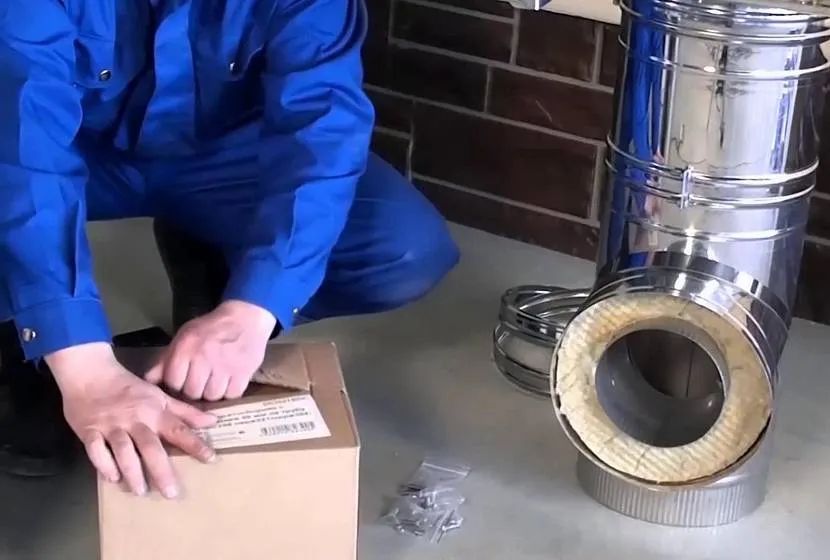
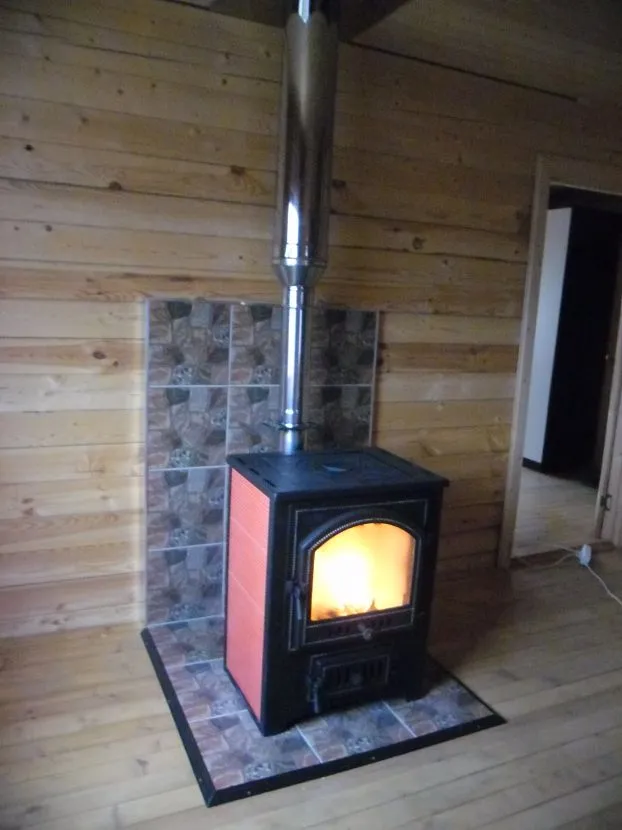
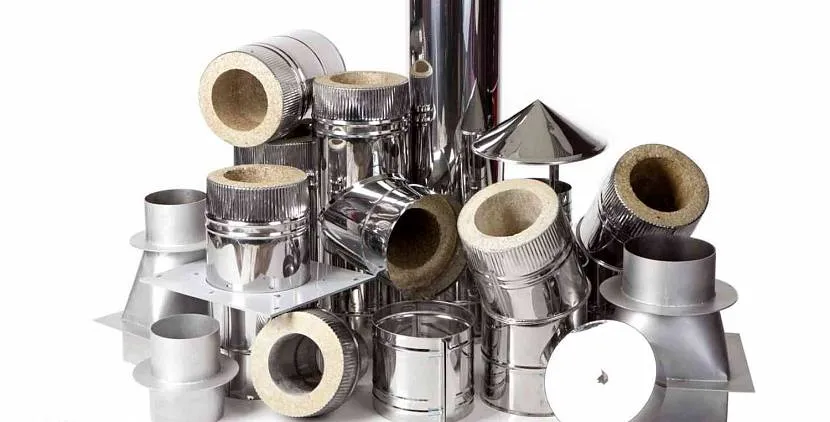
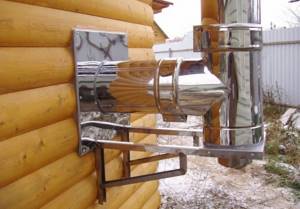
Assembling a sandwich chimney with your own hands Source klimatlab.com
Tools required for installing a chimney
In order to install a chimney in your home with your own hands, you will have to stock up on the following minimum set of tools:
- a grinder for cutting metal and a drill for drilling holes
- spatula, chisel and trowel
- a screwdriver, preferably with hex bits and a jigsaw, possibly electric,
- small hammer and Phillips screwdriver,
- protective gloves and glasses
What you need to remember when installing a chimney yourself
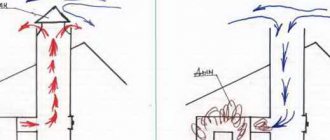
Based on the method of construction, chimneys can be divided into internal or external. Let us consider in more detail in which case you need to choose one or another option.
Thus, the internal structure of the chimney can be used for the construction of heating systems based on heating boilers or fireplaces. Such systems are usually installed inside walls. After installation, such chimneys are closed in the thickness of the wall and decorated. As an advantage, it can be noted that such a system is not subject to moisture condensation and is well protected from the influence of atmospheric moisture.
However, combustion products passing through the chimney have a higher temperature. Consequently, sections of walls running next to internal chimneys become very hot and can catch fire. Thus, it is not recommended to install internal chimneys in walls built from flammable materials. Also, such systems are not recommended for powerful boilers with a large flow of hot combustion products.
chimney components
It is recommended to install an external chimney for industrial and simply large heating systems. Usually they are arranged if the area of the heated room exceeds 500 square meters. Also, such a chimney can be installed if the installation of an internal chimney involves significant difficulties. So, in a building with concrete walls and ceilings, it is easier to break through a slab between floors than to drill a channel in the wall.
Advantages and disadvantages
Technological progress has made it possible to move away from the use of heavy foundations when building a house and to build on prefabricated pile-screw and drill-fill foundations. And if previously heating a house could only be done using a heavy Russian stove or fireplace made of brick, now they have been replaced by modular structures made from a portal with a firebox weighing about 500 kg.
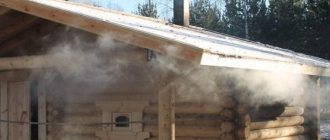
Sandwich chimney in a bathhouse Source spskamin.ru
When wondering how to assemble a chimney for such systems, you need to know the advantages and you need to know their advantages and disadvantages:
- When used, only the internal part of the system becomes very hot. Thanks to the compensation layer of mineral wool, the outer pipe has an acceptable temperature, which significantly reduces the risk of burns;
- after heating the chimney, the draft increases significantly;
- the steel surface of the chimney is not susceptible to soot settling as in systems made of brick or ceramics;
- due to the rapid removal, combustion products do not accumulate in the chimney, which does not lead to the accumulation of condensate on the walls;
- the design of the chimney provides maximum protection: on the outside it is protected by the outer diameter of the pipe from deformation under direct influence, the inner pipe does not allow heat and combustion products to pass through, and mineral wool is a protective layer from fire since it is not hot;
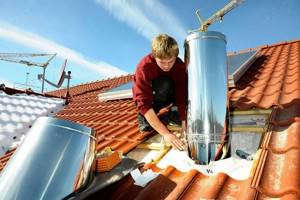
Installed sandwich chimney Source petropech.ru
Since the sandwich chimney system is relatively light in weight, its installation does not require the installation of a special foundation. It is advisable to strengthen the structure of the subfloor with additional lags, but if this is not possible, this may not be done. With proper care, the system will last a long time, but after about ten years, areas with partial depressurization may appear in the seam area.
Step-by-step instructions for installing a chimney made of sandwich pipes
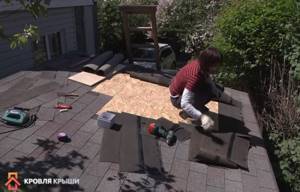
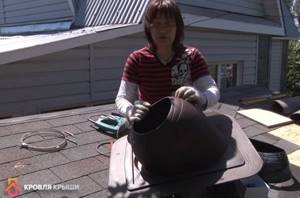
The gazebo does not have a ceiling, so we will not consider this operation. The installation is done in two stages: preparatory and installation. The roof of the gazebo is flat, covered with flexible tiles. The sheathing is continuous, made of moisture-resistant OSB.
Preparing for chimney installation
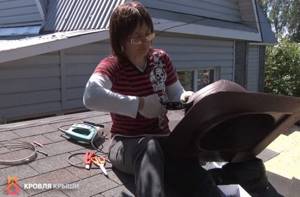
Our barbecue has two chimneys: one from the stove and the second directly from the hood of the barbecue, it is technologically impossible to combine them into one, you will have to make two. Another problem is that the chimney from the stove is located exactly opposite the rafter, it needs to be sawed. To ensure that the roof structure does not lose its original stability, the sawn rafters should be connected with metal corners, and a circle should be welded in the middle. The diameter of the circle should be several millimeters larger than the diameter of the outer pipe of the sandwich chimney.
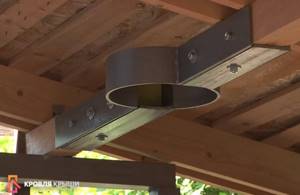
Welded circle design
If such a problem arises during the installation of a chimney in a residential building, then cutting the rafter leg is strictly prohibited. You should try to move the boiler a little. If for some reason this is not possible, then you will have to bend the chimney; special additional elements are sold for this.
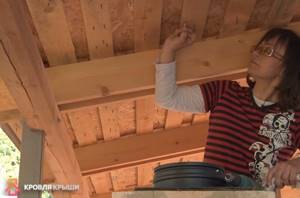
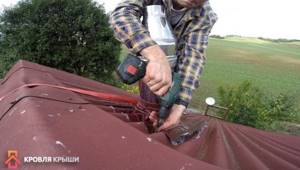
Step 1 . Locate the center of the chimney on the roof. To do this, you will need a long building level or an ordinary plumb line. If it is not there, then tie a nut or bolt to a rope, this will be an elementary plumb line; the accuracy of such a tool is quite sufficient for the measurements being taken. Place the plumb line against the roof and move it until the weight is in the center of the chimney. You can control the position by eye. If in doubt, find the center of the chimney pipe by placing two sticks along the diameter at an angle of 90°. The point where the sticks intersect will be the center of the pipe. Draw a dot on the roof with a pencil.
Pipe center position mark
Step 2. Drill a through hole in the marked place, making sure that the drill does not move during operation. The hole will indicate on the roof the center of the location of the hole for the chimney pipe.
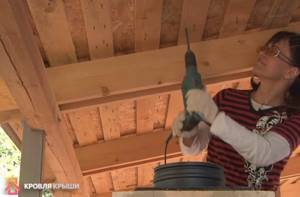
Drilling a through hole
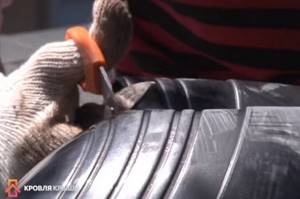
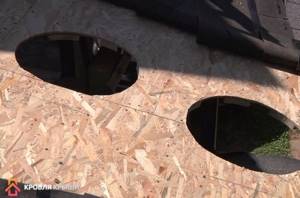
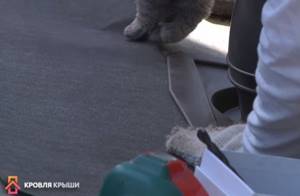
Step 3. Now you need to move to the roof of the building. Due to the fact that the soft tiles have already been laid, some of them will have to be dismantled. Using a thin metal putty knife, carefully lift up the soft shingle shingles.
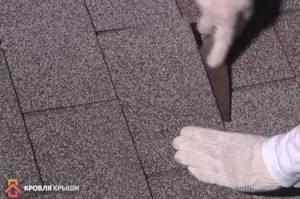
The shingles are lifted with a spatula
By the way, you will immediately see that the adhesive strength of the shingles is not as reliable as the manufacturers of mastics and bitumen shingles advertise.
Step 4. Lift the tile sheets a little and use a screwdriver to unscrew the screw.
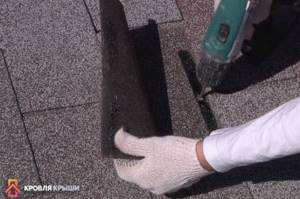
You need to unscrew the screw
If the tiles are fixed with nails, then pulling them out is much easier with a special nail puller. Remove the first shingle. Using the same procedure, remove all shingles from the area of the roof where the chimneys will exit.
Remove the required number of shingles
At this point the preparatory work is completed, you can begin to install the chimney pipe.
Installation of a chimney on the roof
Prices for popular models of screwdrivers
Screwdrivers
It is recommended to install the structure using a pass-through element; it is made of durable materials that are not afraid of harsh ultraviolet rays and high temperatures.
A few words need to be said about the fire distance between the pipe and the wooden elements of the roof. Nobody makes accurate calculations in each specific case; it is very difficult and time-consuming. Practitioners say that if the height of the attic space is at least 1.5 meters and it is unheated, then the sandwich chimney pipe does not need to be further insulated from the sheathing or rafters. The outer surfaces of the chimney never heat up more than two hundred degrees, and this temperature is safe for wood. But for insurance and to avoid problems with firefighters, it is recommended to make a retreat from wooden structures of at least 20 cm around the entire perimeter. This is not very difficult and will eliminate possible claims from the commission during the commissioning of the building.
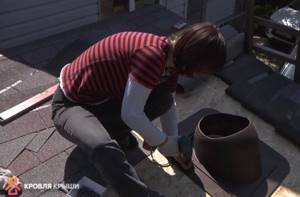
Step 1. Open the packaging of the pass-through element. The passage element is made of polypropylene; modified heat-resistant rubber is used to seal the pipe.
Step 2. Cut a hole in the rubber to fit the diameter of the pipe. It has concentric rings indicating the different diameters. Find the one you need and remove the extra part. You can cut with an ordinary sharp knife, try to make the cut as even as possible. If you have large scissors, that’s great; working with them is much easier and safer.
Cutting the pass-through element
Pass-through element with hole
Step 3. There are circles on the walkway indicating the slope of the roof. This is done to ensure that the chimney pipe on any roof is strictly vertical. It is necessary to cut off the circle that corresponds to the angle of inclination of the roof slope. The penetration is made of polypropylene; it cannot be cut with ordinary scissors; you must use special ones for metal or pruning shears.
Cutting the penetration with pruning shears
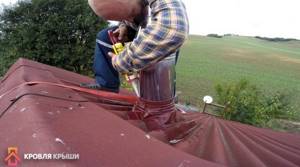
Step 4 . Locate the hole that was drilled from the inside of the gazebo, this hole indicates the location of the center of the chimney. Place the penetration on the continuous sheathing so that it is in the middle of the element. Draw a line with a pencil or felt-tip pen to create a circle for cutting. If you have several chimney outlets on your roof, then such actions must be done for each.
Step 5: Use an electric jigsaw to cut out the hole. To do this, you should first drill holes for the nail file with a drill, and only then insert the tool into it and work. Be careful that the saw does not come into contact with metal hardware; they should be pulled out or bypassed.
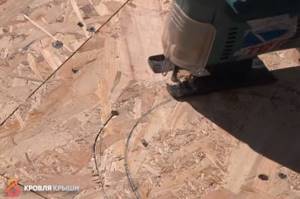
Cutting out a hole with a jigsaw
Ready-made holes for pipes
Step 6. Attach the passage element and secure it to the plate with self-tapping screws. If you wish, then for peace of mind you can place the passage element on any sealant; the squeezed-out excess should be carefully removed with your finger.
Fixing the pass-through element
Step 7: Reinstall the chimney. Individual pipes can be additionally tightened together with clamps.

Chimney installation
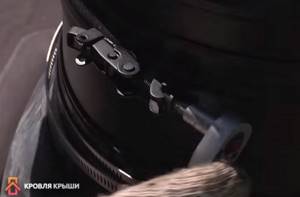
The pipes are tied together with a clamp
It is recommended that on soft, flammable roofs, be sure to cover the pipe with a tip with a spark arrestor. This is especially important for a wood-burning boiler. If the top has a deflector, great; with a side wind, the draft will increase, which eliminates the formation of reverse draft.
The deflector is secured with a clamp
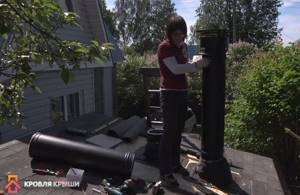
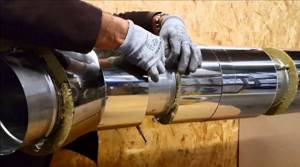
Photo of the chimney assembly process
Step 8: Replace the rubber weather stripping to prevent rain from flowing through the pipes and under the roof. The casing has a special mark indicating in which position to put it on. The mark should face forward towards the roof ridge.
Step 9. Tighten the casing tightly to the pipe with a clamp, using sealant as desired.
At this point, the installation of the chimney is completed; the previously dismantled roof can be returned to its place.
Step 1: Install the underlayment strips. It is pushed around the perimeter into a special slot in the passage element.
Lining layer
Step 2. Begin putting the previously removed shingles back into place. In the places adjacent to the passage element, cut the tiles so that they overlap the contour of the element by 2–3 cm.
Laying soft tiles is done in the usual way using bitumen mastic to seal the joints.
Using sealant
Final result
Installing Master Flash
Prices for roofing master flash
Roofing master flash
This device has a perimeter edging made of aluminum sheet, the edging is hermetically sealed into a rubber gasket. Due to this technological feature, the element copies the roofing profile with maximum accuracy, and the likelihood of leaks is minimized.
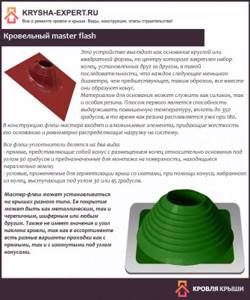
Roofing master flash
How to install Master Flash correctly?
Step 1. Coat the perimeter of the outer chimney pipe with soapy water. This is done in order to tightly place the rubber apron on the chimney.
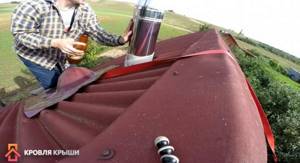
Applying soap solution
But this can only be done if the diameter of the hole on the apron is 2–3 cm smaller than the diameter of the pipe. If the parameters differ more, then the rubber will have to be trimmed a little. For this purpose, manufacturers made special rings on it indicating the diameters. There is no need to try to stretch the apron too much. Rubber cannot remain in such a tense state for a long time; over time, it will definitely begin to tear. As a result, leaks will appear, and they will be so strong that to eliminate them you will have to completely change the master flush.
Step 2: Shape the aluminum into the roof profile. You can do this with your hands, a rubber hammer or a mallet. Start bending from the middle, and then move symmetrically to the edges. If you do the opposite, the last waves will be stretched out, and you will have to start all over again.
Put on the master flush and press down the aluminum sheet
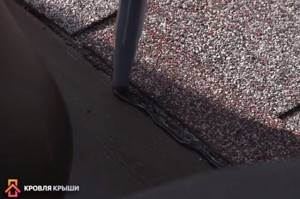
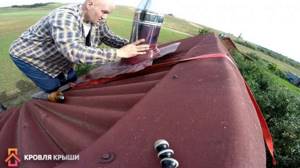
Step 3. Apply silicone or other sealant to the area of the roof that is located under the master flush. Do not spare the material, especially carefully coat the upper part of the element and those places where water drains.
Applying sealant
Practical advice. If the house is located in the southern regions of our country, and the penetration is black, then you need to use special sealants. The fact is that on bright sunny days the surface of the master flush heats up to a temperature exceeding +100°C, and ordinary sealants can withstand no more than +80°C.
The lower part of the element does not need to be coated with sealant; water will not flow upward. But for guarantee and personal peace of mind, it is recommended to apply a silent sealant.
Step 4. Screw the element to the roof. To do this, use special screws. Make sure that the sealant protrudes from under the aluminum plate along the entire perimeter. Screw the screws into the lower waves first, and only then into the upper ones. This fixation technology increases the tightness of the connection of elements.
The element is screwed with self-tapping screws
Step 5: Gently remove any excess sealant with your finger. There is no need to leave it on a lot or spread it in a thin layer over a large surface of the roofing, this will not help increase the service life of the joint. The fact is that after 3-4 years, the smeared thin layer of sealant will definitely peel off from the roof, and water will begin to get into the gap. Only the material that is between the aluminum plate and the roof covering ensures a tight connection.
It is important to know that tightness does not depend on the thickness of the protruding material; durability is affected only by its quality and degree of adhesion. As for resistance to ultraviolet rays, these are not critical indicators; the sealant is protected by an aluminum sheet. It is more important to look at frost resistance.
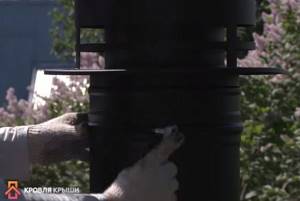
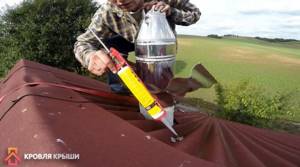
Step 6. Apply sealant around the perimeter of the pipe between the wall and the rubber cap.
Applying sealant between the wall and the rubber cap
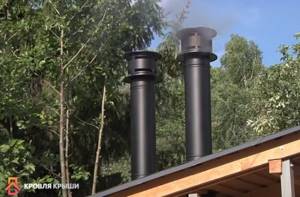
Replace the pipe cap and tighten the clamp.
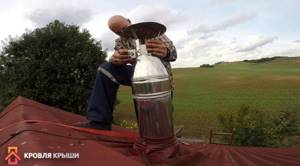
Put on the pipe cap
If all the work is done correctly and high-quality materials are used, then there will be no problems with the chimney for many years of operation.
Calculation of sandwich chimney pipe sizes
Diameter
To determine the optimal pipe diameter size for a sandwich chimney, you need to know the conditions under which the operation will take place. The heating power of the furnace depends on how large the area is, as well as what the planned temperature range is.
As a rule, in order to heat 10 square meters they take 1 kW. Accordingly, in order to heat an area of 100 square meters, you need to purchase a 10 kW stove. Having decided on the power, you can choose a model for individual parameters.
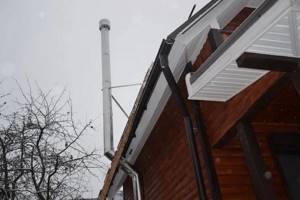
Chimney facing the street Source santehnika-otoplenie.ru
If a system is needed to remove combustion products from a heating boiler, then you need to know the type of fuel and the power of the boiler itself. The higher the temperature of the gases passing through the chimney, the stronger its heating will be. The lowest temperature is for gas boilers, which heat up from 120C to 200C, and the highest for coal boilers, where the temperature of combustion products reaches 700C.
The choice of sandwich should begin with the diameter of the inner pipe. The more powerful the stove is planned to be installed, the wider the diameter should be. For example, if a 3.5 kW oven is installed in a room of 4 square meters, then the width of the outlet from it will be 158 mm. And for an area of 90 square meters with a 9 kW oven, a hole of 220 mm is suitable.
Despite the fact that open fireboxes are not currently recommended for installation, they also have their own standards. The outlet channel in this case should be no more than one hundredth of the total volume of the boiler. If this rule is not observed, the draft in the system will be weak with potential turbulence of air masses with combustion products.
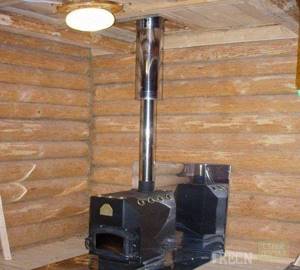
Sandwich chimney inside the house Source pechivrn.ru
Height
To ensure safe removal of smoke away from people, it is necessary to maintain height standards. The total length of the structure should not be less than 5 meters. If the condition is not met, reverse draft may occur, as a result of which the residential area will be subject to smoke. In addition to the overall length, you must also follow the rules for venting the chimney through the roof.
If the roof is pitched, then the upper edge of the chimney should be at least 0.5 meters above the ridge if the middle of the pipe is at a distance of 1.5 meters or less from it. At a distance from the chimney of 1.5 to 3 meters, the chimney should end at the same level as the ridge in a horizontal plane. When removed by more than 3 meters, the top edge should be 10 degrees below the ridge.
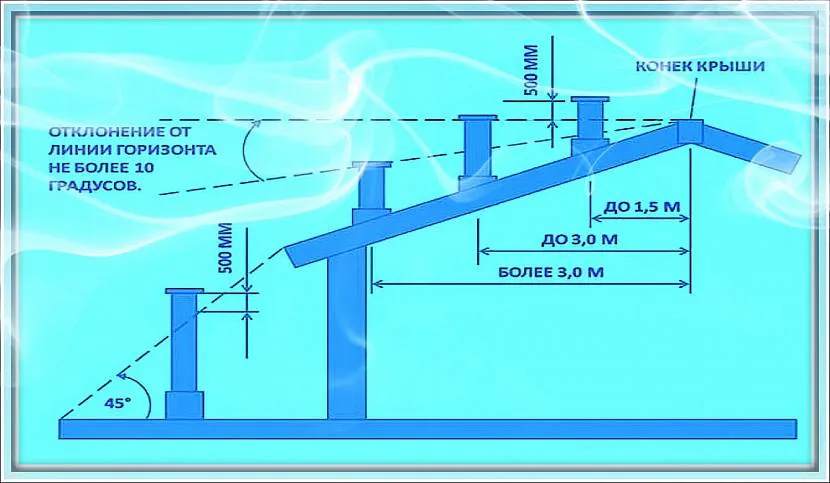
Rules for installing a sandwich chimney on the roof Source stroy-good.ru
If the sandwich system is installed on a flat roof, then the height of the upper edge should be located at a distance of 0.5 to 1.5 m. Since the total size of the chimney should not be less than 5 meters, if the dimensions are insufficient, you can increase the length of the outlet through the roof to 30 cm, making sure to use special reinforcement braces.
Preliminary calculation of the chimney and installation diagram
Installation of a sandwich structure should occur after preliminary calculations, among which it is important to determine not only the cross-sectional parameters, but also the length and its location.
Chimney height and location on the roof
When determining where it should be located, it is important to consider the following:
- In a situation where the house has a flat roof, the sandwich structure should be located at least half a meter (0.5 m) above the roof.
- When the distance between the outlet and the roof ridge is less than half a meter (1.5 m), then the chimney should be installed half a meter above the ridge.
- If the distance between the chimney and the ridge falls within the range of one and a half to three meters, then the height should be made equal to the height of the ridge.
- When the above distance is more than three meters, then the height of the chimney is built according to the principle of an imaginary line, which it should be equal to. The imaginary line, in turn, is drawn from the ridge to the horizon at an angle of 10 degrees.
When calculating the length, it is important to consider several basic rules:
- According to building codes, the sandwich system must have a height of at least 5 m .
- When using a material with a high degree of combustion as a roof covering, the chimney sandwich above the roof ridge should be additionally raised by about 1 - 1.5 m.
- When using a roof covering made of non-combustible material, the same height should be at least half a meter.
- If the house has extensions on the roof and they are higher in height than the house itself, then the structure must be installed so that it is higher than such a building.
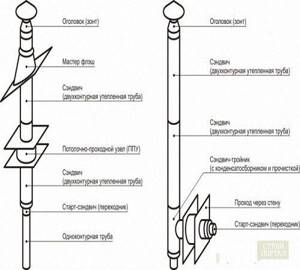
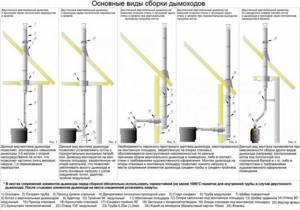
Sandwich chimney installation diagram
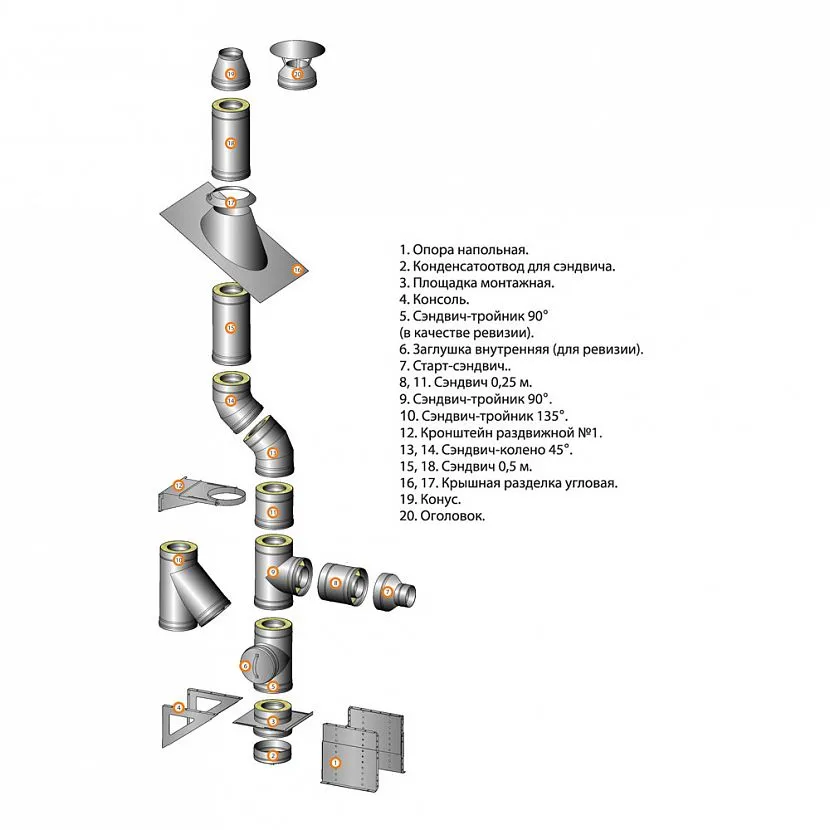
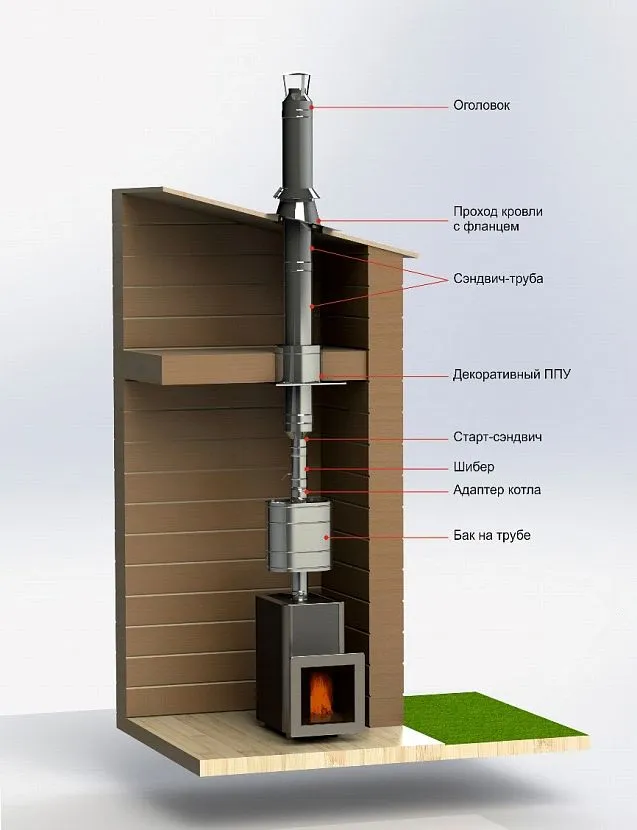
To make it easier to imagine how to carry out the installation correctly, here is a diagram.
Figure - Installation diagram
Thus, if you take into account all the requirements and rules when calculating the location of the sandwich chimney, its height and length, then the installation will be carried out correctly.
How to choose
Since different boilers produce different combustion temperatures, in each case the composition of the steel from which the inner and outer pipes are made can play a role. After burning, sulfur, sulfuric and hydrochloric acid may remain on the walls of the chimney. Temperatures also differ depending on the type of fuel used.
Sandwich chimney details Source www.stroimdom.com.ua
When learning how to properly assemble a chimney from sandwich pipes for a home or bathhouse, you need to know that different grades of steel react differently to aggressive influences. The most common:
- AISI 304. High temperature resistant steel alloy. It has a high content of nickel and chromium. It is used at elevated temperatures up to 1000C, since at low temperatures around 600C it becomes brittle;
- AISI 316. High alloy molybdenum stabilized alloy that is acid resistant. Characterized by the absence of corrosion;
- AISI 321. High alloy steel alloy stabilized with titanium. Suitable for use in the average temperature range, up to 800C. Corrodes when interacting with sulfur;
- AISI 430 . It is used at low temperatures, as it has a low level of resistance to aggressive influences. May be corroded. It is used in the use of inexpensive budget models.
Sandwich chimney components Source www.rus-dimohod.ru
Since it is most often impossible to determine the type and grade of steel with the naked eye, a magnet can be used to determine the type. When learning how to properly assemble a chimney from sandwich pipes for a stove or boiler, it is necessary to take into account the characteristics of steel. If the steel is of high quality, then it will not be attracted, but if the alloy is of low quality, then attraction will arise.
What materials are sandwich pipes made from?
Today, the structural elements of sandwich chimneys are made from two types of steel:
- stainless steel;
- galvanization.
As a rule, the inner pipe is made of stainless steel, which is more heat-resistant and has high anti-corrosion qualities, and the outer pipe is made of galvanized sheet. Such pipes are considered more economical than products in which both circuits are made of stainless steel, so the demand for them remains quite high. On the construction market you can find sandwiches made only of galvanized steel, however, such products are used only for low-power gas boilers.
The inner pipe is always made of heat-resistant steel, and the outer pipe can be either stainless or galvanized
Chimneys for high-power heating equipment are made exclusively of stainless steel. Moreover, for such purposes, special heat-resistant steel grades are selected. All well-known steel grades are presented in the table below.
Table 1
| steel grade | Characteristics |
| AISI 304 | This grade of stainless steel is a more budget-friendly version of AISI 316 and is used for low- and medium-power boilers operating on gas. |
| AISI 316 | A common grade of stainless steel, which includes various alloying compounds (nickel, molybdenum). Pipes made from this alloy are characterized by high strength characteristics, good heat resistance and resistance to active chemical compounds. Used for gas boilers of almost any type. |
| AISI 430 | As a rule, external casings for chimney ducts are made from stainless steel of this brand. This is due to the fact that AISI 430 has low heat resistance. |
| AISI 439 | This grade of stainless steel includes the titanium element, which allows it to be very durable and reliable. Other positive characteristics of this brand of stainless steel include: increased heat resistance and anti-corrosion qualities. Chimneys made from this material are excellent for gas boilers, as well as for heating equipment operating on solid fuel with a power of no more than 30 kW. |
| AISI 316I, AISI 321 | Chimneys made of this material are suitable for any heating equipment operating on solid fuel. The maximum operating temperature for such steel grades reaches +850 °C. |
| AISI 310S | Pipes made from this grade of steel are distinguished by the highest heat resistance and are used to make pipes in the bathhouse. The maximum operating temperature for such pipes can reach +1000 °C. |
The wall thickness of sandwich pipes can also vary from 0.5 to 1 mm depending on the operational area. The width of the thermal insulation layer located between the two contours ranges from 3 to 10 cm.
Type of chimney placement
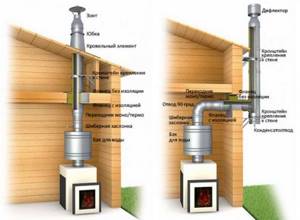
If you are interested in how to assemble a chimney from sandwich pipes, you need to carefully analyze the place where you plan to install it. Depending on the area of the room, the location of the furniture, the level of humidity and other factors, it is necessary to choose the type of placement of the sandwich chimney. Installation is possible indoors or outdoors.
Outdoor installation
A chimney that is assembled from the street side significantly saves space inside the house or bathhouse. Having studied how to install a chimney in a bathhouse from sandwich pipes, you can assemble such a structure with your own hands. There is no need to make a decorative box for it, which significantly saves money.
Main types of chimney assembly Source otopleniehouse.ru
The system consists of assembled elements of the required length, which are connected to a structure located indoors with a special through pipe. To ensure good traction, it is necessary to follow the rules when the length of the passage section should not be more than 100 cm.
During installation, a technological slope of 3 degrees must be observed so that condensate does not accumulate in the boiler or furnace. In this placement, the roof must be more than 50 cm from the edge of the steel outer pipe. The best answer to the question of how to properly install a sandwich pipe in a bathhouse, outside or inside, would be installation from the street side.
Important! If continuous use is not planned in winter, it is advisable to insulate the chimney to avoid freezing and deformation from temperature changes.
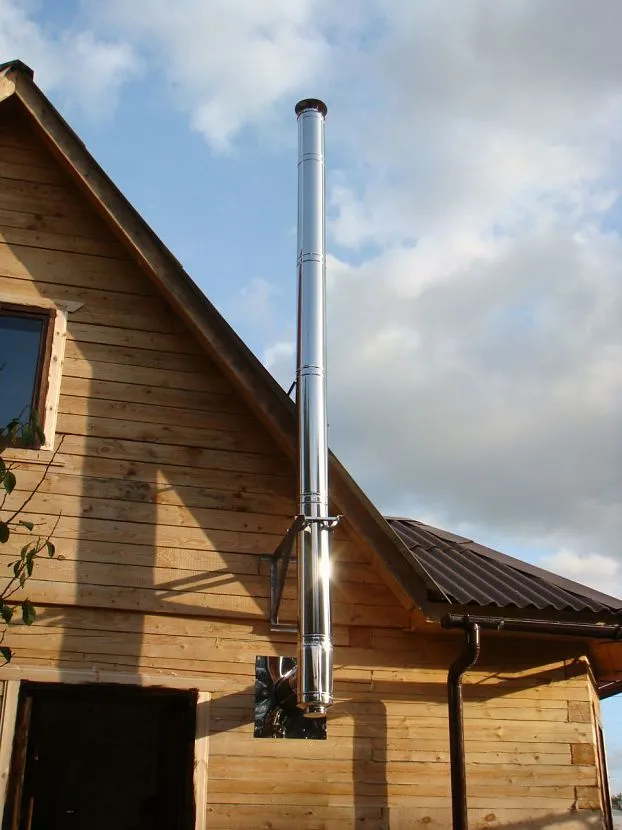
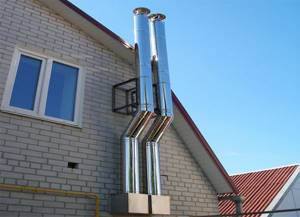
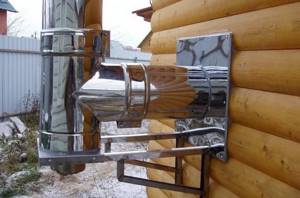
External installation of a sandwich chimney Source fluesystems.ru
See also: Catalog of companies that specialize in the installation of stoves, fireplaces, grills and barbecues.
Indoor installation
The chimney, which is installed in the room, consists of an internal part of the system, located perpendicular to the floor, and an external part, discharged through the roof. The structural parts must be joined together in open areas so that inspection can be carried out. A joint located in the interfloor ceiling does not provide such an opportunity and is considered a potential fire hazard, since if the seal is broken, the wooden floors, floor materials of the second floor and ceiling of the first will overheat.
The placement in a completely vertical position gives a good level of draft, and in addition, such a chimney is easy to maintain. If during installation it turns out that when installed vertically, the chimney rests on the ceiling or rafter, then in order not to interfere with the structural part of the house, it is better to bend the pipe using special connecting elbows.
Main types of chimneys
Depending on the material of manufacture, chimney systems can be divided into those made of various types of metal (for example, cast iron or stainless steel), brick and ceramic. A modern chimney can be made of composite materials and have a multilayer structure.
You can choose the chimney modification that most closely matches your building.
So, for example, the cheapest option - a metal chimney - is most suitable for arranging heating systems for boiler rooms or baths, that is, non-residential premises. However, such an economical approach is hardly advisable to use in a home. The metal structure has poor sealing of the joints, as a result of which you will not be able to get rid of smoke penetration into the room. Also, metal does not have the most attractive service life, since it is extremely unstable to atmospheric moisture.
A pipe consisting of composite multilayer materials is more reliable and resistant to aging. But between the layers of such a pipe, a heat-insulating fire-resistant material is placed. Due to unjustified savings, many manufacturers place a low-quality insulator in the intermediate layer, which, after some time, may begin to crumble. So when purchasing such a pipe, carefully monitor the manufacturer’s reputation.
The cheapest option is to build a chimney from thin-walled stainless metal. The low weight of such a pipe allows it to be fixed in the structure even with the help of a minimal amount of fastening material. Also, a stainless steel pipe is very easy to process - it can be cut with ordinary metal scissors.
external chimney
A ceramic chimney is very complicated to construct, since its installation can only be done together with the entire house. In this regard, it is extremely rarely used, because in order to build it in a finished home, the construction team will need to dismantle part of the floors.
Sandwich pipe connection options
If you are interested in the question of how to assemble a sandwich chimney, another question will probably arise: how to join the system pipes together. There are two possible options, and each of them has its own name:
- “By smoke”, when the lower pipe goes inside the upper one. In this case, combustion products have no way out and are freely discharged upward;
- “Ppo condensate”, when the inner upper pipe is inserted into the lower one. External pipes are assembled with the top side facing out.
It is believed that in the second case the risk of moisture getting into the insulation is reduced, but if the tightness is broken, then some of the combustion products may enter the room.
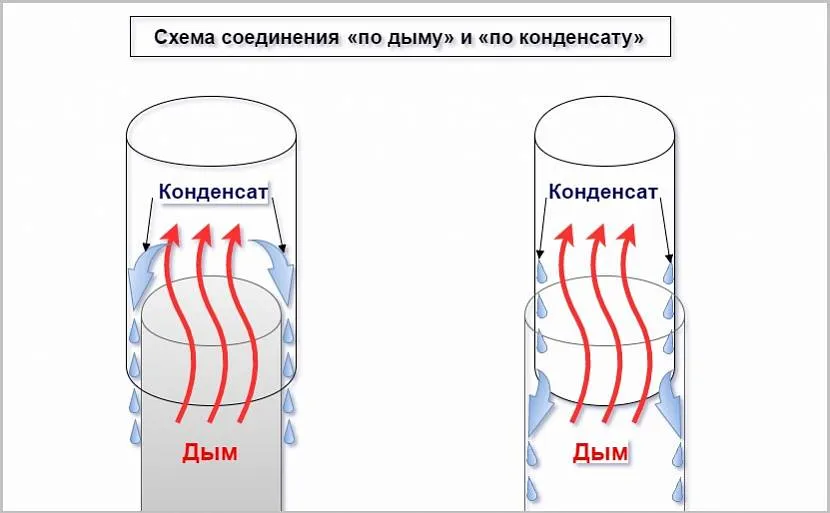
Connection for smoke and condensate Source www.rusovent.rf
Technical characteristics of pipes
These are important parameters when choosing elements for specific installation conditions. Safety and service life depend on the correct identification of the required parts.
Diameter
Most manufacturers of boilers and other heating devices specify the optimal chimney diameter in their operating instructions. This parameter depends on both the height of the fastener and the traction force.
When it is necessary to make a transition from brickwork to sandwich modules in a room, the diameter is calculated as follows:
- In a fireplace, 1 kW of power produces 8 sq. cm sections.
- In wood stoves with a power of up to 3.5 kW 0.02 sq. m section is equal to 160 mm diameter.
- If the furnace power is higher than 5.2 kW, then the diameter increases to 190 mm.
- With a productivity of up to 7 kW per 0.038 sq. m is 220 mm in diameter.
It is prohibited for the diameter of the chimney to be smaller than the diameter of the stove pipe.
Wall thickness
In gas devices it is determined by the diameter of the product:
- with a value of 130 – 450 mm, the wall thickness is 0.5 mm;
- with a diameter of 500 mm - 0.6 mm;
- with an indicator of more than 500 mm - 0.8 mm.
In solid fuel boilers, the main factor influencing the choice of wall thickness is the combustion temperature of the raw materials.
Thus:
- up to 450 degrees, a value of 0.6 mm is enough;
- more than 450 degrees need 0.8 mm.
It is important to note that such boilers must have an uninsulated part of the pipeline, which must be connected to the outlet pipe. It is made from a piece of heat-resistant stainless steel. Wall thickness – 0.8 – 1 mm.
From the outside, the chimney casing with a diameter of up to 450 mm is taken with a wall thickness of 0.5 mm, with a wall thickness of more than 500 mm - 0.6 mm.
Height
The height of the chimney relative to the ridge is determined based on three parameters:
- SNiP 41-01-2003;
- construction rules SP 7.13130.2009;
- manufacturer's instruction manual.

The recommendations are as follows:
- The height of the sandwich pipe is from 5 m.
- If the roof deck is made of flammable material, the pipe is made 1-1.5 m higher than the ridge.
- On a roof made of non-combustible material (corrugated sheeting) it can be placed at a height of 0.5 m from the ridge. The same applies to roofs with a flat structure.
- On pitched roofs, when the chimney is located at a distance of 1.5 m from the ridge, the height is 0.5 m or more.
If the chimney is located at a distance of 3 m from the ridge level, the height is determined by drawing a line at an angle of 10 degrees with respect to the horizon.
Material
To assemble a reliable chimney, 3 main types of raw materials are used.
Brick
The classic option is red fireproof. Withstands high temperatures up to 1000 degrees. Has good heat dissipation. The masonry technology is complex, so you won’t be able to create such a structure yourself without experience. This process is labor-intensive and lengthy. A foundation needs to be poured, which should be planned at the design stage. It is recommended to install a sleeve made of stainless steel sheet inside, otherwise the brick will become saturated with condensation and over time, the inside of the walls will begin to peel off, and stains will form on the outside. Construction will be expensive.
Ceramics
Chimneys are durable, resistant to changes and high temperatures.
Manufacturers can supply ceramics with the following assembly options:
- Ceramo-stainless. The shell is made of stainless steel with a thickness of 0.8 mm, so externally the pipe cannot be distinguished from metal.
- Ceramo-expanded clay. The edging of the product is made of expanded clay blocks. Reminds me of brickwork.
- Expanded clay-stainless steel. A combination of the two previous types.
The ceramic surface is smooth, so soot and ash settle on the walls minimally.
Stainless steel
Modular type. The optimal steel alloy is AISI 430 BA. Features: heat resistance, resistance to chemicals and environmental influences.
The chimney is:
- single wall;
- sandwich (double-walled).
Single-walled can be mounted inside the house.
A sandwich pipe is the best for outdoor conditions, as it has a layer of insulation that minimizes the accumulation of condensate inside the pipe, extending the service life of metal parts.
Sandwich system kit details
Once the location of the chimney has been chosen, whether outdoors or indoors, you need to understand what parts will be needed to understand how to properly assemble the chimney. To compile a list of the necessary parts, you can independently contact a specialized store or request a commercial offer via the Internet. But it’s better if you have an independent understanding of the process and what parts will be useful during assembly.
Manufacturers produce chimneys with all the necessary components so that a full assembly cycle can be carried out. If there are differences between manufacturers' models, they relate to decorative or connecting functions. The list of elements is usually the same. Therefore, having decided on the names, you can choose a manufacturer based on the criteria of reliability or availability.
Sandwich chimney parts Source pech-kamin.ru
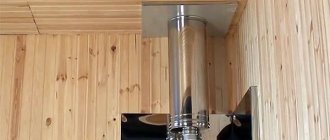
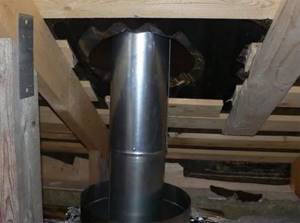
Wiring a sandwich chimney through the ceiling
When installing a smoke exhaust system consisting of sandwich pipes through the roof, it is necessary to take into account the location of the floor beams, as well as take into account the roof truss system. Determining the point at which the pipe will pass is carried out between these structural components of the building.
The minimum distance from the external contour of the sandwich pipe to flammable materials located in the house must be at least 130 mm (if the flammable material is protected by a heat insulator). As a rule, to comply with this rule, you often have to resort to using forty-five degree angles.
The first segment of the sandwich chimney must be made of a material that can withstand maximum temperatures. This is due to the fact that the first pipe is in direct contact with the boiler outlet. Next, the adapter for the sandwich is mounted and only then the laying of the sandwich pipes begins.
How to make a hole in the ceiling and organize PPU? Let's look at this process step by step:
- First of all, the place where the chimney communication from sandwich pipes will pass is determined. The pipe passage point must be between the beams and must take into account the location of the rafter system.
- Installation of a sandwich pipe through the ceiling is carried out in accordance with all necessary building codes, as well as fire safety rules. After determining the place where the sandwich pipe will pass, it is necessary to begin organizing the hole by performing preliminary markings.
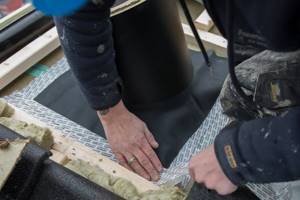
- After the hole is ready, you need to secure its edges in accordance with fire regulations. To do this, it is recommended to trim the edges with a heat-resistant insulator (for example, mineralite). Fixing non-combustible material to the ends of the hole is done using nails or self-tapping screws. A distance of 25 cm must be maintained from the outer contour of the sandwich structure to the edge of the ceiling.
- A ceiling passage unit or PPU is mounted. The organization of the box is quite simple: as a rule, it has ready-made, factory-made holes.
- We attach the box to the ceiling using self-tapping screws.
- Next, you need to stretch the sandwich structure through the finished polyurethane foam. The pipe must be pulled and fixed in a strictly vertical position, without any deviations.
- The free space in the box is filled with heat-insulating material. Mineral wool or expanded clay are well suited for this.
- Finally, you need to take care of the appearance of the structure. On the front side, it is necessary to close the hole with the pipe with a sheet made of stainless steel. It is imperative to place a small layer of heat insulation between the ceiling and the stainless steel sheet.
An important point when exiting a pipe through the roof is waterproofing the exit point
Important! Experts do not recommend rigidly securing sandwich pipes. This is due to the fact that when heated they expand.
Required Tools
After carrying out all the necessary calculations and deciding how to make a chimney pipe yourself, you need to prepare all the required elements. In addition to the list of parts of the sandwich system itself, you need to have on hand a list of the following items:
- clamps for tightening;
- support brackets;
- necessary hardware fasteners;
- heat-resistant sealant;
- grinder, metal scissors;
- spatula for sealant;
- roulette;
- square;
- screwdriver;
- drill and hammer;
- building level.
You also need a marker or construction pencil for marking. When assembling, the joints of the parts must be secured with clamps. The entire resulting structure is fixed vertically along the wall using brackets in increments of 1.5 to 2 meters.
Chimney pipe cleaning and care
Consists of observing the following points:
- During the heating season, cleaning the chimney from a solid fuel boiler is carried out at least once every 2 weeks.
- Cleaning is performed through a special compartment - an inspection window. If it is missing, then you need to remove the clamp and open the plug.
- The condensate trap is also regularly cleaned of moisture. When it is connected to the sewer, the condition of the connecting tube is checked. If damaged, replace it. A piece of wire is used for cleaning.
If care recommendations are neglected, the accumulated soot will fill the pipe, interfere with the free exit of smoke and can lead to increased smoke in the room or, even worse, to a fire.
The sandwich design is perfect for a gas heating system. It can also be used for a wood-burning boiler or stove, but it is important to regularly clean the chimney from soot.
Chimney assembly
If you decide to implement the question of how to make a sandwich chimney correctly with your own hands, you need to once again make sure of the quality of the system and check the availability of the passport before starting the installation. This document must be handed over upon purchase and it indicates a possible assembly diagram, as well as some technical parameters of the composition of the chimney.
When the heating device is already installed, you need to insulate the wall with calcium silicate or mineralite. This must be done immediately, since after installing the chimney there will be no access to the wall. Also, you immediately need to mark and drill holes for the bracket for connecting the mono-pipe and pipe.
Elements of a sandwich chimney assembly Source pandia.ru
When starting assembly work, you need to coat the parts of the outlet of the heating device with sealant. After this, a tee is connected to the boiler or furnace pipe, which contains a plug and a device for collecting condensate.
On the opposite side, a mono pipe is connected to the tee. After the tee is firmly seated on the pipe, it is pushed in all the way and tightened tightly with a clamp. After screeding, you need to apply a building level and if everything is normal, then you can secure the first element with a support bracket to the wall.
Next, the pipes are connected to each other in the chosen way: “through smoke” or “through condensate.” All joints between parts are fixed with heat-resistant sealant. To apply it you need to use a spatula. After application, the composition is distributed in an even layer over the entire surface of the edge of the element.
Support bracket Source topijar.ru
The sequence and list of necessary parts depends on how the chimney will be located. When the installation is carried out indoors and in a vertical position, it is advisable to install a tank for heating water or a specialized mesh heater.
If you place the sandwich elements at once, then exposure to high temperatures may cause the thermal insulating mineral wool layer to sinter, which will cease to perform its functions. The steel can subsequently burn out quickly.
If the question arises of how to assemble a chimney from sandwich pipes into a bathhouse and the system must be taken outside, then first a pipe is installed, and after it a section is immediately placed in a horizontal plane. The passage section must not be installed in a completely horizontal position or with a slope towards the premises, as accumulating condensate can get inside the heating device, which can lead to its deformation.
Chimney indoors Source dizajninterer.ru
DIY installation instructions
Required parts, fasteners and tools
Before you begin installing a chimney sandwich structure on your own, it is worth preparing some accessories and parts. These include:
- a special adapter that will allow you to bring the device to the roof;
- console (bracket) for fixing the sandwich structure;
- platform for unloading, thanks to which it will be possible to evenly distribute the weight and thereby remove the load from the base;
- a kind of hole (window) through which the chimney will subsequently be cleaned;
- clamps for fixing structural elements;
- several adapters;
- an elbow at an angle of 90 or 45 degrees, it will allow you to change the direction of the sandwich chimney;
- device for the upper part - cone, mushroom, woppler, etc.
Before you begin installation, you should find out how and in what way the elements can be connected. There are several such methods:
- Flanged . This connection allows smoke to escape through the pipe without obstacles due to excellent draft, but if the joints are poorly closed, moisture can seep into the structure and damage the basalt insulation.
- Condensate . This method is used when it is necessary for condensed moisture, which arises due to temperature differences, to flow freely down the walls. With this installation, the inner tube is placed in a socket so that moisture does not penetrate inside, but at the slightest crack, smoke will enter the room.
- Bayonet, or bayonet . This connection of parts is obtained as a result of axial movement and rotation, and sometimes lateral displacement, of one part relative to another.
- Smoke . The sandwich structure is assembled according to this method in cases where it is necessary to prevent carbon monoxide from entering the house.
When choosing any of the chimney pipe connection options, it is important that all cracks are carefully closed, then moisture will not be able to damage the insulation, and flue gases will not damage the health of household members. In addition, it is recommended to install the internal pipes of the structure against condensate so that moisture does not get into the joints and does not leak.
After preparing the necessary parts and choosing a connection method, you can proceed directly to assembly. Installation of the structure does not require special or additional skills and abilities. Even a person who is far from construction can do it.
The basic rule to remember before starting assembly is that installation should start from the bottom, that is, from the boiler, and continue towards the roof. The installation can be divided into four main stages.
Assembly of stainless steel chimney elements
Stage 1 – assembly of parts.
Connecting the parts together is quite simple, the main thing is to be careful. First of all, what you need to pay attention to is that one end of the pipe has a small radius, and the other a little larger. In order to connect the parts correctly, you need to insert the end with a smaller radius into the larger one.
This assembly has many advantages:
- soot will not accumulate;
- moisture will be easily removed.
However, to ensure that condensation and moisture actually come out and do not settle inside the device, it is necessary to insert tees.
Stage 2 – output of the chimney pipe.
A sandwich pipe can be installed on the street in two ways:
- Through the wall.
- Through the roof.
Let's look at each option a little later.
Stage 3 – fixing the chimney.
Stage 4 – completion of work.
Through-wall installation
Let's return to the second stage and consider ways to remove the chimney structure. When installing an insulated chimney through a wall, the following steps should be performed:
- When installing sandwich pipes through a wall, the first thing you will need to do is disassemble the entire structure and secure mounting brackets (supports).
- Install the outer console and attach a couple of corners to them so that you get the shape of “runners”. They will allow you to move the tee during operation without obstacles.
- Cover the wall with a 1cm sheet of plywood and secure the fine-fiber asbestos material on top with screws.
- One galvanized sheet with dimensions of 12*20 cm should be installed on top of the asbestos.
- Next, you need to make a square hole in the sheet through which the pipe will come out; the sheet itself should be well secured with screws.
- After installation, the support must be coated with varnish with an anti-corrosion effect.
- An adapter is inserted into the hole in the wall, in which a hole is also made, and then the pipe is put on.
Arrangement of ventilation in a private house with your own hands: choosing a scheme and drawing up a project
How to make a long-burning solid fuel boiler with your own hands - detailed instructions.
When installing a chimney through a wall, be aware of the concession. A concession, or setback, is a space that must be left between the wall and the pipe. The value of the concession depends on the thickness of the chimney (furnace) wall.
Table - Main parameters of assignment
| Chimney (furnace) wall thickness (cm) | Assignment type | Distance from the surface of the chimney (stove) to the wall (cm) | |
| fire-resistant (non-flammable material) | not protected from fire (flammable material) | ||
| 12 | Open | 20 | 26 |
| 12 | Closed | 26 | 32 |
| 6,5 | Open | 26 | 32 |
| 6,5 | Closed | 38 | 50 |
When installing through a wall, it is important to correctly install the first element of the entire structure so that the first part is attached to the second above the level of the ceiling. This installation will allow visual monitoring of fire hazardous elements.
Installation through the roof
To route an insulated chimney through the roof, perform the following steps:
- A sheet of steel is applied to the outlet hole from the inside.
- The chimney is vented outside through the roof.
- The sheet is fixed to the roof using screws.
- If necessary, it can be brought under the edge.
If the roof of the house is made of flammable material, then it should be additionally protected from possible fire. To do this, the deflector itself should be equipped not with a cone or fungus, but with a spark absorber.
Bringing the structure to the roof is the most difficult and with this installation method one more part will be required - the roof trim. This is a special metal structure that prevents the chimney walls from coming into contact with the roofing materials.
Mounting features
When fastening the structure and its component elements, some features should be taken into account:
- all parts and elbows are connected and fastened together with clamps;
- the tee should be additionally secured with brackets;
- if the top of the structure remains unsecured, then to be on the safe side it should be secured with guy wires;
- The connecting elements must be additionally secured and secured to each other with clamps, and with other parts, for example, with an adapter, with clamps on both sides.
How to insulate and seal a chimney from the outside
Features of the final stage:
- After all installation and fastening work has been completed, it is worth removing the protective film.
- It is important to check whether all cracks and joints are well sealed. It is better to seal using a fire-resistant sealant that can withstand very high temperatures, at least 1000 0C.
In this case, the sealant must be applied, taking into account some nuances:
- if it is applied to internal pipes, then it covers the entire area of the outer surface of the upper element;
- if on the outside, then it is applied according to the same principle (see above);
- if at the point of transition from a regular pipe to a sandwich, then they should seal the entire area from the outside around the circumference;
- if at the junction of an ordinary pipe and other elements, then also to the entire area from the outside around the circumference.
- The most dangerous areas of the chimney should be checked for temperature.
- Don’t forget to set aside a place for the inspection window so that there are no difficulties during inspection and cleaning.
- The correct length of the structure should ultimately be approximately 6 m, counting from the grate.
Roof passage
When learning how to properly assemble a chimney from sandwich pipes for a bathhouse or home, special attention should be paid to the place where the sandwich chimney passes through the roof. It is extremely undesirable to crash into the rafter structure as this can negatively affect the roof structure as a whole. The holes should be:
- with a pitched roof of oval or round shape;
- on flat roofs or sheathing with frequent square or rectangular pitches.
The opening is cut with a jigsaw after applying the appropriate markings. The distance from the wooden roof elements should be 13 cm or more. If the chimney gets into the rafter, then you need to use your knees to take it to the right place.
Passage through the roof Source stroy-podskazka.ru
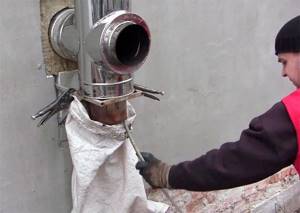
After the chimney is brought outside, there will be a gap between the roofing material and the sandwich pipe, which must be securely and hermetically closed. For this, the best option would be to use a master flush. Its design includes a flanged base reinforced with aluminum for a complete seal and a silicone cone-shaped cuff located at the top.
After installation, the master flush will reliably protect the roof and under-roof space from precipitation and dust. For maximum tightness, before installation, you need to trim the top part so that it is 20% smaller than the chimney pipe.
After this, the master flash is put on the pipe, lowered down to the roof and fixed with silicone glue. Then the upper edge is tightened with a clamp, and the lower edge is treated with sealant. To complete the installation, a head is placed on the upper edge of the pipe and secured with self-tapping screws.
Construction of a metal sandwich chimney
Steel chimneys are popular both in industrial construction and for landscaping in the private sector. Their installation is reminiscent of assembling a ceramic structure, and accordingly, it is easier than building a brick pipe. Let's take a closer look at how to properly make a metal chimney, avoiding mistakes.
Materials for installing a metal structure
A sandwich chimney is a sealed system of pipes and adapters leading from a heat generator to the roof space. It can pass inside the building (internal) and outside, along the wall (external).
A sandwich pipe is a three-layer part consisting of two steel pipes, between which a layer of insulation is laid. Stainless steel fragments are connected by welding
Non-flammable thermal insulation material has different thicknesses - on average from 2.5 cm to 10 cm. Manufacturers most often use one of the best materials - dense basalt wool (from 200 kg/m³).
To assemble a chimney, you will need to connect several parts of various shapes, using the method of connecting tapered ends and sockets. Simply put, one element is inserted into another. From the outside, the joints are reinforced with overhead clamps, which are tightened tightly after installation.
Advantages of a three-layer design: protection of the smoke exhaust channel, minimal condensation formation, organization of stable draft, possibility of installing the system both from the inside and outside of the house
When installing a steel chimney inside a building, the holes in the ceilings and roof are much smaller in diameter than for brick or ceramic analogues.
Sandwich chimney installation diagrams
Let's consider two installation schemes for a sandwich chimney: with an internal arrangement, which requires the organization of holes in the roof and ceilings, and with external installation, which is carried out from the outside and installed parallel to the wall of the house.
Each of the schemes has advantages: the internal equipment produces less condensation, the external device is easier to design and is made with only one hole
The internal installation scheme is often used in bathhouses, since a steel pipe can simultaneously heat both stones and a tank of water. If the bathhouse is not installed separately, but is an extension to the house, this is the most appropriate and effective option.
The disadvantages of the internal system are the need to make holes in the ceilings and roof, as well as a reduction in usable space.
To install an external system, it is enough to make one hole in the wall and ensure the pipes are positioned vertically using brackets. Taking the pipes outside reduces the risk of poisoning from combustion waste. The downside is the provision of additional protection from the influence of the external environment.
Installation procedure:
- connecting an adapter to the boiler (or other heat source);
- punching a hole in the wall (average size - 40 cm x 40 cm), upholstery with fire-resistant material;
- installation of a passage block with thermal insulation in the wall;
- installation of a horizontal section of pipe from the boiler (furnace) to the hole in the wall;
- arrangement of the support unit from the outside (platforms on brackets);
- installation of a vertical pipe;
- fastening in the upper part of the cone and head.
When assembling, it is necessary to rely on the technical documentation prepared during the project preparation process.
Tips for installing an inner pipe
When choosing an internal model, you need to remember some technological nuances. For example, it is important to install a valve in the transition area from the boiler so that heat can be retained.
The joining of two adjacent elements in the transition area is prohibited. The location of the attic rafters and beams should be taken into account: the further they are from the chimney, the better. Read more about self-assembly of a sandwich chimney in this material.
Transitions through floors and roofs require the use of fire-retardant thermal insulation materials, such as mineral wool, and the installation of protective blocks, which can be called a “sandwich within a sandwich”
Briefly about the main thing
Installation of sandwich chimneys is carried out according to the assembly type of the designer.
The type of steel in the pipes must be selected depending on the fuel.
Installation can be done indoors or from the street.
The system can be assembled “by smoke” or “by condensate”.
You can do the installation yourself by preparing the necessary tools. During installation, special attention should be paid to the passage through the roof, walls and sealing the joints between parts.
Ratings 0
Main functions of a chimney
- First of all, the chimney is designed to remove combustion products, which are extremely harmful and often destructive to the body of the inhabitants of your home.
- In addition, the chimney must have insulating properties and protect the building structures of the floors and roofs from fire.
- And finally, a beautiful chimney also has an aesthetic function and decorates the roof of your house.
You can easily install the chimney yourself by following simple instructions.