There is an opinion that it is almost impossible to install and connect a gas boiler yourself, without the involvement of specialists, and even if you can install it, the regulatory authorities will prohibit you from using the device.
If a gas boiler is installed in a new location, then you must first obtain permits for the chimney removal, as well as for the installation of gas pipes.
But no difficulties with the execution of work should arise if the following conditions are met:
- a new water heater is installed to replace outdated equipment;
- the location of the boiler remains the same;
- the main technical characteristics of both devices are the same;
- the new water heater has a certificate of compliance with existing norms and standards.
The work that needs to be done to connect a gas water heater can be carried out by anyone with minimal knowledge and skills.
Requirements for installing a gas water heater
You understand that any gas equipment cannot be installed in any way without observing clearly established rules, because it is unsafe. What do you need to know first?
This is something that we will leave to the relevant services. However, there is a job for you too, because we want to do everything efficiently and save a decent amount (several thousand rubles) on calling a specialist.
So, we have 2 ways of development:
- You are installing the column again - that is, it was never in your apartment/house.
This is the most difficult and time-consuming option, because you will have to visit a gas service, whose employees will have to draw up a project for connecting a gas water heater for you. Let's repeat it again! Do not try to do this yourself - it is very dangerous for you, your family and neighbors!
Having received and agreed upon the project, you can already install the water heater. And this is where you can go wild by doing this part of the work yourself. By the way, you will save quite a decent amount - about 10 thousand rubles. (+-, it all depends on individual situations).
- You dismantle the old column and install a new one.
This option is many times easier: you don’t need any projects, because you already have this equipment. All you need is to find an existing project and carry out all the work in accordance with it.
SNiP standards you need to know:
- A geyser can only be installed in a room with a volume of 7.5 cubic meters. AND MORE.
- The wall must be made of brick, concrete or any other non-combustible material.
- Be sure to have a window - the room should be well ventilated.
- Ceiling height – AT LEAST 2 meters.
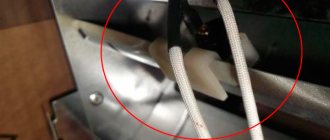
- The room must have a chimney with a diameter of 12 cm or more. At the same time, the so-called vents in the room will not pass for a chimney.
- The water pressure in the system must be 0.1 atm or more.
- Installation of equipment in bathrooms, as well as above a gas stove and at a distance of less than 10 cm is strictly prohibited.
Important! If your old water heater was installed in a bathroom, then the rules do not oblige the owner to move it to another place. That is, you can easily replace the old speaker with a new one, placing it all in the same bathroom
Where can I install
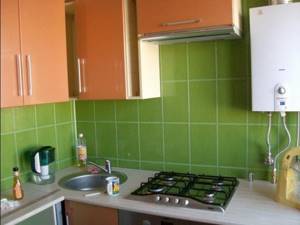
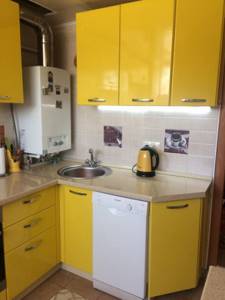
According to the rules for installing geysers in apartments, they can be installed in kitchens with fairly high ceilings and if there is a chimney opening with a diameter of at least 120 millimeters. It is also assumed that these rooms have permanent ventilation to ensure safe operating conditions for gas equipment.
The characteristics of modern models of gas water heaters allow them to be used at high humidity, that is, in the bathroom, without a traditional chimney.
The necessary changes in the project involve the laying of pipe outlets with access to the street, ensuring the flow of air into the closed chamber and the removal of combustion products from it.
The following strict requirements are imposed on the premises in which gas equipment is intended to be used:
- the height of the room must exceed 2 meters;
- the volume of the room can be at least 8 cubic meters;
- it must have natural ventilation (at least one window), as well as a channel for installing a chimney.
The air vents available in the rooms are not suitable for these purposes and are therefore immediately excluded from consideration.
Let's add to this that the media pressure in the water line cannot be lower than 0.1 atmosphere, and the wall intended for hanging the unit must be made of non-combustible materials. In addition, it is not allowed to install it close to a gas stove (technical standards allow the unit to be mounted at a distance of at least 10 centimeters from it).
How to install a geyser
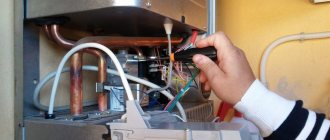
Self-installation is prohibited by Russian law, but since representatives of the gas service often remain elusive, we recommend installing the device yourself. Specialists should only be invited to connect the hose to the gas pipe and check all connections for leaks.
What you need to have with you
First of all, prepare all the necessary materials and tools. You will need:
- new gas water heater;
- PVC pipes for water supply and metal-plastic for gas;
- fitting;
- taps - gas and water (it is better to use ball taps);
- salt and magnetic filters;
- corrugated or galvanized pipe (if included with the column);
- Mayevsky crane;
- a ring to make an entrance to the chimney;
- gas hose (its length depends on the distance between the pipe and the column);
- water hoses (also select the length depending on the distance);
- dowels and screws;
- gas key;
- pipe cutter;
- set of wrenches;
- drill;
- level;
- sealant, FUM tape and tow;
- soldering station for pipes.
In the case of a private house, you may also need a metal (asbestos) pipe to remove smoke. Its diameter should not be less than 120 mm, and its height should be two or more meters.
We remove the old
This is an old gas water heater and is not safe to use. It is best to replace it with a modern analogue.
If you already had a water heater, then the first thing you need to do is dismantle it. For this:
- Close all gas valves.
- Using a gas wrench, unscrew the fixing nut on the hose.
- Then remove the hose from the column. If the hose is new and undamaged, it can be used further. Otherwise, buy a new one.
- Now you can proceed to disconnecting the device from the water supply. Turn off the water (if there is a tap near the water pump, then just turn it off, otherwise you will have to block access to water for the entire apartment).
- Remove the connecting pipe located at the outlet of the column and pull it out of the chimney.
- Dismantle the water heater by removing it from its mountings.
Direct installation
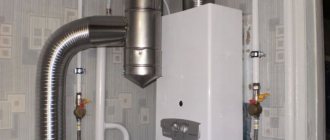
Installation of a gas water heater occurs in several stages. After choosing a location, you need to prepare all communications: water supply, chimney and gas pipeline. All this should be in close proximity to the future column, so that after installing the latter, all you have to do is connect the hoses to the pipes.
To connect gas to a gas water heater, be sure to call specialists from a special service.
- So, the first thing you need to do is mark the location for the water heater. I hang it on a special bar that is included with the device. That's why you will need a drill, dowels and screws. It is better to mark using a level.
- We drill holes, drive in dowels, attach the plank and screw it to the wall with self-tapping screws.
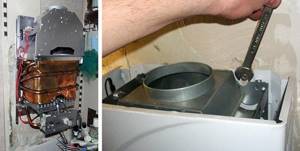
- The next thing you need to do is connect the water heater to the chimney. This is done using corrugation or a metal pipe. Installing the latter is easy. The pipe needs to be put on the pipe (and the sleeve must also be tightened with a clamp) of the column. The other end is inserted into the chimney and covered with cement (asbestos can also be used). But do not forget that the horizontal section of the pipe cannot exceed 6 m and you cannot make more than 3 corrugation bends.
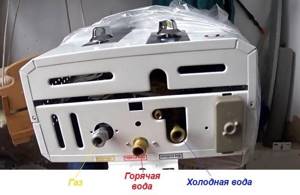
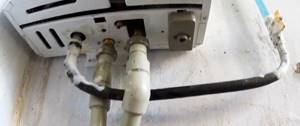
- Now you can proceed to connecting the column to the water supply. As mentioned earlier, it is better to do the installation of pipes and branches in advance. At the same time, cutting into the nearest line is not always a good option (if the pressure in it is weak, cut directly into the main pipe going to the apartment). Be sure to install a tap on the new branch going to the water heater so that you can repair the water heater or replace it without turning off the water in the entire apartment or house. To install the pipeline, you will need metal-plastic pipes and a soldering iron, as well as a tap and couplings.
- After finishing work with the hot and cold line pipelines, all you have to do is connect the hoses to the corresponding outlet and inlet of the dispenser and to the pipes.
This is what a chimney made of corrugation looks like. The ring has a purely aesthetic value.
Your work is now complete. Connection to the gas pipe is carried out by specialists from the relevant service. A ball valve is also placed at the entrance to the column, all connections are sealed and then checked for leaks.
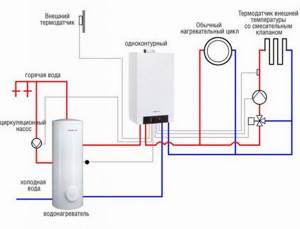
Connection to the water supply system
The drain hole for this type of heater, regardless of the model, is usually located at the bottom. First, you should assemble and install a so-called security group. This is a set of valves and fittings designed to prevent various emergency situations that may arise during operation of the device.
An adapter is installed at the top, which is often called “American”. Next, screw on the bronze tee. A check valve is attached to its lower part, which prevents water from flowing back into the plumbing system. Another tee is connected to the side branch of the tee.
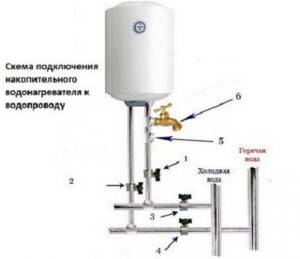
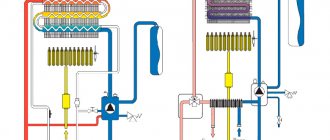
The diagram shows in detail the connection of a storage water heater: hot and cold water risers, water taps (1 and 2); shut-off valves (3 and 4); check valve (5); drain valve (6)
A 6 bar safety valve is attached to it to provide the ability to automatically reduce the pressure inside the container if it has reached a critical level.
A special compression fitting for the water pipe is attached to the same tee. If there is excess pressure, it will drain some of the water from the storage tank into the sewer system.
Storage water heater safety group diagram. This set of devices prevents dangerous emptying of the device’s container and removes excess water if the pressure inside exceeds the norm
After installing the device, be sure to make sure that the pressure valve hole remains open, otherwise the device simply will not work.
All threaded connections should be sealed and sealed. Experts recommend allowing the sealant to dry for at least four hours.
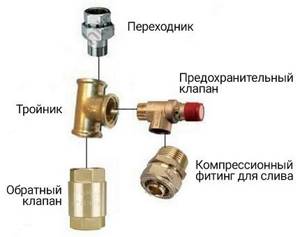
The photo clearly shows and labels the elements of the storage water heater safety group
When installing the device, it is important to strictly follow the sequence of their connections
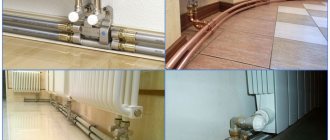
. To connect the device to the cold water riser, you can use steel, copper, plastic or metal-plastic pipes
When doing the installation yourself, they are most often used, since soldering them is relatively easy.
To connect the device to the cold water riser, you can use steel, copper, plastic or metal-plastic pipes. When doing the installation yourself, they are most often used, since soldering them is relatively easy.
Some use flexible hoses for these purposes, but this solution does not justify itself. As practice has shown, such elements wear out quickly.
The individual elements of the storage water heater safety group are connected using threads. In accordance with the standards, these places should be sealed and treated with sealant
It is clear that before inserting pipes, hot and cold water entering the apartment should be turned off. A shut-off valve should be installed between the cold water riser and the heater so that, if necessary, you can turn off the water flowing to the device. All connections are carefully sealed.
Now you need to install another pipe that will connect the heater to the hot water supply system in the apartment. In this area you will need another shut-off valve: between the hot water riser and the heater.
This tap must always be turned off so that the heated water from the boiler does not enter the common hot riser of the house. Again, you need to ensure that all connections are sealed and sealed.
The shut-off valve for cold water between the heating device and the risers must be installed in such a way that, when closed, it does not impede the flow of water to other consumers, cutting off only the heater.
And the connection to the hot water supply system must be made in such a way that, if necessary, the supply of hot water from the common riser to the system in the apartment can be restored.
At this point, the connection to the water supply system can be considered complete. Some experts at this stage recommend performing a preliminary check: fill the container with water, then drain it and see if there is a leak. This check can only be done after the sealant has completely dried on all connections.
Tools and materials
During installation you will need the following:
- Impact drill or hammer drill with a drill bit for working on concrete.
- Open-end wrenches, sizes 27/30 and 32/36.
- Gas (pipe) wrench.
- Unipack sealant.
- Sealant for pipe connections - tow, plumbing flax or FUM tape.
In addition to the water heater you will need to purchase:
A rosette is a decorative detail through which the entry point of a galvanized pipe into a wall chimney is formed. An oblique filter (mud filter) for purifying water from large mechanical impurities. Optional: water softening system that prevents the column heat exchanger from becoming clogged with scale. For this purpose, you can use a cartridge with ion exchange resin or a hydromagnetic system. Pipeline parts (bends and tees), fittings, hoses and shut-off valves - for connecting the column to the water supply
Please note: it is easier to connect hoses (flexible lines), since the connection does not need to be additionally sealed (gaskets are mounted in the threaded ends). A gas hose through which the dispenser is connected to the gas distribution network. Must have sufficient length and connecting thread corresponding to the thread on the gas pipe of the column
If the hose tip does not fit the column nozzle, you will need to additionally purchase an adapter. A galvanized steel pipe with a wall thickness of 1 mm - used to connect the device to the chimney. The requirements for wall thickness are determined by the high temperature of the exhaust gases - a thin-walled part will quickly burn out. Many models have such a pipe included.
If you had to buy it yourself, pay attention to the cross-sectional dimensions: their values, as well as the required dimensions of the chimney, must be indicated in the column passport; If there are no special instructions, use the dimensions of the smoke outlet pipe as a guide. The minimum permissible length of this pipe depends on the ceiling height:
The minimum permissible length of this pipe depends on the ceiling height:
- from 2.0 to 2.7 m: 50 cm;
- over 2.7 m: 25 cm.
The hose should be chosen as carefully as the water heater itself. A low-quality product can cause a gas leak, the consequences of which everyone is well aware of.
Gas hoses from a reliable manufacturer are available for retail sale with a certificate - don’t be lazy and ask to see it.
Permitting documents required for connection
Before starting installation work, you need to contact the management organization to receive certified copies of the design of your apartment or house. You will need the following documents:

Diagram of a gas boiler.
- gas supply plan;
- water supply plan;
- smoke removal plan;
- plan indicating the technical parameters of the water heater and its location.
After you receive these documents, you need to draw up an application to the city or regional gas service, in which you request permission to replace the boiler, provided that its original location is maintained.
A different situation arises if you want to install a boiler not in place of a failed water heater or an old gas water heater, but are planning to install the device in a new location. Such an installation is impossible without changing the chimney system, supply water and gas pipes. This, naturally, is a much more painstaking and complex process.
Documents required for installing a boiler in a new location:
- A report on the current technical condition of your chimney, drawn up and certified by the smoke and ventilation duct inspection service. Please note that you need a report on the condition of the chimney, and not the ventilation system.
- Technical data sheet of new equipment. If you have already decided on the model of the water heater, but have not yet purchased the equipment itself, it is enough to indicate the main technical characteristics of the boiler. They will be needed to draw up a project in the gas service (GORGAZ).
- Equipment installation project indicating a clearly drawn up technical specification for changing the installation location of the boiler (the project is also drawn up at GORGAZ).
Obtaining Permits
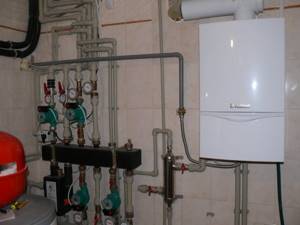
Gas boiler connection diagram.
After you have managed to obtain all the permits, specialists from the gas service must make an insert into the gas supply pipe, install a water supply system and install a gas meter. The regulations also require them to line the wall behind the pipe with non-flammable materials, and paint the gas pipeline itself yellow. But in reality, such work is carried out infrequently.
Next, you can begin installing the water heater. When the main work is completed, you must call a specialist who will set up and start the boiler. As a rule, the regional gas operational service has a license to carry out such work. And only after this can the gas meter be sealed.
Don't forget to register your new boiler with the Fire and Technical Inspectorate. From them you must receive certificates of acceptance of the boiler into operation, and the new project of your apartment must be included in the BTI database.
You can do without this paperwork. But then there is a risk of paying considerable fines if an inspection commission suddenly comes to you. In any case, connecting the boiler to the gas pipeline should be entrusted to a specialist, because in this case we are talking about the safety of you and your loved ones.
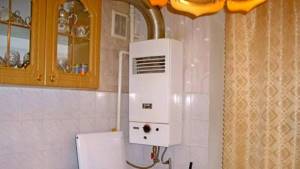
Why you can’t install a gas water heater in the bathroom
In Russia, such issues are regulated by SNiPs - building codes and regulations. Currently SNiP 42–01–2002 is in force. Let's take a look at excerpts from it.
So, the standard allows pipes to be laid through a bathtub or shower, but prohibits the installation of any devices that use gas in the bathroom. Our column also applies to them.
What is the reason for this ban? The main problem lies in carbon monoxide. Even a spacious bathroom is a fairly small room with poor ventilation, where toxic fumes will quickly accumulate and cause health problems. Let's not forget that moisture burdens carbon monoxide molecules, which makes it even more dangerous.
Another reason lies in the condensation that will inevitably form on the walls of the column. Under certain unfortunate circumstances, it can extinguish the wick when the device is turned on. If this happens, gas may continue to flow. It’s unlikely that you need to explain why gas pollution in a small room is bad.
Installing gas equipment in the bathroom is a violation of the current SNiP
Progress
On the surface of the wall, checking the design, make markings for fasteners. Calculate the height of the fasteners; the vertical chimney must have a length of at least 30 centimeters. There is also a little trick - the pipe to the chimney is laid at a certain angle according to a certain diagram.
After taking measurements, transfer them to the wall surface using a tape measure and level. Use a hammer drill to drill holes and insert dowels or hook brackets.
Hang the device on hooks. We return the water supply hoses to the drain and inlet pipes. We check the tightness of the hoses - turn on the water and carefully inspect the place of consumption. Next, the chimney pipe is fixed according to a special scheme; it is possible to use corrugation.
The last step is connecting the gas pipe. But this is the work of a specialist who knows his business. He also issues the HSV registration certificate. And now the process of connecting the equipment is completed.
To summarize, we can conclude the following - the connection of gas appliances is carried out by specialists and is controlled by standards.
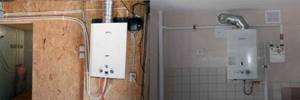
The option of self-installation is possible, but up to a certain stage - connecting to the main line. On the Internet you can find many instructions and photos of installing gas equipment. Everything a home handyman needs. But if you are not confident in your abilities, then use the services of specialized representatives.
Use of liquefied gas
“Problems” with project documentation are not required in the case of using not natural, but liquefied “ballooned” gas. However, in this case the column must have an appropriate design - burners for natural and liquefied gas have different diameters of injector nozzles. Although such equipment is produced by many manufacturers, it is quite rare on sale and is demanding in terms of gas quality.
In any case, the wall where the speaker is installed must be strong and non-flammable - if it is made of plasterboard, then a “mortgage” for attaching the heater, made of wood or metal, must be mounted in it in advance.
Device
With any type of external heat energy source, the boiler operates the same way, with rare exceptions. And even private innovations of individual companies, protected by patent law, do not change the essence of a long-established scheme. A portion of the heat carrier received from any source flows through a coil built into the storage tank. Circulation is maintained by a pump. Upon close contact with the tubes or reservoir, where the initially colder water is located, it heats up.
Since even one joule of heat, needlessly radiated outward, has an extremely negative effect on the operation of the system, it must be equipped with thermal protection. Polyurethane or polystyrene is usually chosen as a heat-impermeable material. The supply of new doses of cold water naturally occurs from the general water supply system. Each new portion passes through specially designed pipes. As soon as the movement cycle in the coil is completed, the coolant enters the heating system of the house - a very special pipe is provided for this.
Then certain differences begin: although most boilers are designed to supply cold water through the bottom, there are also those in which it enters through the top. In such a design, the liquid must first pass completely through the system to the lowest point. There are noticeably fewer variations in the output of the heated coolant; in almost 100% of cases it is discharged from above. It is difficult to find a reason why one should do otherwise. After all, the upper location allows you to supply hot water for as long as possible, as long as there is at least a small portion of it in the container.
In order for the coil to occupy as much space as possible within the housing, it is usually made in the shape of a spiral. When the coolant passes several cycles through this pipe, the temperature becomes equal to the heating of the liquid in the boiler itself. At the command of a special relay, the special circuit that powers the pump stops. When the coolant subsequently cools to the set value, the relay gives another command - close the circuit - and heating resumes. The advantages of such a device are quite well known. All these points must be taken into account before work begins.
Operation of a propane gas water heater
If there are no centralized gas lines near the country house, then a propane gas water heater will help provide hot water supply. This option is good because the fuel source is always under the control of the consumer. The operation of the column does not depend on pressure drops in the central gas pipeline.
The use of gas water heaters for propane has some features related to the installation and storage of bottled gas. There are mandatory rules for the safe operation of liquefied fuels:
- Cylinders should not be stored in direct sunlight.
- Gas must be stored out of the reach of children and strangers.
- Cylinders cannot be kept in a residential area; it is advisable to store them in special boxes outside.
- Propane should never be stored in areas where there are basements or areas with recesses in the floor. The gas is heavier than air and tends to accumulate in the lowest places, acquiring dangerous concentrations. If a spark occurs, the accumulated fuel may explode.
In order for the gas water heater to operate on liquefied gas, it is necessary to reconfigure the burner using a set of nozzles.
Note! Do not use a damaged gas cylinder. Metal boxes in which cylinders are stored must have holes in the bottom to ensure free circulation of fresh air
Metal boxes in which cylinders are stored must have holes in the bottom to ensure free circulation of fresh air.
All valves of unconnected cylinders must be closed, and the caps must be screwed onto the outlet fittings until they stop.
Gas cylinders located outdoors should not be placed closer to:
- 6 m to the entrance to the building;
- 1 m to windows and vents;
- 3 m to flammable materials;
- 1.5 m to ventilation systems.
Some summer residents, in order to save money, try to convert their water heater into a heating source. It is worth noting that such devices consume 1.5-2 times more fuel than a conventional gas boiler of the same power. If you constantly use the heater for heating, you will have to refill gas cylinders too often.
What gas is used as fuel?
Gas cylinders are filled with butane, propane or a mixture of them. The gas is transferred to a concentrated liquid state so that it takes up less space in the container. Since fuel tends to expand when heated, for safety reasons the cylinder is filled to only 85% of its volume.
Basically, fuel is pumped into 50-liter containers. Liquefied gas is supplied to the pipeline under pressure that is several times higher than the main one.
Connecting the column to bottled gas
The cylinder is connected to the gas water heater through a flexible hose with a diameter of 1.2 cm. It is best to choose a tube made of stainless steel. The connected cylinder must be equipped with a reducer with a pressure gauge.
When connecting, the hose should not twist or bend. If a bend is still necessary, then its radius should not be less than 9 cm, and it should begin at least 5 cm before the tip.
To prevent kinks from appearing, it is necessary to use adapters and corner joints.
Cylinders are usually placed outside in a metal cabinet, and the column is installed in the house. The flexible pipeline is pulled through the hole in the wall.
Having connected the hose, place a shut-off valve in front of the column, which should be easily accessible. After installation, the system must be checked for gas leaks.
If in the summer the owners permanently live at the dacha, and the fuel in one cylinder quickly runs out, then it is recommended to install several containers and connect them to the comb (manifold). This will allow you to automatically switch the gas intake from the container that has run out of gas to the next full cylinder.
The gas water heater will operate stably using liquefied fuel if there is a supply pressure of up to 0.2-0.3 mBar. It is recommended to make the connection according to the following scheme: the cylinders are combined using a ramp of 2, 4, 8 pieces, an adjustable reducer is installed.
Liquefied fuel consumption
The gas consumption of a propane gas water heater depends on its characteristics, and especially on its power.
For example, the instructions for Bosch devices with a power of 25 kW say that a 50-liter container should be enough for 10 hours of stable operation.
The Baxi SIG-2 14i dispenser consumes fuel up to 2.14 kg/hour with a possible domestic hot water production of 12.6 l/min. Ariston NEXT EVO SFT 11 NG EXP has a capacity of 11 l/min, consuming only 0.8 kg/h.
Thus, the consumer can choose a device with optimal power and low fuel consumption.
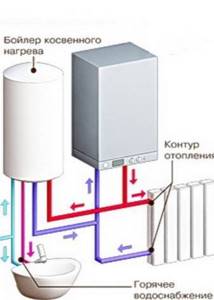
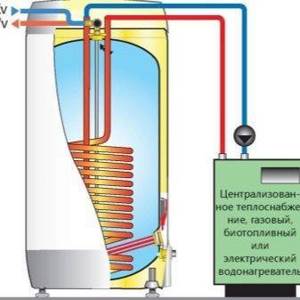
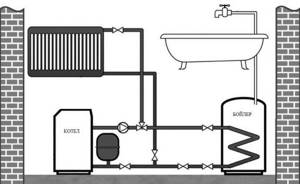
What is the principle of indirect heating?
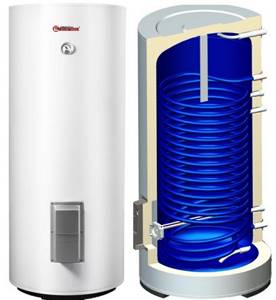
Indirect heating boiler: general view
Unlike direct heating, when water receives heat directly from a burner or electric heater, indirect heating involves heating using the working medium of the heating system. Once heated by the boiler, it is supplied to the heat exchanger in the boiler, where it releases the acquired energy. Then everything happens in the same way as in a conventional heating circuit: the cooled coolant enters the “return” pipeline and through it back into the boiler.
Such water heaters are often called heating boilers. Here are the advantages they have
- The design of such a device can be considered primitive. The central element, the heat exchanger, which is a tube or container, is much simpler than a burner or electric heater.
- Since the coolant temperature does not exceed 90 degrees, the risk of water boiling in the boiler with subsequent rupture of the tank is completely eliminated.
- Water is heated faster than in an electric boiler.
In domestic conditions, it is more convenient to use a boiler than an instantaneous water heater, since it:
- requires relatively little power to operate (due to the heating process being extended over time);
- can serve several water points simultaneously;
- capable, albeit for a limited time, of providing an arbitrarily large flow of hot water.
Such a device, of course, has its drawbacks. There are also several of them:
- The temperature of the water in the boiler cannot be higher than the temperature of the coolant, therefore in the off-season, when the heating system is operated in low-temperature mode, the heated water is consumed very quickly (it has to be used without dilution with cold water).
- In summer, when the heating system is turned off, indirect heating does not work at all.
- Like any other boiler, this device takes up quite a lot of space.
Storing a large supply of hot water in standby mode is accompanied by heat loss, although in the case of simultaneous use of the boiler as a heating device in the boiler room, this disadvantage should not be taken into account
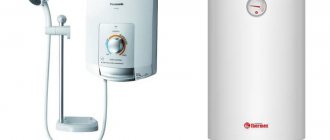
Selecting a geyser model
Oddly enough, but before submitting documents to the gas service, you will have to choose and even buy a gas water heater. Despite the relative simplicity of design, devices vary in quality, reliability and ease of use.
So, if you do not have a boiler, but a regular water heater, then pay attention to the following parameters:
- automatic, manual or semi-automatic control;
- burner ignition system - mains or battery powered, automatic or manual;
- how combustion products are removed.
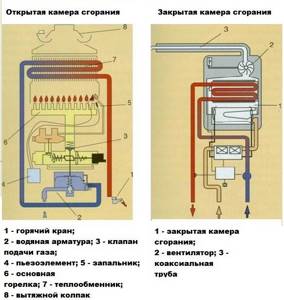
Water heaters with a closed combustion chamber, unlike gas water heaters with an open combustion chamber, use oxygen from the street to maintain the fire and do not require ventilated rooms.
The fully automatic dispenser ignites the gas itself, regulates the water temperature, etc. This is the best option, but quite expensive, so most people choose more affordable semi-automatic models.
The ignition system is also an important component. Although there are currently no speakers where you need to light a fire with a match, it is still better to choose models with batteries installed. If the electricity suddenly turns off, you will not be left without hot water (as is the case with automatic models). Another option is semi-automatic ignition, then you ignite the gas using a button yourself. We advise you to pay extra and take the option where the heater is activated by turning on the hot water tap.
A useful addition to the device is the flame modulation function, which can maintain the water temperature at the same level if hot water goes to several sources at once.
The removal of combustion products in a gas column can be carried out in the following ways:
- using a closed combustion chamber (also called turbo);
- using a chimney (open combustion chamber).
The choice of method depends on the structure of the house and some other parameters. Check with your gas service for more details.
Flow-through
A instantaneous gas water heater is also used. In Russia, a flow-through wall-mounted water heater was more often installed; it used to be called a geyser. If anyone remembers, it was quite difficult to set fire to these units; you had to make sure that the flame did not go out and adjust the height of the flame manually. Modern analogues are easier to operate and less dangerous.
Installation procedure
However, you can still install it yourself if you have the appropriate license. This is quite likely, so let's look at what actions you need to take to ensure everything goes well.

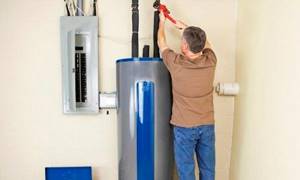
First of all, you need to install the column itself. The main requirement accompanying this procedure is perfect evenness. Only in this case will the equipment work correctly. If you purchased a floor-standing device, the floor must first be leveled.
In case of excessively strong differences in height, the issue is resolved with the help of a concrete screed. With its help, the floor surface is adjusted. After some time has passed for the screed to dry, the boiler is installed. In this case, the evenness must be checked again.
If you purchased a wall-mounted version of the boiler, then its installation will be somewhat more complicated, since the procedure includes hanging. To do this you will need a hammer drill, fasteners and the same good quality construction level.
As a rule, to get to the boiler fastenings, you need to remove its front panel. In accordance with their location, make markings on the wall, remembering to use a building level. The next step is to drill holes according to the markings; this is done using a hammer drill or impact drill.
Then you need to insert fasteners, which are dowels or anchors, after which the column can be hung in its rightful place. At the end of the procedure, do not forget to use the building level again to ensure that the installation is perfectly level.
Gas connection
After the installation of the boiler is completed, it is necessary to connect the gas pipe. There are two options for this. You can bring the pipe itself close to the boiler and make the connection. This method is the most reliable. The second option is to run a flexible hose from the pipe to the boiler. In principle, this method is also good, but only if you are sure that no one will harm it.
For any connection method, it is necessary to provide a shut-off valve on the gas pipe. It will allow you to quickly shut off the supply of blue fuel in unforeseen situations.
Water connection
The next step after connecting the gas pipe is to supply cold water. The corresponding line is supplied to the inlet pipe of the boiler, and hot water is distributed from the outlet to the destinations. Naturally, it is necessary to install shut-off valves on all pipes, and also a cleaning filter on the cold pipes - this will help preserve the structural elements of the gas boiler in almost pristine condition.
The connection procedure itself depends on what pipes you use for water flow. Here it is better to focus on your skills. Steel, for example, requires the use of a welding machine. Not everyone knows how to work with it.
The option with metal-plastic or polypropylene looks much more interesting. Both materials are excellent for water supply systems because they do not rust and are highly durable. Their installation is carried out using special connecting elements - fittings.
Moreover, polypropylene ones are installed using a simple soldering apparatus. And fittings for metal-plastic are screwed on and then pressed - we are talking about crimping elements that it is advisable to use in this case. This connection is very strong and does not require regular tightening.
Electric water heating storage device
In a storage water heater (boiler), water is heated to 35-38ºС and then its temperature is maintained at this level automatically. When you open the tap, warm water flows out of the container, and instead the next portion of cold water enters the tank. The duration of water heating in these water heaters depends on two parameters. This is the volume of the tank and the power of the heating element. To keep energy losses to a minimum, water tanks are made heat-insulating (in the form of a thermos), which does not allow the heat of the water to be transferred to heat the room where the water heater is installed.

Typical storage electric water heater device
Such a device can be connected to a regular outlet, since it does not require high power to gradually heat the water. For example, 150-liter water heaters of this type consume no more than 2 kilowatts. It is this circumstance that makes these devices popular, since they can be installed in almost any room. In addition, the high demand for them is due to another advantage of storage water heaters: water can be consumed from two water intake points simultaneously - both in the kitchen and in the bathroom.
On the other hand, boilers also have some disadvantages. These are large in size and require periodic maintenance: cleaning the heating elements from scale, replacing the magnesium anode. It is no secret that any heating element becomes covered with scale during operation, which reduces its heat transfer, and, consequently, the energy consumption for heating water increases. To protect the heating element from scale, a magnesium anode in the form of a rod is built near it. Dissolving during operation, it reduces the formation of scale. As it wears out, and this depends on the intensity of use and the level of water hardness, the anode is changed. The volume of heated water depends on the capacity of the tank, so when choosing a storage water heater, you need to focus on the capacity you need.
A tank that is too large will consume more electricity, and it will take up extra space. Therefore, you should think carefully to choose a device with the optimal capacity for you, without spending extra money and not taking up extra space. If the water heater is needed only to supply warm water in case of periodic outages, a volume of 10-15 liters will be sufficient. Only for taking a shower will a device with a tank capacity of 50 liters be sufficient. For a hot bath you will need a tank with a capacity of up to 150 liters. In a country house where there is no centralized hot water supply, the required volume is 200 liters or more.
Most manufacturers produce horizontal and vertical models; recently, modern universal designs have been created (installed as needed - either horizontally or vertically).
Requirements for installing a geyser
When installing a gas water heater, you need to think about where the water heater will be located. Poor placement may result in fire or fuel leakage.
Room
Safety standards prohibit placing the unit in a living room, children's room or living room. The room where the heater will be located must be adjacent to an external wall that has a window opening of sufficient area (0.03 m2 per cubic meter). If an ignition incident occurs, the explosive flow will break the glass and escape outside. The window also helps to ventilate the boiler room.
Installation of speakers is allowed in the following types of premises:
- basement and other technical rooms with an external wall and a window opening;
- kitchen, provided that the door has a built-in ventilation grille;
- combustion room, including an extension;
- corridor if other options are unavailable.
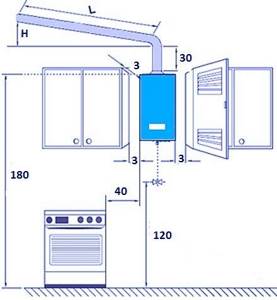
The ceiling height in the room where the heater is installed must be at least 2 m. If a boiler or other unit is also located there, the minimum figure increases to 2.5 m. The volume of the room must be more than 7.5 cubic meters.
Ventilation and chimney
The room must be provided with good ventilation. Every hour, an amount of air equal to three times the volume of the room should be removed from it. The used air is removed through the shaft. If there is no channel in the building, the pipe is brought outside separately. Fresh air masses come from neighboring rooms through the lower door shutter or a grille built into it. In case of severe gas pollution, you need to open the window. If the column is placed in a room with a gas-fired boiler, there must be an additional inflow for combustion.
The column must be connected to the chimney channel using a steel pipe with walls no thinner than 0.5 mm. The material can be galvanized or enameled. Stainless steel can be used. Aluminum corrugation should not be used under any circumstances.
The channel must have a diameter not inferior to that of the outlet column pipe. The vertical fragment connected to the water heater must be long enough (at least 0.25 m). If the wall is made of flammable material, the areas located next to the pipe must be sheathed with metal sheets. In this case, the distance to the flue should be at least 10 cm. For non-combustible wall structures, it can be reduced to 5-7 cm.
The total length of the connecting fragments should not exceed 3 m. Up to three right angle turns can be included in the design. If the diameter of the shaft allows connecting the boiler and heater, there should be 0.75 m of space between the connections. It is possible to connect devices one by one to the same chimney, provided that the pipe cross-section and the size of the gap between taps are taken into account.
Fire and technological indentations
If the wall is made of wood or other flammable material, a 1 mm thick steel covering must be reinforced between it and the column. You can also use basalt cardboard. The edges of this protective layer should extend beyond the boundaries of the unit by 0.7 m at the top and 0.1 m on the other sides. If the column is located in a separate non-residential room (not in the kitchen), a 3 mm thick asbestos sheet is also suitable for installation.
The distance from the front of the heater to the housings of other devices, pieces of furniture, and wall surfaces must be at least 1 meter. For other sides, the normalizations are as follows:
- bottom – 0.3 m;
- top – 0.45 m;
- from the side parts - 0.15 m.
Norms and requirements
Activities for moving or installing a gas unit are divided into two categories:
- installation work carried out in a room (building) where gas-powered equipment has not been used before;
- the procedure for connecting a gas water heater, accompanied by replacing the old unit with a new model.
In the first case, before starting work, you will need to prepare design documentation, which includes the requirements for the arrangement of branches from the gas and water mains. Once the project is ready and agreed upon with all interested organizations, it will be possible to submit an application to the local department of housing and communal services to connect the already purchased device.
The basic requirements for the installation of such equipment are regulated by the following regulations:
- Code of Practice No. 42-101 of 2003, establishing the procedure for preparing a project for connecting gas distribution systems.
- Code of Practice No. 42-01 of 2002, regarding the clarification of the concept of “gas distribution system”.
The main provisions of these documents relate to the technical characteristics of the equipped premises, as well as the placement features of the dispenser itself. When replacing water heaters installed in bathrooms in accordance with current technical standards, it is not necessary to move them to another location.
This rule does not apply to the case when the user himself insists on moving the column at his own expense.
Dismantling of old equipment
It is not difficult to dismantle it yourself if you follow certain safety conditions. The work will have to be carried out with a gas and water supply system. It is necessary to prepare the necessary tools in advance:
- carob and adjustable thorns;
- fasteners;
- fittings, taps;
- hose;
- ribbon;
- sealant.
When dismantling the column, you must adhere to a certain sequence.
- Shut off the gas and water supply to the column. To do this, there must be special taps on the systems.
- Remove the fixing elements from the column.
- Carefully disconnect the hoses from the gas and water supply system.
- Close the valve for supplying hot water from the water heater.
- Disconnect the column from the chimney.
- Carefully remove the speaker from the wall.
Installation of new equipment can be carried out immediately. Until the new equipment is connected, be sure to check the draft in the chimney. To do this, just bring an open flame (lit match) to the chimney. If the flame stretches towards the chimney, then the draft is in perfect order.
Options for homemade water heaters for solid fuel heat generators
In the case of wood or coal stoves/boilers, flue gases can be used as a heat source for indirect heating. To do this, instead of a coil, a pipe is installed in the boiler, which is connected on one side to the smoke exhaust pipe of the heat-generating installation, and on the other to the chimney. It is desirable that this pipe (it is called a fire tube heat exchanger) be located vertically.
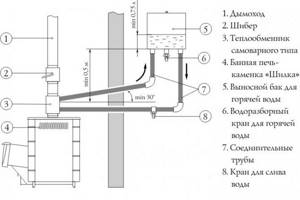
Using flue gas heat: boiler drawing
It’s even better to purchase a convector stove, the firebox of which is surrounded by vertical pipes. Hot air constantly blows out of them during heater operation. The fire tube heat exchanger of the boiler can be connected to one of these pipes using a metal corrugation. This connection method, unlike the option with a chimney, does not cause cooling of the flue gases, accompanied by deterioration of draft and the formation of a large amount of condensate.
Schematic diagram of titanium (wood boiler)
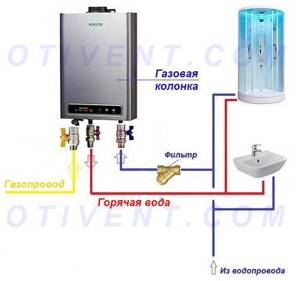
Specifics of gas supply installation
The pipes in the apartment are the property of its owner, but unauthorized changes to the gas supply system cannot be made. For any changes, you must obtain permission from the gas service, otherwise a fine will be issued.
If the gas water heater has already been installed in this place, then this will not cause significant changes to the project. It is enough to turn off the gas valve on the pipe and replace it. If you are installing a water heater for the first time, you will need to do some wiring.
The diagram shows how to properly route gas and water pipes. Depending on the material of the pipes, you will need tools for welding metal or soldering plastic (+)
When installing pipes yourself, you must follow the following rules:
- Turn off the gas before starting work.
- Carry out work with an open window.
- Remove debris from pipes that may have arisen during installation.
- Do not route pipes through door and window openings.
- Do not use the ventilation shaft for laying pipes.
- Do not install the gas pipeline into the wall.
- Do not use flexible hoses longer than 3 meters.
- Paint metal pipes.
Particular attention should be paid to sealing the connecting elements of the gas pipeline. To do this you need to use a sealant and sealant.
After completing the wiring, you can begin installing the device.
Installation and wiring instructions
Before fixing and connecting the column with your own hands, buy 3 ball valves - one gas, 2 water plus connectors with a cap washer - American. The diameter of the fittings is ½” (DN15). Fastening elements are supplied with the water heater.
Connecting a water heater to the communications of a private house
Recommendation. If there is no filter at the cold water supply inlet, purchase a mud filter and place it in front of the inlet pipe of the device.
How to install the speaker yourself:
- Place the heater against the wall in the selected location and mark the outline of the housing. After measuring the distance to the mounting points, drill holes. Mount the bracket or install hooks (the method of hanging depends on the model of the unit).
- Attach the water heater, install the chimney according to the rules. Enter the round channel into the brick shaft using an adapter, and seal the joint with asbestos cord.
- Screw the American connectors to the fittings of the device, then the taps. Be careful not to confuse the gas pipe with the water pipe.
Some manufacturers indicate the purpose of the fittings on the body; in general, follow the factory instructions - Connect the cold and hot water supply, open the common valve and thus check the tightness of the joints. If there are no leaks, connect the gas pipe after lubricating the sealing gasket with grease.
- Test the gas pipeline for permeability - open the shut-off valve and wash the connections with a sponge. Bubbles will appear at the leak site.
Starting and checking water heating for DHW is done according to the manufacturer’s instructions, but only after the device has been put into operation by a representative of the supplier organization. When it is necessary to replace the device, the procedure begins with dismantling, then work is carried out in a similar order.
Comment. It is allowed to supply water and gas to the device with flexible hoses no longer than 2.5 m. But with this connection scheme, the number of joints increases; it is better to connect the pipes to the heater directly, through taps and American connectors.
Installation of the flueless (turbocharged) version of the dispenser with automatic ignition differs in the way the flue is laid - horizontally through the wall to the outside. A double-walled coaxial pipe is placed with a slight slope towards the street so that the resulting condensate drains. The device must be connected to the mains and grounded - mount a socket nearby, powered through an 8 A circuit breaker, as shown in the diagram.

Setup and launch
Before starting any gas equipment, the integrity of the supply lines is first checked. These are primarily seams, joints and joints. The water pipeline should not leak, and the gas pipeline should not allow gas to pass through. If the malfunction of the first is immediately noticeable, then a special method must be used to check the second. Its essence is as follows:
- All inspection points are lubricated with soapy water.
- Next, the gas valve opens.
- A visual inspection of problem areas is carried out.
If soap bubbles appear and grow, it means that the connections are not tight and require replacement or repair.
When the leak test is completed and the detected faults are eliminated, the gas water heater is configured. The procedure is carried out strictly according to the instructions by the masters. They must carry out the first startup and balance the pressure in the system using a pressure gauge.
What to consider when choosing?
When choosing a geyser, it is necessary to take into account a number of basic characteristics that heating equipment should have:
- power;
- ignition type;
- burner type;
- type of combustion products removal;
- safety.
Power is one of the most important characteristics that must be taken into account when choosing heating equipment. Power determines the overall performance of the equipment. In other words, it sets the amount of water that the geyser can handle in a certain time interval. The geyser is designed for power from 6 to 32 kW. It is worth noting that the power of an electric water heater ranges from 1.5 to 3 kW.
Therefore, depending on the number of kW, power is divided into three types:
- small (from 6 to 19 kW);
- medium (from 20 to 28 kW);
- high (from 29 to 32 kW).
The type of ignition is also an important characteristic that can influence the purchasing decision. If previously, matches and lighters were used to light the device, now modern models offer an improved ignition system
There are two types of systems: semi-automatic and automatic.
On the one hand, the semi-automatic type of dispensers entails significant gas consumption. This is due to the fact that the wick cannot be turned off. To turn it on, you need to press the piezo ignition button. On the other hand, the automatic type of dispenser not only reduces gas consumption, but also starts up extremely simply. To start such a system, you need to open the hot water tap.
You should not lose attention to the type of burner, which comes in two types: with constant power and with regulating power. It is inconvenient to use burners with constant power, since you will have to adjust it yourself. This can be explained by the fact that the water pressure is constantly changing and entails a change in temperature. Consequently, temperature-simulating burners successfully cope with this problem. They independently adapt to changing pressure.
The type of exhaust of combustion products is not a fundamental characteristic that has a significant impact on the choice of equipment. However, it is recommended to study this characteristic in order to make the right choice. There are two types: chimney and turbocharged. On the one hand, a chimney column is needed only in one case: if the tubular channel can be routed into an existing chimney. On the other hand, turbocharged devices are not popular, as there is a risk of freezing if the temperature outside is below freezing.
The key issue is safety. Speakers must be equipped with several levels of protection. For example, modern speakers have three levels of protection. Each of them is necessary for different unforeseen situations
Therefore, you need to pay attention to the presence of protective sensors, since high product safety is a guarantee of reliability and quality
However, there are factors that have a secondary influence on the decision to purchase an electric water heater:
- size;
- form.
The size of the geyser does not matter much, but it is necessary to take this factor into account. The size of the column is determined by the scale of the room. If the room allows you to install a large speaker, then choose the appropriate size.