Good day.
Although this option will deviate somewhat from the “standard” solution, in essence it has the right to life.
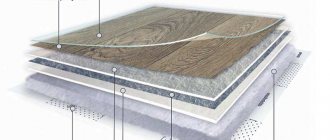
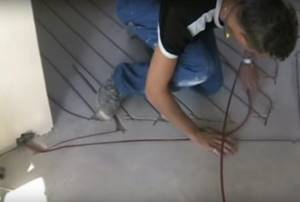
Installation of heated floors in grooves
You will, of course, have to make a groove in the floors, but you just need to think about the following - the thickness of your screed is 3-5 cm, after the groove is installed, it will be much smaller in thickness, and not only will laying the heat-reflecting material be complicated by the complexity “ relief”, and the strength of this structure (screed) will be significantly reduced, even taking into account the fact that the base for it is foam concrete.
If you are confident in the strength of this base, then this type of heated floors can be implemented; also, as you correctly noted, you will need a groove to install a damper tape.
Although the implementation of this type of floor heating device is somewhat incorrect, it is quite possible (as I already said, and again, it should be noted that in order for the design of this floor to be of sufficient quality both in terms of operation and in terms of durability, it is necessary check how durable this “tandem” is - foam concrete + 3-5 cm screed with a groove, since most likely it will turn out that foam concrete will also have to be grooved somewhere).
However, in view of the “constrained” circumstances, which exclude the possibility of increasing the floor level by reducing the height of the wall, as well as the reluctance of additional costs in the form of dismantling and alterations - this option can be implemented - everything will depend on the quality of the work performed.
Chiping concrete surfaces during the repair process is a common thing, due to the need to lay communication wires. However, there are immutable rules in this work, failure to comply with which may lead to the creation of an emergency situation, in other words, the structure of the apartment building may lose its strength. This is exactly what we would like to talk about below using the example of floor gating.
Warm floors in a groove, installation technology and methods of grooves. Pros and cons of this method
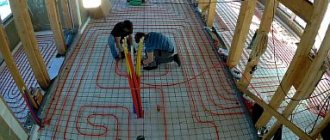
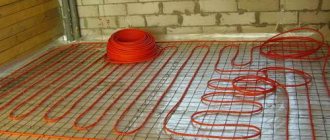
The “warm floor” heating system has become very popular today; it is used as the main or additional source of heat. The technology for laying heated floors depends on its type. Thus, a water circuit or electrical cable is usually mounted in a screed. But what to do if there is already a ready-made screed on the floor? To do this, there is the option of laying a heated floor in a groove.
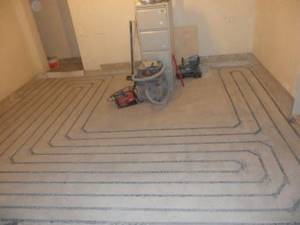
Warm floor in grooves
Advantages and disadvantages of laying heated floors in a groove
This installation method has its advantages and disadvantages.
- Saving costs on purchasing mortar for a new screed. If the old screed is in good condition, you won’t have to remove it and throw away the money spent on installation.
Saving time on dismantling the old screed, it is much faster to perform gating on an already finished surface.
- When laying pipes in grooves, it is not possible to lay a heat-insulating layer with a reflective effect, which will entail heat loss due to the spread of heat to both sides of the concrete base.
- The pipes are too close to the finish coating, which can cause it to dry out. The floor temperature should not exceed 26 degrees.
- For normal heating operation and to prevent damage to the floor covering, you will need to make a small layer of screed on top (20 mm), which will raise the floor by this distance.
- The gating process is quite labor-intensive.
- When chipping, the integrity and properties of the screed are violated.
Grooves for laying heated floors
Important! Even placing foil in the grooves under the pipes will give minimal effect, since the reflector only works if a thermal substrate is installed.
Methods and technology for floor gating
Floor grooves are created in different ways:
- Using a hammer drill. This tool creates very rough openings with broken edges.
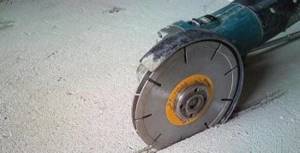
- Using a grinder with a hammer drill. Using a grinder with a diamond disc, grooves are made along the screed, which are then cleaned using a hammer drill. This method is accompanied by a large amount of dust.
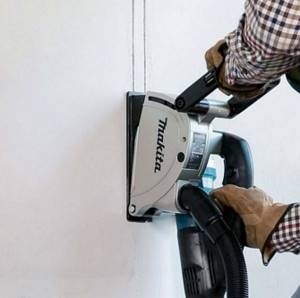
- Using a construction wall chaser. Not everyone has such a device, but for gating it is the best option. It is equipped with two discs and a vacuum cleaner that reduces dust emissions. The grooves made by this device are even and smooth. If there is concrete left in the openings, cleaning is done using a hammer drill.
Wall chaser for creating grooves
Strobe creation technology
Before starting work, the surface is marked depending on the method of arrangement of pipes or cables.
- The arrangement of pipes is in the form of a snail. This installation scheme ensures uniform heating of the room, since it alternates between cold and warm water flow. Hot water, passing around the entire circle, moves further, rushing to the center of the room. Then, reaching the center, it changes direction and comes back.
- Snake. In this version of the pipe arrangement, the coolant first moves along the edge of the room, passes under the windows, moving to the next strip. So, gradually cooling down, the water returns to the beginning of its movement, which causes a difference in the temperature of individual sections of the floor.
The difference in temperature for small rooms is almost unnoticeable, but for large rooms it is very noticeable.
When using a serpentine pipe arrangement, the coolant is supplied from the cold wall side.
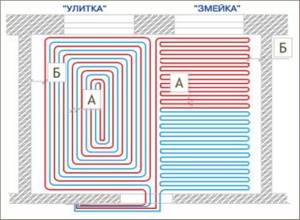
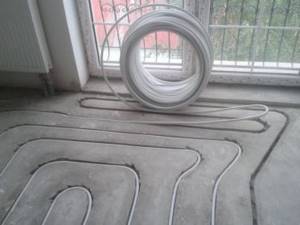
Types of floor heating pipe laying schemes
Important! The heat flow depends on the pitch of the pipe or cable. The recommended step is from 10 to 30 cm.
Technology for laying heated floors in grooves
The technology for laying a heated floor system in grooves consists of the following steps:
Surface preparation
- After scoring the concrete screed, the surface is cleaned of dirt and dust. To do this, use a broom and a vacuum cleaner.
- Reinforced foil is placed at the bottom of the groove, acting as a reflector.
Laying pipes or cables
- The pipes are placed along the grooves on the previously laid foil. The foil should not envelop the pipes so that the heat spreads to the sides and upwards.
- To fasten pipes in grooves, special clips of different diameters are used.
The fastening technology consists of drilling, driving in dowels and screwing in screws. The pipe is secured using a crimp clamp with an elastic band.
Advice! When laying the wire, there is no need to make a foil backing, since the groove holes are very thin.
- Having installed the entire heating system, install the temperature sensor. To do this, a corrugated tube with a plug at one of its ends is placed in the groove for the sensor. This prevents cement from getting inside the tube.
- After sealing the corrugated tube, a sensor is inserted inside.
- A tube with a connecting cable for the temperature sensor is also installed.
- Install a thermostat and connect a temperature sensor to it.
Laying the cable in the groove
The next stage is filling the pipes or cable with solution . But before this, commissioning work is carried out to detect leaks in the heating structure.
Types of solutions for sealing pipes or electrical cables
- cement-sand mortar;
- cement-sand mortar with the addition of tile elastic adhesive (about 1/5 part);
- special repair composition for load-bearing concrete structures, which has particular strength;
- SIMMIX s-10 masonry mortar.
Nuances when filling pipes or cables with solution
- The main purpose of sealing pipes with mortar is to fill all air spaces. The solution should fill even the smallest gaps.
- When using cement-sand mortar with tile adhesive, it is prepared with a consistency that is not too thick. The solution must be poured, not laid, otherwise, when air spaces arise, the heating efficiency will decrease.
- If a cable is laid in grooves, then if there are voids, it will overheat, which will lead to failure of this section, and then the entire system.
- When using a cement-sand composition, the solution must be made thicker and pushed into the gaps.
Important! The solution should be neither too thick nor too thin.
- When pouring, the surfaces are leveled using a spatula.
- The layer thickness must be at least 20 mm.
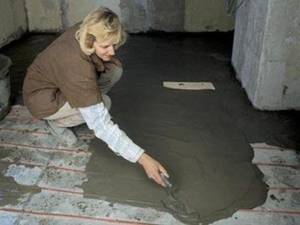
Sealing a heated floor with mortar
Laying the finishing coating
After the top layer of the mortar has dried, you can proceed to laying the floor covering. To do this, it is necessary to carry out a number of activities:
- Clean the surface from dust or other types of contamination.
- Cover the base with a layer of primer.
- Lay aluminum sheets and heat spreaders.
Having prepared the surface, you can lay the flooring.
Why prime the base?
Before laying the finishing coating, it is recommended to cover the base of the concrete floor with a layer of primer. The purposes of such processing:
- Improving the adhesion of the finishing layer.
- Preventing the top layer of screed from coming off due to thermal expansion. This is especially true in cases where a leveling mixture was additionally used to level the surface. A deep penetration primer is capable of penetrating to a depth of 1–2 cm.
- Strengthening the adhesion of the adhesive composition when used as a finishing coating for tiles. If you glue the tiles without first priming the base, then after a few months, when the base is heated to 25 degrees, the tiles will begin to come off.
Video: Technology for laying heated cable floors in grooves.
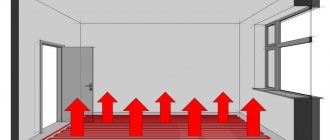
Laying a heated floor into a finished screed is done by gating the base according to the selected pipe or cable laying pattern. The heat transfer of a heated floor with this installation method is no worse than with conventional installation. If you do everything according to technology, the heated floor will last a long time with maximum heat transfer.
DISADVANTAGES OF LAYING
Laying electrical wiring in a concrete floor screed is one of the most popular methods of providing the necessary communications today. Its main advantage is the ease of use of the wiring, which was laid in this way.
Electrical wiring diagram.
However, it is worth knowing that this method also has its disadvantages. In addition, there are some specific features. Both must be taken into account when planning such an installation option.
First of all, we should talk about the cons. The main disadvantage of this method is revealed when it is necessary to carry out repair work on communication lines. In such a case, in order to be able to reach the network, you will need to dismantle the flooring and dismantle the screed. All this costs quite a lot of money.
The next point is the high cost of this option. Due to the fact that the cables are laid directly into the floor itself, you will need to use a special tool (diamond). It is worth understanding that you need to know how to use it. Consequently, the services of a professional electrician here can be expensive.
In addition, for each of the sockets in this case you will need to pull out a separate electrical panel wire. This is also an additional expense, not only in terms of finances, but also in terms of the labor intensity of all work, as well as the time spent on installation.
Is it possible to groove a floor screed?
In general, it’s impossible. But if you really want it, then in a solid or welded iron pipe with the ends bent down so that moisture does not accumulate
In general, it’s impossible. But if you really want it, then in a solid or welded iron pipe with the ends bent down so that moisture does not accumulate
Maybe a person is doing a dry screed. Then the floor is an ideal option.
Over time, water may leak through cracks and pores. Concrete is slightly hygroscopic
In addition to PVC insulation, the NYM cable also has rubber (?) insulation. Does this cable have waterproofing properties?
The corrugation, as far as I understand, is only needed to avoid damaging the wire itself when pouring the screed. The better the cable channels in the screed (obviously there is more fuss with them). Because they are less likely to be damaged during installation and water is less likely to get into them?
Maybe there are inexpensive cables with durable and even better insulation that you can walk on when pouring the screed?
And if it is not laid under a screed, then how? Monolithic columns are regularly found along the walls; they cannot be dug. But I don’t want to make the plaster thick.
vvk0
The NYM cable, in addition to PVC insulation, also has rubber (?) insulation.
Does this cable have waterproofing properties? If it's rubber, then it has it.
In general, it is better to have a cable with some kind of armor (so that it can withstand the weight of the tie, a person and furniture). There is no armor - we put it in the pipe.
It is also desirable to have a hydrophobic filler
Adding from 10/23/2009 10:49:
FAEFAE
is completely normal, it is laid corrugated on the floor slabs and then filled with screed.
How many years have such solutions been working? Has anyone inspected these cables while in use?
Adding from 10/23/2009 11:06:
vvk0
The NYM cable, in addition to PVC insulation, also has rubber (?) insulation.
No, something gray springy there is not rubber, it’s something based on (you won’t believe it) chalk, if sclerosis doesn’t let me down.
Adding from 10/23/2009 11:07:
Jamal
should have a cable with some kind of armor (so that it can withstand the weight of the tie, a person and furniture).
There is no armor - we put it in the pipe. Also, it is advisable to have a hydrophobic filler. Is it difficult to link?
Vovan
in the floor preparation layer or in the voids of building structures, carried out with cable or insulated wires in a protective sheath.
This raises the question of what is meant by a protective sheath, and what kind of cable is allowed to be laid. PVC insulation is also, in some way, a protective shell
Would it be difficult to provide a link?
I described how I would do it myself. Purely common sense. Therefore, I can’t give a link
Jamal
Here the question arises, what should be understood by a protective shell
? Well, not a pipe, and especially not a metal one - that’s a fact.
and what kind of cable is allowed to be laid.
See cable docs.
PVC insulation is also, in some way, a protective shell
Well, NYM is possible.
I described how I would do it myself. Purely common sense.
You know, this is a rare case when common sense almost coincides with the correct answer.
True, there is nothing about water there, but only about maintainability: quote ( PUE
): 7.1.37.
Electrical wiring in the premises should be replaced: hidden - in the channels of building structures, embedded pipes; The use of permanently embedded wiring in panels of walls, partitions and ceilings, made during their manufacture at construction industry factories or carried out in the mounting joints of panels during the installation of buildings, is not allowed. Therefore, I can’t give a link.
But, well, that is, you give advice on electricity without having seen the PUE?
Vovan
And, well, that is, you give advice on electricity without having seen the PUE?
Em. This is exactly the case for which there is no answer in the PUE, so you have to be guided by what is there.
Or did you see in the PUE a description of what kind of cable can be used and what parameters the wire insulation should have?
Adding from 10/23/2009 15:13:
Well, not a pipe, and certainly not a metal one, that’s a fact.
And absolutely everyone knows this fact, so it cannot be described in the PUE?
Well, NYM is possible.
Where such confidence?
See cable docs.
This is correct, you need to watch. But there is one more question: what parameters need to be looked at and what values they should have.
And precisely because such cable laying is not described in sufficient detail in the PUE, I take a supply in the form of an iron pipe and a hydrophobe. If you have positive experience using cables without hard protection and waterproofing, please share.
Vovan
"Designed for .
"won't fit? If the cable is certified in Russia and has the appropriate inscription in the passport (“intended for installation inside a floor screed”), then, in theory, it will be suitable. Do you have an example of a cable for laying in a concrete floor in a residential area?
PS: laying simply “into concrete” is not suitable - you just need “pouring into a concrete floor” or something similar, otherwise the cable for laying in the wall may not be suitable for laying in the floor
Jamal
Em.
this is exactly the case for which there is no answer in the PUE How do you mean “no”? Have you noticed where my quotes come from?
And absolutely everyone knows this fact, so it cannot be described in the PUE?
When something is subject to description in the PUE, they write it there, and they are not shy: quote (
PUE
): 7.1.38. Electrical networks laid behind impenetrable suspended ceilings and in partitions are considered as hidden electrical wiring and should be installed: behind ceilings and in the voids of partitions made of flammable materials in metal pipes with localization capabilities and in closed boxes; behind ceilings and in partitions made of non-combustible materials - in pipes and ducts made of non-combustible materials
This paragraph says nothing about the gasket inside the floor.
Vovan
For this, I suspect, there are all sorts of SNiPs, etc.
things. Well, it seems like we are talking about the design of an electrical installation - just for the PUE.
Vovan
But you can’t pour it into the walls - you have to fill it
in the grooves of the walls
How are these furrows filled in later? a liquid solution from which the moisture then partially evaporates, partially absorbs, and partially flows down. Haven't you ever sealed up a groove?
Vasil Lich,
is it possible to lay electrical wiring in a groove along the floor of an apartment?
if so, is it just a wire, in a corrugation, pipe or something else? Well, this is where the guys wrote.
The floor slab itself cannot be chipped. Because the top of the slab works under compression and when chipped, the slab can break. But in a leveling screed on top of the slab - it IS possible and necessary.
It is not advisable to monolith the wire directly into concrete - the insulation is flimsy. But the CABLE (VVG and its variations, NYM) can be laid directly in the groove and covered with a solution. True, the “Electrical Installation Rules” recommend making the wiring replaceable, i.e. laid in a PVC corrugated pipe, but allow permanent wiring. This is at the discretion of the owner. If the screed is just being made, it is better to put the cables in the corrugation.
Moisture does not matter at all for the CABLE - because these cables can work in damp soil for years (although it is not recommended, because they can be chewed by mice and moles). And all the moisture will evaporate in a week or two.
But low-quality PUNP-type WIRE from underground production in fresh raw concrete can leak. Cases have been described in which people were shocked by electric shock while wallpapering.
Wiring in monolithic houses according to regulatory laws
First, let’s look at what they “say” about hidden wiring in regulatory documents.
Many people remember SNiP 3.05.06-87. But these rules apply to electrical installation work in enterprises and do not apply in any way to residential buildings. There is SP 31-110-2003, which specifically concerns residential buildings. It contains one paragraph on hidden installation of electrical wiring: 14.5.
The essence of this point is as follows: hidden, non-tightened electrical wiring is allowed as follows:
- In the grooves (furrows) of the walls,
- In the partitions,
- In the ceiling
- Under the plaster layer
- In the floor screed layer,
- In the voids of building structures.
Let's look at the basics: GOST R. 50571.1 - GOST R. 50571.18. These are the 18 electrical installation laws. We see: Installation of electrical wiring should not reduce the performance of building structures... (GOST R. 50571.15-97).
These searches can be continued, but the conclusion is this: in the regulatory documents there is no clear prohibition on gating walls in a monolithic house.
- Make grooves in horizontal (!) seams and under internal wall panels;
- Make grooves in wall panels and floor slabs for electrical wiring and piping.
The prohibitions are clear, but these prohibitions, for standard panel houses, do not apply to the monolith.
The question arises, maybe I’m looking in the wrong place and the wiring in monolithic houses is clear from the structure of this type of house.
How to lay electrical and communications in an old screed
N
Often, when renovating a secondary home, the old cement-sand screed does not require replacement, which even after 30-50 years can look and “feel” excellent. Also, in an already installed screed, sometimes it is necessary to lay communications, although communications are laid before its construction, but you never know, sometimes something is forgotten.
Let's look at how to easily and quickly groove a screed, be it old or new, and lay there what we need (cables, pipes).
How to stitch a screed, what are the options?
There are several options, as with → gating walls for electrical installations; in principle, the screed is no different from the walls. This:
- Grooving using a wall chaser (furrow maker) - a professional tool for installing grooves. Not everyone has such a tool, but if something happens, you can rent it and calmly, after studying the tool for an hour or two, having practiced, make neat furrows of the required length and width.
- With a grinder you can make furrows in the screed without much difficulty. The downside is a lot of dust if you don’t use it in conjunction with a vacuum cleaner.
- With a chisel and hammer , if the screed is soft enough and you don’t need to remove it much.
- Using a hammer drill is not very convenient, or rather not very safe, since you can inadvertently gouge large pieces of the screed and you will have to refill it.
All these methods can be combined with each other, for example, to make grooves with a grinder, and knock out the material with a hammer drill or chisel. Let's look at each method separately, but first the basic rules.
Features of the service
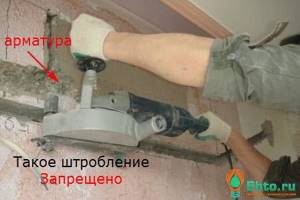
Wall gating may be required when completely replacing the cable in the house, moving sockets, switches, or installing new equipment. There are standards for the size, shape of grooves, rules for their implementation, location relative to heating radiators, gas pipes, window and door openings. Making grooves in load-bearing walls and floor tiles is unacceptable.
The work is performed with a power tool (grinder, impact drill, wall chaser) or by hand using slotting tools. The choice of method depends on specific conditions, customer choice, and wall material. Manual gating of walls for wiring per meter in Balashikha is more expensive because it requires high labor costs. This method is chosen for small volumes; it is less dusty. The use of power tools for making grooves is accompanied by high dust removal and noise.
Basic rules for gating old screed
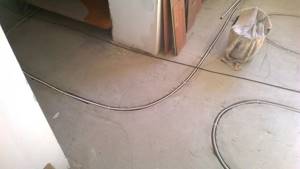
There are several basic rules when gating using any of the methods, especially for old screeds. The fact is that the old screed contains wiring, often it is aluminum and without corrugation (without any protection). Therefore, you first need to check the screed for wiring. If your wiring has changed or is currently changing, then this is not necessary if it is not energized. Although usually the cable is not laid in the screed, but under it, in a layer of insulation - sand. If you have a layer of sand under the screed, then most likely the cables are located there and if you cut out the screed material to a depth of 1-2 cm, nothing bad will happen, but it’s better to play it safe and check.
Checking for cable presence in the tie
There are several ways to check for the presence of a cable in the tie. They are similar to checking walls, but with a small nuance - the cable can be placed in any order, not at 90-degree angles.
The easiest way is to check whether there is wiring in the screed using an electrical tester with a non-contact testing function. The wiring must be live.
Cable installation and socket installation
Cables can be mounted into the wall in several ways - with or without corrugation. In the first case, a special corrugated pipe is placed in the groove, several wires are pulled into it and brought to the point of connection with the elements. In the second case, the cables are simply mounted in a groove, fixed with plaster, putty or plaster.
It is best to install sockets in one frame in blocks; connectors for telephone, Internet, and cable TV can also be connected there. Holes for socket boxes, switches and other elements are made with a hammer drill (in impact mode) with special diamond bits of the required diameter. Then the elements are mounted according to the instructions, everything is sealed carefully.
How to seal recesses before finishing:
- Furrows and areas around the elements are thoroughly cleaned with a vacuum cleaner or broom, removing all dust.
- Then everything is carefully primed, the soil dries.
- The groove or depression is moistened with water, after which it is sealed with plaster, construction plaster or polyurethane foam.
Drilling concrete is not as difficult a task as it might seem at first glance. But each stage of work requires attention, strict adherence to technology and the use of suitable materials and tools. Only in this case can you be sure of the reliability and security of communications.
How to groove an old screed for electrical or communications
Let’s look at each method in more detail and tell you about the nuances.
Grooving the screed with a wall chaser (furrow maker)
The simplest and most effective way. We just need a wall chaser and a vacuum cleaner. The kit costs from 8-10 thousand rubles. (2019, Russian Federation). Not everyone can afford it and not everyone needs it on an ongoing basis, so you can rent it for 2-3 days - this is enough to practice and build a 3-room apartment.
Be sure to install diamond discs for concrete, preferably new ones. After watching the video below, you will understand how to groove a screed with a wall chaser.
Scoring the screed with a grinder
A simple, convenient and very affordable option to make grooves in the screed. The only negative is a lot of dust.
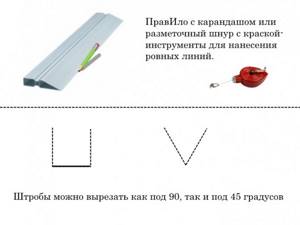
To begin with, using a marking cord with paint or a rule and a pencil, we will mark the lines along which the furrows need to be made. It is desirable that the lines are as straight as possible.
Next, use a grinder with a disc to cut furrows along the stone to the required depth. To avoid dust, you can suck it out with a vacuum cleaner (you need to use a construction vacuum cleaner, a regular one will quickly clog, and you will need an assistant. Another option to get rid of dust is to moisten the cut site with water from a spray bottle, at the same time as punching; the lack of wetting means the dust turns into dirt.
The groove can be cut at 90 and 45 degrees. The disadvantage of the first method is that you will need to gouge out the material between cuts, but in the second case this practically does not have to be done.
→ How to use the grinder is described in one of the materials on the site.
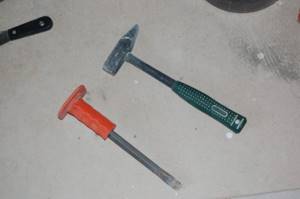
Making grooves in the screed with a chisel and hammer
A chisel and hammer are rather poorly suited for scoring screeds. They can be used only in short areas or used to knock out material from grooves cut with a grinder or wall chaser. In general, it is better to use a chisel (chisel) and a hammer as an auxiliary tool.
Scoring the screed with a hammer drill
Using a hammer drill, you can select material from cut grooves. It is highly not recommended to hammer the screed with a hammer drill, since the tool is quite powerful and can damage the screed, it may crack and you can knock it out in whole pieces. It is not necessary.
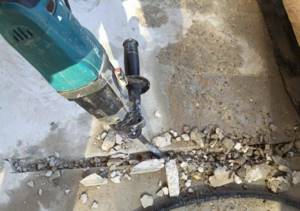
When scoring a screed, a hammer drill can be used to remove material in the grooves between cuts.
Ideal, fast and most budget option:
- make markings,
- cut the grooves with an angle grinder (“grinder”),
- select the material in the grooves with a hammer drill,
This is the end of the story, I hope everything works out for you, and if not, ask questions!
Leave your tips and comments below. Subscribe to our newsletter. Good luck to you and good luck to your family!