In itself, it is an alternative when there is no full and regular supply of hot water. You can list all its advantages, but they are probably already known to many.
Still, when buying a gas water heater, it is difficult to give preference to any type or even brand for a person who has never had such a water heating device before.
We will try to talk about different types of automatic gas water heaters, their advantages, weaknesses and operating nuances. Also read about what to do if the device requires repair.
Igniter malfunction.
The first stage of repairing a Beretta geyser should be to turn off all taps suitable for the device, gas and water. The igniter may be attenuated on speakers with an automated protection system. In working condition, the igniter must be constantly working, since its main function is to ignite the main burner when hot water is turned on.
Ignition occurs as a result of combustion of the gas-air mixture. Ignition occurs when the igniter heats the thermocouple, after which it flows to the main burner. If it goes out, the protective system is activated and the flow of gas is stopped, in order to avoid its accumulation and prevent an accident.
The protective system of the device consists of the following elements: thermocouple, thermal fuse, solenoid valve. A malfunction of the automation can be judged if the igniter does not ignite after you stop holding the gas adjustment handle. To carry out high-quality repairs, you will need to understand the device in more detail.
The thermocouple has failed.
A thermocouple is a device consisting of metals with different thermo-EMF coefficients. Welded or fastened together, they form a solder joint that has the ability to generate an EMF of 30 MV when heated. When an alloy is subjected to a change in temperature, the thermocouple produces a voltage at the time that is directly proportional to the magnitude of the temperature change.
It quite rarely fails, however, breakdowns occur in the central conductor, this is due to the fact that it goes beyond the connection, a short circuit to the housing can occur when the insulation is broken, and the column is turned off.
It cannot be repaired if the contacts at the welding site are broken, soldering will not work. A complete replacement with a new unit is required.
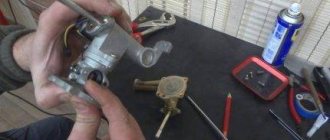
The solenoid valve is faulty.
It is a coil of copper wire, in the center of which there is an iron rod connected to a valve that regulates stopping the gas supply to the burner.
When the required temperature is reached, a current is generated that creates a magnetic field, the rod is set in motion, which directly promotes the opening of the valve. Next, gas is pumped into the burner. The solenoid valve is responsible for the safe operation of the column.
If the wick is extinguished by a draft, if you open a hot water tap, gas will not flow into the apparatus and the wick will not ignite. To check whether the valve is working, you need to connect a regular AA battery to the wiring; when the wick is lit, it should light up, and if you disconnect the battery, the flame will go out. If this happens, then everything is working properly, the problem is something else.
Chimney draft
This is one of the reasons why the gas water heater does not light up. If the main burner of the device suddenly stops lighting, then it is recommended to check the chimney, it may be clogged. A large accumulation of soot inside the chimney, various construction debris, leaves from the street - all this can clog the chimney so that carbon monoxide mixed with air returns back to the column. This will cause attenuation. You won't be able to light it.
Also, a clogged or clogged chimney can lead to carbon monoxide entering the apartment or house, which can lead to serious poisoning.
Modern dispensers from Bosch, Beretta, Ariston and other manufacturers have special sensors that constantly monitor the draft level in the chimney during operation of the dispenser. If suddenly there is no traction, then the supply of fuel (in this case, gas) will be automatically stopped. This is why the gas water heater, Bosch, for example, does not light up.
You can check for yourself whether there is traction. To do this, bring a burning match to the hole in the speaker body. If the match flame is deflected, then the chimney is working properly. If the flame does not move at all, then the ventilation system is clogged. It is better to turn off the column and not use it until the chimney is cleaned.

Thermal fuse is faulty.
It is a bimetallic plate, the function of which is to break the power contacts of the solenoid valve.
One of the characteristic signs of its malfunction is the following: if the room is well ventilated and the device goes out, you should check it first. If you turn on the hood and the window is closed, the device may overheat and the thermal fuse will turn off the gas to prevent an accident.
To check the serviceability of the device, disconnect the leads and short-circuit them to each other; if your column turns on, then you were able to correctly determine the cause of the malfunction. And for further operation of the column, purchase a new spare part (thermal fuse).
Beretta gas boiler. Error codes and their interpretation
If any malfunction is detected in the functioning of the Beretta boiler device, a flashing code will appear on the screen indicating an error. The user will also see the message RESET. In the table, various faults are deciphered as follows:
D — Final stop of the device;
T - Temporary problems. If an error occurs, the boiler tries to restore operation;
° — The boiler is in standby mode;
* — Low pressure in the system.
If error A 01 blinks on the screen, this means it is blocked due to lack of fire or due to a faulty board.
- A02 – blocking by maximum thermostat;
- A03 – stop by smoke exhaust pressure switch;
- A04 – blocking due to hydraulic pressure switch;
- A07 – heating sensor malfunction;
- A11 – flame simulation;
- ADJ – electronic option for minimum and maximum power;
- The bell is flashing 88° - waiting for the flame;
- Error E 18 on a gas boiler - short circuit.
- The letter p is flashing – the DHW is being preheated.
Your idrabagno 11 speaker has a leaking radiator, what should I do?
This is a common failure that is caused by water quality.
But everything can be fixed if you have a simple set of tools at hand, namely we need:
- soldering iron
- solder
- sandpaper (preferably fine grit)
- solvent (for degreasing the surface)
- rosin (to protect the surface from oxidation).
Before you begin the repair, do not forget to close the gas and water valves suitable for the device. Most often, fistulas form on the front side of the device; in this case, you do not need to disconnect it from the column. If it has formed on the back wall of the speaker, you will need to remove the radiator.
The first stage of repair is to drain all the water that is in the pipe, which can be done by opening a hot water tap, then unscrewing the nut of the cold water pipe at the entrance to the column, so the remaining water will flow out. If you do not do this, you will not be able to achieve the required solder temperature, since some of the heat will be absorbed by the water in the pipe.
Using a sheet of sandpaper, treat the area of the leak; we advise you to carefully examine your radiator for the presence of small green inclusions; this is the first sign of the onset of a fistula; perform the same repair steps with them, so as not to return to it again after some time.
The next steps are to degrease the surface and remove particles of dust and dirt; for this you need to take a piece of clean cloth, soak it in a solvent and treat the required surface. You can perform soldering with any solder you have on hand, but if you don’t have it, you can easily purchase it at any radio market in Moscow.
Use a soldering iron with a soldering temperature of at least 170 degrees. Plug in the soldering iron and wait until it warms up, in the meantime treat the surface with rosin, this is done to prevent oxidation on the pipe and to ensure high-quality soldering. Then use a soldering iron to melt the solder (tin) and apply it to the surface. To ensure high-quality repairs, the applied layer of solder should be about two or three centimeters.
Scale formation in the heat exchanger.
This can be determined if the water in the column is not warmed up enough, or if the water pressure at the outlet of the device is low, although the pressure in the water main is quite strong. This breakdown is associated with the low quality of tap water, or more precisely with its hardness.
This problem leads to a significant increase in gas consumption for heating. Deposits can be reduced by lowering the set heating temperature; when heated to more than 70 degrees, it happens much faster. To repair your device, you can resort to store-bought plaque removers, which are expensive; their frequent use is also not recommended, or use a solution with citric acid (100 grams of acid per half liter of water).
Cleaning can be done in two ways:
- Using a special apparatus. This is a reservoir with a pump built into it that drives the cleaning liquid inside the heat exchanger. It is connected to the radiator tubes at the inlet and outlet. Water circulates inside for an hour, dissolving the deposits that have formed. However, not everyone has the opportunity to purchase such a device due to its high cost; there is a cheaper method.
- Drain the water from the system, remove the radiator, and prepare a tank filled one-third with water. Immerse the radiator in it and fill it with a purchased or prepared reagent. Place on the fire and boil for half an hour, then turn off the heat and let stand for an hour. Rinse the radiator; if the pressure has changed, the plaque has gone away; if it remains small, repeat the procedure again.
Low pressure in the water supply system
If the column does not work, then you should check the pressure in the water main. Modern devices, especially Neva, are very sensitive to water pressure and pressure drop in the water supply line. If the pressure level is insufficient, then this is the answer to the question why the Neva gas water heater and similar equipment do not light up. With low pressure, the column membrane does not affect the valve in any way - it does not enter the supply system. The column clicks the piezoelectric element, but the gas does not fully ignite.
You need to open the water tap and make sure that the pressure is really low. In this case, you will have to resolve the issue with the company responsible for the water supply. Low pressure often occurs in the summer, when many people use water at the same time.
If the pressure is large and of sufficient strength, then you need to check the strainer at the inlet of the water unit. The part is removed and checked under running water. If the plaque cannot be washed off, then the filter is soaked in a solution of citric acid.
Another method can be used. Turn off the gas and water supply, unscrew the pipes at the inlet, remove the column body from the wall and install it upside down. Then a cleaning agent is poured into the system using a regular syringe and left for several hours.
There is no spark when turned on.
- The membrane has broken. Disassemble the water unit and replace it with a new one.
- The batteries are dead. Replace with new ones.
- Low cold water pressure. Set the pressure regulator to the extreme right position.
- The piezo ignition has broken down; the connecting contacts may have come loose. Check their serviceability and replace if necessary.
- The distance between the ignition electrode and the ignition burner wick is too large. You will need to adjust and set the desired distance.
How to repair a Beretta gas water heater if it does not burn or heat? In this article, we have collected the main causes of breakdowns and given tips on how to eliminate them.
Beretta has been manufacturing heating equipment for 60 years. Instantaneous heaters are an economical way to obtain hot water, but over a long period of use the equipment breaks down.
The wick does not light
If the column lights up, but very poorly, then there may be several reasons. Let's look at each of them:
- If the piezoelectric element does not work, then problems with the igniter may occur in the Astra and Zerten models. The wick should always be lit, and it is triggered when the tap is opened or when the corresponding button is pressed. If the element does not work, the wick does not burn, then the column jets may be clogged. To do this, disassemble the device, remove the metal protection or casing and nozzles. It is better to do this with thin wire. Usually, after cleaning the nozzle, the column works normally. This is one of the reasons why the Astra gas water heater and other similar devices do not light up.
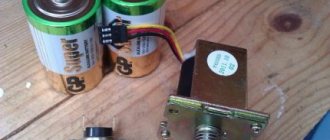
- Another case is automatic speakers that take a long time to light up. The automatic ignition system of the column runs on batteries. When the tap opens, the device is triggered and a powerful spark is formed, which ignites the column burner. If there is no spark, then you should try replacing the batteries, or better yet install batteries.
- The generator of the hydrodynamic system may also fail. The generator rotates when water passes through it. When the unit rotates, it generates a current, from which a spark is then formed. If this is precisely the reason why the gas water heater does not light up, then it is better to entrust the repair to professionals.
Basic faults and DIY repairs
Let's look at the main problems with the Beretta boiler, as well as ways to fix them without contacting a service center.
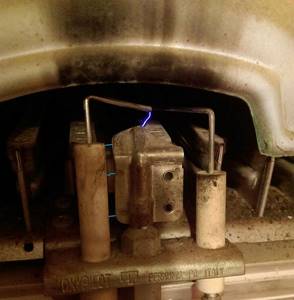
Igniter problems
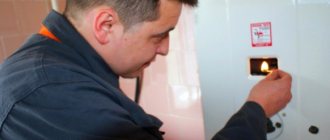
When the water heater is running, the pilot light should be lit continuously. If you stop holding the gas control knob and the igniter does not light, this indicates problems with the automation. The first thing to do is turn off the water and gas supplies.
The flame in the burner occurs when the igniter heats the thermocouple. If it goes out, the protection system is triggered and the column turns off. Otherwise, there is a risk of carbon monoxide entering the room. A similar problem can be caused by the following fuse parts:
- Thermocouple.
- Overheat sensor.
- Solenoid valve.
The protection is triggered when the equipment is rarely serviced. See if it's time to clean the igniter: clogs often occur in dusty and damp areas. What indicates the need for cleaning:
- The burner lights with a loud bang.
- The flame is not blue, but has red tips.
- The burner keeps going out.
How to clean:
- Turn off the gas supply, remove the column casing.
- You will see the pilot light; it may be clogged with soot.
- Unscrew the traction sensor and gas supply tube.
- Remove and clean the nozzle.
- Rinse the tee and other parts under running water.
- Reassemble the igniter in reverse order.
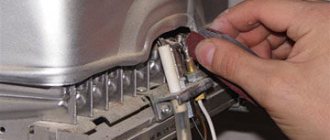
Additionally, you can check the solenoid valve, but you will need a multimeter for this.
Thermocouple faults
A thermocouple is an alloy of two types of metal that serves to protect equipment from damage. The part opens and closes the gas supply to the burner. When a thermocouple heats up, its plates expand, generating EMF (electromotive force). This force is enough to open the solenoid gas valve. When heating stops, the product cools down, and the supply is shut off.
For DIY repairs, you will need spare parts. Please note that they may differ for different models (for example, Idrabagno 11).
- The thermocouple is located next to the igniter. Secure with a nut.
- Loosen the strap that holds the part.
- Now unscrew the thermocouple nut counterclockwise.
- Unscrew the contact screw. It is located on the back of the adjustment knob.
- Disconnect the wiring.
- Install a new element.
Solenoid valve failure
The valve is a coil with a rod and a spring that serves as protection against gas entering the room. There is a seal around the coil to better seal all the cracks. In normal condition, the valve is closed when the equipment is turned off. When the circuit starts and the membrane is activated, the control module sends a signal to the valve to open - gas enters the burner.
Replacing the part is easy; just unscrew the four mounting screws with a screwdriver.
Thermal fuse problem
It is triggered when the column overheats. Try lowering the room temperature by opening the windows. To check the fuse, you need to close its contacts together. If the column turns on, it means it's overheating. If not, the part is replaced.
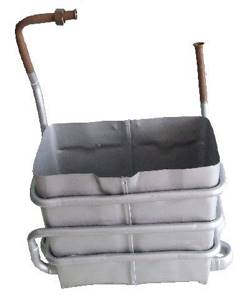
Heat exchanger clogged and leaking
If the equipment does not heat the water well or does not heat the water at all, you need to clean the radiator. The pressure may also decrease because plaque narrows the passages in the coil tubes.
For cleaning you need:
- Remove the product casing.
- Drain the radiator.
- Unscrew the fastening bolts.
- Immediately clean the assembly from dust using a brush. To remove scale, use citric and hydrochloric acid.
- Drive the hydrochloric acid solution through the coil with a pump or watering can.
- Dilute citric acid in water and pour inside.
- After 30 minutes, rinse everything with water.
Leaks occur due to corrosion. Manufacturers try to reduce the cost of production by adding impurities to copper for the radiator. The walls become thin and heat up unevenly. As a result, burnouts appear. An abundance of green spots on the surface indicates an imminent leak.
The accident can be eliminated by soldering. To do this, use a gas burner (for thick-walled radiators) or a soldering iron. You will also need solder and flux.
You can use cold welding or a tin patch. If nothing can be done to help, the heat exchanger is replaced.
When choosing a replacement part, be careful to ensure that the new radiator has not been soldered or repaired.
No spark when turned on
What caused it:
- Problems with the membrane. As we have already written, the membrane starts the gas supply valve. To do this, it must be intact and elastic. If it is deformed and torn, the burner will go out or will not light at all. Replace the rubber part with a silicone one, it will last longer.
- In equipment with electronic ignition. The power supply is located at the bottom of the case. Open the cover and replace the batteries.
- Insufficient cold water pressure. Turn the adjustment knob to the right and down.
- Hold the piezo ignition button longer. Check his contacts: maybe they have moved away.
- The ignition electrode has shifted and is located at a large distance from the wick. Adjust the position.
- Check if the gas valve is open. If not, then open it.
- No traction. Test your guess by holding a lit match to the window. If the flame burns steadily, contact your utility company to have the chimney cleaned.
These are typical malfunctions of Beretta geysers. Depending on the situation, other troubles can occur. Take care of your equipment to avoid such problems.
2016-11-08 Evgeny Fomenko
Now I will list the main malfunctions of the Beretta column and tell you how to repair each malfunction. So let's go.
Igniter malfunction.
The first stage of repairing a Beretta geyser should be to turn off all taps suitable for the device, gas and water. The igniter may be attenuated on speakers with an automated protection system. In working condition, the igniter must be constantly working, since its main function is to ignite the main burner when hot water is turned on.
Ignition occurs as a result of combustion of the gas-air mixture. Ignition occurs when the igniter heats the thermocouple, after which it flows to the main burner. If it goes out, the protective system is activated and the flow of gas is stopped, in order to avoid its accumulation and prevent an accident.
The protective system of the device consists of the following elements: thermocouple, thermal fuse, solenoid valve. A malfunction of the automation can be judged if the igniter does not ignite after you stop holding the gas adjustment handle. To carry out high-quality repairs, you will need to understand the device in more detail.
The thermocouple has failed.
A thermocouple is a device consisting of metals with different thermo-EMF coefficients. Welded or fastened together, they form a solder joint that has the ability to generate an EMF of 30 MV when heated. When an alloy is subjected to a change in temperature, the thermocouple produces a voltage at the time that is directly proportional to the magnitude of the temperature change.
It quite rarely fails, however, breakdowns occur in the central conductor, this is due to the fact that it goes beyond the connection, a short circuit to the housing can occur when the insulation is broken, and the column is turned off.
It cannot be repaired if the contacts at the welding site are broken, soldering will not work. A complete replacement with a new unit is required.
The solenoid valve is faulty.
It is a coil of copper wire, in the center of which there is an iron rod connected to a valve that regulates stopping the gas supply to the burner.
When the required temperature is reached, a current is generated that creates a magnetic field, the rod is set in motion, which directly promotes the opening of the valve. Next, gas is pumped into the burner. The solenoid valve is responsible for the safe operation of the column.
If the wick is extinguished by a draft, if you open a hot water tap, gas will not flow into the apparatus and the wick will not ignite. To check whether the valve is working, you need to connect a regular AA battery to the wiring; when the wick is lit, it should light up, and if you disconnect the battery, the flame will go out. If this happens, then everything is working properly, the problem is something else.
Problems with ignition
Typically, batteries in geysers are located in the lower right corner, and replacing them does not require much effort.
Situations are often observed when gas is supplied, there is draft, the pressure is normal, but the gas water heater does not ignite. If you have a Neva or Oasis gas water heater installed with electric ignition, listen to see if there is a spark being generated. The presence of a spark is indicated by a characteristic crackling sound heard when the tap is opened. If you hear a crackling sound, but the gas heater does not ignite, try replacing the batteries - this is a very common reason for the lack of ignition (a weak spark makes normal ignition impossible).
Owners of speakers with piezoelectric ignition need to make sure that the igniter is working. If it lights up, then the column should light up immediately, without hesitation. If there is no flame, try to light it with the ignition button. If the gas in the igniter does not ignite, then the problem is in the igniter itself (in the nozzle) - it needs to be cleaned. To do this, we disassemble the gas water heater, get to the fuse and clean it with steel wire. Next, we try to light the column again.
When repairing your geyser, be careful and always turn off the gas supply before carrying out any operations.
As for hydrodynamic ignition, it is a combination of a small generator and an electrical circuit that generates a spark and powers some other electronic components. If the generator or circuit fails, the gas water heater will not light. Self-repair here is only possible if you have the appropriate knowledge and experience in electronics repair.
Thermal fuse is faulty.
It is a bimetallic plate, the function of which is to break the power contacts of the solenoid valve.
One of the characteristic signs of its malfunction is the following: if the room is well ventilated and the device goes out, you should check it first. If you turn on the hood and the window is closed, the device may overheat and the thermal fuse will turn off the gas to prevent an accident.
To check the serviceability of the device, disconnect the leads and short-circuit them to each other; if your column turns on, then you were able to correctly determine the cause of the malfunction. And for further operation of the column, purchase a new spare part (thermal fuse).
Your idrabagno 11 speaker has a leaking radiator, what should I do?
This is a common failure that is caused by water quality.
But everything can be fixed if you have a simple set of tools at hand, namely we need:
- soldering iron
- solder
- sandpaper (preferably fine grit)
- solvent (for degreasing the surface)
- rosin (to protect the surface from oxidation).
Before you begin the repair, do not forget to close the gas and water valves suitable for the device. Most often, fistulas form on the front side of the device; in this case, you do not need to disconnect it from the column. If it has formed on the back wall of the speaker, you will need to remove the radiator.
The first stage of repair is to drain all the water that is in the pipe, which can be done by opening a hot water tap, then unscrewing the nut of the cold water pipe at the entrance to the column, so the remaining water will flow out. If you do not do this, you will not be able to achieve the required solder temperature, since some of the heat will be absorbed by the water in the pipe.
Using a sheet of sandpaper, treat the area of the leak; we advise you to carefully examine your radiator for the presence of small green inclusions; this is the first sign of the onset of a fistula; perform the same repair steps with them, so as not to return to it again after some time.
The next steps are to degrease the surface and remove particles of dust and dirt; for this you need to take a piece of clean cloth, soak it in a solvent and treat the required surface. You can perform soldering with any solder you have on hand, but if you don’t have it, you can easily purchase it at any radio market in Moscow.
Use a soldering iron with a soldering temperature of at least 170 degrees. Plug in the soldering iron and wait until it warms up, in the meantime treat the surface with rosin, this is done to prevent oxidation on the pipe and to ensure high-quality soldering. Then use a soldering iron to melt the solder (tin) and apply it to the surface. To ensure high-quality repairs, the applied layer of solder should be about two or three centimeters.
Problem with clogs
Filters are often installed at the entrance to the gas water heater, which filter out small solid impurities contained in the water. Salts also settle here, becoming an obstacle to the normal passage of liquid. As a result, the water heater stops lighting up and providing the household with hot water. In this case, you need to turn off the water supply, unscrew the filter and clean it.
If the condition of the filter is very severe, then it is easier to replace it.
To clean the heat exchanger, soak it in a solution of water and detergent, and pour citric acid into the tubes to the top and leave for half an hour.
Also, during many years of operation of the column, the tubes or heat exchanger may become clogged. In this case, you need to check the permeability of the water unit and make sure that the heat exchanger is permeable. Blockages are removed by washing with special reagents - to purchase them, you should contact your nearest hardware store. After flushing, the functionality of your geyser will be restored.
In order to prevent sediment from clogging the inside of the column, install a decent filter at the entrance to the column, which will remove small impurities and soften hard water.
Scale formation in the heat exchanger.
This can be determined if the water in the column is not warmed up enough, or if the water pressure at the outlet of the device is low, although the pressure in the water main is quite strong. This breakdown is associated with the low quality of tap water, or more precisely with its hardness.
This problem leads to a significant increase in gas consumption for heating. Deposits can be reduced by lowering the set heating temperature; when heated to more than 70 degrees, it happens much faster. To repair your device, you can resort to store-bought plaque removers, which are expensive; their frequent use is also not recommended, or use a solution with citric acid (100 grams of acid per half liter of water).
Cleaning can be done in two ways:
- Using a special apparatus. This is a reservoir with a pump built into it that drives the cleaning liquid inside the heat exchanger. It is connected to the radiator tubes at the inlet and outlet. Water circulates inside for an hour, dissolving the deposits that have formed. However, not everyone has the opportunity to purchase such a device due to its high cost; there is a cheaper method.
- Drain the water from the system, remove the radiator, and prepare a tank filled one-third with water. Immerse the radiator in it and fill it with a purchased or prepared reagent. Place on the fire and boil for half an hour, then turn off the heat and let stand for an hour. Rinse the radiator; if the pressure has changed, the plaque has gone away; if it remains small, repeat the procedure again.
Blockages in the system
How to clean the mesh filter was written above. The heat exchanger system should also be cleaned - scale forms on it during operation. To do this, the heat exchanger is removed and placed in water with citric acid. The container with the solution must be heated on the stove. The inside of the heat exchanger should also be washed with this solution.
In Junkers gas devices and other similar units, burners often become clogged. A large accumulation of soot and soot leads to the fact that the column will not ignite. When cleaning the heat exchanger, it is worth cleaning the burner as well. Wash the outer part of the device with a solution of citric acid. It is better to clean the inside of the burner outside.
There is no spark when turned on.
- The membrane has broken. Disassemble the water unit and replace it with a new one.
- The batteries are dead. Replace with new ones.
- Low cold water pressure. Set the pressure regulator to the extreme right position.
- The piezo ignition has broken down; the connecting contacts may have come loose. Check their serviceability and replace if necessary.
- The distance between the ignition electrode and the ignition burner wick is too large. You will need to adjust and set the desired distance.
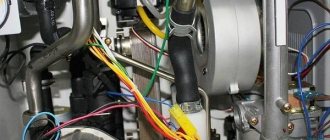
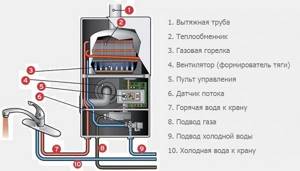
The Beretta speaker is a product of the Italian corporation RIELLO. Beretta geysers with different types of combustion chambers are presented on the world market: closed and open, electric or piezo ignition.
Among the main parts of the presented model of a column with piezo ignition:
- Traction control mechanism.
- Smoke exhaust pipe - allows smoke not to accumulate in the room, sending it to the ventilation.
- Heat exchanger - responsible for heating the water by the column.
- Pilot Burner – This is where the gas is ignited.
- Burner - This is where the gas is burned.
- Hydraulic valve - responsible for the passage of water through the column.
- Thermostat – temperature regulator.
- Gas valve - allows you to open or close the gas flow into the burner.
- Gas inlet – allows gas to enter the burner.
- A gas pressure regulator that provides the ability to stabilize the gas pressure entering the column when it is unstable.
- Piezo ignition button.
- An economizer that allows you to select a specific temperature for heating water, and also, due to its functions, performs the function of saving gas.
- A device for measuring gas pressure and a gasket, which are connected to the inlet of the pressure regulator.
- Ignition electrode.
- Thermocouple.
The column is equipped with automatic power control depending on the amount of water flowing through it. When the pilot burner is active, the equipment is ignited and switched off automatically.
1.1 Beretta gas water heater and its structure (video)
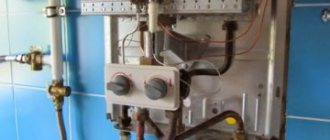
How does a gas water heater work?
Any user must understand how a gas water heater works. This is necessary for correct and safe use.
The speaker contains a metal casing, as well as:
The device can be installed both in the kitchen and in any non-residential premises with a ceiling height of at least two meters. In addition, the ventilation in the room must work properly.
Important! It is prohibited to place a gas water heater above the stove.
Gas devices of the Beretta, Electrolux and Neva brands operate in the same way:
- When turned on, water enters the system;
- Due to pressure, the membrane stretches and opens the gas supply valve;
- The burner is ignited, which begins to heat the liquid circulating through the heat exchanger;
- Combustion products are removed through the chimney and ventilation.
There is an opinion that installing a geyser is unsafe. This was during the time of using a device with manual ignition. Currently, the devices have sensors that control water heating and draft in order to prevent an emergency. However, do not forget about safety rules.
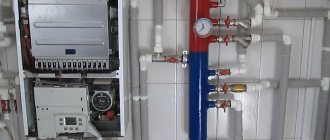
- Independent and simple heating setup: how to connect a boiler to a double-circuit gas boiler
If you notice the smell of gas in your apartment, you must:
- Close the gas supply valve;
- Open window;
- Do not turn on electrical devices until the room no longer smells of gas;
- Contact the gas service.