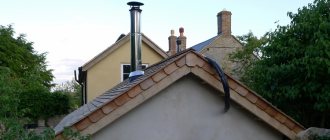
Have you brought the chimney out through the roof and don’t know how or what to use to seal the gap between the chimney and the roof? But we know about this. From ultra-low-cost methods for sealing slate to labor-intensive ways to seal joints on metal tiles and corrugated sheets, we'll cover each in detail. Explore possible options and choose the one that suits you. Step-by-step instructions and a description of the features of all methods of sealing the joint between a pipe and a roof are included.
How to seal the gaps between the pipe and slate
Slate is the most affordable roofing material available. Therefore, solutions for sealing the gap between the pipe and the roof should also be cheap, as well as simple and quick to implement.
So, if you are looking for something to seal the gap between the chimney and the slate roof, then asbestos mortar is best suited for this purpose. If you need a more technologically advanced and durable method of sealing the joint, then place a steel apron on the pipe.
Mortar of cement with asbestos
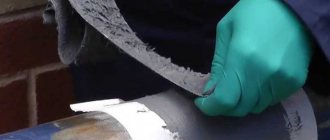
Sealing a pipe on a slate roof with a mixture of cement and asbestos is a makeshift, but no less effective method. After all, it is not for nothing that asbestos continues to be used to create fire-resistant coatings and materials, despite its tarnished reputation.
The method itself is simple: asbestos soaked in water is mixed with cement and the resulting solution is used to cover the joints between the chimney pipe and the slate. The main thing is not to forget about latex gloves and a respirator. Still, the reputation of this material is spoiled for a reason - it is classified as a first-degree carcinogen, that is, it reliably causes cancer. And asbestos is especially dangerous if it gets into the lungs. However, if you follow simple safety measures, the risk is almost zero.
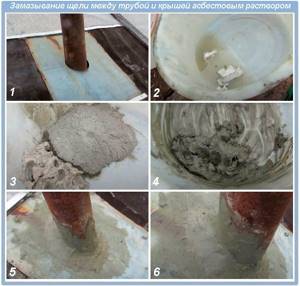
Now we’ll tell you step by step how to seal the gap between the pipe and the roof with asbestos mortar:
- Asbestos is soaked in water in a ratio of 1 to 1. It is better if the asbestos is in the form of fibers or powder, but crushed asbestos sheets can also be used.
- Soaked asbestos in a ratio of 1 to 1 is mixed with M400 cement.
- Before covering the pipe on the roof, the slate around it and 100-150 mm of the chimney are thoroughly cleaned of dirt and degreased.
- The resulting solution is used to cover the gap between the pipe and the slate. Everything is standard on the bottom and sides: the solution should extend slightly onto the pipe in order to better adhere to it. But at the back you need to fashion a small hump from the mixture with a sharp “ridge” in the center and smooth slopes. This is necessary so that the snow does not accumulate behind the pipe, but appears to be cut and slides down the sides.
- With hands dipped in water, smooth out the solution so that there are no ledges or roughness that could interfere with water drainage or snow removal.
Asbestos mortar is very cheap and can easily withstand temperatures of more than 1000 °C, so it can be used to cover the gap between the pipe and the roof of the bathhouse without fear that the mixture will crack due to heating. In addition, asbestos mortar has excellent adhesion to slate and is resistant to caustic substances and temperature changes. But it has three main disadvantages.
Firstly, the joint between the pipe and the roof should not be very wide. Otherwise, when puttying, the mixture will simply fall through the gap. Even if you manage to hammer a wide gap, the solution will begin to crumble over time, which will lead to leakage.
Secondly, the solution stuck to the pipe looks ugly. If we are talking about a bathhouse or an outbuilding, then this may not matter, but sealing a chimney on the roof of a house is a completely different matter.
Thirdly, the knot is not very reliable. A small mistake in mixing the solution or applying it is enough for the roof to leak at the first rain. But even if the technology is followed, the service life of the connection is unlikely to exceed 15 years. Again, this is acceptable for a bathhouse, but not for the roof of the main house.
Apron made of galvanized metal or stainless steel
Another inexpensive way to seal the gap between a slate roof and a round chimney. However, unlike asbestos mortar, this method is suitable for all types of non-metallic roofing.
A steel apron or pipe penetration is a base made of a flat steel sheet to which a cone with a cut off top is welded. The cone is placed on a round chimney and sealed, and the base is attached to the roofing. The result is a reliable and durable unit, which, if installed correctly, can maintain tightness for decades.
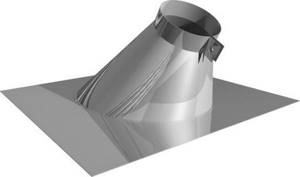
This is what a stainless steel apron looks like for sealing the passage of a round pipe through a pitched roof
Sealing a roof pipe with a steel flashing is done in seven steps:
- The slate and pipe are cleaned of contaminants and, if the roofing pie with insulation has not yet been installed, washed with a stream of water.
- An apron is placed on the pipe so that the base is pressed tightly against the roofing and goes under the ridge. If the pipe outlet is far from the ridge, then the steel sheet is increased to bring its upper edge under the ridge strip by at least 60 mm. This must be done, otherwise the joint between the pipe and the roof will leak, no matter how much sealant you use.
- The base is screwed to the sheathing using roofing screws with an EPDM rubber gasket to protect the joints from leaks. For the same reason, screws are screwed into the top of the wave. Before screwing in the screws, it is necessary to drill holes in the slate so that it does not crack.
- The side edges of the base of the apron are bent with a mallet so that they fit snugly against the slate and coated with polyurethane or silicone sealant.
- A clamp is installed on the pipe and clamped at the transition point between the apron and the chimney.
- The clamp is carefully sealed. For better protection, you can place a collar with a “skirt” close to the clamp, which will cut off water from the connection.
- A sealant is placed or foam is blown into the holes formed between the base and the slate waves.
Like asbestos mortar, this sealing method is also suitable for sealing joints between the chimney pipe and slate. The main thing in this case is to use a high-temperature sealant.
It is advisable that the apron be made of stainless steel - this way its service life will be counted for decades. Galvanized steel is also acceptable, but then the pipe passage through the roof will most likely have to be repaired or redone in 15-20 years.
Advantages of a steel apron for sealing slate roofing:
- cheapness;
- durability;
- relative ease of installation;
- resistance to high temperatures;
- ease of repair and restoration.
Disadvantages of this method:
- Insects, birds and rodents can settle in the lower part of the pipe between the base of the apron and the slate;
- without placing a base under the ridge, leakage is guaranteed;
- increased likelihood of freezing due to the difference in thermal conductivity between slate and metal.
Why do leaks occur?
The question of how to repair holes in heating pipes will be much easier to answer if the main reasons for their appearance are specifically identified. As a rule, leaks in domestic heating systems occur due to:
- Corrosive effects of thermal agents and the external environment. Corrosion of metal pipelines occurs due to condensation, which penetrates into unprotected places of communications, where it causes gradual destruction of the metal.
- Violations of installation and connection technology. The weak point of metal communications is welds, as well as areas around connections and joints. Metal-plastic and polypropylene may lose their tightness due to inconsistencies in the parameters of the system elements, as well as errors during their installation and connection.
- Non-standard operating modes. Incorrectly operating heating units, worn-out fittings, low or, conversely, too high pressure in the system are quite capable of causing a leakage of the thermal agent.
- Mechanical damage. Neither metal nor, especially, metal-plastic or PP pipe will withstand intense physical impact. That is why heating communications and equipment are located hidden or in areas with low access intensity.
Helpful advice! The leak must be repaired for at least the remainder of the operating period, or at least for the time required to call and have a plumber arrive. This should be the main criterion for choosing what can be used to seal holes in heating pipes. After all, a major overhaul of the system will be possible only after the end of the heating season. All other measures are considered temporary.
Connections need to be checked first.
Sealing cracks near the pipe on the roof made of ondulin and bitumen shingles
Unlike slate, special transition elements are produced for ondulin and soft tiles. With them, sealing the chimney on the roof is greatly simplified and comes down to installing these elements in the correct order. Although there are some subtleties here too.
Sealing a round pipe
A ventilation pipe on the roof, when passing through bitumen-based roofing materials, is formed in just a few minutes using one passage element. For ondulin, installation is carried out in five steps:
- The passage element is installed on the pipe or at the place of its future installation, with an overlap of 17 cm or more on the bottom layer of ondulin.
- Approximately in the middle of the overlap, the passage element is attached to the sheathing at the top of each wave, except for the two outer ones.
- On the sides of the passage element, sheets of ondulin are laid and secured with an overlap in one wave.
- Another sheet of ondulin is laid and secured on top of the passage element with an overlap of at least 17 cm.
- The ventilation pipe is completely assembled and secured to the passage element with four self-tapping screws.
Sealing pipes on a soft roof using a pass-through element is even easier:
- The passage element is applied to the roof and the location for the hole is marked.
- Place a cardboard template over the intended hole and trace it.
- A hole is cut along the outer line.
- A continuous layer of sealant is applied to the edge of the passage element, after which it is installed on the hole and secured with self-tapping screws.
- The last step is to install the pipe itself.
The installation process is clearly shown in the video:
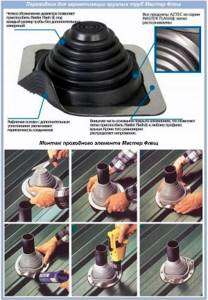
If you are looking for something to seal the gap between the heating pipe and the roof, then standard plastic elements will not work. To do this, you need a flexible adapter Master Flash - an elastic cuff in the shape of a stepped cone with an aluminum fold along the contour, which reliably seals the joints. Since there must be a fairly large distance between the pipe and the roof so that the bitumen coating does not simply melt due to high temperature, choose adapters with a large area. The base of the passage element must cover at least 40 mm of roofing on each side.
Master Flash is usually placed on a ready-made pipe, but without an installed aerator, if it is provided for by the design:
- Several steps are cut on the adapter so that the diameter of the hole in it is slightly smaller than the diameter of the pipe.
- The adapter is placed on the chimney and its lower part is traced along the contour.
- The base is left flat for a soft roof or given the shape of ondulin waves - it should fit closely to the roofing.
- Before sealing the joint between the pipe and the roof, the roofing covering is cleaned of dirt and degreased.
- Silicone sealant is applied along the marked contour.
- Master Flash is fixed to the roof with self-tapping screws.
Master Flash is made from rubber that is resistant to high temperatures and ultraviolet radiation, so using this adapter it is also possible to seal a pipe on the roof of a bathhouse. But only if it is insulated.
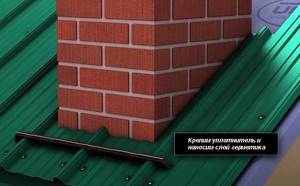
Sealing a brick pipe on the roof
The passage of a brick pipe through the roof is more difficult to seal than a round one. The joint between the pipe and the ondulin roof is covered with special aprons, and between the chimney and the roof made of bitumen tiles - with valley carpets.
Installation of a branded apron is carried out in several stages:
- Along the perimeter of the pipe at a distance of 2-3 cm, additional sheathing is made with timber.
- Before installation, the ondulin and pipe are cleaned and degreased.
- An adjacent apron is fitted to the bottom of the pipe and cut so that it extends to the same wavelength on each side of the chimney.
- The apron is placed close to the pipe and nailed to the top of each wave, except the outer ones.
- The two lower corners of the pipe are sealed with Onduflesh tape, gluing it with an overlap of one wave on the ondulin and 10-15 cm on the pipe. The excess part of the tape is cut and folded, gluing it to the apron.
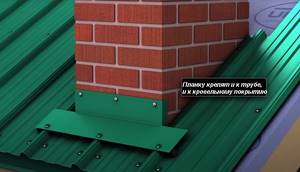
- The side strips are applied to the pipe and the cutting locations are marked: they should follow the shape of the pipe.
- The cut side aprons are attached close to the pipe to the additional sheathing bars.
- At the rear, the brick pipe on the roof is sealed with Onduflesh tape. In this case, the overlap on the ondulin should be at least 15 cm, and on the pipe - at least 10 cm. The tape must be carefully shaped into the roof covering so that there are no folds where water can flow.
- The joints between the aprons and the walls are also sealed with Onduflesh tape 10-15 cm wide.
- Metal strips are placed at the top of the aprons, screwing them to the pipe with self-tapping screws. The top of the aprons or the sealing tape should protrude approximately 5mm above the fastening strips.
- The apron and tape are folded back slightly and the resulting gap is filled with silicone or polyurethane sealant.
- A sheet of ondulin is installed behind the pipe so that it does not reach its wall by about 6 cm, and it is placed under the ridge strip.

Sealing a brick pipe on a soft tile roof is done by cutting and gluing a valley carpet:
- A triangular wooden block with a shoulder of at least 5 cm is attached around the perimeter of the pipe and a lining carpet is placed on it;
- the brick pipe is plastered and coated with bitumen primer to a height of at least 300 mm;
- patterns are made from the valley carpet, which should cover the entire pipe coated with bitumen primer, the adjacent block and 200 mm of the roofing;
- to make a pattern, apply the valley carpet to the desired side of the pipe and mark the lines of the chimney and the block on it;
- the pattern should include overlaps that will cover the corners of the pipe;
- a thin layer of mastic is applied to the finished pattern and glued to the chimney, heating it in the corners with a hair dryer;
- The front pattern is attached first, then the side ones, and the back one last;
- From above, the valley carpet is secured to the pipe with junction strips, on top of which sealant is applied.
Repairing cracks in sewer pipes
Due to temperature changes, small longitudinal cracks may appear on cast iron pipes.
To eliminate this problem, first of all, on the outer part of the pipe, the crack is slightly widened, dried and sealed with sealant. After this, the pipe is wrapped in a heat insulator.

There are cases when water seeps through through cracks.
In this case, eliminating the leak will be as follows:
- the cold welding method with two-component glue is suitable;
- After the glue has dried, we sand the seam, after which it can be painted over.
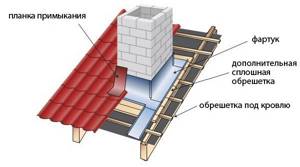
Sealing pipes on a roof made of corrugated sheets and metal tiles
Corrugated sheeting and metal tiles are related materials, so the approach to sealing the joints between the pipe and the roofing is almost the same. There are differences, but they are minor. For example, to design the upper junction of a chimney on a metal tile roof, a transition element that follows the shape of the waves on the sheet can be used. This simplifies installation a little, but due to the high cost of the transition element, a steel sheet painted in the color of the roof is usually installed instead.
As with ondulin, the method of sealing the joint between the roofing material and the chimney depends on the shape of the pipe. If the pipe on the roof of the house is rectangular, then the gap is closed with a set of steel additional elements. If it is round, then a flexible Master Flash adapter is used to seal the pipe.
If the pipe on the roof is brick
Sealing a pipe on a roof made of metal tiles or corrugated sheets is a process that can be roughly divided into two stages:
- Installation of an apron on the roof covering.
- Ensuring a tight fit of the apron to the pipe.
And for each of these stages there are two main solutions. Let's start with installing the apron.
First you need to prepare the roof:
- The waterproofing is applied to the chimney and secured to it. This is important because if there is a gap between the chimney and the waterproofing, condensation that may form on the pipe under the apron will flow directly into the insulation.
- Additional boards for sheathing are placed below and above the pipe. This is necessary so that the apron does not hang in the air. Otherwise, it may be deformed by a snow cap in winter or by an awkward installer who steps on the additional strip, for example, when installing a television antenna on the roof.
- The pipe and coating are cleaned of dirt and degreased.
An apron is installed on the prepared coating either by sealing the joints of additional elements or by folding them.
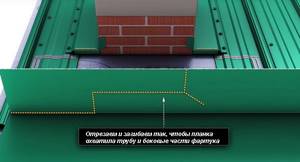
In the first case, the installation process begins with fitting the lower strip adjacent to the pipe. The corners of the chimney are marked on it, they retreat 2-3 cm from these marks towards the near edge of the plank and cut off part of the upper shoulder of the additional element along this line. An incision is made where the corner is bent and the strip is bent so that it wraps around the pipe.

Then, along the entire length of the plank, double-sided self-adhesive butyl tape is applied to the roof covering, a sealant is attached on top of it so that dust does not get under the apron and animals or insects cannot get in, a layer of sealant is applied on top of the sealant.
The connection strip is installed close to the chimney, covering the joint between the pipe and the roof. At the same time, it is attached to the brickwork with anchors, and to the metal tiles or corrugated sheets - with roofing screws with an EPDM rubber gasket. Self-tapping screws are screwed perpendicular to the sheet into the top of each wave.
The side junction strips are attached in a similar way: they are cut to fit the pipe, bent, but installed only with butyl tape and sealant, without seals. In addition, the sealant is also applied to the lower part of the apron so that it completely covers the line where the planks meet. When attaching the side planks to the roof covering, the distance between the screws should not exceed 15 cm.
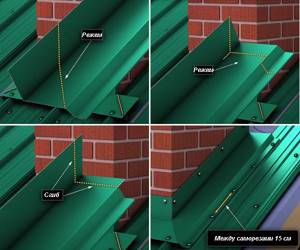
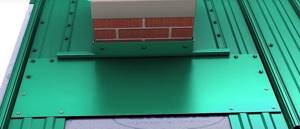
The last gap between the pipe and the roof is closed with an abutment strip with a very wide lower shoulder. It is better that it be made of steel with a polymer coating in the color of the roofing material. But stainless steel sheets are also acceptable. It is not advisable to install galvanized steel sheets - the service life of such material when installed on a roof usually does not exceed 15 years, while corrugated sheets or metal tiles last 20-50 years, depending on the type of coating. The galvanized steel sheet behind the pipe, firstly, will need to be replaced much earlier than the need for repair or reconstruction of the roof; secondly, it can become a source of corrosion and lead to premature deterioration of the surrounding roofing material.
The top bar is also cut and bent so that it completely covers the ends of the side parts of the apron. It is then attached to butyl tape laid along the contour of the support sheet.
The width of the lower shoulder of the additional element must be at least 45 cm with a roof slope of at least 15°. On flatter roofs, the upper part of the apron should be even wider, and it is necessary to additionally coat with sealant the entire junction of the plank with the roofing covering below and on the sides.
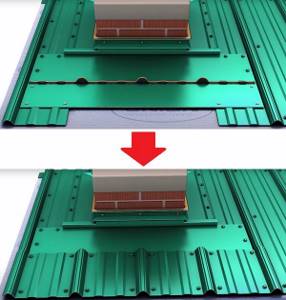
Where the abutment support sheet will be located under the top sheet of corrugated sheeting or metal tiles, the plank is secured with self-tapping screws with flat heads. This is necessary so that the fasteners do not interfere with the installation of the roofing. In the open part, the plank is secured with ordinary roofing screws.
A sheet of corrugated board or metal tile is laid on top of the upper junction strip and placed under the ridge. Before laying, self-adhesive tape is glued to the flat surface of the lower shoulder, then a sealant is glued to it and a sealant is applied to it. To get the seal exactly into the wave, the top sheet is first tried on and the corrugations are marked. If this is not done, the protrusions of the seal may not coincide with the corrugations of the steel sheet. The roofing material is fastened in the same way as on the rest of the roof.
The butt method of installing an apron is aesthetically pleasing, durable, but very difficult to implement even for professional roofers. It only takes a small mistake for the roof around the pipe to start leaking.
The seam method of installing an apron is more reliable in terms of leaks, since its main idea is to minimize damage to the planks. Compared to the butt method, this method has three features:
- The back strip is attached to the roof with clamps, not screws.
- The side strips on the end side closest to the ridge are not cut off, but are wrapped in an envelope and fastened to the rear junction with a fold.
- The front plank is also fastened to the side ones with a fold.
As a result, the apron turns out to be solid, and is held in place not only by self-tapping screws, but also by the seam connections of the planks to each other. For details on how a chimney on the roof is sealed using this method, see the video:
Although a seam apron does not require the same precision of measurements and cutting as a butt apron, it is much more labor-intensive. In addition, it is impossible to do it without special tools for bending metal, while for installation using the butt method you only need metal scissors, a marker and a tape measure. But for those who decide to seal the joint between the pipe and the roof themselves, the seam installation method is better - yes, it will take more time, but the likelihood of error is much less.
Now about sealing the junction of the apron to the pipe. You can do this in two ways:
- cut a groove in the pipe, insert the apron strips into it and fill it with sealant;
- install a special collar (set of upper junction strips) on the pipe and seal it.
Both methods are effective and reliable, but gating is now rarely used. Firstly, cutting the correct groove is difficult, especially in an old pipe. Secondly, you can accidentally make a cut that is too deep and damage the chimney. Thirdly, there will be a cold bridge on the pipe near the groove, which can lead to an increase in the amount of soot inside the chimney.
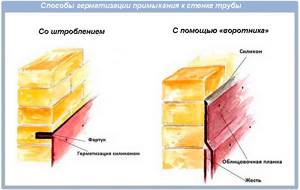
Therefore, sealing the roof pipe using a collar is much preferable. To do this, small strips with an extension at the top are placed on the pipe, which press the apron. A thick layer of polyurethane sealant is placed into this extension. It fills all irregularities and hardens, forming a durable, water-impenetrable barrier.
If the roof pipe is round
To seal the gap between a roof made of corrugated sheets or metal tiles and a round pipe, use the already mentioned Master Flash adapter. It is installed in approximately the same way as on an ondulin roof, but there are three features:
- If possible, the adapter should be attached to the corrugated sheet at the bottom and at the top of the wave. Fastenings to the side areas are best avoided if possible.
- Since it is impossible to give the base a shape that will accurately copy the corrugations of a sheet roof, master flush is treated with sealant twice: when gluing, and then again in places near the folds.
- On roofs made of corrugated sheets with a high wave height, the adapter is installed in a diamond shape.
Using an elastic adapter, you can only seal ventilation and insulated chimney pipes. For uninsulated pipes, you need to use steel clamps and sealant, which are used to coat all the junctions of the clamp with the pipe and steel sheets.
How to repair sewer plastic communications
Since plastic sewer pipes are quite cheap and not very reliable, it is not recommended to radically repair the damaged surface.
In this case, the best option for cosmetically eliminating the problem would be to seal it with a regular sealant.
As additional protection, it is possible to insert shaped parts, for example, tees.
If a leak is detected in the pipe at the junction of two sections, then you should simply replace the leaky sealing elements with new ones, not forgetting to seal the seam with silicone.
Thus, it is possible to eliminate a leak in a sewer pipe made of any materials using available materials and tools. Use our recommendations and everything will work out for you in the best possible way.
Preparatory work
When spot repairing a heating system, it is first necessary to determine the specific location of the coolant leak. If the pipeline is laid hidden (in the wall, in the floor), lined with decorative elements or equipped with thermal insulation, the task becomes more complicated.
Important! In a situation where a pipe or joint embedded in a wall has leaked, it is advisable to consider the possibility of installing a new section of the pipeline, since it makes no sense to spoil the finish of the room to repair a pipe with a high degree of wear.
In the supposed emergency section of the circuit, decorative finishing and thermal insulation are dismantled, the location of the leak is found, after which the nature and extent of the damage, as well as its accessibility to repair, are assessed.
Spot repairs of the heating system can be of three types:
- mechanical - using crimping and tightening devices, electric welding and other means not based on the use of sealing solutions;
- chemical - using various types of sealing compounds that harden as a result of chemical reactions or drying;
- combined - sealing the circuit using a combination of mechanical and chemical methods.
If a mechanical repair method is chosen and the damage is not significant (needle fistula or drip leak), the heating system can be left in operating mode before starting work to eliminate the leak. If the damage is more serious, then the heating must be turned off:
- the autonomous boiler is turned off, the coolant is drained;
- in a central heating system, it is necessary to close the valve of the common riser and hang a warning sign on it, and then also drain the water from the system.

The technology for treating the base before sealing the circuit depends on the material of the pipeline, the status of the leak and the type of repair, but, in any case, the final result of the work is largely determined by the quality of surface preparation.
Best answers
Yuri Russian:
In most of Russia, clay was always taken from cellars, ravines, and rivers. For permanent joints of a metal chimney, a sealant for car mufflers is very suitable; as an option, cold welding for car cylinder blocks (good for repairing boilers in bathhouses) and crankcases. You can also “bandage” the joints with fiberglass with gypsum dough in the “roll” type - if they don’t get too hot, a “bandage” will be made from ordinary tarpaulin (or thinned out from fire hoses), the first layer of “dough” is thicker. Perhaps ordinary gypsum or construction putty will be sufficient. Perhaps, on sale (or from friends, in heating networks, etc.) there is an asbestos cord for sealing, etc. - with the same putties (“test”). Oh, I almost forgot, perhaps the best option (I did this in the bathhouse) is baking foil, which is probably on sale (usually 10 meters in a roll) and it takes a few minutes: wrap it in several layers and wrap it with copper or aluminum wire , - this one definitely won’t crack or bounce off, and it’s easy to carefully disassemble in case of cleaning.
Is that clear and sufficient?
Olga:
They fit tightly into each other and there are no gaps. At least those that are sold for chimneys
Just love:
Go to the furnace store, they sell pipe sealant, but your pipes are not old, maybe it’s time to change them.
Sergey Krushewnickiy:
Try installing chimneys. They will protect both from moisture and from soaking the pipe itself. Here - proffigroup /dymniki-na-trubu I bought myself... I’m not complaining yet.)
Hole around the riser
A hole around the risers of communication systems does not form so often, but you still need to know the solution to such a problem.
In this case, sealing the holes in the ceiling is done as follows:
- A small gap, up to 0.5 cm wide, can be filled with silicone sealant. This material is characterized by good ductility, so it will not interfere with thermal expansion of pipes.
- If there are large holes, the work becomes somewhat more complicated. In this case, before sealing the hole in the ceiling, additional reinforcement is required, for example, with welding electrodes. Further actions involve filling the hole with polyurethane foam in several layers. Excess frozen foam is cut off with a knife and sealed with putty. If the problem occurs in a dry room, then you can use gypsum-based material. Otherwise, it is recommended to use acrylic putty.
In conclusion, it can be noted that you can repair a hole in the ceiling, regardless of the cause, with your own hands. Moreover, the work is accessible even to a home handyman without experience, if he knows how to cover up holes in the ceiling.
Chimney passage through a wooden ceiling
Proper installation of the chimney pipe through the attic floor, rafter system and roof is no less important than compliance with all other requirements when building the stove itself. The fire safety of the house, and therefore of everyone living in it, as well as the efficiency of the heating device, will depend on how reliably these components are equipped.
Chimney passage through a wooden ceiling
The passage of the chimney through a wooden ceiling must be especially reliable, since in this area the heated walls of the pipe are in close proximity to flammable materials. In order to protect the floor elements, various thermal insulation materials and special devices can be used - there is no shortage of them on the market today.
Such work must be carried out with the utmost responsibility. Therefore, in order to understand these issues, you should familiarize yourself with the current requirements of regulatory documents, consider the process of installing a chimney through the ceiling in order to carry out everything strictly according to the rules established by regulatory organizations.