Rules and nuances of operation
For a stove to be economical, it must be maintained in good condition. A crack only 2 mm wide in the valve area will provide heat loss of 10% due to the uncontrolled flow of air through it.
The stove also needs to be heated correctly. If the blower is very open, 15 to 20% of the heat can fly out into the chimney, and if the combustion door is open while the fuel is burning, then all 40%.
In order for the oven to heat up evenly, the thickness of the logs should be the same - about 8–10 cm.
Firewood is laid in rows or in a cage, so that there is a gap of 10 mm between them. There should be a distance of at least 20 mm from the top of the fuel fill to the top of the firebox; it’s even better if the firebox is 2/3 full.
The bulk of the fuel is ignited with a torch, paper, etc. It is prohibited to use acetone, kerosene or gasoline.
After kindling, you need to close the view so that the heat does not escape through the chimney.
When adjusting the draft during kindling, you need to be guided by the color of the flame. The optimal combustion mode is characterized by a yellow color of fire; if it turns white, the air is supplied in excess and a significant part of the heat is thrown into the chimney; The red color indicates a lack of air - the fuel does not burn completely, and a large amount of harmful substances is released into the atmosphere.
Cleaning (including soot removal)
Cleaning and repairing the stove is usually carried out in the summer, but in winter you will need to clean the chimney 2-3 times. Soot is an excellent heat insulator and if there is a large amount of it, the furnace will become less efficient.
Ash must be removed from the grate before each fire.
The draft in the furnace, and therefore its operating mode, is regulated by a viewer, a valve and a blower door. Therefore, the condition of these devices must be constantly monitored. Any faults or wear should be repaired or replaced immediately.
Making holes in the bottom of a large jar
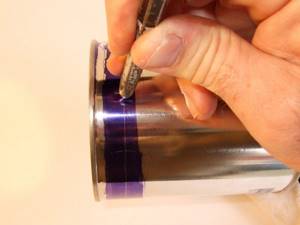
First, draw a line along the bottom edge of the can. This line is needed to mark the points for the ventilation holes. In this case, a special dye is used for marking, but nothing will happen if you do it with a simple marker.
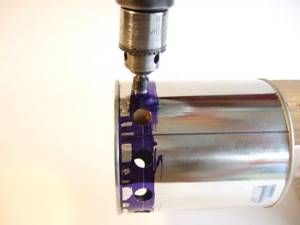
We drill holes along the line we marked. Their number and size are of great importance for the operation of the stove. If there are too few of them, there will be no traction, if there are too many, then the wood will burn out very quickly. Therefore, it is better not to overdo it here in order to be able to drill more holes after testing.
Schemes of brick mini-ovens
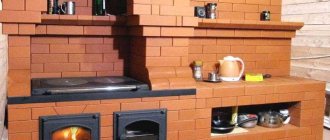
Small ovens occupy a small area; the dimensions of their bases range from 50 to 70 centimeters in width and up to 65–100 cm in length. The height of the heating structure is from 1.5 to 2.3 meters. A cooking floor, an oven, and a water heating tank are built into the oven. Stove makers have also developed devices intended only for heating a home.
Small heating structure
This is the simplest heating structure. We will analyze the model in the following sizes:
- base width - 51 cm;
- base length (depth) - 89 cm;
- height - 238 cm.
The mini-stove is installed in the middle of the kitchen or against the wall. The optimal heating area is 20-35 meters. Interior partitions are erected around the stove, which allows heating both the kitchen and the adjacent room.
Inside the device are:
- combustion chamber;
- blower;
- smoke channels leading into the chimney.
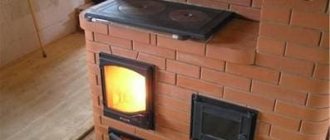
The combustion door of the mini-stove (cast iron or glass) is selected depending on the aesthetic preferences of the home owners. A door made of heat-resistant glass, through which you can see how the wood is burning, gives the structure a resemblance to a fireplace. Two smoke valves are installed in the middle and upper parts of the furnace. There is one door for cleaning the channels. To build this model of the device you will need:
- 260 pieces of ceramic bricks;
- 130 pieces of fireclay bricks;
- grate (40x23 cm);
- combustion (30x20 cm) and blower (20x14 cm) doors;
- 2 doors for cleaning holes (20x40 cm);
- metal pre-furnace sheet (50x70 cm);
- two sheets of roofing material measuring 60x100 mm;
- sand and clay (or ready-made clay-sand mixture for masonry), clay-fireclay mixture.
Reference. Masonry mortar increases the volume of the device by the thickness of the joints.
The base and top of the mini-oven are laid with ceramic bricks on a clay-sand mortar. The firebox is made of fireclay bricks on a clay-fireclay mixture.
Three and a half bricks fit on the long side of the base, and 2 standard bricks 25 cm long on the short side. The masonry consists of 35 rows in height.
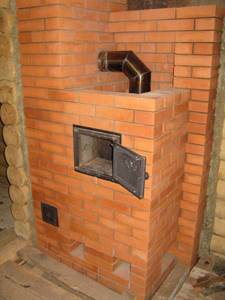
Small heating and cooking stove
This is a mini-oven model for heating and cooking - a convenient and very compact structure. The optimal area for a heated room at sub-zero temperatures is 20-25 square meters.
The device has the following dimensions:
- base length (depth) - 64 cm;
- base width - 51 cm;
- height - 215 cm.
The structure is being erected in the kitchen. The device includes:
- blower;
- combustion chamber;
- smoke channels leading into the chimney;
- cooking floor;
- niche for the oven.
The cast iron cooking floor has a hole that is closed with a disk and a circle. Solid flooring is also available for sale. In the niche for the oven chamber there is a metal oven or a hot water tank with a tap. If the niche is left free, it is used for drying things. To build a stove you will need:
- 222 pieces of ceramic bricks;
- grate (40x25 cm);
- firebox door (20x20 cm);
- door for the blower (14x14 cm);
- cooking floor (35x38 cm);
- metal oven or hot water tank;
- iron pre-furnace sheet (50x70 cm);
- two doors for cleaning holes (20x14 cm);
- two valves;
- a piece of flat slate;
- steel corner;
- clay, sand or ready-made clay-sand mixture for masonry.
A simple baby brick oven for the home
Beginner stove makers are advised to pay attention to just such a simple brick stove. The finished structure is small in size - the total occupied area is no more than 0.5 m2
Set for laying a mini brick oven
Start by preparing the devices necessary for the construction of the unit in question. You will need the following:
- red stove brick;
- fireproof brick;
- fireclay and building clay;
- sifted fine sand;
- roofing iron;
- roofing felt;
- doors for combustion, cleaning and ash chambers;
- grate;
- stove for one burner;
- valve;
- steel pipe;
- plumb line;
- yardstick;
- protective gloves;
- trowel;
- level.
Types of mini-ovens
Mini-ovens are divided into several main subgroups. Let us analyze the main classification in detail.
Material
Steel
The most affordable and popular material in the production of stoves. The main advantage is the low price and the ability to make it yourself. Homemade products will not be able to compare with industrial designs in appearance.
But in terms of performance, a home craftsman can make a design better than an industrial one. To do this, it is enough to weld several convection pipes and cover the surface of the walls with fireclay bricks.
The advantages include the low weight and mobility of steel appliances. They do not require a separate foundation, and in the summer you can equip a kitchen outside.
Cast iron
Cast iron units are the best option for small spaces. According to its properties, the material can accumulate and gradually release heat after fuel combustion.
Such devices can be easily taken out and set up as a summer kitchen in the warmer months, but you will need to find help. This design can weigh at least 25 kg.
An additionally installed container for heating water will add comfort to your small home. But cast iron is very sensitive to shocks and sudden loads.
Especially in a heated state, a slight impact can cause cracks to form. A massive and heavy structure will require an additional foundation, especially when installed on a floor made of fire-hazardous materials.
Brick
Brick mini-stoves are not very suitable for heating a dacha. Small premises in the country mean their use only in the warm season. Therefore, long breaks in operation and the stove being in an unheated, damp room are possible.
Such a stove becomes damp and begins to smoke. It will be necessary to carry out repair work and cover up all the cracks and seams between the bricks. But if there is enough space for construction and you plan to live permanently in a small garden house, there is no better option.
Such a unit can be retrofitted with a water heating tank, hob and oven. The stone accumulates heat well. The room will be heated for a long time after the firewood has burned out.
- Electric infrared stoves (quartz or halogen) allow you to quickly heat a room, but when turned off, the room instantly cools down.
- Gas burners built into metal or brick stoves are preferable to electric ones. But you will need to equip the system with automation and constantly refill gas cylinders.
- Solid fuel stoves are the best option. A homemade steel stove running on available fuel will not require large costs for the production and procurement of fuel. By spending a little more money on the purchase, you can purchase combined units that can operate on several types of fuel.
Miniature stove made from a can
This stove option is perfect for those who like to relax in nature.
The finished product has minimal weight and takes up very little space in a hiking backpack. Despite the simplicity of its design, a stove made from a can is very convenient and productive - you can boil a liter of water by spending a few small dry branches. Miniature stove made from a can
Moreover, such a homemade stove can work not only on branches, but also on leaves, cones and even hay. You definitely won't remain hungry!
The first stage is preparation of components
Prepare three tin cans of different sizes in advance. Canned food containers are perfect. From the largest can you will make the body of the stove, place a medium-sized can in the body, and from a small container you will make an impromptu burner.
Cans
Additionally, prepare scissors, a block, an electric drill and a felt-tip pen.
Wood block
The second stage is making a template
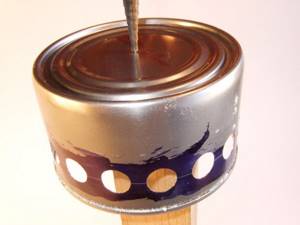
First step. Insert a wooden block vertically into the largest jar and, approximately at the level of the lid, mark a couple of lines on the wood at a distance of about 8 mm.
Insert a wooden block vertically into the largest jar and, approximately at the level of the lid, mark a couple of lines on the wood at a distance of about 8 mm
Second step. Cut a rectangular recess according to the markings, such a size that the upper edge of the container can freely fit into it.
Insert the block into the jar and draw two lines with a marker approximately at the level of the lid
Drill a hole according to the markings
Third step. Place the block so that the can rests steadily on it, and the upper edge of the large can is held in the previously prepared recess in the block.
We put the jar on the block
The third stage - preparing a large jar
First step. Draw a line over the bottom edge of the largest can. This line will serve as a marking to create ventilation holes. The line can be drawn with an ordinary felt-tip pen.
Making the markings
Second step. Drill holes along the marking line. The optimal number of holes can only be selected experimentally. Excessive ventilation will cause fuel to burn too quickly, and if there is insufficient draft, the stove will simply not be able to operate normally.
Making holes
Therefore, make a small number of holes to begin with, and then, if necessary, drill them after the initial tests of the stove.
Stage four - preparing the middle jar
Drill holes under the top edge of the middle can
Drill many holes in the bottom of a medium-sized container. Select the size and number of these holes so that the loaded fuel does not fall out in the future. As a result, the bottom of the jar will look like a sieve.
Drilling the bottom of the middle can
Fifth stage - stove assembly
Place a medium-sized jar into the largest container. The connection should be quite rigid, but not tight - a small gap is required between the walls of the two cans for air circulation.
Insert the middle jar into the large one
Stage six - making the burner
To create the burner, use the smallest tin can.
Cut off half of a small can, make holes closer to the edge, as well as one hole in the bottom
First step. Prepare holes in the side of the jar in the same way as you did with previous containers.
Second step. Cut out the bottom of the can using tin snips.
Third step. Carefully align the edges of the burner and clean them with a file.
Stage seven - checking the stove
Stacking the wood chips
Load the wood chips into the middle jar and set it on fire.
Take the main part of the stove (a middle container inserted into a large one) and load fuel into it (cones, wood chips, leaves, small branches, etc.). If possible, load dry branches directly from trees into the oven, because... Fuel from the ground may be damp.
The smallest part is the burner. We put it on top
Light the load and let it warm up. At first you may not be very good at it, but very soon you will learn how to light a stove with just a couple of matches.
We heat up the food or put on the kettle. The camping mini-stove is ready
Let the fuel burn intensely, place a burner on the stove, and a saucepan, kettle or other container on it.
An improved model of a supercharged mini-stove
Advantages and disadvantages
Advantages of mini-ovens:
- small dimensions allow installation in small rooms, taking into account the recommended distances from the walls without loss of total area;
- quality and compliance with fire safety standards make them safe for installation in wooden garden houses;
- in winter, the stoves can be easily dismantled and stored in the pantry to prevent theft;
- the quality of the materials allows the devices to easily withstand long-term interruptions in operation and being in a damp and unheated room;
- stoves – small fireplaces cost significantly less than large models. Therefore, you can buy them and enjoy the sight of a burning fire;
- simplicity of design and a small amount of materials allow you to make such devices yourself;
- With a little imagination, you can make such a little thing into an interior decoration item for your home.
The only disadvantage that can be highlighted is that little firewood can be placed in a small firebox, therefore the burning time of the firebox is reduced. This can be inconvenient, especially if you need to add fuel at night. Otherwise, the advantages of small structures are undeniable.
Making a burner
The type of burner in different designs may vary slightly. In this case, the option with round holes in the side wall is used. You have already learned how to do them well from previous operations.
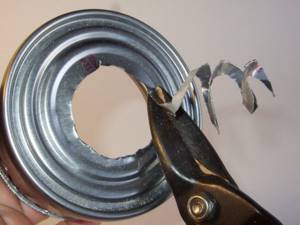
We cut out the bottom of a small jar with metal scissors.

The edges can be smoothed with a hammer and filed.
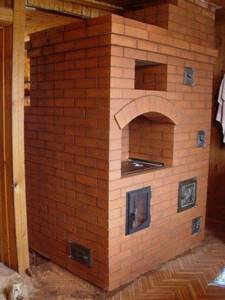
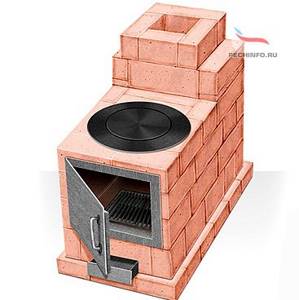
Mini-oven project with stove
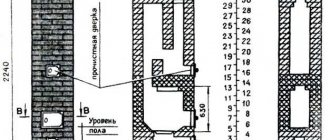
The Russian heating and cooking stove “Teplushka” with an additional combustion chamber has a power of 3.5 kW. The structure is designed for heating a small house or cottage with an area of 30-40 m², as well as cooking in winter and summer. The device of a small heater is shown in the drawing.
The mini-oven can operate in 3 modes:
- Summer move. We open valves 1, 2 and 3 (see the picture), load the firewood with firewood. The gases immediately escape through the main channel into the pipe, and the stove heats up. Damper No. 3 plays the role of a hood.
- Firebox for winter. We use the lower chamber again and close valve No. 1. Then the combustion products move through the furnace and flue ducts into the oven, exit through the channel to the front side and then into the main chimney. The entire body of the furnace is heated, from bottom to top.
- Firebox in Russian. We light firewood in the furnace, open the sealed mouth door and valve No. 3, valves 1 and 2 are closed. The smoke goes into the hailo and the main chimney, only the stove bench is heated. For full heating, close the door, open damper No. 2 - the gases will flow through the lower channels of the stove.
Thanks to its efficiency and relatively low cost of materials, a mini-stove can easily be called a housekeeper. One minus is the small size of the bed. The maximum height of the building is 2.1 m, in the area of the ceiling - 147 cm.
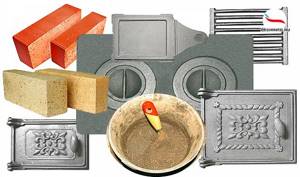
Building materials and stove fittings
To make a Russian mini-oven with your own hands, you need to buy components and materials:
- solid ceramic bricks – 670 pieces (the chimney is counted separately);
- fireclay bricks for the firebox – 25 pcs. (brand ША-8);
- fireclay block brand ШБ-94 or similar in size – 1 pc.;
- door of the main chamber mouth 25 x 28 cm, possible with fireproof glass;
- loading door 21 x 25 cm;
- ash pan door 14 x 25 cm;
- two grates measuring 300 x 250 and 220 x 325 mm;
- wooden template - circle - radius 460 mm, length - 65 cm;
- cast iron hob with 2 burners 71 x 41 cm;
- 3 valves: 13 x 25 cm - 2 pcs., 260 x 240 x 455 mm - 1 pc. (brand ZV-5);
- equal angle corner 40 x 4 mm – 3 meters;
- steel sheet 1 mm thick for a shelf in a stove;
- galvanized mesh for reinforcement, cell 3 x 3 cm - 2.1 lm;
- kaolin wool, corrugated cardboard.
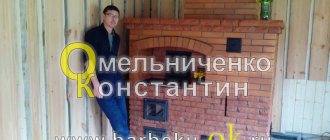
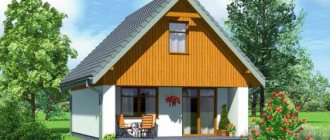
Appearance of a finished mini-stove for a country house
Red brick laying is done using sand-clay mortar. When constructing a chimney, it is allowed to add M400 cement. Fireproof stones are placed on another solution - fireclay clay, mortar and the like.
Laying progress - step-by-step instructions
A reinforced concrete or rubble concrete foundation is cast under the furnace, the dimensions of which are 10 cm greater than the dimensions of the structure. Start construction when the concrete reaches 75% strength; under normal conditions, the hardening process will take about 2 weeks. This assumes an average daily air temperature of +20 °C and proper care of the monolith.
Having installed waterproofing from 2 layers of roofing material, make the first row continuous (40 bricks will be needed). How to fold the stove according to the order, read on:
An ash chamber is formed on 2-3 tiers, a cleaning door is installed, and columns are built to support the bottom of the furnace. The 4th row continues the main walls of the stove; the ash chamber is covered with cut stones. Rows 5-6 form the main smoke channel and the bottom of the firebox made of refractory bricks. The grate is installed without mortar; a row of fireclay stones placed on edge is placed on top.
On the 7th tier a loading door and a vertical summer shutter are installed. Rows 7-9 are laid according to the pattern, at the end the fireclay brick is covered with kaolin wool (marked in green)
Please note: on the seventh tier the walls are reinforced with steel mesh.
Rows 10 and 11 partially cover the flues and the lower heating chamber; a grate for the furnace and a hob are installed. The 12th tier begins to form the main firebox, and on the 13th tier the door is attached to the mouth of the furnace.
Rows 14-17 are laid according to the diagram, corners are mounted to cover the cooking opening
On the 18th tier, steel profiles are covered, and an arched vault with a radius of 46 cm is built from wedge-shaped stones. Tiers 19, 20 are made according to the scheme, the cavity between the vault and the walls is filled with sand or filled with thick masonry mortar. When the filler dries, 21 rows are laid - the roof.
From 22 to 32 tiers the front part of the heater is built. On the 24th row, both smoke valves are placed, on the 25th - an iron shelf measuring 42 x 32 cm. Having laid the 29th tier, cover the stove with the same sheet.
To understand the construction down to the smallest detail, we suggest watching a video with a detailed demonstration of the masonry of each row and explanations from the master:
From a pipe on wood
If the trip is planned for the winter, you cannot do without a serious heating device. Any stove should not be left unattended, especially a wood stove. Purchased models of the best tent stoves are equipped with a spark arrester and an additional chamber for complete combustion of gases. It is difficult to make additional cameras in homemade structures.
If you remove the chimney not vertically, but at an angle of 30 degrees, you can increase the efficiency by 30%. A simple mesh in the chimney is used as a spark arrestor. Thanks to the installation, you won’t have to wait long for heat; the stove heats up the space instantly.
Materials and tools
When making a stove for winter fishing with your own hands you will need:
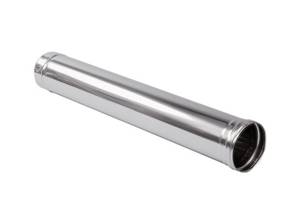
- Chimney pipe 200mm.
- Clamp for plugs 200mm – 2 pcs.
- The chimney pipe is 80mm, the length depends on the height of the tent.
- Plugs 200mm – 2 pcs.
- 80mm clamp.
- Legs from a travel chair.
- Sheet of tin.
Manufacturing instructions
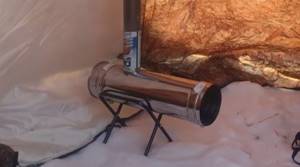
The diagram is quite general, but shows the principle of operation. The shape of the oven depends on the available materials and capabilities. If you don’t want to weld parts, you can use a simpler method described below in the instructions. Tourist stoves for tents should be collapsible and light in weight.
- Cut a suitable pipe length of 200mm, based on the size of the tent and the desired fuel load.
- Bend the edges of the plug slightly to allow free entry into the pipe.
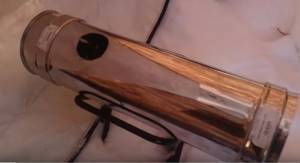
- Use a grinder to cut a hole for the chimney pipe with a diameter of 80mm. Place the hole at a distance of 10-12 cm from the rear plug.
- Try on the chimney pipe, adjust the hole if necessary.
- Cut 20-30 cm from the chimney pipe, cut the edges for riveting by 5-7 cm. This will serve as a diversion.
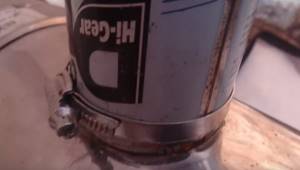
- Insert the tube into the hole and rivet it, pressing the cuts on the outside together.
- Place a clamp on the outlet; this will hold the metal in place as it expands.
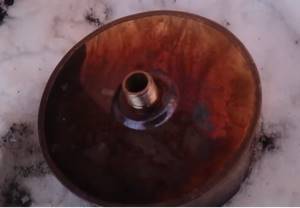
- In the second unattached plug, cut a hole for a neck with a diameter of 70 mm. From a sheet of tin, cut a piece 70 mm wide for the neck hole, and insert a twisted piece of tin into it. Drill holes.
- To regulate the blowing force, you should make a cover from an 80mm pipe. Cut a piece of pipe equal to the length of the piece of tin at the neck. Cut a circle with a diameter of 110 mm from the sheet and rivet it. Put it on the lid.
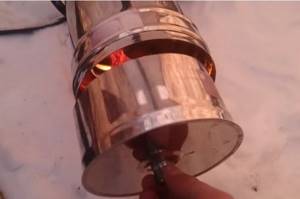
Using the lid - Place a chimney pipe of suitable length on the outlet, install the stove on the legs of a camping chair, and lead the chimney into the opening of the tent.

- Everything is ready, but due to the round shape of the oven, there is no possibility of cooking.
Operating rules
The operating rules are simple:
- The stove must not be left unattended; non-flammable materials must be placed under the structure, and the chimney pipe must be insulated from the tent. This stove will easily heat a 4*4m tent.
- After use, allow the metal to cool, pour out the ash, and disassemble the stove into parts for transportation.
- Ventilate the tent, check the draft and tightness in safe conditions before leaving.
- All openings must be precisely adjusted to prevent smoke leakage.
A stove for a winter tent is made with your own hands in a day, and lasts for several years.
Types of furnace designs
No matter how much time has passed since the appearance of the first stove designs and no matter how far home heating technologies have come, the stone stove still does not lose its relevance. Compared to other types of heating (electricity, gas), it is more economical. At the same time, thick stone walls allow you to retain heat for another day after the firewood burns out.
According to their purpose, furnaces are divided into the following types:
- heating;
- cooking;
- multifunctional;
- combined.
- The heating design is perhaps the simplest and most common. As the name implies, the function of such a stove is aimed only at heating.
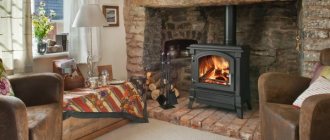
Basically, such a stove is chosen for dachas where there is electricity and a stove is used for cooking. Or home owners want to create a special country coziness with the help of a fireplace stove. The design of such a furnace consists of:
- combustion chamber, which is purchased ready-made or lined with fireclay bricks;
- an ash pit where ashes are collected;
- chimney.
This type of design also includes a fireplace with an open or closed firebox. It is used not only for decorative purposes, but also allows you to effectively heat a room of 15-20 square meters. meters.
Depending on the selected material, wall thickness, masonry scheme, heating stoves may have different heat output.
The most popular type of stove is the one-brick design. This allows the walls to be heated to 60C. The famous Dutch ovens are laid out according to this pattern.
In terms of dimensions, the heating stove can be wide and flat, or it can have an elongated rectangular shape. It all depends on the area of the room, the style of the interior and the personal preferences of the owners.
For cladding such a stove, tiles, decorative plaster, and decorative stone are usually used.
Brick heating stoves in the form of a three-sided prism look very stylish and original, but a beginner cannot implement this option, since it requires a lot of experience. The greatest difficulty is in cutting the bricks and the requirements for maintaining an angle of strictly 60.
Round stoves, which are laid out according to the design of the famous Russian furnace engineer V.E. Grum-Grizhimailo, also look beautiful and unusual. The furnace operates on the principle of free movement of gases. To ensure tightness, the outside of the structure is covered with sheet metal. Such a stove can heat a large country mansion and will become a real decoration for any home.
- Cooking stove. It is advisable to choose this option for a dacha where the owners visit only in the summer. In this case, heating the house is not needed, and if you equip the structure with an additional water tank, it will serve not only for cooking, but will also create comfortable living conditions.
Often this option is installed in country cottages where gas and electric heating are provided, but in order to save resources, owners sometimes use a brick oven.
The design of the stove consists of a brick body, inside of which there is a combustion chamber, an ash pan, and a chimney. There is a metal plate on top (an oven can be built in).
- A heating and cooking stove is already a multifunctional design.
This is a more difficult project to implement, as it consists of:
- combustion chamber;
- chimney;
- ash pan;
- hob;
- oven.
The stove looks massive and is usually chosen for dachas where there is no other heating option.
In our country, heating and cooking stoves are the most popular, allowing you to heat the house and prepare a delicious dinner for the whole family.
It can be additionally equipped with a drying chamber, where you can make preparations for the summer: mushrooms, berries, fruits. In cold and damp weather, you can quickly and safely dry clothes and shoes in this chamber.
Oven with drying chamber
By the way, ovens with drying chambers were first invented in the countries of Northern Scandinavia, where hunters and fishermen needed to dry clothes and boots in one night.
Many schemes of heating and cooking stoves have additional devices in the form of a comfortable bench, drying for firewood, an oven, and a water-heating tank.
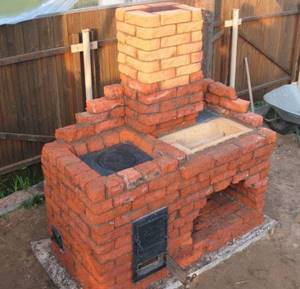
How to build a stove for a summer house with your own hands
After the foundation is prepared, it is necessary:
Start laying out the oven
Row 1 receives special attention, since the shape of the future structure depends on it. Markings are made with chalk, after which they begin solid masonry.
Next they move on to the 2nd row, which differs from the first in that it is laid out taking into account the blower door. The 3rd row is mounted taking into account the arrangement of the ash chamber. 4 and 5 begin to form a firebox and are laid out with fireclay bricks. For 6, similar building material is used. The base of the firebox is laid along with it.
Rows 7, 8 and 9 form the firebox itself. 10 plays the role of covering the oven. 11 is organized taking into account the installation of the hob. Laying out rows 12 to 16 represents the construction of chimney channels. 17 and 18 cover the hob.
19 and 20 provide for the installation of a door through which the oven will be cleaned. Rows 21 to 23 are made in accordance with the chimney diagram. 24 and 25 are laid out taking into account the installation of the metal sheet. A valve is installed on row 26. 27 and 28 are necessary for arranging the chimney opening.
Photo 3. Option for arranging a brick stove for a summer residence. In total it includes 43 rows.
Perform cladding. This procedure begins after the structure is completely laid out. Use decorative stone, ceramic tiles or red brick
During this step, special attention is paid to the fact that any material that is applied to the external part of the structure negatively affects the heat transfer
Dry the oven. This stage is necessary, since a lot of moisture from the cement mortar remains in the masonry. To do everything correctly, open the firebox door and leave it for 10 days. If the construction is carried out in the summer, then drying occurs on its own. In winter, the use of a fan is mandatory.
Attention! Strictly follow the sequence of steps described above, and the oven will turn out to be of high quality and durable! A properly prepared foundation and high-quality masonry guarantee a long operational period. After laying out, there is a need to protect the structure from environmental influences.
To do this, the external surfaces of the structure are faced with ceramic, clinker bricks or decorative tiles. Such a measure will not only protect the device, but also give the stove an aesthetic and unique appearance.
After laying out, it becomes necessary to protect the structure from environmental influences. To do this, the external surfaces of the structure are faced with ceramic, clinker bricks or decorative tiles. Such a measure will not only protect the device, but will also give the stove an aesthetic and unique appearance.
Possible difficulties
There are situations when the owners of a country house want to heat the room as quickly as possible, but nothing works out for them. It takes at least 3-4 hours for the air in the house to heat up. This problem is typical for all brick kilns. The heating process is accelerated, making the brick walls thinner. This is advisable if a small room is heated. A large amount of external cladding, such as tiles or decorative stone, worsens heat transfer.
A brick oven is not capable of heating rooms located at a relative distance from it. This problem cannot be solved by adjusting the design of one device. To ensure that the air is heated evenly throughout a large house, 2-3 stoves are installed at once in different parts of the building.
Over time, the structure is destroyed with some probability. This is due to shrinkage and seasonal soil movements.
To avoid this phenomenon, the foundation of the stove itself should not be connected to the foundation of the house.
It is important to separate these two constructs and prevent any dependency between them
During operation, deformation of the structure occurs. This happens because when heated, the fireclay brick used to lay the firebox tends to expand. To avoid such an undesirable phenomenon, when laying, a gap of 5 mm is left between the ceramic and fireclay bricks.
A serious problem during operation is the varying degrees of thermal expansion of the building materials that make up the furnace. This problem is solved by laying asbestos cord between the metal and brick components.
The destruction of masonry is also an unpleasant moment, indicating the use of low-quality clay. To avoid such a situation, building material of river origin is used, which has lain in the open air for at least 24 months.
Device Features
The functioning of the structure is carried out according to the channel principle, when the distance of passage of heated gases is deliberately extended. For this reason, they give off more heat to the body of the structure. There are simply no special physicochemical and thermodynamic nuances, so it is almost impossible to disrupt anything in the system. (See also the article Heaters for the garden: features.)
Modern small-sized stoves for summer cottages of this type are the predecessors of medieval analogues that appeared on the territory of what is now the Netherlands. The small dimensions are explained by the cramped quarters of that time. It was necessary to create a relatively small but effective heating system.
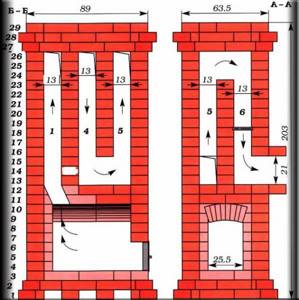
The device of the oven measures 89×63.5 cm.
Initially, designs were made with a firebox that had a solid bottom, but over time a vent was added underneath. The individual chambers began to be separated by a grate. When arched vaults fell out of use, even low-skilled craftsmen began to build systems.
Work sequence
Once you have decided and chosen the right location, pay attention to the surface. It is important that it is made of well-fixed, thick and durable boards. Place a plastic film measuring 78 x 53 cm on the site where the stove will be erected. Make a cushion of sand 1 cm thick.
First row. You need to lay 12 bricks on the sand, without making fastenings between them. Align them to the same height so that they are exactly horizontal.
Second row. We apply the clay solution in a light layer and install the door for the blower, having previously wrapped it with asbestos cardboard. We fix the door with wire.
We build the third row with refractory bricks. Now you can install a cast-iron grate for the firebox above the ash pit, but only if the row has been completely completed.
Fourth row. We place the brick on its edge in the middle of the chimney. We lay out the wall stand from the inside of the oven. We make the reverse side with a protrusion on the outside without clay mortar. These bricks can then be knocked out to clean the well. Wrap the firebox door with asbestos cord so that it can open from bottom to top. We install. We fix it with wire and temporarily place a couple of bricks. We install one at the back of the door, and the second at the top.
We lay the fifth row in a layer. We repeat the outline of the last row.
We place the sixth row edgewise. Rub the walls of the stove with a damp cloth.
We lay out the seventh row in a layer. We make a bunch of three-quarters of the brick with subsequent rows. Again we place a couple of bricks edgewise. We build a back wall near the stove.
We lay the eighth row so that it blocks the furnace door. Be sure to install a beveled brick above the firebox. Thanks to it, the flame in the oven will tend to the center of the burner on the cast iron stove.
We lay out a slightly wetted asbestos cord. We install a cast iron stove. This will create a seal between the bricks and the slab.
We shift the ninth row slightly to keep the door open.
Tenth row. We form a chimney with an extension at the back. The chimney must be straight.
Eleventh row. We fill the valve with asbestos cord, pre-lubricated with clay mortar, and install it. Now the chimney is connected quite tightly to the metal one. If the pipe leans to the side, it needs to be covered with three rows of bricks.
Clean the chimney of dirt. To do this, you need to remove bricks from the fourth row. We whiten the stove. We cover the walls and metal parts. You need to pour a small amount of milk and blue into the lime for whitewashing. It is important to thoroughly coat all seams of bricks and cast iron surfaces.
Place for the furnace
Choose the optimal location for the heating stove. For example, a stove installed in the center of the room will distribute heat as efficiently and evenly as possible. However, such placement of the stove is not always convenient.
Stove in the center of the room
If the stove structure is placed against the wall (this option is the most popular and frequently used), cold will flow across the floor of the house.
Select in advance the location of the combustion chamber door. Design the stove so that in the future you do not have to carry fuel throughout the room, spreading dirt around the room.
The heating stove is located against the wall
The best option is to install a firebox in a room that is rarely visited.
Recommendations regarding the foundation are standard - an individual concrete foundation is installed. It cannot be connected to the main foundation.
Calculate the design of the foundation in such a way that it is able to withstand the load not only of the furnace itself, but also of the smoke exhaust structure, which is also strongly recommended to be built of brick.
Why a stove?
The issue of heating is acute when constructing private houses. Of course, if you do not intend to live in it permanently, but use it only as a summer refuge from the bustle of the city, then you can leave everything as it is. But don’t you want to fry delicious kebabs even in the cold winter? There are several ways to solve the problem, the most difficult is to build a main gas pipeline or make autonomous gasification. The main disadvantage of this option is the large material investments. You can use electric heaters, but the house will still not be warm enough, plus the price of the unit itself and kilometer-long electricity bills.
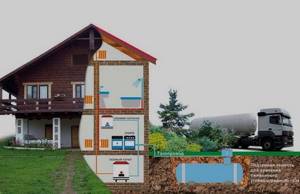
Autonomous gasification of a private house
By giving preference to brick, small cast iron or metal stoves for dachas, which are heated with affordable wood, you will solve this problem at minimal cost, especially since you can easily build them yourself. The main advantages of such devices include efficiency. You will not depend on the central gas pipeline and electricity. Wood-burning country stoves have excellent heat transfer and are very easy to use, and if necessary, you can even cook food on it. In addition, this type of heating is considered the most environmentally friendly.
But there are also some disadvantages to such designs. First of all, heating this stove is somewhat more difficult and takes longer than turning on a boiler or electric heater. True, thanks to current technologies it has been possible to completely automate the process; there are even units with a built-in mechanism for chopping wood. However, such designs are very expensive. But simpler brick stoves for summer cottages, powered by wood, lack these options, but they are easy to make with your own hands.
Brick stove for a summer residence
The next drawback is the need for space. Typically, stoves occupy a relatively large area. Plus, you need to take care of where you will store the firewood. And the last minus, no matter how economical this option may seem, you will still have to shell out a tidy sum, especially if you want the device to be not only useful, but also have an attractive appearance.
How can you paint a stove?
It is clear that a newly minted master will not be able to build a beautiful stove the first time due to lack of experience. But this is a fixable matter, because the outside of a brick wall can be covered with paint. Previously, they were plastered and covered with two layers of chalk or lime whitewash, but now there are simpler and more convenient means. In addition, lime is easily transferred to clothing by accidental touch and constantly needs to be renewed.
If we talk about how to paint a brick stove, here are the following options:
- organosilicon heat-resistant enamel of the KO brand, designed for high temperatures;
- silicate or acrylic paints;
- heat-resistant varnish (for example, PF-238) mixed with dye.
In any case, the coating is applied 2 times, the second layer is applied after the first has dried.
The tools used are a brush and a roller. It is advisable to pre-treat the surface with a special primer intended specifically for such purposes. Date: September 25, 2021
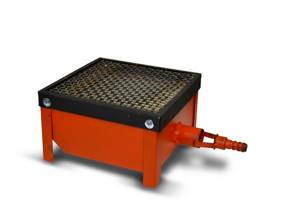
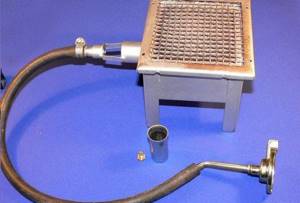
Gas infrared
In this method we will tell you how to assemble such an installation yourself, because... building an infrared burner is very difficult.
Materials and tools
For production you will need:
- Infrared ceramic burner.
- Gas cylinder.
- Oxygen hose 2 m with a diameter of 0.4-0.6 cm.
- Clamp 2pcs
- Screwdriver
- Nozzle for liquefied gas or natural gas (depending on the fuel used).
- Retaining ring
When choosing a ceramic heating pad, it is better to give preference to small models - gas is consumed more economically. The peculiarity of infrared heating is that it heats objects, not air, so if possible, it is good to have a stand under the heating pad, which will allow you to direct the energy.
Manufacturing instructions
The diagram clearly describes the principle of operation of the stove. The gas-air mixture allows you to achieve high temperatures with the least risk of fire.
Principle of operation
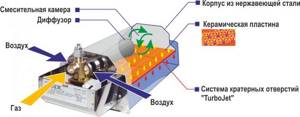
Essential elements
- Place the nozzle into the connection hole of the infrared burner.
- Attach the retaining ring on the reverse side.
- Place a clamp on the oxygen hose to prevent gas leakage.
- Connect to the nozzle, tighten the clamp with a screwdriver.
- Connect the gas cylinder to the hose, also using a clamp.
- To light the heater, you need to hold a match to the ceramic heating pad. It is forbidden to ignite gas near the nozzle. Fuel can be propane, argon and natural gas. When replacing fuel, you need to change the type of injector. The gas camp stove is ready.
Type of infrared gas stove for a tent
Operating rules
A camp stove for a tent should not only heat the space, but also serve as an assistant in cooking.
Infrared heaters are not intended for this, but craftsmen have learned to cook on the following tiles:
- You need to place the heating pad with the radiating side up, and place two stones or bricks on the sides.
- Place metal rods or skewers on the bricks.
- Place dishes on top for cooking and heating canned goods.
A 200g can will last for 2 hours, after which you need to replace it with a new one. The gas cylinder must stand upright. It is prohibited to leave the stove unattended. Ventilate the tent from time to time. The surface temperature of the ceramic heater is 800-900 degrees.
How to make a small oven: recommendations and step-by-step instructions
Before starting masonry, preparatory work is carried out. They include the following steps:
- project selection ;
- selection and purchase of materials ;
- purchase of metal parts for the stove ;
- preparation of tools , containers for solution;
- preparing a site for building a stove;
- construction of a mini-oven.
Project selection
On the Internet and in furnace textbooks there are serial diagrams of a dozen mini-ovens.
The choice is great , but if the home craftsman has no experience at all, it is worth consulting with local professionals or with people who have successfully built similar stoves. When choosing a device that you plan to build yourself, several factors are taken into account :
- area of the heated room;
- number of heated rooms;
- temperature in winter;
- frequency of use of the heating structure;
- purpose of the mini-oven;
- experience in furnace construction and repair;
- material costs .
Photo 1. Before starting construction, it is very useful to model the appearance, dimensions and order of the future stove.
If you plan to cook food , the option with a hob and oven would be preferable. The need for hot water in winter and in the off-season will close the hot water tank in the niche. In it, by removing the removable tank, you can dry shoes and other things . If the house always has electricity or a gas stove, choose a stove option without a hob and a niche for the oven.
For regions where winter temperatures drop below 20 degrees and remain at this level for weeks, a large oven with heat shields . It is not recommended a mini-stove continuously for more than two hours in a row .
The process of constructing a small-sized furnace
The small-sized oven occupies only 0.4 square meters. It is laid out from bricks placed on edge or flat. If you know the basic rules for building a stove, then you won’t even need a diagram or preliminary calculations to build it.
Due to the relatively light weight of the mini-oven, it does not require a foundation, but in this case a thick, durable board, well secured to the joists, should be used for the floor.
Order of masonry
- The first stage is traditionally choosing a place and preparing it for the construction of a furnace. To do this, you need to lay a piece of plastic film, roofing felt, hydrosol or glassine measuring 78 by 53 centimeters on the surface. Pour dry sand on top of the litter (layer thickness 1 cm) and level it.
The first row of bricks is laid out on the sand (12 bricks are used without fastening) strictly horizontally, which can be checked with a level. On top of the first row we thinly apply a clay solution and install the blower door. Pre-wrap the door with a piece of asbestos cardboard or wrap it with cord. Secure it with wire.
- We are laying the second row of our stove.
- the third row of fireclay bricks. We install a grate on it, which will be located strictly above the ash pit.
- In the fourth row, the bricks are laid edgewise. And inside the chimney, a stand is mounted on which the internal partition will be installed. When laying the back wall of the stove, do not use clay, but use so-called knockout bricks (for this they should protrude slightly outward).
- The next essential element of any stove is the firebox door. Wrap it with asbestos cord before installation. We secure the door with wire, use two bricks for temporary fixation: one on the back, the second on the first, and install the door on top of them.
- the bricks in the fifth row flat, following the contours of the fourth row.
- the bricks of the sixth row on edge, and then rub the walls of the oven with a damp rag.
- For the seventh row, we again lay the bricks flat. At the same time, in order to ensure a connection between this and the next row, you need to start with three-quarters. Then place two bricks on edge and begin building the back wall.
The temperature expansion coefficients of clay and cast iron differ significantly, so it is impossible to lay a cast iron hob on top of clay.
It is better to install an attached or nozzle pipe made of light iron. This stove provides for the installation of a direct chimney.
Installation of a mini stove
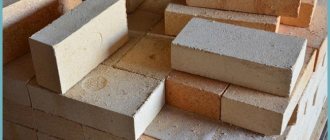
Brick is a traditional stove lining material that has been used for centuries. A mini brick oven is made specifically from bricks, but it is best to use two types of them during construction.
- To build a working one, it is often worth using fire-resistant material. It can withstand even a coal fire.
- Facing material is also quite suitable for finishing.
Making the masonry Having prepared the required amount of bricks, you can begin work, the instructions are outlined below:
First of all, you should decide on a place for the mini-oven. Its effectiveness largely depends on this. A mini brick stove for a bath will occupy an area of about 800x550 mm. You just need to lay a fireproof layer, as well as a layer of waterproofing. As a waterproofing layer, you can use roofing material, and as a fireproof layer, if the base is wooden, you can use sheet asbestos. A layer of sand about 10 mm thick is poured onto the waterproofing layer. The first row of bricks is laid on top of the sand, without using mortar. This row is leveled strictly horizontally, hammering in the exposed bricks using a rubber hammer. A thin layer of clay mortar is applied to this brick row and the blower door is immediately installed. The door is set strictly horizontally and strictly vertically, after which it is securely fixed. After fixing it, you can start laying out the second row. The 3rd and subsequent rows are laid out with refractory bricks (fireclay). After laying out the 3rd row, a grate should be installed, which should be located in the center of the blower. The 4th row is laid out in a quarter of a brick (on the edge), regardless of how the previous rows were laid out. The back wall is laid out without mortar. These bricks will be removed later. After the 4th row, they begin to install the firebox door. It is installed in such a way that it opens from bottom to top. It is attached in the same way as the blower, using wire, the ends of which are embedded between the bricks that form the rows of masonry. The door is exposed and securely fixed. The 5th row of bricks is laid out according to the 4th row, but the bricks lie flat. Then the last row of the 6th is laid out, which lies on the edge. The walls of the chimney and the inner surface of the bricks are cleaned of mortar and wiped with a damp cloth. The next row lies flat, with the back wall laid out on edge in two bricks. This row covers the firebox level and a brick is installed in this row at an angle so that it hangs over the firebox, shifting the flame closer to the center of the stove. This operation is performed on the eighth row. This brick is effective when the stove is used as a fireplace, operating with the firebox door open. The 9th row is shifted slightly back, which allows you to keep the door open. To ensure the tightness of the joints of the slab and brick, an asbestos cord is used. It is not recommended to lay a cast iron slab on clay. On the 10th row, a place for installing the pipe is formed. In this case, an attached metal pipe made of light iron is used. A brick pipe for such a mini-stove will be heavy. The valve, sealed with asbestos cord, is installed on the 11th row. Using the following rows, a part of the pipe is formed that connects to the metal pipe - the chimney. The final stage in the construction of mini-ovens is whitewashing them, but decorative tiling can be done. Unfortunately, whitewashing is not practical: the whitewashing will have to be repeated approximately once a year, but the tiles will not only decorate the stove, but will also save you from constant whitewashing. Before whitewashing, it is advisable to clean the stove of debris and carry out a test ignition. If the stove is working and there are no problems, you can start whitewashing or tiling, after which you need to give time for complete drying
This is very important and you should not rush to light the mini-stove, so as not to cause harm. You should prepare for the heating season in advance, then winter will not seem so cold.
Required tools and materials
To build a small stove you need:
- 60 pcs. red stove brick
- 37 pcs. fireclay bricks
- 20 liters of clay solution
- one vent door
- one grate
- one firebox door
- one cast iron plate
- one valve.
The tools you need to prepare are:
Design of a Russian stove
Any mistake made during the construction process leads to the fact that the entire structure has to be redone. A diagram of the laying of a Russian stove, which is attached to the drawing and can be very different, can help in this matter.
Based on their size, these heating units are divided into mini, medium and large. They are used for heating and cooking. They definitely have a bed. To build them yourself, you need to study how a Russian stove works.
If you look at the diagram of a traditional design, you can see that it consists of:
- ovens used for drying firewood are not always made;
- a cold stove for storing kitchen utensils, it may also not be there;
- pole - a niche located in front of the crucible. A hob is placed in it. If the stove is located in a different place, food is kept in the pole to keep it warm;
- hearth - the bottom of the crucible. It is built with a slight slope towards the entrance to the chamber to make it easier to move the dishes in it.
- a furnace or cooking chamber used for heat-resistant cookware and fuel. The chamber arch is similarly made with a slight slope towards the entrance. Due to this design feature, hot air collects under the ceiling, due to which the stove bench and side walls warm up;
- cheeks – the front wall of the furnace;
- oven mouths - holes between the cheeks;
- cross-pipe - a niche above which the smoke exhaust pipe begins;
- views - a window with a door that serves to block the chimney. Using it you can get to the damper that regulates traction;
- a bench located behind the chimney above the crucible. When the oven is running, it warms up.
In the diagram of the laying of a Russian stove with a stove, you can see different departments. Their presence allows you not to heat the entire room in the summer, but to use exclusively the hob. As a result, a pleasant microclimate is maintained in the house and fuel consumption is reduced. In winter frosts, all departments are heated in the stove, and then not only the oven, water and stove are heated, but also the house itself.
Before you build a Russian stove with your own hands, they carry out a number of preparatory activities, which begin with choosing its location.
Some tips for safe operation
- After a long period of inactivity, be sure to check all visible surfaces for tightness of seams. Any cracks that appear must be repaired with clay mortar.
- Before each fire, check for draft. If smoke from the furnace enters the room, the stove must not be used under any circumstances. Perhaps one of the valves is closed or the chimney needs to be cleaned.
- You can close the view only after the firewood has completely burned out.
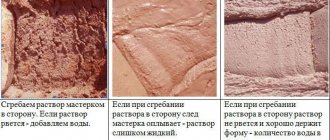
- It is recommended to remove soot from the internal surfaces of the stove at the beginning of each season. In fact, the stove gets dirty very little and after construction it will not require cleaning for several years. However, it all depends on the smokiness and quality of the fuel used.