The cost-effectiveness of insulating the facades of houses, warehouses, country cottages and other buildings has long been proven by experience in civilized and economically developed countries. In addition, facade decorative plasters, which can be used to insulate the facade, pleasantly please with their variety: Bark beetle, Fur coat (Lamb), Mosaic
and many others.
But, like any innovation, thermal insulation has managed to pick up rumors and misconceptions. The lack of reliable information on the insulation of facades of residential buildings leads to problems in the real operating conditions of the insulated facade. Also, the technology for performing work when insulating the facade is often violated. And even more often, an inexperienced end user manages to buy the wrong polystyrene foam, covet the low price of façade adhesive for polystyrene foam, choose a construction team of amateur façade designers...
It's time to dispel myths about facade insulation.
Insulating a wooden house with polystyrene foam: wonderful myths and harsh reality
The most frequently asked question regarding insulation is whether it is possible to insulate a wooden house with foam plastic from the outside? In order to answer it correctly, we need to delve a little deeper into the jungle of thermophysics.
A little about fire safety
Insulation of a wooden house with polystyrene foam from the outside is cautioned to do based on fire safety: the first polystyrene foam burned, emitting poisonous smoke. However, the production of materials for insulating facades (they are marked with the letter F) has now been launched, capable of self-extinguishing within 1 second. Therefore, fears about fire hazards became unfounded.
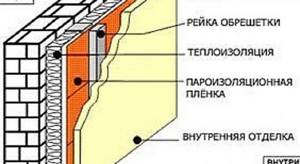
It's all about vapor permeability
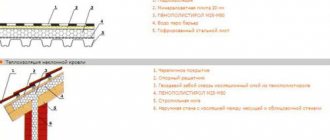
To prevent the wood of the walls from rotting after insulation, it is required that the “dew point” - the point where water vapor turns into water - does not fall on the surface or body of the wooden wall. If this happens, the tree will rot. That is, having made a calculation using a calculator, the walls of a house in the Moscow region have the following structure:
- Beam made of pine or spruce wood, across the grain - 250 mm.
- Insulation – polystyrene concrete slab PPS FG15–80 mm.
- Moisture-windproof membrane – 0.1 mm.
- The air gap is 40 mm.
- Plank cladding (similar to a ventilated façade).
We find that the wall satisfies all thermal requirements, and there are no conditions for the formation of condensation. No condensation means no rotting, which means insulation with polystyrene foam followed by finishing with plank or clapboard, walls of this design are possible.
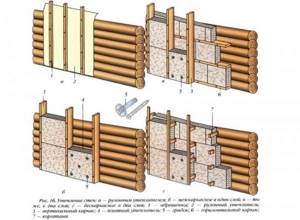
Second option: we have a house in the Moscow region made of Ø 250 mm logs, insulated using a plaster system:
- Pine or spruce log working thickness – 150 mm.
- Closed air gap (due to rounding of the log) -50 mm.
- Insulation – polystyrene concrete PPS F 20–50 mm.
- Finishing layer – mineral plaster – 8 mm.
In this case, there is 100% humidity inside the structure and rotting of the wall is inevitable. This can only be prevented by increasing the thickness of the insulation.
As can be seen from these calculation examples, external insulation of a wooden house with polystyrene foam is possible, but requires a balanced approach, and a thermal insulation thickness of 50 mm for a log frame Ø 250 mm with a working thickness of 150 mm is clearly not enough if you want your house to last longer after insulation. 5-8 years. A person who claims otherwise is a mythmaker.
From a functionality point of view, foam insulation works better when subsequently facing using a ventilated façade system rather than using plaster systems. This is due to the fact that layers of materials, as they approach the outside air, must have greater vapor permeability.
The vapor permeability of moisture and windproof membranes is higher than that of adhesive and finishing layers of plaster materials, and the air layer and cladding provide a 100% release of water vapor.
External foam insulation
So how can you insulate a wooden house with polystyrene foam in order to live a long, comfortable life in it?
It is necessary to follow fairly simple rules without trying to save on the necessary:
- Before carrying out work, make a thermal calculation to make sure that the thickness of the insulation is sufficient and the dew point is not in the wooden wall.
- Prepare the wall thoroughly - clean it from dust, dirt, rot, moss, treat it with a fire retardant and fungicide, check and repair all joints and grooves.
- Carry out work at minimal air humidity, in good weather; In case of possible precipitation, cover the wall with polyethylene.
- Follow the insulation technology in accordance with the recommendations of the material manufacturer.
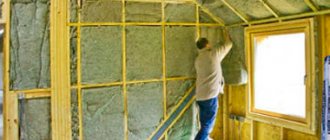
Insulation work does not require special skills and is available to any homeowner. All you need is the ability to use a building level, a stapler and a drill.
Insulation using lathing is the simplest option. Boards with a thickness of 40 mm, a width equal to the thickness of the insulation, are attached to the wall along the entire height of the facade. The distance between them is equal to the width and length of the foam board minus 5 mm. The slabs are installed side by side, without gaps. If necessary, the seams are filled with insulation scraps or polyurethane foam. The slabs are secured with anchors, at least 5 pieces. on the stove.
The moisture and windproof membrane is mounted from bottom to top with gaps of 10–15 cm between the panels using 40x40 wooden blocks to the sheathing boards with special nails.
The finishing cladding is carried out, attaching it to the bars.
Conclusion
Despite the low price of the insulation itself, insulating a house costs money, and not little. Doing the work yourself will save a significant amount, but let this be the only reason for saving. Only high-quality materials and step-by-step implementation of all work will make it possible to insulate a wooden house from the outside and make life in it comfortable - and this is a harsh reality.
Installation of foam plastic on the wall
The technology for installing foam plastic is that first the foam plastic is glued to the wall, and then it is also nailed down with plastic mushroom dowels to ensure fastening strength. They usually glue from the left corner of the wall. When a private house is insulated, the first row on the left is placed on an already installed ebb, and when a “wet” facade is being installed in a high-rise residential building, for example a panel building, foam plastic is installed on the so-called starting strip. If it is not touched up, the foam may “go down”.
Required tools and materials
These are two spatulas, one wide, the other narrow. The narrow one is needed to remove the glue from the bucket where it is poured. The wide one is needed for applying glue to the walls. You will very likely need a fine tooth saw to cut the foam sheets.
You will also need the glue itself. It is specifically for gluing foam plastic, and not some other material, so as not to destroy the structure of the sheet. There are two types of glue: only for foam plastic and universal, which can also be used to glue a reinforcing mesh to a sheet and create a leveling layer. The first one is much cheaper. The combination of two types of glue will provide significant savings.
Glue the foam onto the slopes and to the wall, smear the joints of the foam sheets, coat the mushroom dowels on top.
On corners, slopes, walls, for gluing the mesh and applying a leveling layer, you need universal glue. The consumption of both types of glue can be 4-6 kg/m2 of foam. Or less if the wall is initially flat.
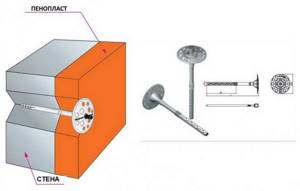
Mushroom dowels are needed to finally secure the foam sheets to the wall. When insulating facades, it is better to use mushroom dowels with a plastic rather than a metal rod due to lower thermal conductivity.
To install the mushroom dowels, you will need a hammer and a drill; to apply the mesh and universal adhesive-leveling layer, you will need the widest spatula - about 300-350 mm or even wider. To sand the leveling layer itself, you will need a plastic grater and sandpaper with a grain size of 400-500.
Method of gluing foam plastic to the wall
The glue is filled with water according to the manufacturer’s recommendation - stirred with a mixer or drill with a special attachment. According to workers, it is easier to work with glue when it is thicker than the manufacturer recommends. In case of strong unevenness of the wall, more glue is applied to the recesses, and correspondingly less is applied to the protrusions.
The glue is spread on the foam approximately as in the photograph, retreating 30-40 mm from the edges.
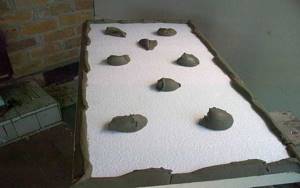
Then they apply the foam to the wall and press it to fix it, but not too hard. The glue that has come out from under the joints of the sheets should be selected for economy and better alignment.
When laying the second row, the foam sheets are placed offset relative to the first row, and so on for the next rows.
It is better to carry out the work in sections in order to move the scaffolding less and keep the foam exposed to ultraviolet radiation less.
Nailing foam
3 days have passed since gluing. Using plastic mushroom dowels of the appropriate length, we begin to nail sheets of foam plastic to the wall. We choose the length of the mushroom dowel taking into account the fact that it should go into the wall by 40-50 mm.
At the tops of the rectangular foam boards (T-shaped joints), 4 holes are drilled and one in the center, for a total of 5 holes. They are drilled 20-30 mm deeper than the required depth.
A mushroom dowel is inserted into the hole that we drilled and hammered in until the cap fits snugly. The cap is recessed into the foam by about 1 mm to reduce the consumption of universal glue for the leveling layer.
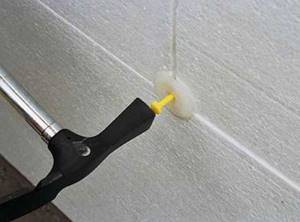
Be sure to seal the seams and mushroom caps
If the edges of the foam stick out, they need to be cut off before sealing. If the surface of the foam is uneven, it is leveled with special trowels for foam. To prevent cold air from entering the seams between the slabs, they are rubbed. You can use regular foam glue. The mushroom caps are also covered with glue at the same level as the surface of the foam. The glue should not protrude anywhere. If there is protrusion, use 400-500 grit sandpaper to rub off the surface until it is completely dry.
Pros and cons of expanded polystyrene
It is necessary to understand that styrene, which is a by-product from the oil industry, is used to make the material. Therefore, it cannot be said to be an absolutely environmentally friendly material. It is produced only industrially; artisanal and home production of polystyrene foam boards is impossible.
However, extruded polystyrene has a number of significant advantages:
- low cost compared to other insulation materials;
- high thermal insulation rates due to the dense structure;
- low weight and good compression resistance;
- has excellent soundproofing qualities;
- moisture resistance;
- a wide choice depending on its characteristics: density, thickness, surface structure, end edges (straight or groove), color palette;
- able to interact with various adhesives, lime, gypsum, cement, salt, bleach, water-based paint;
- does not rot (decomposition of the material in the ground can exceed 10 years);
- fire resistant (fire temperature is 2 times higher than wood);
- durability (manufacturers guarantee a period of operation from 15 to 60 years);
- no need to use special tools for cutting and installation.
The material is created artificially and has no natural origin. It contains many chemical additives and compounds that are unknown to the average consumer, so in addition to its advantages, polystyrene foam has disadvantages:
- reacts negatively to ultraviolet radiation, from which the structure is destroyed over time and the original characteristics are lost;
- reacts negatively to gasoline, fuel oil and various types of solvents;
- susceptible to destruction by termites and rodents;
- in case of combustion, a gas is released, which is many times more dangerous than carbon dioxide (it is fatal for humans).
What is this material and its advantages
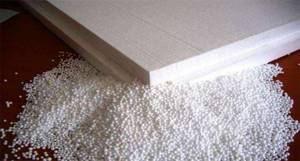
Polystyrene foam is produced by foaming and pressing polystyrene. The result is a slab that consists of many bubbles filled with air. Thanks to this structure, the material has gained popularity as insulation.
It has several positive characteristics:
- Little weight. The design does not load the main structure and problems rarely arise during transportation.
- Good level of thermal insulation. 1 cm of material transmits less heat to the outside than 7 cm of red brick.
- Affordable price. The cost of polystyrene foam is the lowest compared to other insulation materials.
- The material does not shrink even after prolonged use.
A close “relative” of polystyrene foam is extruded polystyrene foam (EPS), which is produced in an extrusion autoclave. It is also used to insulate buildings.
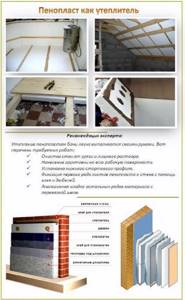
Stages of do-it-yourself foam insulation work
treat with antiseptic compounds
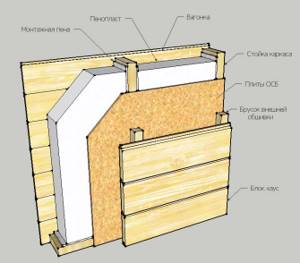
- To install a ventilated facade, it is necessary to make a vertical sheathing. To do this, wooden boards are nailed to the walls so that the insulation fits as tightly as possible, the distance between them is 5-8 mm less than the width of the boards.
- A vapor barrier film is stapled onto the top of the sheathing.
- Counter-lattice slats are placed on the vapor barrier, which serves to create a ventilation gap between the wall and the insulation.
- Foam plastic is placed between the racks, which should fit tightly to the slats. The gaps between the plates must be filled with foam.
- A diffuse membrane is laid on top of the insulation. The smooth side of the material should face the wall. The membrane ensures good air circulation and removal of excess moisture from the house.
- The joints between the sheets are taped with adhesive tape.
- The last stage is cladding with decorative material. Siding, facade panels, lining, etc. can be used as finishing.
When externally insulating a log house with polystyrene foam, which due to the natural roundness of the logs has uneven walls, a two-layer sheathing is made. To do this, first install vertical posts, and then, after laying thermal insulation boards in them, they are additionally secured with horizontal guides. This fastening ensures a tighter fit of the insulation and makes the structure even more reliable.
When thermally insulating a log house, there is no need to install a counter-lattice, since a natural air gap is created between the logs and the insulation.
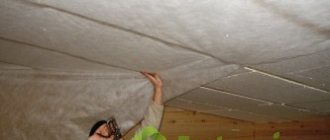
Internal insulation
Sometimes there is no way to insulate from the outside. Either it is forbidden to damage the historical facade of the building, or the neighbors will be against it, or for some other reason, but it is impossible to make external insulation with foam plastic. The only option left is internal insulation. But builders are almost unanimous in their opinion - you can’t do that! Why?
Firstly, even a small fire can lead to the release of very harmful substances from the foam. The reasons may be different: faulty electrical wiring, household appliances, etc. The question arises: why are such risks necessary?
Secondly, some experts claim that harmful substances (styrene) are released even at room temperature. Scientific research does not confirm this fact; polystyrene foam is considered a non-hazardous substance; even disposable tableware and food trays are made from it. But this is high-quality certified foam. Are you confident in the product you buy in your region?
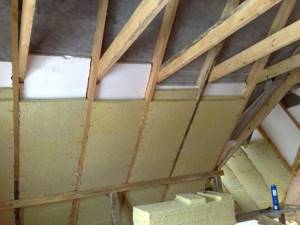
How to insulate a roof with foam plastic?
The roof is perhaps the only place in the house where foam insulation will be the best compared to other types. The advantages of this roof solution are:
- polystyrene foam will keep warm in cold weather and cool in hot weather indoors;
- unpleasant odors will rise upward;
- when wet, the slabs will not lose their properties;
- no load on the rafter system due to the light weight of foam boards;
- ease of attachment to rafters;
- the insulation needs to be laid in the cavity between the rafters, this will save space;
- high fire safety indicator, since the slabs are covered with a roof on top;
- affordable price of material.
Also, if you choose this type of insulation, remember that non-residential premises should be insulated on both sides. In addition, foam plastic will be indispensable for roof insulation, especially based on materials such as:
- profiled sheet;
- ondulin;
- metal tiles.
Characteristics of expanded polystyrene
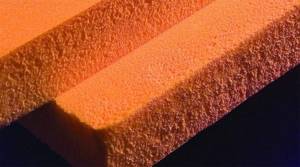
Extruded polystyrene foam is a product of mixing polystyrene with a substance based on carbon dioxide and light freons.
This mixture is heated and passed through a special apparatus - an extruder. This equipment promotes good mixing and foaming of the mixture. This composition is then formed into sheets, which, when hardened, form a lightweight porous material.
Insulating walls with expanded polystyrene is much more effective than with polystyrene foam. This is explained by the fact that foamed polystyrene has a granule size of 2-8 mm, connected to each other by heated steam. Extruded polystyrene foam is subjected to heat treatment while still in a liquid state, due to which the material acquires a solid, durable structure.
Expanded polystyrene has the following properties:
Technical characteristics of polystyrene foam boards.
- Low thermal conductivity: 0.03 W per 1 cc. This high ability to retain heat is explained by the fact that this material consists of 90% air contained in the cells.
- Ability to withstand heavy loads: 35 tons per 1 sq.m.
- Resistance to temperature changes, humidity, precipitation, direct sunlight.
- Chemical resistance: does not rot, is not destroyed by insects and rodents.
- Does not allow moisture to pass through, which eliminates the occurrence of mold and swelling.
- Low vapor permeability. Insulating walls with expanded polystyrene eliminates the use of vapor barriers.
- Fire resistance.
- Long service life: up to 50 years and above.
- Environmentally friendly. Expanded polystyrene is widely used not only in construction, but also in the food industry. Containers and disposable tableware are made from this material.
Currently, the method of constructing hollow walls has become popular. Its essence lies in the fact that a sheet of insulation is placed into the cavity of the supporting structures. This allows you to save building materials and also improves the performance characteristics of the building. In this case, the insulation lasts much longer, as it is hidden from aggressive environmental influences.
Partitions inside a house are rarely insulated with polystyrene foam, since they are in any case located inside a warm room.
Application area
Taking into account the previously mentioned disadvantages, it is possible to choose the use of polystyrene foam without damaging the building. Polystyrene insulation of wooden buildings (if required) is better done from the inside than from the outside. This will protect the material from destruction and the building from defrosting. It makes more sense to use vapor-proof material in stone buildings (brick, concrete), but if absolutely necessary, wooden ones can also be insulated.
Stone and block buildings can and should be insulated from the outside. But it is not recommended to insulate wooden houses from the outside with polystyrene foam.
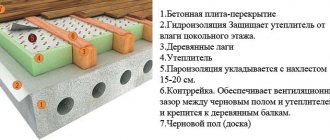
Insulation of floors
When used internally, the main area of application is the ceiling. Laying into a floor structure is also possible. But when carrying out work, the strength of the material should be taken into account.
- The first use case is common for concrete floors. In this case, the insulation is laid under a cement-sand screed. To prevent the foam from breaking through, the screed is made reinforced with a thickness of approximately 50 mm. For reinforcement, special meshes with reinforcement with a diameter of 3 to 6 mm are used.
- The second option is applicable for buildings with wooden and concrete floors. In the first case, the insulation is laid in the ceiling or floor between the beams. In the second case, you will have to make a wooden frame, with foam plastic mounted between the joists. In this case, the ceiling pie increases, eating up the useful height of the premises.
There are also two ways to attach foam to the ceiling. With or without a frame. The choice of method depends on what material the ceiling is made of and technical capabilities.
Ceiling insulation with foam plastic
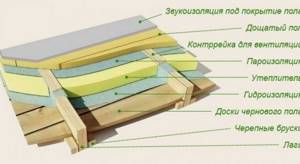
When insulating the ceiling, it is worth remembering about waterproofing and vapor barrier. Polystyrene balls are not afraid of water, but moisture can accumulate between them. Manufacturers are usually silent about this property. In this case, the ceiling should contain the following layers (they are listed from bottom to top, from the side of the warm room):
- the material with which the ceiling is sheathed;
- vapor barrier necessary to protect the insulation;
- insulation;
- floor design;
- waterproofing (sometimes mounted on top of the ceiling);
- floor of the next floor.
If it is necessary to insulate the floor, vapor barrier is also laid below, and waterproofing on top
It is important to remember that the first is always located on the warm air side, and the second on the cold air side.
Wall insulation
Foam plastic is also actively used for thermal insulation of the walls of houses from the inside. In this case, steam and water protection is also required. When performing interior finishing, it is worth leaving a small gap between it and the heat insulator to eliminate settled steam.
But it is important to remember that polystyrene foam is not the best option for walls. It has extremely low breathability, so it can create a greenhouse effect indoors
In this case, you will have to take care of installing additional forced ventilation (which is expensive).
Based on all of the above, we can generalize: polystyrene foam is an inexpensive material to protect a home, with an impressive list of disadvantages. It makes more sense to use it for floors than for walls. In a wooden building, if possible, it is better to use vapor-permeable mineral wool.
Laying a reinforcing layer
Installation of auxiliary reinforcing mesh
To prevent cracks from appearing in the corners of the openings of windows and doors, pieces of reinforcing mesh measuring 20 by 30 centimeters must be glued to these places. This reinforcing mesh is installed in exactly the same way as the main reinforcement layer.
When insulating facades with foam plastic in the lower part, up to a height of two meters, it is necessary to lay an additional layer of reinforcing mesh. It will protect the wall from destruction.
Installation of perforated corners
To strengthen the corners of the house, as well as slopes and decorative elements, corners with perforations are used. They are made of plastic or aluminum, and pieces of reinforcing mesh are attached to the edges. To secure the corners, they are coated with glue (including the mesh), and then pressed with a spatula onto the insulation.
Pre-cut the corners. The glue that comes out through the mesh and perforations must be smoothed out. In the corners, we connect the profiles together tightly, cutting off the mesh and shelves at an angle of 45 degrees.
Glued corner.
Installation of the main reinforcing layer
When the additional layer has dried and all the corners are securely fastened, you can begin fixing the main layer of reinforcement. For this, a special facade mesh made of fiberglass is used. It is alkali resistant and does not stretch. A strip of such mesh, 5 centimeters wide, can withstand a load of up to 1.25 kilonewtons.
To glue this mesh and protect the thermal insulation, a special solution is used. It has a different composition than the adhesive mixture, but is prepared in approximately the same way.
Before reinforcing, the foam boards must be sanded. This will smooth out irregularities at the junction of the insulation boards. We sand the foam with a float and coarse sandpaper. After this, thoroughly clean the surface of the insulation and apply the solution in a layer of 2 millimeters.
The reinforcing mesh is cut into pieces, the size of which corresponds to the height of the wall. Apply the solution to the surface of the walls vertically in a layer equal to the width of the mesh. To do this, we use a metal grater or grater. It is convenient to remove excess glue with a notched trowel to form grooves. Then we apply the mesh to the wall, sinking it into the solution and pressing it with a grater or a smooth spatula.
After leveling, the mesh should not be visible on the surface.
Smooth out the mesh carefully, from the middle to the edges. We distribute the excess glue on the wall plane.
As soon as the mesh is glued, we do not wait for the solution to dry and apply another layer of it, but at the same time leaving a free edge of 10 cm. Its thickness is the same as the previous one - 2 millimeters. We apply a second strip of mesh to the free edge 10 centimeters wide.
The top layer of the solution should completely cover the mesh; it should not peek out from under it. After this, all of the above steps are repeated with the second strip of the grid. The stripes should overlap each other by 10 centimeters.
We are waiting for tomorrow, and the next morning we can fill up the unevenness with putty. It's okay if it hasn't dried completely yet. But if the unevenness is large enough, you will have to wait for it to dry and then apply an additional layer of glue.
One of the thinnest insulation materials
The benefits of insulation using expanded polystyrene are difficult to overestimate. However, one of the most significant of them is its thickness. This means that the product has practically the lowest thermal conductivity coefficient.
The only material that foam plastic is inferior to is penoizol, which is a multicomponent liquid material. However, it can only be used for insulating non-residential structures.
The reason for this is the high toxicity of the material. In addition, only professional builders can work with foam insulation, but with the help of polystyrene foam, anyone can complete the finishing independently.
Glue
Most often, a special adhesive is used for polystyrene foam boards, which is a cement-based dry mixture.
If the wall surface is flat, the difference is no more than 5 mm, then you can apply a continuous layer of glue with a notched trowel.
If there are more irregularities, glue is applied around the perimeter in the form of a strip 3-4 cm wide.
Several beacons with a diameter of about 10 cm are made in the middle part of the slab. After pressing to the base, the glue should cover at least 40% of the plane of the sheet.
There is another option - polyurethane adhesive in aerosol packaging. It does not require additional preparation.
The balloon is inserted into the mounting gun, then a strip of glue is applied around the perimeter of the sheet, 2-4 cm from the edge. A zigzag stripe is applied inside the resulting rectangle. This glue allows you to install foam sheets much faster.
Work order
The text below describes the procedure for successfully insulating walls with foam plastic, both outside and inside. If you do not have an OP, we recommend hiring specialists. Approximate prices for wall insulation with foam plastic are given in the table.
Penoplex (extruded polystyrene) has a smooth surface. You can make it rough to ensure adhesion with glue in the following ways:
Ordinary polystyrene foam has a fairly rough surface and does not require preparation.
Installation of the base profile
A base profile is fixed along the bottom of the wall. It serves as the basis for the sheets of the first row, and also protects the insulation from rodents. Its size must correspond to the width of the insulation.
It is necessary to leave a distance of 2-5 mm between the profiles to compensate for the thermal expansion of the material.
Attaching foam to glue
The sheets are installed in the corners, aligned in the vertical and horizontal planes. Level and rule are used for alignment.
A cord is stretched along the upper edge of the sheets. It determines the position of the top edge of the insulation when filling the current row.
Once the sheet is in place, it must not be moved. If this is really necessary, the sheet should be removed, cleaned of glue and the entire gluing procedure must be performed again.
The sheet is applied to the wall with a slight offset from its final position.
Using a rule or a long trowel, it is pressed into the plane of adjacent slabs. Checked by level. The entire row is covered in this way.
At the corners, a serrated connection of sheets is made - sheets of adjacent rows are alternately wedged into the plane of the adjacent surface to the thickness of the insulation or a little further. After the corner is completely closed, the foam must be trimmed.
The vertical seams of adjacent rows must be at a distance of at least 20 cm from each other, that is, the seams must be bandaged.
There is a pause in work so that the glue sets securely. Usually this is three days.
Fixing with dowels
The sheets are additionally fixed using umbrella dowels, usually 5 per sheet. Their length should ensure penetration into the wall by at least 5 cm. Recesses for fastening are drilled with a hammer drill.
The dowel is driven in with a rubber hammer or screwed in with a screwdriver.
The first dowel is driven into the center of the sheet, the rest - in the corners, in the seam. The cap must be flush with the foam, the permissible protrusion is no more than 1 mm.
Completing the gluing phase
The joints of the sheets are rubbed with glue.
If there are gaps wider than 5 mm, they are foamed with polyurethane foam or sealed with strips of polystyrene foam.
If unevenness is visible, they are leveled with a foam grater.
When laying two layers of insulation, the second one is attached with vertical and horizontal overlap of the seams of the first layer. The seams of the first layer do not need to be foamed.
Fastening the reinforcing mesh
A reinforcing fiberglass mesh is fixed on top of the foam using glue.
First, the corners of the house, as well as the outer corners of window and door slopes on the first floor, are strengthened with a perforated corner, plastic or aluminum. This is done to protect against accidental damage.
If there are no corners, you can glue a strip of reinforcing mesh extending 20 cm onto each side of the corner.
Then the rest of the wall is reinforced:
The mesh is cut into strips of equal length. A 2 mm layer of glue is applied to a section of the wall according to the size of the strip. The strips are glued horizontally. The mesh is embedded in the glue layer with a wide spatula. Another layer of glue is applied on top. The stripes should overlap by 10 centimeters. The next day the surface is sanded.
If necessary, it is leveled. After 3 days the walls will dry completely. They should be primed with a mixture of quartz sand. This ensures high adhesion for subsequent coating layers
Next, the outer layer of the facade is applied, which is a decorative and protective coating. This is usually structural plaster. But you can also paint it with facade paint.
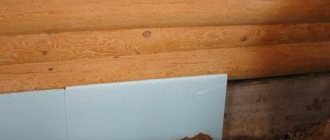
If the walls are made of wood
Some experts express the opinion that wooden walls cannot be insulated from the outside with foam plastic using the bonded thermal insulation method, because the vapor permeability of this insulation is insufficient. Such insulation can lead to dampness and deterioration of the thermal insulation properties of the walls.
They propose to make a hinged ventilated facade.

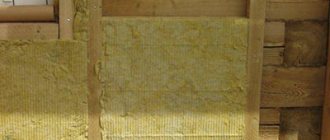
We draw your attention to the fact that sawdust and ecowool are excellent materials for insulating wooden houses.
Sawdust is inferior to ecowool as insulation, because it is not fire safe and rodents can grow in it.
However, ecowool also has disadvantages, which you can find out here.
If you don’t want to bother with insulation, build a warm Canadian house, the construction of which is described here. It is based on sip panels, which are known for already containing insulation in the form of foam plastic.
Insulation of walls from the inside with foam plastic
When using a material such as polystyrene foam to insulate the walls inside, it is necessary to take into account that there is a danger of not getting a good result. The dew point may move closer to the inner surface of the walls, then their freezing will increase.
It is necessary to make preliminary thermal calculations.
The technology of insulating walls with foam plastic on the inner surface has some features:
The entire surface of the sheet is covered with glue. This prevents the formation of air voids.
Moisture may condense in them. To level the walls, you cannot use ordinary cement mortar. Special moisture-proof mixtures are used for finishing bathrooms. Anchors are not used to avoid breaking the tightness of the layer. You can strengthen the fastening by installing between sheets of T-shaped profiles
As can be seen from the above, there are no particular difficulties in the technology of foam insulation. But the work must be done carefully. It is necessary that the insulation layer be strong and without cracks, resulting in a continuous and uniform thermal insulation shell.
Thermal insulation of a wooden house with polystyrene foam - Pros and cons
Do-it-yourself high-quality thermal insulation of a wooden house with polystyrene foam has a number of advantages and disadvantages. That beige has both positive factors and serious negative aspects. Next, we will try to consider in detail all the pros and cons of this thermal product and determine whether or not it is worth insulating a wooden house with polystyrene foam.
Advantages - advantages of polystyrene foam
Any thermal insulation of a building involves eliminating serious heat losses from the building and creating a favorable microclimate in the room. Insulating a wooden house using polystyrene foam (expanded polystyrene) has the following positive aspects:
- Relatively low cost. In comparison with other thermal insulation materials, the thermal product in question is much cheaper. In addition, you can purchase it at almost any construction store.
- Good thermal insulation characteristics. This insulation is as effective as mineral wool or Penoplex. The average thermal conductivity coefficient of the mentioned building materials is almost similar.
- Quite easy to use. The product is easy to cut. You can install polystyrene foam yourself without using special protective equipment. The insulation, to the walls of the house, both outside and inside, is easily fixed with glue and special fungi.
- Small size and weight. Delivery of expanded polystyrene is one of the clear advantages of the product. Thermal material can be transported independently. Such a positive factor will significantly reduce costs for construction activities, especially when transporting heat insulation over long distances.
Foam plastic as insulation
But still, it is worth remembering the shortcomings of the product, which greatly limit its widespread use. Next, we will analyze in detail all the disadvantages of the material.
Disadvantages of polystyrene foam
Before insulating a wooden house with polystyrene foam yourself, you need to immediately decide whether the pros outweigh the cons, of which this thermal material has quite a few. Among them there are a number of disadvantages that greatly hinder the use of heat insulators for some construction and capital structures. The main disadvantages of expanded polystyrene are the following factors:
- It is not recommended to insulate building structures where there are serious loads with polystyrene foam. The heat insulator has relatively low strength and is quickly destroyed under strong impacts. Therefore, it can be used where the product will be reliably protected from loads. For example, to insulate the ceiling from inside the room.
- Foam plastic quickly loses its original appearance and collapses when exposed to moisture and low temperatures. Therefore, thermal insulation of a basement or basement with this product is unacceptable.
- Expanded polystyrene belongs to the group of highly flammable building materials. Thermal insulation of a private house with polystyrene foam must be done in strict compliance with building codes and regulations, as well as fire safety.
- Polystyrene greatly impedes the passage of air. You can insulate a wooden house with polystyrene foam yourself. But still, you need to understand that a permanent structure made of wood loses almost all its advantages. The choice to build a house made of wood assumes not only external aesthetics, but also that the walls of the building will “breathe” well and create a comfortable, favorable microclimate. And polystyrene foam prevents the free movement of air.
To protect the material and increase the service life of the structure, you need to leave a small gap between the wall and the insulation for free air circulation. This approach will allow moisture to be removed from the structure on an ongoing basis. As a rule, this option is used when insulating the walls of a building with polystyrene foam from the inside. But creating an air gap outside is not so categorical.
Application area
Taking into account the previously described disadvantages, it is possible to accurately determine, without significant damage to the capital structure, the scope of application of polystyrene foam. If necessary, it is more expedient to carry out high-quality polystyrene insulation of wooden buildings from the inside than from the outside.
So, in the most effective and practical way, you can protect the thermal material from rapid destruction, and the building from defrosting. In buildings made of brick or concrete, it is imperative to use a vapor-proof material. Thus, it is necessary to thermally insulate a wooden permanent structure only when absolutely necessary, when other thermal insulation methods are unavailable or impossible.
Foam depending on density
When insulating a wooden house with polystyrene foam, it is important to choose it wisely. The material is also distinguished by density.
- PSB-15 is the lowest density. It is used when strength is not required. This type of foam is used in insulating carriages, attics and attics.
- The most popular type is PSB-12, it is found most often on the market. This material is universal and is used for insulating walls, floors and facades. A big advantage of this type is also its high sound insulation.
- The third type is PSB-35. You can guess that this is high-density foam. This type is used for insulating foundations or, for example, underground structures.
- The final look is PSB-50. This material has the highest density and is used, for example, in road construction or in industry.
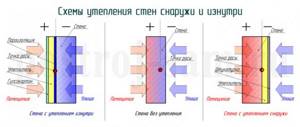
Insulation from the outside and myths about insulating a wooden house with polystyrene foam
Internal insulation is tempting because you can do it yourself, saving on calling a specialist (if you need to insulate the second or third floor of the house). However, many people forget that it contributes to:
- Loss of usable area.
- Deterioration of the internal microclimate.
- Moisture problems in the room.
In addition, internal wall insulation provides food for the most popular “horror story” about insulating houses with polystyrene foam.
According to popular belief, the low vapor permeability of polystyrene foam when insulating a wooden house can give an unpleasant effect in the form of moisture condensation.
Indeed, when the house is insulated internally with polystyrene foam, condensation does occur. And it is explained by the temperature difference.
In winter, the air in the room is heated to an average of +20. Outside the window the thermometer shows -20. The polystyrene foam installed from the inside is heated by room heat, and at the point of contact with the frozen outer wall a temperature contrast is created, which will cause moisture accumulation. And with it - the development of fungus, mold and the gradual destruction of the outer walls of the building.
Thus, insulating the house with polystyrene foam from the outside is a more advantageous option. However, it is worth noting that external insulation of a building with polystyrene foam will cost slightly more than a similar procedure using rolled materials. But in return you will receive reliability and effective heat conservation. And doing the insulation yourself will be much easier.
And this article talks about insulating a wooden house from the inside.
So is it worth insulating a house or apartment from the inside with polystyrene foam?
If you really want to make high-quality insulation at home and decide to use polystyrene foam for these purposes, then insulate it, but from the outside. Exactly outside!
Of course, this is easier to do in a private house. And if you live in an apartment, on some Nth floor, then the process becomes more complicated. Yes this is true.
But it’s better not to waste money and hire a team of high-altitude workers. They will quickly make high-quality insulation of the apartment with polystyrene foam from the outside.
It’s better this way than to live in an apartment and constantly think:
“Isn’t the polystyrene foam that we stuck on the inside harmful to us and our children?”
Features of insulation using foam plastic
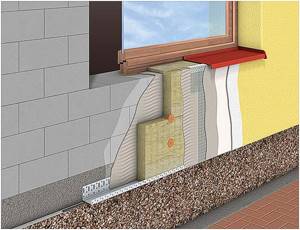
If you plan to insulate external walls with polystyrene foam, they become multi-layered. When constructing a multilayer wall, the following points should be taken into account in order to avoid operational problems later:
- the thickness of the foam layer must be calculated as accurately as possible;
- the thickness of the insulation must be optimal and at the point of contact with the wall the temperature must exceed the temperature of condensation formation;
- if moisture is allowed to form between the masonry and the insulation, the masonry will begin to deteriorate over time;
- as mentioned earlier, foam plastic practically does not allow air to pass through, so the walls cannot “breathe”. You should take care of good ventilation if you choose this type of insulation.
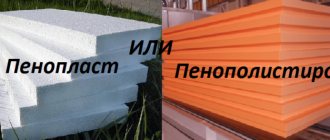
EPS or EPS (foam plastic or extruded polystyrene foam)
Insulating a facade with polystyrene foam begins with deciding the question: what is better to use, polystyrene foam (PPS) or extruded polystyrene foam (EPS). Both materials are made from the same starting material (polystyrene), but they are used in different technologies
It is hardly worth going into the intricacies of the processes; it is important to know the main differences between these two materials. So, in short:
- Polystyrene foam is softer, absorbs moisture, and insects and rodents like to nest in it. With good characteristics, it has a low cost.
- EPS is harder and denser, practically does not absorb water, insects and rodents do not like it. Its main disadvantage is its high price. In the case of insulating walls from the outside, there is another disadvantage - it requires pre-treatment (you have to scratch the surface), and this takes time.
There is another advantage of EPS - usually the slabs are made with a quarter, that is, there will be much fewer direct joints during insulation, and, therefore, fewer cold bridges. The choice is not easy, especially considering that the price difference is significant - 2 times. To make it easier to decide, several positions at EPP and PPP prices are shown in the table.
| Manufacturer/name | Density | Thickness | Sheet sizes | Price |
| PRIMAPLEX 35 (EPS) | 35 kg/m3 | 50 mm | 1200 mm * 600 mm | 4250 - 4400 rub/cub.m |
| PRIMAPLEX 35 (EPS) | 35 kg/m3 | 100 mm | 1200 mm * 600 mm | 4850-5100 rub/cub.m |
| TEPLEX 35 (EPS) | 35 kg/m3 | 50 mm | 1200 mm * 600 mm | 4450-4650 rub/cub.m |
| TEPLEX 35 (EPS) | 35 kg/m3 | 100 mm | 1200 mm * 600 mm | 4450-4650 rub/cub.m |
| URSA XPS N-III (EPS) | 35 kg/m3 | 50 mm | 1250 mm * 600 mm | 4400-4500 rub/cub.m |
| CARBON PROF 300 (EPS) | 35 kg/m3 | 50 mm | 1180 mm * 580 mm | 4500-4650 rub/cub.m |
| CARBON PROF 300 (EPS) | 35 kg/m3 | 100 mm | 1180 mm * 580 mm | 4500-4650 rub/cub.m |
| Penoplast Mosstroy 31 PSBS 25 | 17 kg/m3 | 50 mm | 1000 mm * 2000 mm | 2330-2480 rub/cub.m |
| Penoplast Mosstroy 31 PSBS 25 | 17 kg/m3 | 100 mm | 1000 mm * 2000 mm | 2330-2480 rub/cub.m |
| Foam plastic Mosstroy 31 PSBS 25F (t. 50 mm.) facade | 16.5 kg/m3 | 100 mm | 1000 mm * 2000 mm | 3000-3150 rub/cub.m |
| KNAUF Therm Wall | 25 kg/m3 | 50mm/100mm | 1000 mm * 1200 mm | 2465-2600 rub/cub.m |
| KNAUF Therm Facade Light | 50mm/100mm | 1000 mm * 1200 mm | 2850-2950 rub/cub.m |
Having decided on the type of material, you can begin installation.
Distinctive features of the material
Expanded polystyrene is often called polystyrene foam. Despite the fact that both materials are of the same nature (they are both made from polystyrene granules), there are significant differences between them. In the production of polystyrene foam, the raw materials are treated with water steam.
Extrusion technology is used in the production of expanded polystyrene. Polystyrene granules undergo two-stage processing: heat and hot steam. The result is extruded polystyrene foam - a material with a solid structure consisting of closed cells. There are no micropores in it, due to which the strength of the insulation and its resistance to external aggressive influences are greatly increased.
Detailed characteristics, as well as the advantages and disadvantages of polystyrene foam are described in the article “Pros and cons of polystyrene foam as insulation for a wooden house.” Here we will dwell in more detail on the properties of EPS.
The most famous representative of extruded polystyrene foam is penoplex, which demonstrates the best qualities of this material. Below you can get acquainted with the advantages of EPS compared to polystyrene foam.
Pros and cons of EPS and its differences from polystyrene foam
Advantages of extruded polystyrene foam:
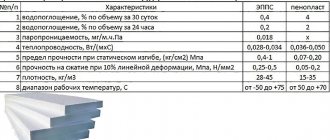
Water absorption (this parameter determines how much liquid a material can absorb per unit of time) of EPS is 0.4%, which indicates its almost complete waterproofness. The same figure for polystyrene foam is 4.0%. The thermal conductivity of the material is 0.028 W/m-K (for foam plastic it is 0.036 and higher). Thanks to such low values, insulation efficiency is achieved with a minimum thickness of the insulator, which ensures not only material savings, but also energy costs. Resistance to deformation and mechanical stress. Due to its high strength (0.25-0.50 MPa), EPS can be used for insulating foundations and blind areas. Polystyrene foam indicators are 0.05-0.20 MPa. Resistant to solvents and inorganic chemicals. Ecological cleanliness
The material is even used in the production of disposable tableware and children's toys. The insulation can withstand temperatures from -50 to +75 degrees. Light weight and thickness of the slabs, which is important for thermal insulation of horizontal structures. The service life of the material exceeds 50 years.
The above data indicate that extruded polystyrene foam shows excellent results in terms of key insulation parameters. However, this material also has some disadvantages, namely:
- UV instability. Under the influence of sunlight, the insulation loses its qualities and gradually deteriorates. When using EPS to finish a facade, it cannot be left open; it must be immediately covered with cladding material.
- Low vapor permeability, which interferes with air exchange processes in wood and leads to the formation of mold and mildew. When insulating the inside of a house, good ventilation is required, as well as the use of special vapor barrier membranes.
Mistake #10. Thinking that “all these contracts are the same”
No self-respecting company will start working without concluding an agreement. And these contracts are not at all as standard as it seems to the average consumer. Some openly describe the rights and obligations of the parties, while others contain only “protective clauses” that relieve the company of all responsibility for the work done. This is not a joke at all: some agreements really look more like a swindler’s ploy than a fair deal. The truth never fades with repetition: always read the contract before signing.
And as a bonus, here are a few more small but useful tips on facade insulation:
- insulation boards must cover at least 60% of the total surface
- The reinforcing mesh must be glued and not puttied
- optimal weather for work: dry, windless, +5 - +25C
- avoid getting glue into the joints of the insulation - these are future cold bridges
- do not delay ordering work until the fall - at the beginning of summer, craftsmen have more free time and the weather conditions are more suitable
Advantages of insulating walls outside
By insulating the room from the outside, we acquire a number of useful qualities of our home.
- You will constantly be in a fairly dry and moderately humid climate, in addition, the rooms will maintain the necessary, comfortable temperature for you.
- The improved sound insulation properties of your building will never become unnecessary for your comfort.
- The outer part of the wall will not succumb to corrosion - the house will become durable and will retain its good aura for your children and grandchildren.
- From the inside we will get rid of fungal formations and unpleasant odors.
- The next reason, and the most significant, is that external wall insulation, depending on the thickness of the layer and the quality of the insulation, allows you to save up to 70% of your hard-earned money in heating costs.
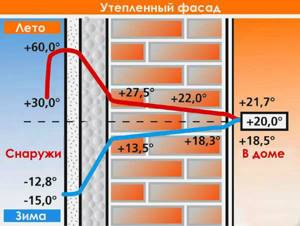
- Another useful quality is that the walls of your house will not freeze. “Wall freezing” is an eternal problem for all builders that must be constantly taken into account. There is such a thing as the “dew point” (in simple terms, this is the temperature difference at which condensation forms), and due to freezing of the walls, the “dew point” shifts to the center of the building. As a result of this, a slight, but catastrophically unnecessary temperature difference occurs inside the room. Warm air from the center of the room moves to cooler walls and corners, causing condensation to accumulate on them, destroying your drywall and peeling off your new wallpaper. We don’t need this, so we draw the right conclusions and insulate the walls from the outside.
- Among other things, insulating a wall with polystyrene foam from the outside is a less labor-intensive task than doing it from the inside of the room.
Insulating the facade is not profitable (expensive)
Those who think so are right in their own way.
After all, this is not exactly a cheap pleasure. But you get the opportunity to strengthen the walls, insulate your home, and decorate the facade in one fell swoop. And an insulated facade means the comfort and coziness of your home, the health of your family, the refined European style of your home, reliability and durability for many years. And the fact that after 5 years the same money will return to you by saving energy resources, and after that you will start “earning money”, generally renders this myth completely irrelevant. Myth No. 8.
Which foam to choose
It has been proven that density does not have a significant effect on thermal conductivity, so preference should be given to a material with a low density, for example, PSB-S-15.
This material has the following characteristics:
- It weighs little.
- Compressive strength is up to 10% and 0.05 MPa when deformed. This means that the insulation will be resistant to fractures.
- Thermal conductivity is no higher than 0.042 W/mK, which is not much more than that of other materials, the density of which is higher.
- Affordable price.
This material will be an acceptable option for insulating the outside of a house with polystyrene foam.
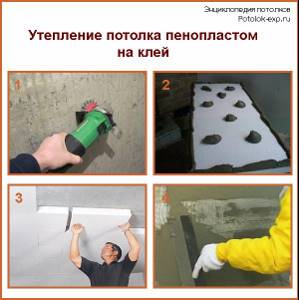
How is insulation carried out from the inside?
Situations when you need to insulate walls with polystyrene foam from the inside happen quite often. For example, if there are too many decorative elements on the façade. As for interior work, a material with a thickness of 30 to 40 millimeters, or 10 to 20 mm, is most suitable here. Typically, adhesive is used to secure the material to the inner surface of the wall. Thus, the sheets do not need to be fixed at all using other devices.
glue is diluted in a plastic container.
The surface of the polystyrene foam is slightly moistened with water, then a little glue is rubbed into the material with a trowel, causing small spots to form. The distance between them should not exceed 20 centimeters. A certain amount of glue is then applied to the spots themselves. It turns out to be a kind of flat cake. Glue must also be applied to the ends if the sheets are joined along them. But this condition is by no means mandatory.
Finally, a sheet of insulation is attached to the wall. Everything is pressed, you should tap the surface with your palm. Thanks to this movement, the glue will be evenly distributed over the entire surface. You can support the sheets with boards to further secure the structure. The gaps between some sheets are sealed after all the walls are covered with insulation. It is better to leave small ventilation openings in the sheets above windows and doors so that condensation does not accumulate under the insulation.
Why is foam plastic most commonly used?
Comparative characteristics of insulating materials
Weight of the material. Polystyrene foam is a very light material; it can be used to insulate various buildings: frame, panel, brick, block.
Lightweight foam does not carry additional load on the walls and foundation. Ease and simplicity of installation. When working with polystyrene foam, no special tools are required, the material does not require additional processing and is easily cut into fragments of any size. Resistance to moisture. Polystyrene foam does not accumulate moisture and does not absorb water when wet. The material does not rot, mold or insect pests do not grow in it. Air permeability and heat-saving properties.
Due to its porous structure and the presence of air bubbles in the structure, polystyrene foam ideally retains heat and “breathes”. Thanks to the material, a healthy microclimate is maintained in the house and a “greenhouse effect” is not created. Affordable price. Despite its undeniable advantages, polystyrene foam is an “economy class” material and has a low price. Easy to transport. Lightweight material does not require special conditions during loading, transportation and unloading.