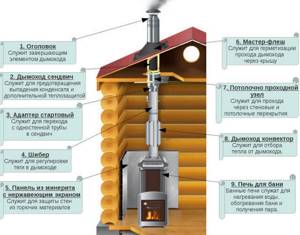
Roof sealants
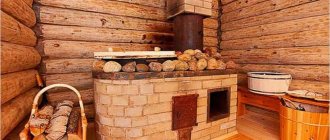
Due to the fact that the chimney and stove heat up quickly, a fire may occur.
Moreover, according to tradition, the material for the bathhouse is wood. Back in the old days, it was customary to insulate the walls, ceiling, stove, chimney with an asbestos layer, clay and other available materials that conduct thermal energy rather poorly and are resistant to elevated temperatures. So how to cover the stove pipe today? Insulation of the chimney structure is necessary both for fire safety and protection from condensation, so that cooling occurs more slowly and the smoke exhaust system lasts longer.
Red brick is not always needed for pipe lining, although it is endowed with excellent thermal insulation properties. The reason is that such a design does not match the design of every bathhouse.
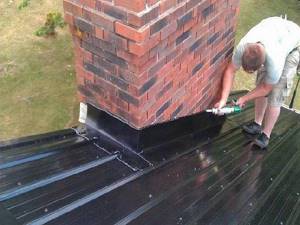
In order to seal the joints of different parts of the bathhouse pipe passage through the roof, you need to use not just a roofing sealant, but always a heat-resistant sealant. It is advisable to use a neutral silicone heat-resistant sealant.
If Master Flash is installed on a metal roof (metal tiles or metal profiles), then it is necessary to use silicone sealant that does not contain vinegar (non-acetic sealant). This is necessary so that it does not enter into a chemical reaction with the metal and does not destroy it.
Roofing silicone sealant retains its properties in the range from -50 ° C to 300 ° C, which is sufficient for all weather conditions and is quite suitable for sealing a chimney pipe.
Roof sealant must be neutral and heat-resistant
But you need to remember that the surface to be treated must be clean and dry. The time for complete hardening is indicated on the packaging, usually 24 hours.
By sealing the cracks of stove or fireplace pipes, combustion products will not enter the room through them. Reliable insulation makes using a stove, fireplace or boiler as safe as possible.
Watch video - high-temperature products for stainless steel and other materials
All sealing agents can be divided into several types:
- based on silicone or silicate;
- by composition: one-component or two-component;
- according to temperature characteristics: temperature-resistant sealants and heat-resistant.
As the name suggests, one-part sealants consist of a single component and do not require mixing of ingredients before sealing. This makes them easy to use and popular with home owners who appreciate the ease of use of the insulation product.
Two-component ones must be mixed before starting work, strictly observing the proportions specified in the instructions. In this case, the finished product should be used within several hours after mixing. This option is not suitable for sealing joints with your own hands; professional builders usually use two-component insulation.
In addition to chimney insulation, sealing compounds are also used to insulate the seams of a heating system structure based on an electric boiler when eliminating pipe leaks.
When wondering how to seal a chimney made of stainless steel, glass, plastic or ceramics, you should pay attention to fireproof silicone. This material promotes close contact of structural parts with each other and reliable insulation. The main advantages of silicone composition:
- thanks to elasticity, the quality of contact is maintained for a long time, even when, due to high temperatures, structural elements are deformed and change position relative to each other;
- after completion of the polymerization process, the material becomes very durable;
- silicone is absolutely waterproof;
- the material has a high degree of resistance to ultraviolet radiation and other weather conditions;
- Silicone is characterized by high thermal and heat resistance.
Silicone sealants come in two types:
- Acidic. They release acetic acid during hardening, which can damage the pipe or roofing. Such a remedy will definitely not help in solving the problem than sealing a chimney made of stainless steel or a material of natural origin: cement, stone or concrete, as it can contribute to the formation of corrosion of metal elements, destruction of the areas of the pipe and roof in contact with it.
- Neutral insulation products, unlike acidic ones, release water and alcohols into the environment when they harden. This is a suitable sealant for stainless steel chimneys.
An additional advantage of silicone-based products is that as a result of heating, the iron oxide contained in it turns brown, which makes the insulation more invisible against the background of a roof or brickwork.
A heat-resistant insulating agent is a better option than caulking the joints of a metal and stainless steel chimney. This is explained by the fact that silicate, which is the main component in the refractory composition, perfectly withstands high temperatures up to 1200-1300°C, and under short-term load – up to 1600°C.
Watch the video – stainless steel versus galvanization
The main advantages of fire-resistant silicate:
- the chemical inertness of the product allows it to be used for structures made of any material, since it does not react with it;
- silicate insulation is resistant to sunlight and precipitation, it can be safely used to treat areas of the chimney located in the open air;
- The top layer becomes porous after drying, making it easy to paint.
Minuses:
- upon completion of the polymerization process, the product becomes rigid: the slightest vibration or “walking” of structural elements can lead to cracks. Therefore, it is not used for pipes made of materials prone to significant temperature deformation. Only cracks should be sealed with a silicate compound, since when treating the chimney elbow, problems may arise in the future with its disassembly for cleaning;
- silicate products have rather low adhesion: the composition will not last long if the sealing area is not treated with a special composition before applying it;
- silicate-based sealant can only be applied at temperatures above 20°C and humidity not lower than standard levels. If these conditions are not met, the seam will take much longer to set.
Although all silicate heat sealants can withstand high temperatures, in order to seal those areas that will come into contact with the flame, it is better to use only non-flammable sealants labeled “fireproof”.
You should not apply silicate sealant in several layers to increase its wear resistance: this way it will not be able to dry out and will become covered with cracks. The required width and depth of application are indicated in the instructions. The silicate product adheres better to a damp surface, so before starting work it is better to slightly moisten the area where you plan to apply it.
We invite you to familiarize yourself with Installing a floor in a bathhouse with your own hands
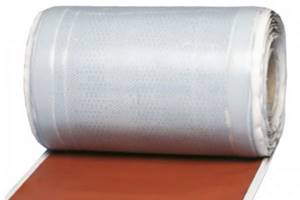
Along with liquid sealants, there is a very convenient tool that allows you to seal the joints of pipes made of materials such as plastic and metal (stainless steel) - thermal tape. Thermal tape is excellent insulation for a chimney. You just need to wrap it around the joint and heat the material. Since this is a self-shrinking sealant, when exposed to temperature, the product will shrink and tightly grip the pipe joint.
Most often, difficulties are caused by the heat and waterproofing of the fireplace, or more precisely, by leading the stainless steel pipe through the roof and sealing the joints between them. This is important not only for high-quality pipe insulation, but also to ensure that the roof does not leak.
The place where the pipe connects to the roof is called the chimney outlet. This is a key part of the entire structure that must be carefully sealed. The durability of the roof and the quality of the heating system depend on its reliability.
Even if the house does not have a fireplace or stove, and it is heated using a boiler, there is still a need to purchase a sealant for the boiler to ensure good draft and stable operation of the heating device.
Most sealing compounds are packaged in cartridges or tubes with a sharp tip, which must be cut at an angle of 45° before starting work. It is important to make a hole of the same diameter as the future seam.
Squeeze out the sealant using a standard construction gun, applying it evenly to the desired areas of the chimney. If a collapsible stainless steel chimney pipe is being treated, then the composition is applied only to the joints, so that in the future it can be easily cleaned and the elements can be disassembled for cleaning.
There are several simple rules for working with sealants:
- It is not recommended to seal pipes and other structural elements at temperatures below 5°C;
- You only need to work with gloves; if the sealant gets on your skin, immediately rinse the area with running water;
- the insulation composition requires at least a day to dry completely;
- Upon completion of the work, you should light the stove or light the fireplace to check the quality of the work performed.
Repairing chimney leaks
The roof, covered with a profiled sheet, must be equipped with several openings through which the chimney pipe and ventilation channels will be routed.
As a result, the integrity of the waterproofing may be disrupted, which will increase the risk of leaks. It is quite difficult to solve this problem if the chimney had to be routed through an already constructed roof. To ensure high-quality sealing of the areas where the pipe meets the corrugated sheet, you need to put in quite a lot of effort.
If the work is done poorly, many problems arise:
- Water begins to flow. This happens if the sealing of the joint between the chimney and the corrugated sheet is poorly equipped.
- The rafter system began to rot. After water gets inside the roofing pie, the wood from which most of the roof elements are made gets wet. As a result, the structure is deformed.
- The roofing material itself begins to rust. Corrugated sheeting is not very well protected from corrosion from below.
- Aging of thermal insulation. When insulation gets wet, its effectiveness is significantly reduced.
To increase the reliability of the roof, you need to correctly select the location of the chimney and ventilation ducts. This will make sealing the pipes much easier.
Not in all cases, the layout of the building allows the chimney to be brought out through the roof ridge. Therefore, another path is chosen - to make a hole on the slope. In this case, the work on sealing the junction becomes significantly more complicated.
The main goal is to correctly install the top element of the apron. Therefore, the main rule is to install this element under corrugated sheeting.
Attention! If the upper side of the chimney structure is more than 80 cm wide, a shaped apron with a slope is installed on it. This design resembles a breakwater that diverts water in different directions from the chimney.
Installation of such an apron is associated with certain difficulties. In addition, at the junction of its elements and corrugated sheeting, two valleys are obtained. They need to be sealed in the same way as valley roofs. This requires the installation of additional strips and increased waterproofing.
If the insulated roofing pie has already been completed, there will be many problems with passing the chimney through it. The main difficulty is compliance with fire safety requirements. At the same time, it is necessary to maintain the integrity of the vapor and waterproofing.
The chimney structure should be located at some distance from the wooden rafters. Therefore, the passage of the pipe through the corrugated roof is created in a special box, which consists of rafters located next to the chimney duct. Two beams are fixed between them. They are placed above and below the chimney structure.
The inside of the box must be filled with insulation with non-flammable properties. Typically, high-density material is used, made using basalt fiber. It has low hygroscopicity compared to conventional insulation.
To ensure the tightness of the roof, it is necessary to cut through the corrugated sheeting with an envelope for hydro- and vapor barrier in the place where the pipe passes. Its edges should be secured to the outside of the wooden box.
To cut corrugated sheeting for a pipe in the place where it will be laid, you should create a continuous sheathing. Thanks to this, it will be possible to firmly secure the lower junction strip and the roofing material near the walls of the chimney structure.
If a pipe on the roof is leaking or the roof is leaking near a stove or vent pipe, then you can eliminate the malfunction that could lead to harmful consequences on your own. To choose a method for troubleshooting, you need to determine the location of the leak and, depending on the type of pipe and roof, prepare the necessary materials.
Broken seal near the chimney
If water gets into the stove when it rains, the cause of the leak is a leak in the stove pipe. The chimney can be made:
- made of brick. Brick is the most durable material, but when constructing a chimney you should follow clear rules;
- made of metal. The most popular are chimneys made of sandwich pipes, which consist of two layers of metal separated by insulation;
- from asbestos. Asbestos is a non-flammable and relatively cheap material, which explains its widespread use.
Elimination of leaks occurs according to the following scheme:
- a solution is mixed from sand, cement and water;
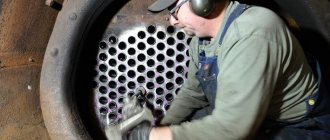
- the leak site is cleared of dirt and remnants of destroyed bricks;
Cleaning the chimney from brick residues
- Using a trowel, the prepared mixture is applied to the damaged area of the chimney.
Fixing a leaking brick chimney
To eliminate a leak in a metal pipe with your own hands, you can use:
- special clamps that are secured around the gap. The diameter of the clamp should be approximately equal to the diameter of the chimney, and the length of the clamp should be slightly larger than the size of the crack;
Devices for eliminating leaks of various sizes
- cold welding. A special mixture is applied to the leak site, according to the attached instructions.
Mixture for eliminating leaks on a metal pipe
Instructions for eliminating an asbestos chimney leak involve the following actions:
- You need to prepare cotton fabric and red lead paint. You can purchase materials at any hardware store;
Special paint for eliminating leaks
- a thick layer of paint is applied to the damaged area, protected from dirt and dust;
- the pipe is wrapped with fabric over the paint;
- a second coat of paint is applied.
If, during precipitation or melting snow, water flows down the drain pipe or chimney, then the cause of the leak is a violation of the seal at the junction of the pipe and the roof. When a roof leaks near a pipe, you can fix the problem in one of the following ways:
- applying bitumen tape;
- installation of a rubber cuff;
- production and installation of a metal apron.
Bitumen tape
If a drain pipe or chimney is leaking where the roof passes, then the simplest and cheapest way to eliminate the leak is to form an apron from bitumen tape.
Roof sealing material
To work you will need:
- ribbon;
- scissors;
- metal brush;
- gas-burner.
We suggest you familiarize yourself with How to repair a crack in slate on a roof.
You can seal the connection as follows:
- a metal brush is used to clean the roof around the pipe and the lower outer surface of the chimney (fan pipe);
- Use a damp cloth to remove any remaining dirt and dust;
- a piece of insulating tape is glued to the junction of the pipe and the roof with the bitumen layer down;
Applying waterproofing tape to the joint
- using a burner, the tape is heated and pressed against the surface of the roof and pipe;
- for greater reliability, the tape can be secured with a wooden board or block.
Rubber cuff
A more reliable method of eliminating a leak is to install a rubber cuff at the joint. For this:
- you need to purchase a special cuff;
- in the upper part, cut a hole equal to the diameter of the pipe being insulated;
- put the prepared cuff on the pipe;
- insulate the area where the cuff meets the roof with sealant;
- Screw the lower part of the cuff to the roof.
Instructions for installing a rubber cuff on a pipe
If the roof is leaking in the area of the pipe, then installing a metal apron will be a reliable way to eliminate the problem:
- An apron is made from a metal sheet, the dimensions of which fully correspond to the dimensions of the pipe going to the roof. The finished product can be purchased at a specialized store;
Metal apron for roof insulation
- the upper part of the apron is attached to the pipe using a crimp clamp;
- the lower part is fixed to the roof with self-tapping screws. To achieve the greatest tightness, the lower part of the plate is attached over the roofing material, and the upper part is tucked under the sheathing.
Scheme of correct installation of a metal apron
How to make a metal apron from scrap materials is shown in the video.
It is necessary to eliminate roof leaks as soon as possible, since the constant flow of water can lead to destruction of the chimney, damage to furniture and other property.
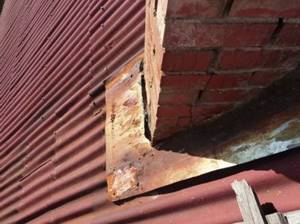
The connection to the chimney is a problem area for all types of roofing. At the point where the pipe passes through the roof, two materials with different physical characteristics converge, for example, brick and metal. The operating mode of the chimney and the roof differ: the chimney experiences temperature effects, and the roof experiences deformation from wind and snow loads. The junction unit is in difficult conditions; the junction is damaged and leaking.
Before starting work, it is important to identify the nature of the leak:
- The roof is leaking near the pipe. The pipe passage unit is not sealed, but the chimney has no defects. The problem area of the roof needs to be repaired.
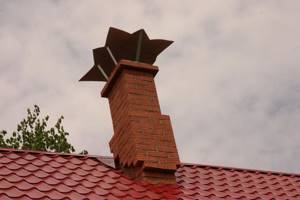
- The chimney is leaking. The cause of the leak is the destruction of the pipe and damage to the wind vane. The situation is typical for brick chimneys. Pipe restoration, masonry and plastering work is required. If the masonry is made of low grade brick, it is recommended to insulate and line the chimney to protect it from environmental influences.
There are two types of chimneys:
- single round pipes;
- chimneys and ducts of rectangular section.
Depending on the type of chimney, the repair method is selected. The joint of a round pipe is best sealed with a passage element, for example, Master Flash. The passage of a rectangular chimney is designed as an abutment, the design of which depends on the roofing material. The components and methods for their repair will be discussed further.
A simple and reliable option for eliminating roof leaks near the chimney is to use a passage element, for example, Master Flash. This method is used to pass through the roof of pipes with a diameter of 75 to 1050 mm.
The passage element is a sealing part consisting of a cuff and an elastic base. The cuff fits tightly onto the pipe. The base takes on the profile of the roofing material, is sealed and secured with self-tapping screws and sealing washers.
Before you fix a roof leak near a chimney, you need to understand the connection structure.
Seal gaps between chimney and slate roof
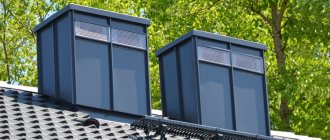
The easiest way to solve the problem of how to seal the gap between the pipe and the roof is to install an apron on top. You can do it yourself, in which case you will need to provide strips for connection to the pipe in advance. There is an easier way - to buy a ready-made stainless steel roof passage. Often round passages are made for the chimney, and they are made of stainless steel; a galvanized chimney pipe is also used, most often. The passage is placed on the pipe, and the joint is fixed with a steel clamp.
If you need to seal minor gaps formed between the pipe and the roof, then for these purposes you can use silicone sealant (read: “Which sealants for chimneys are best to use - types, characteristics”). You can find a huge variety of them on sale, but we need a heat-resistant type.
Sometimes the question arises of how to seal the gap between the pipe and the slate.
The technology provides the following sequence:
- First, a round hole is cut in the steel sheet that will be needed to finish the ridge.
- Next, a ring of sheet asbestos cement is placed on the pipe.
- For absolute sealing, so that in the future there will be no problems with the leaking pipe on the roof, the joint between the pipe and the roof is sealed with an asbestos cement solution (proportion 1:2).
- In addition, the same solution is used to fill the gap between the chimney pipe and the slate sheet. To do this, you can temporarily make a limiter out of cardboard.
On a tile roof, it is best to seal the cracks with a solution of sand and cement, which will best protect the inside of the building from moisture and precipitation.
To achieve the best moisture insulation, you will need:
- Install a galvanized collar on the roof, thus creating a place for pouring the solution.
- Pour a solution of cement and sand, making sure that it clearly fills the entire space between the roof and the chimney.
- In addition, you will need to make a surface and place it at an angle so that excess liquid flows down it.
If a heater is installed in the bathhouse, then fire-resistant bricks are used to build the chimney. It is able to remain warm for a long time.
When building a brick chimney, you should not save, but it is advisable to approach this issue very responsibly, because its durability depends on the quality of the work performed.
In this case, the best way to isolate a pipe in a bathhouse from the ceiling, roof and other roof elements is to attach sheet metal to these surfaces.
Before you learn how to clean a pipe in a bathhouse, you need to remember what the evil is that you have to fight, why soot accumulates, and how it threatens bathhouse lovers.
Bath stoves are usually heated with wood. During their combustion, oxidative reactions occur. If conditions are ideal, the carbon contained in the wood is converted into carbon dioxide - CO2. When oxygen is absent, or there is a great lack of it, carbon monoxide is produced instead of carbon dioxide - CO.
The most serious emergency that owners can expect is a soot fire. If its ignition temperature is “only” 253°, then the process itself raises it to 1100-1200°. The combustion of this black coating is comparable to a flash or even an explosion. Fireclay bricks are able to survive such a serious catastrophe; metal chimneys are not at all designed for such operating conditions.
Fortunately, for such work it is not necessary to look for a professional chimney sweep, since there are several ways to clean a pipe in a bathhouse: mechanically, chemically, or using folk remedies. If none of them brought the desired release of the chimney from black deposits, then there is only one way out - engaging a special team.
Mechanical impact is a radical method that is recommended to be used annually: at least twice a year. The operation begins on the roof and ends inside, cleaning the firebox. There is a mandatory set of tools that makes the work of a chimney sweep easier.
- A brush with flexible bristles. Its diameter must be twice that of the pipe being processed.
- A rope for tying a ruff before plunging it “into the abyss.” At the opposite end of this rope, a handle is made for turning the tool inside the sauna chimney.
- The load is a weight whose diameter is ½ the cross-section of the pipe. It is tied to the ruff to ensure its unimpeded downward movement.
We suggest you read How to build a hammam at home
Additional “helpers” in the fight against soot are hard brushes and scrapers equipped with long handles. Cleaning a metal pipe will be more effective if, at the end of the operation, you wrap a rag or old rags around the brush. Otherwise, most of the raid will remain “resting” at the conquered altitude.
Calm and dry weather is the first condition for a successful and non-traumatic operation. You can't do without a ladder. If the roof is gable, then an aerial platform is the best help. An alternative is to use a rope to tie yourself to the pipe for safety. Another mandatory attribute is a respirator, which guarantees protection from flying soot.
The bathhouse must be cold before starting the operation. The damper is pre-opened, ensuring unimpeded “fall” of soot. The oven itself is wrapped in a damp cloth so as not to stain everything around it.
Sealing with rubber aprons
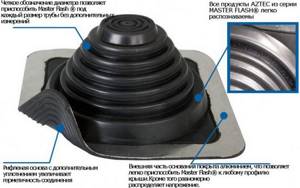
Construction stores suggest using Master Flash rubber aprons or Wakaflex sealing tapes to seal gaps where pipes pass through a roof made of any material:
- Master Flash is an elastic penetration on a rubber base in the form of a stepped funnel, reinforced with aluminum mesh inside. It is suitable for roofs with any slope and any roofing material. The rubber apron reliably protects the gap from liquid penetration. To adjust the apron to the size of the pipe, it is cut to the required diameter. The apron is fixed to the slope with self-tapping screws, and to the pipe using a steel clamp.
Rubber passage Master Flash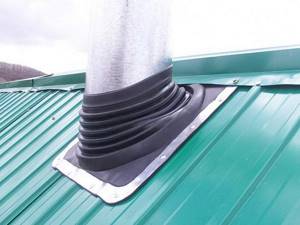
Insulating the joint with an elastic apron Master Flash - Wakaflex is a rubber tape with an adhesive base. It is used to seal the joints of a soft roof with pipe walls. The inner side is reinforced with aluminum mesh. It has high elasticity, takes any shape, and is easily fixed to the slope. Wakaflex tape is used in combination with decorative aprons and collars.
Rubber self-adhesive tape Wakaflex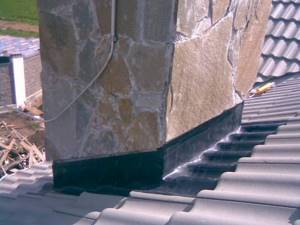
Insulation of the pipe passage through the roof with Wakaflex tape
Note! To eliminate large gaps, a fiber sealant is first compacted into them, and then filled with bitumen mastic or filled with foam. After this, the passage area is decorated with a decorative collar. Please note that collars are produced with a standard angle, which is selected in accordance with the slope of the roof slope and the diameter of the chimney.
The main condition for long-term operation of the roof is maximum tightness, which is achieved by isolating even minor gaps. Whatever sealing method you choose, remember that reliable protection against moisture penetration is more important than an attractive appearance.
Causes of chimney blockage
If the pipe in the bathhouse is clogged with soot, there are several reasons for this. Its deposits settle inside the chimney during combustion, although ideally this should not happen: all solid particles should be removed. Unfavorable conditions are to blame for these consequences. The causes of clogged pipes are:
- Undried firewood. If the humidity is more than 24%, then when they burn, steam is released along with the smoke, which is encountered in the chimney with cold air. The result of the “rendezvous” is the formation of condensation, which instantly settles on the walls, and solid particles of smoke readily adhere to it. The more often the owners use wet firewood, the more “deposits” are formed inside the pipe. The chimney section is slowly but surely closing off. If you don't take action, it will soon become completely clogged.
- Using a variety of waste as fuel - scraps of plywood, chipboard, etc. Such materials containing chemical binders provoke the formation of sticky soot. It is optimal to heat the sauna stove with dry hardwood. It is also better not to use coniferous plants, the reason is the resinousness of the wood, which leads to a similar result.
- Lack of insulation in the section of the chimney that is close to the street. Hot smoke passing through a cold pipe causes condensation to form; the consequences of this phenomenon are described above.
- Pipe bends and turns, horizontal sections. These are ideal places for soot to appear and “multiply”. Therefore, in such problem areas it is necessary to cut out small hatches to remove soot.
- Brick chimney. It is more “friendly” to deposits, since the surface of such a pipe is rough, which allows soot to settle on its walls without much effort.
If the cause of the problem is found, then it is better for the owners to try to eliminate all unfavorable conditions in the near future. Otherwise, the soot will become a permanent “settler” of the chimney: it will have to be cleaned constantly.
How to seal a pipe on the roof: recommendations for choosing material and technology
Despite all the efforts of the roofers to lay the roofing covering as closely as possible to the chimney and various protrusions, there are still leaks at the junction points. Water from the roof can thus enter the under-roof space through the cracks formed. Therefore, they all need to be properly sealed.
One of the most discussed issues among stove builders is how to seal a pipe on the roof. At a time when stove heating was present almost everywhere, when installing a chimney on the roof, a special thickening was made, which protected the roof from leaks. Nowadays, brick pipes everywhere have given way to metal, often serially welded chimneys. It is also worth noting that modern stove makers, when choosing a brick for a pipe on the roof, do not thicken it.
In order not to encounter the most unpleasant situation when a pipe is leaking, you need to figure out how to seal a pipe on the roof.
Principles of closing gaps ↑
The cracks are closed using various available materials. Schematically they can be divided into two groups:
- Elements used to close the gaps between the chimney and the roof. These are different aprons, collars, both factory-made and home-made. The materials used are corrosion-resistant galvanized steel, rubber or silicone. Additional elements may differ in appearance and technical characteristics. Functionally, their installation provides initial rough closure of the joints.
- All kinds of sealants used to fill the remaining cracks. For example, cement mixtures or mastics. Today, to solve these problems, more modern materials are used, which are simple and very convenient when performing insulation work, for example, self-adhesive tapes.
How to seal the gap between the pipe and the roof ↑
As soon as the pipe is made, roofers are faced with the question of how to seal and waterproof the joints , how to seal the chimney. Various materials are used for this. Let's note a few of the most common ones.
- Silicone sealant for chimney on the roof. This is a frost-resistant, waterproof material. It is easy to use and affordable. In addition, silicone sealant has a high level of heat resistance, up to 150˚ C, therefore it is widely used in the construction of baths and steam rooms.
- Bitumen mastic. The surface to be treated is pre-cleaned and dried. The mastic is applied in a layer 3 or 4 mm high. If the gap turns out to be too wide, then you can first fill it with polyurethane foam, and only then apply bitumen mastic.
- Ecobit. This insulating material provides fairly good waterproofing. It is a reinforced self-adhesive aluminum tape with a sealing layer of special modified bitumen. It is laid along the perimeter of the chimney.
- Enkryl. This is a one-component acrylic mastic made in Germany, which is used to treat problematic joints. The waterproofing process takes place in 4 stages.
1. degrease the surface around the perimeter of the pipe,
2. Using a brush, apply the first layer of Enkryl liquid mastic,
3. the pipe is wrapped with Polyflexvlies Rolle (this is a viscose-based reinforcing fabric), which will provide additional elasticity to the waterproofing,
4. After 15–20 minutes, when the mastic has already been absorbed into the fabric, apply the second layer.
According to the manufacturer, it will hardly be possible to see that the roof near the pipe is leaking for 9-10 years.
How to seal a roof pipe made of different materials ↑
Technologies for sealing cracks depend on factors such as the type of roofing material, the size of the gap, and the shape of the smoke channel. Let's take a step-by-step look at the process of sealing a roof pipe from rain for popular coatings.
Tile roof ↑
- The gaps formed between the roof covering and the outer wall of the chimney must be lined with stainless steel corners. If the chimney has an oval or round shape, the metal corners can be replaced with rubber seals with an adhesive backing.
- A special decorative collar is prepared from galvanized sheet steel. It is put on through the head of the chimney and secured with self-tapping screws. Thus, a space for filling is formed between them.
- A viscous cement-sand waterproof solution is poured into the formed gap and left for a day. This time should usually be enough for the mixture to harden.
- To drain water from the roof, an inclined surface is formed. This is done as follows: a hole is cut out in a stainless steel sheet. Its diameter should correspond to the size of the collar. Having placed the cut sheet on the head, it is secured with self-tapping screws.
Slate roofing ↑
Mortar sealing is the most affordable technology for sealing a slate roof. However, in the case of round chimneys, the use of this method is associated with certain difficulties. This problem can be successfully solved using the following algorithm.
- A sheet of polyethylene is placed on thick cardboard and a ring is formed. It is inserted into the gap between the roofing and the chimney.
- A temporary restrictive edge is formed on the slate from some plastic material, say, plasticine.
- An asbestos-cement solution is poured into the resulting gap.
- After the construction mixture has hardened, the side and cardboard cylinder are removed.
- In their place remains an asbestos ring, which serves as waterproofing.
Roofing made of bituminous tiles ↑
On a soft roof, cutting is usually done. The gaps are sealed using a special apron, which is framed with a flexible self-adhesive tape based on rubber, for example, “Vakaflex”. The tape is carefully glued to the existing adhesive layer around the perimeter of the chimney, running it from the roof surface to the walls of the chimney. Then the cutting is pressed with a case. The gaps remaining between the flexible roofing material and the chimney are sealed with bitumen mastic.
If the gaps are large enough, they are first filled with tow or rope. Before this, the material is impregnated with compounds that give it waterproof qualities. For example, use oil paint, bitumen and more. Gaps can also be filled with cement mortar.
Waterproofing a chimney on a corrugated roof ↑
Connection of a corrugated sheet to a chimney with a rectangular cross-section . The most common way to seal a chimney in this case is to install an apron. This shaped element is made of galvanized steel sheet. Install it on the roof, painted in the color of the roof.
- The main part of the installation work is associated with metal junction strips, which must be located in the lower lobe of the chimney.
- Since the pipe is routed through corrugated sheeting, the vapor and waterproofing layers are cut as a result. They are carefully glued to the outer walls of the chimney using tape.
- A shallow groove (about 1.5 cm) is made along its perimeter using a special machine.
- Part of the junction strip, bending the upper edge, is inserted into the groove and additionally fixed with silicone sealant with a high level of heat resistance.
- The next stage of sealing is installing the tie. This is a waterproofing sheet through which water flows into the drainage system, bypassing the chimney.
- Corrugated sheeting is laid on top of the installed elements.
- Then it’s time to install an additional external false apron. Its installation is practically no different from the installation of an internal one. The only difference is that the upper strips are screwed not to the chimney, but to the chimney itself.
Connections to a round or oval pipe. The junction points can be very easily waterproofed using an elastic penetration, say, Master Flash. For roofs made of corrugated sheets they are used as follows:
Heat-resistant and heat-resistant sealants: what are the differences?
According to their temperature characteristics, insulation products are divided into heat-resistant and heat-resistant. They are used to seal joints between different sections of a structure, as they can withstand different temperatures. If heat-resistant ones are only suitable for external surfaces, then heat-resistant ones can seal the cracks of a high-temperature chimney, where temperatures are especially high.
This type of insulation is suitable for working with external walls of a fireplace, stove, as well as for processing the junction of brickwork and roofing.
Heat-resistant sealant is made from silicone. The temperature range at which a product can be used is affected by the additional components present in the product and their percentages. The most common additional component is iron oxide, which gives the insulation a brown tint.
The main characteristics of this type are as follows:
- high elasticity of the thermosealant: due to its resistance to deformation, silicone can be used for insulation on pipe sections of rather complex shape. It will easily cope with the task and will not crack under the influence of temperature;
- the average temperature range of heat-resistant silicone ranges from 250°C to 320°C;
- resistance to ultraviolet radiation: insulation can be used to seal external structural elements;
- silicone does not allow moisture to pass through, which also makes it convenient for outdoor use. Rain and snow are not scary for him;
- high adhesion allows the silicone composition to adhere perfectly to a variety of types of surfaces: brick, metal or ceramics.
Silicone has few disadvantages, but they still exist:
- due to its low heat resistance, it is not suitable for sealing internal surfaces that directly interact with fire;
- Since the material is elastic, it cannot be painted. The paint will not remain on its surface for a long time.
Where does the water in the brick come from?
Moisture inside a chimney brick can be external or internal.
External moisture comes with precipitation, and internal moisture comes with condensation.
Moisture from the street.
It is important to understand that rain is not enough to saturate a brick with water.
In order for a sufficient amount of moisture to penetrate into the brick to destroy the masonry, it is necessary to leave the brick in water for a long time.
Only when immersed in water will the brick become saturated.
Then the question is: How does water saturate the brick on the pipe?
The secret ingredient in this process is snow.
It is the melting snow that saturates the brick pipe with water; rain is not capable of this.
Symptoms of the “disease”
A clogged chimney signals a problem immediately, so owners do not have to carry out any complex investigations. The following signs should alert you:
- Decreased draft in the furnace. First of all, open the damper. If the action does not bring results, then the diagnosis is obvious, and the pipe will have to be cleaned.
- Even completely dry fuel is difficult to ignite. There should be no doubt here: this is prevented by smoke, which is not able to find a way out of the clogged pipe.
- The firewood burns readily, but then the flame gradually begins to fade. The verdict is partial “intestinal” obstruction of the chimney.
- Dim flame. With good draft, the fire has a “healthy” bright color - red-orange with blue tints.
- Acrid smell. If your eyes begin to water for no reason in a bathhouse, then there is no craving: the fumes are directed directly into the room.
Even the discovery of one of the unpleasant symptoms is a sufficient reason to start cleaning the pipes in the bathhouse immediately.
Methods for sealing roof pipes
Despite all the efforts of roofers to lay the roofing material closer to the pipe, it still adjoins it loosely, with gaps. If they are not sealed, water will seep under the roof through such joints. Therefore, all gaps between the roof and the perimeter of the chimney must be sealed.
Brick chimney on roof with rigid metal roofing
How to seal the roof around a pipe on a roof made of metal tiles, seam roofing or corrugated sheeting?
Let's consider a sealing method for a rectangular brick pipe.
- The traditional method of sealing involves installing an apron around the pipe made of four special L-shaped elements made of galvanized steel. The finished junctions are applied to the pipe and a construction marker is used to mark directly on its walls where the grooves will go under the upper bends of the junctions.
- To form the grooves, a cutting machine with a disc is passed along the marked lines on the stone. Installation of the apron begins with the installation of the lower connection, while inserting its upper bend directly into the groove.
- The same applies to overlaps: side and top connections are installed. In this case, the lower horizontal parts of the junctions are attached to the sheathing with self-tapping screws.
- The grooves on the pipe are sealed with silicone sealant.
- Then they arrange the so-called. a “tie” made of waterproofing material, installed directly at the bottom junction and so that moisture flows into the drainage elements of the roof.
- Roofing material is mounted on top of the junctions and the “tie”.
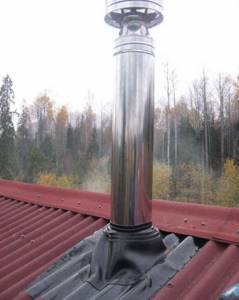
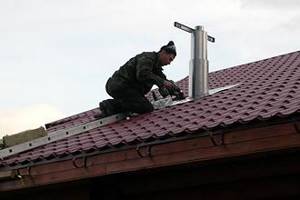
Round pipe on a roof with a rigid metal roof
- Many stove manufacturers produce round multi-layer chimneys. To seal such a chimney on the roof, there are ready-made aprons-caps, which are a metal sheet with a hole closed by a cap in the form of an inclined (relative to the plane of the sheet) truncated cone. The sheet is attached to the sheathing, the pipe is passed through the cap. The top of the cap is pressed against the pipe with a steel clamp with a heat-resistant gasket.
- In addition to rigid metal cap aprons, there is also a special flexible pipe seal on the market called Master Flash. This is an elastic device that allows you to seal roof pipes quickly and with good quality. Its area of application is the sealing of not only chimneys, but also various other additional elements of roofs, such as antennas, ventilation pipes, lamps.
Externally, Master Flash looks like a stepped pyramid. The materials for its production are silicone or rubber, the base is made of aluminum. It should be remembered that the operating temperature range of the rubber Master Flash is – 50°С–(+ 130°С). This article will tell you more about the chimney.
The silicone model operates in the temperature range – 70°С–(+ 250°С) and can be used on any roof and in any climate.
The described material is easy to install and has a long service life.
- A hole with a diameter slightly smaller than the diameter of the pipe should be cut into its base.
- Pull the Master Flash onto the pipe, give it the correct shape, and place a gasket under the base.
- Under the base, apply a layer of special sealant along its edge, and attach it to the corrugated roofing with special screws.
- If the seams between the roof and the pipe do leak, then it is good to seal them with aluminum or copper self-adhesive tape with an adhesive layer based on polymer-modified bitumen and covered with a protective film. This layer does not require preheating; it bonds well to wood, metal, plastic, cement screed and other materials. First, the place where the tape will be attached is cleaned, and after removing the protective film, the tape itself is pressed firmly against the surface. It can be used to glue the places where the apron-cap is attached to the roof sheathing.
Round pipe on the roof with natural tile roofing
On such a roof, a so-called roof is installed around the pipe. “otter” from cement-sand mortar in the following sequence:
- Galvanized collars are placed in the gap between the pipe and the tile.
- A cement-sand mortar is placed into the prepared gap, forming a collar protruding above the roof around the pipe. The lower expanded part of the collar should fit tightly with the tile, and the upper part with the pipe.
- For drainage, a protrusion is formed on the collar from the ridge side, which has two inclined planes.
This work must be carried out with all possible care to prevent cracking.
Round pipe on slate
When the pipe is located close to the ridge, it is sealed in the following sequence:
- One of the steel sheets that forms the ridge is lowered until the pipe cross-section is blocked.
- A round slot is made in the sheet for the pipe with its edge flanged two centimeters up.
- An asbestos-cement ring is put on the pipe.
- To fix the ring at the height of the pipe, insert a pin into its side hole.
- The ring is installed parallel to the slope using a wedge.
- The edges of the slot in the steel sheet are brought inside the ring.
- Cover the joint with a mixture of cement and fluffed asbestos (1:2).
This method is an excellent roof protection from rain, but snow accumulates in the gap between the slate and the pipe. You can find out about the tightness of the roof with the chimney.
To ensure that the pipe and slate are joined hermetically, do the following:
- A cardboard cylinder wrapped in plastic film is inserted into the gap between the slate and the pipe.
- A clay or plasticine border is molded onto a steel sheet. The distance between the side and the cardboard cylinder should not be more than 10 mm.
- The resulting gap is filled with asbestos-cement mixture.
- After the mixture has hardened, the cylinder with the restrictive edge is removed,
- An asbestos ring is put on the pipe (see above).
Teploizol
One of the options for wrapping a pipe in a bathhouse is thermal insulation. To produce thermal insulation, foamed polyethylene is used, hidden between two layers of foil, and the top layer of foil in the material is designed to protect the chimney from overheating.
Teploizol appeared on the building materials market relatively recently. The thickness of such material ranges from 2-10 mm.
This is a unique material, the structure of which includes foamed polyethylene, located between a pair of sheets of foil. Using thermal insulation, you can qualitatively insulate a chimney, and do it yourself.
We suggest you familiarize yourself with How to decorate the walls around the stove in a steam room
The thickness of the thermal insulation varies from 2 to 10 mm, and the thicker the material, the greater its resistance to high temperatures.
The top layer of foil serves as reliable protection for the pipe from significant overheating. Using wire or adhesive tape, a metal craftsman attaches thermal insulation, which is then wrapped around the chimney.
Modern metal stoves are mounted on a foundation, while sheathing the walls on the back and sides with sheets of the same material. If you cover the stove yourself with only metal, its appearance will not be very aesthetic. It is better to make external masonry with red brick, which insulates the stove from fire and retains heat in the bathhouse.
Due to the fact that asbestos releases toxic substances at elevated temperatures, it is not recommended for use in a steam room. Natural felt is considered harmless and is also a good insulator. In terms of price, this material is more expensive than asbestos sheets, and when smoldering it emits a specific smell (felt does not catch fire), which can be immediately felt.
If you intend to install the stove on a wooden floor, then first it is better to lay felt material in a couple of layers, then lay brick in three rows. For walls and floors, it is recommended to lay metal sheets as an insulator, the height of which varies from 50 to 70 cm.
By following all our recommendations correctly, you will extend the service life of the entire smoke exhaust structure and protect it from fire. And you will no longer have questions about how chimney pipes are wrapped.
Repair of the roof at the chimney passage
Rubber cuff
When eliminating a leak, you need to follow a certain sequence of actions, which can differ significantly for each chimney material. Therefore, the technology for eliminating such defects for each type of pipe should be considered in detail.
If a pipe made of red brick is leaking on a roof, then to fix the problem you will need the following materials and tools:
- cement grade M 400 or M 500;
- sand, preferably river or sea, but quarry sand is also suitable;
- water;
- Master OK.
How to seal the gap between the pipe and the roof, having all of the above? You must adhere to the following sequence of actions:
- A cement mortar is made from the prepared materials by mixing 3-4 parts of sand and one part of cement;
- the detected leak site is thoroughly cleaned of dirt and remnants of destroyed bricks;
- The prepared mixture is applied using a trowel to the damaged areas.
If a metal chimney is leaking, then to correct the current situation you will need:
- special clamps with a rubber gasket that can be secured to the pipe where the gap occurs. The diameter of the clamp should be approximately equal to the thickness of the pipe. Its width should be slightly larger than the size of the crack;
- in addition, small cracks can be eliminated using cold welding, instructions for use of which can be found on the packaging.
If water flows through an asbestos pipe, then you can eliminate the leak by performing a number of the following actions:
- First of all, you need to stock up on cotton fabric and “Iron Lead” paint. You can buy such materials at any hardware store;
- then the chimney, namely the damaged area, should be cleaned of dirt and dust;
- the paint is applied in a thick layer;
- fabric is tightly wrapped over it;
- Then the paint and varnish material is reapplied.
- apply bitumen tape;
- install rubber cuffs;
- make and install a metal apron.
All of the above methods allow you to close the leak, so they should be considered in more detail.
If a chimney leaks due to rain or melting snow, then the simplest and cheapest way to eliminate the leak is to make an apron from bitumen tape. To perform such work you need to use the following materials and tools:
- bitumen tape;
- scissors;
- metal brush;
- gas burner.
We suggest you familiarize yourself with How to lay chipboard on a wooden floor
The cracks are sealed by taking the following measures:
- first you need to use a metal brush, which is used to clean the roof around the chimney and its outer lower part;
- Remove any remaining dust and dirt with a damp cloth;
- At the junction of the pipe and the roofing material, pieces of bitumen tape are glued. It doesn't matter which side the gaps are on. You should create a full apron around the entire pipe;
- the glued tape is heated with a gas burner, which is pressed as tightly as possible to the roof and pipe;
- to seal the joint more reliably, the tape can be additionally secured with a wooden block or board (this cannot always be done, it all depends on the roofing material).
If the roof is leaking near the chimney duct, then this situation can be corrected by using a rubber cuff, which can be purchased at almost any hardware store. It is installed as follows:
- a cutout is made in the upper part of the cuff, the diameter of which is slightly less than the thickness of the pipe;
- the prepared cuff is put on the outer part of the chimney duct and lowered to the roof level;
- To avoid the possibility of repeated leakage, it is necessary to use sealant at the point where the roof comes into contact with the lower part of the cuff.
Some types of cuffs are not easily glued to the roof. Some models can be screwed to the roof with self-tapping screws, but this is only possible in cases where the roof is not made of tiles or slate.
A chimney leak at the junction of the pipe and the roof can be eliminated by installing a metal apron. This is done as follows:
- An apron is made from a thin sheet of tin, the dimensions of which must match the dimensions of the pipe. A similar product can be purchased at a hardware store;
- the upper part of the apron is attached to the pipe and crimped using a clamp. The crimping process must be carried out carefully. Gaps are not allowed;
- The lower part of the apron is installed on the roof and secured with self-tapping screws. To ensure that the damaged area of the roof does not leak, in the future the lower part of the plate should be secured on top of the roofing material, and the upper part should be removed under the sheathing.
At this point, the manufacture and installation of the metal apron can be considered complete. The sealed area will no longer cause problems. For additional sealing, the metal apron can be equipped with a rubber lining, and the contact point between the cone-shaped part and the chimney duct can be sealed with sealant.
A leaking roof near a chimney can be repaired in many ways. Such cracks are closed in 5-10 minutes, but it is worth understanding that such repairs cannot be considered high-quality. The sealed joints between the roof and vertical elements will certainly make themselves felt in a few years. Thus, such local repairs are a temporary measure. It is designed to protect against moisture entering the room until a full roofing repair is completed.
You can wrap the chimney with foil insulation
Modern material includes two layers: heat insulator and foil. The second one plays a reflective function and can save up to 90% of the thermal energy in the building. Folgoizol is a harmless material compared to other analogues, since the foil is compacted food grade. The material is resistant to ultraviolet radiation and elevated temperatures within the range of -65 to 175 degrees Celsius, a good insulator.
For those who don’t yet know how to insulate a chimney pipe in a sauna, we recommend covering the steam room ceiling, walls and chimney with foil insulation. As a result, you will get a room whose design resembles a thermos. The heat will remain in the sauna, but the bathhouse will quickly gain temperature and then slowly cool down. Sometimes a mesh is installed on the pipe for stones in the bathhouse, which is very convenient and practical.
It is a two-layer material consisting of a heat-insulating component and foil. Thanks to the reflective layer, the room does not cool down so quickly, because up to 90% of the heat is retained inside the bath, so it is a very high-quality insulator.
Folgoizol is highly environmentally friendly, because thick food foil is used as a raw material. This material is not afraid of ultraviolet radiation and strong temperature changes - the operating range is from -65 ºС to 175 ºС. Therefore, it will be a completely worthy choice for wrapping a pipe in a bathhouse.
Note that foil insulation is often installed not only around the chimney, but also on the walls and ceiling of the steam room. It serves for high-quality vapor and waterproofing, and also insulates the bathhouse well.
Round pipe
Many chimney structures for stoves are equipped with round channels made of sheet metal. Such products are multi-layered and are additionally insulated. Such a pipe is sealed in many ways. It’s worth looking at the most popular ones:
- The passage of these structures can be sealed with bitumen derivatives. Quite often, roll materials are used for this purpose.
- Installation of self-adhesive tape. This material has a foil layer.
- Installation of special aprons made in the form of caps. They are also called roof passages. These devices are simple and reliable. They need to be put on a pipe with a circular cross-section and attached to the roof sheathing.
When there is a residential attic space under the roof of a house, the passage for the pipe must not only be sealed, but also thoroughly insulated. The gap formed between the apron and the pipe must be closed using a special heat-resistant gasket. It is attached to the plane of the product.
As you can see, you can install the joint between a corrugated roof and a chimney yourself, knowing the installation features of various structures. In the process of work, it is important to follow technology. This will ensure sealing of the junction.
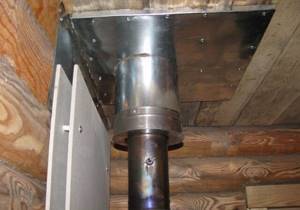
To the rescue - sandwich pipes
For those who want to install a safe chimney in their bathhouse, we suggest using a sandwich pipe. This design includes several sections that can easily be placed inside each other, i.e. looks like a multi-layer cake.
Here are the main components of a sandwich pipe:
- stainless steel layer (inside);
- insulation in the form of basalt/mineral wool (in the middle);
- steel with zinc coating (outside).
This creative design represents the insulation of a chimney built into the overall system and is designed to solve two problems simultaneously:
- protection against soot accumulation inside;
- maintaining optimal temperature outside.
Basic rules and regulations
Before insulating a pipe in a bathhouse from the ceiling, you should study the following SNiP requirements:
- To ensure optimal draft force, a chimney pipe with a height of at least 5 m should be erected;
- A minimum distance of 250 mm must be maintained between the chimney pipe and the nearest combustible elements;
- If materials with insufficient fire protection are used for roofing, a spark arrester must be installed;
- A certain distance must be maintained between the upper stove ceiling and the ceiling: for metal pipes - more than 1.5 m, for brick chimneys - 0.5 m.
How to coat a stove with clay
The choice of how to seal the stove so as not to crack depends on what mixture you decide to use. But first you need to clean the bricks from the plaster and the layer of finishing material. They are then treated with a solution.
If you decide to use a clay mixture, then you need to follow the instructions on how to properly coat the stove with clay:
- The prepared solution is stirred one more time.
- They check its quality. To do this, roll the mixture into a ball and if it starts to crack, then add water.
- Before coating the stove with clay to prevent it from cracking, the damaged areas are moistened with water.
- The cracks are filled with the solution.
- Then the oven can be plastered.
- Despite the fact that the repair of the brick kiln is completed, you should not rush to heat the unit, since the solution must dry completely.
If you carry out repair work in full accordance with the instructions on how to coat the stove with fireclay clay to eliminate cracks, then you can forget about them for a long time.
Source
Conclusion
The work on the pipe release device must be treated extremely responsibly. If it is carried out with flaws, then moisture will penetrate into the attic, as a result of which the rafters, load-bearing beams and insulation will become damp.
High humidity is detrimental to wooden products, so beams and rafters will begin to rot and weaken. So errors in the exhaust equipment threaten to destroy the roof structure. The choice of method for sealing the joint between the pipe and the corrugated sheet depends on the shape of the chimney and the characteristics of the roofing structure. You can create a reliable connection using an apron (for rectangular structures) and additional elements (for products with a round cross-section). The choice of the chimney outlet location is also of great importance. The lower the pipe is located on the slope, the more water accumulates at the joints. This increases the risk of leaks. The optimal location for the chimney opening is at the ridge of the roof or close to it. By following the technology of sealing the junction of the pipe and corrugated sheeting for certain chimneys, you can reliably protect the roof from leaks. It is especially important to do this if you have an insulated veranda.
If you don't seal the joint
When removing the chimney, a hole is made in the roof. The gap between the coating and the walls of the chimney is sealed with special aprons, collars and seals. They can be bought at any hardware store. These protective elements are easy to make with your own hands.
If you do not seal the seams on the roof in time, the following consequences are possible:
- Increased wear of roofing material. Water penetrating into the gap ends up on the inner surface of the roof, which causes deformation of the coating.
- Reduced service life of the building frame. Water that is poured into the gap between the pipe and the roofing contributes to the gradual rotting of the wood. This is fraught with deformation and destruction of the rafters.
- The insulation loses its effectiveness. Thermal insulating materials with which the roof is equipped can quickly lose their properties when wet. If hard insulation is not very exposed to moisture, then soft insulation quickly begins to rot.
- Increased humidity in the attic. Increased dampness causes stale, heavy air to appear. This can negatively affect the interior decoration of the attic.
The method for eliminating the gap between the pipe and the roof depends on its size and type of coating. The shape of the chimney is also taken into account. For a distance of less than 5 mm, use a heat-resistant sealant. If the gap width exceeds 1 cm, use cement mortar, an apron or a special sealant.
It is necessary to seal the gap between the pipe and the roof for:
- ensuring insulation of the attic space from atmospheric moisture;
- to increase the efficiency of thermal and waterproofing;
- increasing the service life of the rafter system and the entire roofing structure;
- eliminating cold bridges.
Sealing the chimney on the roof avoids destruction of the roof itself.
The seam between the pipe and the roof can be sealed with silicone, acrylic, polyurethane and bitumen sealants. Special sealing tapes are also successfully used. Each of these types has its own advantages and applications.
Silicone sealant has become a kind of universal material in construction. It is used both for roofing and for sealing window openings. Silicone sealant is often used when working with glass and wood. It is often used to treat the gap around the chimney pipe on the roof. The material does not lose its properties under prolonged exposure to ultraviolet radiation and high temperatures. To seal the joints of roofing material, there is a special subtype of it - roofing sealant.
Acrylic sealant is most often used to seal cracks in walls and floors. Acrylic compounds are also used to repair windows. It is rarely used for outdoor work - it is not elastic enough.
Polyurethane, unlike acrylic, is used for exterior work almost everywhere. They glue metal, concrete, wood, stone together. Roofing is ideal for minor repairs.
Bitumen solutions are ideally combined with roofing work. They are resistant to precipitation, temperature changes, and chemical solvents. The only drawback of this sealant is its toxicity. For this reason, no internal work is carried out on it. They are ideal for sealing roof chimneys.
Main advantages of bitumen:
- super durability;
- low cost;
- elasticity;
- possibility of coloring;
- high moisture resistance;
- high level of adhesion to dry and wet surfaces.
There are several subtypes of bitumen mixtures that are designed specifically for roofing. They are able to ensure complete sealing of the treated gap between the pipe and the roofing.
How to prepare clay
This solution is prepared in the following sequence:
- The clay is poured with water in a ratio of 1:3 and allowed to brew for 24 hours.
- After a day, it is stirred by adding water. The resulting mixture is filtered through a sieve with a mesh size of 3x3 millimeters and settled.
- The water is drained, after which the thickness of the clay should resemble the consistency of sour cream.
- Sand and clay are mixed in equal proportions.
- The readiness of the solution is determined by stirring it with a stick. If there is a lot of clay left on it, then you need to add sand to the mixture. The solution is ready when small clots stick to the stick.
Usually take 2.5 parts sand to 1 part clay.
Consequences of an unsealed joint
To bring the chimney through the roof, a larger diameter is cut out into it, so that a gap remains between the walls of the chimney and the roofing material. Regardless of the width of the gap, it is a big problem faced by homeowners and builders. To eliminate this defect and protect the under-roof space from the penetration of atmospheric moisture, use seals, aprons, collars, made by yourself or purchased. An unsealed gap between the roof and the chimney pipe is fraught with the following consequences:
- Increased wear of roofing material. Most roof waterproofing materials offer better protection against moisture penetration from the outside. Moisture penetrating through an unsealed gap gets onto the inner surface of the roof and eventually destroys it.
- Reducing the service life of the rafter frame. The pouring water hits the elements of the rafter frame, which are made of wood. This leads to rotting and premature destruction of the rafters.
- Reduced insulation efficiency. Roof insulation materials lose their properties when wet, becoming less effective.
- Increased humidity in the attic. Increased dampness in the attic causes heavy, stale air and negatively affects the interior decoration of the room.
Important! The method of sealing the gap between the chimney and the roof depends on its size, the type of roofing material used and the shape of the chimney. If the distance is less than 5 mm, it is quite possible to get by with a heat-resistant silicone-based sealant. You can close a gap whose width is 1 cm or more using cement mortar, an apron, or a special sealant.