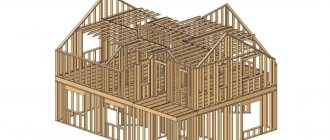
Modern people have long been accustomed to the fact that it is customary to use apartments in high-rise buildings as housing. They are built from foam concrete and brick. To insulate the walls in these buildings, materials of synthetic origin are increasingly being used, which, although not harmful to human health, are sometimes unable to perform their direct functions.
That is why residents of megacities are trying to move into houses made of natural wood. If this is not possible, then you can build a house outside the city. For this purpose, logs or beams insulated with jute thermal insulation are usually used.
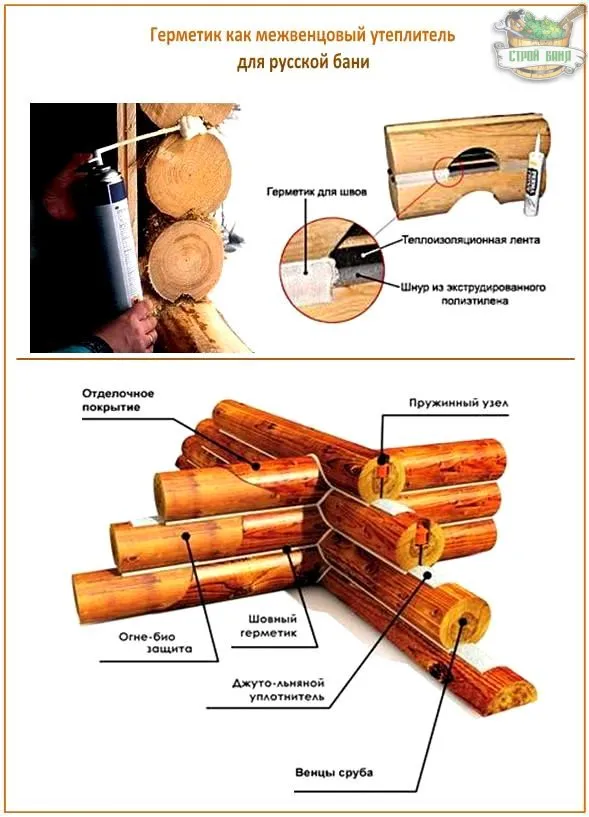
Technology of thermal insulation of walls with inter-crown insulation
Choosing a method of insulation
- Laying the tape without bends
. The method is used in the construction of houses from laminated veneer lumber, which is distinguished by high quality workmanship. The material is placed on the surface of the top row in one layer and secured with a construction stapler. - Laying inter-crown insulation with a one-sided bend
. This method is used in houses made of profiled timber. During installation, the material is folded in half, folded inward, with a distance of 5 mm from the edges, and secured with a stapler. This option is used when installing a house or bathhouse made of profiled timber with natural humidity. After the lumber dries, cracks may appear on one side of the wall, so the sealant is bent. When determining the amount of insulator, keep in mind that you will need twice as much. - Laying with double-sided bend
. It is used in houses made of chopped or rounded logs, in which the width of the groove for the insulation varies along the entire length of the wall. To be able to adjust the width of the strip, it is folded on both sides. The thickness of the inter-crown insulation for a log house can be increased by placing tow inside. If after the start of operation of the house there is a need for additional insulation, finish caulking of the cracks is carried out using tape material or tow.
Recommendations for material selection
The choice is also influenced by the density and thickness of the insulation:
- A seal with a thickness of 3-4 mm and a density of 300-400 g/cm2 is used in massive rooms, for example, in baths.
- Tapes with a thickness of 4-5 cm and a density of 500-600 g/cm2 are used with heavy rounded logs.
- Strips 8-10 mm thick and with a density of 700-800 g/cm2 are used to insulate two-story buildings.
- Trouble may arise if the thickness of the inter-crown insulation is 6-7 mm and the density is 300-400 g/cm2; bald spots will soon appear between the logs. Similar problems will also arise if the tapes are 5-6 mm thick and have a density of 700-800 g/cm2. Rigid products will not be able to fill all the voids.
Making a groove in a log
The dimensions of the groove depend on the minimum winter temperature of the area where construction is taking place:
- Minus 20 degrees - sample width is at least 10 cm;
- Minus 30 degrees - at least 12 cm;
- Minus 40 degrees - at least 14 cm;
- General recommendations - the width of the longitudinal groove should be at least half the diameter of the log.
Laying inter-crown insulation
- Inspect the grooves on the beams into which the insulator will be laid. As a rule, they are done by hand and of average quality, so you need to stock up not only with strips of insulation, but also with tow, which will help fill the remaining gaps.
- Drill a hole in the timber for the dowel.
- Clean the profile from splinters. You can saturate the groove with insecticide and rot-proofing agent.
- Place a roll of material on the log and roll it out to its full length along the wall according to the chosen installation method. The inter-crown insulation for the timber should not reach its edge by 5 mm.
- If the lumber is roughly processed, choose wide strips so that they hang 5 cm on each side. The extra parts will be needed to caulk the wall. The thickness of inter-crown insulation for logs or roughly processed beams can reach 15 mm. If necessary, the strips can be laid in two layers.
- Secure the tape with a staple gun, driving the staples in a checkerboard pattern.
- Make a hole in it for the dowel.
- Place a log on top, which should securely clamp the product. Make sure there are no gaps between the decks, especially if they are uneven or roughly processed. Install dowels into the holes and connect the beams.
- If there are strips hanging from the logs, perform initial caulking. To do this, use a chisel to push the tape 0.5-1 mm deep into the crack. You can lightly tap the chisel with a mallet.
- If you feel that the insulation has stopped falling, stop the process and carefully cut off the excess parts.
- Continue working on the next section in a circle.
- After sealing the gaps at one level, it is necessary to caulk the same level from the inside so as not to warp the frame.
- Repeat the operation at the next joint. The work is not difficult, but long. It may take several days to repair the cracks.
Many synthetic sealants, such as Polytherms, are sold with an adhesive backing. Before laying inter-crown insulation from the surface, remove the protective tape and glue the product to the wood.
How to choose a jute ribbon
Jute insulation is selected according to density, thickness and width. A high-density jute tape is laid between the crowns; when shrinking, the low-density insulation cakes more; the width is chosen according to the size of the timber; for rounded logs - according to the size of the laying groove. Experts recommend:
- Lay the edged timber with jute tape 20-25 mm thick; under pressure its thickness will be no more than 4 mm;
- For dry planed timber, use a tape 10-12 mm thick, which shrinks to 2 mm.
Intervention seams are caulked with a material of lower density; to fill cracks, jute batting with a density of 500-600 grams per square meter is used.
Builder mistakes: typical and gross
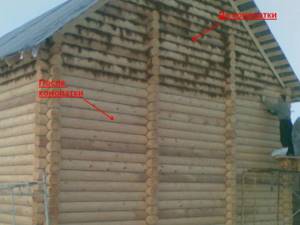
As Alexey Markin notes, the most common mistake when making a log house from chopped logs is the small areas of contact between log and log (small width of the inter-crown groove). The thermal characteristics of such a house will be low. The head of the Domostroy-SK enterprise, Oleg Valuev, adds that in some cases the crowns may not be adjacent to each other at all (photo 1). Huge cracks will have to be caulked regularly, which will require considerable additional costs. However, the appearance and thermal characteristics of the house cannot be radically improved.
Photo No. 2
– The log house cannot sit properly due to incorrectly placed racks.
It happens that builders build a house in such a way that it simply cannot sit down.
As Oleg Valuev explains, if you plan to make a veranda under the roof, then between the upper end of the post and the upper crown you need to install a special jack for shrinkage (photo 3). This will allow the log to sit evenly. Instead of a jack, you can put several planks that will need to be knocked out periodically. By the way, shrinkage jacks are clearly visible in the first illustration (Fig. 1) to our earlier publication.
Photo No. 3
– Jack for shrinkage (photo by Domostroy-SK).
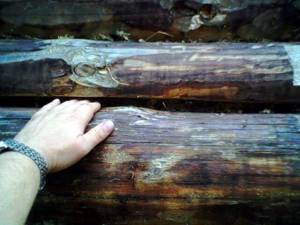
Another mistake that prevents the shrinkage of a log house is an attempt to fasten adjacent crowns with nails. The log lies unevenly on the nail head, and an inter-crown gap appears. Due to a loose fit, the log may begin to “spin” during the drying process.
The problem of poor-quality waterproofing of the lower crown of a log house has somewhat lost its relevance. As a rule, the installation team performs this operation efficiently
However, the customer should pay attention to how the foundation and wooden walls are connected. If the foundation is strip or grillage, then the surface of the strip should be leveled, and between the foundation and the lower crown there should be 2-3 layers of roofing material, or a waterproofing layer of similar effectiveness
However, excess moisture can enter the wood not only through the foundation. If you lay floors and hang ceilings in a house before the frame has settled and dried, this will impede air circulation and lead to “steaming” of the house - mold or mildew may appear on the internal walls.
The head of the Domostroy-SK enterprise, Oleg Valuev, notes that in the washing room there is also no need to make baseboards on the floor. Moisture collects under them and the process of rotting also begins.
Photo No. 4
– Mold on unventilated wooden structures.
Isolation stages
Insulation of the foundation and log house from moisture is carried out in several stages.
Install a drainage pad under the foundation. This stage is carried out even before pouring the foundation, immediately after preparing the trench. Layers of sand and crushed stone are successively poured onto the bottom of the trench. After backfilling, each layer is carefully compacted. The total thickness of the drainage pad should not be less than 30 cm.
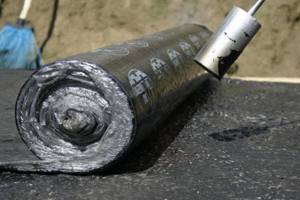
After pouring, drying and removing the formwork, the foundation is treated with coating waterproofing in the form of mastic. A better effect can be achieved if you use combined waterproofing, i.e. stick a layer of waterproofing or roofing material on top of the mastic. An additional water barrier can be created by insulating the foundation with penoplex or other non-hygroscopic thermal insulation.
The upper section of the foundation is waterproofed. It should have as smooth a surface as possible. This will eliminate the occurrence of cavities and irregularities in which moisture can concentrate. When the foundation is prepared, it is coated with mastic. Depending on the type of mastic used, it must be applied in a cold or heated state.
Rolled waterproofing is installed. The sheet material should have overlaps along the edges of the foundation of 5-10 cm. It is necessary to provide overlaps at the joints of adjacent waterproofing sheets (at least 15 cm).
It is necessary to lay the insulation so that the material fits tightly to the base. Leaving air bubbles and folds is unacceptable.
Tool for getting the job done
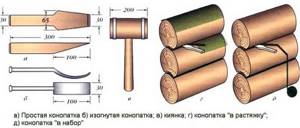
To properly caulk a log house, you need to use special tools.
To properly caulk a log house, you need to use special tools. Otherwise, the insulation will lie superficially in the cracks, which will lead to the formation of cold bridges. Mostly professionals use special caulks made of steel or metal. The first one is better. You can also make wooden caulks from dense woods - beech, walnut, oak. It is desirable that the tool have a rubberized handle for ease of work.
The main type of caulking tools:
- Stacked caulk. It is a kind of flat chisel with a blade width of 10x0.6 cm. It is used for stuffing the seams between logs with insulation.
- Crooked caulk. The same chisel, but curved in shape. Used for caulking house corners and rounded cracks. The width of the blade in this case is half that of a type-setting caulk.
- Road caulk. It has a fork-shaped shape and is used for caulking cracks using the “stretching” method. The blade here has parameters of 170x15 mm. Depending on the width of the gap, you can use wide, medium or narrow caulk.
- The caulk is broken. It has a wedge-shaped blade 30-35 mm wide. This tool is used to widen narrow cracks and fill them with insulation.
- A mallet is used to assist all types of instruments. Using such a rubber hammer, push the seal into the cracks.
The process of filling gaps between logs
If the gap between the logs is even and approximately the same, you can push the insulation into the recesses with a special wide spatula - a road worker. This allows you to speed up your work. If the recesses are uneven, with narrow gaps, it is better to use a tool with a sharp tip. If the cracks are crooked and you have to drive the sealant into them at an angle, then it is better to use an oblique metal caulk.
You can process seams and gaps with jute in different ways. The choice of method depends on the size of the cracks and the desired aesthetics. There are 2 main approaches to laying the seal:
- Stretch. The compaction material is taken in individual strands and pushed with a thin tool along the gap between the logs. A roll is formed from the hanging remains of jute and forcefully compacted into the groove using a thin tool and a hammer. This method is suitable for processing small cracks and allows you to create good thermal insulation. But the wall does not look entirely aesthetically pleasing due to the remnants of insulation peeking out from under the logs.
- Into the set. This method allows you to process even the largest gaps. To do this, jute fibers of the required length are taken, which are then wound into balls. The larger the gap, the larger the ball you need to form. Then the formed balls are filled tightly into the cracks using a chisel and hammer. When using this method, the edges of the insulation do not protrude from the gaps between the logs, making the treated walls look more aesthetically pleasing.
Caulking should be done evenly, in a circle, level by level. You should move from bottom to top. If you treat each wall separately, the entire structure may become warped due to uneven distribution of gravity. One should take into account the fact that after caulking, the structure can grow in height by almost 15 cm.
Insulation made from plant fibers
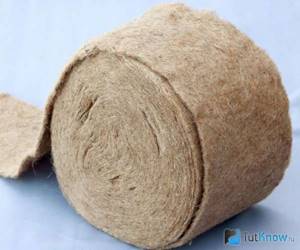
Jute
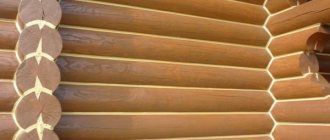
Jute interventional insulation
Jute is one of the most popular insulation materials today. It is made from a plant that can be found in southern latitudes. In its composition, the material is very close to wood, durable and very hygroscopic, therefore it is absolutely not afraid of moisture and can be used to insulate baths. Jute also has good decorative properties - a beautiful golden color that looks great against the background of wooden walls. It is this color that is an indicator of the quality of jute - some manufacturers add flax fibers to the material, which is why it becomes soft, grayish and significantly loses quality. This jute has a low density and cakes much faster.
Jute
Another common inter-crown insulation is the so-called “lush” jute
It attracts the attention of buyers due to its thickness and low cost. However, all the “pomp” will very quickly disappear under the weight of the building, and the connection of fibers in this case is carried out using thermal bonding using synthetic materials
To choose the right insulation from jute fibers, you should take into account the required thickness of the material, which directly depends on the characteristics of the surface of the logs (dryness, evenness, etc.).
- For wooden houses made of glued and ordinary timber, it is recommended to use material with a thickness of 5-6 mm and a density of 400 g/m2.
- For buildings made of rounded logs, you will need insulation with a thickness of 8-10 mm and a density of 600 g/m2. You can use another option, 5-6 mm thick and 400 g/m2, which is laid in two layers.
- For log houses made of wood, it is recommended to take insulation with a thickness of 15-18 mm with a density of 800 g/m2. It is allowed to use material with a thickness of 8-10 mm and a density of 600 g/m2. in two layers.
This is what high-quality inter-crown jute insulation looks like
Inter-crown insulation made of jute is offered to customers both in the form of tapes and in the form of tow or ropes. The latter option is very popular today, as it gives the building an attractive and finished look.
Jute tow
Jute ropes
Linen
Interventional insulation made from flax fibers is cheaper than jute fibers, and has a number of advantages and disadvantages. Linen is absolutely safe for humans (sometimes it is even called healthy), quickly absorbs and releases moisture, does not accumulate static electricity and does not promote the proliferation of microorganisms. There are no hard or prickly impurities in the material, so all work can be done manually.
Inter-crown insulation flax
The most budget option is flax tow, which can be found on any construction market. Its disadvantages are that laying in this case is a rather labor-intensive process (it will have to be distributed manually, which is quite a difficult task), the material can rot, and subsequently birds can take it away. In addition, linen insulation often harbors moths, which gnaw through the material, and when performing finishing work, it can wrap around the drill.
Linen tow
A more expensive, but at the same time practical solution is linen insulation in the form of tape, since it is much easier to install, and the reliability of the material is much higher. The material can have different widths, and also does not require preparatory work - it can be laid immediately.
Hemp
Linnet - natural inter-crown insulation
Hemp is also one of the oldest materials for insulating wooden buildings (even the name of the plant itself comes from the word “caulk”) - a material called hemp is made from it. Its disadvantages are exactly the same as those of flax fiber: flammability, tendency to rot and breeding of insects.
Hemp hemp
Chemical characteristics of natural fibers
| Jute | Linen | Hemp | |
| Lignin | 12,7 | 2-5 | 3,7-8 |
| Cellulose | 64-71 | 76-80 | 74-77 |
| Pectin | 0,2 | 3 | 0,9 |
| Wax | 0,3-0,4 | 2-3 | 0,6-0,8 |
| Water | 10 | 8,5 | 10 |
| Particle length | 2-3 | 13-30 | 15-25 |
The main indicator of the strength of fibers is the content of the natural polymer lignin. This substance is contained in wood, so natural insulation materials do not destroy its structure. It promotes the lignification of cells and the formation of drainage channels (the most lignin is found in jute fibers). Pectin and wax are responsible for the elasticity and flexibility of the material: accordingly, flax has the softest fibers, and jute has the hardest.
What is good insulation?
The main purpose of interventional insulation is not only to prevent heat loss, but also to create a comfortable and favorable microclimate indoors, so it must have the following characteristics:
- reliably protect the building from drafts and frost;
- have sufficient density and elasticity so that cracks do not form in it during operation;
- have good vapor permeability and moisture absorption ability;
- do not contain substances or impregnations harmful to the body;
- do not contribute to the proliferation of microorganisms and fungal spores;
- have resistance to the effects of negative factors;
- do not change its performance properties over a long period of time.
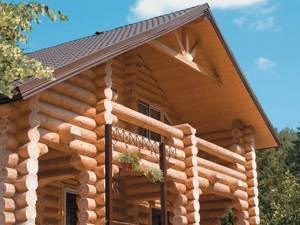
Intercrown insulation will keep your wooden house warm and cozy
In addition, when choosing an interventional beam, you should take into account the qualities and features of the material from which the building is constructed, as well as its main purpose - a residential building, a bathhouse, an outbuilding.
Materials unsuitable for insulation
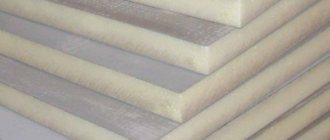
Option #1 - mineral wool
Ordinary mineral wool also cannot serve as a heat insulator for timber in any way - its threads have moisture absorption close to zero. All the moisture in this material is retained by the tension of the fibers and does not disappear anywhere. In addition, this material allows heat to pass through and even creates a dew point when lighting a bath. And yet, unscrupulous builders sometimes manage to use it.
Option #2 - isover
As for Izover, which has recently become incredibly popular, in those places between the rims where there is no gap, it is compressed almost 100%, and here its heat transfer is somewhat less than that of other material under the same conditions. But in the gaps, Izover is a little fluffy and copes quite well with its functions as a heat insulator. On the other hand, Izover’s ability to absorb and remove moisture is almost the same as that of many other inter-crown insulation materials, but this material does not burn, does not rot, does not need to be caulked, and over time it does not crumble like dust. Unpleasant dust can be eliminated with a sealed finish.
So, let's summarize. This is what Izover is preferred by many as an interventional insulation:
- Doesn't burn, doesn't rot;
- Convenient to use;
- It compresses well and leaves no gaps;
- Birds don't like it;
- Does not require additional caulking.
But this fashionable material also has a significant drawback: it is not very environmentally friendly, and when slightly torn, it emits caustic and allergic dust. It also quickly accumulates moisture... And many lazy builders convince future owners of bathhouses to use this inter-crown insulation - after all, it’s much easier for them to work: it cuts easily, just rolling out over the log, construction goes quickly and costs are less. That is why, despite advertising from neighbors, not many people want to install Izover in the walls of bathhouses - especially those who saw it in use: even with dry timber, the insulation turned out to be 2/3 wet.
Also, similar synthetic materials often serve as a dangerous source of phenol. So, let’s conclude: mineral wool in a compressed state does not remove moisture at all, and Izover, if not covered with a vapor barrier, completely turns into a sponge. The decision is yours.
Option #3 - polyurethane foam
Polyurethane foam is also used as inter-crown insulation. It is valued for the following properties:
- Fast technological installation.
- Good adhesion, thanks to which the timber sticks tightly together. When drying, it will not twist, and the steam room will not warp.
- Foam seals corners in a log house much better than moss or tow.
- Hardened one-component foam is not flammable and does not emit toxins, which, however, multi-component foam cannot boast of.
- The process of caulking after foaming is quite simple.
But with all its advantages, foam as an interventional insulation does not please with the following qualities:
- It is not elastic, which is why microcracks may appear over time (and wood, like any living material, can slightly change its volume).
- In winter it does not tolerate the cold well - it crumbles.
- Less resistant to ultraviolet radiation. Over time, it turns to stone and discolors from the sun.
- Not environmentally friendly enough.
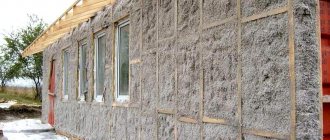
And, let us note that polyurethane foam is used relatively little today as inter-crown insulation, and therefore many other negative consequences of such insulation are not yet known. But the foam itself is also used as inter-crown insulation in the following alternative:
- Option #1. The beams are laid half a meter apart, and after construction is completed they are foamed. This way it supposedly dries faster, and then the remaining wide gap can be foamed. Fast, airtight and no caulking required. From the inside of the bathhouse, the cracks are caulked with linen rope.
- Option #2. Before using the foam, allow the bathhouse to sit completely on the tow. After all, the settlement of the building occurs due to the shrinkage of the timber itself - and this is at least a year and a half. After that, a 5-centimeter gap is punched in the tow and the groove is foamed, and finally, the seams are protected with sealant.
As for the choice of foam brand, “Macroflex Pro” is so far most suitable for this purpose. In a word, there is a lot of material, and, as they say, as many people as there are so many opinions. There are also bathhouse owners who built their steam rooms ten years ago and are quite satisfied with Izover as a sealant. They claim that after rains the timber will be wet in place of the insulation, regardless of the type of insulation: it is moss or a modern material. And the main advantages become the decisive factor: it is cheap and easy to build.
It’s just important not to take the cheapest Izover (it’s also called Chinese) - you can really get poisoned from it
Features of the use of interventional insulation
Wooden walls absorb moisture well and change their linear dimensions and volume when humidity changes. Therefore, the wooden frame is constantly in motion, which leads to the appearance of cracks in the wall. They cause premature destruction of lumber and rapid cooling of the room. To prevent the appearance of gaps between the logs, inter-crown insulation is laid.
The principle of using the material is very simple: it is laid in a special groove on the beam and fixed with a construction stapler. Another round timber is placed on top, which with its weight compresses the insulator and keeps it from blowing out. The joint becomes airtight.
The insulation is used with any logs - rounded, profiled and rough-processed. Its dimensions depend on the quality of lumber processing. For logs with high quality finishing, you will need a standard strip 25 m long, 8-10 mm thick and 5 to 15 mm wide, to suit the size of the joining surface.
The insulator is sold in rolls, which speeds up the installation process several times. Its density should be at least 600-700 g/m2. Glued beams are insulated with products of smaller thickness, chopped logs with thicker ones.
There are two groups of this kind of insulation - natural and synthetic, they have their own advantages and disadvantages. Let's look at them in more detail:
Natural insulation materials
.
There are very few such materials - these are modifications of jute and flax. They are made using needle-punched technology, resulting in a woven fabric in the form of felt. Less commonly used for such purposes are moss, tow and sheep's wool. Synthetic insulation
. There are many more similar samples, one of the most popular is polytherm. They are much more expensive than natural ones, do not burn, are highly reducible, but have low vapor permeability. If a house with caulked holes will stand for a long time without protective cladding, it is better to use artificial insulators. It is not recommended to use mineral, polyurethane wool, or isover.
The process of insulating joints is divided into two stages. The tape is laid between the logs at the stage of wall construction. After a year, when the box shrinks, the process of caulking the joints is carried out to eliminate possible cracks.
Advantages of jute sealant
The main advantage is hygroscopicity. The fibers absorb moisture well and dry quickly. This protects the wooden surface from the influence of water, reduces the likelihood of rotting, the formation of fungi and mold. Jute is resistant to microorganisms and does not rot if properly pretreated.
- Durability.
The service life of the insulation is up to 90 years. - Installation.
Sold in rolls of different widths and thicknesses, it evenly fills the inter-crown space and has elasticity. - Does not collapse.
The fibers fit tightly to each other and do not deform when the log structure subsides, maintaining thermal insulation. - Appearance.
Jute is golden in color and does not stand out against the background of wood.
Safe for the environment and human health. When using, no additional impregnations or mixtures are needed. The downside is the cost. But it is compensated by good performance and durability.
Features of the use of interventional insulation
2
- Natural insulation materials
. There are very few such materials - these are modifications of jute and flax. They are made using needle-punched technology, resulting in a woven fabric in the form of felt. Less commonly used for such purposes are moss, tow and sheep's wool. - Synthetic insulation
. There are many more similar samples, one of the most popular is polytherm. They are much more expensive than natural ones, do not burn, are highly reducible, but have low vapor permeability. If a house with caulked holes will stand for a long time without protective cladding, it is better to use artificial insulators. It is not recommended to use mineral, polyurethane wool, or isover.
Caulking rules
Caulking of a log house is carried out in two stages - immediately after construction and after some time, when shrinkage occurs. Primary (or rough) caulking can be carried out in two ways: with laying insulation during the process of assembling the walls or performing one-time work upon completion of construction.
Each log house requires high-quality caulking, which is performed in two stages
1 way
Lay the bottom row of logs on the base.
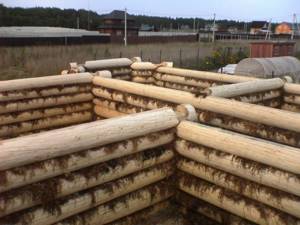
Layed logs of the log house and inter-crown insulation between them
Then the insulation is spread on top so that the ends of the material hang evenly on both sides. Next, lay the second crown, and again a layer of insulation. This is repeated until the very top of the log house. After all work on the construction of the log house is completed and the roof is installed, the protruding ends of the seal are driven into the gaps between the beams using caulking.
The result of caulking a log house
Method 2
Caulking begins after installation of the roofing system on the log house. Insulation (preferably tape) is applied to the seam of the bottom row and, using a tool, is pushed into the gaps between the logs along the entire length, leaving hanging edges 5-7 cm wide. Then these edges are folded in, formed into a roller and hammered inside the seam. Repeat the procedure in the next row and so on until the top of the structure.
The second stage of caulking is carried out after shrinkage of the log house - after 1-2 years. The selected insulation is applied to the cracks between the crowns and driven tightly inside. You should always start work from the bottom row, and be sure to do it along the perimeter of the log house.
Insulation padding
You cannot caulk one wall first, then the second, and so on. In addition, each row is caulked both from the outside and from the inside to avoid distortions in the structure. The insulation raises the frame by 5-10 cm, and its uneven distribution contributes to the vertical deviation of the walls. In some cases, the log house is caulked for the third time - 5-6 years after construction. During this time, the wood completely shrinks and new gaps form.
Gaps between crowns
There are two ways of caulking - “set” and “stretched”. The first is used to eliminate wide gaps between logs, the second is usually used during primary caulking, when the gaps are still narrow.
To work, you need tools - a set of caulking tools, a road worker and a mallet. As a rule, metal caulks are used, although many craftsmen make them themselves from hardwood.
This is interesting: Why does the stove smoke in the bathhouse?
How to caulk the corners of a log house with jute
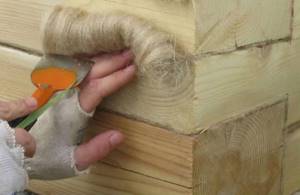
When caulking a log house, special attention is paid to the corners; this largely determines whether the house will be warm or not. The easiest way to work is with corners cut into a bowl. In this case, the oblo is part of a log or beam, the jute tape is laid on a common surface, as a result, each seam of the corner lock receives its own layer of insulation.
When chopping into a paw, the elements of the castle are caulked in different ways; in general, the principle is followed: each joint must be caulked.
Finishing caulking is done in order, simultaneously with the crowns.