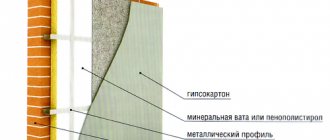
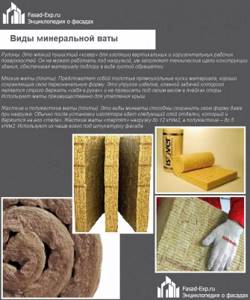
Types of mineral wool
- Glass wool . Among organic mineral wool heat insulators, it is considered one of the most famous and time-tested. The material is made from the same raw materials as ordinary glass - broken glass and quartz sand. It is environmentally friendly, does not burn and is affordable. A significant disadvantage of this type of insulation is the increased fragility of its fibers. During its transportation and thermal insulation work, so-called “glass dust” is formed, which poses a danger if it comes into contact with mucous membranes and skin. This material is most often used for insulation of external utility networks and industrial construction sites.
- Slag wool is distinguished by the presence of another flaw - the raw materials for its production are characterized by low environmental cleanliness. When the material is moistened, which will inevitably occur due to the penetration of water vapor into the insulation, a humid environment with a high level of acidity is formed. An acidic environment has a detrimental effect on both wood and metal siding fasteners.
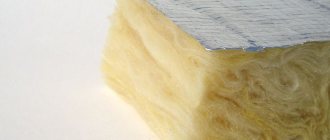
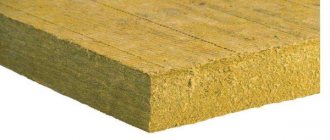
- For external insulation of a wooden residential building, laying stone wool . This material is environmentally friendly because it is a product of rock melt. The thermal conductivity of stone wool is quite low, and the material is non-flammable, which is especially important for a wooden house.
The only significant drawback of stone wool is its ability to absorb significant amounts of moisture. Therefore, if it is installed, it is important to equip it with high-quality ventilation, which will extend the life of both the insulation and the wooden building itself.
REFERENCE! There are varieties of mineral wool that come in the form of hard mats. They are often used as an integral part of a fire protection structure.
What is mineral wool and how to choose it correctly
Mineral wool is a material for insulation, which is obtained by blowing fibers from solid materials.
There are three types of this heat insulator:
- stone (basalt) wool;
- glass or glass wool;
- slag or slag wool.
Stone wool
The most common natural rock used for its production is basalt. According to experts, this type of heat insulator is a collection of the best characteristics:
- Basalt is the main type of raw material for the manufacture of insulation.
- It contains special substances that do not allow the final material (mineral wool) to have an elongated shape.
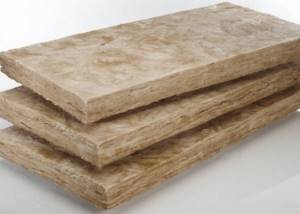
- The finished slabs have high compressive strength.
The production process is quite simple, since the composition of the material, in addition to the basalt (dolomite) itself, includes only some additional additives. Stone wool, in fact, is a by-product of the main production - metallurgy. This greatly affects the price of the heat insulator.
Glass wool
The insulation is made from waste from glass production, broken glass and rock residues containing silicon (silicates) - for example, sand. One of the main characteristics of insulation is the presence of pointed particles. Their size varies from 0.04 to 0.3 cm.
Key Features:
- When using a microscope, you can notice that the fragments have a somewhat pointed shape. This nuance can contribute to irritation of the respiratory and visual organs, as well as unpleasant scratches when working with the material.
- Individual fibers have a very high ability to adhere to each other.
The performance of this material is optimal and does not require the use of personal protective equipment when working with it.
Slag wool
The main starting product is often blast furnace slag, which has small particle sizes due to the peculiarities of the manufacturing technology. The compressive rigidity characteristics are 0.015 MPa, which is considered the minimum among mats and slabs of a similar kind. The thermal conductivity of slag wool is also comparable to other types of similar materials. The installation process is quite simple, which makes this product quite common among developers. Slag wool is often used for insulation of industrial workshops, mines, pipelines, etc.
The material can be used for thermal insulation of inclined and horizontal surfaces.
Installation stages
Strict adherence to installation technology is necessary to prevent transfer of the dew point on the walls of the building or inside it. In this way, it will be possible to achieve uniform temperature distribution. Below are step-by-step instructions on how to properly carry out these activities. External insulation of a house with mineral wool includes six key stages.
Preparation work
When starting to insulate the facade of a building, it is first necessary to prepare the surface, that is, the walls. The base of aerated concrete blocks is thoroughly cleaned of dust and dirt and, if necessary, treated with a primer solution. If the walls of the building are made of wood, an antiseptic composition is applied to it and dried well. All decorative elements must be removed. If the walls are wet before starting work, you need to let them dry completely. Before proceeding with the installation of the sheathing, markings are applied to the surface, which will indicate the places where the frame elements are attached.
The distance between the sheathing elements should be slightly less than the width of the mineral wool slabs. This is necessary so that the insulation fragments can be mounted by surprise, and they fit as tightly as possible.
Sheathing device
As a rule, wooden beams are used as the basis for the sheathing. The width of the frame material is selected in accordance with the planned insulation thickness. Wooden sheathing elements must be treated with an antiseptic and a solution that reduces their flammability. Nails and dowels are used for fixation. The beams can be placed on the wall surface in both vertical and horizontal orientation. Their location will depend on how the siding will be attached in the future.
All defects in the surface of the brick wall must be eliminated. This can be done by using additional wooden pads. In the classic version, a vertical frame is mounted from timber. Once the racks are secured to the wall, you can begin installing the horizontal guides. It is convenient and correct to make markings using a horizontal level and a marker. The distance between the beams will depend on the overall dimensions of the siding used. When installing guides, it is important to take into account the need to create a gap of five centimeters between the wall and the insulation, which will ensure air exchange inside the structure.
Laying mineral wool
To insulate the facade of a house and then cover it with siding, mineral wool is used in a slab version. Insulation in the form of rolls during operation can move downward under the influence of gravity, then the thermal insulation properties of the structure will be impaired. Mineral wool slabs need to be installed against each other with the seams re-positioned. This will avoid the appearance of cold bridges. The mats are laid out from bottom to top. Insulation boards can be cut into pieces of the required size.
Installation is carried out using adhesive and special studs.
Installation of waterproofing
When the insulation itself has already been installed, it is protected on top with a special diffuse membrane, which protects the base material from atmospheric influences and does not interfere with the removal of moisture. The protection layer must be rolled out in a horizontal plane, from bottom to top.
Sheets of membrane material must be laid taking into account the obligatory overlap of 10-15 centimeters, and the joints must be secured to the staples of a construction stapler.
Ventilation gap
Between the protective membrane material and the siding surface, you need to leave 2-5 centimeters of free space for ventilation. The final stage is finishing the walls with cladding.
It will be convenient to create a gap using additional slats. Organizing the structure in this way will facilitate the free drainage of moisture condensation.
Siding installation
The installation of decorative siding is carried out in the following order:
- If there is a protruding plinth on the facade, you need to install the ebb on top of it and secure it with self-tapping screws. When fixing the ebb, you need to carefully check the horizontal level of its location.
- Then a starting bar is mounted above the low tide, which should also be positioned strictly horizontally.
- Corner profiles are vertically attached to the corners with self-tapping screws.
- Window openings around the perimeter should be decorated with slopes. It is recommended to purchase the necessary elements complete with siding.
- After this, you can begin installing the siding. The elements of the first row must be connected into a hook with the starting bar, and additionally secured on top with self-tapping screws. The ends of the panels located at the edges must be inserted into corner profiles.
- The second and subsequent rows are assembled by analogy with the starting one - in a hook with the previous one, with obligatory fixation with self-tapping screws.
- Before attaching the last row of siding to the facade, a finishing profile strip is installed.
- After this, the panels of the last row are connected to the penultimate one and placed under the finishing strip.
Installation of material
Work on thermal insulation of building walls with mineral wool is best done using wooden blocks or galvanized metal profiles. Properly installed sheathing will allow you to perfectly level the wall surface. This will allow for high-quality fixation of the decorative finishing material (in our case, vinyl or acrylic siding).
Facade surface preparation
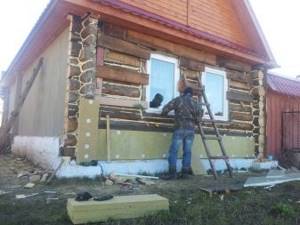
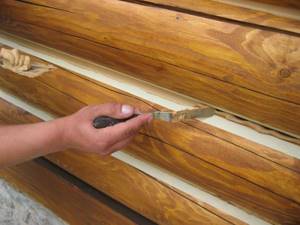
- The surface of the walls is thoroughly cleaned of protruding or hanging elements. When finishing an old log house, this could be old decorative finishing from boards, made once to protect the main facade and level the surface, followed by painting;
- Regardless of which building’s walls need to be insulated: old log or new timber, the surface must be treated with a special antiseptic. This will prevent the appearance of insects or fungal microorganisms in the wood. In addition, it is necessary to examine each crown for the absence of diseased areas susceptible to rotting. If such are detected, they must be immediately removed and replaced with uninfected ones.
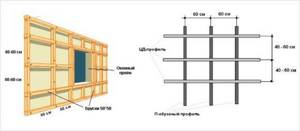
Installation of sheathing
Using timber or a galvanized profile, a sheathing is made, which is necessary to secure the insulation inside it. It is recommended to make the distance between the guides 2-3 cm less than the width of the thermal insulation slabs, the average step is approximately 60 cm. Thus, you can quickly, and most importantly, correctly distribute and fix the mineral wool inside the resulting frame. The method of installing the sheathing under the siding depends on the material used for these purposes:
- The wooden beam is fixed to the surface of the facade using self-tapping screws of the appropriate size;
- The galvanized profile is attached to metal hangers that are firmly fixed to the surface of the walls and allow you to create a strong and even sheathing for the siding in a short period of time.
First, it is necessary to determine the extreme points of the guides. This can be done using a level, level or plumb line. The best way to do this is as follows: having visually determined the most protruding points on the surface of the wall outside the house, you need to set the two outer guides (right and left) plumb. By connecting the two upper and lower ends of the guides with a thread or fishing line, we obtain a plane along which it is necessary to align the subsequent profile or beam.
useful in work
Since siding is installed only horizontally, the sheathing must be designed vertically to the ground surface.
Fixing the insulation
Before you start working with mineral wool, you need to prepare personal protective equipment. These include:
- Long sleeves;
- tight pants below the ankle;
- gloves;
- respirator;
- protective glasses.
Despite the fact that mineral wool is considered safe for humans, as a result of tiny particles coming into contact with the skin, especially in hot weather, it can cause irritation.
Depending on the number of layers of material required to create high-quality thermal insulation for a log house, you can use five or ten centimeter slabs. As an option, for better insulation of a timber building, two layers of mineral wool can be fixed under the siding. The number of rows depends directly on the thickness of the walls of the house and the climatic and atmospheric conditions of the region in which it is located.
In order to correctly insulate the walls of a residential building from the outside, you need to correctly position the heat insulator on the surface of the facade, placing it under the sheathing. All slabs must be firmly fixed; this can be done using special disc-shaped dowels, or as they are popularly called “fungi”. This will not only secure the sheets, but also reduce the pressure on the lower rows of material.
Siding fastening
The siding is fixed using galvanized self-tapping screws into special grooves in the panels. If metal siding is chosen as cladding, then it is necessary to take into account the temperature compensation of the metal. To properly understand the installation of the material, you need to watch the proposed video lesson.
Prices for materials and work on thermal insulation
Thermal insulation of the façade of a house followed by finishing with siding is one of the most budget-friendly options for such work. The arrangement of the external walls of the building can be done either with your own hands or by turning to specialists. The price of services for the installation of thermal insulation materials and cladding will depend on several components:
- types and prices of materials used;
- surface area of the building facade;
- number of storeys of the insulated building;
- remoteness of the work site from the city;
- the current condition of the walls of the house.
The cost of work is calculated based on one square meter of area. In addition to the cost of the basic materials necessary for construction, the cost of various preparation activities should be added to the cost - from the installation of scaffolding to the finishing work on the facade.
The price of mineral wool will depend on its variety, grade and brand, thickness and density, as well as the amount of material in the package. In addition, the geographic location of the region may also affect pricing.
How to choose the right material for insulation
When selecting insulation, and in our case mineral wool, you need to pay attention to the form in which it is produced. To carry out work on cladding a building from the outside, it is more convenient to use a slab. Based on the composition of mineral wool, there are 2 types of mineral wool: stone and glass wool. Stone has a yellow-brown or greenish tint and is made by melting rocks to form fibers. Glass wool is produced by melting quartz sand and glass and then blowing it into fibers. Has a yellow color.
If we talk about the fire resistance indicator, then stone wool has a higher indicator. Glass has higher elasticity, which makes it easier to install. But in construction, stone wool is given greater preference.
Benefits of mineral wool
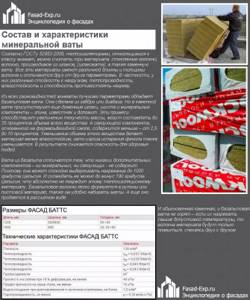
Composition and characteristics of mineral wool
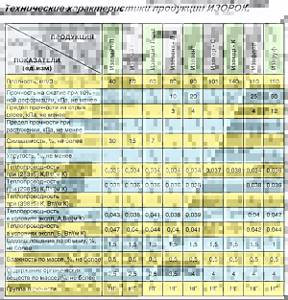
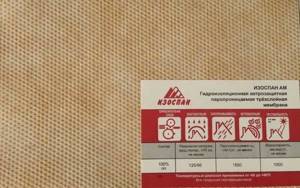
Mineral wool brand Izorok
Why has mineral wool become such a popular insulation material for private construction? The answer to this question is simple - due to the totality of its advantages, this material is superior to other insulation materials in certain characteristics.
- Mineral wool does not burn. It can only melt, and only at very high temperatures. Therefore, this insulation is better suited for buildings made of wooden beams or logs than combustible foam.
- Mineral wool is easy to handle - it does not require the use of special equipment, like ecowool. The installation process is simple - take it out of the package, cut it (if necessary), lay it, and secure it with dowels or glue.
- Mineral wool does not shrink over time and is not attractive to rodents, insects, fungus and mold. In addition, it is able to retain its properties for several decades.
- And like any good insulation, mineral wool has extremely low thermal conductivity values - 0.03-0.047 W/(m*K) depending on the type of material and the outside temperature.
About mineral wool brands
Mineral wool, polystyrene foam or ecowool - which insulation is better?
From the table above it can be seen that in some characteristics mineral wool is inferior to ecowool, so it is often chosen for insulating a log house from the outside.
However, it is quite difficult to install ecowool yourself, since to install it you need to have expensive professional equipment. Very often, facade insulation is made with polystyrene foam, but this insulation has both an impressive list of advantages and quite significant disadvantages, one of which is high flammability. All characteristics of the material are described in more detail in the article “Pros and cons of polystyrene foam as insulation for a wooden house.”
Therefore, it is impossible to say unequivocally what is better to insulate a log house from the outside: foam plastic or mineral wool, or use ecowool or expanded polystyrene for these purposes. When addressing this issue, it is necessary to take into account many factors: specific operating conditions, area of application, climatic characteristics of the region, financial costs.
Selection of mineral wool
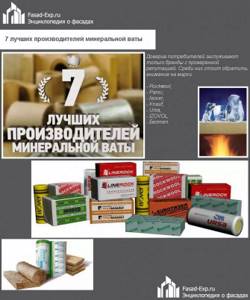
7 best mineral wool manufacturers
When you go to a hardware store, you will see many types of mineral wool with different characteristics. The question arises: what characteristics should a material have that is suitable for insulating a house from the outside?
- Type – stone or basalt wool. Slag wool or glass wool is not the best choice for the walls of a residential building. The reasons are high alkalinity and the content of substances that are harmful to humans (especially slag wool).
- Density – from 80 kg/m3 and more. This is due to the fact that the laid material experiences heavy loads. And so that under their influence the insulation does not wrinkle, does not lose its shape and thermal insulation qualities, it must be dense enough.
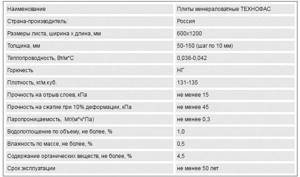
- Dimensions - most mineral wool for external wall insulation is sold in the form of slabs with a length and width of 1200 by 600 millimeters. The thickness varies and can range from 50 to 150 millimeters.
- Since insulation is carried out from the outside, the mineral wool must be hydrophobic. By absorbing water, this insulation loses its thermal insulation properties by 50-70%. It is worth considering that high humidity outside and its sudden changes are not at all uncommon. Therefore, the ability not to absorb moisture and condensation is very important for mineral wool. However, this is not enough, therefore, when insulating the walls of a wooden house, take care of high-quality hydro- and vapor barrier.
Types of mineral wool
Separately, it is worth discussing the issue of the thickness of the thermal insulation layer. Wood itself has some insulation qualities, and therefore does not require such a large layer of mineral wool as for construction made of concrete or sand-lime brick. For example, in mid-latitude conditions, for a wooden house with a wall thickness of 15 centimeters, a layer of insulation of 10 centimeters would be optimal. If the walls are even thicker, 20 centimeters, then the required layer of mineral wool will be half as much.
Of course, if you live in a region with a sharply continental climate and severe frosts, then the thickness of the wall insulation should be higher. And if sheets of mineral wool 50 or 100 millimeters thick are not enough for thermal insulation, they need to be laid in two layers.
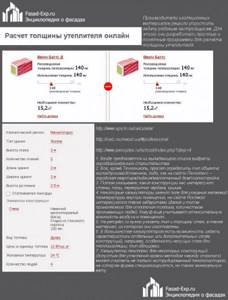
Calculation of insulation thickness online
The table below shows materials that meet the requirements and are suitable for wall insulation.
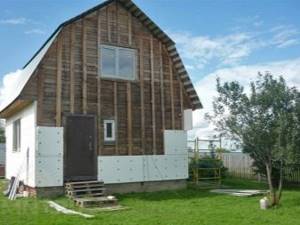
Almost 40% of utility bills go towards heating. Only the use of drastic measures aimed at insulating a wooden house with mineral wool will help save a huge part of the family budget in times of economic crisis. Owners of apartments in multi-storey buildings are very limited in the choice of necessary building materials, and the situation is completely different for owners of private houses made of timber or logs. It is proposed to consider in more detail the methods of carrying out work aimed at insulating your own wooden house.
Buildings made from materials such as timber have been valued at all times, because in addition to being highly environmentally friendly, natural wood is characterized as a durable, beautiful and durable material. Modern owners of summer cottages prefer to use wood to build small buildings that would allow them to take a break from the bustle of the city for at least some time. But many people prefer to live in such houses all year round, which makes insulating a residential wooden house from the outside under siding with mineral wool extremely necessary. Heating in such buildings is expensive, so the issue of building insulation is more than relevant.
Safety precautions
Even if you are not allergic, when working with mineral wool, be sure to protect your nose and mouth with a respirator, and your eyes with safety glasses. You will also need thick clothing with long sleeves and pants below the ankle and gloves. Otherwise, the smallest particles of mineral wool that get on the skin will cause irritation.
We put a barrier to the cold
Hired workers often insulate the facade from the outside with mineral wool, installing 100 mm thick insulation boards in one layer. However, cold air will still penetrate into the cracks between the mineral wool. It is more reliable to fasten 50 mm slabs in two layers, with a slight offset. If there are gaps and gaps left somewhere, they can be insulated with pieces of the same material. It is best to insulate the top layer with mineral wool of higher density.
The next stage is waterproofing the facade. For this purpose, a perforated diffusion membrane is used. It is mounted outside, between the mineral wool and the cladding, with the rough side facing the insulation. This technique will ensure the movement of water only from the inside to the outside. This means that your homemade insulation will be reliably protected from dampness.
What should I attach the cladding to?
The main highlight of the ventilated facade is the presence of a gap between the mineral wool and the facing material. And the constant movement of air quickly dries the water droplets.
For this purpose, slats 50 mm thick are mounted on the frame on top of the waterproofing. Exterior finishing will be attached to them - siding or facade panels, block house or wooden lining, etc. They are laid from bottom to top. If wooden cladding is used, the locking joints are oriented with the tenon up and the lock down. Then water will not get into the joints of the boards.
HELPFUL ADVICE: When finishing with panels, start work with large areas. The remaining trimmings - pieces of panels - can be used at corners and when finishing structural protrusions of a wooden structure.
Air vents must be left at the bottom and top. But on the outside they are covered with a fine metal mesh to keep rodents out. And lastly: insulation will increase the thickness of timber walls by almost 20 cm. Do not leave the insulation open either from below or in the areas of window and door openings. Install sufficiently wide slopes, window sills and ebbs.
How to insulate a wooden house
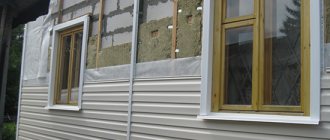
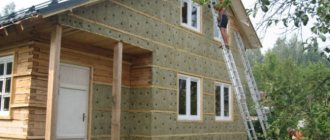
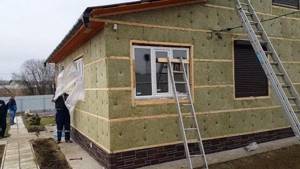
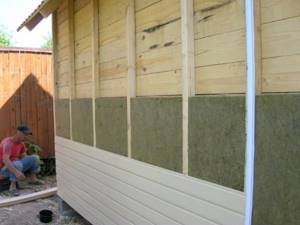
The surface of the walls of houses made of timber can be covered with siding. This technology is popular both in our country and in the CIS countries. The climatic conditions are such that it is simply impossible to do without high-quality insulation of a wooden house. To do this, it is recommended to sheathe the external walls of the house with mineral wool and cover it with siding. This will ensure that the thermal insulation material is properly protected from external influences.
To carry out the necessary manipulations you will need the following tools and materials:
- butyl (can be replaced with tape);
- screwdriver;
- perforator;
- several sets of screws;
- dowels;
- metal profile;
- universal suspension;
- construction staples;
- mineral wool.
First, you will need to carry out the necessary preparatory work, which will be aimed at cleaning the working surface and installing the first layer on it, consisting of a vapor barrier. A screwdriver or dowels will be needed to secure the direct universal hanger to the wall. The vertical pitch of the installed profiles will be 0.5 m. The mineral wool is strung on protrusions in the form of hangers. There should be no gap between the plates.
To fix a square meter of material you will need at least 4 dowels. A membrane is laid on top of the insulating material. All its joints are taped with tape (butyl). For better fixation of the film, it is necessary to use dowels. Installation of metal profiles is carried out on hangers. It should be screwed on both sides with dowels of smaller diameter. The cotton wool will be slightly pressed by the profile itself.
Correct installation – up to 100% savings
The easiest way to preserve the elegant appearance of a log house for a long time is to make a ventilated facade with insulation. This technology has been used in Russia for more than 15 years, and in Europe for much longer.
If you strictly follow the rules for installing such a facade, it will delight you for many years. But you shouldn’t try to buy materials “cheaper”. By saving pennies, you will lose much more. It’s better to save on workers and do everything yourself.
The technology is generally simple and, with minimal experience in construction work and the simplest tools - a construction stapler, a screwdriver, a level, a hammer - you can count on high-quality installation of the facade.
Before you start insulating the timber, you need to make sure that the structures of the wooden structure are strong enough, have not rotted or been damaged by woodworms.
A newly erected timber or log house cannot be insulated or covered. We'll have to wait a year. During this time, the settlement of a wooden house made of timber with a cross-section of 150x150 mm and a height of 18 links can be 10-12 cm.
Procedure for insulating a wooden house from the outside under siding
- The surface of the walls of a log house must be treated several times with antiseptic agents. The end of the house is processed with special care, since it is from there that the fungus begins to multiply. Such manipulations are carried out on a warm and clear day, since after the manipulations are completed, the surface will take several days to dry completely. Particular attention is paid to the corners and the lower crown of the building.
- The vapor-permeable material is attached to the wall surface using a construction stapler. It is worth paying attention to the fact that the glossy side of the material used should be directed towards the insulation. All joints are overlapped and sealed with tape. A sheathing with a beam diameter equal to the thickness of the insulation used is attached to it. If you lay the material sideways, then auxiliary fasteners will not be needed.
- Heat insulation mats should be laid between the bars, pressing them. If necessary, they can be lightly trimmed using a stationery knife. Fixation with slats will be needed if the insulation material has insufficient rigidity and does not adhere well inside the frame. The final fastening is done using anchor nails.
- If you plan to lay several layers of heat-insulating material at the same time, then this should be done overlapping so that the first seams are not visible. All work aimed at insulating a house made of timber from the outside using mineral wool and without dew must be carried out in protective clothing using a respirator.
- The membrane film is fixed on top of the insulation (to the outside). The joints are overlapped and sealed with tape.
- Then you should begin installing the frame's forced ventilation system. To do this, you will need bars that will help create the necessary gap between the insulation and the facade of the house (about 5 cm). Self-tapping screws are used to secure the bars. Profile hangers will only be needed if the walls are not level, which will allow you to independently adjust the gap to the frame.
- Fastening is carried out based on the technology given by the manufacturer. Timber, block house, metal profiles, and vinyl siding are used as facing materials.
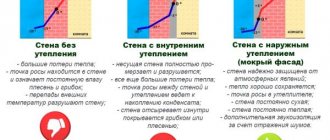
Let's look at the differences between external and internal insulation using the example of their advantages and disadvantages
Advantages of insulating wooden walls outside :
- External walls are additionally protected from dampness and solar activity, which increases their service life;
- Removing the dew point outside without the possibility of condensation;
- Providing highly effective thermal insulation;
- Preservation of room volumes;
- Possibility of sealing external holes and cracks;
Flaws:
- Changing the appearance of the building facade;
- high cost of work;
- dependence of work on the season and weather conditions;
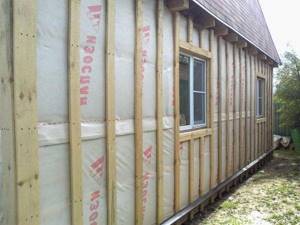
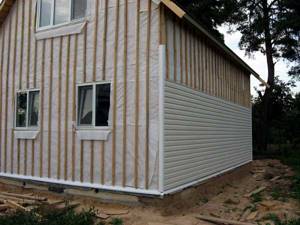
External insulation under siding
Advantages of internal insulation :
- low cost;
- the possibility of leveling the walls;
- independence of work from the season and weather conditions;
Flaws:
- Shift of the dew point indoors and the likelihood of condensation and mold formation;
- Reducing the volume of the premises;
- Possible change in the interior for the worse;
Internal insulation
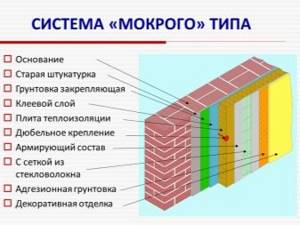
Types of external insulation:
- Strengthening heat insulators to the wall surface using adhesive solutions and finishing with plaster;
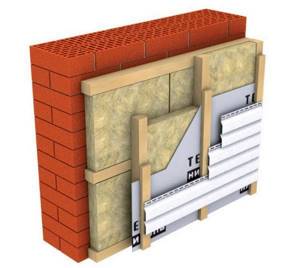
- Non-ventilated walls in three layers. The insulating material is fixed with mortar and a single-brick external wall is installed, maintaining an air gap;
- Ventilated facade. The walls are protected with waterproofing material, on top of which insulating material is mounted. Then a wind barrier is installed, and the frame is sheathed with clapboard or any other siding. This method allows installation even in winter due to the absence of the need to use adhesive solutions.
IMPORTANT!
The main secret of a proper house lies in the structure of its walls. The so-called wall “pie” determines a healthy microclimate and longevity of the structure.
Insulating a timber house with mineral wool
Mineral wool will be used as an insulation material for wooden beams and the house as a whole. The upcoming installation process should not cause difficulties, but you should prepare for it in advance.
- Sheathing dimensions. The cross-section of the beams used will be 50x50. But the thickness will directly depend on the number of layers of thermal insulation material being laid. If only one layer is mounted, then a section of 50x50 will be more than enough. In the case of arranging two layers, the cross-section of the timber will be 50x100. You will need an antifungal solution, as well as sets of screws, anchor screws and a waterproofing film.
- Primary processing of the working surface. Before you begin insulating a building with your own hands, you should treat the surface of the walls several times with an antifungal solution. This will help to avoid the rapid manifestation of the consequences of damage to the material by dampness. It would not be superfluous to treat the surface with fire-prevention impregnations.
- Vapor barrier and waterproofing layer. The rough side of the material should be directed towards the wall, since it is the one that is moisture-conductive. The glossy side will not allow moisture to pass through the installed barrier. If everything is done correctly, you can achieve a surface without dew and condensation in general. The film is fastened using a construction stapler, and the overlapping material (10-12 cm) is then glued with tape.
- Installation of sheathing. To carry out subsequent manipulations, you will need to create a sheathing. To begin with, the beads are attached to the corner of the house end-to-end with self-tapping screws. The distance between the remaining elements must completely coincide, and the material must be strictly in a vertical plane.
- Laying mineral wool. The material is cut into pieces. To perform the following steps, you will need a set of anchor fasteners that will help fix the material to the wall. First, you will need to create several through holes in which the anchors will be placed. After driving, they should be wedged to hold the cotton more tightly.
- Outer layer of waterproofing. This stage involves re-fixing the waterproofing material with the glossy side facing out. Thus, condensate will be removed from the insulation, which will help to significantly extend the service life of the materials used. A stapler is used to secure the film.
Installation of insulation
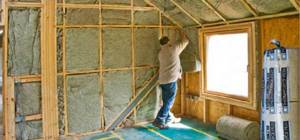
The walls are less often insulated from the inside, since the material takes up a significant area of the house. But if you do this, then you must also provide external thermal insulation, otherwise condensation may appear between the insulated wall and the heat insulator.
Please note that before directly insulating any structures, all wooden elements must undergo antiseptic and fire retardant treatment.
Floor insulation
Thermal insulation of interior spaces in a private house should begin with insulation of the lower part of the building: the basement and the floor of the first floor. You can read more about how to properly insulate the floor in a wooden house from below here. In this article we will only touch on the main aspects.
Minvata
The membrane is laid under the insulation, and mineral wool is also laid on top. The canvases are placed overlapping each other and secured together with adhesive tape.
The floor insulation scheme with mineral wool is as follows:
- Wooden flooring is mounted on bars installed along the joists.
- A diffuse membrane or waterproofing film is laid between the beams.
- The space between the beams is filled with mineral wool slabs.
- The top of the heat insulator is covered with a membrane vapor barrier.
- A rough wooden floor is fixed on top of the joists.
Ecowool
“Features of external insulation of a house with mineral wool”
Floor insulation with ecowool is usually done using special installations, but it is quite difficult to do such work with your own hands. Only professionals can perform it at a high quality level.
If the floor area is small, you can use the manual method:
- Open the briquette and pour the insulation into a separate container, where it is loosened with a mixer.
- The logs and wooden base are moistened with water from a spray bottle.
- The loosened mass is poured into the space between the beams in a layer slightly above the joist level.
- The insulation is compacted and moistened.
- After complete drying, which will take several days, the ecowool is covered with waterproofing, and then a wooden flooring is installed.
Ceiling insulation
To remove cold bridges, it is necessary to insulate the attic. How to do this is described in detail in the article “How to insulate an attic or attic yourself.”
Ceiling insulation is performed in the following sequence:
- A film or membrane vapor barrier is secured to the flooring laid on the floors using a construction stapler.
- Mini-slabs are laid between the beams. They are secured using slats, which are screwed to the wooden floors with self-tapping screws.
- Another layer of vapor barrier is laid, which is also fixed with a stapler.
- The ceiling is sheathed on top with clapboard or other finishing material.
Thermal insulation of walls
Installation of mineral wool on walls
Before insulating the walls, it is necessary to check the quality of the caulk. If there are gaps between the crowns, they need to be caulked, and then the wood should be treated with antiseptics.
Stages of work:
First, the frame is mounted; it serves to create an air gap between the wall surface and the thermal insulation.
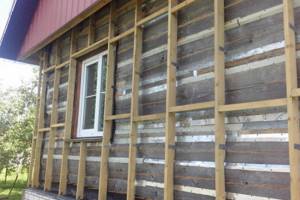
This is especially important when mineral wool, which intensively absorbs moisture, is used as insulation. For the sheathing, slats with a thickness of 25 mm are taken; they are installed in increments of 50-60 cm, depending on the width of the insulating boards. Then a vapor barrier membrane is fixed to the frame. The sheathing is made of timber, it is attached to the frame posts with an edge, as shown in the photo. Mineral slabs are tightly laid between the beams, which are a kind of partitions between the insulation slabs. The top of the structure is covered with another layer of vapor barrier. The frame is covered with finishing material.
How to insulate the outside of a log house
It is worth starting to insulate the walls of a log house only if all other manipulations aimed at insulating a wooden house, including the interfloor ceiling, have already been completed. If previous efforts have not brought the required result, then action should be taken immediately to avoid damage to the façade of the building. External walls should be insulated, as this is due to the natural characteristics of the material used (wood), which is capable of accumulating moisture and breathing. If you insulate the façade of a building, dampness will not accumulate indoors, but will gradually flow out into the street. Such manipulations can only be carried out after the building has completed shrinkage.
Making the façade ventilated
After the walls of the wooden house have been insulated from the inside using mineral wool, you can begin external work. You can insulate a log house by installing a ventilated façade in accordance with available technologies. Thus, the tree will not only retain its ability to “breathe”, but also give up the existing moisture. First of all, the surface is treated with solutions against fungi and fires. A sheathing is installed on top, inside of which the insulating material will be placed. The insulation boards used are laid between the sheathing and tightly filled into the openings. You have to go from top to bottom.
Often the surface is not leveled beforehand, and based on the specifics of the technology used, there should be no gaps between the surface and the material. In this case, all voids can be filled with insulation such as basalt or jute.
A waterproofing membrane is attached on top. Next, you should install a sheathing on which you can place siding, block house or any other material. Thus, a small gap (5 cm) will remain between the facade and the membrane, which will serve as ventilation. For free circulation of air flows, it is necessary to take care of the vents.
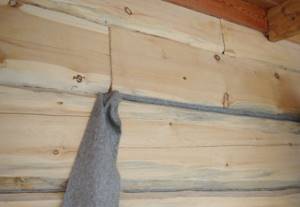
Caulk of log type walls
Before you begin insulating the entire building, you should caulk all the external walls of the house. First you need to find all the cracks (an ordinary candle and calm weather will help to detect sources of drafts in residential areas). In winter, you should take time to look for “bunnies” - places where frost forms due to heat loss. Caulking should be done in the absence of rain. For this you will need:
The material is pushed into the cracks and pushed as deep inside as possible using caulk.
Warmth in the wrapper
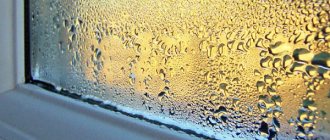
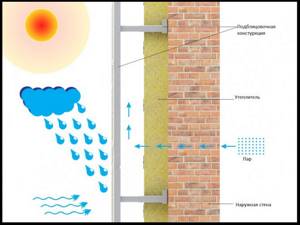
The thermal conductivity of wet insulation increases several times. Therefore, one of the most important rules for installing a ventilated facade on a house is high-quality vapor barrier. Including from the side of the wooden structure. Why?
Let's consider the physics of the process. In winter, the air in hot rooms contains large amounts of water vapor. It moves to the cold side of the structure. Simply put, if there is a cold surface (the outer wall of a log house), then warm air in contact with it inevitably turns into condensation.
To protect the insulation, the outside walls are covered with membrane-type vapor barrier films. The panels are joined with an overlap of 10-15 cm, secured with a stapler. The joints are taped with butyl tape. Please note that one side of the vapor barrier is smooth, and the other is fleecy. When installing it yourself, you will be able to place it correctly - with the fleecy side facing the wall.
The lathing is made from antiseptic-treated timber or galvanized profile. Lumber is selected with the same cross-section as the dimensions of the insulation board. For example, if the thickness of the slab is 100 mm, the sheathing is made of 50x100 mm bars. They are attached to the wall with an edge, vertically, using self-tapping screws of the appropriate size, then a counter rail is nailed to create a ventilation gap. To fix the galvanized profile you will need metal hangers.
Advice! When insulating buildings with your own hands, the distance between the guides is made smaller than the width of the thermal insulation slabs. How much? Depends on what kind of mineral wool - glass or stone - you use. If the edges of the slabs are elastic, like basalt wool, then by 2 cm, soft, like glass wool, by 5 cm. This technique will speed up the installation process and minimize the amount of waste.
Having installed the two outer beams, stretching the cord along them, all the rest are leveled. Using a level, check for significant irregularities on the walls of the log house. You level them with your own hands using plywood pads. The sheathing is also installed in the corners of the house, along door and window openings.
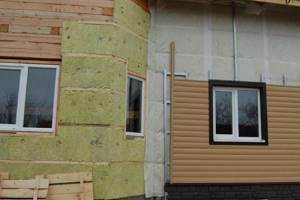
Insulation of a wooden house under siding
- Laying the base material. To level walls previously treated from parasites, you will need a galvanized metal profile or wooden blocks of the required size. This way you can achieve the tightest possible fit of the heat-insulating material used, avoiding the possibility of gaps forming. In addition, attaching siding to such a structure will be much easier.
- Preparatory work. All hanging or protruding elements must be removed. Previously, painted boards were used as decorative finishing for log houses. Regardless of whether it is planned to insulate a timber or log building, its surface must be treated with protective compounds.
- Installation of sheathing. To do this you will need a galvanized profile or timber. It is on them that the insulation material will be attached. There should be a distance of several centimeters between the guides. And the step should be 0.5 m. In this way, you can significantly speed up the process of insulating the facade of a wooden house and avoid many mistakes. Siding can only be installed horizontally, so the sheathing should be designed vertically relative to the ground surface.
- Laying insulating material. Before starting the upcoming work, you should take care of personal protection (goggles, respirator, gloves, overalls). Mineral wool is recognized as a completely safe material, but if it comes into contact with wet skin, it can cause very unpleasant irritation. The slabs can be 5-10 cm thick. The choice will be based on the expected number of layers used.
- Fixing siding. To carry out such manipulations, you will need self-tapping screws, which will be placed in special grooves located on the panels used. We should not forget about temperature compensation of the metal when using metal siding. When connecting it, you should be guided by the diagrams proposed by the manufacturer.
In what cases is insulation of a log house with mineral wool used?
No matter how professionally a house is built from beams, gaps still appear between them. Cold will penetrate even through microcracks, which makes living in such a house uncomfortable. Therefore, insulating the outside with mineral wool is a good way to retain heat.
Information about the types of timber and its selection can be read here.
Insulating the outside of the house with mineral wool will allow:
- Insulate the room as much as possible.
- Save space inside the house, because the insulation will be attached outside.
- Reduce heating costs.
- It's easy to do the work yourself.
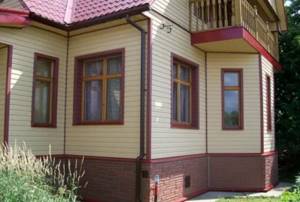
- Upon completion of the work, the building was covered with siding, due to which the building acquired a beautiful modern look.
Any wooden house is subject to shrinkage. Therefore, over time, cracks will still appear in it, and then insulation will need to be done. To perform the work efficiently, you need to prepare the necessary materials, tools, and also follow the technology.
Insulation under plaster
If you plan to lay insulation under the plaster, then all upcoming manipulations should be divided into several main stages.
There are only three of them:
- Laying thermal insulation material.
- Carrying out reinforcement.
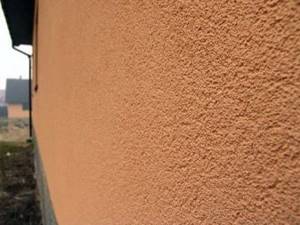
- Application of decorative finishing.
First of all, the installation of a strip or base profile is carried out, which will act as a guide for the first roll of mineral wool. With its help, you can adjust the required gap between the wall and the material being laid. Also, the bar will not allow rodents to get to the base material. The profiles will also prevent the plaster from deforming in the future and joining it at the seams. Next, a reinforcing mesh 20-30 cm wide is attached. Its lower edge is folded up immediately after gluing the reinforcement to the mineral wool. Such actions will make the structure monolithic. For fixation, you will need an adhesive-reinforcing plaster composition.
Several types of plaster can be used to decorate mineral wool:
- silicone based;
- acrylic;
- mineral;
- silicate.
After the layer of plaster has completely dried, its surface can be painted.
Preparatory stage
Before insulating a wooden house from the outside, the facade must be prepared.
There is a standard set of measures for any type of building, which consists of freeing the surface from hanging elements. And there are works typical for a wooden house - checking the condition of inter-crown insulation, caulking (if necessary) and treating with an antiseptic.
Insulating a wooden house does not eliminate the need for caulking of inter-crown joints. Source tiu.ru
Preparatory work should be carried out in dry weather
This is especially important for impregnating the top layer of wood with an antiseptic. The treatment process itself consists of applying the solution using the “dying” method, and if the capillaries of the top layer contain water, the antiseptic will not be properly absorbed into the wood
Treatment with an antiseptic is a mandatory step before insulating and covering wooden walls with façade panels. Source ultra-term.ru
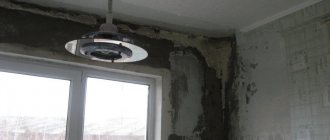
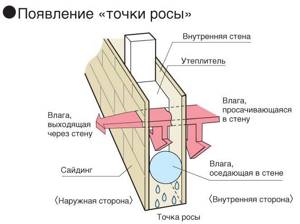
Internal wall insulation and dew point determination
It is undesirable to carry out such manipulations in a wooden house, since due to the physical properties of natural wood, the existing dew point will move inside the living premises. This will inevitably lead to stagnation of moisture and condensation on cold wooden surfaces. However, if there is no other way out or all other options have already been tried, then proper ventilation in the form of several gaps and a vapor barrier should be installed.
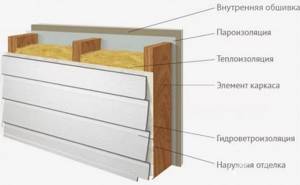
The created pie will look like this:
- interior decoration;
- ventilation gap no more than 3 cm;
- vapor barrier layer;
- insulation material;
- waterproofing;
- another ventilation gap;
- house wall.
It is worth paying attention to the fact that the larger the layer of insulation used, the smaller the difference required in order for condensation to form again on the wooden surface. To create the necessary ventilation conditions, you will need to drill several vents (no more than a centimeter) at some distance from each other.
What properties should insulation for a wooden house have?
Houses made of timber look neat, they are beautiful even without exterior decoration. But if the homeowner is faced with the task of reducing heat loss and making the building thermally efficient, then it is necessary to insulate the log house from the outside. This issue is especially relevant in the Russian climate. An insulation that is suitable for solving this problem must have the following properties:
- Be vapor permeable. This indicator for the insulator should not be less than that of the timber from which the house is built.
- Good to keep warm.
- Do not absorb moisture, as when wet, the thermal insulation properties of the insulation deteriorate.
- Be non-flammable.
With all the abundance of thermal insulation materials on the construction market, only a few types are suitable for insulating wooden houses. The insulation used for thermal insulation of wooden houses has special requirements. The material must have such properties that, in all technical parameters, a residential building made of wood complies with the building codes adopted in the Russian Federation - SNiP 31-02-2001.
Thermal conductivity
The thermal conductivity coefficient shows how much thermal energy a material can transmit in a certain period of time. The lower this indicator is for the insulation, the better, since the heat loss of the building will be lower. Standards for thermal conductivity of insulation for wooden houses are regulated by SNiP 02/23/2003. Insulation should be selected taking into account thermal conductivity, and the thickness of the insulating layer depends on the region in which the house is being built.
Vapor permeability
Wood is a vapor-permeable building material. This means that when there is a difference in temperature outside and inside the house, a pressure difference is created, as a result of which moisture vapor moves through the walls from the inside to the outside. To ensure the release of moisture from building structures, the insulation used must have the same vapor permeability properties as wood.
In this case, all moisture from the house will come out, ensuring natural drying of building structures. If you install a non-vapor-permeable material along the contour of a wooden house, then water will accumulate in the timber or logs, causing them to accelerate rotting.
Fire safety
Fire resistance is one of the most important parameters when choosing materials for insulating and finishing the walls of a wooden house. The log house itself is made of flammable material, so in construction everything possible is done to reduce the possibility of fire in wooden structures.
In regulatory documentation, it is customary to classify building materials according to the degree of flammability into several types: from non-flammable (NG) to flammable with a combustion class from G1 to G4. The insulation under siding for houses made of timber or rounded logs must be non-flammable NG. Basalt wool is suitable for this parameter - made from stone rocks, it can withstand heating up to 1000 degrees Celsius.
Insulation shrinkage
Thermal insulation material must be form-stable - maintain its shape throughout the entire life of the building, and not shrink. Otherwise, gaps appear between the individual elements of the insulating layer (plates, mats, rolls), through which heat escapes. As a result, the amount of heat loss increases and the efficiency of the building's thermal insulation decreases.
Water absorption
When absorbing moist vapors from the environment, any insulation loses its heat-preserving properties. Water conducts heat better than air and freezes when the temperature drops below zero, turning the heat insulator into a piece of ice. To ensure that the heat-retaining properties of the walls do not decrease during operation, external insulation must be carried out with insulation with a low water absorption coefficient.
The water absorption of a material is indicated as a percentage - this is the amount of water that it absorbs when completely immersed. The lower the water absorption coefficient, the better.
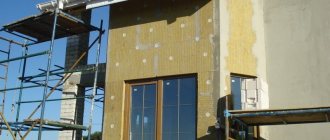
Facade insulation methods
It should be said that for insulating a wooden house from the outside, there are two technologies for external insulation:
- ventilated facade;
- wet facade.
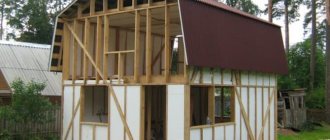
The first technology is suitable for frame houses. The frame is mounted on the walls, after which it is covered with siding, clapboard or some other finishing material. In this case, the insulation is placed between the finishing material and the wall. This technology is very good in that it eliminates wet work, and in this case the facade itself will be stronger and more durable.
In the second case, the walls of the house are simply covered with insulation, after which they are plastered using a technology specially developed for this.
Now we will tell you in more detail about the features of each method.
Ventilated facade technology
The process of creating a so-called ventilated (or curtain) facade includes several parts:
- façade preparation;
- arrangement of the ventilation gap and installation of the frame;
- frame covering.
And, in principle, with this method its use is also allowed. You just need to remember that polystyrene foam resists fire very poorly, and also does not allow steam and moisture to pass through. And this can negatively affect the microclimate inside the house. Therefore, in this case it is better to give preference to mineral wool.
If we talk about racks for the frame, then either beams or boards are used for it. They can be attached to the walls using brackets or metal corners. By the way, as an option, you can use a profile that is used for installing drywall. In addition, you will need a vapor barrier film, which will protect the insulation from getting wet, and a material that will be used for finishing: siding, lining, block house or some kind of facade material.
Also, to implement this method you will need inter-crown insulation. Usually jute tow is used in this capacity, which acts as an excellent protection for seams, but you can use special foam or any other materials that are suitable. You will also need a wood preservative so that it can resist moisture. It is usually applied under plaster.
Now let's talk about the features of another method.
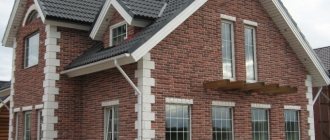
Wet facade technology
It consists of the following parts:
- façade preparation;
- installation of insulation;
- reinforcement;
- painting.
If we talk a little more in detail, then in this case it is also better to give preference to a material such as mineral wool. In addition to insulation, in this case it will also be necessary to purchase special glue for mineral wool, dowels in the shape of umbrellas, a special reinforcing mesh made of fiberglass, perforated corners, primer, paint for the facade, as well as decorative plaster. Once all these materials have been purchased, work can begin.
Nuances of thermal insulation of a building with mineral wool for siding
When finishing a house with siding, it is important to preserve the advantages of a wooden structure - environmental friendliness, low thermal conductivity. At the same time, it is necessary to reduce the fire hazard, moisture absorption and the likelihood of insect exposure.
Mineral wool will solve these problems, but it is important to strictly follow the insulation instructions. In particular, ensure the possibility of air circulation to prevent the accumulation of condensation and the negative impact of moisture on the wood. To do this you should:
- install a frame made of wooden beams;
- choose insulation of such a thickness that will protect the walls from freezing;
- equip a ventilated façade (a metal profile can be used for lathing).
When thermally insulating a building with mineral wool for siding, it is important to maintain environmental friendliness.
Vapor barrier of walls
When carrying out work on wall insulation, you need to do so as to minimize the penetration of moisture from the interior of a residential building under the insulation.
To do this, you need to provide a layer of vapor barrier; it is laid directly on the wall. To do this, you can use an air-permeable diffuse membrane.
The vapor barrier material is attached using a construction stapler; individual strips must be secured with staples. To preserve the insulating properties of the material, it is best to overlap the fabric by 10 -12 cm.
The seams can be additionally insulated with adhesive tape (stationery tape is suitable for this purpose).
Preparatory work
Before installation, carry out the following steps:
- Now comes the time to seal cracks and gaps . They are sealed with sealants or jute fibers;
- Next, proceed to installation of the sheathing . bars measuring 50×50 mm or 50×100 mm are attached to the surface of the walls with self-tapping screws - they are selected according to the number of layers of insulation.
- The lathing is installed in the form of horizontally and vertically located guides with a distance between them almost equal to the width of the insulation - less by one cm, in order to more tightly join the material.
Sealing cracks with tow
Sealing cracks with sealant
What you need to prepare to insulate a house with mineral wool
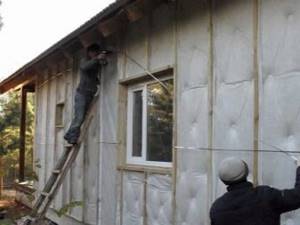
In addition to the mineral wool mats, you need to prepare two layers of film - waterproofing and for wind and water protection.
The first layer of film will protect the wood from moisture. It is placed on a protected wooden surface. The film must be vapor permeable. The second film is attached after thermal insulation. It protects against moisture that could enter from the outside. After this, the outer part is covered with any cladding, not forgetting to arrange ventilation. There must be a ventilation gap between the cladding and the insulation, which is why the cladding is often called a ventilated façade.
You will also need two layers of antiseptic, fastening brackets, mounting tape, timber for sheathing, anchor nails, a knife for cutting mats, protective gloves and a respirator for working with cotton wool. Siding or corrugated sheeting for cladding, or other material can be chosen depending on your preferences - the market offers a wide variety.
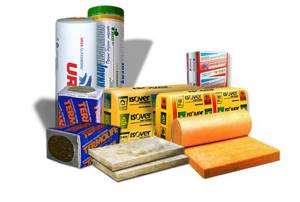
Characteristics of insulation for facade siding
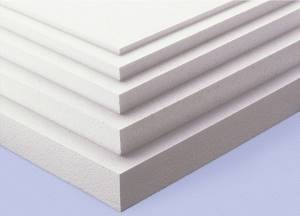
The domestic market offers a wide selection of insulation materials that can be used to insulate the facade of a building with subsequent installation of siding: mineral wool and polystyrene foam (expanded polystyrene), glass wool and penoplex, as well as polyurethane foam.
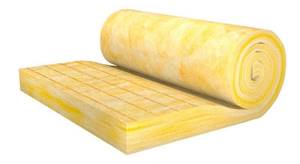
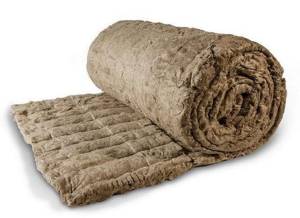
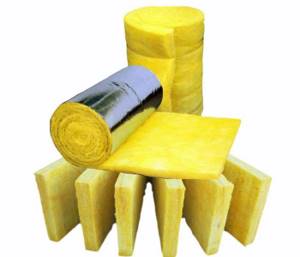
Mineral wool
Mineral or stone wool is the most common and popular material used for insulating walls under siding. Mineral wool is produced in the form of slabs or rolls of various sizes. Its distinctive features are affordable cost, ease of use and good thermal characteristics.
This type of insulation is produced by domestic and foreign manufacturers and is quite widely represented on the building materials market in our country.
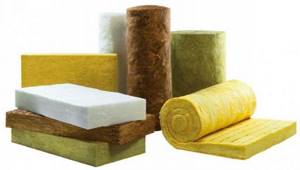
A variety of release forms allows you to choose the mineral wool of the desired size
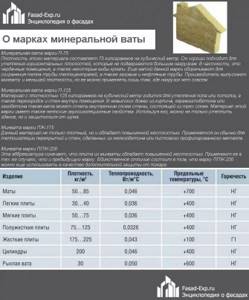
The main technical characteristics of mineral wool are given in the table below:
| Thermal conductivity coefficient, W/m2×˚K | Water absorption,% | Vapor permeability, m2×h×Pa | Flammability class | Density, kg/m3 |
| 0,031 – 0,12 | 70 | 0,3 – 0,6 | NG/G1/G2/G3/G4 | 50-225 |
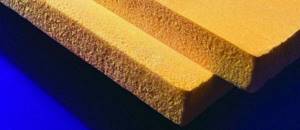
Styrofoam
Polystyrene foam or its modern modification polystyrene foam is a popular type of insulation used for siding. Low cost and ease of use are the main advantages of this material, but flammability somewhat reduces its overall positive rating.
The main technical characteristics of polystyrene foam are given in the following table:
| Thermal conductivity coefficient, W/m2×˚K | Water absorption,% | Vapor permeability, m2×h×Pa | Flammability class | Density, kg/m3 |
| 0,039 – 0,05 | 3,0 | 0,05 | G1/G2/G3/G4 | 60 – 220 |
Polystyrene foam is available in various sizes, both in width and length, and in thickness, which is convenient for use in different climatic regions of our country
Glass wool
Glass wool is similar in appearance and in its produced form to mineral wool, but the differences lie in the components used in its production.
The main technical characteristics of glass wool are given in the table below:
| Thermal conductivity coefficient, W/m2×˚K | Water absorption,% | Vapor permeability, m2×h×Pa | Flammability class | Density, kg/m3 |
| 0,03 – 0,052 | 70 | 0,01 – 0,6 | NG/G1 | 11-50 |
Glass wool is available in a form similar to mineral wool, but when using it, it is necessary to comply with more stringent requirements for safe work practices
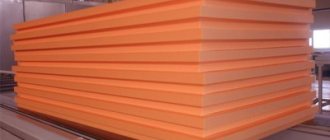
Penoplex
Penoplex is a type of extruded polystyrene foam, which is quite in demand when insulating walls under siding. The advantages of this material are the following indicators:
- excellent thermal characteristics;
- low ability to absorb moisture;
- resistance to external mechanical influences.
Among the disadvantages, it should be noted: flammability and the ability to release harmful substances during combustion.
Main technical characteristics of penoplex:
| Thermal conductivity coefficient, W/m2×˚K | Water absorption,% | Vapor permeability, m2×h×Pa | Flammability class | Density, kg/m3 |
| 0,028 – 0,033 | 0,2 – 0,4 | 1,2 – 2,0 | G1/G2/G3/G4 | 20-48 |
Penoplex is produced by almost all companies operating in the thermal materials market.
Related article:
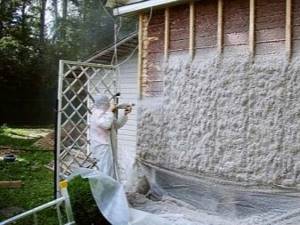
Polyurethane foam
This insulation is less in demand among individual developers, which is due to the need for special equipment to apply it to the wall surface when used in a liquefied state, and the high cost when sold in solid form.
Expert's point of view
Dmitry Kholodok
Technical director of repair and construction
Ask a Question
“Polyurethane foam in a liquefied state is a gas-filled mass that is applied to the surface to be treated in liquid form, after which it foams and hardens.”
Main technical characteristics of polyurethane foam:
| Thermal conductivity coefficient, W/m2×˚K | Water absorption,% | Vapor permeability, m2×h×Pa | Flammability class | Density, kg/m3 |
| 0,019 | 2,00 | 0,05 | G1/G2/G3 | 30-150 |
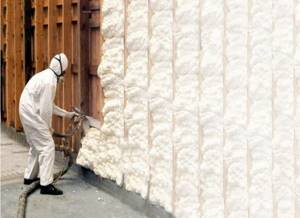
Applying polyurethane foam to the wall of an insulated building
Methods and technology of working with mineral wool for plaster and siding
At the moment, there are several common methods of insulating the facades of private houses using mineral wool. Among them, the most popular are:
- “Wet” facade (under the plaster layer). Initially, the mineral wool must be attached directly to the building itself. After this, plaster is applied to it, which is subsequently painted or decorated in other ways, depending on the preferences of the building owner.
- "Ventilated facade. Often used for insulation under siding. In this case, an air gap is created between the mineral wool fixed to the wall and the outer cladding layer. Its thickness must be calculated using the appropriate formula. To create a gap, an appropriate metal or wooden structure must be attached to the house. Its main purpose is to fix facing materials. This could be lining, tiles, stone, fiber cement boards, etc.
“Wet” facadeVentilated facade
Penoplex is often used in combination with mineral wool. For example, the base is insulated with penoplex, and the walls with mineral wool.
Insulation of the facade of a private house with mineral wool can be done independently without the help of specialists. In order to do this, you need to take a responsible approach to the procedure, prepare all the tools in advance and understand the most important nuances of the work.
Preparation when working with mineral wool with your own hands
The preparatory stage involves performing certain work on the surface of the walls. Be sure to:
- remove peeling plaster;
- remove paint;
- get rid of solution build-up.
Places that have been affected by mold or mildew must be thoroughly cleaned. After this, they need to be treated with appropriate substances.
Preparatory work involves removing window casings, drainpipes and additional decorative elements of facades. After this, the walls must be primed. To do this, use a deep penetration primer.
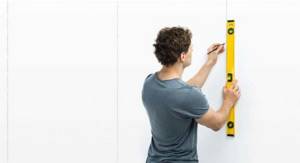
Surface marking
In order to carry out the insulation process efficiently, it is necessary to mark the surface of the facade. To do this, you should install sags: horizontal, vertical and diagonal. First, pins or nails must be secured at different points on the facades. A nylon cord should be pulled between them as a weight gain. In this case, you should use a level. Weights allow you to identify wall unevenness and install insulation evenly in such places.
Installation of profiles for mini-slabs
Base profiles (or strips) are used as a guide that supports the first row of mineral wool on the facade. In addition, such elements help protect the insulation from rodents penetrating into it from below. For installation of profiles, driven dowels are most often used.
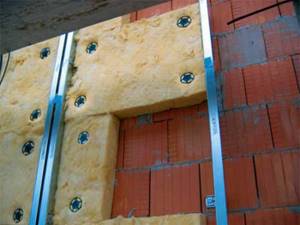
Fixing mineral wool boards
In order to install mineral wool on the facade, you need to use a special construction adhesive designed for such purposes.
It is prepared in accordance with the instructions. The substance should be applied to the mineral wool using a comb spatula. The glue should cover the entire surface of the sheet.
If we are talking about a ventilated façade, then before installing mineral wool on it, you need to secure special brackets in advance, where the guides will subsequently be attached.
The mineral wool itself is attached to disc-shaped dowels or mushroom dowels. Afterwards, holes are cut in the mineral wool so that it can be easily placed on the brackets. And finally, disc-shaped dowels are attached so that the “head” of the dowel holds a couple of mineral wool slabs at once.
For 1 square meter it is necessary to use up to 5-7 disc dowels. It is best to hammer them into the corners of the slabs.
Final work
The roll of mounting mesh must be fixed at the top of the wall. This can be done using pins or mortar. The material sheets must overlap each other by at least 10 centimeters.
It is allowed to perform rough plastering with a thickness of 3 to 5 millimeters. 2-3 days after this, you can begin applying the decorative layer.
Methods for installing mineral wool
The choice of installation method depends on the type of facade finishing. If panels, siding, or lining are used for cladding, it is better to lay mineral wool into the frame. It will also serve as the basis for creating a ventilation façade or securing finishing materials. If you decide to plaster the walls outside, then you need to attach the insulation to the walls without a frame. Both options are suitable for finishing with siding.
Frame
The frame method involves building a sheathing into which insulation will be laid.
The frame method reduces installation time.
The disadvantage of this option is the high costs associated with the purchase of timber. Advantages of the method:
- ease of laying and fixing mineral wool;
- reduction of installation time (if the sheathing cells are multiples of the slab sizes);
- ease of fastening finishing materials;
- the ability to equip a ventilated façade;
- All work can be done by 1 person.
Frameless
If there is no frame, the insulation is glued to the wall and secured with umbrellas. The use of this method will allow you to save on the purchase of materials (timber, profiles) and their installation. Instead, you will need a reinforcing mesh and a mixture to create a protective layer, onto which plaster is then applied. If you plan to finish with siding, it is necessary to install a sheathing to secure it.
You can lay mineral wool in whole slabs, without cutting. This will speed up the process. The inconvenience is the need to carefully seal the joints and the inability to work alone (due to the large size of the sheets).