You can even make a welding machine or sawmill yourself, but when you need to make a device with your own hands that will be used in everyday life, then ensuring the safe operation of the product comes to the fore.
A homemade water heater will be used by all family members who may have only a vague understanding of electrical resistance, voltage and current. To minimize the likelihood of an accident, you will need to manufacture the device in accordance with all electrical safety rules.
Do-it-yourself water heater: choosing the type of device
Despite the fact that it is much easier to make a storage device at home, you should first of all consider the option of assembling an instantaneous water heater. Such household appliances will allow you to instantly heat water, and electricity will be consumed only when the device is turned on. Unlike boilers, installing a flow-through device does not require much space, and you also do not need to insulate the device.
To heat water, both options use a heating element, but to make a flow-through device you will need to purchase a more powerful element.
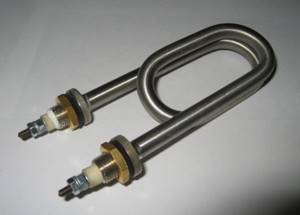
Powerful water heating element
Of the additional parts, you cannot do without the use of an RCD. This device will automatically disconnect the contacts if an electrical leak occurs. You should also stock up on large-section copper wires and tools for the job.
DIY instantaneous water heater
To make an instantaneous water heater, you should prepare the necessary tools:
- Welding machine (inverter).
- Electrodes.
- Grinder with a nozzle for removing rust.
- Hammer.
- Drill with a set of metal drills.
- Kern.
For the instantaneous version of the water heater, you will need the following materials:
- A steel pipe, the length and diameter of which slightly exceed the width and length of the heating element.
- Electric water heating element with a power of 4 kW.
- Sheet steel 3 mm thick.
- Anti-corrosion paint.
- Bolt and nut M14.
When everything you need is prepared, you can begin manufacturing the device. The first thing you need to do is to thoroughly clean the metal surfaces from rust. To do this, you need to use a grinder with an attachment.
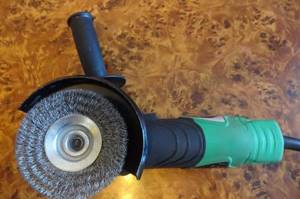
Grinder with a nozzle for removing rust
Then a rectangle is cut from the metal sheet, the minimum side of which should slightly exceed the outer diameter of the metal pipe. On the cut metal sheet, 2 holes are made with a drill, the diameter of which should be 1 mm greater than the thickness of the heating element leg. To position the holes at the required distance from each other, you should dip the ends of the contact rods in white paint and then lean the ends of the contacts against the plate, trying to make marks equidistant from the side edges of the plate. When the paint dries a little, it is necessary to drill into the metal along the white dots.
At the next stage, the plate prepared in this way should be welded to the end of the pipe. Before performing this operation, the part must be lightly grabbed so that the previously made holes are exactly in the middle. After the side plug is welded, the metal protruding beyond the outer diameter of the pipe is cut off with a grinder or gas cutter.
Next, having marked 2 points with a core at a distance of 20 mm, which must be on the same line, use a drill to make holes with a diameter of 19 mm. These holes are necessary for welding threaded pipe sections to connect the water supply and remove the heated liquid.
Considering the need for grounding, an extended M14 nut must be welded to the pipe, to which the conductor will be connected using a bolt.
In the next step, the electric heating element should be placed inside the pipe. The legs of the device should be carefully installed in the previously made holes, and then tighten the fastening nuts with sufficient force. When installing the heating element, be sure to put rubber washers on the threaded part of the legs.
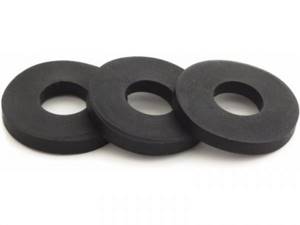
Sealing washers for heating elements
Washers should be installed on the inside and outside of the device, and for greater reliability, apply high-temperature sealant to the surface of the gaskets.
Then the opposite end of the metal pipe should be hermetically welded. A square piece of sheet steel should also be cut for this purpose. The side of the square must be at least 50 mm larger than the outer diameter of the pipe. To reliably connect the device to the plate, it is necessary to lay it on a flat surface, then install the device with its heating element legs turned upside down exactly in the middle of the square so that the device’s nozzles are positioned strictly perpendicular to any of the edges of the lower square and carefully weld the metal, trying not to overheat the homemade water heater too much.
When the device has completely cooled down, it is also placed upside down on a wooden board and 4 holes are made in the corners of the bottom plate with a 10 mm drill. The holes are necessary for attaching the homemade device to the wall.
Before installing an instantaneous water heater, its performance must be checked. For this purpose, you should connect the electrical cable to the threaded contact of the heating element, fill the device with enough water to fill the entire space, and plug the device into the network.
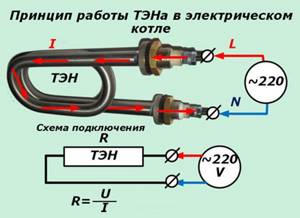
Heating element connection diagram
As soon as the water in the device boils, it should be turned off. If there are no leaks, then the homemade heater should be painted in any color with high-temperature paint for metal. Before carrying out this operation, you should pour the water out of it, degrease the surface with a solvent, and paint the device using a spray gun.
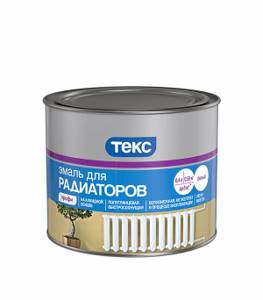
Radiator paint
When the paint has dried, you can begin installing the device into the plumbing system. To do this, install the device at an equal distance from the liquid sampling points, and position the device with the pipes up and attach it to the wall. For this purpose, you should first make 4 holes in the vertical surface. Using anchor bolts, a homemade electric water heater is attached to the wall from the side of the plate in which special holes were made for this purpose.
After the device is securely fixed, a flexible hose with cold water is connected from the water supply network to one of the pipes, and the other is connected to the hot water circuit.
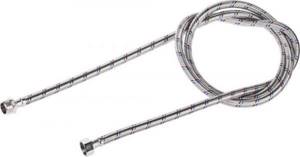
Flexible hot water hose
Then water is supplied to the device and the water heater is tested for leakage by water pressure. If no leaks are found, then electricity should be connected to the homemade device.
Given the high power of the device, it is not recommended to use a standard plug to turn on the device. The water heater should have a separate electrical circuit from the incoming electrical panel. You should also install an additional 20 A automatic fuse, which should be located in an accessible location, to turn on the device when necessary.
When operating a heater of this design, it will be very inconvenient to turn on the device using a switch each time. For more comfortable use of the device, it is recommended to install a pressure switch in the water supply circuit after the heating device. And install a check valve in front of the water heater so that if there is no water in the water supply, the heating element will not automatically turn on. When using this scheme, water will be heated only at the moment when the tap is open.
To automatically turn on the device, you can install a thermostat directly into the water heater, but installation of such a system must be done at the stage of manufacturing the device. The disadvantage of a water heating system with a built-in thermostat is that the device will operate in heater mode, giving off some of the heat to the surrounding air. Losses can be reduced by covering the device with a heat insulator that is resistant to high temperatures. Despite the more complex design of such a system, the main difference from a device with an installed pressure sensor will be the instant supply of hot water when the tap is opened. Significant disadvantages include higher electricity consumption due to the more frequent activation of the heating element.
Manufacturing process
- A copper tube should be wound around the mandrel. If its diameter is less than 8 mm, then we recommend making a double winding. The length of the spiral should be 15-20 cm. The tube should be pulled towards you to prevent its deformation. A mandrel with a diameter smaller than 5 mm should not be used. This will cause the tube to bend and flatten.
- You need to cut a couple of round plates from sheet copper. Their diameter should be the same as that of brass couplings. Holes are drilled in the center of the plates according to the diameter and number of tubes. Both surfaces of the plates and one of the ends of the coupling are cleaned. This is done using sandpaper.
- Medium-temperature solder should be used to solder the plates to the couplings.
- After the parts have cooled, tubes are inserted into them to a depth of 1 mm. They are soldered using a gas burner or the same solder with flux.
- Next, the coil is connected to the water supply and water is supplied to check for leaks. If it exists, the problem must be fixed.
- In a thick pipe it is necessary to mark a pair of holes that correspond to the coil couplings. They must be drilled so that they are 1 mm larger than the diameter of the pipe sections.
- The stainless steel pipe is cleaned from the inside and outside using a grinder. A coil is lowered into a thick pipe. It is inserted into the hole of the tube with the coil using FUM tape. Then the coupling is screwed in.
- Thin pipes are soldered using a torch or fluxed solder. The thin tube should not be overheated so as not to subject the FUM tape to melting.
- A pair of holes are drilled from the opposite edge of the body, and threaded pipes are welded to them.
- If the heating system has thick pipes, then threaded sections of identical diameter should be used and a hole made to match their size.
- A pair of circles are cut out of sheet steel, the diameter of which should be 11 cm larger than the body. If the water heater is not insulated, then the size of the disks should match the diameter of the body.
- The circles are welded to both ends of the body.
- Both heating terminals are connected to the water supply to check the device for leaks.
- The unit should be coated with paint that prevents corrosion.
How to make your own thermostat for a water heater
If the budget is very limited when making a water heater, then you can make a thermostat for the water heater with your own hands. The thermal breaker is installed as follows:
- Remove the thermal relay from a faulty car of any brand that controls the inclusion of forced engine cooling.
- Set the thread type of this part.
- Select a metal tube of suitable diameter and use a tap to cut the internal thread.
- Make a hole in the instantaneous water heater and weld a threaded tube.
- Screw in the thermostat, having first applied high-temperature sealant to the threads.
For the correct functioning of the heating element switching system, you cannot do without using an additional 12 V source and an intermediate relay. The relay installed in the system must be of reverse action, that is, it must open the circuit when low-voltage voltage is applied to the coil. This feature is due to the fact that in a car, the radiator blower is turned on when a certain temperature value is exceeded, while the flow radiator must be turned off at the moment when the temperature value exceeds a critical value.
How to make it yourself
For those who like to do something with their own hands or have a technical education, it will not be difficult to make a flow-through boiler.
The simple design itself is repairable and productive - all this is possible for budget money. A homemade instantaneous boiler is installed by bending the spiral of a pancake around an electric stove or gas burner.
To make a water heater at home you will need:
- The pipe is made of copper, since copper is an excellent heat conductor. Sometimes they use nichrome wire, winding it several times.
Please note: the length of the pipe does not affect the amount of heat transferred from the source, so in this case it is not necessary to clutter the structure with additional rings.
- Rubber hose (preferably new).
- Rubber gaskets matching the diameter of the hose and metal clamps.
In order to do everything correctly and safely, you need to familiarize yourself with the technical documentation of the electric (gas) stove and determine its potential.
Progress:
- Measure the diameter of the electric stove or burner pancake.
- Bend the copper pipe into a spiral with a diameter slightly larger than the diameter of the stove so that the spiral outlets protrude 20-30 cm from the stove. It is necessary that the spiral fits tightly to the base of the slab and does not have any distortions. Make sure the spiral has straight, smooth edges.
- Secure the spiral using the brackets and bolts (you can use another fastening hardware to secure it).
- Connect a rubber hose to the spiral outlets and secure it with a metal clamp.
- Connect the other end of the hose to the faucet and install it along the sink.
- Turn on the water and check the operation of the system for leaks.
It is important to know: before turning off the water, you must first turn off the heating element. If you do the opposite, the spiral may burn out. Keep in mind that the lower the pressure of the flowing water, the hotter it is.
Keep in mind that the lower the pressure of the flowing water, the hotter it is.
If the coil overheats, do not turn on the water - this can lead to rupture of the metal. Turn off the gas (electricity) and give the metal some time to cool.
All parameters can be varied, since, in fact, a homemade boiler is based on the potential and capabilities of a gas or electric stove.
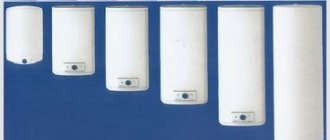
What can be made from an old Ariston heater?
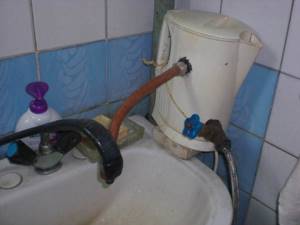
“Happy” owners of Ariston water heaters, after replacing the heating element multiple times, decide to purchase and install a device of a different brand. The old device makes an excellent version of a country shower, the water for which is heated by solar energy. To convert the device into a water heating tank you must:
- Use a grinder to saw through the outer casing of the device and remove it.
- Clean the internal tank from thermal insulation.
- Degrease the surface.
- Paint the tank matt black with any metal paint.
- Install and connect the tank to the summer shower system.
The tank must be installed at a height of at least 2.5 meters in an area open to sunlight. The most correct thing would be to install a water heating device directly on the roof of the summer shower. The container should be installed in a vertical position, and the water connection must be made to the drain pipe of the device, because, unlike the electric model, in a summer shower the water will drain by gravity.
This version of a country shower is the simplest; if desired, you can make a more complex design of a device that heats the liquid using solar energy.
Country version of the water heater
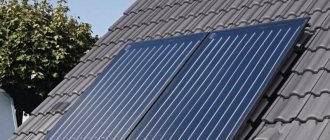
At your dacha you can make homemade solar water heaters. The only drawback of such devices is the lack of heating during cloudy weather. The solar water heater is made of the following materials and parts:
- Old refrigerator.
- Water tank.
- Metal-plastic pipe with a diameter of 16 mm.
- Edged boards 200 mm wide.
- Cellular polycarbonate sheet.
- Steel sheet 3 mm thick.
- Black metal paints.
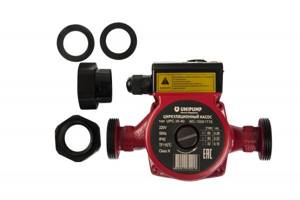
You will also need to purchase consumables for fastening materials and various adapters for connecting pipes. In addition, you will need to buy a low-power circulation pump.
The manufacture of a water heater powered by solar energy can be done in the following sequence:
- The rear radiator is removed from the refrigerator and the copper tubing is cut off where the unit connects to the compressor and freezer. When performing this operation, it is necessary to preserve the original fastening elements of the part.
- A rectangle is cut out of a metal sheet with a grinder, the length and width of which should be 20 cm greater than the parameters of the refrigerator radiator.
- One of the sides of the metal rectangle is cleaned, degreased and painted black. The refrigerator radiator also needs to be painted.
- When the paint has dried, place a copper grid on the painted surface of the metal sheet so that it is equidistant from its corners.
- On the painted surface of a metal sheet, using any sharp object, notches are made under the mounting holes of the copper radiator.
- Then, at the marked points, you need to drill holes, the diameter of which should correspond to the radiator mounting holes.
- It is also necessary to make holes with a diameter of 5 mm along the perimeter of the metal sheet for attaching the side edges of the device. The distance between the holes should be about 100 mm.
- Using a gas soldering iron, adapters for connecting metal-plastic pipes are soldered to the cut ends of copper tubes.
- It is necessary to cut off sections of 200 mm from the board with a hacksaw. 2 segments should be equal to the width of the metal sheet, and the other two should be 50 mm less than its length. After this, the wood must be treated with a protective compound.
- The board sections are installed on an edge along the perimeter of the metal sheet and screwed with wood screws through previously made holes.
- A copper radiator is installed inside the “box”, which is screwed to a metal plate with bolts. The pipes with adapters for connecting the metal-plastic pipe should be brought out through the holes made with a feather drill in one of the side boards.
- Cut a rectangle from a sheet of transparent cellular polycarbonate that will be equal to the size of the metal base.
- Using self-tapping screws and rubber washers, screw the polycarbonate rectangle to the ends of the boards.
- It is necessary to install the freezer removed from the refrigerator into the water tank, and adapters should also be soldered to the copper tubes of it. The freezer should be fixed at the bottom of the tank, and the pipes should be routed to one of the side walls.
A DIY country water heater is installed as follows:
- The device is placed in a sunny area.
- A tee is connected to one of the water heater pipes, to which a metal-plastic pipe and tap are connected. Only a metal-plastic pipe should be connected to the second pipe.
- On the other side, the pipes are connected to the pipes coming out of the water tank.
- It is also necessary to install a circulation pump in the system so that the coolant moves from the water heater to the water tank.
After connecting the pump to electricity, the oil will be heated by solar radiation, which will easily pass through the polycarbonate plate. The device also creates a greenhouse effect, which will allow you to effectively use the device even during partly cloudy weather.
The heated oil will transfer heat to the water in the tank with the freezer installed, so it should be insulated with foam. Hot water intake can be forced using a pump or by gravity, but this will require installing the tank as high as possible. To ensure that the heated oil does not cool down on the way to the heat exchanger, metal-plastic pipes should be covered along the entire length with polyurethane foam.
Making a homemade water heater will not only save money, but also gain invaluable experience in constructing complex devices with your own hands. If you need to make an electrode device yourself, then you should definitely remember about safety precautions when handling devices that run on electricity.
Water heater insulation
- 7-10 angles are welded to the surface of the body so that the second shelf runs parallel to the surface of the pipe. Welding is not carried out with a continuous seam, but through four tacks, the length of which is 1 cm.
- A strip 2 cm wider than the distance between the end circles of the base is cut out of thin sheet material. The length of the strip should be enough to wrap the device.
- Sides are made on both sides of the strip, the width of which is 1 cm. Using pruning shears or scissors for cutting metal, the sides are given a sawtooth shape. The teeth are marked with a zigzag. They should have the shape of an equilateral triangle. The teeth on the edge of the strip, which are opposite the corner, are cut off.
- The strip is applied to the corner. It must be directed in the correct direction to wrap the unit. Once the rivets are installed, it will be impossible to correct errors in operation.
- Next you should drill the strip and corner. Seven holes should be made and the parts should be fastened using a riveting device.
- A piece of the required size is cut out of mineral wool and inserted between the corner to which the thin metal is attached and the adjacent corner.
- The insulation is covered with metal and secured with rivets.
- A similar operation is carried out with other corners.
Do-it-yourself faults and repairs of instantaneous water heaters
Water heaters are used not only in apartments, but also in private cottages or country houses. Many owners prefer instantaneous electric water heaters because of their advantages - compactness, reliability, efficiency, long service life and reasonable price.
Even the most reliable and high-quality water heaters can experience breakdowns that you can try to fix yourself.
Before repairing a instantaneous water heater, you should familiarize yourself with the recommendations of specialists
Before you begin repairing the device, be sure to disconnect it from the power supply to avoid accidents. To repair a water heater you will need various types of screwdrivers, adjustable wrenches, a tester and the necessary spare parts.
Water heater breakdowns:
- Failure of the heating element. This malfunction makes it impossible to regulate and heat the water, the indicator light does not light up, and water from the tap flows with scale. Most often, a failed heating element is replaced with a new one.
- Thermal relay and thermostat malfunction. If one of the two elements breaks down, the heating element does not turn on, or the device operates at the lowest power when the regulator is set to the extreme level. The tester is used to measure resistance. The broken element is thrown away and a new one is installed in its place.
- Blockage. When the heater is operating, extraneous sounds are heard or a decrease in the power of the device is observed. To do this, you need to clean the heating element from scale and dirt using special means.
- Violation of the seal of the device. The only sure way of failure is wear of the material to which the heating element is attached. To do this, you need to unscrew the heating element and replace the flange under it.
If problems arise with the instantaneous water heater while the device is still under warranty, it is not recommended to repair it at home. In case of the slightest problem, it is better to contact the service center.
DIY passive solar water heater: device diagram
A solar water heater is a device for which there is no need to connect to electricity and use pumps to circulate water. The simplest unit, often used for a summer shower or homemade plumbing, is a large metal tank filled with water. During the day, the water in it can heat up to 40 degrees. Thanks to the pipe layout, you can run water both into the shower and into the kitchen.
By using solar energy to heat water, you can significantly save on the electricity or gas required for a tankless water heater.
Passive solar water heater needs to be installed in an open area
The solar convector consists of a storage tank, water pipes, a heat absorber and a heat exchanger. For domestic needs, a 200 liter tank and a solar convector with an area of 2-2.5 sq.m. are sufficient. Such a device can heat a sufficient amount of water in a couple of sunny hours.
Scheme of working on a solar convector:
- Weld seamless pipes together to form a lattice. By welding, attach it to a sheet of durable steel and cover it with black paint.
- Make a frame from moisture-resistant plywood and attach it to a steel sheet, cutting holes in the frame for pipes.
- Insulate the pipes and cover the collector with glass, connecting the parts with silicone. Also coat the free space between the frame and the glass with silicone.
- Bend the copper pipe in a spiral, bringing its edge out. Insulate the tank for better heat retention.
- Place the manifold in place and connect it to the cold and hot water pipes. Install the expansion tank when hot water enters the tank.
To check the boiler for functionality, you need to fill the tank with water, pour water into the convector system. When water heats up, it will rise up and fill the tank, and cold water will flow from it into the system.
Installation methods and types of fastenings

Installed structure in the toilet
Currently, manufacturers produce two main types of gas boilers: instantaneous and storage. Products from Electrolux and Vector are especially popular among consumers. The device of this line can be located on the floor or on the wall. In the second case, various types of fastenings are used:
- dowels with fixation;
- metal hooks.
These elements are suitable for a reliable base of concrete or stone. For looser and thinner surfaces, other fastenings and installation methods should be used.
For example, on a wall made of plasterboard, it is better to install a reinforced boiler. For these purposes, you can use various materials:
- wood reinforcement;
- metal reinforcement;
- fastening with chemical anchors.
The choice of installation option directly depends on the experience of the technician, available tools and materials, as well as the size of the boiler.
How to make an electric water heater with your own hands
Quite often, in city houses connected to the gas main, an instantaneous gas water heater is used, popularly called a “boiler”. Gas stove appliances are also quite popular, providing hot water to the kitchen and bathroom.
For country cottages, an electric boiler is most often used, which not only heats water for domestic needs, but also allows you to connect autonomous heating.
A tank with a capacity of 120 liters should be enough for a family of 4 people for several days. By installing a homemade boiler on a high cabinet, water from it will be supplied by gravity.
Parts to make an electric water heater can be found at a flea market
Progress:
- Prepare a container of the required size;
- Make a coil from copper pipes;
- Insulate the structure;
- Assemble instantaneous water heater;
- Connect the heating element;
- Remove pipes for hot and cold water, install taps at the inlet.
A homemade instantaneous water heater from the mains can be made from an old gas cylinder or you can purchase a large container made of stainless steel or aluminum.
Tips: how to make an electric water heater with your own hands
Residents of private houses often experience inconvenience due to the lack of hot water. The rather troublesome process of obtaining hot water makes life inconvenient and wastes time. Purchasing and installing an electric heating boiler, which can solve this problem, will be quite expensive.
The design of the boiler includes a container with sufficient volume, a heating element responsible for heat and its supply. You need to choose a container for a homemade boiler that is least prone to corrosion.
How to make coils for a water heater:
- For manufacturing, you can use a metal pipe.
- You can make a coil from a metal-plastic pipe that has a small diameter.
- To easily make a coil, you can use a pipe that will have a cylindrical shape.
- One end of the pipe must be fixed on the rod, performing a slow rotation, which will allow you to control the density of the turns and their freedom.
It is important to remember that scale forms on the metal coil over time, so it needs to be cleaned from time to time. To retain heat, the boiler must have good thermal insulation
To do this, you can use a wide variety of materials: foam film, isolon, polyurethane foam.
Do-it-yourself heating from a water heater: nuances of operation
As a rule, a boiler is used to provide hot water to homes. The water flowing through the pipes is heated by a heating element. Already hot water is distributed through pipes to the bathroom or kitchen.
You need to choose a water heater depending on the area of the room
A flowing electric water heater can be used as a boiler for heating rooms.
Most often, small flow-through heaters are used to heat summer cottages with non-permanent residence. A significant disadvantage of using such a device is the high consumption of electricity. Before using the boiler as a heating boiler, you need to equip it with a pump for circulating coolant and provide the ability to replenish the system directly from the water supply. It is not recommended to use a homemade water heater for the heating system due to the unsafety of its use.
Recently, induction water heaters, which are used to heat water and heat rooms, have been gaining popularity.
How to make a boiler with your own hands (video)
Instantaneous electric water heaters require replacing the meter and laying separate wiring to the device. You can install such a heating device yourself, having the slightest experience in working with electricity.
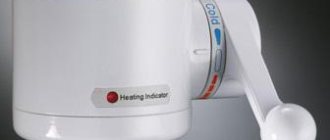
Few people know that an electric instantaneous water heater for a shower is almost no different from a storage one. Only in size. The one on the sink is another matter - there may be a different heating method, but most often there is a ceramic-coated spiral. This reduces scale formation. The fact is that there is nowhere to install a magnesium anode, so it turns out that additional protection against scale is needed. At the same time, the cost of the devices is not at all that high. Termex instantaneous water heaters are no more expensive than geysers (about 4,500 rubles), although, of course, they have less power. However, 3.5 kW for the average apartment panel will not be so little. If only the traffic jams weren't knocked out. How to make a instantaneous electric water heater with your own hands? Today we will try to answer this question.
Design of instantaneous electric water heater
A storage water heater, as you know, has a heating element. Flow-through models are designed in exactly the same way. But since the danger to the coil is increased, instantaneous electric water heaters have a couple of degrees of protection: (See also: How to choose an electric water heater)
An overheating sensor cuts off the power as soon as the temperature in the miniature tank exceeds a certain threshold. The thermostat is an ordinary bimetallic plate that makes an electrical contact.
At the inlet there is usually a water pressure or flow sensor. In particular, the device will not turn on if the value is, for example, less than 0.5 bar. In instantaneous water heaters that operate on flow, the minimum flow value is 1.2 liters per minute.
Therefore, if the instantaneous water heater, just from the store, does not want to work, then first of all turn on the water as loud as possible. Usually the device is installed instead of a faucet and often comes with a shower head. That is why the requirements for the protection class of the housing are special. Usually this is not lower than ip25. We believe that a homemade instantaneous water heater should not be installed in the bathroom under any circumstances. There is simply no way to guarantee one hundred percent that the case will be assembled according to all standards. Another thing is to put it somewhere in a nook where no one will touch it. And, of course, the case should be grounded so that nothing happens. You can do this through a plug, or leave the terminal directly on the body. (See also: DIY pool water heater)
How to install an instantaneous water heater
The process of installing a instantaneous water heater with your own hands includes a preparatory period
First of all, it is important to correctly determine the model. To choose a device that best suits its characteristics, take into account the following factors:
- the number of people living in the house;
- maximum hot water flow with all taps open at the same time;
- number of water points;
- required temperature of water leaving the tap.
Having a clear understanding of the requirements, you can begin to select an instantaneous heater of suitable power
Separately, it is worth paying attention to other nuances: complexity of installation, price, maintainability and availability of spare parts for sale
Organization of power supply
The power of household instantaneous heaters varies from 3 to 27 kW. Old electrical wiring will not withstand such a load. While a non-pressure device rated at 3 kW can still be connected to an existing electrical network, powerful pressure models require a separate line.
A powerful water heater cannot be connected to an outlet. A straight line is laid from the device to the electrical panel. An RCD is provided in the circuit. The circuit breaker is selected according to the power of the flow-through electrical appliance. According to the standard, the indicator is 50–60 A, but you need to look at the instructions for the device.
The cable cross-section is selected similarly, taking into account the heater power, but not less than 2.5 mm 2. It is better to take a copper wire and definitely a three-core one. The instantaneous water heater cannot be used without grounding.
Choosing an installation location
The choice of location for the water heater is determined by the convenience and safety of using the device:
When installing a water heater in an apartment, it is important to choose a place so that there is easy access to the device. There are control buttons on the body. All family members will set the optimal water temperature according to their preference
The installation of the electrical appliance is carried out in such a way that splashes of water do not fall on its body when using a shower or sink. The device is placed as close as possible to the water points and electrical panel, taking into account convenient connection to the water supply
All family members will set the optimal water temperature according to their preference. The installation of the electrical appliance is carried out in such a way that splashes of water do not fall on its body when using a shower or sink. The device is placed as close as possible to the water points and electrical panel, taking into account convenient connection to the water supply.
The choice of installation location depends on the type of flow device:
- Non-pressure low-power models are designed to connect one water point. The water heater is often designed as a faucet installed on the sink. Non-pressure models are mounted under the sink or on the side of the sink. The device can be equipped with a hose and shower head. It would be optimal to install a instantaneous water heater in the bathroom near the shower stall. When the question arises, how to connect a non-pressure instantaneous water heater, there is only one answer - as close to the mixer as possible.
- Powerful pressure models are capable of providing hot water to more than two water points. It is allowed to install an electrical appliance near a cold water riser. With this scheme, hot water will flow to all taps in the apartment.
The presence of IP 24 and IP 25 markings on the water heater means protection from direct contact with jets of water. However, it's not worth the risk. It is better to place the electrical appliance in a safe, dry place.
Wall mounting
The instantaneous water heater is installed on the wall using the hanging method. The product includes dowels with self-tapping screws, a mounting strip, and brackets. When installing an electric instantaneous water heater, two important nuances are taken into account:
- Support strength. A wall made of solid materials is ideal. The device is characterized by light weight. It can even be mounted on a plasterboard wall. The main thing is that the partition does not wobble, and a mortgage is provided under the gypsum board for reliable fixation of the brackets.
- During installation, ensure that the body of the flow device is perfectly horizontal. At the slightest tilt, an air lock forms inside the water heater chamber. A heating element not washed with water in this area will quickly burn out.
Installation work begins with markings. The fastening strip is applied to the wall and the drilling holes are marked with a pencil.
It is important at this stage to set the level horizontally. Holes are drilled according to the markings, plastic dowels are driven in with a hammer, and then the fastening strip is screwed in with self-tapping screws. The supporting base is ready
Now all that remains is to attach the water heater body to the bar
The supporting base is ready. Now all that remains is to attach the water heater body to the bar.
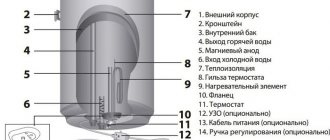
Design of an electric instantaneous water heater
To make an electric water heater with your own hands, you need to clearly understand what it consists of and how it can be replaced in practice by selecting spare parts. The heart of the device is the spiral. Sometimes there are two of them, different in power, and this allows you to set three heating modes. Both are placed in a sealed copper cylinder, which has two holes:
This is trivial information, but it makes it clear that the heating element is not removed from the device, as a rule. The copper container is sealed, it can be opened artificially, and this will require considerable effort. It is necessary to decide whether we will introduce a thermostat and water protection into the design. The latter seems unnecessary to us: if we have assembled a instantaneous water heater with our own hands, then we will be even more able to use it correctly.
When you look at all this for the first time, there is a desire to copy the design exactly. And it looks something like this: we take a copper cylinder, cut it with a torch, implant spirals... solder it, long and difficult. It is proposed instead to buy a heating element for an instantaneous water heater in a store for 430 rubles. What's the salt in this? We will save about 2000 rubles. If readers think that this is a sufficient incentive, then we proceed to create the device. It will produce about 2 liters of hot water per minute, which is almost enough to wash yourself. But any other electric water heater of this type works in a similar style. And if there is no difference, then why pay more? (See also: How to install a boiler with your own hands)
Types of water heaters
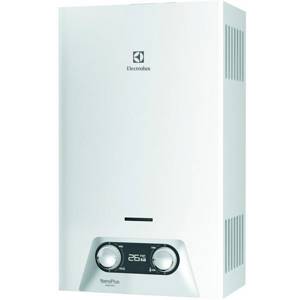
Gas water heater Electrolux GWH 265
Popular models of gas water heaters that you can make yourself will help you choose the ideal option for specific purposes. Currently, such structures can be of several types:
- solar;
- aquatic;
- electrical;
- gas.
The last version of heating devices is the most popular among consumers. It is a boiler powered by a gas stove. Such designs guarantee their owners an uninterrupted supply of water, efficiency and durability of operation.
It’s not difficult to make a good heater from a gas stove with your own hands. Creating it requires a number of useful skills and tools. In addition to such devices, many craftsmen make excellent water heaters from gas cylinders. The design of these models standardly includes a heating element, a regulator, a nut and some additional elements.
A homemade balloon heater in these cases is a stationary container for heating and storing water. The devices operate on electricity. Their only drawback is the limited amount of heated liquid. Therefore, many owners of private housing construction prefer to make a gas water heater with their own hands from a stove.
How to make an electric instantaneous water heater with your own hands
Any small saucepan or small iron bucket with a lid will do. If you take a container of 10 - 15 liters, and this is easy to find, then the heater will turn out to be a mixed type - flow-storage. The difference is small in principle, but the size will be significantly larger. In order not to bother for a long time with installing a heating element (for example, EVN F00 3000W 85A10/3.0J220, 3 kW), we make a couple of holes for installation in the area of the bottom of the container. You will need a pair of rubber gaskets that should be placed inside. From the outside, the heating element is attached with a pair of nuts. This will ensure water heating throughout the entire volume.
Since we are making a flow-through water heater with our own hands, the water should enter directly through the spiral. To do this, we drill a hole in the bottom of the bucket, attach a half or three-quarter inch drain fitting, or a threaded brass nipple (sometimes called fittings), which fits better with the water supply system. You can already connect a riser to this, including plastic pipes. At the outlet we install a metal drain ball valve with a fitting onto which a shower head will be attached if necessary. This thing costs about 140 rubles and can be used on the farm for a variety of purposes. And in the absence of a ball valve, an electric instantaneous water heater will serve as a washbasin.
This is not the only option; it is also possible to install brass threaded fittings at the outlet of a homemade electric water heater, to which the liner is connected. (See also: Do-it-yourself repair of Termex water heaters)
So, we have a boiler that will heat a 10-liter bucket in 20 minutes, and a smaller container instantly. What's missing from it? We agreed that we would monitor the water level manually. To do this, just apply pressure and open the tap of a turned off homemade electric instantaneous water heater. If everything is in order, then turn on the power. However, three things still need to be completed, at a minimum:
Temperature regulator in the form of a thermostat of any type.
Sealing and welding the container so that it holds pressure.
Insulation of the body so as not to lose energy and not get burned.
The latter may seem unnecessary to many in a container of such a volume, we will not persuade you, but it is imperative to ground it to the garden so as not to electrocute yourself. Dig a hole in the beds and bury a steel frame there. A steel strip is inserted into the house and serves as grounding. We also don’t forget about the differential protection device. Any factory-made electric water heater works through this, unless there is a built-in automatic switch for emergency shutdown, as in Thermex Champion. What to use as a thermostat?
Usually the coil in an electric kettle burns out. Most often there is a flat heating element, under which there is an arc, inside of which there is nichrome or fechral wire sprinkled with powder for electrical insulation. We throw away this part, and take the thermostat (which is stuck on the flask) and the power button for ourselves. We have an almost finished control element, now it’s time to think about the body of a homemade electric water heater. Nothing better comes to mind than taking tin and bending it. We will leave one large hole for the spiral contacts so that they can be replaced if something happens. (See also: How a storage water heater works)
We glue the thermostat sensor in the area of the heating element to control the current temperature. The button is located on the outer casing made of tin, so that it is convenient to use. Between the bucket and the bottom of the body we place at least three wooden cubes with a cross member of about 3 cm. We fill the space between the walls with polyurethane foam (although we prefer the ecowool option). Is it possible to do without thermal insulation? Yes, but you still need to mount the switch somewhere. The device is convenient because it can be hung from any tree or long nail by its handle. The main thing is to keep it away from the shower where someone will wash.
We weld the lid using semi-automatic argon welding, or using alternating current. After completing the operation, we check the homemade electric instantaneous water heater for leaks at normal temperature. If everything is in order, we start using it. The advantage of the design is that many parts can be taken from broken household appliances, which many people have in their apartments. Would a heating element in the form of an arc from a flat electric kettle heater fit here? We think so. It is necessary to first test the insulation resistance (at least 30 MOhm) and the spiral itself (about 28 Ohm). If everything is in order, use it to your health. The contacts can be filled with any electrical compound you can find.
Boiler advantages
There are undeniable advantages of a boiler, let’s consider them:
- Temperature sensor that works automatically. In the event of a malfunction, it simply turns off. If we look from the point of view of fire safety, then, of course, the industrial boiler wins, since it is equipped with several types of interlocks. But if we consider the situation with a homemade one, then everything is at your discretion.
- Water flow sensor and pressure sensor. Of course, the boiler neutralizes pressure drops, withstands water hammer, and also easily copes with high water pressure. Saving water with a boiler is only beneficial if it is small in size. For example, a 50-liter boiler consumes a sufficient amount of electricity, so the savings on water are practically unnoticeable. As soon as insufficient pressure appears in the water supply system (less than 0.6 bar), the boiler automatically turns off. As for the instantaneous water heater, even with a minimum water flow, the number of liters of water flowing per minute is about 1.5 liters.
There are instantaneous water heaters on sale that have industrial assembly and a quality guarantee.
They are fixed in place of the tap and have a presentable appearance. For added safety, the chassis must be grounded as the equipment is powered.
More expensive models come with a shower head, which is very convenient for summer residents. But, unfortunately, the price of such a device is very impressive.
If you attach a pan or any large container to a flow-through heater, it will also become storage. To screw in the hoses, use a brass nipple.
Installing a metal articulated crane will greatly simplify the operation of the drive. Without a tap, it will look more like a washbasin, which is very impractical. Pay attention to the tightness of the drive (the lid must be welded with argon welding) and the entire structure as a whole. Insulate the hull and make it safer.
When using a storage flow heater, pay attention to the meter readings: in rural areas the maximum power is about 4 kW.
If an ordinary electric kettle draws 1.5 -2 kW, and a TV draws 1 kW, then you can already calculate which electrical appliances can be turned on at the same time and which cannot. If the meter is automatic, then it will simply blow out the plugs, as fuses will trip, which can be replaced. But if your meter does not have fuses, then turning on the water pump, electric stove and TV at the same time can cause a fire in the wiring.
Technical characteristics of a homemade electric instantaneous water heater
The technical characteristics of an electric instantaneous water heater are the most common. 3 kW allows you to wash your hands, dishes, and at least use the shower. If necessary, you can install several heating elements, the main thing is not to exceed the power quota of an apartment or private house. Otherwise, not only will traffic jams be disrupted, but a local accident may also occur. If the power engineers prove something, the case has every chance of going to court or ending in a fine.
To make an instantaneous electric water heater for heating, you need a lot of power. At least 10 kW. With lower levels you will not achieve heat in the house. A real industrial instantaneous water heater can have a power exceeding 100 kW. His performance is, of course, fabulous. In light of the above, the use of this variety for the home is inappropriate. Many of our citizens cannot obtain a preferential tariff for using an electric hob. And here you will need to coordinate a homemade device!