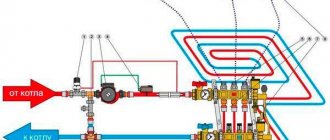
Is it possible to shorten the underfloor heating cable?
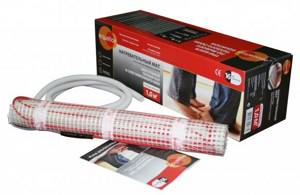
There is a heating mat TEPLOLUX TROPIX INN 770-5.5, its area is 5.5 sq. m.
And I need 4.5 sq. m. Is it possible to cut this heating cable, solder the wires at the end and seal it all with heat shrink? Logically, if you shorten the cable, its resistance will decrease and the power will increase, but won’t it burn out from this excess power? Bad idea. Alternatively, try to separate the cable from the substrate and lay it in some way.
It's better to tuck the mat in than to cut the cable.
westent wrote: Logically, if you shorten the cable, its resistance will decrease and the power will increase, but won't it burn out from this excess power?
That is why you cannot shorten the cable. It is better to reduce the branch pitch. Although this trick is more difficult with swearing :-/
westent wrote: is it possible to cut this heating cable, solder the wires at the end and seal it all with heat shrink?
In principle, it is possible. Just don’t solder, but connect by crimping. Apply heat shrink with an adhesive layer. And be sure to turn it on through a step-down transformer installed after the thermostat. Option 2Marsik and 2heat is more reasonable, but the step should be at least 5-6 cm.
Gru wrote: And be sure to turn it on through a step-down transformer installed after the thermostat
Isn't it easier to insert a corresponding resistor into the circuit?
Thanks for the idea, I somehow didn’t think about the thermostat. There is a 1000 W dimmer, I'll try it.
westent wrote: somehow I didn’t think about the thermostat.
How did I not think of that? It should be included in the kit, and it should be installed in any case.
Damn, it was not the thermostat that was expressed correctly, but the voltage regulator.
westent wrote: There is a 1000 W dimmer, I'll try it.
Have you already cut the cable?
westent wrote: not a thermostat, but a voltage regulator.
westent wrote: There is a 1000 W dimmer, I'll try it.
What's the point? Adjust the same load twice? If you turn the dimmer all the way up, you will get the very excess power that you fear. Don’t fuss: if there is no other way to lay the thermal cable, put in the circuit a resistance corresponding to the cut piece, and you will be happy!
Impuls wrote: put in the circuit a resistance corresponding to the cut piece
The dissipative is about 140 W. All that remains is to understand what kind of product this is, how to hide it and where to put the heat, which, by the way, was paid for by the meter.
Gru wrote: Some 140 W dissipative. It remains to understand what kind of product this is
yu:yu Right in the eye.
If there is no way to replace the cable, then at your own peril and risk, lay it all on the floor. Of course, tinker. try to lay evenly.
Gru wrote: It remains to understand what kind of product this is, how to hide it and where to put the heat
Will there be no such problems with the transformer? However, you can do nothing at all: find a way to limit the maximum power on the thermostat
Another option is to limit the voltage with a capacitor, just what size it will be.
I haven't cut the cable yet. The resistor is no longer needed, since finding and hiding a resistor of such power is a problem. The best option would, of course, be a transformer, but again it must be of sufficient power, and this is rated at 630 W with a cut wire. Such a transformer will cost quite a bit and again you need to hide it somewhere since the size will be larger than the resistor.
I think another option, since the walls in the room will be leveled using old plaster, is to remove the old plaster on the wall where its maximum thickness will be observed when leveling the walls and put this extra meter there.
westent wrote: The best option would be, of course, a transformer
He's never the best. The best way is to replace it with mats of the required area. Everything else is perversion.
westent wrote: remove the old plaster on the wall where its maximum thickness will be observed when leveling the walls and put this extra meter there.
Funny: “warm wall”. But the option is also valid.
Types of heating cables for water supply
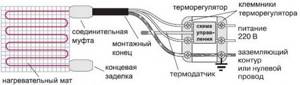
There are two types of heating cables - resistive and self-regulating. Resistive ones use the property of metals to heat up when passing an electric current. In this type of heating cables, a metal conductor is heated. Their characteristic feature is that they always emit the same amount of heat. It doesn’t matter whether it’s 3°C or 20°C outside, they will heat up the same way - at full power, therefore, they will consume the same amount of electricity. To reduce costs in relatively warm times, temperature sensors and a thermostat are installed in the system (the same as those used for electric heated floors).
When laid, resistive heating wires should not intersect or be located next to each other (close to each other). In this case, they overheat and quickly fail. Pay close attention to this point during the installation process.
It is also worth saying that resistive heating cables for water supply (and not only) can be single-core or double-core. Two-core ones are more often used, although they are more expensive. The difference is in the connection: for single-core ones, both ends must be connected to the mains, which is not always convenient. The two-core ones have a plug at one end, and at the other end there is a fixed ordinary electrical cord with a plug, which is connected to a 220 V network. What else do you need to know? Resistive conductors cannot be cut - they will not work. If you bought a coil with a section longer than necessary, lay it in its entirety.
This is approximately how heating cables for plumbing are sold.
Self-regulating cables are made of a metal-polymer matrix. In this system, the wires only conduct current, and the polymer, which is located between the two conductors, heats up. This polymer has an interesting property - the higher its temperature, the less heat it releases, and vice versa, as it cools down, it begins to release more heat. These changes occur regardless of the condition of adjacent sections of the cable. So it turns out that it regulates its own temperature, which is why it is called self-regulating.
Self-regulating (self-heating) cables have many advantages:
- they can intersect and will not burn out;
- they can be cut (there are markings with cutting lines), but then you need to make an end coupling.
They have one drawback - the high price, but the service life (subject to the operating rules) is about 10 years. So these expenses are reasonable.
When using a heating cable for any type of water supply system, it is advisable to insulate the pipeline. Otherwise, heating will require too much power, which means high costs, and it’s not a fact that heating will cope with particularly severe frosts.
Outdoor installation
The heating cable for the water supply must be secured to the outer surface of the pipe so that it fits tightly over the entire area. Before installation on metal pipes, they are cleaned of dust, dirt, rust, welding marks, etc. There should not be any elements left on the surface that could damage the conductor. A rein is laid on clean metal and fixed every 30 cm (usually possible , less often not) using metallized adhesive tape or plastic clamps.
If there are one or two threads stretching along, then they are mounted from below - in the coldest zone, laid parallel, at some distance from each other. When laying three or more wires, they are positioned so that most of them are at the bottom, but the distance between the heating cables is maintained (this is especially important for resistive modifications).
There is a second installation method - a spiral. The wire must be laid carefully - they do not like sharp or repeated bends. There are two ways. The first is to unwind the coupling, gradually winding the freed cable onto the pipe. The second is to secure it with slack (bottom picture in the photo), which is then wound and secured with metallized adhesive tape.
If a plastic water pipe is to be heated, then metallized tape is first glued under the wire. It improves thermal conductivity, increasing heating efficiency. Another nuance of installing a heating cable on a water supply system: tees, valves and other similar devices require more heat. When laying, make several loops on each fitting. Just watch out for the minimum bend radius.
Fittings and taps need to be warmed up better
How to insulate
It is definitely not advisable to use mineral wool of any origin to insulate a heated pipeline. She is afraid of getting wet - when wet, she loses her thermal insulation properties. Having frozen wet, after the temperature rises, it simply crumbles into dust. It is very difficult to ensure the absence of moisture around the pipeline, so it is better not to use this insulation.
Insulation materials that compress under the influence of gravity are not very good. Having shrunk, they also lose their thermal insulation properties. If your pipeline is laid in a specially constructed sewer system, nothing can put pressure on it, you can also use foam rubber. But if you are simply burying the pipe, you need rigid thermal insulation. There is another option - put a rigid pipe, for example, a plastic sewer pipe, on top of the crushable insulation (for example, closed-cell polyethylene foam).
An example of insulating a water pipe with a heating cable
Another material is polystyrene foam, molded into fragments of pipes of different diameters. This type of insulation is often called shell insulation. It has good thermal insulation characteristics, is not afraid of water, and can withstand some loads (depending on density).
Keep your feet warm: everything you need to know before buying underfloor heating in the form of heating mats
The article was prepared with the participation of specialists from Leroy Merlin
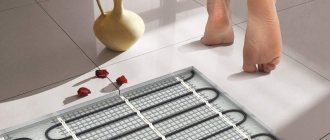
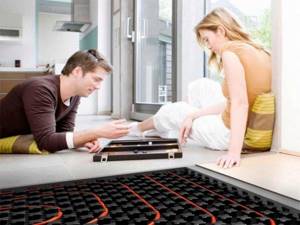
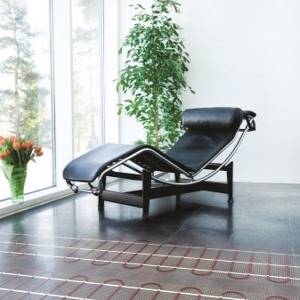
Heating mats for heated floors are gradually becoming the most popular method of heating both apartments and country houses. Sometimes they are combined with heating radiators, sometimes the heat loss of the room allows you to limit yourself to just “mats”. A heating mat is relatively inexpensive, can be installed in no time, lasts a long time and, most importantly, evenly heats the floor, so its popularity among consumers has only grown over the years. In which rooms are heating mats installed, how to install them correctly, how to save energy and what to look for when purchasing, explains Natalia Terekhova, head of the Electrical Goods department.
The main difference between mats and conventional electric heated floors is that the cable is already laid on the mesh, and this significantly reduces the installation time of the heated floor, ensuring uniform installation and, accordingly, heating of the surface.
What are mats made of?
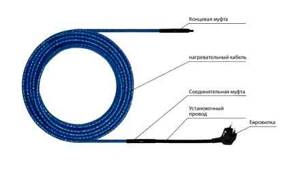
A heating mat consists of a thin heating section mounted on a base made of plastic, silicone or other mesh. The heating section, in turn, includes a heating cable, power wires and couplings that ensure a tight connection between the cable and the power wire.
Heating mats and sections are single-core and double-core. Single-core ones have two installation wires, so during the installation process the second end must be returned to the place where installation began. Two-wire heated floors have one wire that connects to the power supply, and a sealed termination is installed at the other end, so there is no need to return anything, this makes installation easier. This is a serious choice: single-core cables are cheaper, but two-core cables are easier to install. The difference is essentially in the connection method.
The service life and safety of a heated floor directly depend on the quality of the cable in the heating section and the quality of the coupling connections. Modern cables are made from specially developed materials, so they are really durable - heated floors from some manufacturers last for 25 years.
For additional protection against electric shock, the cable has a shield made of aluminum-dacron tape.
The power of the heating mat is determined by the cable laying pitch - the distance between the fragments of the heating section fixed to the mesh. In most heating mats, the laying step is such that there is enough power for both basic and comfortable heating of the room.
Top 5 articles
- Review of the cost of heated floors per m2, installation cost
- DIY installation of electric and water heated floors
- Which heated floor is better
- What flooring can be used for heated floors?!
- How much does underfloor heating cost per month?
Like and thank the author for his work!
- Popular
- Bestsellers
Film heated floor Hi Heat Standard 305/308/310
134.00 UAH.
Hemstedt single core heating cable
59.00 UAH
Single-core floor heating cable Therm EKO
37.00 UAH
DEVI Single Core Heating Cable
65.00 UAH
Perforated film Monocrystal
195.00 UAH.
Strip heating film Heat Plus
139.00 UAH.
DEVI floor heating mat
874.00 UAH.
DEVI Single Core Heating Cable
65.00 UAH
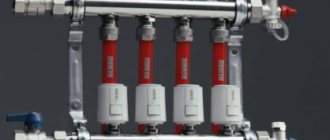
COUPLINGS FOR SHORTENING THE HEATING CABLE
REPLACE THE WARM FLOOR WITH A DIFFERENT SIZE
Heating cables are designed for a certain area, even at the manufacturer’s factory. They are not sold by the cut
But in some cases, it happens that the coolant has already been purchased, and the area of the room has decreased due to the addition of furniture (or other reasons), a problem arises, since it is impossible to install the cable under closed places, which will lead to air being blocked, and in the future can lead to leakage cable is faulty. Ideally, it would be good to replace the section with a smaller area.
What else can you do with a heated floor (is it possible...)
(information also applies to underfloor heating mats)
What to do if this is not possible?
You can simply raise the furniture by 1.5-3 cm by installing mini legs (which are purchased separately; you can drill 1-3 holes in the cabinet by inserting plastic covers, all this is necessary for air circulation. This is the first way out of the situation.
You can also reduce the wire laying pitch by reducing the distance between the turns within the limits specified by the manufacturer (usually up to 7 cm). After reducing the laying width, you need to record the places on paper or take a photograph so that in the future you will know the location of the cable under the screed; this will make it easier to determine the location of a breakdown if this happens. It is also possible to lay part of the remaining wire in a combined room or even on the walls, or lay the rest of the cable around the perimeter of the room near the baseboard, but so that it does not overheat (that is, cover it with tile adhesive or concrete).
Choosing electric and water heated floors (Read)
Well, is it still possible to cut the heating cable?
The cable can be reduced by 10% of its length, no more (as a last resort). In order to shorten it, you need special tools and materials, such as heat-shrinkable sleeves, crimp sleeves, and a hair dryer. Cable coupling points are considered the most unreliable in the system. Therefore, you should not do this work yourself. Since if the wire is coupled or terminated incorrectly, the coupling will have to be repaired again, and for this it is necessary to remove the finishing coating. It is better to provide this robot to a specially trained specialist.
Remember, heating cables and mats are very reliable, since they are made on a metal base - nichrome , but this metal is very unstable to bending. Be careful!
Cable heated floor: characteristics and features

Currently, there are many special systems on the building materials market that provide heat in rooms. All devices have their own technical characteristics, features, and they differ in design. Consumers have access to a variety of heated floors: liquid, film. Today, cable underfloor heating has gained great popularity. This is not surprising: after all, such a system has a large number of advantages.
Device and functions
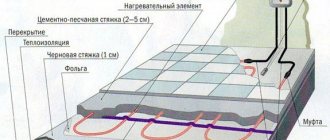
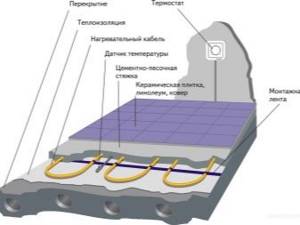
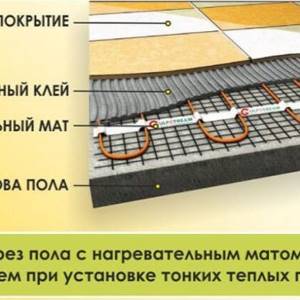
What is a heating mat? Essentially, it is a combination of conventional cables and a multi-layer sheath on a mesh. The cable consists of steel or copper wires and insulating protection. It is laid on the substrate in a snake pattern with a pitch of at least 50 mm. When current passes through it, it heats up. To connect to the electrical network, a cold wire is used, the length of which is at least 1.5 m and which is connected using a coupling to the heating element.
The cable sheath is a mixture of rubber, polymer fibers and fiberglass. Unlike cable underfloor heating, heating mats are fixed not on a metal mesh, but on a mesh made of synthetic fibers (Kevlar, fiberglass, etc.). The upper part of the substrate has an aluminum shell and is covered with a polyvinyl chloride film. Are there too many insulators? No, multilayer insulation reliably protects the wires from possible mechanical damage.
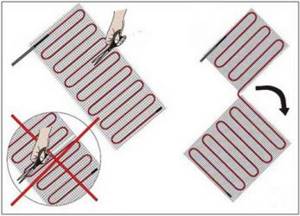
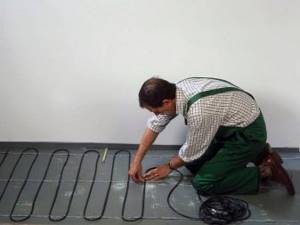
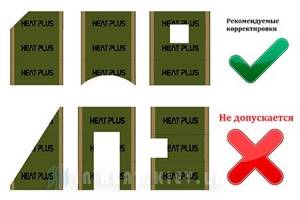
If during installation you need to lay the mat in a different direction, the mesh can be cut.
The figure shows how you can cut the mat and lay sections in different directions
The cable can be bent, but not cut.
Since both the heating cable and the substrate are very thin, the warm floor will practically not reduce the height of the room, which is a definite plus.
The main purpose of thermomats is an additional, local source of heating. Most often, mats are laid in bathrooms, kitchens or balconies. And if you have a private house, you can use them to prevent icing of the stairs and porch in front of the entrance.
Distinctive features
Warm cable floors are basically heating wires.
By design, such systems are divided into several types:
- Single-core. In such systems, the heating element and conductor are one core. Such wires are characterized by increased radiation, so you should not use them in rooms where people often visit.
- Twin-core. They consist of a closing and heating wire. Radiation is minimal, so such systems are suitable even for those rooms where children live. Installation work is carried out quite quickly and easily. The disadvantage of such systems is their high prices.
- Self-regulating. Such designs are the most reliable, but also the most complex. When the temperature in a particular part of the system becomes high enough, the wires control the resistance, so that the heating elements do not overheat.
Cable devices are usually presented in the following forms: mats, reels. The mat is a fiberglass mesh that contains the wires. This mesh can be cut, which is very convenient - especially in cases where it is necessary to install heated floors in hard-to-reach areas. Thermal energy is generated from the incoming current. This happens thanks to heating elements that are located under the floor covering or in the screed.

Installation of heated floor mats
Warm electric floors have long become commonplace in city apartments, houses of various sizes outside the city and other administrative, utility or commercial premises. They are an additional and sometimes the main source of heating for buildings. Moreover, it is quite economical, but only subject to strict adherence to the technology for arranging such floors.
Types and types of electric floors
From the point of view of technical equipment, all modern electric floors can be divided into 3 main types:
- classic cable, which has several varieties;
- innovative infrared-carbon, rod and film;
- and thermomats, that is, thin cables on a mesh.
All these types of electric floors have a number of general characteristics:
- they require a dry mounting base;
- they need thermal insulation with grounding;
- they are equipped with a special thermostat.
In addition, they are all reliable and durable systems for additional heating of premises.
There are also several types of electric floors, which may belong to the same type (or may not), but differ from each other in:
- features of installation technologies;
- combination with various types of floor coverings;
- quality of generated heat.
Thermal mats or thin-cable floors on a mesh
One of the most modern and functional options for heated floors is, of course, thermomats. Such a thin cable (up to 4.5 mm in diameter, no thicker), fixed in a special wave-like manner on a special fiberglass mesh, the width of which is half a meter. The heating core itself in such a cable is shielded, and also insulated and protected by an outer sheath.
pros
If we compare such a heating system with others, it can be noted that warm cable floors benefit in many ways.
The main advantages of such designs:
- Versatility. Such systems are suitable for both ordinary apartments and private houses.
- Environmentally friendly.

- Ease of installation work. You can easily deal with them on your own, without turning to professionals for help.
- Durability. Some other heated floors rely on piping, which can result in unexpected costs if they fail. The cable system can last more than ten years.
- Safety. Since the system is located under the floor covering, there will be no burns or injuries.
- Reliability. The heating elements do not overheat - no matter what material or furniture they are under.
- Power.
- Economical.
We can say that warm cable floors have no disadvantages. However, some consumers who leave reviews on websites still point out the disadvantage of such systems: high cost. When choosing the appropriate option, you need to give preference to a manufacturer that offers quality products and has won the trust of consumers.
Heating cable for water pipes
Making the water supply to a private home or cottage constant and uninterrupted is not an easy task. The most difficult thing is to ensure water supply in winter. To prevent pipes from freezing, they can be laid below the freezing depth, but weak points still remain. The first is abnormally cold winters, which periodically break all records. The second is the entry points into the house. They freeze often anyway. The solution is to install a heating cable for the water supply. In this case, sewerage is desirable, but it can be buried shallowly. And in the areas leading into the house, you can install a more powerful heater and better insulate it.
READ Is it possible to lubricate the grinder with Lithol
What power is required for a heating cable for a water supply system?
The required power depends on the region in which you live, on how the pipeline is laid, on the diameter of the pipes, whether it is insulated or not, and even on how exactly you lay the heating - inside the pipe or on top of it. In principle, each manufacturer has tables that determine cable consumption per meter of pipe. These tables are compiled for each power, so there is no point in posting any of them here.
From experience, we can say that with average pipeline insulation (expanded polystyrene shell 30 mm thick) in central Russia, a power of 10 W/m is sufficient to heat one meter of pipe from the inside, and at least 17 W/m must be taken from the outside. The further north you live, the more power (or thicker insulation) you need.
How does a resistive cable work?
Resistive cable is a wire with one or two cores. Metal conductors act as heating elements. They are isolated. The electric current passing through the veins is converted into heat due to the resistance of the metal, resulting in heating.
Resistive cable must not be cut .
In addition, its use is quite energy-intensive.
Despite their reliability, heating devices may malfunction and break due to improper operation.
Design features
How is the conductor constructed? Its design is based on steel cores (one or two); depending on this, the resistive heating cable is divided into two types: with one and with two cores. The conductor is insulated with a special material. In some types, the design includes two layers of insulation. A protective metal shield (braided shielding) is applied to the insulating material. Its purpose is protection against mechanical damage, as well as use as grounding. For complete protection, an outer protective shell is used.
A single-core resistive heating cable has one heating conductor that occupies the entire length of the structure. The use of such a device is considered the most cost-effective, since it is resistant to high plastic temperatures. Power is supplied from both sides of the device. Such a scheme may create some boundaries in terms of installation, since there is a need to return the heating conductor to its connection point. There is also a need to use additional power systems.
The two-core design includes two wires: heating and conductive. An electric current is applied to one end of the wire, and a coupling is installed on the other end. When drawing up a project, this design option is much more comfortable to use.
Installing a self-regulating cable outside the pipe
To avoid new breaks in the heating cable, you need to clean the pipes from rust and other contaminants.
Secure the cable to the bottom of the pipe. The cold end of the wire must be outside the insulating material. Work very carefully around the break point. If you have plastic pipes, use foil to wrap them. This will ensure uniform heating of the pipe and avoid new breaks.
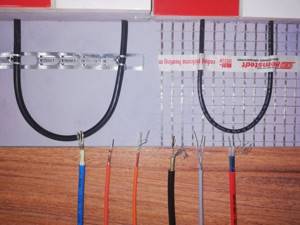
Connecting a self-heating cable to the electrical network after a break
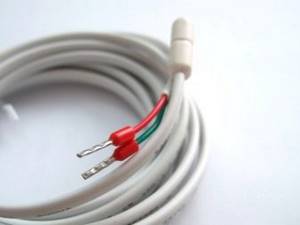
- connecting wire and heat-shrinkable tubing
- plug for connecting to the network
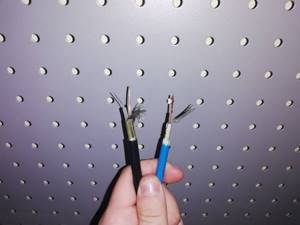
After preparing the materials, remove the cable’s own insulation by no more than eight centimeters with a sharp object. Separate the braid. Carefully remove its insulation to expose the polymer matrix. Clean the wires, exposing the conductors by 10-20 mm.
Clean the ends of the wire. Use a three-wire stranded cable . Using such a cable makes it easier to identify the ground (this wire usually has two colors). Heat-shrinkable tubing is “slapped” onto the power cable to insulate the connection. A thermal tube is attached to the corresponding terminals of the connecting sleeve. Twist and crimp the wires. Perform all manipulations with each output.
Heating cable
- one of the most technological innovations.
It is widely used in everyday life, agricultural and industrial applications. The popularity of this cable is due to the fact that it is the best alternative to gas and water heating systems. The heating cable
is more economical and safer.
It can be turned on in a specific room only at the moment when heating is required. But it possible to connect heating cables together? Yes! We'll look at how to do this below.
What to do with excess heating mat
Types of heating cables
Currently there are the following types of such cables:
- resistive
- self-regulating
Operating principle of a self-regulating heating cable
self-regulating cable is made from a special material that can change its thermal conductivity during operation. The lower the ambient temperature drops, the lower the resistance of the heating cable becomes. The main feature in the operation of this heating element is that its resistance does not change along its entire length simultaneously. Currently, such a process can be maintained even without the use of automatic machines.
With the help of a self-regulating cable, you can reduce your electricity costs. Another advantage of this device is that it can be cut anywhere.
When connecting a heating cable, it is necessary to use a large amount of insulating materials. Otherwise, spontaneous combustion cannot be ruled out.
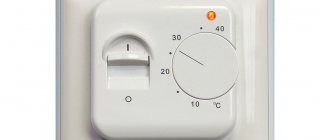
Installing the Thermostat
To save energy and more efficient operation of the heated floor, you should use a thermostat. It must be installed before laying the heating elements. It is mounted in a convenient place, at least 30 cm away from the floor. You need to make a niche in the wall to install the box and draw a groove to the base of the floor, in which the corrugation or pipe is placed. The corrugation should pass another 0.5–1 m along the base of the floor; connecting wires from the heating elements are placed in it.
A good place to mount the thermostat
The ends of the cable must be led to the thermostat in such a way that the couplings remain in the screed.
How to connect 2 pieces of self-regulating heating cable?
Two heating cables can be connected to each other. The main thing is to make this connection correctly. Only in this case will the system you are setting up work for a long time and without interruptions.
To connect 2 pieces of self-regulating heating cable, you need to perform the following steps:
Cut the outer and then the inner insulation of the cable and remove it.2. Heat the semiconductor core with a hairdryer and remove it to expose the conductive wires.3. With another heating cable, perform the same actions as described in points 1 and 2.4. Connect the wires by soldering or crimping.5. Use heat shrink tubing to insulate the twist.
Using additional equipment
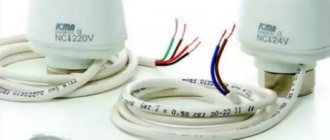
In order for the cable system to function as efficiently as possible, you need to use a sensor and a thermostat. Typically such devices are included in the kit.
Thermal sensors
These devices are conductors that allow you to learn about temperature. If the cable system is the main source of heat, you need to use external and internal temperature sensors. If this equipment is additional, only using an external sensor will be sufficient.
Thermostats
Such devices are used indoors to regulate temperature. Manual regulators are the cheapest. However, such devices are not very convenient; programmable models are much better in this regard. Using such a thermostat, you can monitor the temperature in the room visually. It is also worth noting that you can set a pattern according to which the temperature will change.

Errors when installing water and electric underfloor heating
The heated floor system is quite popular today. Using a heating cable, thermomats, infrared film or pipes, you can heat the floor covering. In fact, installing heating elements with your own hands is not too difficult, but many inexperienced craftsmen make simple mistakes, due to which the entire system can fail some time after installation. Below we will look at the main mistakes when installing water and electric heated floors.
- The calculation of materials was carried out incorrectly. When calculating the length of the heating cable or the size of the mats, you need to use the usable area of the room, and not the total. Usable area means that space that will not be filled with furniture, appliances and other objects. If you install heating elements under large objects, the system will overheat in these places, causing it to fail. To avoid this mistake, we recommend that you familiarize yourself with the technology for calculating heated floors.
- Do not cut the resistive cable into suitable lengths. If there are more conductors than needed, try to lay them a little closer together, without violating the manufacturer's requirements. We draw your attention to the fact that a self-regulating cable does not have such a drawback, so when installing it you are unlikely to make this mistake.
- Watch the laying step, as well as the distances from walls and other objects. Remember that the conductor loops should not intersect each other, otherwise overheating may occur.
- Please note the minimum bending radius indicated in the technical specifications. As a rule, it ranges from 5 to 10 cable diameters.
- Heating elements should only be placed on a clean surface. During installation, make sure that the heated floor does not lie on construction debris, otherwise, after pouring the screed, it will quickly fail under mechanical loads. It is even recommended to remove all dust before installation work.
- An elementary mistake that inexperienced specialists also make is ignoring recommendations for testing the system after installation. Before pouring screed or laying parquet (on infrared film), be sure to measure the system resistance and check this value with the nominal value indicated in the passport. Perhaps you made a connection error and the system no longer works. Then repairing the heated floor will be much more difficult. We described in detail how to check a heated floor after installation in a separate article.
- You can turn on the heated floor only after the screed has hardened. If you decide to check whether the floor is hot before the solution has dried, this could damage the system. It is strictly forbidden to connect the cable in the bay.
- The temperature sensor must be placed in a corrugation so that it can be easily removed at any time (for repair or replacement). The end of the corrugation must be sealed so that the solution does not get on the sensor.
- The sensor itself must be placed in the middle between two turns of the cable so that it shows the temperature as accurately as possible. Too much distance from the cable will cause the system to operate continuously and vice versa. It is recommended to place the temperature sensor closer to the surface of the new floor covering.
- Each room should have its own underfloor heating circuit and its own thermostat. A serious mistake is to save materials during installation and make a single system with one temperature controller.
- During installation work, do not step on the cable, especially in shoes with hard soles. This may damage the conductors and insulation. Try to avoid the coils of the heating element.
- Before pouring the screed, take a photo of the layout of all the elements so that during repairs you can know where everything is.
- Under no circumstances should you help the solution harden quickly by turning on the system. Those who advise turning on the heating immediately after installation will sooner or later be faced with a situation where the system quickly fails.
- Before starting work, be sure to read the instructions, in which the manufacturer can recommend important points. Our main mistake is that we do it first and then read the instructions. So it's better the other way around.
- Remember, infrared heated floors should be laid under parquet, laminate and linoleum, and thermomats and heating cables should be laid under tiles. If you lay a film floor in the bathroom and pour tile adhesive on it, the system will not work. These seem to be obvious facts, but sometimes they manage to do this.
We also recommend watching videos that discuss some points in more detail:
So we have provided 15 mistakes when installing water and electric heated floors. Be sure to take them into account and share them with your friends on social networks, so that they don’t have to re-install the system, which will quickly fail due to improper installation!
It will be useful to know:
Like(0)Dislike(0)
samelectrik.ru
Installation work
When installing a heated cable floor, you need to follow the following rules:
- In order for the room to heat well, the heating device must occupy most of the floor surface - about 70%.
When planning to lay a heated floor, you need to first decide how the cables will be located.
- When carrying out installation work, do not allow the cables to become deformed. Intersections and sharp bends can cause the heated floor to fail.
- If you use mats, simply place them on the surface - there is nothing complicated in this installation. In cases where coils are involved, you need to carefully study the instructions before carrying out installation work.
- If you want to avoid unnecessary expenses when purchasing cables, first determine how long they should be.
Installation of cable heated floors is carried out in several stages:
- Decide exactly where the heated floor will be located.
- Place insulation throughout the room.
- You will need to secure the mounting tape to the floor.
- The cable should be secured to the mounting tape.
- You will need to install a temperature sensor in the corrugated tube.
- Test the temperature controller (you will need to connect it first).
- Use a cement-sand screed (layer thickness - several centimeters).
- Lay linoleum, tiles or other floor covering.
How to cut a special film heated floor
The restrictions described above do not apply to special continuous infrared film (premium).
Premium heating film is made with a continuous coating of a heating carbon layer.
- cut
such
infrared film
not even along the cutting line.
Moreover, this type of infrared floor allows for oblique and shaped cuts
However, you should not overdo it in the standard cutting process of such heaters. Some continuous film flooring
are still present.
Below in the photo
you can see the acceptable forms of cutting infrared film.
Popular models
Warm cable floor Ensto is a system that is of very high quality. If you use it correctly, it will last a long time. The heating device is available in two versions: mats and cable. The range is very wide. The cables are flexible: they easily bend around fireplaces and columns.
Gulfstream heating mats are very suitable when repairs do not use a cement-sand screed. Two-core and single-core systems are available to consumers. Installation work is carried out as easily as possible.
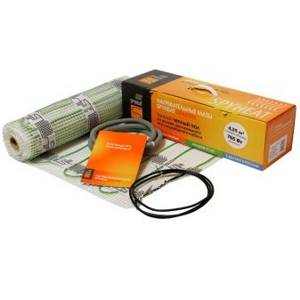
Spyheat warm floors can be used in a variety of conditions: in living spaces, hallways, and glazed balconies. Both double-core and single-core cables are produced under this brand. The manufacturer also presents mats that can be used without screed. The main advantages of Spyheat products are absolute compliance with the requirements that apply on the territory of the Russian Federation, maximum ease of installation work.
To learn how to choose the correct length of the heating cable, see the following video.
Self-regulating cable
A shielded or self-regulating cable for underfloor heating is a matrix, inside of which two conductors are placed, and between them there is a layer of polymer, which releases the necessary thermal energy. The special feature of this cable is that it regulates heating due to the resistance of the polymer. As the temperature increases, the resistance also increases, which leads to a decrease in current strength and, as a result, the amount of heat generated decreases.
Self-regulating heating cable braid
Screened wire composition:
Shielded Heating Cable Design
- carbon conductor;
- polymer;
- insulation;
- reinforcing braid;
- external insulation made of PVC.
Despite the ability to control overheating, it is also not recommended to lay such a cable under furniture, since this will increase electricity consumption but will not provide the necessary effect - heating the cabinet is pointless.
How to make a warm floor with your hands. Installation of heated floors - Repair
About how we chose a warm floor: https://samisebe.livejournal.com/2253.html
So, the floor was chosen and purchased, and it was time for installation. The manufacturer assures that the mats can be laid in tile adhesive immediately under the tiles, but this is too simple an option for us :) In addition to laying the heated floor, we had another important task - to raise the level of the floor itself by 2.5 cm so that the tiles would fit together well with future parquet.
We calculate how much: the thickness of the porcelain stoneware is 8 mm, the tile adhesive is 4 mm, 13 mm remains - this is the height that the floor needs to be raised to. Below we used photos from the website of the heated floor manufacturer and our own photos taken during the renovation process.
1. First of all, you need to mark the location of the sensor and the heated floor regulator, and make a recess for the sensor:
Warm floors cannot be installed under a kitchen unit, so keep this in mind when calculating and marking the floor. We stepped back from two walls by 60 cm - the depth of the cabinets. It’s about 20 cm from the wall with the radiator. We don’t need to heat the floor there either.
2. Our floor is already covered with construction screed. We clean it of dust, sweep and vacuum, then cover it with a layer of primer. We mark where our heated floor will be located.
3. Install the corrugation for the sensor and secure it with plaster:
The manufacturer's pictures show special tapes for installing the wire. We use mats.
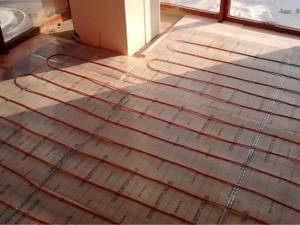
4. Roll out the mats, cutting the mat material and turning it in the desired direction. It is important to remember that the wires cannot be cut! Only the grid. We have two separate blocks of mats here - 5 squares and 1.5 squares. They are attached to one regulator. We glue the mats at the corners to the floor with plaster so that they do not move or rear up.
5. We install metal beacons on top of the mats at the level we need. To do this, any building mixture is diluted - tile adhesive, plaster, glue for blocks - whatever. Slides of the required height are formed, on which the beacons are placed. We use a building level to check the evenness.
6. Pour the screed solution over the mats, between the beacons, and level the screed using the rules. The screed should be quite liquid in order to spread well and fill all the voids. We had to install an additional fence in the form of a board to get a smooth edge on one side. We add water and a plasticizer additive for the screed to the dry screed mixture. We took Polish - Plaston. You don’t have to do this, but they still recommend it, at least this is a small insurance against the fact that the tie may “buzz” and ruin our wire.
After the screed has dried, you will need to remove all the beacons, fill the resulting depressions with the same screed, and you can lay tiles on top. The sensor will be lowered into the corrugation we have installed, and the removed wires of the heated floor will be connected to the regulator. A 13 mm screed like ours will dry for about a week. This is complete drying and hardening. In reality, after 36 hours you can walk on it carefully.
samisebe.livejournal.com