One of the most economical types of fuel is used oil - a product that is formed during the operation of car engines. It is used for heating both residential and industrial premises. Used oils of any category are used, which in other conditions are simply disposed of. If you have drawings of a boiler for testing with a water circuit, it is not difficult to make it yourself. In this case, you can get rid of used oil and save significant money on fuel.
Features of the furnace during mining
Boiler furnaces for waste are most often installed in places where there is an abundance of used engine oil: in garages, car service centers, and on farms with their own fleet of vehicles. The process of recycling used oil is not easy, since it cannot be poured into the ground or sewer. Using it as fuel can solve the problem.
If you install an ordinary potbelly stove for this purpose, it will warm up the air quite quickly, but as soon as the burning of the fuel stops, it will immediately become cold. Therefore, it is impossible to stably heat a garage or workshop in this way. If you make an exhaust furnace with a water jacket, the energy efficiency of the heating unit will increase significantly.
Furnace with afterburner
Furnace with afterburner
To prevent precious heat from quickly escaping into the chimney, you can organize its additional collection. To do this, the second chamber is bent at an angle of 90° or a little more (but it should not be sharp).
The principle of assembling such a device is usual. The only difference is that you will need two pipes. To connect them at an angle of 90° when cutting workpieces, they should be sawn at an angle of 45°.
If black smoke comes out of the chimney when the stove is ignited, this means that there is not enough oxygen to burn the fuel. This problem can be eliminated by making 3-5 additional holes in the afterburner.
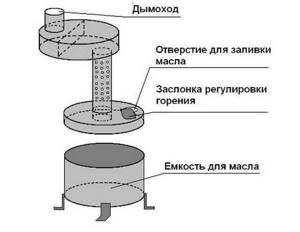
How the oven works and works
The design of an exhaust furnace with a water circuit is not complicated: two chambers that are connected by a perforated metal pipe. The lower chamber is equipped with a special container where the fuel (working off) is located. It can enter the waste oil boiler with a water circuit automatically or manually. Light the stove using a small amount of gasoline, which is poured onto the oil on top. The gasoline begins to burn, the oil underneath it heats up and begins to boil. Oil vapor enriched with oxygen in the perforated pipe begins to actively burn in the pipe and the upper chamber. At the same time, in the lower chamber the temperature is 350 degrees, and in the top it reaches 900.
If the stove has a manual fuel supply, the fuel flow and ignition in the lower chamber occurs through a special hole at the bottom of the chamber. With an automated fuel system, a pipe leads into the chamber, which is connected to a container filled with used oil.
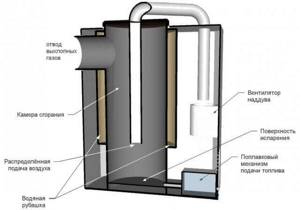
The lower chamber must be additionally equipped with a special hole with a damper so that the draft and combustion temperature can be controlled. To organize a water circuit, a tank is installed above the upper chamber or around the chimney duct with fittings welded to it for the supply and exit of coolant.
Important. To control the temperature and pressure of the coolant, you need to install a pressure gauge and thermometer on the heating unit.
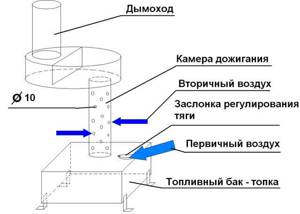
The design and principle of operation of a boiler using waste oil
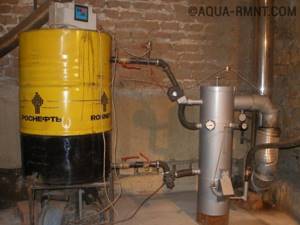
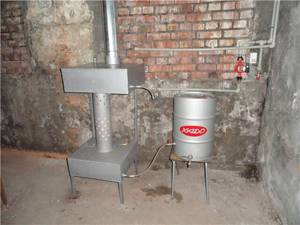
Homemade heating boiler running on used automobile oil
Drained automobile oils are multicomponent, highly contaminated substances, which also burn poorly. We can say that as a fuel, waste in itself is “not very good”, since oxygen is simply not able to oxidize all the chemical diversity that is contained in it. If you break down the oil into simpler components, it will be much easier to burn them.
The decomposition method has been known to modern science for a long time. Flame separation, or, scientifically speaking, pyrolysis, is used to obtain simple flammable substances from any fuel - oil, coal, firewood, etc. This process is convenient in that no additional costs are required for chemical transformations - for this the heat generated by combustion of fuel is sufficient. The advantage of pyrolysis combustion also lies in the fact that this process supports and regulates itself, and therefore practically does not require outside intervention . All that is needed to start the decomposition process is to evaporate the fuel and heat the vapors to a temperature of 300–400 °C. To do this, you can use two methods.
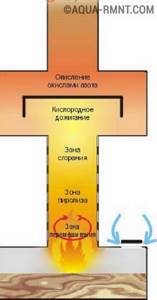
The processes occurring inside the furnace during processing ensure high temperature and complete combustion of fuel
In the first case, the fuel is set on fire in the tank, after which it begins to actively evaporate. Effective mixing and obtaining a homogeneous gas-air mixture is ensured by the Coriolis force, so accurate calculation of the diameter and height of the combustion chamber is important. Fuel vapor rises through a vertical pipe with numerous holes through which it is saturated with oxygen from the air. At the top of the combustion chamber there is a partition, which is needed to reduce the gas speed and separate the nitrogen oxide afterburning zone. It is here that dangerous chemical compounds react with nitrogen oxides and break down into harmless substances.
The so-called self-burning method undoubtedly has attractive simplicity and reliability, however, a tank of burning oil does not allow us to talk about safety. In order to eliminate this drawback, it will be necessary to complicate the design of the heating unit.
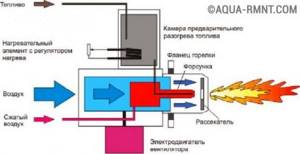
The efficiency of waste combustion is significantly increased when using a specially designed burner
The second method involves the formation of zones of pyrolysis, combustion and afterburning directly in the flame, and this requires a burner of a special configuration. In order for the fuel to be completely oxidized, the injector must provide multi-stage formation of a gas-air mixture. In such a device, the primary movement of the fuel flow is provided by a compressor. Thanks to injection, the injected air carries with it atmospheric air, and the formation of vapors occurs due to the heating of the burner by the flame torch. Almost the same processes can be observed when using a blowtorch. A similar method is implemented in industrial liquid fuel units. Homemade designs use the same principle, but work a little differently. In them, the waste drips into a red-hot container, where it instantly evaporates and burns at high temperature. In this case, we cannot talk about pure pyrolysis, since there is also energy from the decay of molecules in the process of microexplosions.
The advantages of such a stove, and what disadvantages need to be taken into account
Waste oil furnaces with a water circuit come to the rescue in many cases and have their own advantages:
- This is a universal heating unit that is ideal for utility rooms, greenhouses, home workshops, garages;
- construction of a furnace is inexpensive (it can be assembled from scrap metal);
- warms up the room very quickly in any frost;
- compact design;
- can be adapted for heating and cooking;
- allows waste to be disposed of.

But there are also disadvantages that need to be kept in mind when operating the stove:
- requires regular cleaning of the chimney and combustion chambers, as during operation it is intensively covered with soot;
- it operates “loudly” and produces a hum when the fuel is actively burning;
- you need containers and a place to store used oil (it will freeze outside at sub-zero temperatures);
- the furnace is a fire hazard, since the body heats up to very high temperatures and the requirements for installation and operation must be strictly observed.
But all these disadvantages are not significant compared to fuel savings, especially if used engine oil is obtained free of charge. If all requirements are met, the stove will serve for a long time and safely.
Oil furnaces with a water circuit can have any configuration and size, it depends on what materials the home craftsman has at his disposal, and on what power the unit plans to obtain.
What are the fuel requirements?
Any oil that has exhausted its service life is suitable as fuel: industrial, transmission and motor oil.
There are certain requirements and precautions that you need to be aware of before you start operating the unit:
- the mining should not contain impurities, even minor ones, as this may cause an explosion of the heating unit;
- A fire can be caused by ordinary water getting into the oil, which boils much faster than oil, and the splashes can ignite.
Important. Before pouring waste into the fuel container, it must be filtered. It is prohibited to use other flammable liquids as fuel. Gasoline for ignition is taken in very small quantities.
What stoves can you build yourself using drawings?
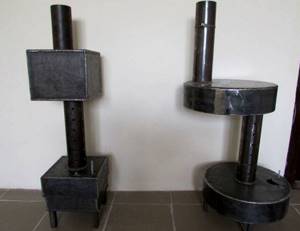
A waste oil stove with a water circuit can have a different design:
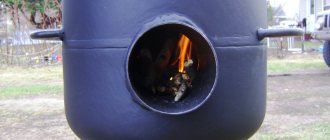
- The stove is round in shape, welded from steel sheet. The fuel tank is combined with the combustion chamber. The afterburning chamber is a perforated pipe and an upper chamber equipped with a dividing partition that cuts the flame. A hole is cut in the lid of the lower chamber into which the waste is poured, and air will also flow there. The principle is this: the wider the damper is open, the better the oil will burn.
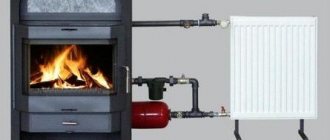
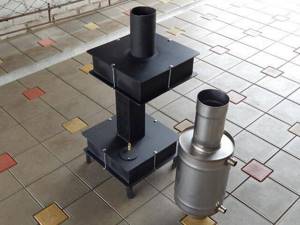
- Two barrel oven. In one (bottom) there is a fuel tank, there is a hole for loading it. The upper combustion chamber consists of a pipe that passes through an upper barrel filled with water. It has fittings for supplying coolant water. Externally, the model is very similar to a samovar. Its body gets quite hot, so you need to handle the stove with care. Such a “samovar” is installed only in those rooms where accidental contact with the body of people or animals is excluded. This design has a big advantage: the large tank acts as a heat accumulator.
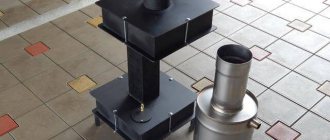
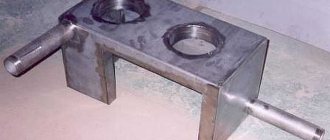
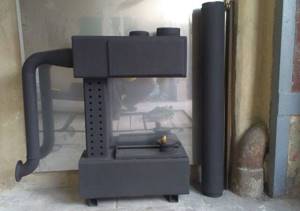
- Compact mini-oven made of square profiled pipes 18x18 cm and 10x10 cm. Simple in design, it is very easy and quick to assemble. You can cook food on it.
- A practical model of an exhaust boiler with a water circuit from a gas cylinder with a cut off upper part. Here you can provide an automated feed of mining. The oil line is located in the combustion chamber. The water circuit has the form of a boiler, through which a chimney channel is passed. Or it could be a copper heat exchanger coil that is used to wrap the furnace body.
How to make a waste oil stove: step-by-step instructions
The most common furnace model used for mining is made from pipe sections with a diameter of 352 mm and steel sheets 4 mm and 6 mm thick. You need to prepare a small piece of thick-walled pipe with a diameter of 100 mm and a metal steel corner for supports. This model can cope with heating an area of 80 square meters. meters.
Tools you will need for work:
- welding equipment;
- grinder with a circle for cutting metals and a grinding disc;
- drill;
- roulette.
You also need to purchase heat-resistant paint and solvent.
Stages of manufacturing a stove for mining with a water circuit according to the drawings:
- The necessary parts are cut out, and burrs are removed from the cut areas;
- The lower tank is welded from a pipe 115 mm high and 344 mm in diameter. The bottom is made of steel sheet. The legs can be welded from a metal corner or from pipe scraps.
- A pipe section with a diameter of 100 mm and a height of 360 mm is perforated.
- The lid of the lower tank is assembled together by welding: a pipe with a diameter of 352 mm, a height of 60 mm, a lid with two holes and a perforated pipe. The damper is secured to the air supply hole with rivets.
- Parts of the upper compartment are welded from a pipe with a diameter of 352 mm and a height of 100 mm. The bottom is welded from a steel sheet, in which there is a hole for a perforated pipe.
- Weld a chimney pipe with a diameter of 100 mm and a height of 130 mm. On the inside of the lid, closer to the chimney, a partition made of steel sheet is attached.
- The upper chamber is welded to the lid on which the chimney is installed. The upper chamber is connected to a perforated pipe. You can strengthen the structure by tightening it with an iron rod.
- The upper compartment of the boiler is tightly placed on the lower one.
- In order to increase the service life of the unit, it is painted with heat-resistant silicone paint. Before applying paint, the metal is cleaned of rust, and the seams after welding are cleaned of scale.
- Install the stove and connect it to the chimney duct.
Important. The chimney pipe of a welded stove for mining with a water circuit must be straight, at least four meters long and without bends.
Using the same principle, you can make a rectangular oven.
How to make a potbelly stove from steel
Potbelly stove of convection type.
If you need to heat a house in the country and cook food, you should definitely know how to weld a potbelly stove yourself from sheet steel. This design will not require a lot of fuel. This is achieved through the installation of partitions in the firebox, reliable fastening of the doors and the ability to adjust the air flow. To make such a device with your own hands, you will need to prepare the following elements:
- sheet metal 4 mm thick or more;
- metal 8-12 mm thick, from which the partitions will be made;
- lattice;
- chimney pipe;
- corners from which the legs will be constructed;
- welding device.
Sequence of manufacturing actions
From the steel sheet, the first thing you need to do is cut out elements for the body and several partitions that will be mounted in the upper part of the firebox. They will be able to create a labyrinth for the smoke, which will increase the efficiency of the stove. In the upper part you can make a recess for the chimney structure. The recommended recess diameter is 100 mm. Next, you will need to make a recess for the hob with a diameter of 140 mm.
Potbelly stove made of sheet steel.
Using a welding device, you need to attach the side elements to the bottom of the structure. You will need to attach thick strips of metal to the side walls. As a result, it will be possible to attach the grate. This can be a sheet of metal with recesses with a diameter of about 20 mm. The lattice can be made of reinforcing bars. At the next stage, you need to attach supporting elements from a metal strip to the side walls. After this, the partitions are installed.
Doors for the firebox and ash pan should be cut out of metal. They can be installed on ordinary hinges. However, a more reliable option is to use curtains made of steel pipes and rods. They can be secured to wedge latches. The elements are cut out of a stainless steel sheet and then secured with bolts. In order to be able to adjust the intensity of fuel combustion, a recess must be made on the door that closes the ash pan for mounting the damper.
A sleeve 200 mm high must be attached to the recess for the chimney structure, on which the pipe will be mounted. A damper in the tube will help retain heat. For it you will need to cut a circle from a metal sheet. One extreme part of the steel rod needs to be bent. After this, you will need to make several parallel holes in the tube. Next, the rod is mounted, after which a round damper is welded to it.
Diagram of a brick fence for a potbelly stove.
The chimney pipe should be installed at an angle of 45°. If it passes through a recess in the wall, the part must be wrapped in fiberglass in this place, and then secured with a cement mixture.
To prevent burns from touching a hot stove, you will need to build a steel protection screen on several sides and place it at a distance of 50 mm. If there is a desire to increase the thermal efficiency coefficient, the structure can be covered with brick. After the firebox is finished, the brick will continue to heat the house for some time. The laying should be done at a distance of 12 cm from the metal body.
A pillow of air can act as a heat protector.
To implement it, holes for ventilation must be made in the masonry at the top and bottom.
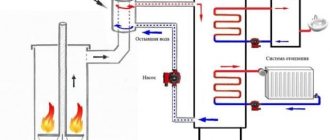
Connecting the water circuit to the furnace
The water circuit is connected to the upper chamber. You can weld a water container directly to the surface of the furnace, but it is better to make a separate structure so that when the bottom burns out, water does not get into the combustion chamber. This will cause the oil to splash and ignite.
The tank can be made to any size. For maximum heating, it should fit tightly to the upper chamber and the chimney. Fittings for the coolant supply and return are welded to the tank.
Be sure to attach a thermometer and pressure gauge. The pump and expansion tank are installed on the return line, closer to the boiler.
Fire safety requirements
During testing, the furnace becomes hot and becomes a fire hazard, so you must comply with the requirements for its installation and operation:
- The floor surface must be fireproof. Concrete, ceramic tile, and metal surfaces are allowed. The wooden floor near the stove is covered with metal.
- If the wall next to which the stove is located is made of wood or other non-fire-resistant material, then it must be covered with an asbestos sheet.
- Do not allow drafts in the room where the stove is installed. Flames from a perforated pipe can spread to surrounding objects.
- Storing any flammable materials near the stove is prohibited.
- Mining reserves are stored in another room.
- Do not add fuel while the stove is operating.
- You should keep powder or salt fire extinguishers in a convenient place indoors.
Important. Burning used oil must not be extinguished with water. The fire will only get worse.
A waste stove is an economical and convenient heating unit, which, with proper operation and installation of the water circuit, will significantly improve the indoor microclimate and will be an indispensable source of heat in a garage or workshop.
Reading time: 5 minutes No time?
You can save significant money by using waste materials for heating. Therefore, the do-it-yourself stove is very popular. Drawings, videos and diagrams will help you create a high-quality design. For heating, you can use any oil with flammable properties. In this case, the heating unit can also be made from scrap materials. In this case, scraps of pipes, sheet steel and even used gas cylinders are used.
Read in the article
Requirements for a homemade unit, installation location and fuel
In addition to the fact that the stove must be made exactly according to the diagram, you need to pay attention to:
- A pipe that removes gases. A mandatory requirement is to equip it with a four-meter chimney (or more) facing the street. Diameter – more than 10 cm. Be sure to make it dismountable for cleaning (flange connections).
- Legs. They must be there. The stability of the unit is carefully checked, because tipping over and leaking blazing hot oil is the worst thing that can happen. The gap between the floor and the bottom of the structure will further improve the heating of the room.
- Expansion tank. Due to the specific features of an oil furnace, a large expander will be required, about 50 liters. Membrane models are not suitable - only a simple, open option. In case of boiling, emergency drainage of water is provided.
- The room in which the stove is located must be non-residential, made of fire-resistant materials, with good ventilation. Nothing wooden, much less flammable, should be placed nearby. The location of the stove should not be where there are drafts - a gust of wind can blow out the burning flame along with boiling oil fractions.
- The fuel must be of good quality. Without impurities of water, antifreeze, etc. To rid the questionable oil of impurities, it must first be settled in an open container. A tap is welded into its bottom to drain the water (it will peel off and settle at the bottom). Volatile impurities, such as gasoline, on the contrary, will rise up and evaporate. It is imperative that the fuel storage room (located separately from the stove) has good ventilation!
It is not so easy to extinguish boiling waste. If it has already flared up, it should burn out completely. Never try to extinguish the flame with water, this will cause an explosion! It is better to use a carbon dioxide or foam fire extinguisher, which should be stored nearby.
Do-it-yourself stove: drawings, videos and design features
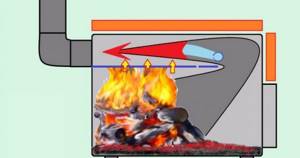
Before you make a waste oil stove with your own hands, you need to study its structure. The device consists of two tanks, which are connected by a perforated pipe. The lower compartment is a firebox. There is a pipe element with holes in the middle, and a heated element on top. There are holes in the firebox that regulate draft and increase the intensity of fuel combustion.
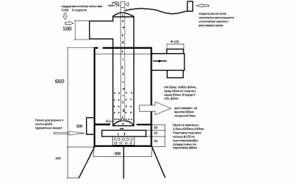
The diagram shows the operation of such a device
Fuel is supplied to the lower compartment, which is ignited using matches, rags and paper. After a few minutes, the top layer begins to boil. At this time, the vapors pass into the burner, where they are saturated with oxygen and completely evaporate. Then the smoke masses move to the chimney and are removed. Engine, transmission, diesel and industrial oils are used for fuel. Such devices are distinguished by their simplicity, low cost and high efficiency.
Helpful information! Do not use any solvents for the firebox.
Safety rules for operating the stove
When using the stove, careful handling is required to avoid fire. The following things are prohibited:
- use materials other than oils;
- light a fire if the chimney is not connected or if it is damaged or incorrectly connected;
- leave the heating device unattended for a long time;
- allow children or animals near the stove;
- do not allow liquid to enter the oil tank or hot areas in the oven;
- close the holes in the burner;
- when the device is running, add fuel;
- use a broken device;
- Place containers with flammable liquids near the stove.
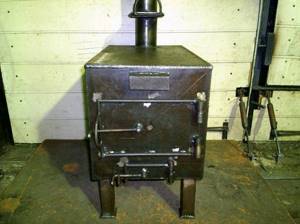
Fully manufactured structure
Helpful information! If necessary, use sand or a fire extinguisher to extinguish.
After carefully studying the drawings and videos, it is quite possible to make a stove for testing yourself. It is important to follow safety precautions, and in difficult situations it is worth seeking advice from a specialist.
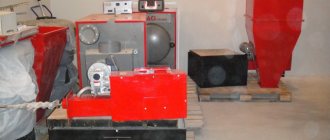
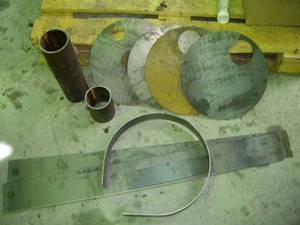
With the onset of cold weather, it’s time to think about heating the garage, having reviewed a bunch of options, I decided to make a homemade furnace using a water circuit and install heating radiators in the garage.
This means that I found drawings of a furnace for testing on the Internet, prepared the metal, and ordered blanks like these to be cut from a friend at the factory.
How to properly install a potbelly stove in the garage
As a rule, the vehicle storage room also contains various fuels, lubricants and rags that can ignite at the slightest spark. Manufacturing the heater is only the first stage; it still needs to be installed correctly in the garage, and 3 conditions must be met:
- the stove should be in a convenient place and at the same time heat the entire room;
- there should be no flammable materials in the immediate vicinity of the unit;
- It is important to arrange the chimney correctly so that there are no questions about why the stove smokes inside the room.
Advice. Many motorists prefer to store oils and lubricants in the basement of the garage, then in the event of an emergency they will not ignite from a homemade potbelly stove.
Usually they try to install the heater in the far corner of the room, where it will not interfere with car maintenance work. In this case, the chimney can be brought out either vertically through the roof or laid at an angle along the entire wall, and then turned onto the street. In the first case, the efficiency of the potbelly stove will be low, since the short section of the chimney is not able to transfer heat from the flue gases to the air in the room.
In this situation, there is a simple solution - to make a chimney with a water circuit. The pipe section is enclosed in a sealed water jacket with two pipes. The larger the area that can be covered, the more efficiently the heat will be removed. You can connect a pair of homemade heating registers to the pipes of such a heat exchanger, ensuring water circulation using a pump.
In the second option of laying along the wall, when the chimney duct directly heats the air in the garage, it is important to ensure good draft, otherwise the unit may not work well and smoke. When the chimney is installed correctly, the height of the upper cut of the pipe above the combustion chamber of the potbelly stove is at least 4 m.