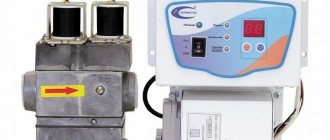
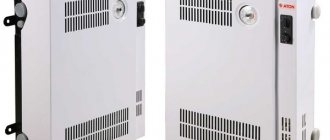
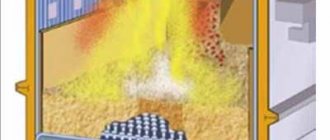
Briefly about the principle of operation
To better understand the principle of operation of room thermostats, we first explain the operating algorithm of a water heating boiler in the basic configuration:
- The user ignites the heater and uses buttons or control handles to set the desired coolant temperature.
- Each device is equipped with a submersible or surface-mounted sensor that informs the control unit about the degree of water heating. When the coolant temperature reaches a predetermined threshold, the gas valve is activated and shuts off the fuel supply to the main burner. The circulation pump continues to “drive” water through the system.
- After the coolant has cooled to the lower temperature limit, the gas supply is resumed, the burner is re-ignited and heats the water.
Reference. In turbocharged wood boilers, the automatic system turns off the blower fan. The flow of air and the combustion process in the furnace are suspended, and the unit goes into standby mode.
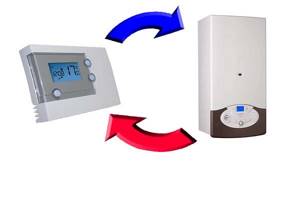
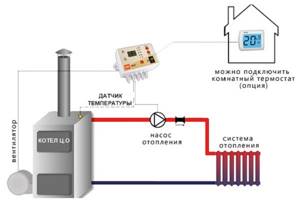
Scheme of operation of a heating boiler with a remote thermostat - the automatic system stops and starts the burner depending on the temperature of the air, not the coolant.
Without an external temperature sensor, the heater “does not see” the air temperature in the rooms and stupidly heats the water to the specified limit. Result: during the transitional autumn-spring period, the so-called clocking is observed - frequent start/stop of the burner (once every 2-3 minutes), reducing the life of the unit as a whole.
Now about the main thing. A remote thermostat extends the intervals between turning on/off a gas boiler, since it focuses on the temperature of the air, which cools more slowly. The device is connected to the power supply circuit of the gas valve (turbines on TT boilers) and the built-in pump.
Installing an automatic thermostat allows you to kill three birds with one stone:
- reduce energy consumption;
- make boiler control more convenient;
- extend the life of the heat source.
Important note. The listed points apply not only to gas heaters. Any heat generator equipped with an electronic or electrical control unit is connected to the thermostat: solid fuel, diesel, electric boiler, and so on.

When the room warms up to the specified temperature, the thermostat breaks the circuit, the burner and the built-in heat generator pump stop. The unit starts up after the air has cooled by 1-2 degrees, which increases the duration of the interval between shutdown and ignition to 15-20 minutes.
Let us note 2 significant nuances:
- When using a room regulator, the standard start/stop function based on the water temperature in the boiler jacket continues to operate. When the coolant in the boiler heats up to the set limit, the gas burner device will turn off.
- If the burner is extinguished at the command of the internal temperature sensor, the standard circulation pump continues to operate. When the remote thermostat is triggered, both devices – the burner and the pumping unit – stop.
This is why it is important to correctly configure the boiler-external thermostat combination.
How to choose a temperature sensor
DT are the main elements of automatic safety and regulation of any boiler. Their selection is made by the manufacturer as part of the unit protection system. Nevertheless, there are situations when you need to do this yourself, for example, when reconstructing the heating supply circuit of a house or installing an additional indirect water heating boiler into the circuit.
The selection of a temperature sensor for a gas boiler is carried out taking into account the following indicators:
- The DT must be sensitive in operating temperature ranges and record all changes in the heated medium with the least delay, at high temperatures, for example, as in the furnace of a boiler;
- take into account the specifics of the controlled environment and technological features of installation: submerged or fixed to the body;
- take into account all negative influencing factors and, if possible, minimize them;
- take into account the design features of the DT: voltage, speed of the transmitting signal, permissible errors in measurements, areas of application, maximum service life, the need for periodic inspection and certification of the device.
At the same time, when choosing a diesel engine, you need to carefully read the instructions and connection diagram so that the requirements match the equipment already installed on the boiler.
As a rule, you should order meters recommended by the boiler manufacturer to ensure compatibility of safety system elements and guarantee their error-free operation. In cases where such modifications are not available in the retail chain, you should choose from certified analogues.
Types of room regulators
To automatically adjust the boiler combustion according to the room air temperature, 2 types of thermostats are used:
- Mechanical. The electrical circuit is broken and closed by a bimetallic plate that bends when heated. To change the desired temperature, the user rotates the knob, which increases or decreases the gap between the plate and the second contact.
- Electronic (digital). Here, the role of a heat-sensitive element is played by a thermistor, which changes resistance depending on temperature. The circuit, which includes the specified part, closes the relay contacts, guided by changes in resistance and user settings.
Reference. Mechanical and electronic temperature sensors are used not only for the boiler. Thermostats are successfully used in other areas of the heating system, for example, to turn off the circulation pump of a separate radiator branch or for zonal control of heated floors.
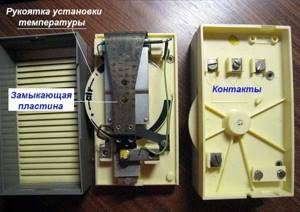
The mechanical device is connected to the heat generator via a cable. Most electronic models provide wireless connection. According to reviews, radio-controlled thermostats are gaining wide popularity due to their ease of installation and operation. How a wireless boiler thermostat works:
- The device consists of two blocks equipped with radio modules.
- The first block, including the executive relay, is placed directly next to the heater and connected to the desired connector. Power supply - from the house electrical network 220 volts.
- The second unit with a display and control buttons is powered by batteries and is installed in a convenient place in the home.
- The temperature sensor located inside the remote control reacts to the air temperature. At the right moment, the radio module sends signals to the first block to turn on/stop the boiler. It opens the relay contacts, heating and circulation of the coolant is stopped or resumed.
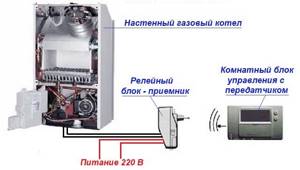
Typically, electronic models are equipped with programmers that allow you to set the boiler operating schedule for a week. The temperature in the rooms can be changed several times during the day. Individual instances are programmed for 90 days and controlled via mobile communications, for example, via SMS or a smartphone Internet application.
How to check a thermocouple on a gas boiler
Content
How to check a thermocouple, draft, pressure switch, transformer on a gas boiler
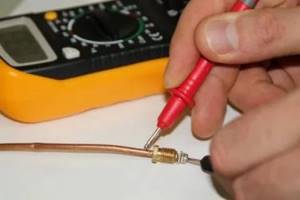
Each gas boiler needs several key components that will monitor the unit for its proper operation. In case of any deviations, various components are triggered and the installation simply stops functioning. But at the same time, you need to understand how to check the solenoid valve of a gas boiler, thermocouple or any other component. After all, knowing about the malfunction, in most cases you can remove it yourself.
Thermocouple
This device is one of the few that can measure high temperature. It is both simple and yet reliable. A thermocouple is made of two wires of different metals that are connected at different points. All this makes it possible to use it for different purposes. The main disadvantage is the error of one degree. To ordinary people this seems insignificant. But for such devices, many consider such indicators to be simply gigantic.
The device is used as a fuse. It measures the temperature in the heating pad. If it starts to fall quickly (say, for some reason the fire goes out or there are problems with the smoke exhaust), the system is triggered, which sends a signal to the solenoid valve and the gas supply stops. Therefore, if this component does not work, the equipment is inoperative.
Sequence of actions for checking:
- The thermocouple has two ends, the first of which is heated by the igniter, and the second is attached to the solenoid valve. It is necessary to separate the device from the boiler, be it a regular one or a condensing one with a three-way valve.
- Then provide a constant flame. A candle is best.
- Heat the tip above the flame at a distance of 1 cm. Just be careful, as the heat can reach half of the body.
- We take the tester and turn it on to millivolts. One probe is placed on the body, and the second on the output contact.
- After half a minute, a working thermocouple will show the EMF in the range from 17 to 25 mV. If the indicators are normal, then the problem of a non-working system may be elsewhere.
Solenoid valve
The solenoid valve is a shut-off valve that directly affects the safety of the unit. It is mainly installed so that in the event of a problem, it closes the fuel supply. Emergency situations in the operation of gas heating can occur due to various factors:
- drop in fuel pressure;
- lack of fluid in the system (you can check the joints, three-way valve and pipes);
- worsening traction;
- gas leak.
Each of the problems described above is dangerous to human life, and therefore further operation of the system is unacceptable. This is why the solenoid valve is activated. Its initial position is open. To close it, an electrical impulse is applied to it, coming from a thermocouple installed above the flame in the combustion chamber or on the chimney.
It must be said right away that this element rarely fails, since it has great potential for use. Despite this, moments still happen.
There are two ways to check the functionality of this valve:
- Fire. The used thermocouple is replaced with a new one. The automatic button turns on. Next, the igniter is ignited and the fire is brought to the end of the thermocouple. In this case, the automation should work.
- Instrumental. The sensor is removed from the housing and a repair contact is inserted. It is supplied with voltage from 3 to 6V. If the solenoid valve is in order, the automation will work. Otherwise, you need to replace this element.
Ignition transformer
This element supplies the burner with a current discharge (spark), which is necessary to ignite the fuel. In addition to other elements that directly affect the operation of the unit, the component can also fail. As a result, all automation will work, but fire will not appear, since there is no source of ignition.
How can you quickly check the ignition transformer of a gas boiler for functionality? Just. You need to make a few simple movements:
- Through a special window, see whether the discharge is going on or not.
- Using a tester, check the voltage coming out of the controller during the ignition attempt. A figure falling within the range from 187 to 235V is considered normal.
- If a problem is detected, you need to disconnect the power from the transformer and connect it back.
- Check again.
Any gas boiler is equipped with many safety elements and sensors that allow you to monitor the correct operation of the unit. In the event of situations that clearly threaten human life, the system completely shuts down the installation.
Source:
Thermocouple for a gas boiler: classification, features and installation principle
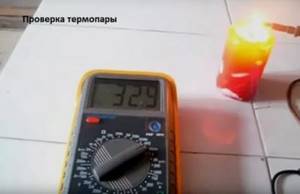
All heating boilers must be equipped with devices to control the operation of the device and protect it from overheating. A similar element is a thermocouple for a gas boiler. It has a fairly simple design; its action is based on certain laws of physics.
The design and principle of operation of a thermocouple
Thermocouple - a sensor that regulates the temperature of water heating in a gas boiler
This mechanism ensures the safe operation of heating equipment.
Device:
- It consists of 2 different types of conductors, which must be in contact in one or two places.
- When heated, a voltage is created between different types of conductors, which is subsequently used in the operation of the heating unit.
- Due to the properties of the conductors, there is no need to use external excitation of the heating device; the elements are powered autonomously.
A thermocouple is a sensor that monitors the temperature in a heating unit. Its device is quite simple, but when purchasing, be sure to check the quality of the connection of the dots. Otherwise, an unacceptable error exceeding 1 C° may occur.
Operating principle:
- The junction points of dissimilar metals are heated to a certain temperature value.
- A measuring device is connected to the cold ends of the conductors on which voltage is created, and the electrical circuit is closed.
- Induction occurs in the valve coil, under the influence of which it opens and remains in this position.
If the gas heating unit fails, it is first recommended to check the serviceability of the thermocouple. It most often causes the entire system to fail.
Control sensors are made from base metals. For the purpose of reliable protection from external influences, they are placed in a pipe; the present movable flange fixes the structure. The latter consists of the following elements:
- sealed housing with lid;
- porcelain speakers (attached to the head with screws).
The material for production is determined by the temperature range that will be measured by the device.
Main types
The following types of devices installed in gas heating boilers are considered the most popular.
Type K
Is the most common. Marking: THA. The composition contains plates made of chromel and aluminum. Operating temperature range – from -200 to +1350°C. The devices are very sensitive to any temperature changes, but are highly dependent on the external environment.
Type E
Made from chromel and constant. Has high reliability. Manufacturer's marking - THKn. Operating temperature range – 0 – 600°С.
Type N
It is a modification of type E, capable of operating at temperatures up to +1200 °C. Nichrosil and nisil are used for the production of plates. Such models are considered the most accurate devices used in heating equipment.
Advantages and disadvantages
The reason for poor boiler operation may be poor contact of the thermocouple - the part is cleaned and reinstalled
The thermocouple has many advantages:
- Low price due to the absence of expensive parts and materials.
- Long lifespan.
- Easy installation and replacement.
- Huge range of measured temperature values.
- Accuracy.
Some cons:
- Disproportional increase in temperature and potential difference (no linear relationship).
- The voltage limit is 50 mV.
If a thermoelectric sensor fails due to a poor-quality junction, it cannot be repaired.
Sometimes a thermocouple stops functioning due to poor contact at the connection point. To correct this problem, you need to unscrew the nut, remove the conductor, clean its end, and put everything back together.
Thermocouple in a gas control system
Any thermocouples for a gas boiler have the same operating principles:
- The user mechanically opens the valve to supply gas by pressing a button for 15-30 s.
- After turning on the piezo ignition, a spark appears and the burner ignites.
- The solenoid valve button is held for another 30-60 s until the thermocouple junction produces the required voltage.
- After the button is removed, combustion does not stop, since the heated thermocouple creates the necessary voltage to keep the valve open. The heating unit operates as usual.
- When there is no combustion, the flame does not heat the sensor, resulting in insufficient voltage to hold the valve open. Therefore, it closes and the gas supply stops.
Most models of control sensors are suitable for a wide variety of gas heating units. This is explained by the simplicity of their design and versatility.
Installing a thermocouple on a gas boiler
If the part is burned out, the value will be less than 50
The connection is made only with wires made of thermocouple material or metal with similar parameters. Before connecting the thermocouple, you need to strip the ends of the wires to improve the accuracy of measurements. During installation, make sure that all gas pipes are directed downward.
Once a breakdown occurs, the device cannot be restored. Therefore, you need to understand how to check a thermocouple using a multimeter.
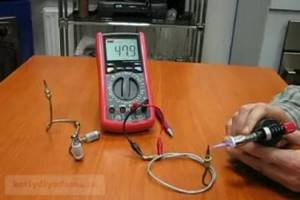
To test the functionality of the device, you need to connect one end to a multimeter, and heat the other end with a lighter. The operating thermocouple has an approximate voltage of 50 mV.
DIY repair
After checking, the thermocouple is installed back into the boiler or a new one is purchased
To troubleshoot you need:
- Using a wrench, unscrew the clamping nut and remove the elements.
- Clean ends from dirt.
- Check the thermocouple with a multimeter.
- Compare the required indicator values.
- Assemble the thermocouple and turn on the boiler.
Temperature control sensors are actively used in modern automation of gas boilers. If the consumer requires clarification to select the right device, it is recommended to consult with a specialist. He will tell you which model to choose so that it matches the parameters of the gas unit.
The thermocouple is the only accurate sensor designed to measure high temperatures. It is widely used in boiler equipment to control and protect against overheating.
Source:
What is a gas boiler thermocouple and why is it needed?
In many homes, the central element of the heating system is a gas boiler. However, to maintain the serviceability of the device, it is necessary to take into account the operating features of the equipment.
For example, during the operation of a boiler installation, the air temperature increases, so it is important to control this parameter.
A thermocouple is used specifically for this - a thermoelectric device, which is practically the only device for accurately measuring elevated temperatures. Today, equipment is used that operates together with automatic valves.
ontakte
Odnoklassniki
The widespread use of equipment is due to the fact that this device is considered the main way to measure air temperature, as well as control the flame level.
After all, the device is not exposed to elevated temperatures and operates according to a special principle that allows it to obtain accurate readings and quickly respond to even minor changes.
What is it for?
A thermocouple is a device that is installed in heating equipment and is designed to convert thermal energy into electric current for electromagnetic coils and serves as the main component of gas control protection. The device works in conjunction with a special gas shut-off valve that shuts off the fuel flow.
Principle of operation
An alloy of metals is used to manufacture the device . It can withstand high temperatures. However, if a failure occurs in the equipment, the operation of the gas boiler will be stopped.
Photo 1. Thermocouple for a gas boiler with automation 345-1000 mm, Russia.
After all, this thermoelement functions in conjunction with a special electromagnetic shut-off valve that regulates the flow of gas into the fuel path, which closes immediately after the thermocouple breaks down.
The operating principle of the device is based on the following physical phenomenon: two metals are connected and when heated at the attachment points (working area that is placed in the flame), voltage . This is called the Seebeck effect.
Attention! Many models of solenoid valves are sensitive and therefore remain open until the input voltage drops to 20 mV.
Specifications
The thermocouple has the following technical parameters:
- wide temperature ;
- high measurement accuracy;
- increased resistance to corrosion ;
- electronic control mechanism.
Varieties
The thermocouple has a simple structure. If you have the appropriate skills, you can even make this device with your own hands at home. However, it is better to purchase an industrial device after first studying the technical characteristics, as well as the features of all types of devices.
Specialized companies produce three types of thermocouple:
- Type E - two plates are used for manufacturing: constantan and chromel. This device has improved performance. In addition, it controls the process occurring in the temperature range from -5°C to 74°C.
- Type J - instead of chromel, the device has an iron plate, which does not in any way impair the technical characteristics of the device. It has increased sensitivity to changes, and the temperature range is from -4°C to 74°C.
- Type K — such thermocouples are the most popular. They are equipped with plates made of aluminum and chromel.
The operating range varies from -20°C to 135°C, and the manufacturers managed to increase the sensitivity itself by several positions.
The service life of this device is determined by the environment of use : for example, in carbon dioxide, a chromel plate becomes covered with rust in the form of green rot, the alloy quickly deteriorates and the device loses its non-magnetic properties.
There are other types of thermocouples, however, they are not suitable for use in gas boilers for the following reasons:
- alloys contain expensive metals , so they have a high cost;
- such models are no better than types K, E or J.
Which thermostat is better to choose?
To make the right choice of a room regulator, we suggest considering the pros and cons of two types of household appliances. Disadvantages of mechanical models:
- low accuracy of maintained temperature;
- wired connection - the cable will have to be pulled from the boiler room to the desired room;
- lack of various convenient functions available in programmers.
Note. Judging by the reviews of real owners on the forums, the accuracy of temperature maintenance is not a critical problem and does not worry users too much. Another thing is the wires that need to be hidden under the baseboards, in the grooves of the walls, and so on.
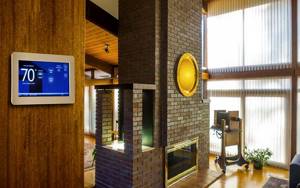
There are also three obvious advantages of bimetallic thermostats:
- low price and availability;
- reliability in operation - in the simplest models there is nothing to break;
- ease of control of the boiler using one handle, which is important for older homeowners.
The negative aspects of electronic regulators are a higher price, a not always clear interface and the need to timely replace batteries. Cheap Chinese models encounter an additional problem - a breakdown in communication with the relay unit when installing the control panel behind 1-2 partitions.
An absolute plus of digital thermostats is comfortable operation. It is enough to set the weekly and daily operating program for the heat generator once; no further actions are required.
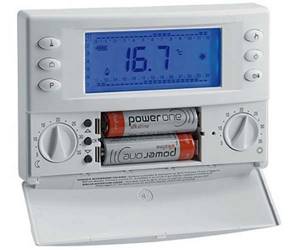
Wireless programmers need to change batteries on time.
We list a typical set of functions using the Baxi Magic Plus thermostat as an example:
- temperature control range – 5…35 °C;
- protection against freezing of the heating system, by default starts the boiler when the home cools down to +3 degrees;
- LCD display with backlight, control – push-button;
- shift of temperature sensor readings ±5 °C (read the explanation in the next section of the publication);
- 2 operating modes – economical and comfortable;
- hourly/daily/weekly programmer.
Reference. Manufacturers often call such devices digital chronothermostats. The weak point of the devices is their low maintainability in the event of a breakdown, especially Chinese products for which it is not easy to find spare parts.
Knowing the features of electronic and mechanical regulators, it is not difficult to choose the appropriate model. Focusing on your budget, first of all consider reliable products from European, Japanese and Korean brands, there are also decent brands, but on average the quality of the products leaves much to be desired.
Installation and connection of the device
Installation of a household regulator consists of two stages - mounting in a convenient place and connecting to a gas (solid fuel) boiler. In order for the thermostat to record the temperature without deviations, position the control element according to the recommendations:
- minimum height from the floor – 1.5 m, maximum – 1.7 m;
- within 1 m from the device there should not be heating radiators, heaters or other household appliances that distort the thermal image (including air conditioners);
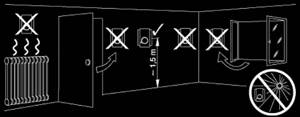
The temperature regulator should be placed away from various sources of heat or cold. - exclude exposure to drafts and running ventilation;
- It is not advisable to install the sensor away from heated rooms.
Advice. For a private home with heated floors, it is worth buying a thermostat model equipped with an additional temperature sensor. The latter is placed above the floor surface and measures the temperature in the lower zone of the room.
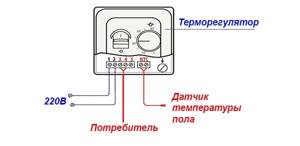
After mounting the device on the wall, according to the manufacturer’s instructions, lay the wire to the heat source in a hidden or open way (if there is a wired connection). How to connect the regulator to the boiler:
- Connect one end of the control cable to the contacts marked COM (common) and NO (normally open) of the thermostat. On the wireless version, these terminals are located in the relay block.
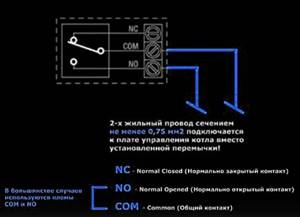
- In the operating instructions for the heat generator, find the connection diagram for the remote thermostat, markings and location of the contacts.
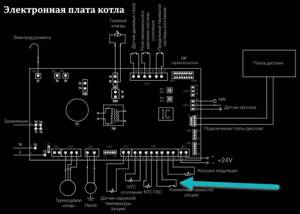
- Remove or fold down the front panel of the gas heater, which provides access to the control board and connectors.
- Remove the jumper inserted between the terminals indicated in the passport. Do not throw away the part; you may need it later.
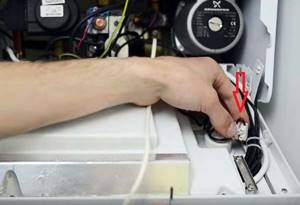
- Connect the wires coming from the regulator contacts to the free terminals. There is no need to observe polarity.
- When installing a wireless thermostat, connect a three-wire 220 V power cable with a grounding wire to the relay unit.
Advice. If the contacts of your device have numbers or strange letters instead of the indicated markings, find the 2 required terminals using a tester (the circuit between them must be open). There are three contacts in total, the pair COM and NC are initially closed, as shown in the diagram above.
Details of installing a wireless thermostat are shown in the video:
Non-volatile floor-standing boilers equipped with gas automatics 630 SIT, 710 MiniSIT, SABC, Orion and the like are incompatible with remote controllers. The reason is the completely mechanical design of the gas valve and the absence of electrical circuits where the breaker relay can be connected.
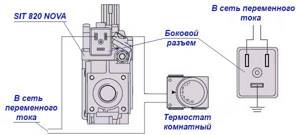
Connection diagram of the regulator to the SIT 820 NOVA valve
The exception is gas heat generators equipped with Kare automatics and the latest generation of Italian valves EuroSIT - 820 NOVA. These blocks provide solenoid valves and special contacts for connecting two types of external thermostats - mechanical and digital.
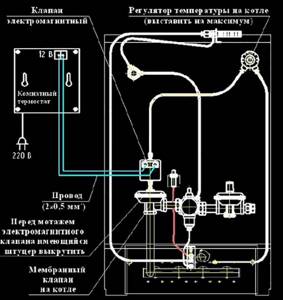
The “Kare” automation uses an electromagnetic valve, where the thermostat is connected
Where to install
DT is set extremely close to the controlled parameter. So in double-circuit boilers they are placed on the return line before entering the boiler, at the outlet from it in the supply pipeline, at the outlet from the unit in the DHW circuit.
DT for monitoring the outgoing temperature of flue gases is installed at the outlet of the boiler in front of the mouth of the chimney. Wireless diesel engines for the boiler unit are placed directly on the controller or on the gas shut-off valve. Wired - connected by the option designated by the equipment manufacturer.
Setting procedure
To configure the system and select a comfortable temperature, follow these steps:
- Set the maximum temperature using the remote controller.
- Start the boiler and bring it to the optimal operating mode, in which the unit achieves the greatest efficiency.
- When all rooms are at a comfortable temperature, take an electronic thermometer and measure the temperature near your regulator.
- Select the measured value on the thermostat as the heater shutdown threshold. Enter the required settings into the programmer.
Important clarification. The gas boiler operates with maximum efficiency at a temperature range of 80/60 °C (supply/return).
Let us explain the purpose of these manipulations. Due to different areas and heat losses, the temperature in the rooms may differ by 1-3 degrees, so it is better to navigate by the degree of heating of the air near the sensor itself.
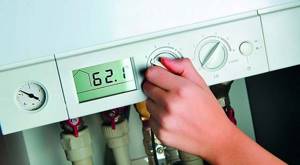
If the temperature at the point where the regulator is installed is very different from other rooms, when setting, you need to make an adjustment for the magnitude of this difference. Some models, for example, Baxi Magic Plus, provide a function for such adjustment (called temperature shift). Then all that remains is to enter the desired value into the device’s memory, ranging from 1 to 5 degrees.
When does the thermostat not save gas?
There are quite a few reviews like this on the Internet: “I fell for the sellers’ assurances about saving 30%, bought and installed a temperature regulator, now the boiler consumes more gas. Why is it needed at all? Let's figure out how this device saves energy (not only gas, but also solid fuel, diesel fuel and electricity):
- The interval between starts of the heat generator increases. The reason is that the cooling and heating of the air occurs more slowly than the water in the batteries.
- Together with the burner, the circulation pump is turned off, consuming up to 100 W of electricity. In TT boilers the fan (turbocharger or smoke exhauster) stops.
- The premises are fully heated at the right time when residents are at home. During other hours, a reasonable permissible temperature is maintained. It is recommended to reduce the heating at night - for a comfortable sleep, it is enough to heat the rooms at 18-19 °C.
Explanation. Reasonably acceptable means the temperature at which the boiler will quickly warm up the rooms to a comfortable level without much energy consumption. It is determined empirically and lies within 15-18 degrees.
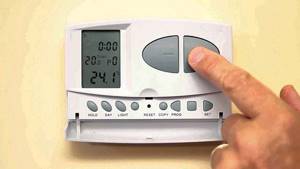
Now let’s look at situations where, instead of saving, there is increased consumption or deterioration in heating:
- The boiler is set to the minimum coolant temperature (40-45 °C), because the underfloor heating circuits are connected directly. The heater operates with low efficiency, gas consumption does not decrease.
- When the home is heated exclusively with warm floors, and the thermostat does not measure in the lower zone of the room. The screed and air warm up slowly, and at the moment the sensor is triggered, the floors become too hot. When cooling, the opposite picture is observed.
- The heat loss of the building is too great. No thermostats will help here; insulation is required.
- The temperature sensor-boiler connection is incorrectly configured, the hysteresis (temperature difference between starting and stopping the heat generator) is incorrectly selected.
Each thermostat provides a temperature difference between turning off and turning on the boiler. The value can be changed within 0.5-2 degrees. If maximum hysteresis is selected and the house is heated with underfloor heating, the air temperature difference will increase greatly, staying in the room will become uncomfortable, and the heat generator will consume more fuel for heating.
The master installer will tell you about the intricacies of setting the thermostat in the video:
