Do-it-yourself insulation of a balcony with mineral wool and vapor barrier
The use of mineral fiber materials has a huge number of both ardent fans and those who consider insulating a balcony with mineral wool a waste of time and unacceptable for such premises. Building codes and regulations allow the use of mineral insulation, but only if the warm layer is reliably insulated with absolutely impermeable materials.
Insulating a balcony is cost-effective
Installation of insulation materials
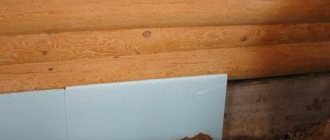
After applying the glue, the mineral wool slabs are placed on the insulated surface between the sheathing guides, pressing lightly. Each element of mineral wool should be laid adjacent to the previously installed one.
If there are cracks and gaps, they are filled with small pieces of insulation. The laying of thermal insulation material begins from the ceiling, and after that they move on to the wall surfaces.
If the thickness of the loggia walls allows, then it is better to use additional fasteners.
The more securely the system is reinforced, the longer it will last. After the glue has dried, the cotton wool is secured with dowels.
Vapor barrier
Upon completion of installation of insulation materials, a vapor barrier membrane is installed. Place it with the foil side inside the room to reflect heat. The edges of the material are joined without overlap. The joints are taped with metallized tape.
Mineral wool installation technology: step-by-step instructions
There are two technologies for installing insulation for a balcony - standard and ventilated.
When using standard technology, the installation of frames or similar elements is not provided. In order to insulate a loggia or balcony using standard technology, you need to lean slabs with glue previously applied to them against the wall, and then lubricate them with water-repellent plaster. This allows you to protect the walls of the house with mineral wool, and the wool itself with a layer of plaster. Standard technology involves the following steps:
- cleaning the wall and priming it;
- marking the slab location plan;
- installation of base profiles and flashings;
- mounting slabs with glue;
- fixing the slabs with dowels;
- installation of waterproofing;
- applying water-repellent plaster;
- finishing.
Ventilated installation technology is slightly different from the standard one. When using ventilated technology, mineral wool is placed in a frame prepared in advance for it. The frame itself, in turn, is the fastening of the future cladding profile. A ventilated front profile is installed on this frame, which creates a gap between the frame and the insulation. In the presence of such a gap, the cotton wool insulation can be ventilated, which improves the overall insulation technology inside and outside the balcony. Ventilated technology includes the following steps:
- surface preparation and priming, metal cleaning;
- securing frame elements;
- fixing the boards with glue;
- strengthening slabs with bolts;
- applying insulation to the frame;
- assembly of the face covering;
- securing the front covering to the frame.
General information
It is perfectly used for thermal insulation of attics, roofs, floors and walls. it is completely harmless, but is afraid of fire and will not release toxic components. When choosing such a material for thermal insulation of a balcony, heat losses are significantly reduced. Therefore, by using mineral wool as insulation, you create a cozy and comfortable atmosphere.
Algorithm of actions for insulation:
Clearing space of junk.- Glazing.
- Insulation of the ceiling.
- Implementation of floor insulation.
- Wall insulation.
- Carrying out electrical installation work.
- Carrying out work on installation of flooring.
- Carrying out finishing work.
Let's look at everything in order.
Preparatory stage
Before starting insulation work from the inside, the balcony should be properly prepared.
The first step is to clear the room of any debris: it should not be on the walls, ceiling, or floor. Then you need to free the balcony from various elements and decorative details, for example, shelves, hangers or racks. If there is a covering on the floor, it must be removed. Next, you should proceed to a thorough inspection and verification of the structure itself. If large holes or cracks are found, they must be sealed with cement mortar.
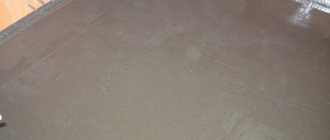
You should also pay attention to the evenness of the surfaces of the balcony or loggia. If there are large uneven surfaces and deformations, you can plaster them yourself. For this type of work, finishing plaster is used.
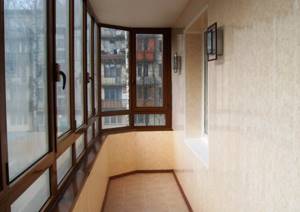
What I had to face and what our loggia looked like before insulation
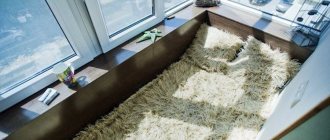
When I told my friends about my idea, at first everyone laughed at me. They began to say that there was not enough space there, and they were frightened by the cold of the unheated room - after all, our loggia was essentially an outdoor room. To give you an idea of what I had to face, I am attaching a plan of the balcony. I had to turn three and a half squares of usable space into a full-fledged office, where two of my sewing machines with a table, a cutting table, and an ironing board could fit.
The first window has a balcony door and access to the kitchen. This wall is the main one - it’s already warm, so you don’t have to sheathe it. Subsequently, we abandoned covering it with plaster, since the brick itself looks quite interesting in the interior. We just cleaned its surface from dirt with sandpaper.
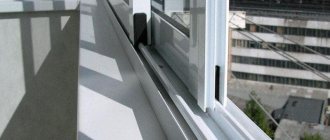
The second window is located on the wall of the loggia; it required complete replacement and damaged the stained glass windows. The photo was taken after installing a new double-glazed window.
Loggia insulation technology
Tools and consumables
To insulate a loggia, no special tools are required. As a rule, every home craftsman has everything necessary. As a last resort, you can borrow something from a neighbor.
So, from the tool you will need:
Consumables
Related consumables for insulating a loggia with your own hands are available in any construction supermarket.
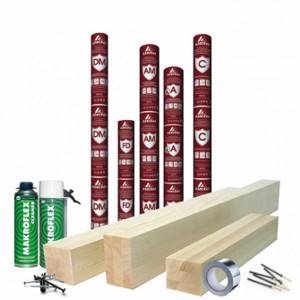
When starting insulation, in addition to the insulation itself, you need to stock up on materials such as:
- polyurethane foam,
- means for cleaning foam guns,
- wooden beams for lathing on walls and ceilings with a section of 30x30, 40x40 or 50x50 mm, depending on the thickness of the insulation,
- wooden beam for floor joists with a section of 100x60 mm,
- fasteners: self-tapping screws, dowel-nails, plastic dowels with a mushroom-shaped cap (for polystyrene foam and polystyrene foam) or glue for mineral wool,
- Izospan for vapor barrier,
- metallized tape.
Advantages and disadvantages
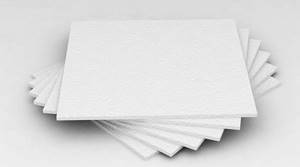
Mineral wool is a fibrous material that is obtained from rocks or slag. This insulation has unique properties, they are its undeniable advantages:
- Fire safety. Minwatane deforms at high temperatures.
- Convenient to use. Material in the form of slabs is easy to cut with a knife, and mats are sawed with a hacksaw.
- Minimal thermal and natural shrinkage. Over time, no gaps are formed at the joints for the passage of cold.
- Excellent sound insulation properties. When passing through the material, the sound becomes weaker by 95%.
- Non-hygroscopic and good vapor conductivity. An optimal microclimate is maintained in the room.
- Excellent biological stability. Mice or mold will grow in the mineral wool.
- Low thermal conductivity. High thermal resistance allows you to save money on repair work.
Almost every modern city apartment has the opportunity to expand the living space by using additional balcony or loggia space. To do this, you will need to carry out work to insulate cold glazing, as well as walls, floors and ceilings. It will be useful for anyone who is faced with the need to solve this problem to learn about the technologies, methods, stages, and materials that will be required for this.
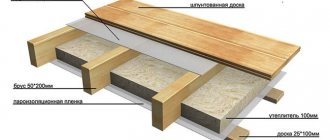
Finishing the floor with mineral wool
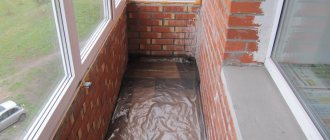
The cleaned surface of the loggia floor is covered with a layer of roofing felt. To create a durable coating, sheets of roofing felt are glued with a special glue and sealant.
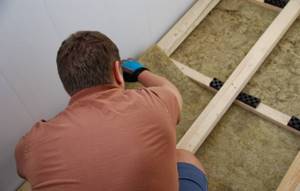
Logs are attached on top of the mineral wool under the subfloor
Next, using wooden beams, a frame is formed for a layer of mineral wool. As a rule, logs are installed along the width of the loggia in half-meter increments and can be connected with bars. Before installation, even at the stage of preparatory work, wooden beams must be treated with waterproofing impregnation.
Important! The thickness of the beams for the frame is calculated based on the distance from the floor to the doors to the loggia, minus the thickness of the roofing material, subfloor and final coating.
Then, mineral wool is placed in the cells formed by the beams, previously cut into pieces equal to the compartments of the frame. A subfloor is laid on top of the mineral wool, the sheets of which are attached to the joists using self-tapping screws.
Floor installation, determining the amount of materials
In order to quickly and successfully complete a task, you need to have a clear plan. In this case, this is the plan of the loggia. We measure the length and width of the loggia, as well as niches and projections, if any.
Scheme of beams layout
On the plan of the loggia we determine the layout of the transverse and longitudinal beams. In doing so, we adhere to the following rules:
- the bottom row consists of transverse beams, which are laid out along the loggia, the step between the beams is 40-60 cm;
- the top row consists of longitudinal beams located along the loggia; the distance between the longitudinal logs should be no more than 45 cm.
In standard loggias, it is enough to lay three longitudinal beams. If the loggia has a width of 1.2 m, then you can lay the outer beams at a short distance from the walls: 10 cm from the inner wall and 20 cm from the fence of the loggia. The length of the longitudinal beam can be 10-15 cm shorter than the length of the loggia (5-7 cm on each side).
Floor structure height
It is important to correctly determine the height of the floor. For good insulation, it is enough to make the floor 10-20 cm thick. You need to check how the floor will fit the threshold of the balcony door and match its height. In this case, it is necessary to take into account all the elements that make up the structure: the height of the transverse and longitudinal beams, the thickness of the subfloor (chipboard) and the thickness of the finishing coating.
In order to achieve the desired floor height, you can choose the appropriate timber height and chipboard thickness. It must be remembered that the thinner the chipboard thickness, the smaller the distance between the longitudinal beams should be. The recommended chipboard thickness is 18 mm, the recommended height of the upper (longitudinal) row of beams is 70 mm. The height of the bars of the first row is 50-70 mm. To accurately calculate the required amount of flooring materials, you can use our calculator.
Foam plastics
This heat-insulating material is familiar to everyone since childhood. It was used to make boards for learning to swim. The balls that make up the foam were often used to create artificial snow at children's parties. The technology for producing polystyrene foam is reminiscent of making popcorn. Only polystyrene foam granules do not explode under high temperature, but are saturated with air at high pressure.
Foam plastic is the most common and cheapest heat-insulating material.
It has excellent heat-insulating properties, second only to penoplex. Lightweight, easy to install, easy to cut.
There are two production technologies - non-press - in which the balls adhere to each other as a result of the residual stickiness of the uncooled polymer, and press - the most dense and heaviest grades of foam plastics used for insulating floors or road surfaces, underground parts of foundations.
The most common brands in residential construction are PSB-S 15, PSB-S 25, PSB-S 35. They differ in density - 8/15/25 kg/m 3, respectively, and different coefficients of resistance to compression and fracture force. The larger the number in the designation of the foam brand, the more durable it is and resistant to mechanical damage.

Polystyrene foam is flammable, which makes it significantly different from practically non-flammable mineral wool. When burned, it releases deadly dioxide gas. According to the degree of fire hazard, foam plastics belong to flammability category 3. Therefore, it is better not to use foam insulation in rooms and buildings where large numbers of people can gather. Polystyrene foam, unlike mineral wool, is slightly hygroscopic. When completely immersed in water for 24 hours, PSB-S 15 absorbs 4% of the dry weight, and PSB-S 35 – 2% of water.
The temperature range in which foam plastic can be used varies from -60° to +80° C.
It is believed that polystyrene foam is not dangerous to human health. But it is better not to use it for indoor insulation. Polystyrene foam is vapor-proof. In rooms insulated with foam plastic, it is difficult to breathe humid and stale air. Therefore, as insulation, it is most often used outside the room or in those rooms where there is good ventilation, in particular on loggias and balconies.
Facing
When the vapor barrier layer is installed, you can proceed to the cladding of the structure. Plywood, chipboard, MDF, lining, and plasterboard are usually used as facing materials for balconies. If the walls are supposed to be plastered, then a reinforcing mesh is installed on top of the insulation.
Floor insulation
Laying of insulation boards on the floor is carried out between pre-arranged joists. There is no need to additionally fasten the material. After the glue has hardened, a film vapor barrier is installed and then the floor is sewn up.
After arranging the thermal insulation system, you can move on to decorative finishing of the room.
Preparatory work
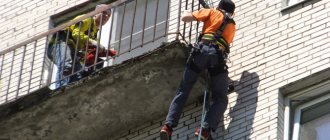
Insulation of a balcony can be done both outside and inside, but the first option is not always possible for a number of reasons.
These include violation of the architectural appearance of the building, the number of floors in the location of the balcony, which is determined by the level of danger of the work. At the preparatory stage of work, an accurate calculation of the required material and its cutting should be carried out. The technology for insulating a loggia or balcony with glass wool involves dismantling all finishing materials and exposing the main frame of the structure to place insulating material between the load-bearing elements of the loggia. It is necessary to take care of a set of tools for carrying out such work, namely:
- 1 construction knife;
- 2 Measuring tape, long ruler or floor rule and level;
- 3 Electric screwdriver;
- 4 Construction stapler.
In addition to the main material - mineral wool, you should take care of the presence of wooden blocks, which will play the role of a holding frame for the insulation and the basis for attaching subsequent finishing materials. In this case, the dimensions of the bar can be 50 by 40 mm. You will also need material for hydro- and vapor barrier.
Important! To ensure health safety, you should use special gloves and respirators that provide protection from small fibers of cotton wool during cutting or installation.
Carrying out work on a loggia or balcony using mineral wool
But before you get ready to insulate the balcony directly with the cotton wool itself, you need to carry out additional work. Thermal insulation itself, no matter how good it is, will do nothing if you still have old window frames on the loggia or there are cracks somewhere.
If you have a loggia, then there will be much less preparatory work than on a balcony. Firstly, loggias most often have side walls and, in addition, the front wall is made of blocks or bricks, which cannot be said about the balcony.
Stages of preparation for installation:
- the first stage is to restore order, that is, it is necessary to completely empty the loggia of all items, including building materials;
- taking measurements and calculating the materials needed for the work - this stage is important because it will help you avoid unnecessary costs; at current prices for building materials, this point plays a big role;
- It is also necessary to assess the condition of the slab - whether it can withstand additional load; if you are not able to do this yourself, then you need to invite a specialist.
After the preparatory work has been carried out and all materials have been purchased, you can proceed directly to work. The first step is to install double-glazed windows; it’s up to you to decide what they will be, wooden or metal-plastic.
Next, you need to prepare the surface itself for installing insulation, in our version of mineral wool. If there are cracks and holes, they must be eliminated, sealed with polyurethane foam and plastered. After this, we proceed to waterproofing the surfaces; this process is not as complicated as it seems. There are two main methods of waterproofing: coating or roll. In a city apartment, the second option is more preferable, since bitumen is most often used as a coating, but its smell can persist for a long time. This stage of work is mandatory, since without the necessary waterproofing, mineral wool may soon become unusable.
No. 3. Balcony insulation with mineral wool: technology features
Insulation of balconies with mineral wool is carried out under the constructed sheathing. A lining is mounted on top of the frame - wooden or plastic panels with special grooves.
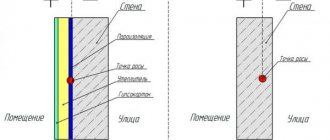
A well-known fact is the construction recommendation to carry out insulation from the outside of the building. However, when insulating balconies and loggias, it is often not possible to place the insulation material outside. The internal placement of the insulation layer requires certain calculations, adherence to technology and the correct selection of materials, so that in the future the work performed does not lead to wetness of the walls, corners and ceilings inside the external structure.
What materials can be used to insulate a balcony and loggia from the inside? What finishing will reliably protect the insulation from the internal space and create an aesthetic appearance of the internal walls?
How to properly insulate a balcony from the inside with mineral wool
To arrange the insulation of a balcony room, first of all, it is necessary to purchase materials that are recommended by leading manufacturers for this type of work. The list will include:
- Wooden slats, section 50x50 mm, for a standard balcony you will need at least 20 pieces of 4 m each;
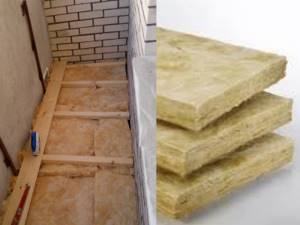
- Mineral wool rolled or in the form of slabs;
- Double-sided and single-sided tape;
- Mounting stapler with staples, screwdriver with a set of screws 75-100 mm;
- Vapor barrier film.
In addition, after insulating the floor on the balcony with mineral wool, you will need to sew a rough base made of plywood or OSB panels. It is recommended to cover the walls of the balcony with clapboard or wooden slats. It is clear that it is better to buy all of the above as a kit specifically for installing insulation indoors, but you can also use leftover building materials from laying the roof of a summer house. The general technology for insulating a balcony with mineral wool is shown in the video:
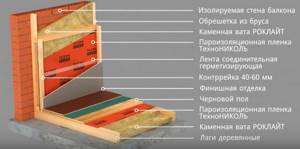
Warm “pie” for the balcony
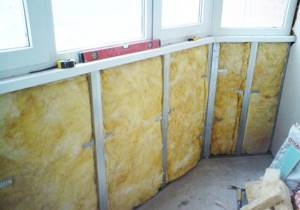
Insulation of balcony walls and ceilings with mineral wool
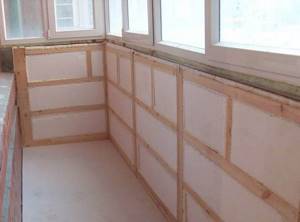
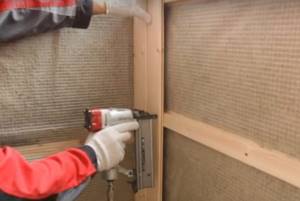
First of all, it is necessary to sew vertical pine bars of the supporting frame onto the walls and ceiling. The slats are attached to the walls using self-tapping screws and a screwdriver. The horizontal distance between the beams is chosen within 58-59 cm, if the width of the mineral wool slab is standard, 60 cm. It is not necessary to follow any specific order of installation, the main thing is that the size is 10-15 mm smaller than the width of the mineral wool piece, otherwise the insulation will simply fall out of the sheathing.
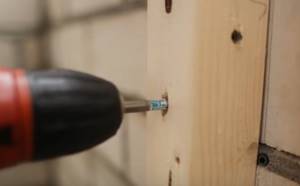
We attach the timber to the wall
Each beam is fastened at two or three points, first at the top, then leveled vertically according to the building level and sewn at the bottom and in the center. On the ceiling, the lath for insulating the concrete slab with mineral wool is attached with overlapping ends.
The next step is to lay the mineral wool into the wall sheathing; the thickness of a standard mineral wool slab is 50 mm, so the surface of the laid insulation is obtained from the cut of the vertical slats.
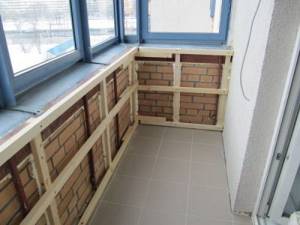
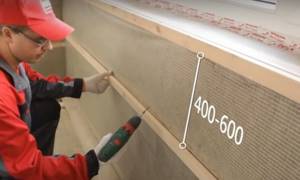
Next, we sew horizontal beams on top, the height between levels is selected in the range of 400-600 mm. A second layer of mineral wool is placed in the resulting niches; double laying ensures the absence of cold bridges.
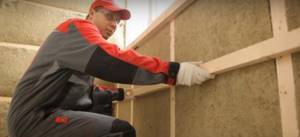
A second layer is sewn on top of the first layer of insulation.
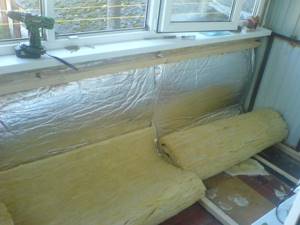
Laying vapor barrier film
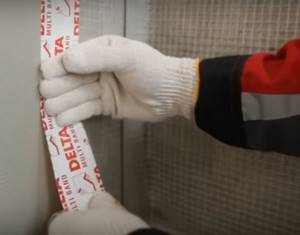
The next stage is the most critical; it is necessary to lay a vapor barrier for insulation on the walls. It looks like polyethylene film reinforced with mesh. The roll is unwound horizontally, the upper edge is placed under the window frame and on the walls. The edges of individual panels must be laid with an overlap of 100 mm and secured with double-sided tape. The panel itself is attached to the mineral wool sheathing using construction staples and a stapler.
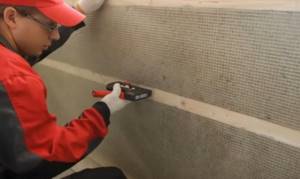
The film is sewn to the horizontal post of the balcony
The edges of the laid vapor barrier are glued to the surface of the walls and ceiling with special adhesive tape. To prevent the insulation protection from steam from being torn off in strong winds, secondary slats with a cross-section of 20x20 mm are sewn onto the horizontal beams.
Sewn-on bars make it possible to press the vapor barrier film in places where the brackets are installed, and at the same time serve as a lathing for hanging decorative cladding.
Lathing for eurolining
Technology for insulating loggia floors with mineral wool
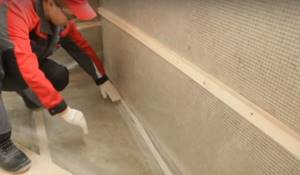
Laying mineral wool on a concrete slab is carried out according to a similar scheme. Initially, the slats of the future sheathing are laid on the floor for laying mineral wool. To insulate the floor, choose a size of 50x50 cm or even 40x40 cm. The section of the beam is 50x70 mm; usually, after insulation, the loggia room is used as part of the living space, so the base is made with a small margin of safety.
Mineral wool is laid directly on concrete, without any gaskets or additional insulation from roll insulation. A vapor barrier is laid over the mineral fiber insulation, the edges are run onto the walls and taped with wall insulation insulation.
If the thickness of the mineral wool slab is selected according to the level of the beam, then you will additionally need to fill the counter-lattice slats, the step is taken to be 20-25 cm. Only after this can you sew on the plywood of the subfloor and stuff the eurolining on the walls.
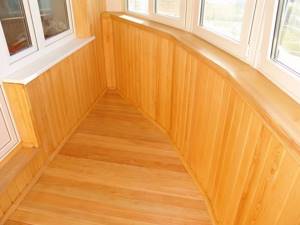
Functional purpose of an insulated loggia
A balcony insulated with mineral wool or polystyrene foam is used in different ways. There you can set up a study or turn the room into a flower greenhouse. Sometimes summer bedrooms, recreation areas, or even dining rooms are set up on balconies, offering views of the surrounding area.
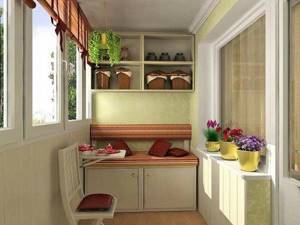
Depends on the total area. The main thing is that the insulation is carried out correctly. Thanks to this, heat leaks are reduced, and the finished room meets the owner’s needs. It is better to think through these tasks before starting work in order to clearly know what kind of insulation will be required.
Common mistakes when insulating yourself with mineral wool
Below is a list of the most common mistakes made when using mineral wool as balcony insulation:
- insulation in one layer - leads to freezing of the structure;
- failure to use vapor barrier leads to condensation on the ceiling;
- incorrect floor construction - with a thick floor screed, swelling is possible at the places where the insulation is attached;
- inappropriate insulation of the wall between the balcony and the apartment.
Mineral wool is an excellent material for external insulation of balcony walls. Its quality characteristics help to avoid condensation and mold formation. Moreover, mineral wool is a very long-lasting material when used correctly.