The dew point in a wall is the temperature zone at which water vapor condenses and turns into water.
The dew point is highly dependent on air humidity, and the higher the humidity, the higher the likelihood of condensation.
The dew point is also affected by the temperature difference between inside and outside the room.
In this review, we are testing to find the dew point in a wall made of D500 aerated concrete. Different options for walls made of aerated concrete will be considered, for example, 200mm and 400mm thick, as well as using insulation.
Dew point in a wall - what is it, how to calculate and find
Construction technologies require taking into account many nuances that affect the durability of the structure and the ability to resist the negative influence of external factors. One of the main enemies of most buildings and structures is constant high humidity. A variety of techniques are used to combat it.
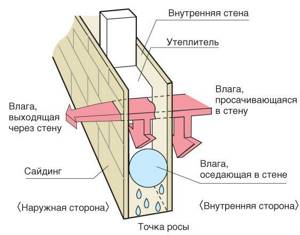
It is necessary to take into account all factors at the initial design stage, when it is possible to influence the use of materials and the formation of the exterior of buildings. An important place in such a situation is given to competent calculations when insulating buildings. A mandatory attribute in them is the determination of dew point temperature.
Dew point
Dew point is measured in degrees. This is the temperature at which the content of water vapor in the air is maximum. The dew point cannot be more important than the air temperature - condensation occurs. For example, in a kitchen where dishes are washed and cooked, the dew point will be the temperature of the window glass on which drops of water can be seen.
The dew point can be located both outside the wall and inside, it depends on the humidity and air temperature inside and outside the room, and on the thickness and vapor permeability of each layer of the wall “pie”.
Complex finishing and insulation of walls using the “Wet Facade” technology has undeniable advantages. But the first two options are slightly different from the marketing presentations below. This is not entirely true.

We are investigating the case of wet walls
The structure of most building materials consists of numerous capillaries - pores, microcracks, through which moisture dissolved in the air moves. The number and size of such “holes” affect the vapor transparency.
Imagine two anthills. One with many large passages (vapor-transparent material), and the other has few passages and they are narrow (non-vapor-transparent material). In the first, crowds of insects (water molecules) can freely run in and out. In the second - only a few.
Vapor transparency is expressed through the coefficient of vapor permeability or the value of resistance to vapor permeation:
1.
The vapor permeability coefficient depends on the material itself. Roughly speaking, it depends on how porous it is. The higher the coefficient (Table 1), the easier it is for steam to pass through the material.
2.
Resistance to vapor permeation is the inverse value, which also takes into account the thickness of the layer. For example, the thicker the wall, the longer and more intricate the capillaries in it, the more difficult it is for steam molecules to squeeze through them.
A thick layer of dense material will have higher resistance to vapor permeation than a thin and porous one.
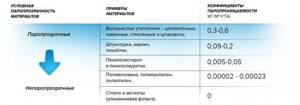
The coefficient and resistance value are used to calculate the dew point in the wall and insulation. The calculations require certain engineering knowledge, but for a general understanding, let’s break it down:
1.
The vapor permeability coefficient shows how many milligrams (mg) of steam will pass through a sample of material 1 meter thick in 1 hour, if the difference in vapor pressure between the opposite surfaces of the sample is one pascal (Pa, 100,000 Pa = 1 bar? 1 atm) - fig. 5. The designation of the coefficient “mg/(m*h*Pa)” can be found on the packaging of some building materials. For example, it is indicated for foam plastic or aerated concrete.
2.
Vapor permeability resistance ((m2*h*Pa)/mg) is found by dividing the thickness of the material layer in meters (m) by the vapor permeability coefficient. Thus, the resistance, in contrast to the coefficient, already shows the vapor transparency not of 1 m, but of a layer of material of a specific thickness.
When calculating the vapor transparency of a multilayer structure, for example, “wall + insulation + finishing,” the total vapor permeability resistance is determined taking into account the resistance of each layer.

Let's consider a simple (non-insulated) wall made of brick or concrete. Let it be +20 °C indoors and -20 °C outside. Homes are warmer and there is more actual moisture in the air than outside.
Sources of steam in apartments are bathrooms, kitchens, drying laundry, human and plant breath.
The more moisture, the heavier it is - the higher its pressure. We have a system with a pressure difference and a vapor-transparent layer (wall) inside (Fig. 6). What will happen? The steam will equalize the pressure. Therefore, in winter the direction of its flow is always directed from indoors to outdoors.
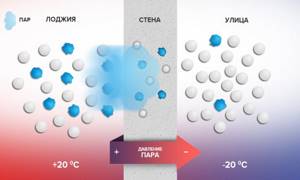
Where does water come from in the wall or on the wall?
The temperature in the wall gradually decreases from its inner surface to its outer surface. Water will appear where the air moisture cools to the dew point temperature. This can happen in the inner layer of a porous wall, as well as on its surface.
The location of condensation depends on the vapor transparency of the material, its thickness, temperature and humidity indoors and outdoors.
Dew on a cold wall can be seen if:
1.
The surface is painted with oil paint. Oil coatings are practically impermeable to vapor, so all condensation on them collects outside. If there is a lot of it, then it flows in streams.
2.
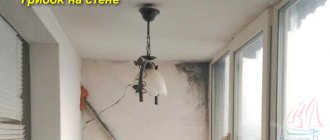
The vapor-permeable material (brick, concrete) has cooled down so much that condensation falls both inside and on the surface. First of all, this happens where it is coldest - in the corners of the room, on window slopes or behind furniture pushed towards external walls. In such places, damp spots, drops of dew or even frost with ice appear.
The dew point does not always make itself known so clearly. It happens that she hides unnoticed inside a wall structure.
Unfortunately, walls that look dry are not always dry on the inside. In winter, dripping moisture is not uncommon in external uninsulated walls. You can easily verify this by placing your palm on the wall surface in a typical apartment built in the last century.
The feeling of coldness is a combination of cold and high humidity.
It turns out that although the condensate does not flow down in streams, it is still there. Why don't we see him?
1.
The air near the wall is dried due to ventilation or good ventilation.
2.
Severe frosts do not last long; dew does not have time to appear on the surface.
3.
During the day there is enough sun, which additionally warms the walls from the street.
4.
The dew point is deep in the wall. From the wet layer, water flows through capillaries into the adjacent dry layer, where it mostly has time to evaporate and weather (Fig. 7).
This is roughly what happens if you put a porous sponge on a wet table: the sponge will absorb water and dry the surface.
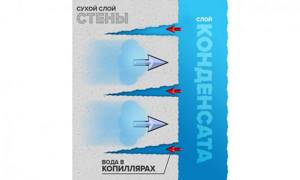
Why is dew point dangerous in building structures?
Dew in any quantity can cause serious problems:
Damp walls are colder because the water in the capillaries cools faster than the air. Result: either freeze in the apartment or spend more money on heating.
If there is constant dew on/in the walls, then mold will appear. Result: ruined finish and mood. In addition, mold spores are dangerous to health - they are the cause of many lung diseases.
Where there is minus in the wall and there is condensation, ice will appear. Result: when freezing, water expands and gradually breaks even heavy-duty reinforced concrete - it cracks, delaminates and crumbles.
Obviously, even a little condensation in building materials is already bad. How to fight it?
There is no place for a wet spot in the walls
Eliminate at least one of the causes of condensation, and the problem of dew point inside and outside building structures will disappear by itself. To do this, you can choose one of three:
1.
Don't let the walls freeze.
Thermal insulation material
To protect buildings from heat loss, high humidity and point shifts, it is insulated with thermal insulation materials. In winter, insulation helps reduce heating costs, and in summer it keeps the room cool. Each product has its own areas of application and properties. Eco-friendly and easy-to-install materials are used in construction. The required type of insulation is selected for certain conditions.
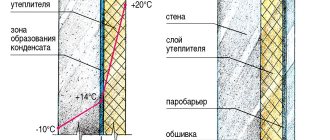
With proper insulation from the outside, the dew point will be located inside the insulation.
According to their form, materials are divided into:
- roll;
- leafy;
- bulk;
- single.
By structure:
- fiber;
- cells;
- grainy.
Raw materials can be organic, inorganic and mixed.
Main characteristics of insulating materials:
- thermal conductivity;
- moisture absorption;
- porosity;
- humidity;
- density;
- vapor permeability;
- specific heat;
- strength, etc.
Penoplex
Penoplex is also called expanded polystyrene. Unlike foam polystyrene, the material has a higher density and is less subject to mechanical damage. It almost does not conduct steam due to its low vapor permeability coefficient. However, it belongs to group IV of flammability (it ignites quickly).
Penoplex is recommended for external wall insulation.
Penoplex of the “comfort” category is produced for insulating walls, terraces, loggias, and balconies. Its thermal conductivity coefficient is 9 times less than that of mineral wool. The material requires little time to heat the room after cooling due to its low heat capacity. The operating temperature range is -70…+70°C. Penoplex of this type does not have the best sound insulation, has the lowest density and lower tensile strength compared to other materials.
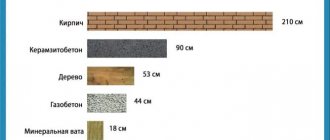
A 2 cm wide layer of polystyrene foam retains heat almost as well as 40 cm of mineral wool or 37 cm of brickwork.
Styrofoam
Polystyrene foam is a material characterized by lightness and buoyancy. It is resistant to fire, but when exposed to fire it begins to melt. The material is easy to process and is not subject to infection by fungi and mold.
Polystyrene foam is obtained from foamed polymer raw materials: polystyrene, polyethylene, polyvinyl chloride or polyurethane. It consists of small identical balls that are fastened together. High-density rigid foam is used for insulation. The panels are easy to connect using rubber or epoxy adhesive.
The temperature range is not important for polystyrene foam, but the material is subject to mechanical damage.
Slabs 5 and 10 cm thick are used as thermal insulation. But, despite the structure, the material is sound-permeable.
Polystyrene foam is one of the most common materials for home insulation.
Mineral wool
Thermal insulation material consists of compressed fibers. Glass, basalt and slag are used as raw materials. The starting material is melted and spun into fibers. Their length is 2-60 mm. The air pores of the mats fill approximately 95% of the total volume. The product is easy to produce and has a low cost.
Due to its porosity, cotton wool allows air and steam to pass through, maintaining air exchange. At the same time, it does not burn and is resistant to moisture, has good sound insulation. But the material has 2 drawbacks:
- contains phenol;
- Flying pieces of cotton wool, falling on human skin, cause itching.
Determining the position of the dew point in the wall
In order to ensure the normal thermal protection qualities of the enclosing structures, it is necessary not only to know the value of the condensation temperature, but also its position within the enclosing structure. The construction of external walls is now carried out in three main options, and in each case the location of the condensation boundary can be different:
- the structure was built without additional insulation - from masonry, concrete, wood, etc. In this case, in the warm season, the dew point is located closer to the outer edge, but if the air temperature drops, it will gradually shift towards the inner surface, and may a moment will come when this boundary is inside the room, and then condensation will appear on the internal surfaces.
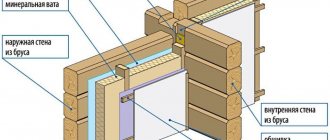
It should be noted that the dew point in a wooden house with correctly selected wall thickness - made of logs or timber - will be located closer to the outer surfaces, since wood is a natural material with unique properties, having very low thermal conductivity with high vapor permeability. Wooden walls in most cases do not require additional insulation;
- The structure was built with an additional layer of insulation on the outside. If the thickness of all materials is correctly calculated, the dew point when insulating with foam plastic or other types of effective insulation materials will be located inside the insulating layer, and condensation will not appear indoors;
- The structure is insulated from the inside. In this case, the boundary for the appearance of condensation will be located close to the inside and, during severe cold weather, can shift to the inner surface, to the junction with the insulation. In this case, it is also likely that moisture will appear indoors, leading to unpleasant consequences. Therefore, this insulation option is not recommended and is carried out only in cases where there are no other solutions. At the same time, it is necessary to take additional measures to prevent negative consequences - provide an air gap between the insulation and the cladding, ventilation holes, arrange additional ventilation of the premises to remove water vapor, air conditioning to reduce humidity.
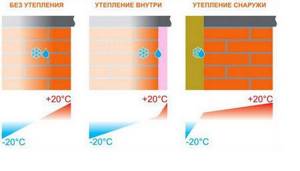
Location of the dew point for different wall insulation options
Let's look at an example of how you can calculate the position of the condensation boundary in a structure with external insulation. The following data will be required for the calculation:
- wall thickness, including base material (h1, in meters) and insulation (h2, m);
- thermal conductivity coefficients for the supporting structure (λ1, W/(m*°C) and insulation (λ1, W/(m*°C);
- standard room temperature (t1, °C);
- outdoor air temperature, taken for the coldest time of year in a given region (t2, °C);
- standard relative humidity in the room (%);
- standard dew point value at given temperature and humidity (°C)
We will accept the following conditions for calculation:
- brick wall with thickness h1 = 0.51 m, insulation – expanded polystyrene with thickness h2 = 0.1 m;
- thermal conductivity coefficient established according to the regulatory document for sand-lime brick laid on cement-sand mortar, according to the table in Appendix “D” SP 23-101-2004 λ1 = 0.7 W/(m*°C);
- thermal conductivity coefficient for EPS insulation - polystyrene foam, having a density of 100 kg/m² according to the table in Appendix "D" SP 23-101-2004 λ2 = 0.041 W/(m*°C);
- indoor temperature +22 °C, as established by standards within 20-22 °C according to Table 1 SP 23-101-2004 for residential premises;
- outside air temperature –15 °C for the coldest time of year in a conventional area;
- indoor humidity – 50%, also within the standard limits (no more than 55% according to Table 1 SP 23-101-2004) for residential premises;
- the dew point value for the given values of temperature and humidity, which we take from the table above, is 12.94 °C.
First, we determine the thermal resistances of each layer that makes up the wall and the ratio of these values to each other. Next, we calculate the temperature difference in the load-bearing layer of the masonry and at the boundary between the masonry and the insulation:
- the thermal resistance of the masonry is calculated as the ratio of the thickness to the thermal conductivity coefficient: h1/ λ1 = 0.51/0.7 = 0.729 W/(m²*°C);
- the thermal resistance of the insulation will be equal to: h2/ λ2 = 0.1/0.041 = 2.5 W/(m²*°C);
- thermal resistance ratio: N = 0.729/2.5 = 0.292;
- the temperature difference in the brickwork layer will be: T = t1 – t2xN= 22 - (-15) x 0.292 = 37 x 0.292 = 10.8 °C;
- the temperature at the junction of the masonry and insulation will be: 24 – 10.8 = 13.2 °C.
Based on the calculation results, we will plot the temperature change in the wall mass and determine the exact position of the dew point.
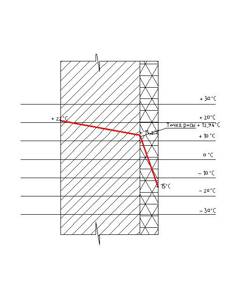
Graph of temperature changes in the thickness of the wall and the location of the dew point when insulating from the outside
According to the graph, we see that the dew point, the value of which is 12.94 °C, is within the thickness of the insulation, which is the best option, but very close to the junction between the wall surface and the insulation. When the outside air temperature decreases, the condensation boundary may shift to this joint and further inside the wall. In principle, this will not cause any special consequences and condensation cannot form on the surface indoors.
The calculation conditions were adopted for central Russia. In the climatic conditions of regions located in more northern latitudes, a greater thickness of the wall and, accordingly, the insulation is accepted, which will ensure that the boundary of condensation formation is located within the insulating layer.
Features of moisture accumulation in walls with facade insulation with foam plastic, expanded polystyrene
Insulation materials made from foamed polymers - polystyrene foam, polystyrene foam, polyurethane foam - have very low vapor permeability. A layer of insulation boards made of these materials on the facade serves as a barrier to steam. Steam condensation can only occur at the boundary of the insulation and the wall. A layer of insulation prevents condensation from drying out in the wall.
To prevent the accumulation of moisture in a wall with polymer insulation, it is necessary to prevent steam condensation at the boundary of the wall and the insulation . How to do it? To do this, it is necessary to ensure that the temperature at the boundary of the wall and the insulation is always, in any frost, above the dew point temperature.
The above condition for temperature distribution in a wall is usually easily met if the heat transfer resistance of the insulation layer is noticeably greater than that of the insulated wall. For example, insulating a “cold” brick wall of a house with foam plastic 100 mm thick. in the climatic conditions of central Russia it usually does not lead to the accumulation of moisture in the wall.
It’s a completely different matter if a wall made of “warm” timber, logs, aerated concrete or porous ceramics is insulated with polystyrene foam. And also, if you choose a very thin polymer insulation for a brick wall. In these cases, the temperature at the boundary of the layers can easily be below the dew point and, to ensure that there is no moisture accumulation, it is better to perform the appropriate calculation.
The figure above shows a graph of the temperature distribution in an insulated wall for the case when the heat transfer resistance of the wall is greater than that of the insulation layer. For example, if the wall is made of aerated concrete with a masonry thickness of 400 mm. insulated with foam plastic 50 mm thick, then the temperature at the border with the insulation in winter will be negative. As a result, steam condensation will occur and moisture will accumulate in the wall.
The thickness of the polymer insulation is selected in two stages:
- They are chosen based on the need to provide the required resistance to heat transfer of the outer wall.
- Then they check for the absence of steam condensation in the thickness of the wall.
If the check according to clause 2. shows the opposite, then it is necessary to increase the thickness of the insulation.
The thicker the polymer insulation, the lower the risk of steam condensation and moisture accumulation in the wall material. But this leads to increased construction costs.
A particularly large difference in the thickness of the insulation, selected according to the two above conditions, occurs when insulating walls with high vapor permeability and low thermal conductivity. The thickness of the insulation to ensure energy saving is relatively small for such walls, and to avoid condensation, the thickness of the slabs must be unreasonably large.
Therefore, to insulate walls made of materials with high vapor permeability and low thermal conductivity, it is more profitable to use mineral wool insulation . This applies primarily to walls made of wood, aerated concrete, gas silicate, and large-porous expanded clay concrete.
The installation of a vapor barrier from the inside is mandatory for walls made of materials with high vapor permeability for any type of insulation and facade cladding.
To install a vapor barrier, the interior decoration is made of materials with high resistance to vapor permeation - a deep penetration primer in several layers, cement plaster, vinyl wallpaper is applied to the wall, or a vapor-proof film is used.
Everything described above applies not only to walls, but also to other structures enclosing the thermal contour of the building - attic and basement floors, mansard roofs.
Watch the video, which clearly shows the thermophysical processes in insulated roof slopes. Similar processes occur in the outer walls of buildings.
After reading this article, you learned how to make a wall dry.
The wall should also be warm. Read about this in the next article.
Next article:
Heating costs and heat transfer resistance.
Previous article:
Practical use
In practice, the meaning of the term dew point is important when insulating the walls of a building. To ensure optimal thermal insulation characteristics of the building envelope, it is necessary to know not only the value of the dew point, but also its position on the surface or in the body of the wall.
Modern construction methods allow 3 options for carrying out work, and in each case the point of condensation may be different:
- A building constructed from a single material without additional thermal insulation. If the body of the wall consists of brick, stone or monolithic concrete, then if the construction technology in such buildings is followed, the dew point is located inside the wall. Its location gravitates towards the outer edge of the surface. As external temperatures decrease, the dew point will shift inside the wall. If the temperature difference turns out to be significant, there may come a time when the dew point is inside the room and moisture appears on the wall. We are all familiar with the situation: windows fogging up in winter.
With proper insulation from the outside, the dew point will be located inside the insulation
- The building was constructed with a layer of external thermal insulation. If calculated correctly, this thermal insulation is optimal. Correctly selected material thicknesses will allow you to insulate the structure, while the dew point will be located inside the insulation layer.
- A structure with an internal insulating layer. In this case, the dew point will be close to the inner surface of the wall, and in case of cold weather it will move directly to the surface.
- leave an air pocket between the thermal insulation layer and the cladding;
- provide ventilation openings and heating the room with an additional reduction in humidity levels.
An exception in the case of a wall of the same type would probably be wooden log houses. Wood is a natural material with excellent quality characteristics of low thermal conductivity and high vapor permeability. In such buildings, the dew point will always be located closer to the external surface. Wooden log houses almost never require additional thermal insulation.
The latter option is extremely undesirable and is done only when there is no other option. To learn how to properly insulate the walls of a house, watch this video:
If, however, the insulation is installed inside the building, then additional measures should be taken:
Scope of the concept
This term is widely used in industrial and civil construction. The need to determine this value arises when insulating the walls of a room. If you neglect to calculate this indicator, problems will appear after insulation work. One option is damage to the wall finish due to settling moisture. If the finish is tolerant of water, but drops of condensation will fall on the walls, there is nothing good about it either. A humid environment promotes the development of pathogenic microorganisms and mold.

Ignoring the dew point can lead to a plane crash. This value is also used in forestry. Forest fire protection specialists use the dew point to calculate the fire hazard class, which characterizes the possibility of forest fires. Based on this, protective measures are designed.

Dew point is used in calculations for planning fire prevention measures
In agriculture, knowing the dew point, the probability of damage to crops by non-infectious diseases (damage caused by weather conditions) is determined. At the same time, one of the tasks of breeding is to develop varieties of cultivated plants capable of condensing moisture from the air on their vegetative organs. This will allow successful farming in conditions of low rainfall.

Dew point placement
How to move the dew point in a wall
If after all the calculations you are not satisfied with the location of the dew point, you should think about shifting it. To do this you can:
- increase the layer of insulation on the outside;
- use material with high vapor permeability;
- dismantle the layer of internal insulation, moving it outside;
- adjust the microclimate in the room - install forced ventilation, additionally heat the air.
The appropriate option is chosen based on the climatic conditions of the region of residence, the design features of the house, financial capabilities and the building materials used.
Ignoring such a phenomenon as moisture condensation in the wall “pie” can be very expensive. At a minimum, this is an unpleasant smell in the room, constant dampness . At the most, there are large colonies of mold fungi that spoil the interior decoration of the walls, destroy the insulation and harm the health of household members. Therefore, calculating the dew point is essential if you want to build safe and dry walls for your home.
Wall insulation options
Modern construction companies offer several options for raw materials for insulation. Each of them has its own distinctive features, as well as obvious differences.
Wall without insulation
In economical construction methods, as well as for the construction of non-residential premises, the material is used without the use of insulation. It has the following features:
- Significant thermal conductivity, meaning greater heat loss.
- The dew point is located inside the wall, which creates a favorable environment for fungal mold.
- Strong temperature changes on different sides of the partition have a destructive effect on the wall itself.
Type of allocation. Peculiarities
Depending on the base material, the dew point can have three types of localization.
- Closer to the edge located on the street. A reliable wall, moisture does not penetrate into the room.
- The dew point is not located at the center, shifted to the inner surface. The walls are wet for some time after a significant drop in temperature in the external environment.
- The dew point is located on the inner surface of the wall. If moisture settles in the room, additional ventilation is required, otherwise the surface will collect condensation.
This option is the most unreasonable from a savings point of view. Additional costs may be required for ventilation as well as space heating.

Walls with internal insulation
In this case, the surface on which condensation settles is shifted inward. Characteristic features of such walls:
- complete freezing and subsequent destruction of the load-bearing parts of the structure;
- damp insulation is usually infected with fungus;
- large heat losses.
When the insulation layer is located internally, the dew point is shifted inward, which means condensation accumulates directly in the wall structure. In this case, the dew point has three location options:
- Between the insulation layer and the center of the wall slab: the wall will be dry even with a sharp cold snap.
- Behind the insulating layer: the surface will be damp throughout the winter period.
- Inside the insulation: the resulting condensation will be absorbed by the insulating material in winter and dry out in summer.
Such insulation is considered optimal for warm regions with short winters.
Wall with external insulation
The most convenient solution would be a wall with external insulation. It is valued for the following qualities:
- reliably protects wall slabs from various atmospheric phenomena (snow, rain, hail);
- retains heat indoors;
- constantly dry and warm internal surfaces of the house;
- additional sound insulation effect.
The most optimal option for walls are those that are made using a technology called “wet facade”. It includes proper insulation and comprehensive exterior finishing.
Conclusions and useful video on the topic
You can learn how to determine the dew point and what it is from the following video:
The following video will discuss methods of wall insulation and the correct choice of materials:
You can find out the dew point either independently or by contacting professionals. The dew point number allows a specialist to choose the right material and efficiently insulate the walls of a residential building or any other room.
Not only the warmth and comfort in the house, but also the health of its inhabitants depends on the accuracy of measurements. Professionals recommend insulating a wall from the inside only as a last resort and after professional consultation.
Please write comments and ask questions on controversial issues, publish photos and posts with your opinion in the block below. Share useful information and methods for determining dew point that are not described in the article. Tell us about your personal experience in resolving this issue.
What is the dew point for walls?
The air in the environment always includes water vapor, the concentration of which depends on many factors. Inside buildings, steam is emitted by people and other living organisms. It also enters the internal space from various everyday processes - washing, ironing, cleaning, cooking, and so on.
Outside, the percentage of moisture in the atmosphere depends on weather conditions. Moreover, the filling of air with vapor has its own limit, upon reaching which the process of moisture condensation and the formation of fog follows.
At this moment, the air mixture absorbs the maximum amount of steam and its relative humidity is 100%. Subsequent saturation leads to the appearance of fog - small droplets of water in the atmosphere.
When an air mass that is not completely saturated with vapor (humidity less than 100%) comes into contact with a surface whose temperature is several degrees lower than its own, condensation forms even without fog.
The fact is that air at different temperatures can hold different amounts of steam. The higher the temperature, the more moisture it can absorb. Therefore, when an air mixture with a relative humidity of 80% comes into contact with a cooler object, it cools sharply, its saturation limit decreases, and the relative humidity reaches 100%.
Then condensation occurs, that is, a dew point appears. This is exactly the phenomenon that can be observed on the grass in the early summer morning. At dawn, the soil and grass are still cold, and the sun quickly heats the air, its humidity near the ground quickly reaches 100% and dew falls. The condensation process is associated with the release of thermal energy that was previously spent on vaporization. Therefore, the dew disappears quickly.
Thus, the dew point temperature is a variable value that depends on the relative humidity and air temperature at a certain moment. To determine the dew point and its temperature, various meters are used - thermohygrometers, psychrometers and thermal imagers.
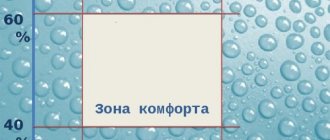
The dew point depends on the relative humidity of the air. The higher it is, the closer the TP is to the actual air temperature. If the relative humidity is 100%, then the dew point is the same as the actual temperature.
The dew point in construction is necessary in order to understand whether the degree of wall insulation is adequate to prevent condensation from forming.
At dew point values of more than 20 °C, physical discomfort is felt, the air seems stuffy; above 25 °C people with heart or respiratory diseases are at risk. But such values are achieved very rarely even in tropical countries.
In a dry wall there is a vapor barrier and a ventilated gap
The dew point in a properly designed wall without insulation will be in the thickness of the wall, closer to the outer surface, where steam will condense and moisten the wall.
In winter, as a result of the transformation of steam into water at the condensation boundary, the outer surface of the wall will accumulate moisture.
During the warm season, this accumulated moisture should be able to evaporate.
It is necessary to ensure a shift in the balance between the amount of vapor entering the wall from inside the room and the evaporation of accumulated moisture from the wall towards evaporation.
The balance of moisture accumulation in the wall can be shifted towards moisture removal in two ways:
- Reduce the vapor permeability of the inner layers of the wall, thereby reducing the amount of vapor in the wall.
- And (or) increase the evaporation capacity of the outer surface at the condensation boundary.

Single-layer walls
have the same resistance to vapor permeation throughout the entire thickness, as well as a uniform temperature change across the thickness of the wall. The boundary of water vapor condensation in a properly designed wall without insulation is located in the thickness of the wall, closer to the outer surface. This provides such walls with a positive balance of moisture removal from the wall thickness in all cases, except for rooms with high humidity.
In multi-layer walls
materials with different vapor permeability resistance are used with insulation. In addition, the temperature distribution throughout the multilayer wall is not uniform. At the boundary of layers in the thickness of the wall we have sharp temperature changes.
To ensure the required balance of moisture movement in a multilayer wall, it is necessary that the resistance to vapor permeation of the material in the wall decreases in the direction from the inner surface to the outer.
Otherwise, if the outer layer has greater resistance to vapor permeation, the balance of moisture movement will shift towards the accumulation of moisture in the wall.
When is it possible or not to insulate walls from the inside?
Now let's look at when it is possible to insulate a wall from the inside, when it is not, what it depends on and how it depends. What is this “no”, what are the consequences?
The main “is it possible or not” is what will happen to the wall after insulating it from the inside. If the wall is dry, it’s possible.
If the wall is dry, and only with a sharp, unexpected (which happens once every ten years) cold snap can it become wet, you can try to insulate it from the inside (at the discretion of the customer).
If the wall is consistently wet throughout the winter design period (with normal winter temperatures in the region), it cannot be insulated from the inside.
As we have already found out above, these consequences depend on the position of the dew point. And the position of the dew point in the wall can be calculated, and then it will be clear (BEFORE insulation) whether it is possible or not to insulate a particular wall from the inside.
Now a little discussion on the topic of what affects the possibility of insulation from the inside, and how it affects it.
This part of the article was prompted by questions from readers of the following nature: “Why can one person insulate from the inside, but I can’t, because he and I (further options) have the same apartment layout, or the houses are built from the same material, or the same city of residence, or the same wall thickness etc.
As we have already found out above, the consequences of internal insulation depend on:
dew point (condensation temperature);
the position of the dew point in the wall before and after insulation.
In turn, the dew point (temperature) depends on: room humidity and room temperature.
And the humidity in the room depends on:
Mode of residence (permanently or temporarily).
Ventilation (both supply and exhaust, are they sufficient according to calculations).
And the room temperature depends on:
Heating quality.
The degree of insulation of the remaining structures of the apartment building, except for the walls (ceiling, roof, windows, floor).
The position of the dew point depends on:
thickness and material of all layers of the wall;
indoor temperature. What it depends on was clarified above;
temperature outside the room. It depends on whether it is outside or another room, as well as on the climate zone;
indoor humidity. What it depends on was found out above;
humidity outside the room. It depends on whether it is outside or another room (and on the mode of operation of this room), as well as on the climate zone.
Here is a list of these factors:
mode of residence in the premises (permanently or temporarily);
ventilation (both supply and exhaust, are they sufficient according to calculation);
quality of indoor heating;
the degree of insulation of the remaining structures of the apartment building, except for the walls (ceiling, roof, windows, floor);
thickness and material of all layers of the wall;
indoor temperature;
indoor humidity;
outside temperature;
humidity outside the room;
what is behind the wall, a street or another room (its mode of operation).
It becomes clear that there may not be two identical situations regarding insulation from the inside.
Let's see what (approximately, without specifics) the situation looks like when insulation from the inside is possible:
permanent residence premises,
ventilation is carried out according to the norm (for this room),
The heating works well and is done according to standard,
the remaining structures are insulated according to the standard,
the wall that is planned to be insulated is thick and quite warm. According to the calculation of additional insulation for it, it should not be more than 50mm (foam plastic, cotton wool, EPS). In terms of heat transfer resistance, the wall “falls short” of the norm by 30% or less.
I think it is clear that in each specific case you need to consider your “input data” and then make a decision.
Everything that is written above gives the impression that there are very few cases when internal insulation is possible and not harmful. This is true.
In our experience, out of 100 who came up with the idea of internal insulation, only 10 can do it without consequences. In other cases, it is necessary to insulate from the outside.
Calculating the dew point in a wall using a table - detailed instructions
First, take care of the necessary equipment. You will need:
- thermometer;
- a non-contact thermometer, which, by the way, can be replaced with a regular one;
- hygrometer.
Below is the algorithm of actions.
Step 1.
In the room where you need to determine the dew point, measure approximately 60 centimeters from the floor, no more. After this, determine the air temperature at a given altitude (to do this, you can put a thermometer, say, on a table).
Step 2.
Next, take a hygrometer and determine the humidity at the same point.
Step 3.
In the table we gave above, find your value and then find out the cherished dew point.
Step 4.
Then you should determine whether it is possible to carry out renovation work in a building with similar humidity - for example, pouring a polymer floor or laying thermal insulation. To this end, take a non-contact thermometer and measure the temperature of any surface at the same point 60 centimeters away. In the absence of this device, you can take a simple thermometer, wrap it in a rag and take readings in about fifteen minutes.
Step 5.
Finally, compare both numbers. If the surface is warmer than the air by more than 4? C, then the humidity is high and there is a possibility that the dew point is present. If so, then thermal insulation work should be supervised by an experienced specialist who will take into account the thickness of the building material that will be used for this.
Video - Determining dew point
Dew point. Rules for vapor permeability of walls
The temperature at which water vapor in the atmosphere becomes more saturated is called the “dew point.” This temperature means that the relative humidity has reached the maximum possible value (100%).
Based on this, the merits of modern breathing walls become controversial. Probably, first of all, it is required that the walls of the house are strong enough to reliably retain heat, and steam from the room can escape through artificial ventilation.
In residential premises, the air masses are much warmer than outside, which is why water vapor appears in the house. Water is constantly flowing in the bathroom or used in the kitchen, house plants are also watered, wet cleaning is carried out regularly, and in rainy weather some of the moisture is brought into the house from the street. The temperature difference between the outside and inside the house creates air currents containing steam. The higher this difference, the more actively the air moves. This relationship is not linear, since there is a second important variable - humidity; this indicator has different values on the street and in the house. If the external and internal environments are characterized by low humidity levels, then the risk of condensation is minimal.
Steam passing through modern breathing walls has a destructive effect on them. It not only slowly destroys their material, but also increases heat transfer, reducing the temperature in the room. During the cold period, the accumulation of moisture in the walls of the house should be below the established standard value, this will reduce the damage to which the wall material is exposed.
How to practically determine the location of condensation
The location of condensation depends on the location of the insulation (inside or outside).
In an uninsulated house
In such buildings there is a high probability of condensation forming on the walls inside the room. The reason for this is the lack of insulation, which traps warm air inside and prevents it from ventilating. The location of the dew point in them depends on the weather outside.
With slight temperature fluctuations, condensation forms on the outer wall, and the interior will be comfortable. With significant cooling, the dew point may shift when insulating the walls inward. This leads to the formation of condensation and wet walls inside the room.
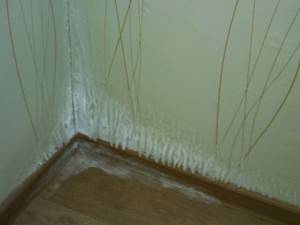
Calculation of dew point using the device
The dew point can also be determined in real time using a special TV. This is an electronic device with a monitor that will display information about indoor humidity, air temperature and dew point. Such devices are relevant for measuring the dew point for an already erected and completed building structure. This device will not help in designing the thickness of walls and buildings.

dew point thermal imager
Consequences of using insulation on the inside of walls
Contrary to the desire to more reliably insulate a living space, the use of thermal insulation from the inside is highly discouraged. In this case, moisture begins to accumulate close to the surface, and more often - between the wall and the insulation, which has very negative consequences. It is known that abandoned buildings are destroyed much faster than exploited ones. This occurs due to the fact that load-bearing structures are not protected from negative climatic phenomena. In the case of insulation from the inside of the wall, the entire structure is also under intense influence of the external environment.
Location of areas with high levels of condensation
The location of the dew point is determined by several parameters. The main factors are the humidity of air flows in the interior and heating temperature. Depending on the proximity of the point to the outer or inner cladding, the wall can be either dry or wet. The conditions under which the conversion of vapor to liquid occurs may vary. If +20°C is fixed in the rooms, the appearance of drops at a humidity of 60% will occur when the surface cools down to 12°C. At 100 percent humidity, drops will appear on walls heated to 20° above zero.
The location of condensation points is influenced by the following factors:
- An increase in wall thickness leads to an increase in thermal resistance. Access of cold air masses inside the building becomes difficult. In this case, the dew point moves deeper into the wall and can lead to premature wear of the insulation and expensive repairs.
- Insulation from the inside allows you to cut off the walls from the heat coming from the inside. In this case, drops of liquid appear in the immediate vicinity of the inner lining and also leads to premature destruction of the coating.
- External insulation is considered the best way to keep the walls of a frame house in perfect condition. The dew point remains near the outer wall, and moisture is gradually removed from the insulation without destroying it or causing rotting.
The farther the place where steam is converted into liquid is located from the inner wall, the more reliable and better quality the cottage or private house becomes. An external wall, if well insulated, shifts the place of condensation formation to the outside of the building and has a positive effect on the service life.
Proper insulation of the walls of a frame house with mineral wool - in detail and step by step
It is worth noting that mineral wool is a very good material for insulation, but it still has several negative parameters, such as the release of harmful substances, which limits its use indoors .
It is also noted that the material is afraid of moisture and water vapor.
If the mineral wool is saturated by even a few percent, the insulation loses half of its heat-insulating properties.
Now you should highlight several basic steps for insulating walls with your own hands when using mineral wool:
- First, it is necessary to sheathe the inside of the structure with a vapor barrier material;
- Then sew up the inside of the frame, often this is done using OSB . In this way, niches are created for further sealing;
- Usually niches are made to the size of mineral wool, but if necessary, you will have to trim the sheet with a simple knife . It is worth considering that you should cut 5 mm more on each side than was measured, this creates additional protection against possible cracks;
- Selecting the number of mineral wool sheets . Each is 5 cm thick, the calculation must be made based on the terrain, in normal cases 2 sheets are enough. Sometimes niches are made in several layers that intersect;
- Now the frame is sheathed on the outside with wind protection;
- The sheathing goes on top of the insulation.
Breathing walls
The ability of walls to “breathe” is not critical and fundamental during construction. It's more a matter of personal preference and ideological considerations. There was a time when slit windows and vapor-permeable walls were valued, but at that time you didn't have to pay much to save energy. Now many people are concerned about the environment. Nowadays, a private house must be built taking into account effective energy saving. Perhaps phrases about innovative breathing walls are a trick of skillful marketers? Should the walls primarily retain heat, and the movement of air flows should be ensured by thoughtful ventilation?
Articles on the topic
Brick plinth on a strip foundation - masonry technology, instructions, advice from masons

Skirting on a brick wall - is it necessary, how to fasten it, instructions, advice from masons
Cladding windows with bricks - options, stages of implementation, instructions, advice from masons
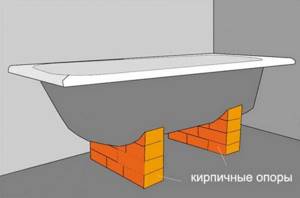
Installing a bathtub on bricks - what materials are used, instructions, advice from masons

Brick partitions - preparation, construction, instructions, advice from masons
How to cover a wooden house with bricks - masonry, preparation, instructions, advice from masons

Brick foundation - step-by-step instructions, pros, cons, instructions, advice from masons
Beating plaster from brick surfaces using machines and manually, instructions, advice from masons
Reviews ()
Factors affecting dew point
The above examples clearly show that there are two key factors that determine the correct position of the dew point and the operation of the wall structure. The first of these is an accurate thermotechnical calculation of the thickness of the insulation. It is performed at the project development stage and takes into account several parameters, including:
- climatic properties of the region where construction is planned;
- dimensions of the building, for example, area and number of storeys;
- number of residents;
- characteristics of the thermal insulation material used, etc.
For most of the country's territory, when using modern insulation materials, a sufficient material thickness is usually 100-150 mm. If the value of this parameter deviates in any direction, the likelihood of a situation from the first or second example described earlier is high.
The second factor influencing the effective operation of a frame wall is the correct placement of vapor and waterproofing in relation to the insulation. A ventilation gap is created on the inside and a vapor barrier film is installed, and a windproof film is installed on the outside. In this case, the condensation formed at the dew point is removed from the insulation without problems or negative consequences.
