To maintain a comfortable indoor temperature, stove heating has been used for centuries. But even in this traditional method of heat supply, new modern technologies are emerging. Most often, stoves are used in places where the possibility of connecting to a gas pipeline is excluded. Although, even if gas is available, this type of heating can be used as a backup or additional option.
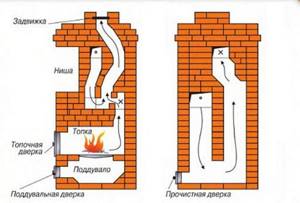
Why do you need a heating circuit?
A brick stove perfectly heats a private village house with an area of up to 50 m2.
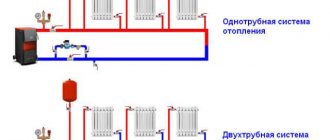
In a traditional village log house, it is located in the middle of one common room, divided by partitions into a kitchen and rooms. Each room has a heated oven wall, which allows them to be heated evenly. Modern private houses have a completely different layout, and the rooms can be located at a considerable distance and even on different floors. In this case, it will be necessary to install additional heating sources, for example, electric heaters. But the price of electricity is now high, so it is more practical to install water heating radiators.
They receive hot coolant through pipes - water, which enters a boiler built into a brick oven. When wood burns in such a stove, not only its walls, but also the coolant are heated, and a comfortable temperature is established in all rooms of the house. The heat capacity coefficient of water is high, and the heating system remains hot for quite a long time, even if you heat the stove only once a day, and significant savings are achieved, because the price of such heating is low.
Air heating options
So, our task is to heat the air masses and supply them to the premises of a country cottage or apartment. How to organize air heating:
- From the fireplace, wood stove.
- Use VRF systems using freon. Simply put, inverter air conditioners, air source heat pumps.
- Install a combined boiler + chiller + fan coil air conditioning system.
- Organize centralized air heating (abbreviated as VO), combined with ventilation of a private house. Use an electric heater or a gas air-heating furnace as a heat source.
A veranda with a large glass area can be conveniently heated with hot air supplied from the floor
Reference. The latter option is often implemented in American and Canadian cottages built using frame technology. The heater is a gas oven.
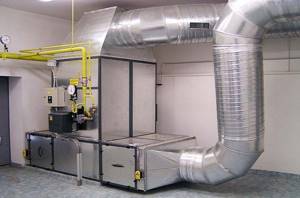
For heating/cooling large production workshops, a slightly different scheme is implemented. There are 2 networks of air ducts built in the premises - supply and exhaust. Both converge to a ventilation unit - a central air conditioner, consisting of the following blocks:
- 2-3-stage filters purify air masses before being supplied inside the building and emitted outside;
- heat exchanger-heater No. 1 heats the flow using hot water from the boiler room;
- heat exchanger No. 2 serves to cool the air and works in conjunction with a chiller;
- a plate cross (or rotary) recuperator removes heat from the exhaust flow and transfers it to the supply flow, saving 50...80% of energy;
- humidification unit;
- Centrifugal fans force flows through sections of the central air conditioner and further along the air ducts.
Why did we describe the design of an industrial climate control system? So that you immediately understand: installing full-fledged air heating + ventilation + cooling is not an easy and expensive task. But, as the owner of a country house, you can consider all heating methods, choose the simplest and cheapest, or return to the water scheme - heated floors, radiators.
Industrial series heating system running on natural gas
Direct air heaters
Direct air heaters are based on the principle of heating a room with red-hot porous ceramic tiles emitting infrared radiation, in the depths of which natural gas is burned. These are nothing more than gas fireplaces, near which it is pleasant to spend time, basking in the flow of radiant energy. Usually these are relatively inexpensive devices with a power of 3-4 kW, the production of which has been mastered by some manufacturers of heating devices (about the selection and placement of heating devices).
The biggest disadvantage of heating devices of this type is that oxygen “burns out” in heated rooms, and gas combustion products remain in the room. Therefore, such devices serve more for decorative purposes and cannot be recommended as the main source of heat.
Indirect air heaters
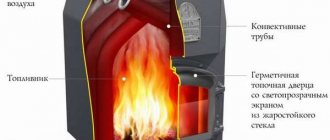
The above disadvantages can be partially or completely avoided by using indirect air heaters. This equipment is a convective-radial heat exchanger and heat exchangers with a built-in combustion chamber. When heated, the air becomes lighter and rises, and in its place comes cold air, which heats up, etc. (picture 1). Thus, the idea of a convector that warms a room without using forced air circulation devices arose.
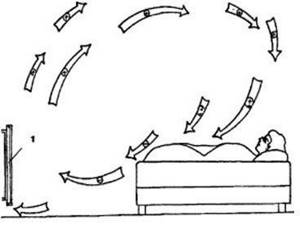
Figure 1. Convector air exchange in the room: 1 - convector; (+) - warm air; (+/-) — cooling air; (-) - cold air.
Gas convectors and heaters
Gas convectors are independent heating equipment that represents a real alternative to traditional heating devices. They provide not only the ability to maintain a set temperature in the range from 8 to 33°C in a heated room, but also allow you to set different temperatures in different rooms.
We recommend: Electric heaters for heating with minimal energy consumption
Convectors operate on the principle of burning natural gas in a metal heat exchanger, which ensures highly efficient heat transfer to the room. At the same time, combustion products are removed outside and combustion air is taken in. This ensures the environmental cleanliness of the room and its effective ventilation. Compared to a traditional heating system, which requires boilers, radiators, room piping, fittings, pumps and other components, when using convectors, all this equipment is not required, since there is no water circuit. It is this feature of gas convectors that allows them to be used for efficient heating of country houses, cottages, garages, greenhouses, etc. The gas-air mixture in these devices is ignited either by a spark from the electronic unit or by the wick of the pilot burner, which, in turn, ignites when the button of the built-in “piezo lighter” is pressed. In the latter case, no electrical energy supply is required.
Duct air heating
In the practice of cottage construction in regions with cold and temperate climates, ducted air heating systems have been widely used (Figure 2). This system allows you to heat the premises of the house with warm air supplied through special channels without traditional pipelines and radiators. The advantages of this method over traditional ones are the low inversion of the system, which allows you to raise the temperature in the house from -10 to +22°C in 35 - 40 minutes.
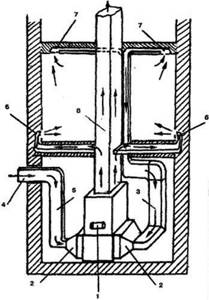
Figure 2. Scheme of air heating of a house: 1 - stove; 2 - filters; 3 - air intake pipe from the premises; 4 — fresh air intake; 5 — fresh air supply pipe; 6 — supply of warm air to the premises; 7 - air intake from premises; 8 - chimney.
After quickly warming up the premises, the automation switches on, allowing you to maintain the temperature at a given level. The advantages of air heating systems include:
- uniform heating of the room throughout the entire volume with a slight “pressure” of air, which completely eliminates drafts and the possibility of penetration of street dust;
- the ability to ventilate rooms, filter heated air to eliminate odors, germs and other foreign matter;
- low operating costs, allowing to increase efficiency up to 93%;
- ability to work in economical mode.
Gas or liquid heaters with safety automatics are used as heat generators. If the house is well thermally insulated, the heater is turned on 3-4 times a day to maintain the set temperature, which saves fuel and, consequently, money for heating residential premises. For example, to heat a small country house, one cylinder of liquefied gas is enough for about 8 - 12 days.
In almost all heating systems, the heat generated by the heat generator is transferred to the consumer by air. Even in a water heating system, water acts only as an intermediate coolant, and the final distribution of heat from the radiators still remains with the air. The only exceptions are heating devices from which heat is transferred by radiation - open fireplaces, infrared emitters, etc. But they play a limited role in heating residential buildings in our country.
The air is heated on heat-releasing surfaces (the surfaces of water heating radiators, convective-type electric heaters, “mirrors” of stoves, etc.) and enters the heated room, where it cools, giving off heat to walls, ceilings, and pieces of furniture. After this, the air should heat up again. This air circulation can occur under the influence of natural forces (warm air is lighter and therefore rises) or forcefully - due to a fan. In the future, we will use the term convection heating (by the way, here is general information about heating) for systems with natural air circulation and air heating (AH) for systems with forced air circulation.
This definition of VO is not generally accepted. A heating system is often called air-based if there is a system of air ducts for distributing heated air from a heat generator (without a fan). Wood-burning stoves such as “Buleryan” and “Professor Butakov” also fall under this definition, since they have the ability to connect air ducts and distribute warm air to other rooms due to convection.
Based on our definitions, these ovens should be classified as convection-type systems.
VO systems can be divided into two types - channel and local. Ducted systems require a system of air ducts, both supply and return. For local systems, air ducts are usually not needed. The simplest local heating systems are fan heaters and heat guns.
Figure 3. Direct heating heat exchanger: 1-hot air; 2- heat exchanger; 3-fan; 4-cold air; 5-burner; 6-chimney.
Figure 4. Indirect heating heat exchanger: 1 - hot air; 2 - heat exchanger; 3 - fan; 4 - cold air; 5 - burner; 6 - intermediate coolant circuit; 7-chimney.
How to organize stove heating
An important advantage of any stove: it simultaneously heats the air and surrounding surfaces with intense infrared radiation. No batteries or coolant pipes are needed.
Clarification. Stoves or fireplace inserts with a water circuit can be used to heat 2-3 small rooms. The coil is connected to a gravity or closed system with a pump.
How to use a stove for pure air heating:
- For 1 room it is enough to install a cast iron or steel potbelly stove.
- To heat 2–3 rooms with a total area of up to 40 m², place a brick stove of a suitable design in the wall between the rooms.
- It is not easy to build a stove in a lived-in house. If there are no high aesthetic requirements, we install a potbelly stove, attach convection casings to the firebox and connect air ducts.

Cast iron stove with air pipes and a ceramic heat accumulator on the chimney
Option No. 3 involves laying air ducts into adjacent rooms and installing duct fans that can withstand the temperature of the moving medium 100–150 °C. Air can move through the pipes on its own, but too slowly, and the ventilation duct must slope upward. How such an air heating system works, see the video below.
The first two options are well known, but not always applicable:
- It is generally unrealistic to install a stove in an apartment;
- even a large Russian stove is not able to cover an area of more than 50 square meters (on one floor), so it is suitable for heating a dacha or a small house;
- the foundation plus a brick stove-fireplace is erected during the construction or major renovation of the building;
- a metal potbelly stove takes up space and is dangerous for small children (in terms of burns).
You can install an iron stove with your own hands - this is a tangible plus. But you will also have to heat it, which results in a lot of inconveniences: frequent loading, the smell of firewood and smoke in living rooms, dust. The author of the video acted wisely by placing the potbelly stove in a separate furnace room. We do not recommend repeating one thing after the home craftsman - installing air ducts made of aluminum corrugations. Such pipes create high aerodynamic resistance and greatly slow down the flow. It is better to use galvanized boxes.
We recommend: Pellet stove: automatic pellet stove, pellet boiler with water circuit, long-burning heating stove
Preliminary conclusion. Solid fuel stoves are a budget option for air heating with their own advantages and disadvantages. Suitable for small buildings - country houses, garages, greenhouses.
Application of air conditioners and heat pumps
As you know, modern split systems are able to operate in heating mode, consuming three times less electricity than a conventional electric boiler of the same power. Hence, a completely workable solution is to buy and install an inverter air conditioner in each room.
Reference. Why an inverter? The compressor in such “splits” does not stop, and therefore does not freeze in the cold. The air conditioner successfully heats the air down to -5 °C outside, after which the efficiency noticeably decreases.
The advantages of this scheme are obvious:
- lack of batteries, pipes, boilers and other heating equipment;
- relative ease of installation;
- aesthetic appearance of the indoor unit;
- cooling mode in summer;
- Possibility of installation in apartments.

The air-conditioned heating method is viable in the southern regions, where the temperature rarely drops below -15 °C. To the north, “splits” are used only during the transition period – in spring and autumn.
Other disadvantages of heating with a split system:
- Air conditioners will have to be installed in all rooms, which is unacceptable for cottages of 2–3 floors. A multi-split VRF system will cost more than the same number of single coolers/heaters.
- The device “can” clean, dry and change the temperature of the air flow. Rare models are designed to mix in outside air. This means that you will have to do separate ventilation.
- When the external unit of the air conditioner is operating, the distinct noise of the fan and the hum of the compressor can be heard from behind the wall.
The problem of efficiency at low temperatures is solved by an “air vent” heat pump, whose performance remains intact down to -30 degrees below zero. The design and operating principle are identical to the split system, the differences being the larger size and price. If the external unit is installed on the ground and carried 2-3 m from the building, the noise of the unit will become inaudible.
Brief conclusion. VRF systems are good for apartments and small houses located in the southern regions. Heat pumps can also be installed in northern latitudes, but the cost of the equipment plays a role here. If desired, you can install the air conditioner yourself.
Combined multi-zone systems
In this case, the coolant is still used, which is why the system is called combined. How this equipment works:
- Each room has an air heating/cooling unit - a four-pipe fan coil unit that looks like an indoor air conditioner unit.
- One pair of pipes supplies the units with coolant from the boiler. Hot water passes through a heat exchanger blown by a fan, causing the room air to heat up.
- When it is necessary to switch to cooling, the automation switches the fan coil to the second pair of pipes supplying cold water from the chiller.
- Users in rooms can set different air temperatures, but they cannot turn on cooling and heating at the same time. Hence the second name of the air conditioning system – multi-zone.
Note. Chiller is a type of refrigeration machine designed to cool liquid. Usually located on the street under a canopy or in an open place (depending on the design).
Various fan coil units are used inside the building - wall-mounted, duct-mounted, floor-mounted, ceiling-mounted. It all depends on the wishes of the homeowner and aesthetic requirements. Duct-type units can be built inside ventilation ducts to heat/cool the supply air.
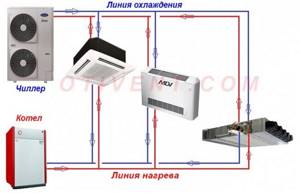
Connection diagram of a cassette, duct and floor fan coil to a chiller and boiler
Advantages of multi-zone air systems:
- applicable in large buildings with 20 or more rooms - administrative and residential buildings, warehouses, and so on;
- can work in conjunction with forced ventilation of the cottage;
- any heat generator is used for air heating - a boiler using solid fuel, gas, electricity, diesel fuel;
- pipes with coolant (coolant) take up little space, air units are easily built into the ceiling, hung on the wall or hidden behind the cladding;
- closed terraces with stained-glass windows covering the entire wall are heated by in-floor convectors or wall-mounted fan coil units;
- possibility of adjusting the temperature in individual rooms, remote control.
We believe that the boiler + fan coil + chiller scheme is the most universal and successful from the point of view of aesthetics and operation. Of course, you can’t do this type of air heating yourself; this is a minus. It is necessary to make calculations, select equipment, install, adjust... without knowing the basics, it is extremely difficult to carry out these works.
Let's list other negative points:
- high price of air conditioning units;
- the boiler and chiller are quite large devices, occupying 2–3 m² of area;
- the operation of the system depends entirely on electricity; when the lights are turned off, the heat supply will stop.
Conclusion. A multi-zone combined scheme is the best way to air-heat a home. But implementation will require significant investments.
Heating combined with ventilation
This is a classic method of heating buildings with air, used in enterprises since the last century. Subsequently, manufacturers began to produce small-sized analogues of industrial ventilation units installed in private homes. Thanks to less stringent requirements for air purity, the treatment scheme has also been simplified.
Let us explain the principle of operation of the “ventilation + heating” system step by step:
- The heat source is a stove, usually a gas one. A burner, an air heat exchanger, a fan and an electronic control unit are installed inside.
- The first network of ducts radiates from the furnace, distributing heated air throughout the rooms. With the help of diffusers, grilles and other supply devices, jets are supplied to the premises (usually to the upper zone).
- The second network of channels collects polluted/cooled air from the lower zone of the rooms into a common collector connected to the stove from below.
- Having passed through the collector, the exhaust air masses are cleaned in a mesh or cell filter, then sent to a heat exchanger, where they are heated by a burner.
- Electronics monitor the safe operation of the gas air heater, maintain the outlet temperature, and signal when the filters are dirty.
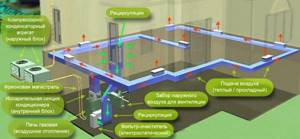
Typical air heating circuit with recirculation. The heater is a furnace and an air conditioner with a ducted indoor unit
Addition. Since the heater dries the air, an automatic humidifier with an electronic hygrometer is usually installed on the supply duct. The latter is located on the return air duct to measure the humidity of the flow.
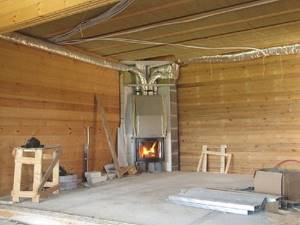
The air heating stove is a rather noisy unit, so it is installed in a separate room. Combustion products are removed through a conventional or coaxial chimney (depending on the design of the heater). Air ducts made of galvanized steel are laid in several ways:
- in the basement or ground floor;
- hide in floors and wooden ceilings;
- in the attic;
- vertical channels run along the walls and are covered with facing materials.
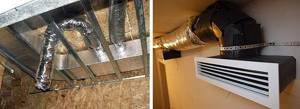
Large ventilation ducts are laid under plasterboard finishing
The supply air temperature reaches 40...45 °C, the speed of movement through the ventilation ducts is 4-5 m/s. You can't go any faster; there will be additional noise. In this situation, the diameter of the main collector reaches 300 mm, we took a typical flow rate of 1000 m³/h, although it can be more.
We recommend: Why the boiler stopped heating hot water: reasons
A logical question: why heat air masses to 40 °C if 22 degrees is sufficient in the house? We answer: the heating system must compensate for 2 types of heat loss - through building structures and energy consumption for heating the inflow, since ventilation is needed in any case. Accordingly, we bring the air to a temperature of 20–24 °C (compensating for losses at home), then overheat it to 40…45 °C.
Conclusion. The “ventilation + heating” scheme is the most cumbersome and expensive. The building must be prepared in advance - even at the design stage, otherwise the air ducts will go directly through the rooms. Operating efficiency is highly dependent on the way the building is ventilated, which we will discuss next.
Some useful tips
When installing a steam heating system, you should remember that all its elements must withstand high temperatures, more than 100 degrees. For example, a conventional membrane expander will not work as a reserve tank in case of an increase in coolant volume, because its maximum is 85 degrees.
The chimney of a stove with a built-in heat exchanger will become dirty faster than that of a conventional stove. Therefore, chimney cleaning needs to be planned and performed more often.
If desired, an oven with a heat exchanger can also be used for cooking, but this is not very convenient. In summer, when heating is not needed, this stove cannot be lit. We'll have to look for an alternative. It’s easier if there is a separate, convenient stove for the kitchen in the house.
Which stove to choose
Each type of furnace-boiler is appropriate for solving certain problems.
When heating utility rooms or greenhouses, there is no need to fence a multi-ton colossus of bricks. Most consumers in this case choose the simplest boiler.
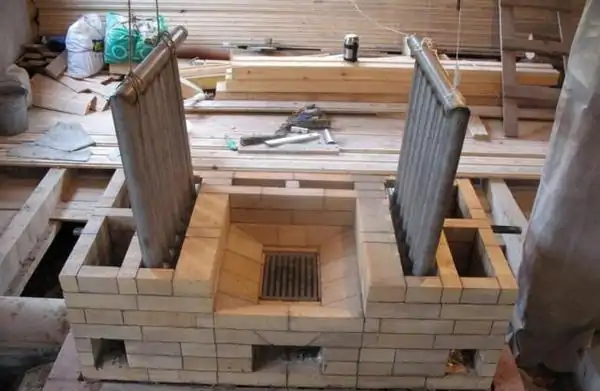
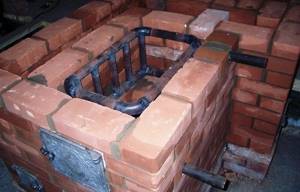
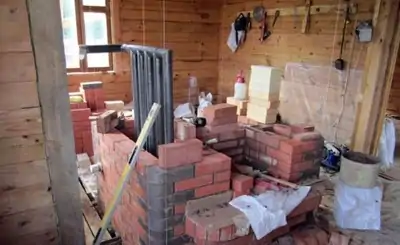
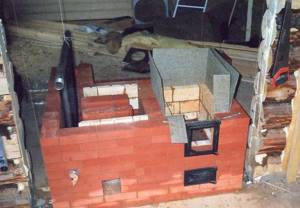
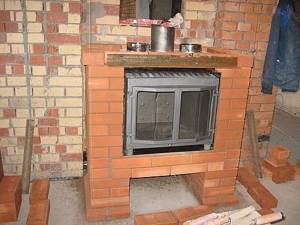
Photo 1. The process of building a heating furnace with a boiler. A heat exchanger made of pipes is mounted in the firebox.
If the house already has a working brick Dutch oven, you can insert a heat exchanger welded from pipes or sheets of metal into its firebox. To do this, you will have to remove the door, expand the opening of the fuel chamber, insert the heat exchanger and put everything back in place.
When constructing a new furnace, the Kuznetsov boiler design is considered optimal. High heating efficiency is achieved by installing a heat exchanger in a hot hood, where the temperature is higher. The wood in the firebox of the stove burns in an optimal mode, and the hot gases heat the stove hood with a heat exchanger. The temperature rises gradually and remains stable for a long time without additional heating.
Making a bed: step-by-step instructions and video
Further actions consist of manufacturing the support unit (frame), installing the working equipment, connecting it to the electric motor and direct commissioning. The sequence of actions is as follows:
- First you need to make a frame, which can be cut from steel pipes (profiles) in accordance with the dimensions in the drawings. All joints must be made only at right angles, so you can check the correctness of the connection using a regular square. The bed is made of guides. which can be used as long shafts.
The side posts of the frame should be given special attention, since they are load-bearing elements. Consequently, the immobility of the entire structure largely depends on them
It is best to make the stands on a professional lathe.
Next, you need to assemble the entire support installation: the side elements go along the edges, between them there are 2 guides. Bushings are mounted on the guides at a certain interval, as shown in the photo.
Next, the bushings are fixed, with the help of which the tailstock and tool holder will be attached. In this case, it is better to make sure that the bushings are of different sizes, since the movement of the mechanism in this case will be greater.
The surfaces for mounting the caliper are made of ordinary steel sheets
It is important that they are free from defects and even. The optimal sheet thickness is within a centimeter.
Next, the lead screw is installed. You can make a carving on a metal stick, but there are simpler options - for example, use the leg from an old swivel chair
When installing the screw, it is important to ensure that the side posts are equipped with bushings. A steering wheel is attached to the propeller itself to allow rotation, as well as a vernier.
After this, the surface is mounted on which the headstock will then be installed.
After this, the frame is completely assembled
It is important to take into account that all elements are tightly connected - the slightest slack is unacceptable, since during operation vibration swings will increase the fragility of the mechanism and can lead to damage.
Visual instructions for installing the frame are in this video.
Construction of fireplaces with a water circuit
All work can be divided into two stages:
- Construction of the body of the heat source, that is, the fireplace itself;
- Installation of heat exchanger.
Construction of the fireplace body
The construction of the fireplace body should begin with the search for a formal masonry scheme. When choosing materials, give preference to those that allow you to build a fireplace with a water jacket. To ensure tightness, steel sheets are usually used.
The construction of a fireplace begins with the installation of the foundation. To fill it you will need:
- Boards for installation of formwork;
- Ruberoid;
- Crushed stone;
- Sand;
- Cement.
The size of the base should be slightly larger than the dimensions of the future fireplace. To ensure waterproofing of the finished foundation, roofing material is laid on it. After this you can start laying. Fire-resistant bricks are used for the construction of the building; the firebox is assembled from a heat-resistant fireclay grade. A special clay mixture is used as a solution. It is not recommended to make it yourself. Experts use ready-made dosage formulations.
The masonry should be assembled from horizontal main rows. At this stage, it is important to ensure accurate positioning in the horizontal plane. After this, the ash pan is assembled, then the craftsmen lay out the fireplace firebox. The final part of the installation differs significantly from the construction of a classic fireplace. At this stage, installation of the heat exchanger is required.
Heat exchanger organization
The simplest type of heat exchanger is a small tank with two flanges for connecting pipes. Cold water enters through the first pipe, heated water is discharged through the second. Due to the harmful effects of open flames, temperature changes, and the negative effects of combustion products, it will not last long. The material for the heat exchanger must be sheet steel with a thickness of at least 4 mm.
The exact dimensions of the tank are determined by the design of the fireplace. To increase efficiency, it is recommended to use coil-type heat exchangers. Such designs consist of sections and registers, assembled in the form of a labyrinth.
After the heat exchanger is manufactured, it is built into the body of the fireplace. After this, special stands are formed on which the tank will rest. Installation is carried out in such a way that the heat exchanger flows are outside the fireplace. This allows for repairs in the event of a breakdown.
After installing the heat exchanger, the assembly of the fireplace fuel chamber is completed. It is covered with masonry with the obligatory organization of a smoke hole. Finally, a chimney is erected.
After the masonry has completely dried, which will take at least 10 days, the system can be filled with water for the first time. During initial start-up, it is necessary to check for leaks. In an open system, leaks lead to a decrease in the volume of water, but in a closed system they will cause a lack of circulation.
If the fireplace will be used as a backup heat source, a system must be provided for turning on and off the circuits from it. Using a bypass valve allows you to stop the water supply.
Types of wood stoves by material of manufacture
Wood-burning stoves, while still remaining an excellent source of heat, fit well into modern heating systems for private households. Wood-burning stoves can be divided according to the material of manufacture into the following main groups:
- brick (stone);
- cast iron;
- steel.
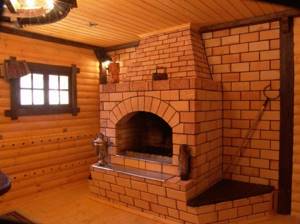
Brick wood stoves
Brick kilns are the most durable and expensive to build. A good stove is not cheap, and it is not easy to find an experienced installation technician. To build such a stove, fireclay and refractory red bricks are used, as when laying a wood-burning fireplace, special mastics for masonry, cast iron doors, grates, and valves for the chimney pipe. A brick oven takes a long time to heat up, but also retains heat in the room for a long time.
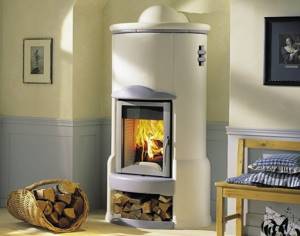
Cast iron wood stoves
Cast iron stoves are usually used as an additional heat source. Manufacturers create not only heat sources from cast iron, but also beautiful products that fit perfectly into the interior of any home. Heated cast iron retains heat excellently, and the presence of a hob allows you to cook food or heat water for domestic needs.
Metal wood stove
A metal wood stove can quickly raise a room's temperature using minimal fuel, but the thin steel they're made of doesn't allow the heat to last long. The simplest type of metal stove is the well-known “potbelly stove,” which is often used to heat small country houses or garages.
As mentioned above, the stove itself only heats the room in which it is located. In order to transfer heat to other rooms, there are two ways - organizing air heating with an air duct system, or water heating from a stove with a heat exchanger, piping and heating radiators. Air heating is easier to install, but has a number of disadvantages, which together outweigh the use of a traditional water heating circuit.
The disadvantages of air heating include:
- installation of air ducts through which warm air is distributed must be carried out at the stage of building a house, since they are quite bulky;
- the need to install fans with a flow rate regulator, which improve air circulation but produce noise. Installing a furnace with fans in the basement of the house can solve this problem.
- The need to install additional air filters to prevent dust transfer.
The advantage of air heating, which at the same time is also a disadvantage, is low inertia. That is, the rooms begin to warm up immediately after the stove is lit, but they also cool down quickly.
Another advantage of air heating is the absence of heating radiators. Air ducts, as a rule, are hidden under the ceiling of the building, and the space under the windows remains free.
In most cases, owners of houses with stove heating opt for a water heating circuit for a private home, so we will analyze this option in detail.
Description and types of long-burning furnaces
Long-burning stoves save coolant by burning gases released during combustion.
The unit is convenient to use, because after loading you can not open the firebox for a long time. When wood or coal burns, flammable gas is released, which is collected in a chamber where it burns and releases energy.
Such devices are used in private homes, cottages, garages, and enterprises.
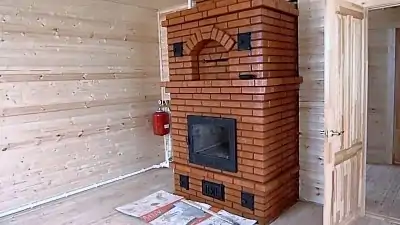
Based on functionality, stoves are divided into equipment for heating, cooking, and combined options are used. The materials are metal, cast iron, brick. For year-round use, it is better to choose a brick fireplace with combined action. A good option would be a homemade “bubafonya” stove made from a gas cylinder.
Classic oven
The complex design requires the presence of an internal coal combustion chamber. It contains a chamber connected to a hood for combustion of the released gases.
The fuel is ignited from below, the gases enter the bell and burn. The classic is manifested in pushing flammable gases through a mass of fuel into a chamber where air is supplied. These types include stoves: Buleryan, Butakov stove.
Shaft furnace
In the unit, the combustion area is shifted to the grate zone. The gases exit through the adjacent compartment, where they burn out and release heat. The best material is brick.
Contains:
- kokoshnik for loading the charge and removing gases;
- furnace shaft;
- bugle;
- lance for supplying gases.
The equipment has a high efficiency coefficient and high productivity.
Hearth oven
The fuel is ignited in it from above, the fire moves down. Air is supplied under the burnt layer through special channels. The simple and effective design comes in a variety of models that are easy to make yourself.
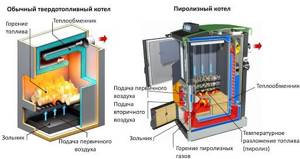
Gas generating furnaces
Provides for slow combustion of gases separated on the basis of pyrolysis. Wood fuel burns under the influence of heat and a small amount of oxygen, releasing flammable gases. The unit must have a heat exchanger. Suitable for heating with the connection of one or two circuits.
Water heating device
Closed expansion tank in a stove heating system with a water circuit
The choice of stove and construction of the entire system is carried out at the stage of planning and construction of the house itself. Most models require the construction of an additional foundation. Heating based on a furnace with a water circuit consists of the following components:
- furnace design;
- heat exchanger (it is located inside or around the firebox, as well as in the form of a coil around the chimney);
- coolant circuits, radiators;
- expansion tank, which is best located in the attic.
In some cases, the heating circuit is equipped with a circulation pump. Installing a heat accumulator will increase the efficiency of the stove.
Pipe selection
It is difficult to control the water temperature in the furnace, so metal pipes are chosen
Using a furnace with a water circuit to heat a house involves the use of radiators and pipes. Not only cast iron or steel elements are suitable, but also metal-plastic and polypropylene. However, there are some peculiarities here. Since wood is used for heating and there is an open flame, the liquid in the coil may boil. In such conditions, metal-plastic pipes cannot withstand for a long time. It is better to use stainless steel products.
Another reason for choosing metal pipes is that the pipes that come out of the furnace get very hot. Under such conditions, plastic products melt. Pipes that are connected directly to the pipes must have a diameter of 3 cm. For other elements this figure is 2 cm.
Choosing a stove
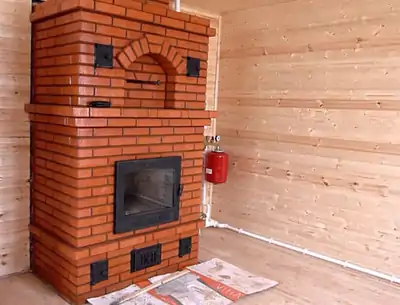
Universal oven with hob and heating circuit
You can select a heating device taking into account the technical parameters and purpose of the device. According to the second characteristic, devices are:
- For heating. The generated thermal energy is used only for heating the premises. A heat exchanger tank is installed in this type of furnace.
- For cooking and heating homes. The design of the device provides an additional compartment. An oven is located above the combustion chamber. The heat exchanger can be located on the sides of the firebox. On small stoves there may only be a burner.
The technical characteristics take into account the area of the house, the fuel used and the material of manufacture. The first parameter provides that for every 10 sq.m. The area of the structure requires 1-1.2 kW of energy. At the same time, the ceiling height is 2.5-2.7 m.
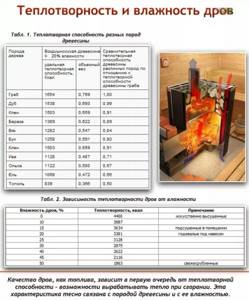
Coal, peat, pellets, and firewood are used as fuel. They all have different characteristics: when burning the same volume, different amounts of heat are released. The cost of fuel and its availability are also taken into account.
The following materials are used to make the stove:
- Brick. This option has a lot of weight and dimensions, and therefore requires an additional foundation during arrangement. This design releases heat evenly and for a long time. A specialist is needed to lay a fireplace stove. However, brickwork fits perfectly into any interior, creating a special atmosphere and comfort.
- Cast iron. This material heats up quickly, but is heavy and more brittle than others. It does not require the construction of a separate foundation.
- Steel. The presented option is popular because it is lightweight and durable. The coolant in it heats up faster.
Heat exchanger for furnace
Homemade heat exchanger for a brick oven
The heat exchanger is the main element of the furnace, so the choice must be approached responsibly. It can be mounted in the firebox, but there is always a risk of coolant leakage. A safe option is to install a heat exchanger in the chimney cap. This element has a different shape and material:
- Made from sheet steel. It can be installed directly into the firebox. The thickness of the material is 3-4 mm. 2 pipes are connected to it. The top one should be connected at the highest point of the exchanger. The internal gap of this element should not be less than 3 cm. In this case, boiling of the coolant can be avoided.
- From pipes. Elements can be round or rectangular. The pipe is also allowed to be installed in the firebox. It all depends on the design of the stove. The main requirement is to install the heat exchanger so that it does not block the door, and the stacking of firewood is free.
- Flat register. This option is often installed in the chimney duct. The heat exchanger can last a long time, since it is not operated in aggressive conditions. It is large in size.
The correct choice of heat exchanger will ensure maximum stove performance.
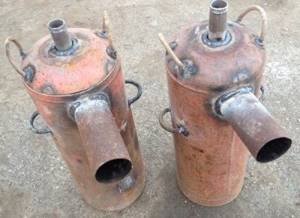
Using a cast iron radiator for homemade work
You can easily make an excellent water boiler for a stove with your own hands - just like you can build such a miracle stove yourself. And an ordinary cast-iron radiator is suitable as a water heater - you can use the M-140, which is often thrown away after the demolition of old five-story buildings. The approximate capacity of such radiators is 1.5 liters, and their surface area is 0.254 sq.m. If you connect 12 sections, you get a heater with an area of 3 sq.m. and 18 liters of capacity. A boiler welded from sheet material with such characteristics would take up a lot of space, which is an undoubted advantage of this particular design.
Such a stove with a water boiler-radiator can even heat a fairly large bathhouse - up to 100 sq.m. But, before installing the boiler itself, you will first need to disassemble the radiators, clean them of dirt and rinse thoroughly with a hot solution of hydrochloric acid - 6%. Then rinse again with water. Next, the cardboard gaskets between the sections are changed, because the temperature in the oven reaches 600? C, with coal it is even higher. The cardboard will simply burn out and the radiator will begin to leak - to prevent this from happening, it is more advisable to use an asbestos cord impregnated with graphite powder and natural drying oil instead.
Now the radiator parts need to be assembled in the following sequence:
- Nipples with their right and left threads are screwed into the sections being connected, after which the same impregnated asbestos cord is wound around them and both nipples are tightened with a wrench - but without any misalignment of the sections.
- As soon as two of them are pulled together, you can connect the third.
- Now you need to compress the radiator to check the quality of the assembly - despite the fact that the water pressure will be low.
- After all this, you can proceed to the installation of risers - their diameter should be 1 and ? inches. The cold water inlet and hot water outlet can be placed diagonally on the radiator battery, and the other two holes can be plugged with plugs to ensure water circulation through the entire volume. Moreover, one of the risers must have a left-hand thread - if it does not exist, then you can do this: screw a regular nipple into the radiator hole, and a coupling with a drive onto it.
But the battery itself must be placed not in the furnace firebox - but directly in the smoke channel, the one behind the firebox. This is necessary in order to heat the boiler not with direct fire, but with hot gases - cast iron, after all. And it is more expedient to place its entrance and exit perpendicular to the floor.
And in order to increase the natural circulation of water in such a furnace, the return line pipe must be routed through its foundation and underground space - this will increase the temperature difference between the return and hot lines, and the battery in the furnace must be installed with a slight slope to allow air to escape and enter the system. It wouldn’t hurt to install an additional cleaning door in the smoke channel of the stove with a heater.
The main advantage of such a stove with a water heating boiler is the overall dimensions of the sauna boiler room: only 1.6 x 0.2 x 0.7 m.
Brick PVC - operating features
Often, water heating is combined not only with a fireplace or a modern wood-burning stove. For many, the best option would be to install a classic brick stove as a source of thermal energy. By properly expanding the capabilities of a brick oven using a water circuit, you can efficiently heat not only the nearest living rooms, but also the entire building. To increase the efficiency of a brick kiln, various designs of heat exchangers have been developed (coils and registers act as them). The operation of such a system in suburban housing has features, which include:
- Arrangement. To build a high-quality stove and then install water heating, you will need highly qualified craftsmen.
- Size. A large traditional Russian stove takes up a lot of usable space and does not fit in every kitchen. An alternative for modest-sized rooms would be a Dutch or Swedish brick oven. Such designs are characterized by smaller sizes, but full functionality.
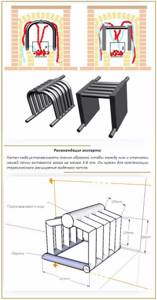
Heat exchanger installation diagramSource ogon.guru
- Improved efficiency. The maximum efficiency of the furnace does not reach 50%; half of the heat (and money) disappears irretrievably in the pipe. The design of a full-fledged water heating system allows you to increase this parameter to 80-85%, which is comparable to the characteristics of industrial boilers operating on solid fuels.
- Inertia. Unlike electric boilers, it will take some time to heat up a system connected to a brick oven.
- Care. Burning wood leaves behind ash and dust. The room in which the brick oven is located will have to be cleaned frequently and thoroughly.
- Security requirements. Improper operation of a brick stove for a home with water heating poses a threat not only to fire, but also to carbon monoxide poisoning.
About laying a brick oven with a water circuit in the following video:
How to choose a project? Order
First of all, decide on the conditions in which the furnace with a water circuit will operate.
If this is integration into an existing OS, it is important to ensure interchangeability in the operation of existing communications. For the independent option, it is important to determine the area that the system will heat
For 100 square meters of a one-story house, a conventional stove is quite enough.
Another thing is if the area, number of rooms and floors is larger
Finally, it is important to understand whether the OS will be used all year round or only in cold weather. If people live in a house in the summer, and in winter it is idle, then after cold weather and frosts the system will require restoration work, which will entail additional costs
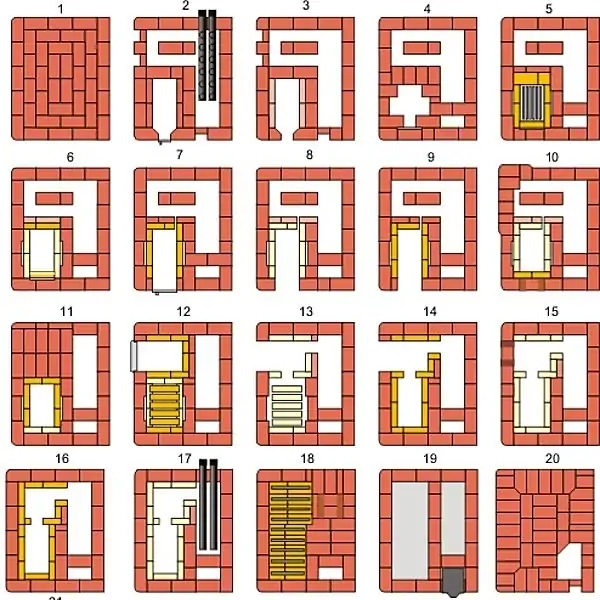
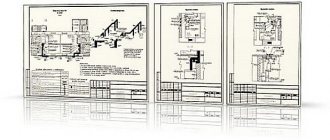
Photo 4. An example of the order of a brick kiln with a water circuit: the initial stages of construction from 1 to 20 are depicted.
What materials will be needed
For the furnace itself: concrete, mortar, refractory and red clay bricks, valves, fire door, grate, ash pan.
For the manufacture of a heat exchanger: metal pipes with a diameter of up to 50 mm or steel sheets 3 mm thick and a rectangular profile 60x40 mm.
For the manufacture of outlet and supply lines of the furnace: metal pipes. For distribution of hot water throughout the house: polypropylene pipes and radiators.
Required Tools
For laying the furnace, making a heat exchanger, installing communications and heating devices you will need:
- building level;
- roulette;
- Master OK;
- bucket;
- pliers;
- electric drill;
- welding inverter;
- wrench;
- screwdriver.
Other tools may also be required, since the laying of a furnace with a water circuit and the wiring in each case are carried out taking into account individual conditions.
Preparing the site
A furnace with a water circuit is located in a fireproof area that is waterproofed.
This area of the room should be well ventilated and access to the oven should always be open. Then make sure that the place for the stove is level and its walls rise up at a right angle.
It is important that the roof allows the pipe to be brought outside without obstacles. Then check how strong the foundation under the future structure is
After all, a stove is a heavy structure that requires a prepared base. The approximate weight of the stove is calculated by equating 1 cubic meter to 1350 kg. If a suitable location is identified, it is cleared and prepared for the construction process.
Attention! To achieve maximum effect, a stove with a water circuit is positioned so that it heats as much space as possible. This will reduce heat loss and reduce the cost of its production.
Building a stove with a water heating boiler with your own hands
Construction begins with the foundation. Its lower part is filled with concrete, and its upper part is laid out with bricks. Then the laying begins. The first row is laid out dry, and then - on the solution. In this case, the masonry is made from the walls to the middle.
During the laying process, a heat exchanger is installed in the firebox, and the pipes coming from it are distributed throughout the body right up to the point of entry/exit of communications. When external communications are installed, water is released into the circuit and the system is tested for leaks. If the test is successful, the furnace with a water circuit is considered ready for operation.
Difficulties during construction and commissioning
The main challenge when building hot water furnaces is their integration into the existing building layout. You have to look for a convenient place in it, and then adapt it to the operating conditions of the furnace.
If you put the design of the system into perspective at the design stage of the building, you will be able to calculate all the nuances and make the efficiency of the heating system as high as possible.
It is better to test the elements of the water circuit (heat exchanger, pipes for hot water outlet and return inlet) immediately after manufacture and before installation.
If everything is already built and installed, and the heat exchanger suddenly leaks, you will have to dismantle the masonry and disconnect the communications in order to eliminate the detected defect.
Another problem when building a system can arise from pressure. The liquid moves through the water circuit under its own pressure. But it is not always enough for the coolant to reach remote areas of the room. Then an electric pump comes to the rescue to distribute heat evenly throughout all areas of the building.
PVC installation
If in a country cottage it is planned to install water heating from a brick stove (wood-burning), the heat exchanger is designed individually, for a specific stove. Such a device is practically beyond repair, so for installation a specialist stove specialist is hired who can professionally perform all the work:
- Make a heat exchanger and double check its quality - before and after installation.
- Install the heat exchanger at the required stage (after completing the foundation), then continue laying, observing certain rules. When installing the heat exchanger, compensation gaps are left, leaving 1-1.5 cm to the walls of the combustion chamber. Gaps that take into account thermal expansion are also needed when installing pipes.
- When installing a heat exchanger with pipes and for insulation, use only heat-resistant seals.
Steel pipes for the manufacture of a heat exchangerSource 36doors.ru
DIY oven
To make a stove you will need a welding machine.
Use any steel containers with the required wall thickness. Metal is used most often; sometimes craftsmen build stoves from brick. Iron structures have the advantage that they can be rearranged if necessary.
Bubafonya stove from a gas cylinder
The top of the container is cut off with a grinder at the point where the walls of the container are rounded; the part is used as a lid. An iron strip is welded to the cut for its stability.
For the pressure piston, a circle is cut out of steel so that it can pass inside the cylinder, a 5 cm hole is formed in the middle. The supply air pipe is connected to the hole by welding. A channel is welded crosswise to the reverse side. Install a chimney at the top and side, clean the cut seams with a grinder. A do-it-yourself long-burning stove made from a gas cylinder is ready.
Long-burning brick stove
Long-burning brick stove
This type of stove looks the most advantageous, but requires more labor during construction and more time.
A solid foundation is built regardless of the base of the house; its dimensions exceed the dimensions of the stove by 20 cm on each side. A sand and crushed stone bedding is made under the sole, and a layer of roofing felt is laid.
After concreting, you can lay the stove for 28 days. The top of the foundation is insulated from the masonry with roofing felt in 3 layers, and a heat-resistant coating made of asbestos and glass-ceramic materials is installed.
The arrangement of bricks in each row is necessary to ensure the effective operation of the structure. Layout drawings can be found on the Internet, where the method of laying each tier is indicated.
The gases inside move not only vertically, but also horizontally. Proper laying of rows increases the plane of contact of smoke with brick and increases the return of thermal energy.
Recommendations for placing heating system elements
Elements of the heating system can hardly be called decoration of a modern interior. Only pipes that look organic in some industrial interiors can fit this definition. In general, building codes and architectural principles recommend placing parts in areas that are hidden but accessible for repair and maintenance. When placing, they are guided by the following rules:
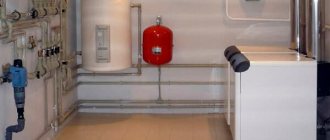
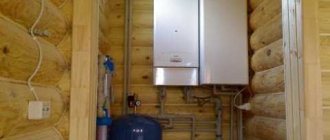
- The heat generator is placed in an isolated room with heating and good ventilation. The circulation pump must operate under the same conditions. Small boilers (with a power of up to 30 kW) can be installed in the kitchen, hallway, basement or warm heated extension. Stoves intended for residential premises are installed taking into account fire safety rules.
- The place for an open-type expansion tank is in the attic; supply and collection pipelines tend to be located along the main wall structures.
Compliance with operating rules helps the system operate smoothly Source yandex.ru
- The main riser runs openly in the corners of the living spaces; in the attic it is covered with thermal insulation.
- Radiators are installed openly under window openings. They participate in room circulation, heating the cold air coming from the windows. Attempts to decorate radiators with decorative screens are undesirable, since they reduce the thermal efficiency of the system.
How does air heat up?
A heating fireplace for a home with hot air distributed throughout the room works as a convection heater. The fireplace takes air from the floor through special lower compartments. Next, the air heats up, and the fireplace begins to distribute hot masses through convection channels and out into the air ducts.
Fireplaces with an air duct for heating a country house are of two types:
- With natural air circulation, when a system with air masses operates without additional “generators” - that is, fans and turbines that accelerate air through the system. This system only works effectively in one- and two-story houses.
— With forced air circulation - this system is suitable for heating large buildings, as it is supplemented with fans inside the convection channels. They effectively distribute air throughout the room. The system is good for everyone, it helps make every room in the house warm and comfortable to live in. However, such a system is too dependent on electricity and consumes a lot of electricity.
Which type is better for heating immediately becomes clear - the one that has a forced system and is installed according to all the rules.
The efficiency of the device with air distribution is 80%. This is a good indicator for heating fireplaces that burn wood and other solid fuels (briquettes, coal).
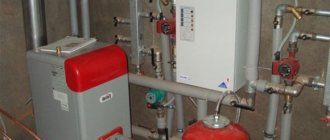
Step-by-step boiler installation instructions
The selection and arrangement of equipment is not yet a guarantee of trouble-free operation of the system, because its elements still need to be installed correctly. And you should start with arranging the boiler room, in which all this should be located
A small instruction in pictures will tell you what you need to pay special attention to
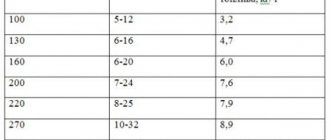
Table 2. Correct step-by-step installation.
Steps, photo Description
Step 1. Arrangement of the boiler room
The boiler is installed after repairs have been completed in the room where it will be installed.
It is important that: non-combustible materials are used in the finishing; the foundation for the boiler was prepared; there must be an air flow in the room; An exit for the chimney pipe must be provided in advance in the wall or ceiling.
Step 2. Choosing a location for the boiler
When choosing a place for installation, you need to keep in mind that there must be a minimum of 700 mm between the walls and the rear and side surfaces of the boiler body
On the front side, this distance must be at least 1250 mm (if the unit is top-loading). If loading is done from the front, you must also add the width of the door to this distance.
Step 3. Aligning the body position
It is very important that the position of the boiler does not deviate from the vertical, so during installation you need to use a level. Place it on the firebox with the lid folded back.
Step 4. Preparing components
According to the boiler passport, check its equipment, which may vary depending on the manufacturer. Purchase all other elements necessary for installation in advance in accordance with the selected scheme.
Step 5. Preparing tools
Naturally, you will need tools: adjustable, gas, socket and open-end wrenches, as well as screwdrivers of different sizes, a square and an angle grinder.
Step 6. Installing the combustion regulator
FUM tape is wound onto the regulator rod, and it is installed in its regular place. Tighten the nut, set the desired temperature and fix it in this position with a screw.
Step 7. Installation of the heating element thermostat
A little further than the combustion regulator there is a hole for installing the heating element regulator. If you don’t plan to install it, then simply screw a plug in there.
Step 8. Installation of the heating element
Next, the heating element itself is mounted - or a plug instead.
Step 9. Install the faucet
For ease of operation or routine maintenance of the system, taps are installed at the inlet and outlet of the coolant from the boiler.
Step 10. Assembling the security group
You assemble a pressure gauge, an air valve and a safety valve into one unit, which ensure the safe operation of the boiler and come with it. The group is placed in front of the shut-off valves.
Step 11. Pipeline connection to the boiler
To connect the supply and discharge pipelines to the boiler, you need to make rotary pipes. It is better if the connections are welded rather than detachable.
Step 12. Sealing the chimney landing site
To ensure that the chimney pipe fits tightly and does not allow combustion products to enter the room, its landing site and all other connections are treated with sealant.
Step 13. Water connection
Install a flexible tube onto the faucet installed at the very beginning, through which the hydraulic part of the boiler will be filled with water. Open all taps, raise the pressure to 1.3 atm, and check the tightness of the system. There shouldn't be any leaks anywhere.
Step 14. Heat the boiler
Now, in accordance with the instructions, you can load the firebox with wood and light it.
The installation process is presented only in general terms, since each boiler model has its own nuances, and the connection diagram may be different.
Some tips for proper boiler operation
In order for your boiler to be as efficient as possible, it must be operated correctly
Here are the points you need to pay attention to so that the firewood burns longer:
- When igniting the fuel, the damper on the boiler must be completely open;
- The long burning mode is set only after heating to +600 degrees;
- The coolant at the outlet must have a temperature of 65 degrees or more;
- If the boiler design does not provide for the laying of raw firewood, its humidity should not exceed 20%;
Dependence of heat production on wood type
- To avoid resin settling on the walls of the firebox and chimney, heat the boiler with hardwood firewood - acacia, birch, alder, aspen. And, by the way, the breed has a great influence on the amount of heat received;
- Do not chop the firewood - the larger the pieces, and the closer to each other they are laid in the firebox, the longer they will burn;
- To prevent logs from hanging, they should not be too long. The ideal size is the length of the combustion chamber minus 5 cm.
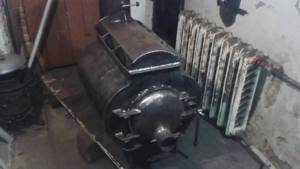
Two examples of wood heating boilers
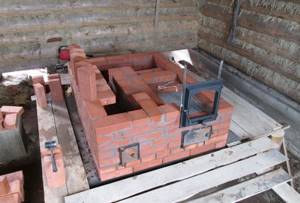
Laying a furnace with a boiler
If you decide to delve deeper into the topic, you may decide to install a Kuznetsov bell furnace, the operating principle of which is the free flow of gases, which does not require additional external energy. The drawings are available on the Internet. Here we will talk about a simpler design. So, first you need to pour a foundation, the depth of which is 50-70 cm. Sand should be poured onto the base in a layer of 10-15 cm, crushed stone, gravel or construction waste should be laid on top, and a space of 25-30 cm should be kept for pouring cement. It is best to prepare the solution for the foundation without using sand, replacing it with screenings, the ratio will be approximately 1:6. Roofing felt should be laid under and on top of the screed for waterproofing.
Then you should make a solution of clay + sand in a ratio of 1: 2.5, however, the proportions may vary depending on the level of fat content of the material
It is important not to leave lumps, and therefore the clay should be soaked in the evening. If the mixture slides off the trowel, leaving small streaks on it, then the concentration is appropriate. Before starting masonry, it is necessary to lay roofing felt over the area of the poured foundation and cover it with mortar
The first row is laid out with a pallet completely made of bricks, where the furnace will then be laid. Then the first row of the furnace contour is laid out, then the next, etc. During laying you will need order
Before starting masonry, it is necessary to lay out roofing felt over the area of the poured foundation and cover it with mortar. The first row is laid out with a pallet completely made of bricks, where the furnace will then be laid. Then the first row of the furnace contour is laid out, then the next, etc. During laying you will need order.
Now the firebox, ash compartment and ash pit are made. The doors are secured using galvanized wire or a strip of galvanized sheet. It is necessary to trim the brick above the doors using a grinder, but it is best to make one of them with a wedge, so that the masonry will not crack. Make protrusions for the boiler on the brick in advance, which can also be cut with a grinder. Do not forget that the instructions require level installation, and therefore you should use a level. Then the firebox and the rear part of the structure are installed, where the chimney with cleaning is located. The pipe should protrude at least 50 cm above the roof.
You can make your own stoves for heating your home without being a pro in this matter. They are versatile and have a high heat transfer coefficient. The big advantage is their autonomy, since they do not depend on external energy sources. Such boilers can have any size depending on the area of the heated room.
Rules for the safe use of a water heating boiler
In order for a device with a heating water circuit to operate with the highest efficiency, it is recommended to follow a number of rules:
- The stove should never be heated with the heat exchanger drained - this will lead to irreversible damage.
- If you light the stove and supply cold water to an already heating heat exchanger, this will lead to its deformation and cracking of the metal.
- In the absence of a circulation pump, the speed of water movement through the pipes and the corresponding quality of heat transfer will decrease.
- In order to avoid water freezing in pipes located near external walls, special antifreeze is used in the circuit in winter.
- If you stop moving water through the pipes while the furnace is still running, there is a risk of an overheated heat exchanger exploding.
If all operating rules are followed, a Kuznetsov stove with a water circuit will provide the highest quality heating of the room and a long service life of all systems.
Which chimney is suitable?
Knowing which fireplaces are best for heating a private country house, you need to decide which chimneys are suitable for it:
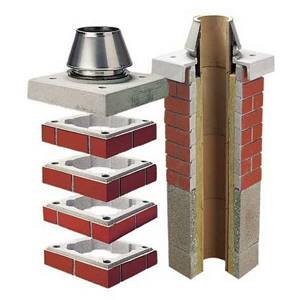
- Made from stainless steel. Chimney systems assembled from materials such as stainless steel are distinguished by their strength and durability. Stainless steel chimneys withstand strong heat, sudden temperature changes, exposure to acids, alkalis and condensation. However, to use such pipes, they must be insulated. The most popular variation of stainless chimney pipes at the moment is the sandwich. Such pipes are very strong, reliable, and have three main layers (internal, external and intermediate insulation);
- Brick. Brick chimneys have been used for centuries. However, today they are not as popular as they were several decades ago. Brick does not tolerate the effects of an acid-alkaline environment formed due to emitted vapors and the removal of combustion products. In addition, the structure of the brick begins to crumble, and the surface soon develops cracks that violate the tightness of the structure. This is due to the formation of a large amount of condensate on the inner surface of the chimney walls. Also, such systems are quite complex to install, install, and maintain. For brick pipes, due to their large mass, it is necessary to build a separate foundation, and the inner surface will be insulated with heat-resistant materials. The advantages of brick chimneys include good tolerance of high temperatures typical of solid fuel fires;
Ceramic chimneys are reliable, but they are heavy
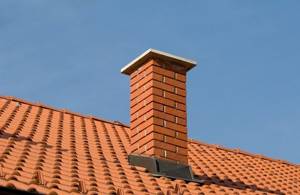
Brick systems are short-lived and do not tolerate acid-base environments well
Stainless steel chimneys are durable, lightweight and have the best performance characteristics
- Ceramic. Ceramic systems are one of the most popular, modern ones. Even a beginner can build such a structure with his own hands. Ceramic blocks withstand high temperatures well. Due to its special structure, the structure does not freeze. Disadvantages include large mass and rather large dimensions. However, if necessary, such a ceramic chimney can be hidden in a pre-prepared niche or box, lined with any fire-resistant materials in a given style direction;
- Flexible. If you want to build a structure that has several branches, complex slopes, bends, turns, it is recommended to use flexible pipes that, bending in the required direction, retain their shape and do not deform. To install such elements, a minimum amount of connecting fittings, parts, and fasteners is required.
You can assemble a portal for a purchased hearth from fireclay bricks
A stationary hearth that does not require additional equipment with a portal
Corner stove with air heating circuit in a wooden house
Tip: to insulate pipes with your own hands, you can use basalt fiber or any other non-flammable material. The insulation can be located inside or outside the product.
Important: if your brick chimney is in poor condition, its seal is broken, you do not have to completely dismantle it, but simply insert stainless steel pipes of a suitable diameter inside it.
Interesting to know: fireplaces with air heating, assembled by yourself, do not have a high enough efficiency. Installations that have not only the possibility of air heating, but also a water jacket will be much more efficient. Such devices are connected to the heating and water supply systems of the house. Thus, you will receive not only an efficient device with an efficiency of up to 80 percent, but also the opportunity to always have hot water in the house, which can be used for domestic purposes.
A fireplace for heating several rooms must be quite powerful and efficient. The performance of such a unit is calculated based on the total area of all residential premises in the house. To achieve a greater effect, you can place the stove in the wall of two adjacent rooms or make your own fireplace with several sides of the radiation of thermal energy. Also, as an option, for two-story buildings, you can place one stove with medium power on each floor.
Automatic and electronic innovation complex
It includes a number of useful functional options:
- COOKING PRO with remote control allows you to cook food (including on the grill) by setting the desired parameters using the remote control;
- optimal comfort and atmosphere in the room is served by the Wellness functionality - providing the necessary level of humidification and aromatization of the air;
- unconditional guarantee of safety through ignition testing and a full cycle of each fireplace;
- remote monitoring and control using the remote control display.