Radiator installation
When the purchase of equipment and preparatory work have been completed, it is worth thinking about how to properly change the batteries in the apartment.
This process occurs in several steps:
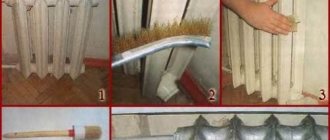
- Provided that the cast-iron heating radiators in the apartment will be replaced using metal pipes, new threads must be cut on the sections remaining after cutting off the old radiators. If it is necessary to increase the length of the pipe, an additional section is welded or secured using a threaded sleeve.
- The cut threads on the supply and return pipes are first wrapped in tow, after which a special sealant is applied to it and the ball valves are screwed on.
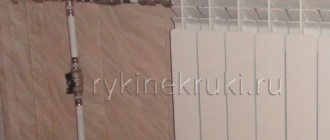
- The new radiator is hung on brackets and the length of the straight run to the ball valves is measured in order to connect it to the system.
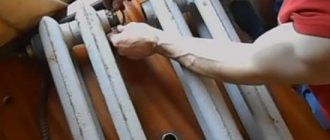
- Next, they prepare the required size hoses and screw them into the threads on the radiator, thereby sealing it with the supply pipe and return pipe. Threaded connections are also sealed with tow coated with sealing paste.
- You can simplify the work of replacing a battery radiator in an apartment by using modern flange couplings with union nuts. Such devices are sometimes called “American”. The advantage of these fittings is that they simplify disassembly of the system, if necessary. If desired, you can find both a coupling and a ball valve included in the kit.
- In cases where replacing the battery in an apartment with your own hands is done at the highest point of the riser, the installation of a Mayevsky tap is mandatory. It is attached on the side opposite to the insertion point in the upper part of the radiator. When at the beginning of the heating season the circuit is filled with coolant, excess air is released through the Mayevsky tap, which can interfere with the free circulation of water in the heating system.
- A plug is installed on the radiator with the Mayevsky tap in the lower part.
- If the radiator being mounted is not the last in the chain, then in its upper part it is not the Mayevsky tap that is attached, but the supply pipe. A return line is installed at the bottom of the battery. These elements are subsequently connected to other radiators.
- If desired, metal-plastic or polypropylene pipes can be used instead of metal pipes. However, you will still need to cut threads to install the compression weld fitting. Additionally, a threaded fitting or coupling can be used to connect the battery.
In difficult areas, such as corners, tee installation areas or transitions, it is necessary to use an approach specific to a particular type of pipe. Polypropylene pipes are welded with a special apparatus, which provides a strong continuous seam that is resistant to changes in temperature and pressure. Metal-plastic pipes are joined with special compression fittings. Be that as it may, any fastening and shaped elements can always be found on sale.
. plug valve
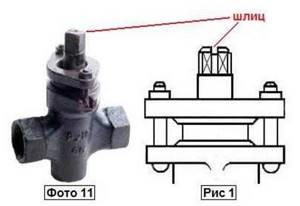
Anyone else have plug valves on their old various piping systems or gas lines. A particularly pressing question is in what position should the plug valve be open or closed if there is no handle on it (Photo 11). So, usually at the top of the end of the rod (plug), even during manufacturing, a slot (notch) is made to visually determine the through hole in the plug (Fig. 1).
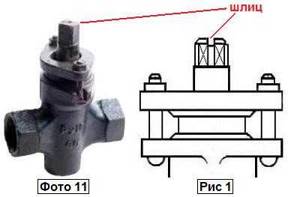
As in the case of ball valves, if the slot in the position across (perpendicular) to the plug valve is closed, the slot along (parallel) is open.
The ball valve has a handle. It is designed either in the form of a long rod or in the form of a “butterfly”), that is, a nut with flat wings. If the tap is open, then the handle (or wings) are directed along the axis of the pipe, as if along the flow of water. If the tap is closed, then the handle is turned perpendicular to the axis of the pipe, blocking the flow. This is how it should be standard.
And God forbid, someone will put the handle differently). We had a case when testing an installation - on the inlet ball valve the handle was in reverse. So we ran around this installation for about 5 hours, we couldn’t understand why the hell the pumps with regulators weren’t pumping)), if the tap was clearly open).
Air valves and radiator fittings
Almost all modern radiators provide the possibility of installing Mayevsky manual valves for air discharge. Some manufacturers even complete their products with them. If desired, instead of a manual air vent, you can install an automatic one, but in practice it does not look very presentable.
Recently, laying heating lines below floor level and using radiators with bottom connections has become increasingly popular. Then there remains a small gap between the battery and the floor, where it is not always possible to place any fittings. For this case, there is a special connection headset with built-in taps, shown in the picture (left):
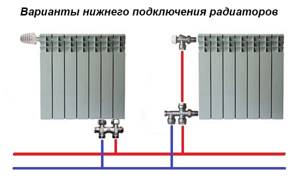
On the right is a headset for the bottom connection of a conventional radiator with side plugs; it also has valves plus the ability to connect a thermal head. Such solutions look very aesthetically pleasing, but will require maximum financial costs. More information about the headset is shown in the video:
Watch this video on YouTube
Opening and closing valves
You can determine whether a valve is open or closed by several criteria, depending on the type of device installed.
Determining Ball Valve Position
To determine the state of the ball valve, you can use:
- control handle;
- recess located on the rod.
The ball valve can be equipped with two types of handles:
- a handle, which is an oblong element attached to the body of the device;
- a butterfly handle, consisting of two similar parts, located symmetrically relative to the attachment point.
The valve closes if the handle is turned perpendicular to the device and the direction of the pipeline, and opens if the handle is turned in the direction of the axis of the device and, accordingly, the pipeline.
Determining the valve status by the handle installed on the device
The following video will help you determine the condition of the valve by looking at the handle.
If the handles are broken or completely missing for some reason, is it possible to find out the position of the valve? To determine the condition of the device under the circumstances under consideration, you can use the groove located on the rod.
Element by which the valve position can be determined
If the recess is located parallel to the pipeline, then the valve is open and allows liquid (gas) to pass through. If the recess is located perpendicular to the direction of the pipes, then the valve is closed and the movement of liquid through the system is impossible.

Determining valve position by groove
Determining the position of the plug valve
Which direction should you unscrew the plug valve if there is no handle on the device, and how can you find out the position of the valve in this case?
To determine the position of a valve that does not have a handle, you must:
- find the slot (risk) on the top of the rod;
- visually check the status of the device.
Determining the state of a plug valve without a handle
To close any type of valve, you must rotate the control handle or mounting rod in a clockwise direction. To open the valve, the handle rotates in the opposite direction, that is, counterclockwise.
Incorrect placement of water supply hoses to the mixer causes great discomfort to many people. A hose with blue spots is used only for installing cold water supply. With red ones - for hot.
To resolve incorrect installation, it is recommended:
- Close the riser valve.
- Remove the nut from the distribution socket.
- Change hoses.
- Reinstall the hoses.
- Install new gaskets under the nuts.
- Check connections for leaks.
- Open the tap and check the flow.
The tubes must be swapped under the sink. The hot water supply is connected to the left socket. To the right - cold. The system can install universal hoses with blue and red shades. They are suitable for supplying both warm and cold flow.
Everything you need to know about hot water is presented in this section of the site.
What to do if it doesn't turn?
If the ball valve has been in the closed position for a long time, the valve element may jam due to salt deposits. If you cannot turn, do not try to do it with more force, as there is a risk that the handle will break.
Try the following:
· Unscrew the handle lock with a key and remove it;
· slightly loosen the nut securing the oil seal (if provided);
· Grab the spline of the faucet with an open-end wrench and tilt it at a slight angle in different directions.
These steps will help clear the jam. To make sure that the tap closes, put the handle in place and try turning it several times until it stops in both directions, the problem should disappear. In the future, do not forget to preventively turn the handle of faucets that you rarely use, at least once every three months. This will avoid jamming.
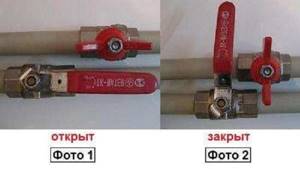
. ball valve
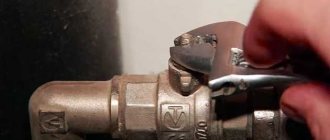
A ball valve (ball valve) has in its design either a handle (handle) or a butterfly handle. The position of the handle axis determines whether the mechanism is closed or open. If the axis of the handle is parallel to the axis of the tap and the pipe on which it stands, then it is open (Photo 1). And if the axis of the handle is perpendicular (at an angle of 90 degrees) to the axis of the ball valve, then it is closed (Photo 2). And the protrusions on the body limit rotation to a certain angle for the convenience of maximum opening - “counterclockwise” or closing - “clockwise”.

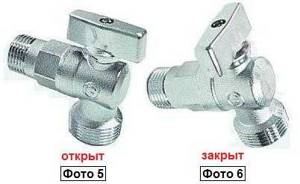
People often forget in what position they have an angle ball valve installed on a water supply, for example, for a washing machine (Photos 5 and 6).
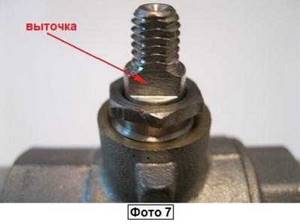
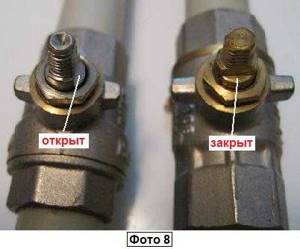
Sometimes it happens that the handle is broken or missing, and how do you understand what position the ball-type mechanism is in? By the groove(s) on the stem (Photo 7) you can recognize the position of the valve by analogy, as with the handles (Photo 8).
Options for piping heating radiators
Installation of heating radiators involves connecting them to pipelines. There are three main connection methods:
- saddle;
- one-sided;
- diagonal.
Connection options
If you install radiators with a bottom connection, you have no choice. Each manufacturer strictly binds the supply and return, and its recommendations must be strictly followed, since otherwise you simply will not get heat. There are more options with a side connection (more about them is written here).
Strapping with one-sided connection
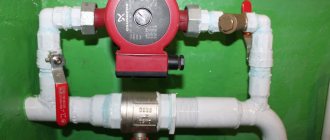
One-way connection is most often used in apartments. It can be double-pipe or single-pipe (the most common option). Metal pipes are still used in apartments, so we’ll consider the option of tying the radiator with steel pipes on pipes. In addition to pipes of a suitable diameter, you need two ball valves, two tees and two bends - parts with external threads at both ends.
Lateral connection with bypass (one-pipe system)
All this is connected as shown in the photo. With a one-pipe system, a bypass is required - it allows you to turn off the radiator without stopping or draining the system. You cannot put the tap on the bypass - you will block the flow of coolant through the riser, which is unlikely to make your neighbors happy and, most likely, you will be fined.
All threaded connections are sealed with fum tape or linen winding, over which packaging paste is applied. When screwing the valve into the radiator manifold, much winding is not required. Too much of it can lead to the appearance of microcracks and subsequent destruction. This is true for almost all types of heating devices, except cast iron. When installing all the others, please do not be fanatical.
Welding option
If you have the skills/opportunity to use welding, you can weld the bypass. This is what the piping of radiators in apartments usually looks like.
With a two-pipe system, a bypass is not needed. The supply is connected to the upper entrance, the return is connected to the lower entrance, taps, of course, are needed.
One-way piping with a two-pipe system
With bottom wiring (pipes laid on the floor), this type of connection is made very rarely - it turns out inconvenient and ugly; in this case, it is much better to use a diagonal connection.
Strapping with diagonal connection
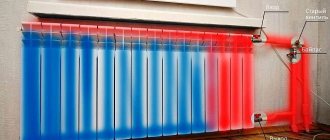
Installing heating radiators with diagonal connections is the best option in terms of heat transfer. In this case it is the highest. With bottom wiring, this type of connection is easy to implement (example in the photo) - the supply on this side is at the top, the return on the other is at the bottom.
A single-pipe system with vertical risers (in apartments) does not look as good, but people put up with it because of the higher efficiency.
Coolant supply from above
Please note that with a one-pipe system, a bypass is again required
Coolant supply from below
Strapping with saddle connection
With bottom wiring or hidden pipes, installing heating radiators in this way is the most convenient and least noticeable.
With a saddle connection and lower single-pipe wiring, there are two options - with and without bypass. Without a bypass, the taps are still installed; if necessary, you can remove the radiator and install a temporary jumper between the taps - a squeegee (a piece of pipe of the required length with threads at the ends).
Saddle connection for one-pipe system
With vertical wiring (risers in high-rise buildings), this type of connection can be seen rarely - the heat losses are too large (12-15%).
. valve
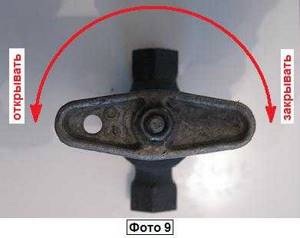
To open a cast iron or brass valve, you need to rotate the handwheel on the stem “counterclockwise”, and close it “clockwise” (Photo 9). Before closing, make sure that there is no rust on the rod, especially the steel one. Otherwise, you need to clean the rod and apply a little lubricant to it.
If the valve stem does not turn at all or with great difficulty, then you can loosen the packing nut a little and try again. And if there is no liquid in the pipeline, you can do this: remove the flywheel, completely unscrew the stuffing box nut, remove the bushing, then remove the old stuffing box and replace it with a new one. And assemble everything in reverse order (Photo 10).

Types of valves
To determine the position of the device and find out how the valve opens or closes, you first need to know the type of device installed.
In household systems the following are most often installed:
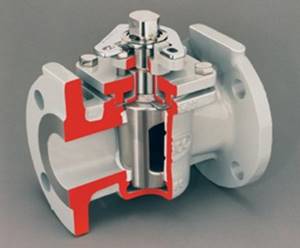
- ball valves. There is a metal ball in the body of the device, which serves as a locking mechanism. The body and locking element are usually made of durable metals (brass, steel, bronze), which ensures a long period of use of the device;
Valve with ball-shaped locking mechanism
- plug valves. The locking elements in this type of device are cylindrical or conical plugs. The plug valve body is also made of high-strength metal. The locking mechanism allows the valve to be used in pipelines with aggressive media.
Valve with cylindrical plug
The principle of adjusting the temperature of heating radiators
It is directly related to the design features of this element and its installation. The valve is a ball with a through hole.
The operation of the crane is controlled using a handle fixed to the ball by a rod.
Important! To install the device, you need to choose the location wisely so that turning the handle in the future does not interfere with other devices of the heating system. The diameters of the tap and pipe must be identical.
The diameters of the tap and pipe must be identical.
The device must be fixed in parallel
as it is twisted using tow or special tape. They provide the mechanism with additional protection against leaks. The correct installation is further verified by applying water pressure.
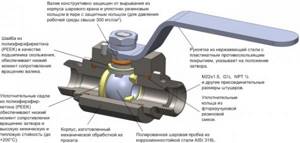
Photo 1. Ball valve device for adjusting the temperature in a heating radiator. Arrows indicate parts of the product.
Activating the handle promotes the movement of the mechanism around its own axis. Rotating the ball hole to the nozzles and pipeline inlets makes it possible to circulate coolant through it
, otherwise the fluid flow will be blocked.
The ball in such mechanisms can be fixed and movable. In the first case, it is attached to the rod so that it remains completely static. The tightness of such a connection is ensured by bolts or disc springs.
The movable ball is capable of moving depending on the degree of water pressure on it
. Due to this possibility, this type of mechanism is more widespread than the first.
How to open a tap
This is done to supply the maximum possible amount of coolant in order to provide the room with heat. To adjust the mechanism, you need to turn the handle parallel to its own axis and the pipe.
For convenience, there are protrusions on the faucet body indicating restrictions on the degree of its opening. This is done counterclockwise.
How to close
With this action, the circulation of the coolant completely stops. This needs to be done when there is a need to reduce the radiator temperature to a minimum, for example, in the summer.
The handle of the device in the “closed” position should form an angle of 90 degrees with its axis and the pipeline.
According to the protrusions, the movement of the handle to stop the fluid circulation should be done
clockwise.
Reference.
In both situations, in the absence of a handle, it is possible to determine the position of the tap
by the groove
. If it is aligned with the pipeline and the mechanism itself, then its position is “open”, otherwise the fluid flow is blocked.
How to turn a jammed tap on a battery and adjust it
Often this situation arises if the position of the mechanism is not periodically changed and developed as a preventive measure.
Before taking directed steps to repair the device,
it is worth trying to do it yourself.
Attention! It is necessary to know in advance what the faucet is made of, since the use of additional mechanical tools can cause irreversible damage to the mechanism. The repair begins with unscrewing the fixing nut and removing the handle
The top of the rod is located under the handle
Repair begins with unscrewing the fixing nut
and removing the handle. The top of the stem is located under the handle.
Some a hexagon clamping sleeve
which puts pressure on the seal. If the rod rotates only by applying force, then the bushing is fixed a little looser.
of small drips is quite common.
water at the top of the faucet.
Then using an adjustable wrench
The rod is developed with slow movements from side to side.
Important! It is dangerous to make increased efforts or speed up restoration work. This can lead to the process of complete deformation of the ball or the mechanism as a whole.
The final stage of the repair process is to reinstall the handle
. A test turn of it to the protrusions of the permitted degree of opening allows you to determine whether it is possible to fix the pressure sleeve. The control knob is finally installed in place only after a positive test result and the mechanism has been checked for leaks.
To avoid further unpleasant consequences in the form of faucet breakdown, you should not use a device made of silumin with a wall thickness of its pipes less than 2.8 mm
At the same time, you should pay attention to products with a high level of quality, manufactured by European or Turkish manufacturing companies
Types of valves
To determine the position of the device and find out how the valve opens or closes, you first need to know the type of device installed.
In household systems the following are most often installed:
- ball valves. There is a metal ball in the body of the device, which serves as a locking mechanism. The body and locking element are usually made of durable metals (brass, steel, bronze), which ensures a long period of use of the device;
Valve with ball-shaped locking mechanism
- plug valves. The locking elements in this type of device are cylindrical or conical plugs. The plug valve body is also made of high-strength metal. The locking mechanism allows the valve to be used in pipelines with aggressive media.
Valve with cylindrical plug
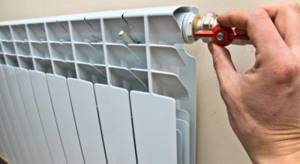
What to do to ensure that the faucet always rotates easily: advice from a plumber
There are some practical tips to help your ball valve always rotate easily:
1. Before installing shut-off valves in the heating system, lubricate the outer mirror side of the ball with Litol or another lubricant on the same basis. And this needs to be done on both sides. Then turn the valve lever several times to get the lubricant onto the inside of the valve body. Don’t be afraid that the lubricant will be washed off with water - it doesn’t interact with it (though you shouldn’t apply a thick layer so that excess lubricant doesn’t accumulate at the outlet). If you plan to install it in a water supply system and this water will be used for food purposes, take Huskey Lube-O-Seal - it comes in bags, does not wash off with water and is food grade.